CD player CADILLAC ESCALADE 2010 3.G User Guide
[x] Cancel search | Manufacturer: CADILLAC, Model Year: 2010, Model line: ESCALADE, Model: CADILLAC ESCALADE 2010 3.GPages: 616, PDF Size: 39.41 MB
Page 281 of 616

STOPc:Press once to stop playing a DVD.
There is a pre-stop feature for DVD and video CD only.This feature resumes playback of the disc where it wasstopped. Press the stop button once during disc
playback andcdisplays on the DVD startup screen.
This icon disappears after a few seconds. Press thestop button a second time, or eject the disc, to cancelthe pre-stop feature and to clear the disc positionmemory.
SOURCE :Press to select between Monitor 3,Monitor 4, or the AV INPUT.
Each video display screen can be adjustedindependently, as well as display information from bothDVD players and both A/V inputs.
Infrared Remote Sensor :Located in the top center ofthe video display screen. Do not block the signal fromthe remote to the sensor.
Infrared Transmitters :Located in the top center of thevideo display screen. Do not block the signal from theheadphones to the transmitter.
Video Display Screen :Located on the back of eachheadrest.
AV OUTPUT (Audio/Video Output Jack) :Located onthe lower left side of the screen and is identified on thevideo screen panel as the AV OUTPUT.
Headphone Jack :Wired headphones can be pluggedinto the headphone jack with one-eighth inch stereoplugs.
AV INPUT: (Audio/Video Input Jack) :The audio/videoinput jack is located below the video display screen andallows viewing of auxiliary sources such as portableDVD players, game stations, or video cameras, on eachscreen.
.Video Input—The yellow connector is used forvideo input.
.L Audio—The white connector is used for the leftside audio.
.R Audio—The red connector is used for the rightside audio.
Level Lock and Release Latch :The viewing angle ofthe video screen can be adjusted by releasing the latchand gently moving the screen. Then lock it into a secureposition.
4-89
Page 282 of 616
Vehicle Speakers
Audio from the DVD player or an auxiliary device canbe heard through the vehicle speakers or the wireless/wired headphones, while the radio is tuned to one of thesix frequencies selected on the Sound Around portionof the system’s remote control. See“Remote Control”later in this supplement.
Only one audio source can be heard through thevehicle’s speakers at a time. The audio source beingused is specified by the A/V (audio/video) sourceselected on the driver side head restraint video displayscreen.
To turn the RSE system audio output to the vehicle’sspeakers, press Sound Around ON, on the system’sremote control. The audio from the RSE system can beheard through the wireless/wired headphones and thevehicle’s speakers at the same time. The volume on theradio can vary when switching between the radio, CD,DVD, MP3, or an auxiliary device.
Wireless Headphones
The two wireless headphones included with theHeadrest DVD RSE system will only work with theHeadrest DVD RSE system and are marked for channel3 and 4. The wireless headphones must be used withina line of sight of the transmitter that is located above thevideo display screen.
3!4 Channel Selector :This is located on the rightearpiece. Either Channel 3 or 4 can be selected withthe channel selector. The driver side monitor isdesignated as Channel 3, and the passenger side asChannel 4. Set the channel selector switch according tothe video display screen being viewed. The message,“To listen to this monitor tune your headphones toChannel 3 (or 4)”displays for five seconds thendisappears when the video display screen is turned on.
OFF/ON (Power) :Turn the power switch located onthe earpiece to turn the wireless headphones on or off.Each headphone has a light to indicate ON. If the lightdoes not come on, the batteries may need to bereplaced. See“Battery Replacement”under Rear SeatEntertainment System in the vehicle’s owner manual.
The headphones shut off automatically if the RSEsystem is turned off or if the headphones are out ofrange of the transmitter for more than three minutes.
VOL0(Volume):Use to adjust the volume on the
headphones.
Notice:Do not store the headphones in heat ordirect sunlight. This could damage the headphonesand repairs will not be covered by the warranty.Storage in extreme cold can weaken the batteries.Keep the headphones stored in a cool, dry place.
4-90
Page 287 of 616
Using the RSE On-Screen Display
(OSD) Menus
Use the OSD setup display menus for:
.Initial setup
.Display setup
.Parental control setup
.Adjusting the picture quality
.Setting the various outputs
.On!screen display language
To use the OSD menus while using the DVD player oran auxiliary device:
1. Press the SETUP button on the remote control todisplay the icons and pages on the display screen.
2. Select the desired page by using the left/rightnavigation arrows to move the cursor.
3. Press the SETUP button again on the remotecontrol to cancel use of the setup display.
Not all DVDs support all of the feature defaults in thesetup menus. If a feature is not supported, the defaultsare provided by the DVD media.
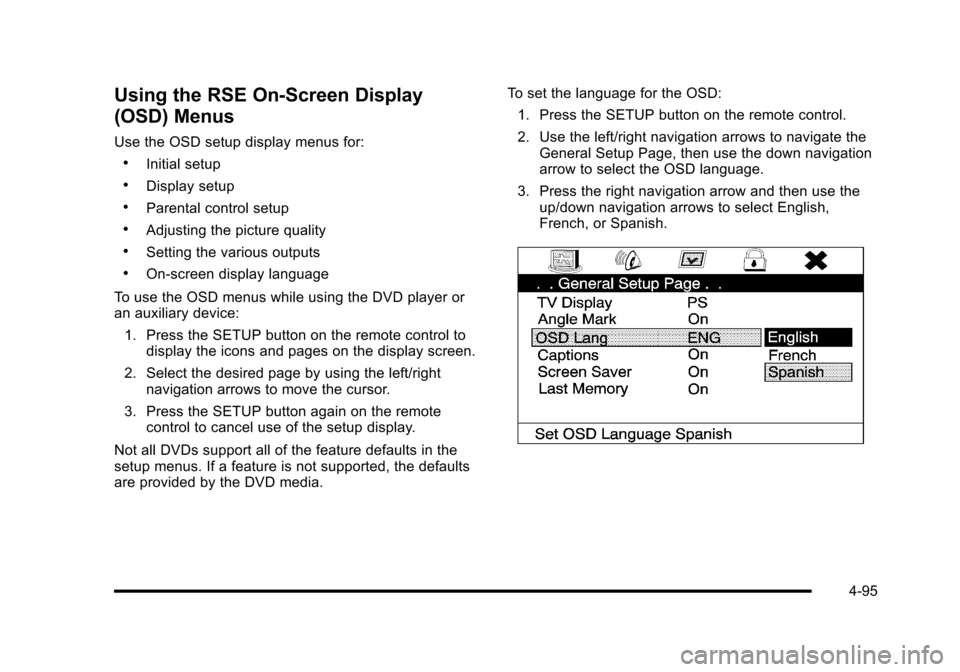
To set the language for the OSD:
1. Press the SETUP button on the remote control.
2. Use the left/right navigation arrows to navigate theGeneral Setup Page, then use the down navigationarrow to select the OSD language.
3. Press the right navigation arrow and then use theup/down navigation arrows to select English,French, or Spanish.
4-95
Page 290 of 616
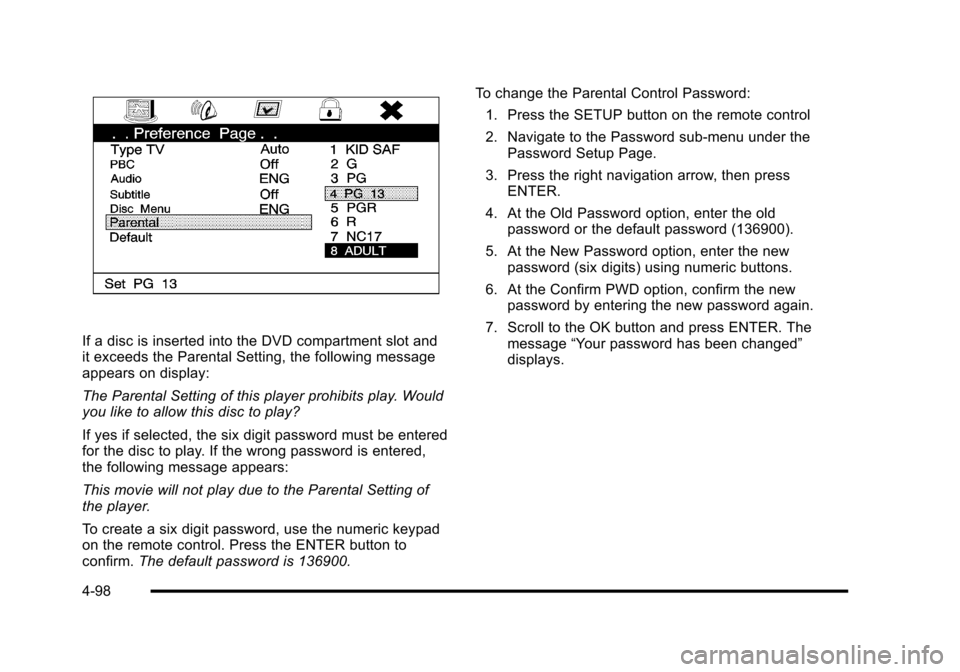
If a disc is inserted into the DVD compartment slot andit exceeds the Parental Setting, the following messageappears on display:
The Parental Setting of this player prohibits play. Wouldyou like to allow this disc to play?
If yes if selected, the six digit password must be enteredfor the disc to play. If the wrong password is entered,the following message appears:
This movie will not play due to the Parental Setting ofthe player.
To create a six digit password, use the numeric keypadon the remote control. Press the ENTER button toconfirm.The default password is 136900.
To change the Parental Control Password:
1. Press the SETUP button on the remote control
2. Navigate to the Password sub-menu under thePassword Setup Page.
3. Press the right navigation arrow, then pressENTER.
4. At the Old Password option, enter the oldpassword or the default password (136900).
5. At the New Password option, enter the newpassword (six digits) using numeric buttons.
6. At the Confirm PWD option, confirm the newpassword by entering the new password again.
7. Scroll to the OK button and press ENTER. Themessage“Your password has been changed”displays.
4-98
Page 292 of 616
Playing Audio CD
When an audio CD is playing, the display shows thecurrent track and the amount of time that track has beenplaying, the total amount of time on the disc, and thecurrent time running on the disc.
DISPLAY :Press to choose from the following displayoptions:
1. Press DISPLAY once and Single Elapsed appearsalong with the current track playing and the lengthof time for that track.
2. Press DISPLAY twice and Single Remain appearsalong with the current track playing and the amountof time left on the track.
3. Press DISPLAY three times and Total Elapsedappears along with the current track playing andthe total time that has played on the CD.
4. Press DISPLAY four times and Total Remainappears along with the current track playing andthe amount of time left on the CD.
REPEAT :Press to toggle between Track and All.The default for repeat is OFF.
.Track repeats the track that is playing.
.All repeats the disc that is playing.
Playing MP3 CD
MP3 is the format for storing digital audio. An audio CDquality song can be compressed into the MP3 formatwith very little loss of quality, while taking up much lessspace. CD-R/RW discs that have been encoded in MP3format can be played on the DVD player. See“Using anMP3”under the Audio System(s) section in the vehicle’sowner manual.
4-100
Page 293 of 616
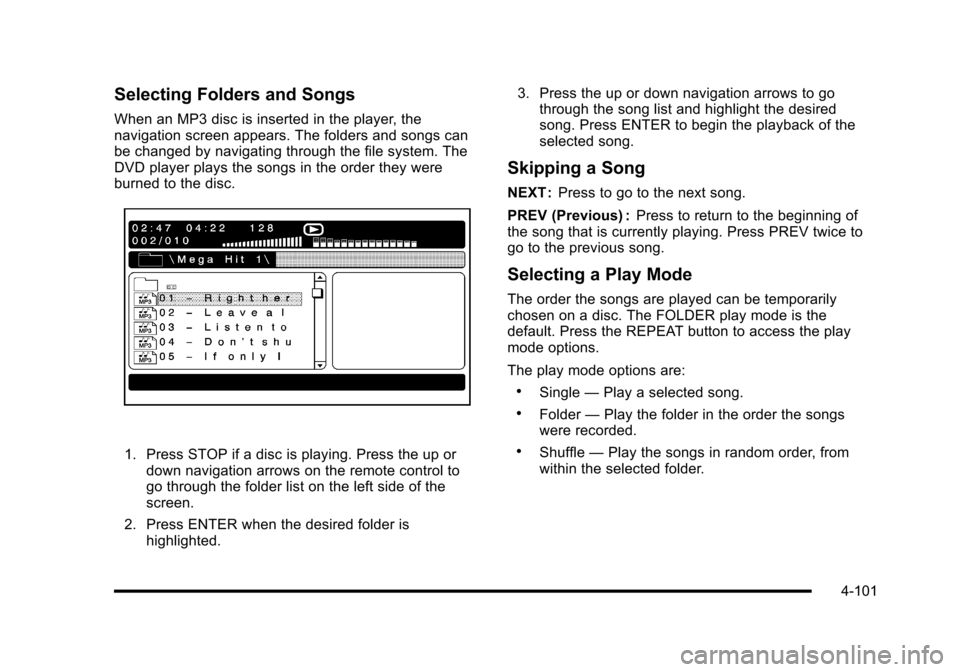
Selecting Folders and Songs
When an MP3 disc is inserted in the player, thenavigation screen appears. The folders and songs canbe changed by navigating through the file system. TheDVD player plays the songs in the order they wereburned to the disc.
1. Press STOP if a disc is playing. Press the up ordown navigation arrows on the remote control togo through the folder list on the left side of thescreen.
2. Press ENTER when the desired folder ishighlighted.
3. Press the up or down navigation arrows to gothrough the song list and highlight the desiredsong. Press ENTER to begin the playback of theselected song.
Skipping a Song
NEXT :Press to go to the next song.
PREV (Previous) :Press to return to the beginning ofthe song that is currently playing. Press PREV twice togo to the previous song.
Selecting a Play Mode
The order the songs are played can be temporarilychosen on a disc. The FOLDER play mode is thedefault. Press the REPEAT button to access the playmode options.
The play mode options are:
.Single—Play a selected song.
.Folder—Play the folder in the order the songswere recorded.
.Shuffle—Play the songs in random order, fromwithin the selected folder.
4-101
Page 295 of 616
Cleaning the Components
Use care when touching or cleaning the componentssuch as the DVD player or the discs.
Do not use DVD lens cleaners for DVD players becausethe lens of the DVD optics can become contaminatedby lubricants.
Handle CDs and DVDs carefully. Store them in theiroriginal cases or other protective cases and away fromdirect sunlight and dust. The DVD player scans thebottom surface of the disc. If the surface of a CD orDVD is damaged, such as cracked, broken,or scratched, the CD or DVD may not play properly ornot at all. If the surface of a CD or DVD is soiled, take asoft, lint free cloth or dampen a clean, soft cloth in amild, neutral detergent solution mixed with water, andclean it. Make sure the wiping process starts from thecenter to the edge.
Do not touch the bottom side of a CD or DVD whilehandling it; this could damage the surface. Pick up CDsor DVDs by grasping the outer edges or the edge of thehole and the outer edge.
Rear Seat Audio (RSA)
Vehicles with this feature allow the rear seatpassengers to listen to and control any of the musicsources: radio, CDs, DVDs, or other auxiliary sources.The rear seat passengers can control the same musicsources the front seat passengers are listening to (dualcontrol) or a different source. For example, rear seatpassengers can listen to and control a CD through theheadphones, while the driver listens to the radio throughthe speakers. The rear seat passengers have control ofthe volume for each set of headphones.
The radio functionality is controlled by both the RSAand the front radio, only one band can be tuned to atone time. Changing the band on the RSA or the frontradio will change band on the other system.
RSA functions can be operated even when the mainradio is off.
Audio can be heard through wired headphones(not included) plugged into the jacks on the RSA.If the vehicle has this feature, audio can also beheard on Channel 2 of the wireless headphones.
The audio system allows the rear speakers to continueplaying even when the RSA audio is active through theheadphones.
4-103
Page 301 of 616
Section 5 Navigation System
Overview. . . . . . . . . . . . . . . . . . . . . . . . . . . . . . . . . . . . . . . . . . . 5-2Navigation System Overview . . . . . . . . . . . . . . . . . . . . 5-2Getting Started . . . . . . . . . . . . . . . . . . . . . . . . . . . . . . . . . . 5-4Cleaning the Display . . . . . . . . . . . . . . . . . . . . . . . . . . . 5-11
Features and Controls. . . . . . . . . . . . . . . . . . . . . . . . . . . 5-12Using the Navigation System . . . . . . . . . . . . . . . . . . 5-12Maps . . . . . . . . . . . . . . . . . . . . . . . . . . . . . . . . . . . . . . . . . . 5-14Symbols . . . . . . . . . . . . . . . . . . . . . . . . . . . . . . . . . . . . . . . 5-17Destination . . . . . . . . . . . . . . . . . . . . . . . . . . . . . . . . . . . . 5-24Configure Menu . . . . . . . . . . . . . . . . . . . . . . . . . . . . . . . 5-42Global Positioning System (GPS) . . . . . . . . . . . . . . 5-57
Vehicle Positioning . . . . . . . . . . . . . . . . . . . . . . . . . . . . 5-57Problems with Route Guidance . . . . . . . . . . . . . . . . 5-58If the System Needs Service . . . . . . . . . . . . . . . . . . . 5-59Ordering Map DVDs . . . . . . . . . . . . . . . . . . . . . . . . . . . 5-59Database Coverage Explanations . . . . . . . . . . . . . 5-59
Navigation Audio System. . . . . . . . . . . . . . . . . . . . . . . . 5-60CD Player . . . . . . . . . . . . . . . . . . . . . . . . . . . . . . . . . . . . . 5-68DVD Player . . . . . . . . . . . . . . . . . . . . . . . . . . . . . . . . . . . . 5-75Care of Your CDs and DVDs . . . . . . . . . . . . . . . . . . . 5-84Auxiliary Devices . . . . . . . . . . . . . . . . . . . . . . . . . . . . . . 5-85
Voice Recognition. . . . . . . . . . . . . . . . . . . . . . . . . . . . . . . . 5-86
5-1
Page 303 of 616

A. FULL MAP Touch Screen Button. See“NAV”under“Hard Keys”underUsing the Navigation Systemon page 5!12for more information.
B. No GPS Symbol. SeeSymbolson page 5!17formore information.
C. North Up/Heading Up Symbol. SeeSymbolsonpage 5!17for more information.
D. Map Scale. See“Map Scales”underMapsonpage 5!14for more information.
E.0(Zoom In) Touch Screen Button. See“Map
Scales”underMapson page 5!14for moreinformation.
F. Mark Touch Screen Button. See“AddingDestinations to the Address Book”underDestinationon page 5!24for more information.
G.Z(DVD Map Disc Eject) Key. SeeMapson
page 5!14for more information.
H. Map DVD Slot. See“Installing the Map DVD”underMapson page 5!14for information on how toinstall and eject a map DVD.
I.M(Load) Key. SeeCD Playeron page 5!68or
DVD Playeron page 5!75for more information.
J.Z(CD/DVD Video/Audio Eject) Key. SeeCD
Playeron page 5!68orDVD Playeron page 5!75for more information.
K. CD/DVD Video/Audio Slot. SeeCD Playeronpage 5!68orDVD Playeron page 5!75formore information.
L.O/n(Power/Volume) Knob. SeeNavigation
Audio Systemon page 5!60for more information.
M.M(Disc Up/Down) Key. See“Hard Keys”under
Using the Navigation Systemon page 5!12formore information.
N. AUDIO Key. SeeNavigation Audio Systemonpage 5!60for more information.
O. FAV (Favorite) Key. See“Storing Radio StationPresets”underNavigation Audio Systemonpage 5!60for more information.
P.5(Phone) Key. See the OnStar®owner guide and
Bluetooth®on page 4!67for more information.
Q.e(Sound) Key. See“Sound Menu”under
Navigation Audio Systemon page 5!60formore information.
R. Source (AM, FM, XM, CD, etc.) Touch ScreenButton. SeeNavigation Audio Systemonpage 5!60for more information.
S. Clock Touch Screen Button. See“Setting theClock”underConfigure Menuon page 5!42formore information.
5-3
Page 312 of 616
Features and Controls
Using the Navigation System
This section presents basic information needed tooperate the navigation system.
Use the hard keys located on the navigation systemalong with the available touch-sensitive screen buttonson the navigation screen to operate the system. SeeNavigation System Overviewo n p a g e 5!2for moreinformation.
Once the vehicle is moving, various functions aredisabled to reduce driver distractions.
Hard Keys
The following hard keys are located on the navigationsystem:
O/n(Power/Volume):Press to turn the systemon and off. Turn to increase or decrease the volume tothe audio system.
Press and hold for more than two seconds to turn offthe navigation system, the Rear Seat Entertainment(RSE), and Rear Seat Audio (RSA). If the vehicle hasnot been tuned off, the RSE and the RSA can be turnedback on by pressing this knob and continues play of thelast active source.
w(Tune):Turn to go to the next or previous radiostation or disc track or chapter. SeeNavigation AudioSystemon page 5!60,CD Playeron page 5!68,orDVD Playeron page 5!75for more information.
Z(DVD Map Disc Eject):Press to eject the DVDmap disc. This button is located next to the upper discslot. SeeMapson page 5!14for more information.
M(Load):Press to load CDs or audio/video DVDs. SeeCD Playeron page 5!68orDVD Playeron page 5!75for more information.
Z(CD/DVD Eject):Press to eject CDs or audio/videoDVDs. This button is located under the load button. SeeCD Playeron page 5!68orDVD Playeron page 5!75for more information.
M(Disc Up/Down):Press the up or down arrows to goto the next or previous disc.
AUDIO :Press access the full Audio screen to changeAM, FM, XM™Satellite Radio Service (if equipped),CD/DVD, and auxiliary input. See“Audio”underNavigation Audio Systemon page 5!60for moreinformation.
FAV (Favorite) :Press to access the preset stations.See“Storing Radio Station Presets”underNavigationAudio Systemon page 5!60for more information.
5-12