reset CADILLAC ESCALADE 2010 3.G Service Manual
[x] Cancel search | Manufacturer: CADILLAC, Model Year: 2010, Model line: ESCALADE, Model: CADILLAC ESCALADE 2010 3.GPages: 616, PDF Size: 39.41 MB
Page 310 of 616

7. Select the state/province screen button, if needed,to change the current state or province. A list of allof the available states and provinces appear.Select the state or province.
8. Enter the specific title of the POI in the POI namespace (e.g. Washington Monument).
If five or less names are available, a list displays.If more than five are available, the List screenbutton displays a number. This button representsthe number of available POIs. Select this button toview the list.
9. Select the Go screen button next to the POI.A map screen, with the destination markedappears.
10. Select the route preference (Fastest, Shortest,or Other). The system calculates and highlightsthe route.
11. Select the Start Guidance screen button. The routeis now ready to be started.
See“Point of Interest (POI)”underDestinationonpage 5!24for more information.
Storing Preset Destinations
1. If the radio is already on with a map disc inserted,skip to Step 5.
2. PressOto turn the system on.
3. Insert the DVD map disc. See“Installing theMap DVD”underMapson page 5!14for moreinformation.
4. A caution may appear. Touch the OK screen buttonto proceed.
5. Press the DEST hard key.
Enter a destination. SeeDestinationon page 5!24for more information on how to enter a destination.
6. Press the DEST hard key, the Route screendisplays. Press the Final Destination or Stopoverscreen button. The information screen displays forthat location. Press the Add to Address Bookscreen button. The address book screen appears.
7. Select the Name screen button. An alpha-keyboarddisplays. Enter the name. Select the Back screenbutton.
8. Press and hold one of the screen buttons at thebottom of the screen until the name appears in thescreen button on the display.
The name appears in that preset destinationscreen button and is now available to select fromthe Destination Entry screen. See“Using YourStored Preset Destinations”next in this section toselect it as a destination.
See“Adding or Changing Preset Destinations”underDestinationon page 5!24for moreinformation on how to add preset destinations.
5-10
Page 311 of 616
Using Your Stored Preset Destinations
These destinations are available for selection whiledriving.
1. If the radio is already on with a map disc inserted,skip to Step 5.
2. PressOto turn the system on.
3. Insert the DVD map disc. See“Installing the MapDVD”underMapson page 5!14for moreinformation.
4. A caution may appear. Touch the OK screen buttonto proceed.
5. Press the DEST hard key.
6. Select one of the available preset destinationscreen buttons. A map screen, with the destinationmarked appears.
7. Select the route preference (Fastest, Shortest,or Other). The system calculates and highlights theroute.
8. Select the Start Guidance screen button. The routeis now ready to be started.
See“Preset Destination”underDestinationonpage 5!24for more information.
Canceling Guidance
Guidance is canceled once the final destination isreached. To cancel guidance prior to arrival at the finaldestination:
1. Press the DEST hard key.
2. Press the Cancel Guidance screen button.
3. Press OK to confirm.
Guidance Volume
Adjust the volume of voice guidance prompts:
1. Press the CONFIG hard key to enter the menuoptions, then press the CONFIG key repeatedlyuntil Nav is selected or touch the Nav screenbutton.
2. Press the Voice Prompt screen button.
3. Press the + (plus) or–(minus) screen buttons toincrease or to decrease the volume of the voiceprompts. The system responds with the adjustedvoice level.
See“Voice Prompt”underConfigure Menuonpage 5!42for more information.
Cleaning the Display
Use a soft clean cotton cloth dampened withclean water.
5-11
Page 312 of 616
Features and Controls
Using the Navigation System
This section presents basic information needed tooperate the navigation system.
Use the hard keys located on the navigation systemalong with the available touch-sensitive screen buttonson the navigation screen to operate the system. SeeNavigation System Overviewo n p a g e 5!2for moreinformation.
Once the vehicle is moving, various functions aredisabled to reduce driver distractions.
Hard Keys
The following hard keys are located on the navigationsystem:
O/n(Power/Volume):Press to turn the systemon and off. Turn to increase or decrease the volume tothe audio system.
Press and hold for more than two seconds to turn offthe navigation system, the Rear Seat Entertainment(RSE), and Rear Seat Audio (RSA). If the vehicle hasnot been tuned off, the RSE and the RSA can be turnedback on by pressing this knob and continues play of thelast active source.
w(Tune):Turn to go to the next or previous radiostation or disc track or chapter. SeeNavigation AudioSystemon page 5!60,CD Playeron page 5!68,orDVD Playeron page 5!75for more information.
Z(DVD Map Disc Eject):Press to eject the DVDmap disc. This button is located next to the upper discslot. SeeMapson page 5!14for more information.
M(Load):Press to load CDs or audio/video DVDs. SeeCD Playeron page 5!68orDVD Playeron page 5!75for more information.
Z(CD/DVD Eject):Press to eject CDs or audio/videoDVDs. This button is located under the load button. SeeCD Playeron page 5!68orDVD Playeron page 5!75for more information.
M(Disc Up/Down):Press the up or down arrows to goto the next or previous disc.
AUDIO :Press access the full Audio screen to changeAM, FM, XM™Satellite Radio Service (if equipped),CD/DVD, and auxiliary input. See“Audio”underNavigation Audio Systemon page 5!60for moreinformation.
FAV (Favorite) :Press to access the preset stations.See“Storing Radio Station Presets”underNavigationAudio Systemon page 5!60for more information.
5-12
Page 333 of 616
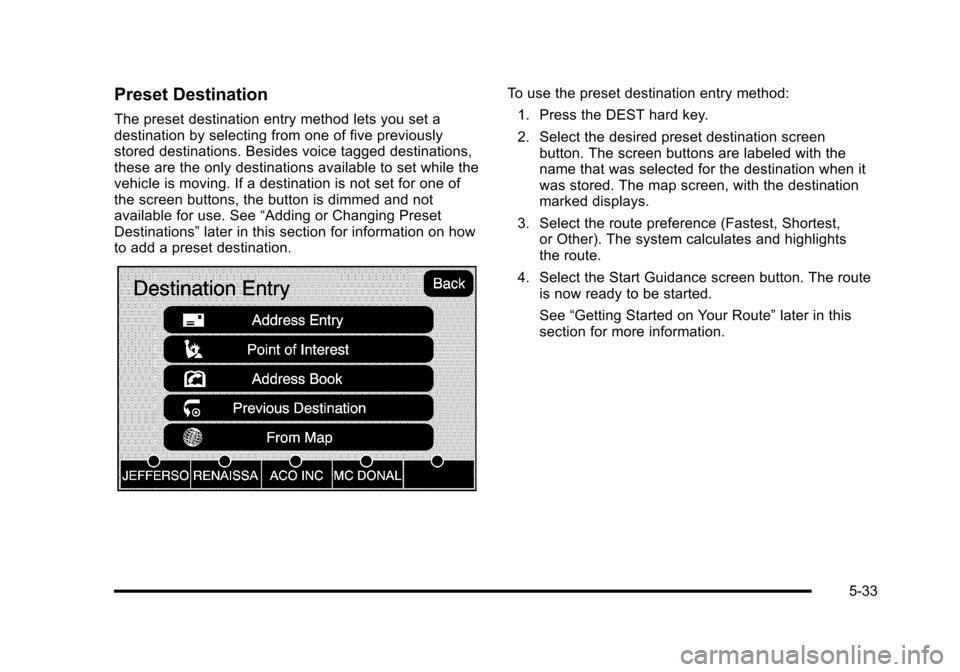
Preset Destination
The preset destination entry method lets you set adestination by selecting from one of five previouslystored destinations. Besides voice tagged destinations,these are the only destinations available to set while thevehicle is moving. If a destination is not set for one ofthe screen buttons, the button is dimmed and notavailable for use. See“Adding or Changing PresetDestinations”later in this section for information on howto add a preset destination.
To use the preset destination entry method:
1. Press the DEST hard key.
2. Select the desired preset destination screenbutton. The screen buttons are labeled with thename that was selected for the destination when itwas stored. The map screen, with the destinationmarked displays.
3. Select the route preference (Fastest, Shortest,or Other). The system calculates and highlightsthe route.
4. Select the Start Guidance screen button. The routeis now ready to be started.
See“Getting Started on Your Route”later in thissection for more information.
5-33
Page 341 of 616
Adding or Changing Preset
Destinations
This feature allows additions or changes one of fivepreset destinations. When a destination has beenadded as a preset destination, it is available to selectfrom the Destination Entry screen. See“PresetDestination”previously for information on how to selecta preset destination as a final destination.
To store the current vehicle position as a presetdestination:
1. Select the Mark screen button from the mapscreen to add the current vehicle position to theaddress book. The Address Book screen appears.
2. Select the Name screen button. An alpha-keyboarddisplays. Enter the name. Press the OK screenbutton then the Back screen button to return to theaddress book information screen.
3. Press and hold one of the buttons at the bottom ofthe screen until the name appears in that presetdestination screen button. It is now available toselect from the Destination Entry screen.
To store an address book entry as a preset destination:
1. Select the CONFIG hard key.
2. Select the Nav screen button or press theCONFIG key until Nav is selected or touchthe Nav screen button.
3. Select the Edit/View screen button.
4. Select the address book entry to be storedas the preset destination. Select the Name screenbutton to add a name, if needed.
5. Press and hold one of the buttons at the bottom ofthe screen until the name appears in that presetdestination screen button. It is now available toselect from the Destination Entry screen.
5-41
Page 342 of 616

Configure Menu
Press the CONFIG (Configure) hard key to adjustseveral of the system's features and preferences.The last selected CONFIG screen is the screen thatdisplays: Sound, Radio, Nav (navigation), Display,or Time.
Sound
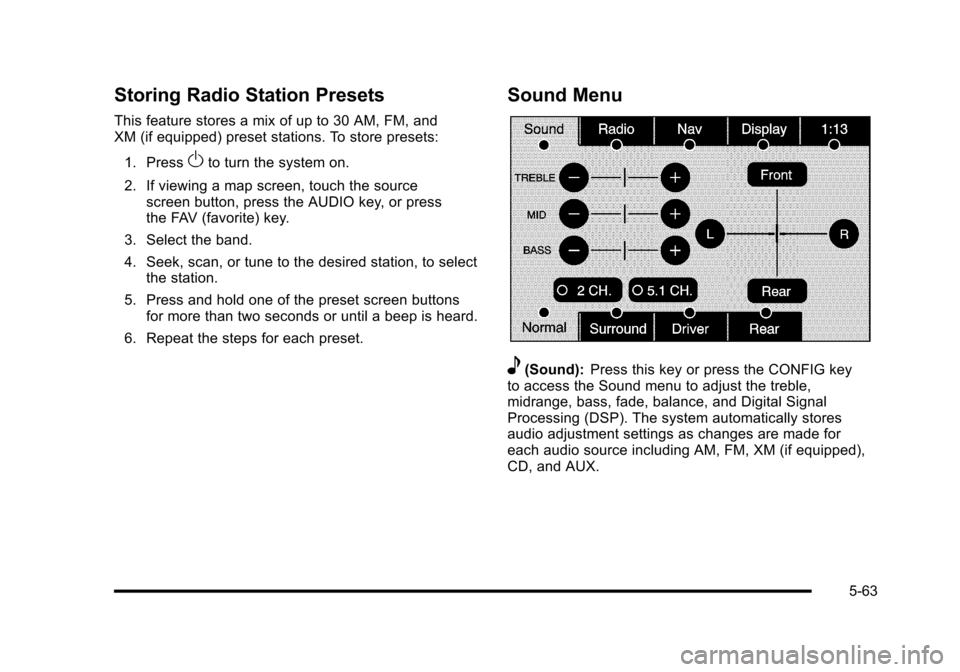
Press the CONFIG key to enter the configure menuoptions, then press the CONFIG key repeatedly untilSound is selected or touch the Sound screen button tomake speaker and DSP (Digital Signal Processing)adjustments. See“Sound Menu”under,NavigationAudio Systemon page 5!60for more information.
Radio
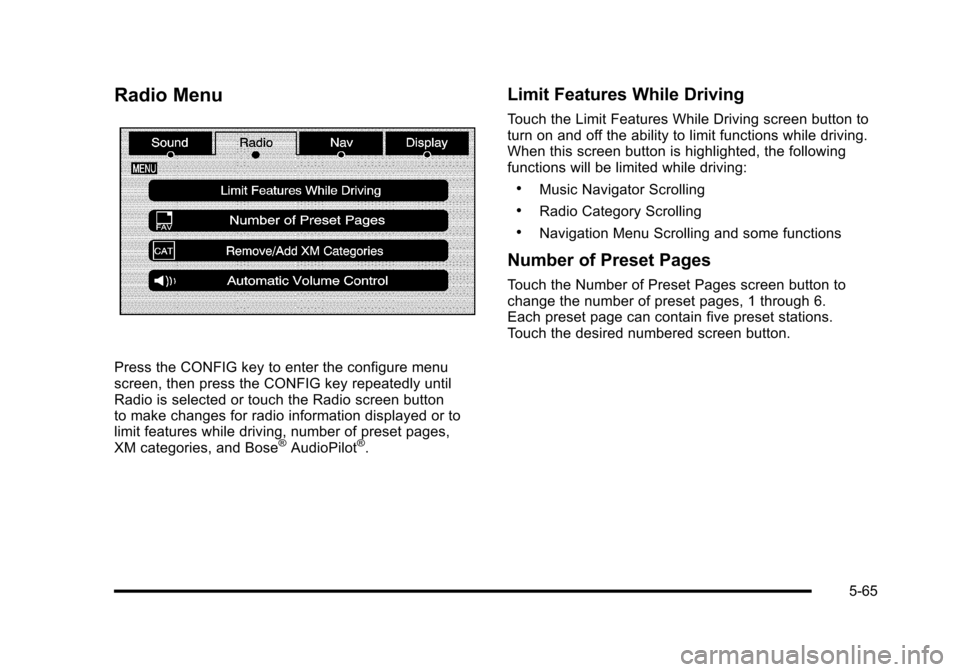
Press the CONFIG key to enter the configure menuoptions, then press the CONFIG key repeatedly untilRadio is selected or touch the Radio screen button tomake changes for radio information displayed, presetpages, XM™categories, and Bose®AudioPilot®.See“Radio Menu”under,Navigation Audio Systemonpage 5!60for more information.
5-42
Page 363 of 616
Storing Radio Station Presets
This feature stores a mix of up to 30 AM, FM, andXM (if equipped) preset stations. To store presets:
1. PressOto turn the system on.
2. If viewing a map screen, touch the sourcescreen button, press the AUDIO key, or pressthe FAV (favorite) key.
3. Select the band.
4. Seek, scan, or tune to the desired station, to selectthe station.
5. Press and hold one of the preset screen buttonsfor more than two seconds or until a beep is heard.
6. Repeat the steps for each preset.
Sound Menu
e(Sound):Press this key or press the CONFIG keyto access the Sound menu to adjust the treble,midrange, bass, fade, balance, and Digital SignalProcessing (DSP). The system automatically storesaudio adjustment settings as changes are made foreach audio source including AM, FM, XM (if equipped),CD, and AUX.
5-63
Page 365 of 616
Radio Menu
Press the CONFIG key to enter the configure menuscreen, then press the CONFIG key repeatedly untilRadio is selected or touch the Radio screen buttonto make changes for radio information displayed or tolimit features while driving, number of preset pages,XM categories, and Bose®AudioPilot®.
Limit Features While Driving
Touch the Limit Features While Driving screen button toturn on and off the ability to limit functions while driving.When this screen button is highlighted, the followingfunctions will be limited while driving:
.Music Navigator Scrolling
.Radio Category Scrolling
.Navigation Menu Scrolling and some functions
Number of Preset Pages
Touch the Number of Preset Pages screen button tochange the number of preset pages, 1 through 6.Each preset page can contain five preset stations.Touch the desired numbered screen button.
5-65
Page 397 of 616

If the system fails to turn on or activate, the StabiliTraklight along with one of the following messages will bedisplayed on the Driver Information Center (DIC):TRACTION CONTROL OFF, SERVICE TRACTIONCONTROL, STABILITRAK OFF, SERVICESTABILITRAK. If these DIC messages appear, makesure the StabiliTrak system has not been turned offusing the StabiliTrak on/off button. Then turn thesteering wheel clockwise from the nine o'clock positionto the three o'clock position. If this clears themessage(s), the vehicle does not need servicing.If this does not clear the message(s), then turn thevehicle off, wait 15 seconds, and then turn it back onagain to reset the system. If any of these messagesstill appear on the Driver Information Center (DIC), thevehicle should be taken in for service. For moreinformation on the DIC messages, seeDriverInformation Center (DIC) on page 4!41.
The StabiliTrak light willflash on the instrumentpanel cluster when thesystem is both onand activated.
The system may be heard or felt while it is working; thisis normal.
The traction controldisable button is locatedon the instrument panelbelow the climatecontrols.
The traction control part of StabiliTrak can be turnedoff by pressing and releasing the StabiliTrak button ifboth systems (traction control and StabiliTrak) werepreviously on. To disable both traction control andStabiliTrak, press and hold the button for five seconds.
Traction control and StabiliTrak can be turned on bypressing and releasing the StabiliTrak button if notautomatically shut off for any other reason.
When the TCS or StabiliTrak system is turned off,the StabiliTrak light and the appropriate TCS off orStabiliTrak off message will be displayed on the DIC towarn the driver. The vehicle will still have brake-tractioncontrol when traction control is off, but will not be ableto use the engine speed management system. See“Traction Control Operation”next for more information.
When the traction control system has been turned off,system noises may still be heard as a result of thebrake-traction control coming on.
6-7
Page 466 of 616
Engine Oil Additives / Engine Oil
Flushes
Do not add anything to the oil. The recommended oilswith the starburst symbol that meet GM standards areall that is needed for good performance and engineprotection.
Engine oil system flushes are not recommended andcould cause engine damage not covered by the vehiclewarranty.
Engine Oil Life System
When to Change Engine Oil
This vehicle has a computer system that indicates whento change the engine oil and filter. This is based onengine revolutions and engine temperature, and not onmileage. Based on driving conditions, the mileage atwhich an oil change is indicated can vary considerably.For the oil life system to work properly, the system mustbe reset every time the oil is changed.
When the system has calculated that oil life has beendiminished, it indicates that an oil change is necessary.A CHANGE ENGINE OIL SOON message comes on.SeeDIC Warnings and Messageson page 4!48.Change the oil as soon as possible within the next600 miles (1 000 km). It is possible that, if driving underthe best conditions, the oil life system might not indicatethat an oil change is necessary for over a year.However, the engine oil and filter must be changed atleast once a year and at this time the system must bereset. Your dealer/retailer has trained service peoplewho will perform this work using genuine parts andreset the system. It is also important to check the oilregularly and keep it at the proper level.
If the system is ever reset accidentally, the oil must bechanged at 3,000 miles (5 000 km) since the last oilchange. Remember to reset the oil life systemwhenever the oil is changed.
7-20