reset CADILLAC ESCALADE 2010 3.G Workshop Manual
[x] Cancel search | Manufacturer: CADILLAC, Model Year: 2010, Model line: ESCALADE, Model: CADILLAC ESCALADE 2010 3.GPages: 616, PDF Size: 39.41 MB
Page 467 of 616

How to Reset the Engine Oil Life
System
The Engine Oil Life System calculates when to changethe engine oil and filter based on vehicle use.Whenever the oil is changed, reset the system so it cancalculate when the next oil change is required. If asituation occurs where the oil is changed prior to aCHANGE ENGINE OIL SOON message being turnedon, reset the system.
Always reset the engine oil life to 100% after every oilchange. It will not reset itself. To reset the Engine OilLife System:
1. Display the OIL LIFE REMAINING on the DIC.
2. Press and hold the SET/RESET button on the DICfor more than five seconds. The oil life will changeto 100%.
If the CHANGE ENGINE OIL SOON message comesback on when the vehicle is started, the Engine Oil LifeSystem has not reset. Repeat the procedure.
What to Do with Used Oil
Used engine oil contains certain elements that can beunhealthy for your skin and could even cause cancer.Do not let used oil stay on your skin for very long. Cleanyour skin and nails with soap and water, or a good handcleaner. Wash or properly dispose of clothing or ragscontaining used engine oil. See the manufacturer'swarnings about the use and disposal of oil products.
Used oil can be a threat to the environment. If youchange your own oil, be sure to drain all the oil from thefilter before disposal. Never dispose of oil by putting it inthe trash, pouring it on the ground, into sewers, or intostreams or bodies of water. Recycle it by taking it to aplace that collects used oil.
7-21
Page 471 of 616

4. Allow the engine to idle (500–800 rpm) for at leastone minute. Slowly release the brake pedal.
5. Keep the engine running and press the Trip/Fuelbutton or trip odometer reset stem until TRANSTEMP (Transmission Temperature) displays on theDriver Information Center (DIC).
6. Using the TRANS TEMP reading, determine andperform the appropriate check procedure. If theTRANS TEMP reading is not within the requiredtemperature ranges, allow the vehicle to cool,or operate the vehicle until the appropriatetransmission fluid temperature is reached.
Cold Check Procedure
Use this procedure only as a reference to determine ifthe transmission has enough fluid to be operated safelyuntil a hot check procedure can be made. The hotcheck procedure is the most accurate method to checkthe fluid level. Perform the hot check procedure at the
first opportunity. Use this cold check procedure to checkfluid level when the transmission temperature isbetween 80°F and 90°F (27°C and 32°C).
1. Locate thetransmission dipstick atthe rear of the enginecompartment, on thepassenger side of thevehicle.
SeeEngine Compartment Overviewon page 7!16for more information.
2. Flip the handle up and then pull out the dipstickand wipe it with a clean rag or paper towel.
3. Install the dipstick by pushing it back in all the way,wait three seconds, and then pull it back out again.
4. Check both sides of the dipstick and read the lowerlevel. Repeat the check procedure to verify thereading.
7-25
Page 483 of 616

Overheated Engine Protection
Operating Mode
If an overheated engine condition exists and theENGINE POWER IS REDUCED message is displayed,an overheat protection mode which alternates firinggroups of cylinders helps prevent engine damage. Inthis mode, you will notice a loss in power and engineperformance. This operating mode allows the vehicle tobe driven to a safe place in an emergency. Drivingextended miles (km) and/or towing a trailer in theoverheat protection mode should be avoided.
Notice:After driving in the overheated engineprotection operating mode, to avoid engine damage,allow the engine to cool before attempting anyrepair. The engine oil will be severely degraded.Repair the cause of coolant loss, change the oil andreset the oil life system. SeeEngine Oilonpage 7!17.
Engine Fan Noise
The vehicle has electric cooling fans. You might hearthe fans spinning at low speed during most everydaydriving. The fans can turn off if no cooling is required.Under heavy vehicle loading, trailer towing, and/or highoutside temperatures, or if you are operating the airconditioning system, the fans can change to high speedand you might hear an increase in fan noise. This isnormal and indicates that the cooling system isfunctioning properly. The fans change to low speedwhen additional cooling is no longer required.
7-37
Page 498 of 616

Headlamp Aiming
The vehicle has a visual optical headlamp aimingsystem. The aim of the headlamps have been preset atthe factory and should need no further adjustment.
However, if the vehicle is damaged in a crash, the aimof the headlamps may be affected and adjustment maybe necessary.
If oncoming vehicles flash their high beams at you, thismay mean the vertical aim of your headlamps needs tobe adjusted.
It is recommended that the vehicle is taken to yourdealer/retailer for service if the headlamps need to beadjusted. It is possible however, to re-aim theheadlamps as described.
The vehicle should:
.Be placed so the headlamps are 25 ft. (7.6 m) froma light colored wall or other flat surface.
.Have all four tires on a level surface which is levelall the way to the wall or other flat surface.
.Be placed so it is perpendicular to the wall or otherflat surface.
.Not have any snow, ice, or mud on it.
.Be fully assembled and all other work stoppedwhile headlamp aiming is being performed.
.Be normally loaded with a full tank of fuel and oneperson or 160 lbs (75 kg) sitting on the driver seat.
.Have the tires properly inflated.
.Have the spare tire is in its proper location in thevehicle.
Headlamp aiming is done with the vehicle's low-beamheadlamps. The high-beam headlamps will be correctlyaimed if the low-beam headlamps are aimed properly.
To adjust the vertical aim:
1. Open the hood. SeeHood Releaseon page 7!15for more information.
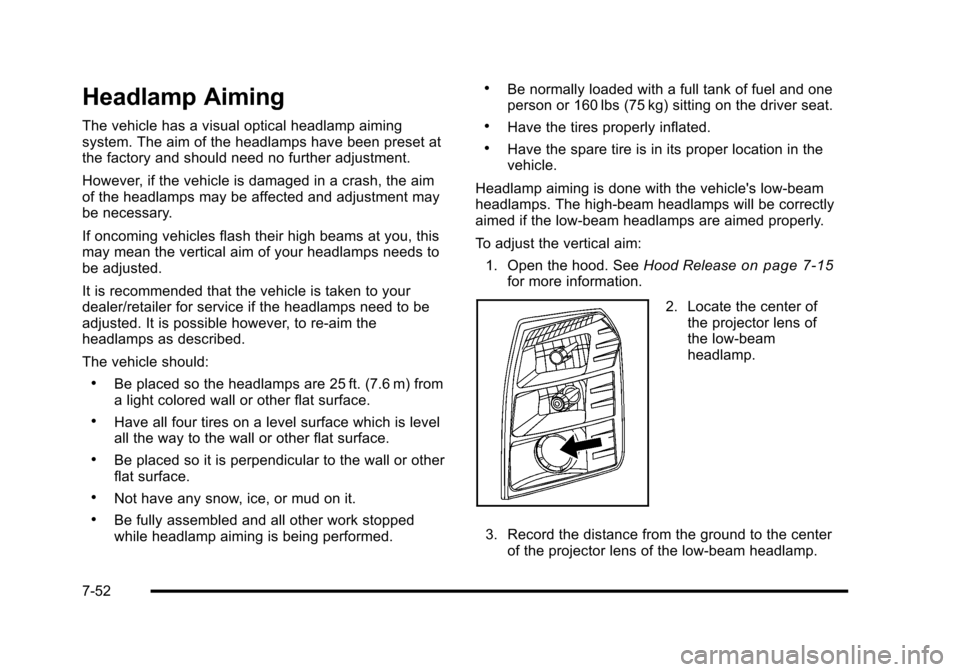
2. Locate the center ofthe projector lens ofthe low!beamheadlamp.
3. Record the distance from the ground to the centerof the projector lens of the low!beam headlamp.
7-52
Page 518 of 616

Any time you notice unusual wear, rotate your
tires as soon as possible and check wheel
alignment. Also check for damaged tires or
wheels. SeeWhen It Is Time for New Tireson
page 7!73andWheel Replacementon page 7!77.
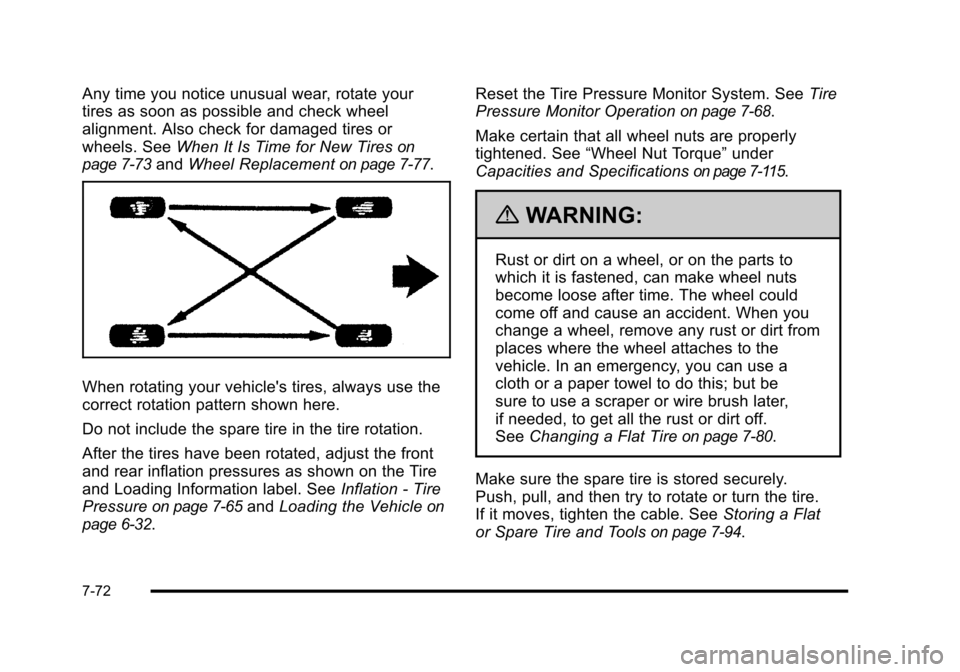
When rotating your vehicle's tires, always use the
correct rotation pattern shown here.
Do not include the spare tire in the tire rotation.
After the tires have been rotated, adjust the front
and rear inflation pressures as shown on the Tire
and Loading Information label. SeeInflation - Tire
Pressureon page 7!65andLoading the Vehicleon
page 6!32.
Reset the Tire Pressure Monitor System. SeeTire
Pressure Monitor Operationon page 7!68.
Make certain that all wheel nuts are properly
tightened. See“Wheel Nut Torque”under
Capacities and Specificationson page 7!115.
{WARNING:
Rust or dirt on a wheel, or on the parts to
which it is fastened, can make wheel nuts
become loose after time. The wheel could
come off and cause an accident. When you
change a wheel, remove any rust or dirt from
places where the wheel attaches to the
vehicle. In an emergency, you can use a
cloth or a paper towel to do this; but be
sure to use a scraper or wire brush later,
if needed, to get all the rust or dirt off.
SeeChanging a Flat Tireon page 7!80.
Make sure the spare tire is stored securely.
Push, pull, and then try to rotate or turn the tire.
If it moves, tighten the cable. SeeStoring a Flat
or Spare Tire and Toolson page 7!94.
7-72
Page 565 of 616

At your General Motors dealer/retailer, you can becertain that you will receive the highest level of serviceavailable. Your dealer/retailer has specially trainedservice technicians, uses genuine GM replacementparts, as well as, up to date tools and equipment toensure fast and accurate diagnostics.
The proper replacement parts, fluids, and lubricants touse are listed inRecommended Fluids and Lubricantson page 8!10andMaintenance Replacement Partsonpage 8!12. We recommend the use of genuine partsfrom your dealer/retailer.
Rotation of New Tires
To maintain ride, handling, and performance of thevehicle, it is important that the first rotation service fornew tires be performed when they have 8 000 to13 000 km (5,000 to 8,000 miles). SeeTire Inspectionand Rotation on page 7!71.
Scheduled Maintenance
When the Change Engine Oil Soon
Message Displays
Change engine oil and filter. SeeEngine Oilonpage 7!17.An Emission Control Service.
When the Change Engine Oil Soon message displays,service is required for the vehicle as soon as possible,within the next 1 000 km/600 miles. If driving under thebest conditions, the engine oil life system might notindicate the need for vehicle service for more than ayear. The engine oil and filter must be changed at leastonce a year and the oil life system must be reset. Yourdealer/retailer has trained service technicians who willperform this work and reset the system. If the engine oillife system is reset accidentally, service the vehiclewithin 5 000 km/3,000 miles since the last service. Resetthe oil life system whenever the oil is changed. SeeEngine Oil Life System on page 7!20.
When the Change Engine Oil Soon message displays,certain services, checks, and inspections are required.
8-3