lock CADILLAC ESCALADE 2020 Owner's Manual
[x] Cancel search | Manufacturer: CADILLAC, Model Year: 2020, Model line: ESCALADE, Model: CADILLAC ESCALADE 2020Pages: 392, PDF Size: 6.39 MB
Page 318 of 392
Cadillac Escalade Owner Manual (GMNA-Localizing-U.S./Canada/Mexico-
13566588) - 2020 - CRC - 4/24/19
VEHICLE CARE 317
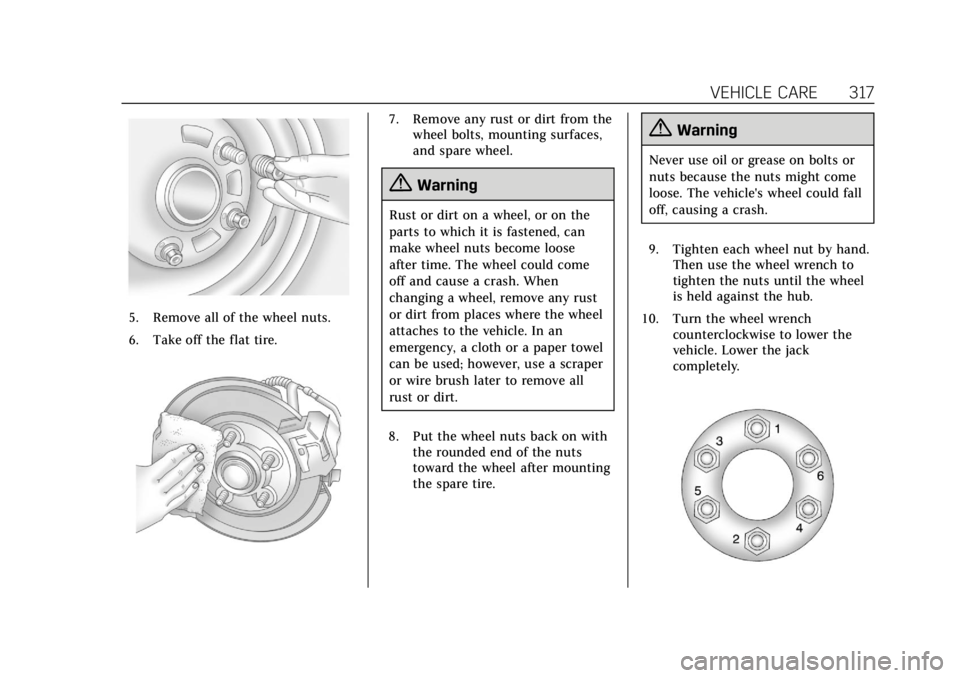
5. Remove all of the wheel nuts.
6. Take off the flat tire.
7. Remove any rust or dirt from thewheel bolts, mounting surfaces,
and spare wheel.
{Warning
Rust or dirt on a wheel, or on the
parts to which it is fastened, can
make wheel nuts become loose
after time. The wheel could come
off and cause a crash. When
changing a wheel, remove any rust
or dirt from places where the wheel
attaches to the vehicle. In an
emergency, a cloth or a paper towel
can be used; however, use a scraper
or wire brush later to remove all
rust or dirt.
8. Put the wheel nuts back on with the rounded end of the nuts
toward the wheel after mounting
the spare tire.
{Warning
Never use oil or grease on bolts or
nuts because the nuts might come
loose. The vehicle's wheel could fall
off, causing a crash.
9. Tighten each wheel nut by hand. Then use the wheel wrench to
tighten the nuts until the wheel
is held against the hub.
10. Turn the wheel wrench counterclockwise to lower the
vehicle. Lower the jack
completely.
Page 319 of 392
Cadillac Escalade Owner Manual (GMNA-Localizing-U.S./Canada/Mexico-
13566588) - 2020 - CRC - 4/24/19
318 VEHICLE CARE
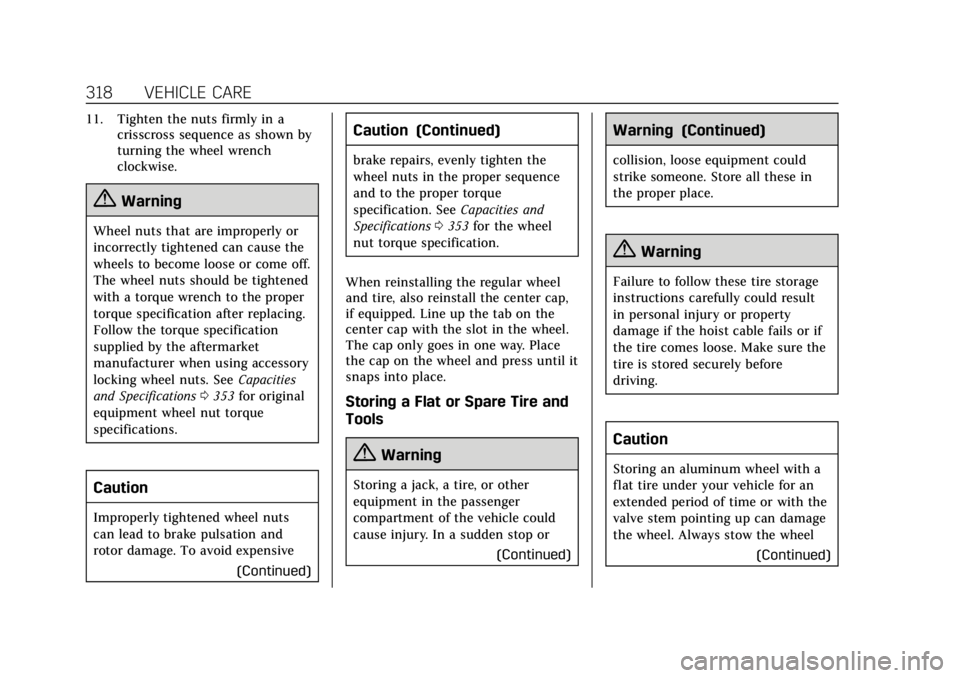
11. Tighten the nuts firmly in acrisscross sequence as shown by
turning the wheel wrench
clockwise.
{Warning
Wheel nuts that are improperly or
incorrectly tightened can cause the
wheels to become loose or come off.
The wheel nuts should be tightened
with a torque wrench to the proper
torque specification after replacing.
Follow the torque specification
supplied by the aftermarket
manufacturer when using accessory
locking wheel nuts. See Capacities
and Specifications 0353 for original
equipment wheel nut torque
specifications.
Caution
Improperly tightened wheel nuts
can lead to brake pulsation and
rotor damage. To avoid expensive
(Continued)
Caution (Continued)
brake repairs, evenly tighten the
wheel nuts in the proper sequence
and to the proper torque
specification. SeeCapacities and
Specifications 0353 for the wheel
nut torque specification.
When reinstalling the regular wheel
and tire, also reinstall the center cap,
if equipped. Line up the tab on the
center cap with the slot in the wheel.
The cap only goes in one way. Place
the cap on the wheel and press until it
snaps into place.
Storing a Flat or Spare Tire and
Tools
{Warning
Storing a jack, a tire, or other
equipment in the passenger
compartment of the vehicle could
cause injury. In a sudden stop or (Continued)
Warning (Continued)
collision, loose equipment could
strike someone. Store all these in
the proper place.
{Warning
Failure to follow these tire storage
instructions carefully could result
in personal injury or property
damage if the hoist cable fails or if
the tire comes loose. Make sure the
tire is stored securely before
driving.
Caution
Storing an aluminum wheel with a
flat tire under your vehicle for an
extended period of time or with the
valve stem pointing up can damage
the wheel. Always stow the wheel
(Continued)
Page 320 of 392
Cadillac Escalade Owner Manual (GMNA-Localizing-U.S./Canada/Mexico-
13566588) - 2020 - CRC - 4/24/19
VEHICLE CARE 319
Caution (Continued)
with the valve stem pointing down
and have the wheel/tire repaired as
soon as possible.
Caution
The tire hoist can be damaged if
there is no tension on the cable
when using it. To have the
necessary tension, the spare or road
tire and wheel assembly must be
installed on the tire hoist to use it.
{Warning
An improperly stored spare tire
could come loose and cause a crash.
To avoid personal injury or property
damage, always store the spare tire
when the vehicle is parked on a
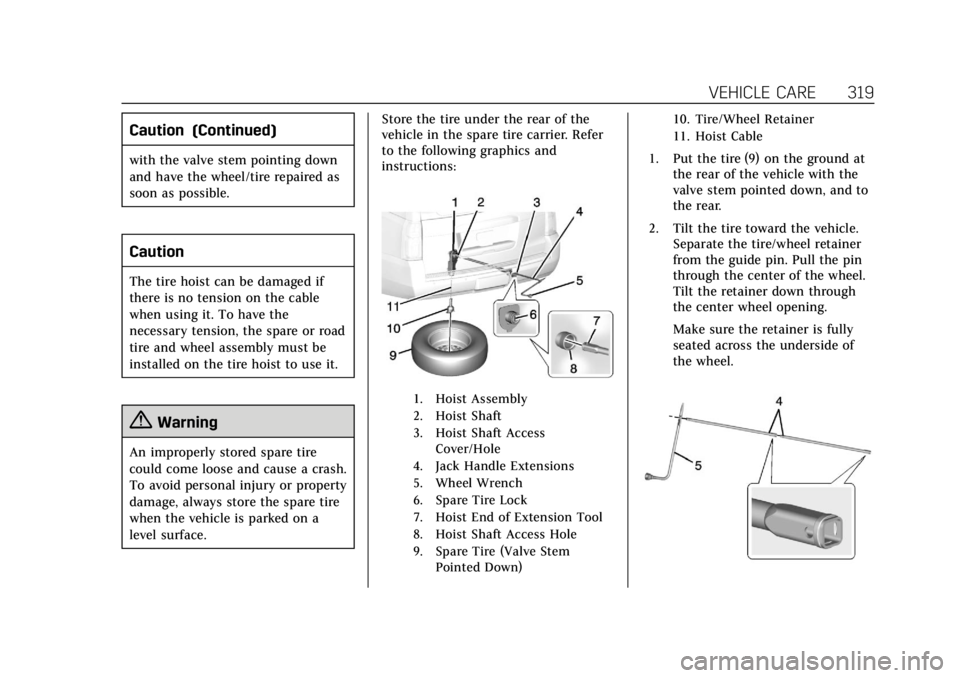
level surface.Store the tire under the rear of the
vehicle in the spare tire carrier. Refer
to the following graphics and
instructions:
1. Hoist Assembly
2. Hoist Shaft
3. Hoist Shaft Access
Cover/Hole
4. Jack Handle Extensions
5. Wheel Wrench
6. Spare Tire Lock
7. Hoist End of Extension Tool
8. Hoist Shaft Access Hole
9. Spare Tire (Valve Stem Pointed Down) 10. Tire/Wheel Retainer
11. Hoist Cable
1. Put the tire (9) on the ground at
the rear of the vehicle with the
valve stem pointed down, and to
the rear.
2. Tilt the tire toward the vehicle. Separate the tire/wheel retainer
from the guide pin. Pull the pin
through the center of the wheel.
Tilt the retainer down through
the center wheel opening.
Make sure the retainer is fully
seated across the underside of
the wheel.
Page 321 of 392

Cadillac Escalade Owner Manual (GMNA-Localizing-U.S./Canada/Mexico-
13566588) - 2020 - CRC - 4/24/19
320 VEHICLE CARE
3. Assemble the two jack handleextensions (4) and wheel
wrench (5).
Caution
Use of an air wrench or other power
tools with the hoist mechanism is
not recommended and could
damage the system. Use only the
tools supplied with the hoist
mechanism.
4. Insert the open end of theextension (7) through the hole in
the rear bumper (8) (hoist shaft
access hole).
5. Raise the tire part way upward. Make sure the retainer is seated
in the wheel opening.
6. Raise the tire fully against the underside of the vehicle by
turning the wheel wrench
clockwise until you hear two
clicks or feel it skip twice. The
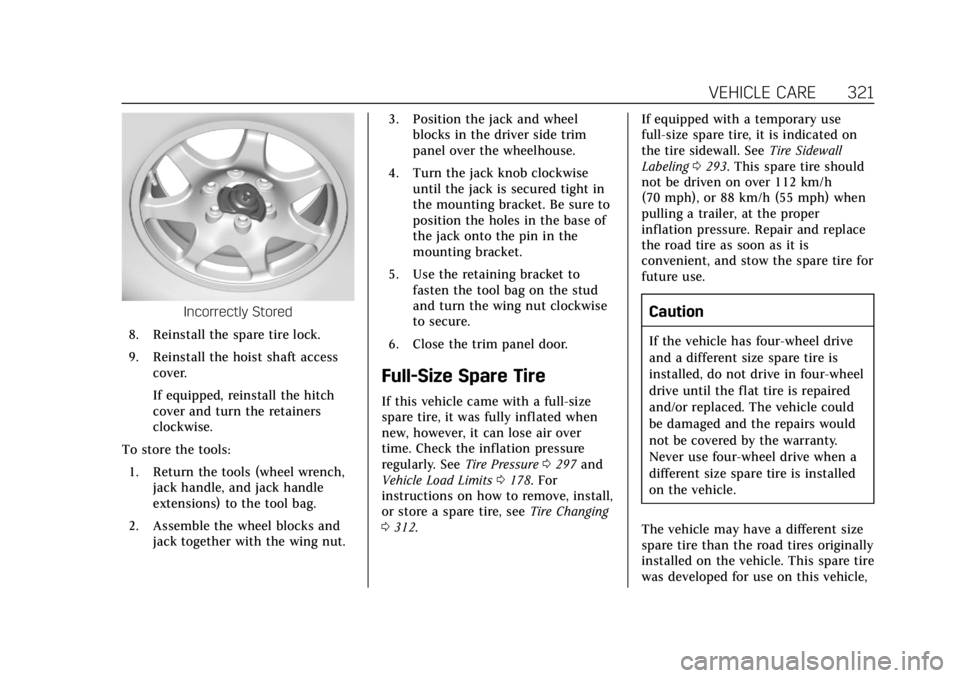
cable cannot be overtightened.7. Make sure the tire is storedsecurely. Push, pull, and then try
to turn the tire. If the tire moves,
use the wheel wrench to tighten
the cable.
Repeat this tightness check
procedure when checking the
spare tire pressure according to
the scheduled maintenance
information or any time the
spare tire is handled due to
service of other components.
Correctly Stored
Page 322 of 392
Cadillac Escalade Owner Manual (GMNA-Localizing-U.S./Canada/Mexico-
13566588) - 2020 - CRC - 4/24/19
VEHICLE CARE 321
Incorrectly Stored
8. Reinstall the spare tire lock.
9. Reinstall the hoist shaft access cover.
If equipped, reinstall the hitch
cover and turn the retainers
clockwise.
To store the tools: 1. Return the tools (wheel wrench, jack handle, and jack handle
extensions) to the tool bag.
2. Assemble the wheel blocks and jack together with the wing nut. 3. Position the jack and wheel
blocks in the driver side trim
panel over the wheelhouse.
4. Turn the jack knob clockwise until the jack is secured tight in
the mounting bracket. Be sure to
position the holes in the base of
the jack onto the pin in the
mounting bracket.
5. Use the retaining bracket to fasten the tool bag on the stud
and turn the wing nut clockwise
to secure.
6. Close the trim panel door.
Full-Size Spare Tire
If this vehicle came with a full-size
spare tire, it was fully inflated when
new, however, it can lose air over
time. Check the inflation pressure
regularly. See Tire Pressure0297 and
Vehicle Load Limits 0178. For
instructions on how to remove, install,
or store a spare tire, see Tire Changing
0 312. If equipped with a temporary use
full-size spare tire, it is indicated on
the tire sidewall. See
Tire Sidewall
Labeling 0293. This spare tire should
not be driven on over 112 km/h
(70 mph), or 88 km/h (55 mph) when
pulling a trailer, at the proper
inflation pressure. Repair and replace
the road tire as soon as it is
convenient, and stow the spare tire for
future use.
Caution
If the vehicle has four-wheel drive
and a different size spare tire is
installed, do not drive in four-wheel
drive until the flat tire is repaired
and/or replaced. The vehicle could
be damaged and the repairs would
not be covered by the warranty.
Never use four-wheel drive when a
different size spare tire is installed
on the vehicle.
The vehicle may have a different size
spare tire than the road tires originally
installed on the vehicle. This spare tire
was developed for use on this vehicle,
Page 326 of 392

Cadillac Escalade Owner Manual (GMNA-Localizing-U.S./Canada/Mexico-
13566588) - 2020 - CRC - 4/24/19
VEHICLE CARE 325
Do not let the other end touch
anything until the next step.
9. Connect the other end of thenegative (−) cable to the metal
bracket that is bolted to the
engine and supports the
resonator, on the vehicle with
the dead battery.
10. Start the vehicle with the good battery and run the engine for a
while.
11. Try to start the vehicle that had the dead battery. If it will not
start after a few tries, it probably
needs service.
Caution
If the jumper cables are connected
or removed in the wrong order,
electrical shorting may occur and
damage the vehicle. The repairs
would not be covered by the vehicle
warranty. Always connect and
remove the jumper cables in the
correct order, making sure that the
cables do not touch each other or
other metal.
Jumper Cable Removal
Reverse the sequence exactly when
removing the jumper cables.
After starting the disabled vehicle and
removing the jumper cables, allow it
to idle for several minutes.
Towing the Vehicle
Caution
Incorrectly towing a disabled
vehicle may cause damage. The
damage would not be covered by
the vehicle warranty. Do not lash or
hook to suspension components.
Use the proper straps around the
tires to secure the vehicle. Do not
drag a locked wheel/tire. Use tire
skates or dollies under any locked
wheel/tire while loading the vehicle.
Do not use a sling type lift to tow
the vehicle. This could damage the
vehicle.
Caution
If the vehicle cannot be shifted into
Neutral (N), do not use the tow eye
to tow the vehicle. Vehicle damage
may occur.
Page 329 of 392

Cadillac Escalade Owner Manual (GMNA-Localizing-U.S./Canada/Mexico-
13566588) - 2020 - CRC - 4/24/19
328 VEHICLE CARE
Caution
Failure to disconnect the negative
battery cable or to have it contact
the terminals can cause damage to
the vehicle.
6. Disconnect the negative battery cable at the battery and secure
the nut and bolt. Cover the
negative battery post with a
non-conductive material to
prevent any contact with the
negative battery terminal.
7. Shift the transmission to P (Park).
Caution
If the steering column is locked,
vehicle damage may occur.
8. Move the steering wheel to make sure the steering column is
unlocked.
9. With a foot on the brake pedal, release the parking brake. 10. If equipped with Keyless Access,
keep the RKE transmitter outside
of the vehicle, and manually lock
the doors. Access the vehicle as
if it has a dead RKE transmitter
battery, by using the key in the
door lock.
Disconnecting the Towed Vehicle
Before disconnecting the towed
vehicle: 1. Park on a level surface.
2. Set the parking brake, then shift the transmission to P (Park).
3. Connect the battery.
4. Apply the brake pedal.
5. Turn the ignition on with the engine off. Shift the transfer case
out of N (Neutral) to 2m. See
“Shifting out of N (Neutral)”
under Four-Wheel Drive 0196.
See your dealer if the transfer
case cannot be shifted out of
N (Neutral).
6. Check that the vehicle is in 2
m
by starting the engine and
shifting the transmission to R (Reverse) and then to D
(Drive). There should be
movement of the vehicle while
shifting.
7. Shift the transmission to P (Park) and turn off the ignition.
8. Disconnect the vehicle from the tow vehicle.
9. Release the parking brake.
10. Reset any lost presets. The outside temperature display
will default to 0 °C (32 °F) but
will reset with normal usage.
Dolly Towing
Page 330 of 392
Cadillac Escalade Owner Manual (GMNA-Localizing-U.S./Canada/Mexico-
13566588) - 2020 - CRC - 4/24/19
VEHICLE CARE 329
Caution
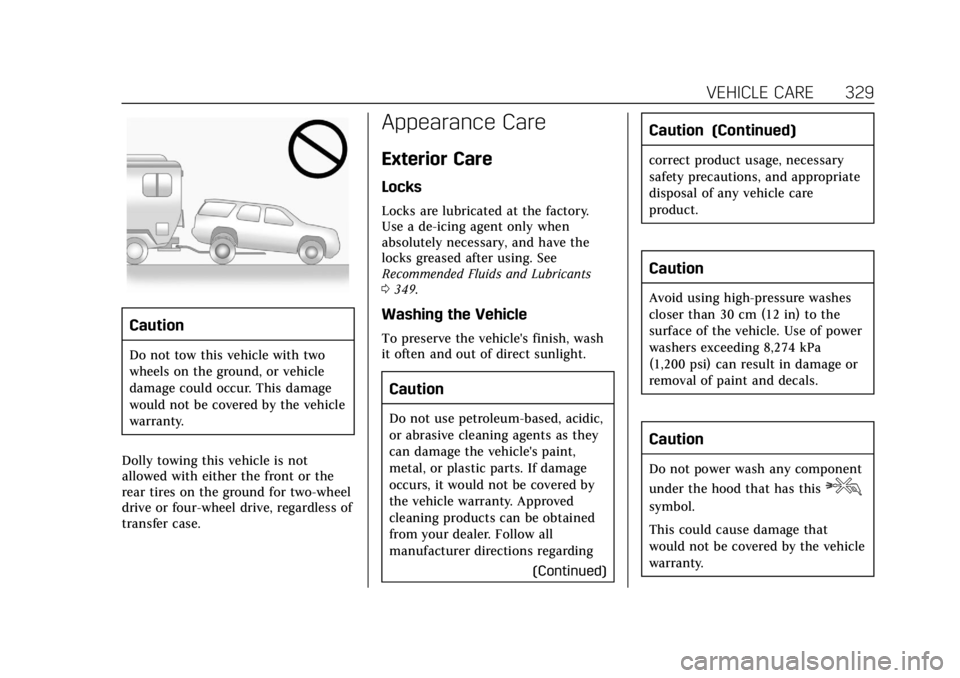
Do not tow this vehicle with two
wheels on the ground, or vehicle
damage could occur. This damage
would not be covered by the vehicle
warranty.
Dolly towing this vehicle is not
allowed with either the front or the
rear tires on the ground for two-wheel
drive or four-wheel drive, regardless of
transfer case.
Appearance Care
Exterior Care
Locks
Locks are lubricated at the factory.
Use a de-icing agent only when
absolutely necessary, and have the
locks greased after using. See
Recommended Fluids and Lubricants
0 349.
Washing the Vehicle
To preserve the vehicle's finish, wash
it often and out of direct sunlight.
Caution
Do not use petroleum-based, acidic,
or abrasive cleaning agents as they
can damage the vehicle's paint,
metal, or plastic parts. If damage
occurs, it would not be covered by
the vehicle warranty. Approved
cleaning products can be obtained
from your dealer. Follow all
manufacturer directions regarding
(Continued)
Caution (Continued)
correct product usage, necessary
safety precautions, and appropriate
disposal of any vehicle care
product.
Caution
Avoid using high-pressure washes
closer than 30 cm (12 in) to the
surface of the vehicle. Use of power
washers exceeding 8,274 kPa
(1,200 psi) can result in damage or
removal of paint and decals.
Caution
Do not power wash any component
under the hood that has this
e
symbol.
This could cause damage that
would not be covered by the vehicle
warranty.
Page 334 of 392
Cadillac Escalade Owner Manual (GMNA-Localizing-U.S./Canada/Mexico-
13566588) - 2020 - CRC - 4/24/19
VEHICLE CARE 333
Caution
Lubrication of applicable steering/
suspension points should not be
done unless the temperature is
−12 °C (10 °F) or higher, or damage
could result.
Body Component Lubrication
Lubricate all key lock cylinders, hood
hinges, liftgate hinges, steel fuel door
hinge and power assist step hinges,
unless the components are plastic.
Applying silicone grease on
weatherstrips with a clean cloth will
make them last longer, seal better,
and not stick or squeak.
Underbody Maintenance
At least twice a year, spring and fall,
use plain water to flush any corrosive
materials from the underbody. Take
care to thoroughly clean any areas
where mud and other debris can
collect. If equipped with power assist
steps, extend them and then use a
high pressure wash to clean all joints
and gaps.Do not directly power wash the
transfer case and/or front/rear axle
output seals. High pressure water can
overcome the seals and contaminate
the fluid. Contaminated fluid will
decrease the life of the transfer case
and/or axles and should be replaced.
Sheet Metal Damage
If the vehicle is damaged and requires
sheet metal repair or replacement,
make sure the body repair shop
applies anti-corrosion material to
parts repaired or replaced to restore
corrosion protection.
Original manufacturer replacement
parts will provide the corrosion
protection while maintaining the
vehicle warranty.
Finish Damage
Quickly repair minor chips and
scratches with touch-up materials
available from your dealer to avoid
corrosion. Larger areas of finish
damage can be corrected in your
dealer's body and paint shop.
Chemical Paint Spotting
Airborne pollutants can fall upon and
attack painted vehicle surfaces
causing blotchy, ring-shaped
discolorations, and small, irregular
dark spots etched into the paint
surface. See
“Finish Care”previously in
this section.
Interior Care
To prevent dirt particle abrasions,
regularly clean the vehicle's interior.
Immediately remove any soils.
Newspapers or dark garments can
transfer color to the vehicle’s interior.
Use a soft bristle brush to remove
dust from knobs and crevices on the
instrument cluster. Using a mild soap
solution, immediately remove hand
lotions, sunscreen, and insect
repellent from all interior surfaces or
permanent damage may result.
Use cleaners specifically designed for
the surfaces being cleaned to prevent
permanent damage. Apply all cleaners
directly to the cleaning cloth. Do not
spray cleaners on any switches or
controls. Remove cleaners quickly.
Page 338 of 392
Cadillac Escalade Owner Manual (GMNA-Localizing-U.S./Canada/Mexico-
13566588) - 2020 - CRC - 4/24/19
VEHICLE CARE 337
Removing and Replacing the
Floor Mats
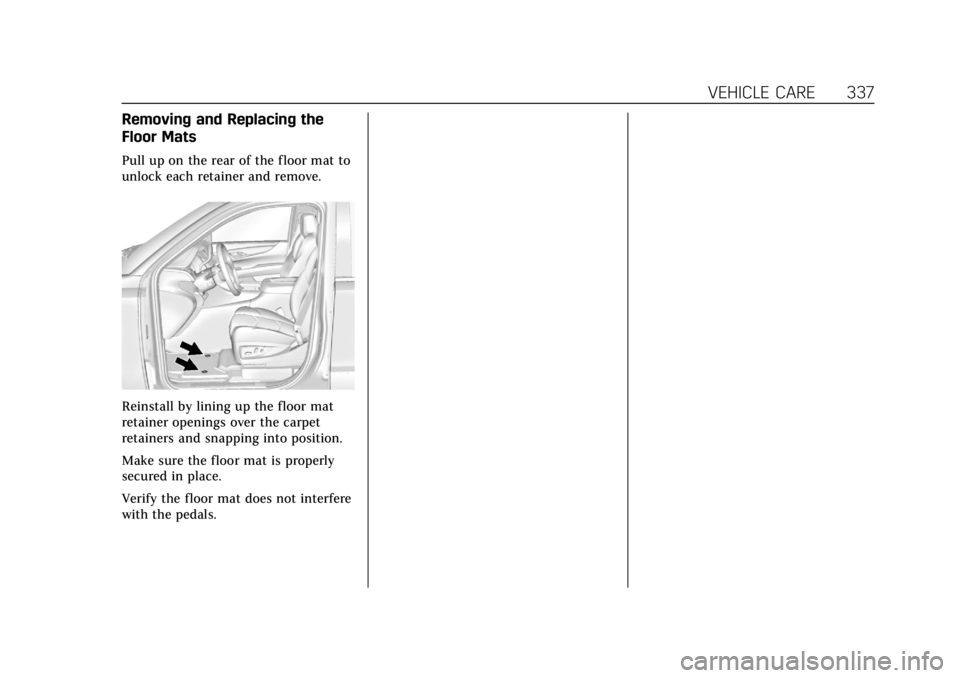
Pull up on the rear of the floor mat to
unlock each retainer and remove.
Reinstall by lining up the floor mat
retainer openings over the carpet
retainers and snapping into position.
Make sure the floor mat is properly
secured in place.
Verify the floor mat does not interfere
with the pedals.