check CADILLAC ESCALADE 2023 Owner's Manual
[x] Cancel search | Manufacturer: CADILLAC, Model Year: 2023, Model line: ESCALADE, Model: CADILLAC ESCALADE 2023Pages: 461, PDF Size: 7.99 MB
Page 80 of 461
Cadillac Escalade Owner Manual (GMNA-Localizing-U.S./Canada/Mexico-
16417396) - 2023 - CRC - 5/9/22
78 Seats and Restraints
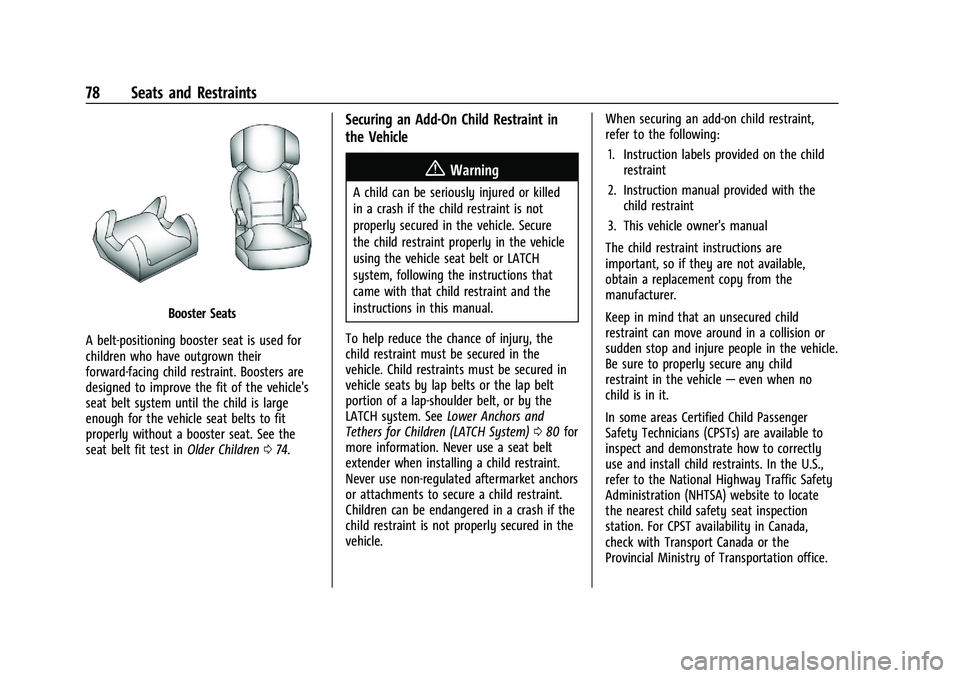
Booster Seats
A belt-positioning booster seat is used for
children who have outgrown their
forward-facing child restraint. Boosters are
designed to improve the fit of the vehicle's
seat belt system until the child is large
enough for the vehicle seat belts to fit
properly without a booster seat. See the
seat belt fit test in Older Children074.
Securing an Add-On Child Restraint in
the Vehicle
{Warning
A child can be seriously injured or killed
in a crash if the child restraint is not
properly secured in the vehicle. Secure
the child restraint properly in the vehicle
using the vehicle seat belt or LATCH
system, following the instructions that
came with that child restraint and the
instructions in this manual.
To help reduce the chance of injury, the
child restraint must be secured in the
vehicle. Child restraints must be secured in
vehicle seats by lap belts or the lap belt
portion of a lap-shoulder belt, or by the
LATCH system. See Lower Anchors and
Tethers for Children (LATCH System) 080 for
more information. Never use a seat belt
extender when installing a child restraint.
Never use non-regulated aftermarket anchors
or attachments to secure a child restraint.
Children can be endangered in a crash if the
child restraint is not properly secured in the
vehicle. When securing an add-on child restraint,
refer to the following:
1. Instruction labels provided on the child restraint
2. Instruction manual provided with the child restraint
3. This vehicle owner's manual
The child restraint instructions are
important, so if they are not available,
obtain a replacement copy from the
manufacturer.
Keep in mind that an unsecured child
restraint can move around in a collision or
sudden stop and injure people in the vehicle.
Be sure to properly secure any child
restraint in the vehicle —even when no
child is in it.
In some areas Certified Child Passenger
Safety Technicians (CPSTs) are available to
inspect and demonstrate how to correctly
use and install child restraints. In the U.S.,
refer to the National Highway Traffic Safety
Administration (NHTSA) website to locate
the nearest child safety seat inspection
station. For CPST availability in Canada,
check with Transport Canada or the
Provincial Ministry of Transportation office.
Page 88 of 461

Cadillac Escalade Owner Manual (GMNA-Localizing-U.S./Canada/Mexico-
16417396) - 2023 - CRC - 5/9/22
86 Seats and Restraints
If the position you are using does
not have a headrest or head
restraint and you are using a single
tether, route the tether over the
seatback.
If the position you are using does
not have a headrest or head
restraint and you are using a dual
tether, route the tether over the
seatback.
If the position you are using has a
fixed headrest or head restraint and
you are using a single tether, route
the tether around the inboard side
of the headrest or head restraint.
If the position you are using has a
fixed or an adjustable head restraint
and you are using a dual tether,
route the tether around the head
restraint.
If the child restraint is installed next
to a center seat, make sure the top
tether does not interfere with the
center seating position shoulder
belt/retractor. If it does, find
another suitable seating position to
install the child restraint.
3. Before placing a child in the child restraint, make sure it is securely held in
place. To check, grasp the child restraint
at the LATCH path and attempt to move
it side to side and back and forth. There
should be no more than 2.5 cm (1 in) of
movement, for proper installation.
Replacing LATCH System Parts
After a Crash
{Warning
A crash can damage the LATCH system in
the vehicle. A damaged LATCH system
may not properly secure the child
restraint, resulting in serious injury or
(Continued)
Page 91 of 461

Cadillac Escalade Owner Manual (GMNA-Localizing-U.S./Canada/Mexico-
16417396) - 2023 - CRC - 5/9/22
Seats and Restraints 89
anchor weight limits, and instructions
listed inLower Anchors and Tethers for
Children (LATCH System) 080.
7. Before placing a child in the child restraint, make sure it is securely held in
place. To check, grasp the child restraint
at the seat belt path and attempt to
move it side to side and back and forth.
When the child restraint is properly
installed, there should be no more than
2.5 cm (1 in) of movement.
To remove the child restraint, unbuckle the
vehicle seat belt and let it return to the
stowed position. If the top tether is attached
to a top tether anchor, disconnect it.
If the head restraint was removed, reinstall
it before the seating position is used. See
"Head Restraint Removal and Reinstallation"
under Lower Anchors and Tethers for
Children (LATCH System) 080 for additional
information on installing the head restraint
properly.Securing Child Restraints (With
the Seat Belt in the Front
Passenger Seat)
This vehicle has airbags. A rear seat is a
safer place to secure a forward-facing child
restraint. See Where to Put the Restraint
0 79.
In addition, the vehicle has a passenger
sensing system which is designed to turn off
the front outboard passenger frontal airbag
under certain conditions. See Passenger
Sensing System 069 and
Passenger Airbag Status Indicator 0113 for
more information, including important
safety information.
Never put a rear-facing child restraint in the
front. This is because the risk to the
rear-facing child is so great, if the airbag
deploys.
{Warning
A child in a rear-facing child restraint can
be seriously injured or killed if the front
outboard passenger frontal airbag
inflates. This is because the back of the
rear-facing child restraint would be very
(Continued)
Warning (Continued)
close to the inflating airbag. A child in a
forward-facing child restraint can be
seriously injured or killed if the front
outboard passenger frontal airbag inflates
and the passenger seat is in a forward
position.
Even if the passenger sensing system has
turned off the front outboard passenger
frontal airbag, no system is fail-safe. No
one can guarantee that an airbag will not
deploy under some unusual circumstance,
even though it is turned off.
Secure rear-facing child restraints in a
rear seat, even if the airbag is off. If you
secure a forward-facing child restraint in
the front outboard passenger seat,
always move the seat as far back as it
will go. It is better to secure the child
restraint in a rear seat.
SeePassenger Sensing System 069 for
additional information.
If the child restraint uses a top tether, see
Lower Anchors and Tethers for Children
(LATCH System) 080 for top tether anchor
locations.
Page 93 of 461

Cadillac Escalade Owner Manual (GMNA-Localizing-U.S./Canada/Mexico-
16417396) - 2023 - CRC - 5/9/22
Seats and Restraints 91
6. To tighten the belt, push down on thechild restraint, pull the shoulder portion
of the belt to tighten the lap portion of
the belt, and feed the shoulder belt back
into the retractor.
There must be finger clearance between
the push button and the child restraint.
If there is not clearance between the
buckle push button and the child
restraint, move the seat upward and
repeat prior installation steps. Otherwise
secure the child restraint in a rear seat.
When installing a forward-facing child
restraint, it may be helpful to use your
knee to push down on the child restraint
as you tighten the belt. Try to pull the belt out of the retractor
to make sure the retractor is locked.
If the retractor is not locked, repeat
Steps 5 and 6.
7. Before placing a child in the child restraint, make sure it is securely held in
place. To check, grasp the child restraint
at the seat belt path and attempt to
move it side to side and back and forth.
When the child restraint is properly
installed, there should be no more than
2.5 cm (1 in) of movement.
If the airbag is off, the OFF indicator in the
passenger airbag status indicator will come
on and stay on when the vehicle is started.
If a child restraint has been installed and
the ON indicator is lit, see “If the On
Indicator Is Lit for a Child Restraint” under
Passenger Sensing System 069.
To remove the child restraint, unbuckle the
vehicle seat belt and let it return to the
stowed position.
Page 98 of 461

Cadillac Escalade Owner Manual (GMNA-Localizing-U.S./Canada/Mexico-
16417396) - 2023 - CRC - 5/9/22
96 Storage
{Warning
Before driving and occasionally during a
trip, check that cargo is securely fastened,
rests evenly between the cross rails and
does not block the vehicle's lamps or
windows. Never load cargo directly on
the roof of the vehicle or allow cargo to
hang over the rear or sides of the vehicle.
Never load cargo without first properly
installing cross rails and other accessories
designed to carry cargo. Personal injury,
death or damage to the vehicle or other
property may occur.
If driving for a long distance, on rough
roads, or at high speeds, occasionally stop
the vehicle to make sure the cargo remains
in its place.
Cargo Weight Limits
Do not exceed the maximum cargo weight
for the roof rack system, including the
weight of the cross rails and any other
accessories used to carry the cargo such as
bike racks or roof boxes. The maximum
cargo weight that can be loaded onto the
roof rack system is 100 kg (220 lb) or the weight designated in the instructions that
came with the cross rails or other roof rack
accessories, whichever is less.
{Warning
Never load the roof rack with more
weight than specified in this section.
Loading cargo on the roof rack will make
the vehicle's center of gravity higher. To
avoid losing control of the vehicle, avoid
overloading, high speeds, sudden starts,
sharp turns, sudden braking, or abrupt
maneuvers when carrying cargo on the
roof rack.
The weight of any cargo carried on the roof
rack system must be included in calculating
the loaded weight of the vehicle. Do not
exceed the maximum vehicle capacity when
loading the vehicle, including cargo carried
on the roof rack system and passengers
and cargo carried in the vehicle. For more
information on vehicle capacity and loading,
see Vehicle Load Limits 0215.
Page 99 of 461
Cadillac Escalade Owner Manual (GMNA-Localizing-U.S./Canada/Mexico-
16417396) - 2023 - CRC - 5/9/22
Instruments and Controls 97
Instruments and Controls
Controls
Steering Wheel Adjustment . . . . . . . . . . . . 98
Heated Steering Wheel . . . . . . . . . . . . . . . . . 98
Horn . . . . . . . . . . . . . . . . . . . . . . . . . . . . . . . . . . . 98
Windshield Wiper/Washer . . . . . . . . . . . . . 98
Rear Window Wiper/Washer . . . . . . . . . . 100
Compass . . . . . . . . . . . . . . . . . . . . . . . . . . . . . . . 101
Clock . . . . . . . . . . . . . . . . . . . . . . . . . . . . . . . . . . 102
Power Outlets . . . . . . . . . . . . . . . . . . . . . . . . . 102
Wireless Charging . . . . . . . . . . . . . . . . . . . . . 104
Warning Lights, Gauges, and Indicators
Warning Lights, Gauges, andIndicators . . . . . . . . . . . . . . . . . . . . . . . . . . . . 106
Instrument Cluster . . . . . . . . . . . . . . . . . . . . . 107
Speedometer . . . . . . . . . . . . . . . . . . . . . . . . . . 108
Odometer . . . . . . . . . . . . . . . . . . . . . . . . . . . . . 108
Trip Odometer . . . . . . . . . . . . . . . . . . . . . . . . 108
Tachometer . . . . . . . . . . . . . . . . . . . . . . . . . . . 108
Fuel Gauge . . . . . . . . . . . . . . . . . . . . . . . . . . . . 108
Engine Oil Pressure Gauge . . . . . . . . . . . . 109
Engine Coolant Temperature Gauge . . . . 110
Transmission Temperature Gauge . . . . . . 110
Voltmeter Gauge . . . . . . . . . . . . . . . . . . . . . . . 111
Seat Belt Reminders . . . . . . . . . . . . . . . . . . . . 112
Airbag Readiness Light . . . . . . . . . . . . . . . . . 113
Passenger Airbag Status Indicator . . . . . . 113
Charging System Light . . . . . . . . . . . . . . . . . 114 Malfunction Indicator Lamp (Check
Engine Light) . . . . . . . . . . . . . . . . . . . . . . . . . 114
Brake System Warning Light . . . . . . . . . . . 115
Electric Parking Brake Light . . . . . . . . . . . . 116
Service Electric Parking Brake Light . . . . 116
Antilock Brake System (ABS) Warning Light . . . . . . . . . . . . . . . . . . . . . . . . . . . . . . . . . 117
Four-Wheel-Drive Light . . . . . . . . . . . . . . . . . 117
Automatic Vehicle Hold (AVH) Light . . . . 117
Lane Keep Assist (LKA) Light . . . . . . . . . . . 117
Automatic Emergency Braking (AEB) Disabled Light . . . . . . . . . . . . . . . . . . . . . . . . 118
Vehicle Ahead Indicator . . . . . . . . . . . . . . . . 118
Pedestrian Ahead Indicator . . . . . . . . . . . . . 118
Traction Off Light . . . . . . . . . . . . . . . . . . . . . . 118
StabiliTrak OFF Light . . . . . . . . . . . . . . . . . . . 119
Traction Control System (TCS)/ StabiliTrak Light . . . . . . . . . . . . . . . . . . . . . . 119
Engine Coolant Temperature Warning Light . . . . . . . . . . . . . . . . . . . . . . . . . . . . . . . . . 119
Driver Mode Control Light . . . . . . . . . . . . . 120
Four Corner Air Suspension Light . . . . . . 120
Tire Pressure Light . . . . . . . . . . . . . . . . . . . . . 121
Engine Oil Pressure Light . . . . . . . . . . . . . . 122
Low Fuel Warning Light . . . . . . . . . . . . . . . . 122
Security Light . . . . . . . . . . . . . . . . . . . . . . . . . . 122
High-Beam On Light . . . . . . . . . . . . . . . . . . . 123
Adaptive Forward Lighting (AFL) Light . . . . . . . . . . . . . . . . . . . . . . . . . . . . . . . . . 123
Lamps On Reminder . . . . . . . . . . . . . . . . . . . 123 Cruise Control Light . . . . . . . . . . . . . . . . . . . . 123
Door Ajar Light . . . . . . . . . . . . . . . . . . . . . . . . 124
Information Displays
Driver Information Center (DIC) . . . . . . . . 124
Vehicle Information . . . . . . . . . . . . . . . . . . . . 127
Head-Up Display (HUD) . . . . . . . . . . . . . . . . 127
Vehicle Messages
Vehicle Messages . . . . . . . . . . . . . . . . . . . . . . 130
Engine Power Messages . . . . . . . . . . . . . . . 130
Vehicle Speed Messages . . . . . . . . . . . . . . . 131
Universal Remote System
Universal Remote System . . . . . . . . . . . . . . 131
Universal Remote System
Programming . . . . . . . . . . . . . . . . . . . . . . . . . 131
Universal Remote System Operation . . . 133
Page 103 of 461

Cadillac Escalade Owner Manual (GMNA-Localizing-U.S./Canada/Mexico-
16417396) - 2023 - CRC - 5/9/22
Instruments and Controls 101
INT :Turns on the rear wiper with a delay
between wipes.
ON : Turns on the rear wiper.
1:Push the windshield wiper lever
forward to spray washer fluid on the rear
window. The wipers will clear the rear
window and either stop or return to your
preset speed. For more washer cycles, push
and hold the lever.
The rear window wiper/washer will not
operate if the liftgate is open or ajar. If the
liftgate is opened while the rear wiper is on,
the wiper returns to the parked position and
stops.
See “Rear Camera Washer” later in this
section.
Rear Wiper Arm Assembly Protection
When using an automatic car wash, move
the rear wiper control to OFF to disable the
rear wiper. In some vehicles, if the
transmission is in N (Neutral) and the
vehicle speed is very slow, the rear wiper
will automatically park under the rear
spoiler.
The wiper operations return to normal when
the transmission is no longer in N (Neutral)
or the vehicle speed has increased. Auto Wipe in Reverse Gear
If the rear wiper control is off, the rear
wiper will automatically operate
continuously when the transmission is in
R (Reverse), and the front windshield wiper
is performing low or high speed wipes.
If the rear wiper control is off, the
transmission is in R (Reverse), and the front
windshield wiper is performing INT wipes,
then the rear wiper automatically performs
INT wipes.
This feature can be turned on or off. See
“Auto Wipe in Reverse Gear”
under Settings
> Vehicle > Comfort and Convenience > Auto
Wipe in Reverse Gear.
The windshield washer reservoir is used for
the windshield, rear window, and rear mirror
camera, if equipped. See Rear Camera Mirror
0 32. Check the fluid level in the reservoir if
either washer is not working. See Washer
Fluid 0351.
Rear Camera Washer
If equipped, push the windshield wiper lever
forward to spray washer fluid on the rear
camera lens. The lever returns to its starting
position when released. See Rear Camera
Mirror 032.
Activating the Rear Camera Washer also
cleans the rear window.
Compass
The vehicle may have a compass display on
the Instrument Cluster. The compass receives
its heading and other information from the
Global Positioning System (GPS) antenna,
StabiliTrak/Electronic Stability Control (ESC),
and vehicle speed information.
The compass system is designed to operate
for a certain number of miles or degrees of
turn before needing a signal from the GPS
Page 108 of 461

Cadillac Escalade Owner Manual (GMNA-Localizing-U.S./Canada/Mexico-
16417396) - 2023 - CRC - 5/9/22
106 Instruments and Controls
THIS SOFTWARE IS PROVIDED BY THE
COPYRIGHT HOLDERS AND CONTRIBUTORS
"AS IS" AND ANY EXPRESS OR IMPLIED
WARRANTIES, INCLUDING, BUT NOT LIMITED
TO, THE IMPLIED WARRANTIES OF
MERCHANTABILITY AND FITNESS FOR A
PARTICULAR PURPOSE ARE DISCLAIMED. IN
NO EVENT SHALL THE COPYRIGHT HOLDER
OR CONTRIBUTORS BE LIABLE FOR ANY
DIRECT, INDIRECT, INCIDENTAL, SPECIAL,
EXEMPLARY, OR CONSEQUENTIAL DAMAGES
(INCLUDING, BUT NOT LIMITED TO,
PROCUREMENT OF SUBSTITUTE GOODS OR
SERVICES; LOSS OF USE, DATA, OR PROFITS;
OR BUSINESS INTERRUPTION) HOWEVER
CAUSED AND ON ANY THEORY OF LIABILITY,
WHETHER IN CONTRACT, STRICT LIABILITY, OR
TORT (INCLUDING NEGLIGENCE OR
OTHERWISE) ARISING IN ANY WAY OUT OF
THE USE OF THIS SOFTWARE, EVEN IF
ADVISED OF THE POSSIBILITY OF SUCH
DAMAGE.Warning Lights, Gauges, and
Indicators
Warning lights and gauges can signal that
something is wrong before it becomes
serious enough to cause an expensive repair
or replacement. Paying attention to the
warning lights and gauges could prevent
injury.
Some warning lights come on briefly when
the engine is started to indicate they are
working. When one of the warning lights
comes on and stays on while driving,
or when one of the gauges shows there
may be a problem, check the section that
explains what to do. Waiting to do repairs
can be costly and even dangerous.
Page 111 of 461

Cadillac Escalade Owner Manual (GMNA-Localizing-U.S./Canada/Mexico-
16417396) - 2023 - CRC - 5/9/22
Instruments and Controls 109
There is an arrow near the fuel gauge
pointing to the side of the vehicle the fuel
door is on.
When the indicator nears empty, the low
fuel light comes on. There still is a little fuel
left, but the vehicle should be refueled soon.
The fuel gauge may:
.Take a little more, or less fuel to fill up
than it indicates. For example, the gauge
may have indicated the tank is half full,
but it actually will take a little more,
or less than half the tank's capacity to fill
the tank.
.Moves a little while turning a corner,
speeding up, or braking.
.Take a few seconds to stabilize after the
ignition is turned on and goes back to
empty when the ignition is turned off.
These are normal conditions, none of which
indicate a problem with the fuel gauge.
Engine Oil Pressure Gauge
Metric
English The engine oil pressure gauge shows the
engine oil pressure in kPa (kilopascals)
or psi (pounds per square inch) when the
engine is running.
This gauge displays on the infotainment
display. If show in cluster is selected a
digital value is shown on the instrument
cluster in the left zone.
Oil pressure can vary with engine speed,
outside temperature, coolant temperature,
and oil viscosity.
On some models, the oil pump will vary
engine oil pressure according to engine
needs. Oil pressure may change quickly as
the engine speed or load varies. This is
normal. If the oil pressure warning light or
Driver Information Center (DIC) message
indicates oil pressure outside the normal
operating range, check the vehicle's oil as
soon as possible.
See
Engine Oil 0342.
Caution
Lack of proper engine oil maintenance
can damage the engine. Driving with the
engine oil low can also damage the
engine. The repairs would not be covered
(Continued)
Page 112 of 461

Cadillac Escalade Owner Manual (GMNA-Localizing-U.S./Canada/Mexico-
16417396) - 2023 - CRC - 5/9/22
110 Instruments and Controls
Caution (Continued)
by the vehicle warranty. Check the oil
level as soon as possible. Add oil if
required, but if the oil level is within the
operating range and the oil pressure is
still low, have the vehicle serviced.
Always follow the maintenance schedule
for changing engine oil.
Engine Coolant Temperature
Gauge
Metric
English
The engine coolant temperature gauge
measures the temperature of the vehicle's
engine.
This gauge displays on the infotainment
display. If show in cluster is selected a
digital value is shown on the instrument
cluster in the left zone.
While driving under normal operating
conditions, if the needle moves into the red
area, the engine is too hot. Pull off the road,
stop the vehicle, and turn off the engine as
soon as possible.
Transmission Temperature Gauge
Metric
English