remote control CADILLAC ESCALADE ESV 2009 Owner's Manual
[x] Cancel search | Manufacturer: CADILLAC, Model Year: 2009, Model line: ESCALADE ESV, Model: CADILLAC ESCALADE ESV 2009Pages: 602, PDF Size: 5.18 MB
Page 268 of 602
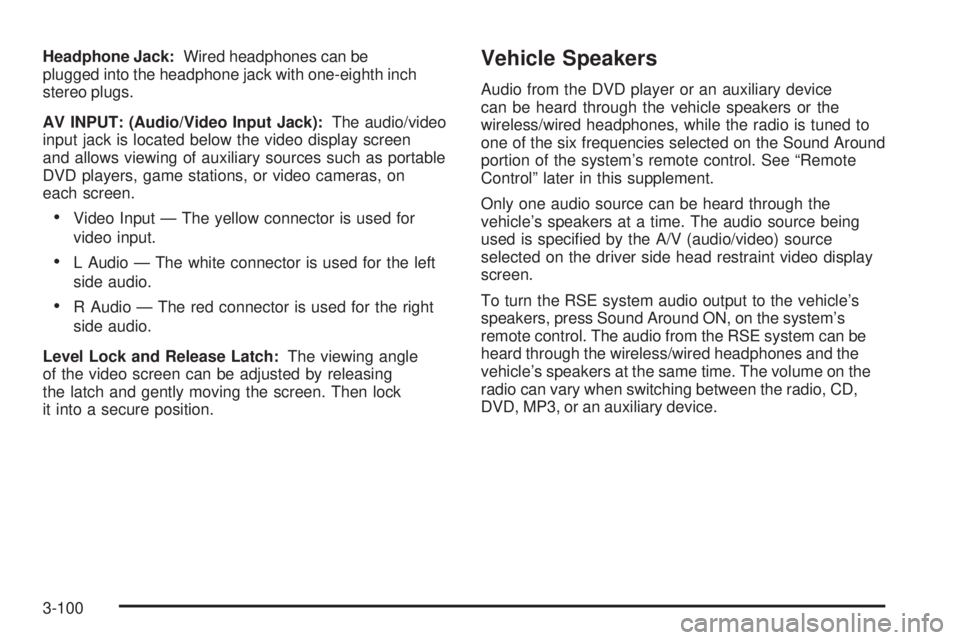
Headphone Jack: Wired headphones can be
plugged into the headphone jack with one-eighth inch
stereo plugs.
AV INPUT: (Audio/Video Input Jack): The audio/video
input jack is located below the video display screen
and allows viewing of auxiliary sources such as portable
DVD players, game stations, or video cameras, on
each screen.
Video Input — The yellow connector is used for
video input.
L Audio — The white connector is used for the left
side audio.
R Audio — The red connector is used for the right
side audio.
Level Lock and Release Latch: The viewing angle
of the video screen can be adjusted by releasing
the latch and gently moving the screen. Then lock
it into a secure position. Vehicle Speakers Audio from the DVD player or an auxiliary device
can be heard through the vehicle speakers or the
wireless/wired headphones, while the radio is tuned to
one of the six frequencies selected on the Sound Around
portion of the system’s remote control. See “Remote
Control” later in this supplement.
Only one audio source can be heard through the
vehicle’s speakers at a time. The audio source being
used is speci�ed by the A/V (audio/video) source
selected on the driver side head restraint video display
screen.
To turn the RSE system audio output to the vehicle’s
speakers, press Sound Around ON, on the system’s
remote control. The audio from the RSE system can be
heard through the wireless/wired headphones and the
vehicle’s speakers at the same time. The volume on the
radio can vary when switching between the radio, CD,
DVD, MP3, or an auxiliary device.
3-100
Page 269 of 602
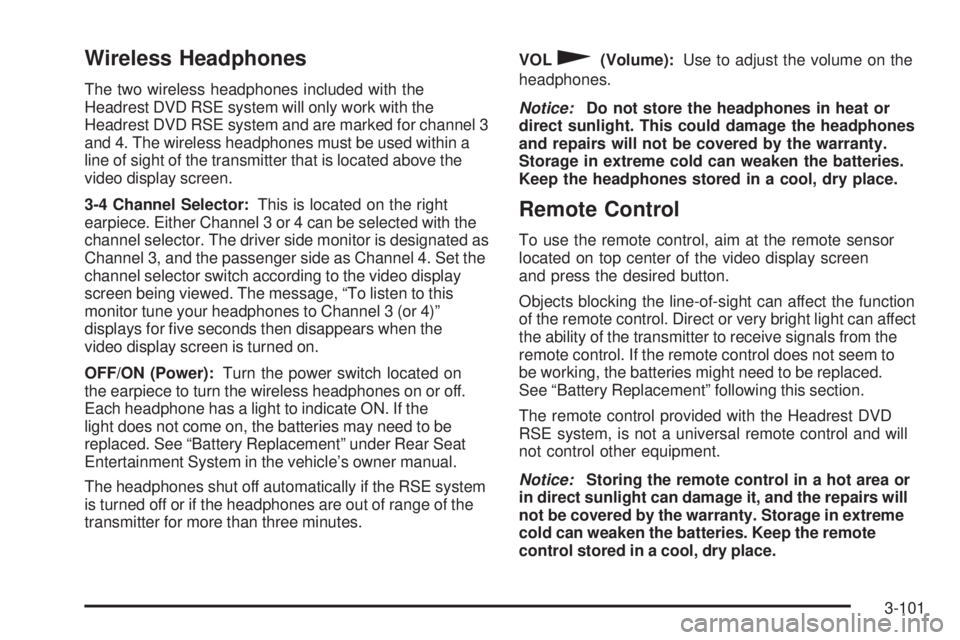
Wireless Headphones The two wireless headphones included with the
Headrest DVD RSE system will only work with the
Headrest DVD RSE system and are marked for channel 3
and 4. The wireless headphones must be used within a
line of sight of the transmitter that is located above the
video display screen.
3-4 Channel Selector: This is located on the right
earpiece. Either Channel 3 or 4 can be selected with the
channel selector. The driver side monitor is designated as
Channel 3, and the passenger side as Channel 4. Set the
channel selector switch according to the video display
screen being viewed. The message, “To listen to this
monitor tune your headphones to Channel 3 (or 4)”
displays for �ve seconds then disappears when the
video display screen is turned on.
OFF/ON (Power): Turn the power switch located on
the earpiece to turn the wireless headphones on or off.
Each headphone has a light to indicate ON. If the
light does not come on, the batteries may need to be
replaced. See “Battery Replacement” under Rear Seat
Entertainment System in the vehicle’s owner manual.
The headphones shut off automatically if the RSE system
is turned off or if the headphones are out of range of the
transmitter for more than three minutes. VOL
0 (Volume): Use to adjust the volume on the
headphones.
Notice: Do not store the headphones in heat or
direct sunlight. This could damage the headphones
and repairs will not be covered by the warranty.
Storage in extreme cold can weaken the batteries.
Keep the headphones stored in a cool, dry place.
Remote Control To use the remote control, aim at the remote sensor
located on top center of the video display screen
and press the desired button.
Objects blocking the line-of-sight can affect the function
of the remote control. Direct or very bright light can affect
the ability of the transmitter to receive signals from the
remote control. If the remote control does not seem to
be working, the batteries might need to be replaced.
See “Battery Replacement” following this section.
The remote control provided with the Headrest DVD
RSE system, is not a universal remote control and will
not control other equipment.
Notice: Storing the remote control in a hot area or
in direct sunlight can damage it, and the repairs will
not be covered by the warranty. Storage in extreme
cold can weaken the batteries. Keep the remote
control stored in a cool, dry place.
3-101
Page 270 of 602
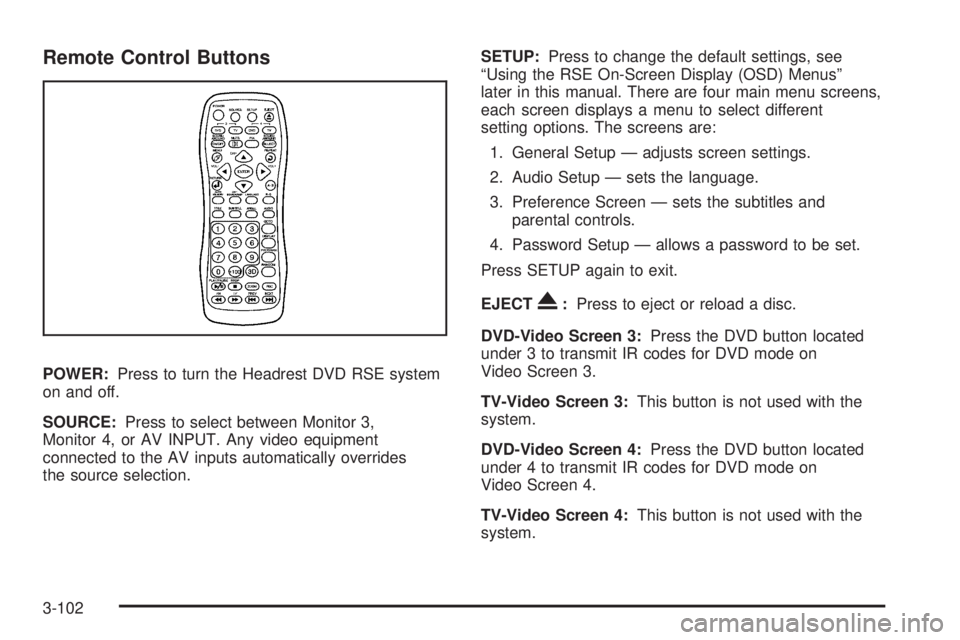
Remote Control Buttons
POWER: Press to turn the Headrest DVD RSE system
on and off.
SOURCE: Press to select between Monitor 3,
Monitor 4, or AV INPUT. Any video equipment
connected to the AV inputs automatically overrides
the source selection. SETUP: Press to change the default settings, see
“Using the RSE On-Screen Display (OSD) Menus”
later in this manual. There are four main menu screens,
each screen displays a menu to select different
setting options. The screens are:
1. General Setup — adjusts screen settings.
2. Audio Setup — sets the language.
3. Preference Screen — sets the subtitles and
parental controls.
4. Password Setup — allows a password to be set.
Press SETUP again to exit.
EJECT
X : Press to eject or reload a disc.
DVD-Video Screen 3: Press the DVD button located
under 3 to transmit IR codes for DVD mode on
Video Screen 3.
TV-Video Screen 3: This button is not used with the
system.
DVD-Video Screen 4: Press the DVD button located
under 4 to transmit IR codes for DVD mode on
Video Screen 4.
TV-Video Screen 4: This button is not used with the
system.
3-102
Page 272 of 602

TITLE: Press to enter the disc title mode. The title
feature is disc-speci�c, and may not be available on
all discs.
SUBTITLE: Press to change the subtitle language to
another available language or to turn subtitles off.
ANGLE: Press to select a different viewing angle for
discs that are recorded with different camera angles.
AUDIO: Press to select a different language for
discs that are recorded with different languages.
0-9 (Numbers): The numbers located on the lower
left side of the remote control can be used to enter
numbered menu options, channels, or track numbers.
GOTO: Press to enter the GOTO menu to choose
a desired title, chapter, track, or song inside the disc.
DISPLAY: Press to scroll through display information
on the upper left corner of the screen, such as title,
chapter/track, time elapsed, and time remaining,
or to turn off the display
PROGRAM: Press to edit a playback program
containing desired titles in the DVD or tracks in
the CD-DA.
3D: Press to change between different 3D audio modes
for DVD or CD.
The options for DVD are: Off, Rock, Pop, Live, Dance,
Techno, Classic, and Soft. The options for CD are: Off, Concert, Living room, Hall,
Bathroom Cave, Arena, and Church.
RANDOM: Press to play titles randomly.
PLAY/PAUSE
r /
j : Press to start playback of the
disc, or to pause playback.
STOP
c : Press to stop playback of a disc.
To resume disc playback, press PLAY.
To start playback from the beginning of the disc,
press STOP, STOP, then PLAY.
ZOOM: Press to either enlarge the viewed image by
2X, 3X, and 4X, or reduce the image by 1/2X, 1/3X,
and 1/4X.
PBC (Playback Control): Press to turn video CD
playback control on or off.
FR
r (Fast Reverse): Press to fast reverse the disc.
Press multiple times to choose between 2X, 4X, 8X,
16X, and 32X speeds.
FF
[ (Fast Forward): Press to fast forward the disc.
Press multiple times to choose between 2X, 4X, 8X,
16X, and 32X speeds.
3-104
Page 273 of 602
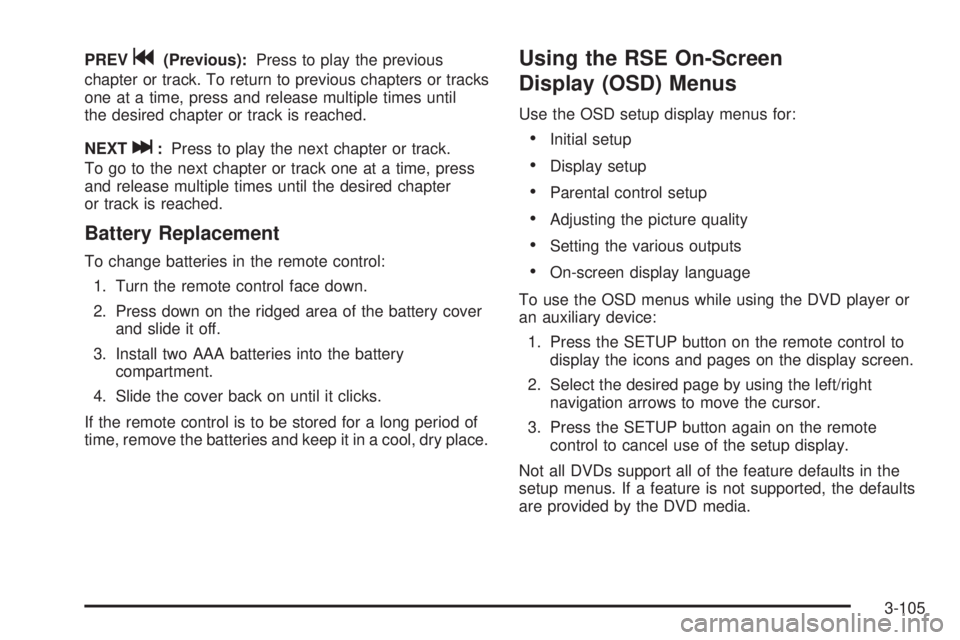
PREV
g (Previous): Press to play the previous
chapter or track. To return to previous chapters or tracks
one at a time, press and release multiple times until
the desired chapter or track is reached.
NEXT
l : Press to play the next chapter or track.
To go to the next chapter or track one at a time, press
and release multiple times until the desired chapter
or track is reached.
Battery Replacement To change batteries in the remote control:
1. Turn the remote control face down.
2. Press down on the ridged area of the battery cover
and slide it off.
3. Install two AAA batteries into the battery
compartment.
4. Slide the cover back on until it clicks.
If the remote control is to be stored for a long period of
time, remove the batteries and keep it in a cool, dry place. Using the RSE On-Screen
Display (OSD) Menus Use the OSD setup display menus for:
Initial setup
Display setup
Parental control setup
Adjusting the picture quality
Setting the various outputs
On-screen display language
To use the OSD menus while using the DVD player or
an auxiliary device:
1. Press the SETUP button on the remote control to
display the icons and pages on the display screen.
2. Select the desired page by using the left/right
navigation arrows to move the cursor.
3. Press the SETUP button again on the remote
control to cancel use of the setup display.
Not all DVDs support all of the feature defaults in the
setup menus. If a feature is not supported, the defaults
are provided by the DVD media.
3-105
Page 274 of 602
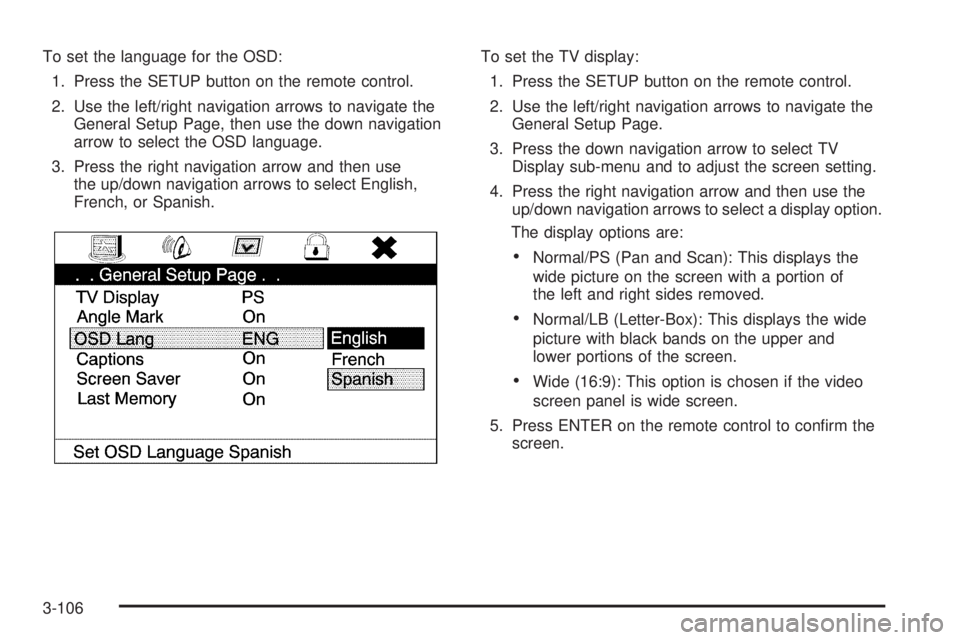
To set the language for the OSD:
1. Press the SETUP button on the remote control.
2. Use the left/right navigation arrows to navigate the
General Setup Page, then use the down navigation
arrow to select the OSD language.
3. Press the right navigation arrow and then use
the up/down navigation arrows to select English,
French, or Spanish. To set the TV display:
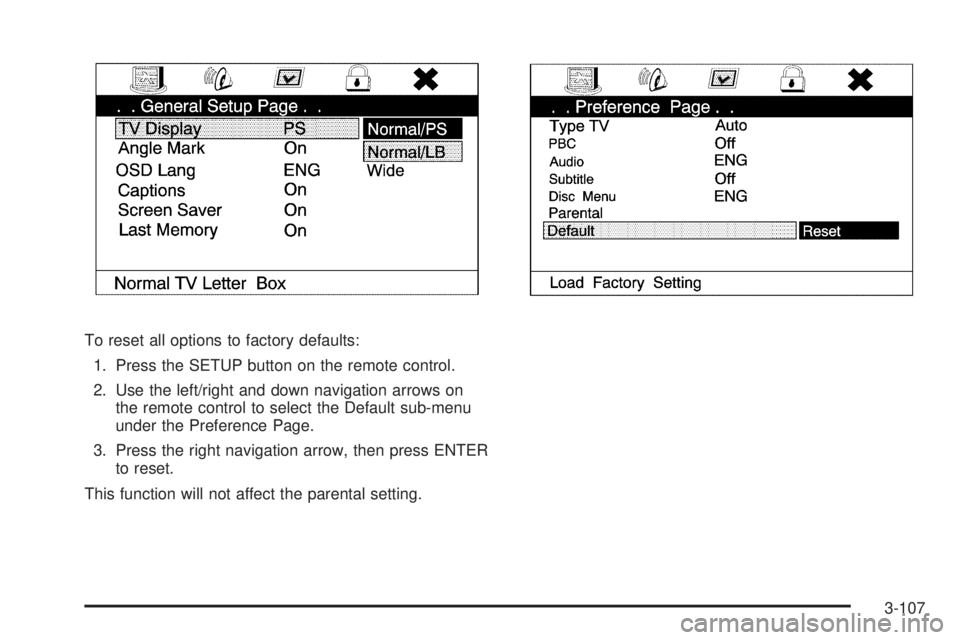
1. Press the SETUP button on the remote control.
2. Use the left/right navigation arrows to navigate the
General Setup Page.
3. Press the down navigation arrow to select TV
Display sub-menu and to adjust the screen setting.
4. Press the right navigation arrow and then use the
up/down navigation arrows to select a display option.
The display options are:
Normal/PS (Pan and Scan): This displays the
wide picture on the screen with a portion of
the left and right sides removed.
Normal/LB (Letter-Box): This displays the wide
picture with black bands on the upper and
lower portions of the screen.
Wide (16:9): This option is chosen if the video
screen panel is wide screen.
5. Press ENTER on the remote control to con�rm the
screen.
3-106
Page 275 of 602
To reset all options to factory defaults:
1. Press the SETUP button on the remote control.
2. Use the left/right and down navigation arrows on
the remote control to select the Default sub-menu
under the Preference Page.
3. Press the right navigation arrow, then press ENTER
to reset.
This function will not affect the parental setting.
3-107
Page 276 of 602
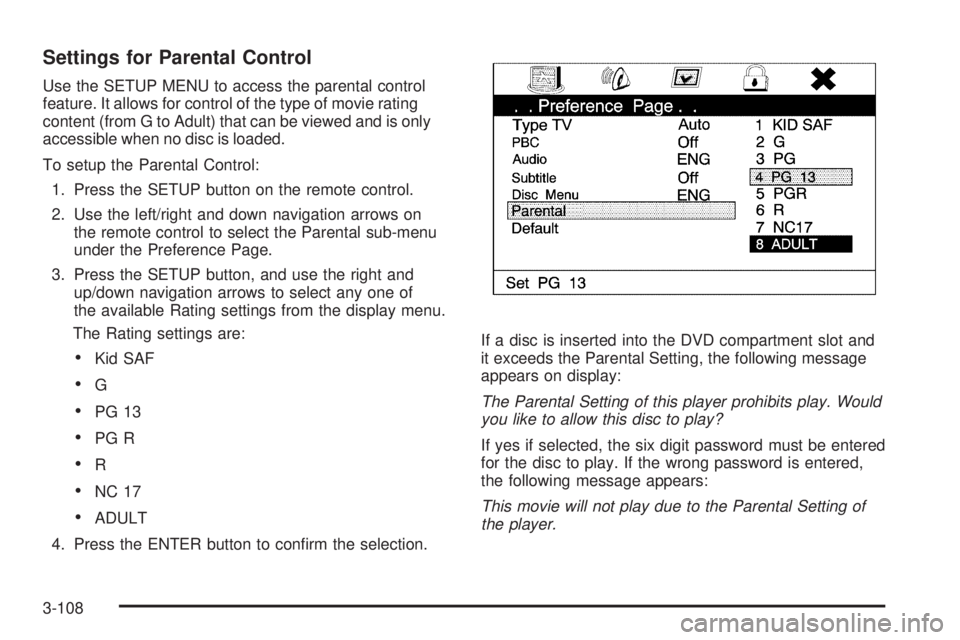
Settings for Parental Control Use the SETUP MENU to access the parental control
feature. It allows for control of the type of movie rating
content (from G to Adult) that can be viewed and is only
accessible when no disc is loaded.
To setup the Parental Control:
1. Press the SETUP button on the remote control.
2. Use the left/right and down navigation arrows on
the remote control to select the Parental sub-menu
under the Preference Page.
3. Press the SETUP button, and use the right and
up/down navigation arrows to select any one of
the available Rating settings from the display menu.
The Rating settings are:
Kid SAF
G
PG 13
PG R
R
NC 17
ADULT
4. Press the ENTER button to con�rm the selection. If a disc is inserted into the DVD compartment slot and
it exceeds the Parental Setting, the following message
appears on display:
The Parental Setting of this player prohibits play. Would
you like to allow this disc to play?
If yes if selected, the six digit password must be entered
for the disc to play. If the wrong password is entered,
the following message appears:
This movie will not play due to the Parental Setting of
the player.
3-108
Page 277 of 602

To create a six digit password, use the numeric keypad
on the remote control. Press the ENTER button to
con�rm. The default password is 136900.
To change the Parental Control Password:
1. Press the SETUP button on the remote control
2. Navigate to the Password sub-menu under
the Password Setup Page.
3. Press the right navigation arrow, then press
ENTER.
4. At the Old Password option, enter the old password
or the default password (136900).
5. At the New Password option, enter the new
password (six digits) using numeric buttons.
6. At the Con�rm PWD option, con�rm the new
password by entering the new password again.
7. Scroll to the OK button and press ENTER.
The message “Your password has been changed”
displays.
3-109
Page 279 of 602
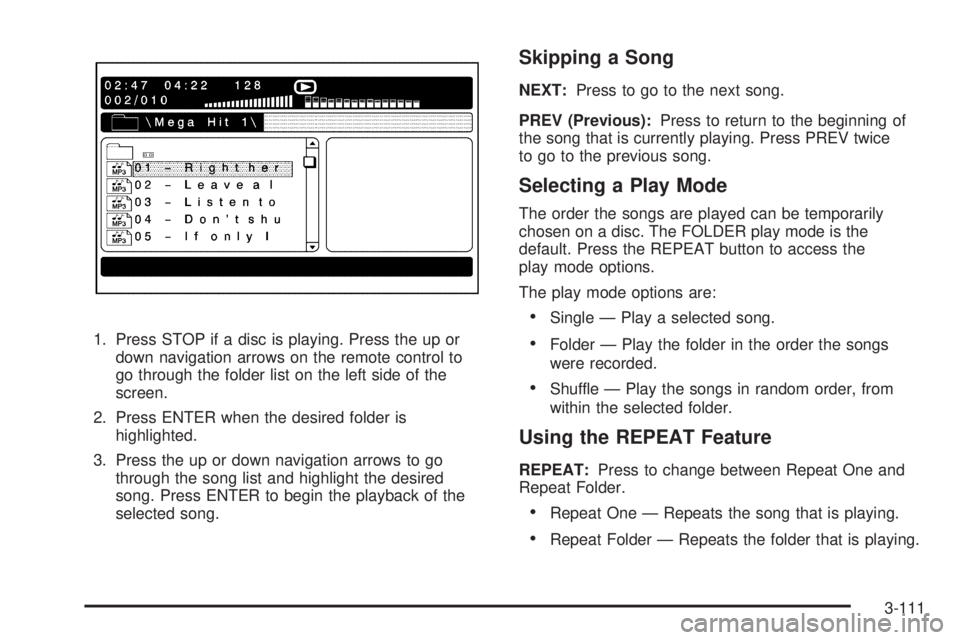
1. Press STOP if a disc is playing. Press the up or
down navigation arrows on the remote control to
go through the folder list on the left side of the
screen.
2. Press ENTER when the desired folder is
highlighted.
3. Press the up or down navigation arrows to go
through the song list and highlight the desired
song. Press ENTER to begin the playback of the
selected song. Skipping a Song NEXT: Press to go to the next song.
PREV (Previous): Press to return to the beginning of
the song that is currently playing. Press PREV twice
to go to the previous song.
Selecting a Play Mode The order the songs are played can be temporarily
chosen on a disc. The FOLDER play mode is the
default. Press the REPEAT button to access the
play mode options.
The play mode options are:
Single — Play a selected song.
Folder — Play the folder in the order the songs
were recorded.
Shuffle — Play the songs in random order, from
within the selected folder.
Using the REPEAT Feature REPEAT: Press to change between Repeat One and
Repeat Folder.
Repeat One — Repeats the song that is playing.
Repeat Folder — Repeats the folder that is playing.
3-111