clock setting CADILLAC ESCALADE ESV 2010 Owners Manual
[x] Cancel search | Manufacturer: CADILLAC, Model Year: 2010, Model line: ESCALADE ESV, Model: CADILLAC ESCALADE ESV 2010Pages: 620, PDF Size: 7.4 MB
Page 213 of 620

Black plate (21,1)Cadillac Escalade/Escalade ESV Owner Manual - 2010
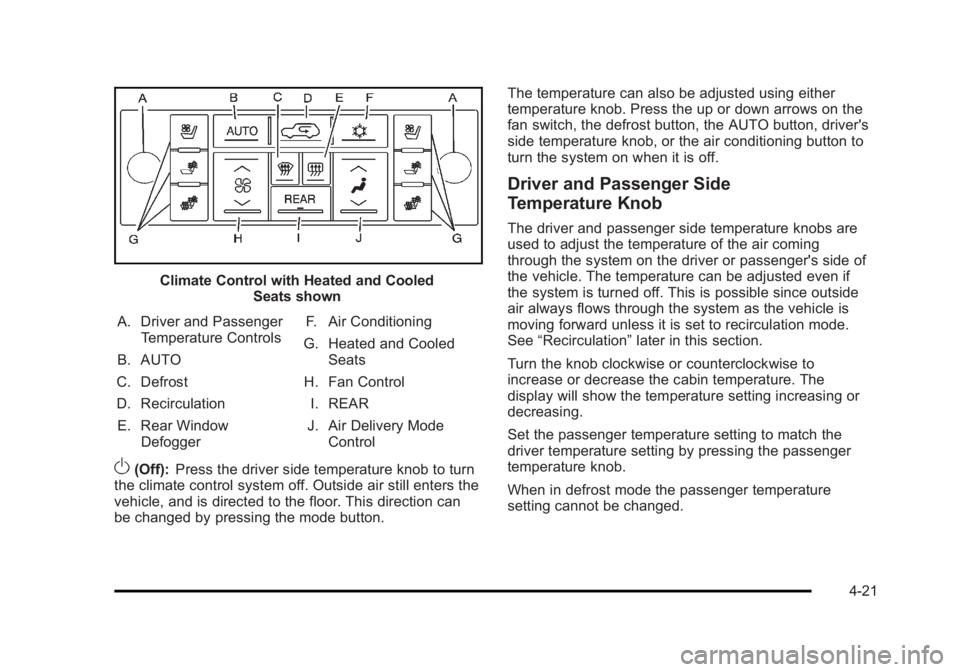
Climate Control with Heated and Cooled
Seats shown
A. Driver and Passenger
Temperature Controls
B. AUTO
C. Defrost
D. Recirculation
E. Rear Window
Defogger F. Air Conditioning
G. Heated and Cooled
Seats
H. Fan Control
I. REAR
J. Air Delivery Mode
Control
O (Off): Press the driver side temperature knob to turn
the climate control system off. Outside air still enters the
vehicle, and is directed to the floor. This direction can
be changed by pressing the mode button. The temperature can also be adjusted using either
temperature knob. Press the up or down arrows on the
fan switch, the defrost button, the AUTO button, driver's
side temperature knob, or the air conditioning button to
turn the system on when it is off.
Driver and Passenger Side
Temperature Knob The driver and passenger side temperature knobs are
used to adjust the temperature of the air coming
through the system on the driver or passenger's side of
the vehicle. The temperature can be adjusted even if
the system is turned off. This is possible since outside
air always flows through the system as the vehicle is
moving forward unless it is set to recirculation mode.
See “ Recirculation ” later in this section.
Turn the knob clockwise or counterclockwise to
increase or decrease the cabin temperature. The
display will show the temperature setting increasing or
decreasing.
Set the passenger temperature setting to match the
driver temperature setting by pressing the passenger
temperature knob.
When in defrost mode the passenger temperature
setting cannot be changed.
4-21
Page 305 of 620

Black plate (3,1)Cadillac Escalade/Escalade ESV Owner Manual - 2010
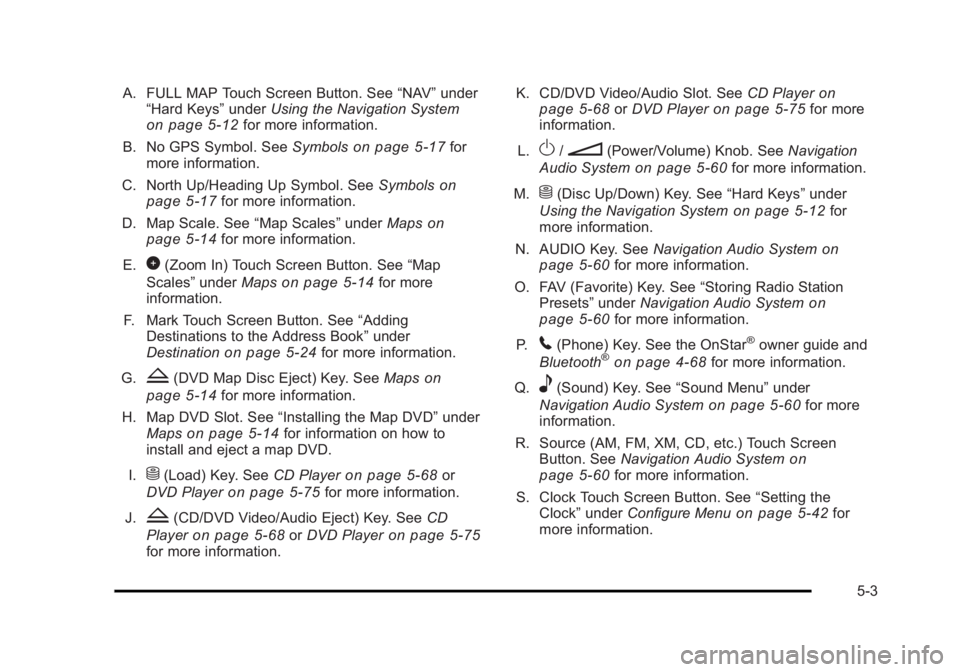
A. FULL MAP Touch Screen Button. See “ NAV ” under
“ Hard Keys ” under Using the Navigation System
on page 5 ‑ 12 for more information.
B. No GPS Symbol. See Symbols on page 5 ‑ 17 for
more information.
C. North Up/Heading Up Symbol. See Symbols
on
page 5 ‑ 17 for more information.
D. Map Scale. See “ Map Scales ” under Maps on
page 5 ‑ 14
for more information.
E.
0 (Zoom In) Touch Screen Button. See “ Map
Scales ” under Maps on page 5 ‑ 14 for more
information.
F. Mark Touch Screen Button. See “ Adding
Destinations to the Address Book ” under
Destination
on page 5 ‑ 24 for more information.
G.
Z (DVD Map Disc Eject) Key. See Maps on
page 5 ‑ 14 for more information.
H. Map DVD Slot. See “ Installing the Map DVD ” under
Maps
on page 5 ‑ 14 for information on how to
install and eject a map DVD.
I.
M (Load) Key. See CD Player on page 5 ‑ 68 or
DVD Player on page 5 ‑ 75 for more information.
J.
Z (CD/DVD Video/Audio Eject) Key. See CD
Player
on page 5 ‑ 68 or DVD Player on page 5 ‑ 75
for more information. K. CD/DVD Video/Audio Slot. See CD Player on
page 5 ‑ 68
or DVD Player on page 5 ‑ 75 for more
information.
L.
O /
n (Power/Volume) Knob. See Navigation
Audio System on page 5 ‑ 60 for more information.
M.
M (Disc Up/Down) Key. See “ Hard Keys ” under
Using the Navigation System on page 5 ‑ 12 for
more information.
N. AUDIO Key. See Navigation Audio System on
page 5 ‑ 60 for more information.
O. FAV (Favorite) Key. See “ Storing Radio Station
Presets ” under Navigation Audio System
on
page 5 ‑ 60 for more information.
P.
5 (Phone) Key. See the OnStar ®
owner guide and
Bluetooth ®
on page 4 ‑ 68 for more information.
Q.
e (Sound) Key. See “ Sound Menu ” under
Navigation Audio System
on page 5 ‑ 60 for more
information.
R. Source (AM, FM, XM, CD, etc.) Touch Screen
Button. See Navigation Audio System
on
page 5 ‑ 60 for more information.
S. Clock Touch Screen Button. See “ Setting the
Clock ” under Configure Menu on page 5 ‑ 42 for
more information.
5-3
Page 310 of 620

Black plate (8,1)Cadillac Escalade/Escalade ESV Owner Manual - 2010
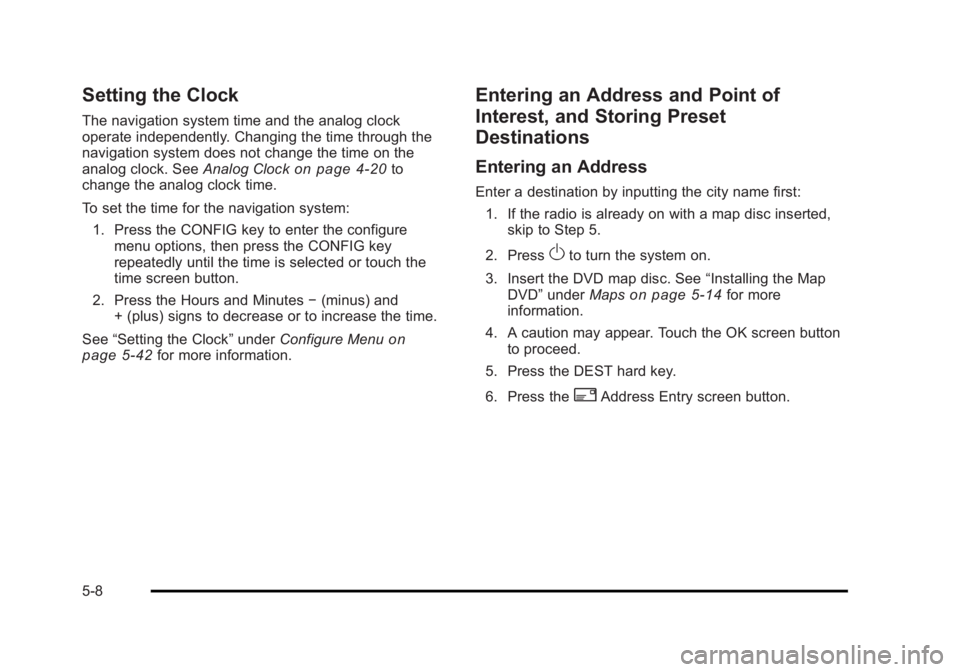
Setting the Clock The navigation system time and the analog clock
operate independently. Changing the time through the
navigation system does not change the time on the
analog clock. See Analog Clock
on page 4 ‑ 20 to
change the analog clock time.
To set the time for the navigation system:
1. Press the CONFIG key to enter the configure
menu options, then press the CONFIG key
repeatedly until the time is selected or touch the
time screen button.
2. Press the Hours and Minutes − (minus) and
+ (plus) signs to decrease or to increase the time.
See “ Setting the Clock ” under Configure Menu
on
page 5 ‑ 42
for more information. Entering an Address and Point of
Interest, and Storing Preset
Destinations Entering an Address Enter a destination by inputting the city name first:
1. If the radio is already on with a map disc inserted,
skip to Step 5.
2. Press
O to turn the system on.
3. Insert the DVD map disc. See “ Installing the Map
DVD ” under Maps on page 5 ‑ 14 for more
information.
4. A caution may appear. Touch the OK screen button
to proceed.
5. Press the DEST hard key.
6. Press the
2 Address Entry screen button.
5-8
Page 358 of 620
![CADILLAC ESCALADE ESV 2010 Owners Manual Black plate (56,1)Cadillac Escalade/Escalade ESV Owner Manual - 2010
Brightness/Contrast/Mode
Touch this screen button to change the brightness,
contrast, and mode of the display.
] (Brightness): Touc CADILLAC ESCALADE ESV 2010 Owners Manual Black plate (56,1)Cadillac Escalade/Escalade ESV Owner Manual - 2010
Brightness/Contrast/Mode
Touch this screen button to change the brightness,
contrast, and mode of the display.
] (Brightness): Touc](/img/23/58683/w960_58683-357.png)
Black plate (56,1)Cadillac Escalade/Escalade ESV Owner Manual - 2010
Brightness/Contrast/Mode
Touch this screen button to change the brightness,
contrast, and mode of the display.
] (Brightness): Touch the + (plus) or − (minus) screen
buttons to increase or decrease the brightness of the
screen.
_ (Contrast): Touch the + (plus) or − (minus) screen
buttons to increase or decrease the contrast of the
screen. Auto (Automatic): Touch this screen button for the
system to automatically adjust the screen background
depending on exterior lighting conditions.
Night: Touch this screen button and the system makes
the map background darker.
Day: Touch this screen button and the system makes
the map background brighter.
Setting the Clock The navigation system time and the analog clock
operate independently. Changing the time through the
navigation system does not change the time on the
analog clock. See Analog Clock
on page 4 ‑ 20 to
change the analog clock time.
Press the CONFIG key to enter the configure menu
options, then press the CONFIG key repeatedly until the
time is selected or touch the time screen button.
Hours: Press the − (minus) or + (plus) signs to
decrease or increase the hours.
Minutes: Press the − (minus) or + (plus) signs to
decrease or increase the minutes.
12/24 Format: Select the 12 screen button for standard
time; select the 24 screen button for military time.
5-56