CADILLAC SEVILLE 2001 5.G Owners Manual
Manufacturer: CADILLAC, Model Year: 2001, Model line: SEVILLE, Model: CADILLAC SEVILLE 2001 5.GPages: 371, PDF Size: 2.76 MB
Page 171 of 371
2-104
Driver Unlock in PARK (P)
Enter FEATURE PROGRAMMING by following the
previous instructions and then press the down arrow on
the INFO button one or more times until the DRIVER
UNLOCK IN PARK (P) prompt appears. This feature
will automatically unlock only the driver's door when
the vehicle is shifted into PARK (P). To turn the feature
on, press ON/OFF until ON is displayed on the DIC.
To turn the feature off, press ON/OFF until OFF
is displayed.
Driver Unlock Key Off
Enter FEATURE PROGRAMMING by following the
previous instructions and then press the down arrow on
the INFO button one or more times until the DRIVER
UNLOCK KEY OFF prompt appears. This feature will
automatically unlock only the driver's door when the
ignition key is turned to OFF. To turn the feature on,
press ON/OFF until ON is displayed on the DIC. To turn
the feature off, press ON/OFF until OFF is displayed.
Doors Unlock in PARK (P)
Enter FEATURE PROGRAMMING by following the
previous instructions and then press the down arrow on
the INFO button one or more times until the DOORS
UNLOCK IN PARK prompt appears. This feature will
automatically unlock all doors when the vehicle is
shifted into PARK (P). To turn the feature on, press
ON/OFF until ON is displayed on the DIC. To turn the
feature off, press ON/OFF until OFF is displayed.
Doors Unlock Key Off
Enter FEATURE PROGRAMMING by following the
previous instructions and then press the down arrow on
the INFO button one or more times until the DOORS
UNLOCK KEY OFF prompt appears. This feature will
automatically unlock all doors when the ignition key is
turned to OFF. To turn the feature on, press ON/OFF
until ON is displayed on the DIC. To turn the feature
off, press ON/OFF until OFF is displayed.
Page 172 of 371
2-105
Mirror To Curb In Reverse (If Equipped)
Press the down arrow on the INFO button one or more
times until the MIRROR TO CURB IN REV prompts
appears on the DIC display. This feature will move the
passenger's outside rearview mirror to a curb view
position when the console shifter is placed in
REVERSE (R) and it will return the mirror to the last
known driving position when the console shifter is
moved out of REVERSE (R). To turn this feature on,
press the ON/OFF button until ON is displayed on the
DIC. To turn the feature off, press the ON/OFF button
until OFF is displayed. For more information, see ªCurb
View Assist Mirrorº in the Index.
Tire Pressure Display (If Equipped)
To enter feature programming follow the instructions
listed previously, then press the down arrow on the
INFO button one or more times until the TIRE
PRESSURE DISPLAY prompt appears. This feature
will allow each of the four (left front, right front, left
rear, right rear) tire pressure readings to be displayed
when using the INFO button to scroll through the
DIC displays. To turn the feature on, press ON/OFF
until ON is displayed on the DIC. To turn the feature
off, press ON/OFF until OFF is displayed.Even with this feature programmed to be turned off a
low or high tire pressure condition will still cause the
CHECK TIRE PRESSURE message to be displayed on
the DIC. See ªDriver Information Center (DIC)
Messagesº in the Index for more information.
Driver's Names Set/Recall (If Equipped)
After the FEATURE PROGRAMMING prompt is
displayed on the DIC and the ON/OFF button is pressed,
the prompts DRIVER NO 1 or DRIVER NO 2 will
appear. These prompts correspond to which RKE
transmitter button or memory recall button has been
pressed on the driver's door armrest. You may have your
name and a second driver's name displayed here,
replacing the prompts DRIVER NO 1 and DRIVER
NO 2. A dealership can program your vehicle to display
the names you want. The names will appear whenever
the key is turned to ON only if RKE transmitters 1 or 2
are used to enter the vehicle or buttons 1 or 2 on the
driver's door are pressed.
Page 173 of 371
2-106
Comfort Controls and Radio
System Personalization
These features allow both drivers to personalize their
own climate control settings as well as their radio
settings. For more information, see ªClimate Control
Personalizationº and ªRadio Personalizationº in
the Index.
The outside temperature is always available for display
if it has been selected for a DIC display when your
vehicle is running unless an overriding DIC message
appears. You can change the temperature from
Fahrenheit to Celsius by pressing the ENG/MET
(English/metric) button on the instrument panel.
For more information on the DIC, see ªDIC Messagesº
in the Index.The electronic sensor can be affected by road or engine
heat during idling, slow driving or when the engine is
first started after a short trip. To ensure proper automatic
climate control operation, the outside air temperature
display may not update as quickly as expected. This is to
allow the air surrounding the outside temperature sensor
to be as close to the actual outside conditions as
possible. This is determined by how much time has
elapsed since the vehicle has been turned off and by
vehicle speed.
Continuous Variable Road Sensing
Suspension (CVRSS) - STS Only
The CVRSS automatically adjusts the ride of your
vehicle. Automatic ride control is achieved through a
computer used to control and monitor the suspension
system. The controller receives input from various
sensors to determine the proper system response. If the
controller detects a problem within the system, the DIC
will display a SERVICE SUSPENSION SYS message.
If this message appears, have your vehicle serviced at
your dealership.
Page 174 of 371

2-107
Oil Life Indicator
This feature lets you know when to change the engine
oil. It's based on the engine oil temperatures and your
driving patterns. To see the display, press the INFO
button several times until ENGINE OIL LIFE appears.
If you see 99% ENGINE OIL LIFE, 99 percent of your
current oil life remains.The DIC may display a CHANGE ENGINE OIL
message. Always keep a written record of the mileage
and date when you changed your oil. For more
information, see the Maintenance Schedule booklet.
If you see CHANGE ENGINE OIL, it means the
oil life is gone and you should change the oil right away.
The system doesn't check how much oil you have,
so you'll still have to check for that. To see how, see
ªEngine Oilº in the Index.
When the oil is changed, you'll need to reset the system.
See ªOil Life Indicator, How to Resetº in the Index.
Page 175 of 371
2-108
Navigation (Option)
Navigation Display and Controls
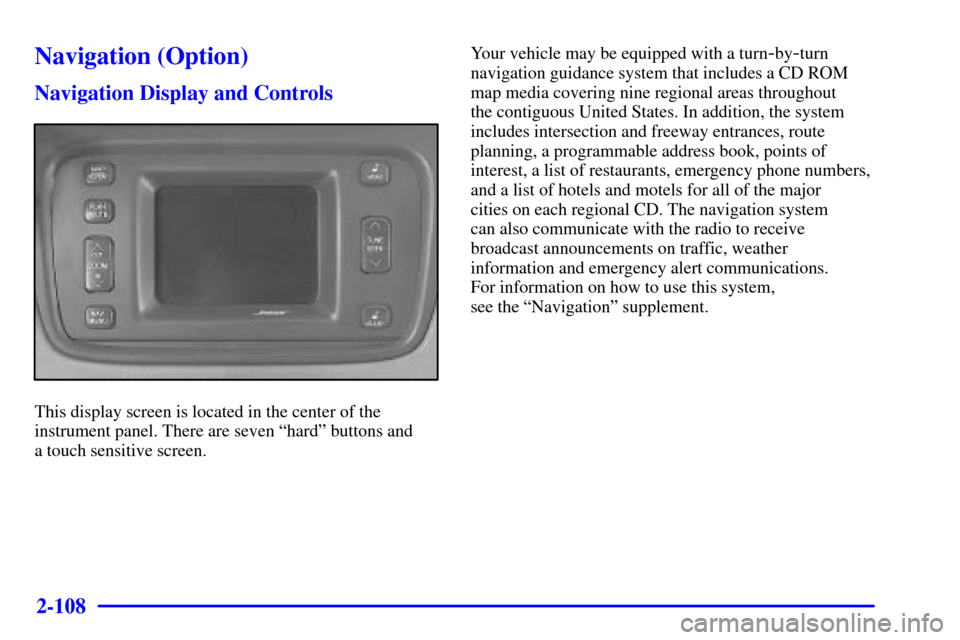
This display screen is located in the center of the
instrument panel. There are seven ªhardº buttons and
a touch sensitive screen.Your vehicle may be equipped with a turn
-by-turn
navigation guidance system that includes a CD ROM
map media covering nine regional areas throughout
the contiguous United States. In addition, the system
includes intersection and freeway entrances, route
planning, a programmable address book, points of
interest, a list of restaurants, emergency phone numbers,
and a list of hotels and motels for all of the major
cities on each regional CD. The navigation system
can also communicate with the radio to receive
broadcast announcements on traffic, weather
information and emergency alert communications.
For information on how to use this system,
see the ªNavigationº supplement.
Page 176 of 371
2-109
Ultrasonic Rear Parking Assist
(URPA) (Option)
Ultrasonic Rear Parking Assist can help you to
determine how close an object is to your rear bumper
within a given area, making parking easier.
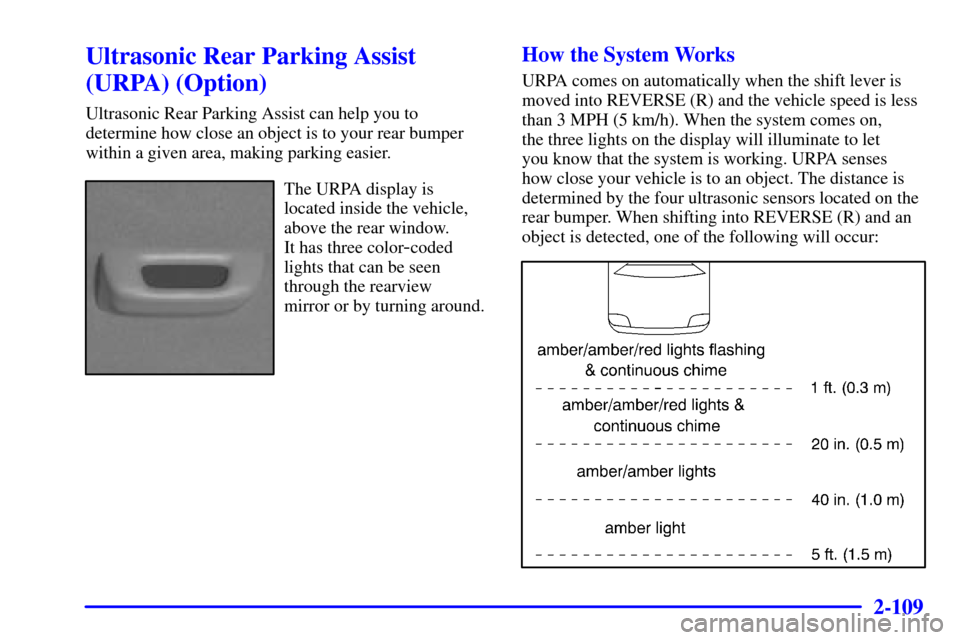
The URPA display is
located inside the vehicle,
above the rear window.
It has three color
-coded
lights that can be seen
through the rearview
mirror or by turning around.
How the System Works
URPA comes on automatically when the shift lever is
moved into REVERSE (R) and the vehicle speed is less
than 3 MPH (5 km/h). When the system comes on,
the three lights on the display will illuminate to let
you know that the system is working. URPA senses
how close your vehicle is to an object. The distance is
determined by the four ultrasonic sensors located on the
rear bumper. When shifting into REVERSE (R) and an
object is detected, one of the following will occur:
Page 177 of 371

2-110
A chime will sound the first time an object is detected.
URPA can detect objects 3 inches (7.6 cm) and wider,
and at least 10 inches (25.4 cm) tall, but it cannot detect
objects that are above trunk level. In order for the rear
sensors to recognize an object, it must be within
operating range.
If the URPA system is not functioning properly, the
display will flash red, indicating that there is a problem.
The light will also flash red while driving if a trailer is
attached to your vehicle, or a bicycle or object is on
the back of, or hanging out of your trunk. The light
will continue to flash until the trailer or the object is
removed and your vehicle is driven forward at least
15 mph (25 km/h). It may also flash red if the ultrasonic sensors are not
kept clean. So be sure to keep your rear bumper free of
mud, dirt, snow, ice and slush or the system may not
work properly. If after cleaning the rear bumper and
driving forward at least 15 mph (25 km/h), the display
continues to flash red, see your dealer. It may also flash
red if your vehicle is moving in REVERSE (R) at a
speed greater than 3 mph (5 km/h). Other conditions
that may affect system performance include things like
the vibrations from a jackhammer or the compression
of air brakes on a very large truck.
As always, drivers should use care when backing up
a vehicle. Always look behind you, being sure to
check for other vehicles, obstructions and blind spots.
For cleaning instructions, see ªCleaning Your Vehicleº
in the Index.
Page 178 of 371

2-111
-NOTES
Page 179 of 371

2-112
-NOTES
Page 180 of 371
3-
3-1
Section 3 Comfort Controls and Audio Systems
In this section, you'll find out how to operate the comfort control and audio systems offered with your vehicle.
Be sure to read about the particular systems supplied with your vehicle.
3
-2 Comfort Controls
3
-2 Climate Control Panel
3
-6 Air Conditioning
3
-6 Heating
3
-7 Defrosting and Defogging
3
-7 Rear Window Defogger
3
-8 Ventilation System
3
-10 HVAC Steering Wheel Controls (If Equipped)
3
-10 Climate Control Personalization (If Equipped)
3
-11 Audio Systems
3
-11 Setting the Clock
3
-11 AM-FM Stereo with Cassette Tape and
Compact Disc Player
3
-16 AM-FM Stereo with Cassette Tape and
Compact Disc Player with Radio Data
Systems (RDS) and Digital Signal Processing
(DSP) (If Equipped)3
-26 Radio Data Systems (RDS) Program
Type (PTY) Selections
3
-27 Navigation/Radio System (Option)
3
-27 CD Adapter Kits
3
-28 Console-Mounted CD Changer (Option)
3
-30 Radio Personalization with Home and Away
Feature (If Equipped)
3
-31 Theft-Deterrent Feature
3
-32 Audio Steering Wheel Controls
3
-32 Understanding Radio Reception
3
-33 Tips About Your Audio System
3
-33 Care of Your Cassette Tape Player
3
-35 Care of Your Compact Discs
3
-35 Care of Your Compact Disc Player
3
-35 Diversity Antenna System