clock CADILLAC SRX 2006 1.G User Guide
[x] Cancel search | Manufacturer: CADILLAC, Model Year: 2006, Model line: SRX, Model: CADILLAC SRX 2006 1.GPages: 456, PDF Size: 2.55 MB
Page 376 of 456
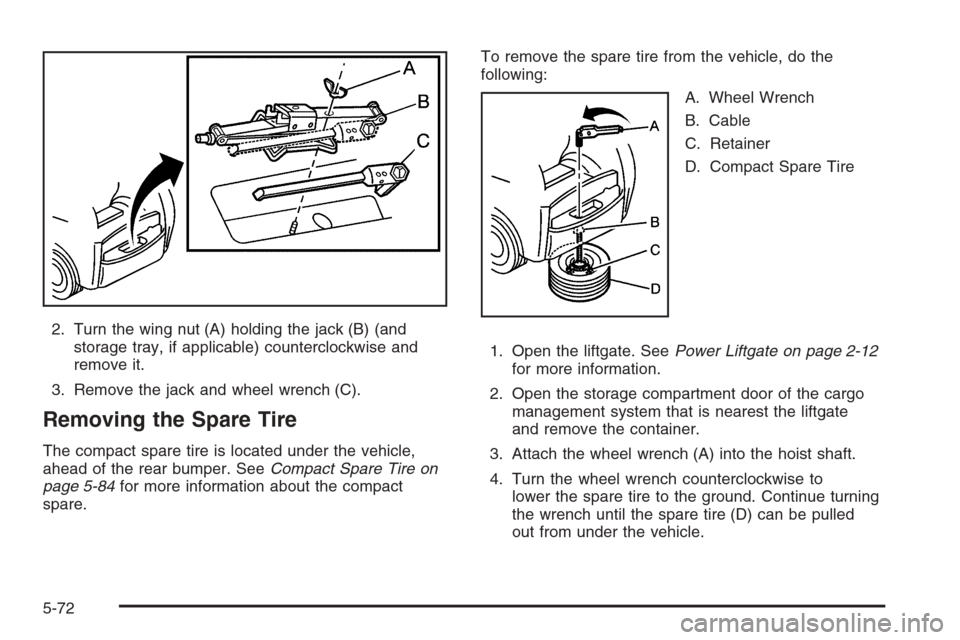
2. Turn the wing nut (A) holding the jack (B) (and
storage tray, if applicable) counterclockwise and
remove it.
3. Remove the jack and wheel wrench (C).
Removing the Spare Tire
The compact spare tire is located under the vehicle,
ahead of the rear bumper. SeeCompact Spare Tire on
page 5-84for more information about the compact
spare.To remove the spare tire from the vehicle, do the
following:
A. Wheel Wrench
B. Cable
C. Retainer
D. Compact Spare Tire
1. Open the liftgate. SeePower Liftgate on page 2-12
for more information.
2. Open the storage compartment door of the cargo
management system that is nearest the liftgate
and remove the container.
3. Attach the wheel wrench (A) into the hoist shaft.
4. Turn the wheel wrench counterclockwise to
lower the spare tire to the ground. Continue turning
the wrench until the spare tire (D) can be pulled
out from under the vehicle.
5-72
Page 377 of 456
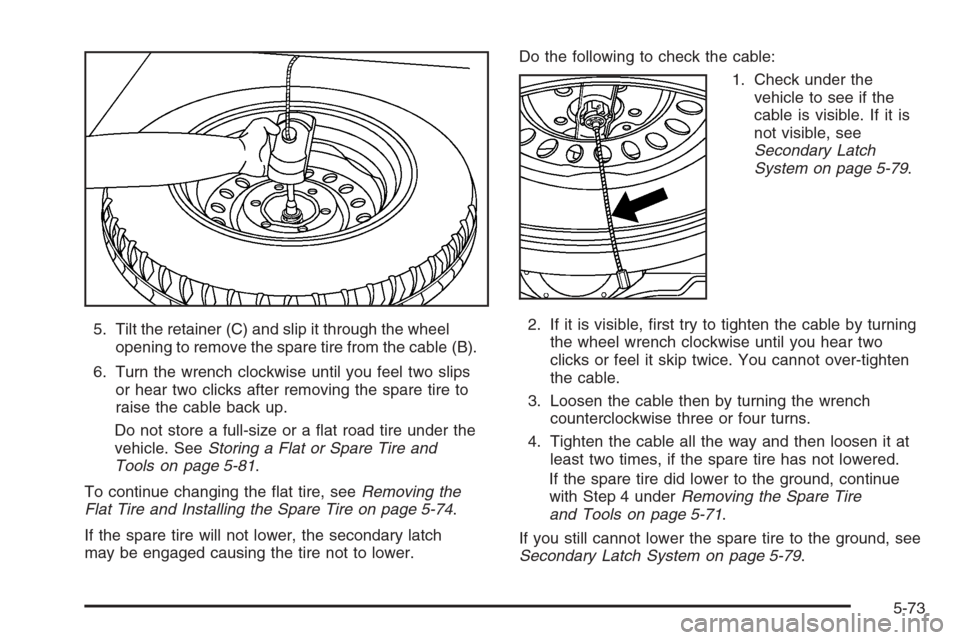
5. Tilt the retainer (C) and slip it through the wheel
opening to remove the spare tire from the cable (B).
6. Turn the wrench clockwise until you feel two slips
or hear two clicks after removing the spare tire to
raise the cable back up.
Do not store a full-size or a �at road tire under the
vehicle. SeeStoring a Flat or Spare Tire and
Tools on page 5-81.
To continue changing the �at tire, seeRemoving the
Flat Tire and Installing the Spare Tire on page 5-74.
If the spare tire will not lower, the secondary latch
may be engaged causing the tire not to lower.Do the following to check the cable:
1. Check under the
vehicle to see if the
cable is visible. If it is
not visible, see
Secondary Latch
System on page 5-79.
2. If it is visible, �rst try to tighten the cable by turning
the wheel wrench clockwise until you hear two
clicks or feel it skip twice. You cannot over-tighten
the cable.
3. Loosen the cable then by turning the wrench
counterclockwise three or four turns.
4. Tighten the cable all the way and then loosen it at
least two times, if the spare tire has not lowered.
If the spare tire did lower to the ground, continue
with Step 4 underRemoving the Spare Tire
and Tools on page 5-71.
If you still cannot lower the spare tire to the ground, see
Secondary Latch System on page 5-79.
5-73
Page 379 of 456
{CAUTION:
Raising your vehicle with the jack improperly
positioned can damage the vehicle and even
make the vehicle fall. To help avoid personal
injury and vehicle damage, be sure to �t the
jack lift head into the proper location before
raising the vehicle.
{CAUTION:
Lifting a vehicle and getting under it to do
maintenance or repairs is dangerous without
the appropriate safety equipment and training.
The jack provided with your vehicle is
designed only for changing a �at tire. If it is
used for anything else, you or others could be
badly injured or killed if the vehicle slips off
the jack. Use the jack provided with your
vehicle only for changing a �at tire.4. Turn the wheel wrench clockwise to raise the jack
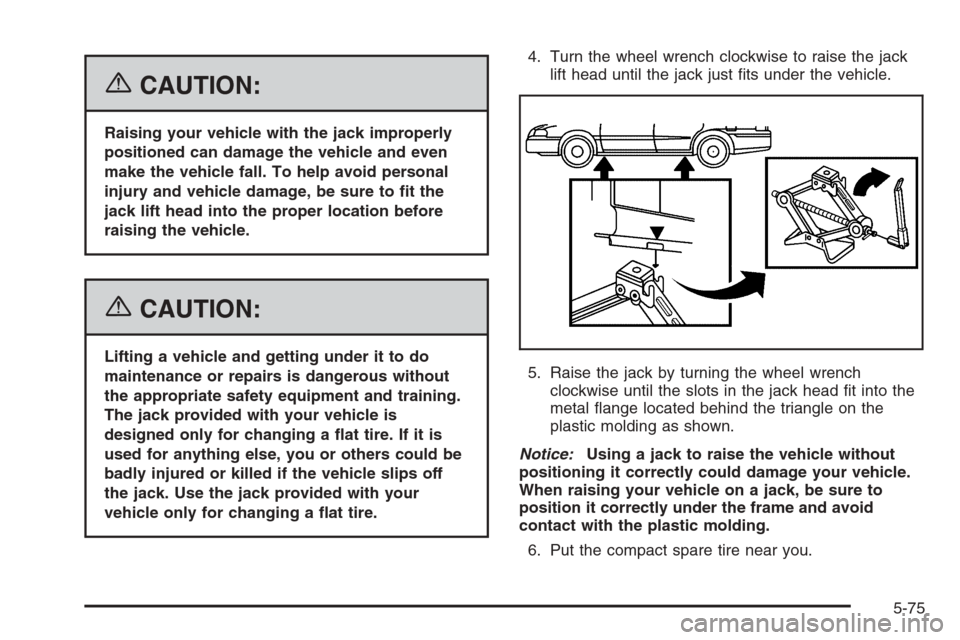
lift head until the jack just �ts under the vehicle.
5. Raise the jack by turning the wheel wrench
clockwise until the slots in the jack head �t into the
metal �ange located behind the triangle on the
plastic molding as shown.
Notice:Using a jack to raise the vehicle without
positioning it correctly could damage your vehicle.
When raising your vehicle on a jack, be sure to
position it correctly under the frame and avoid
contact with the plastic molding.
6. Put the compact spare tire near you.
5-75
Page 380 of 456
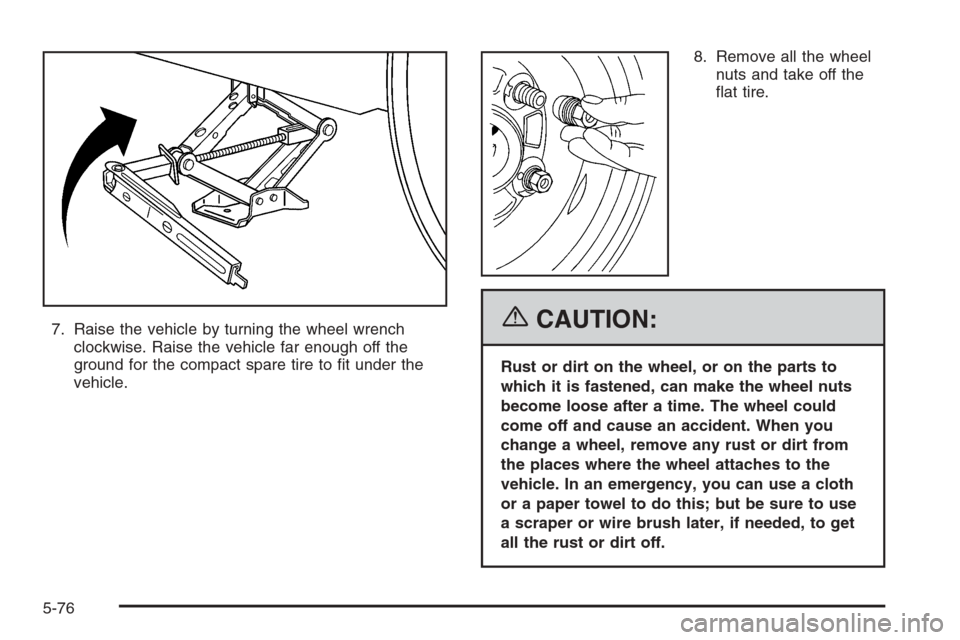
7. Raise the vehicle by turning the wheel wrench
clockwise. Raise the vehicle far enough off the
ground for the compact spare tire to �t under the
vehicle.8. Remove all the wheel
nuts and take off the
�at tire.{CAUTION:
Rust or dirt on the wheel, or on the parts to
which it is fastened, can make the wheel nuts
become loose after a time. The wheel could
come off and cause an accident. When you
change a wheel, remove any rust or dirt from
the places where the wheel attaches to the
vehicle. In an emergency, you can use a cloth
or a paper towel to do this; but be sure to use
a scraper or wire brush later, if needed, to get
all the rust or dirt off.
5-76
Page 381 of 456
{CAUTION:
Never use oil or grease on studs or nuts. If
you do, the nuts might come loose. Your wheel
could fall off, causing a serious accident.
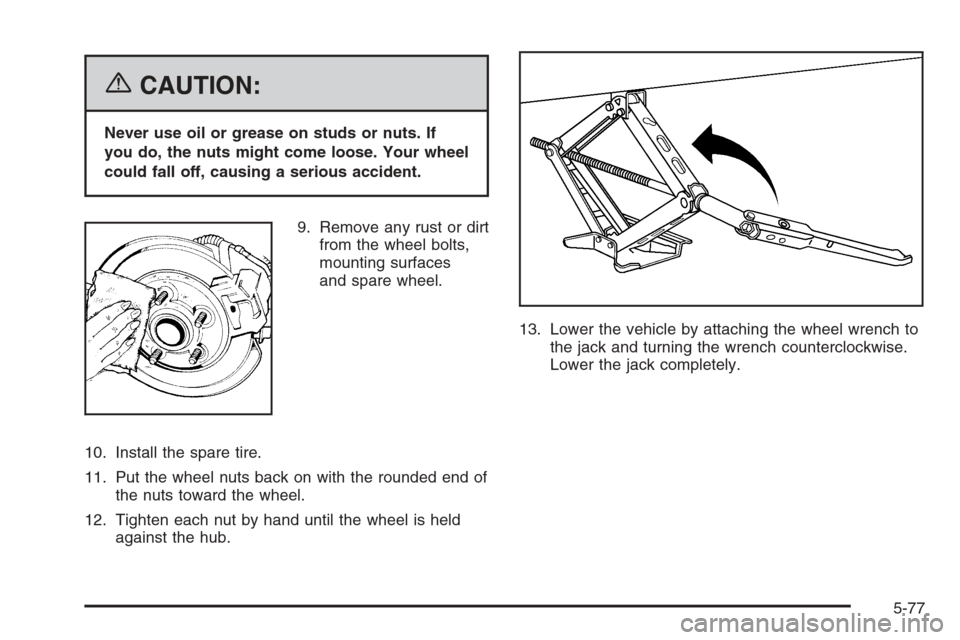
9. Remove any rust or dirt
from the wheel bolts,
mounting surfaces
and spare wheel.
10. Install the spare tire.
11. Put the wheel nuts back on with the rounded end of
the nuts toward the wheel.
12. Tighten each nut by hand until the wheel is held
against the hub.13. Lower the vehicle by attaching the wheel wrench to
the jack and turning the wrench counterclockwise.
Lower the jack completely.
5-77
Page 383 of 456
Secondary Latch System
Your vehicle has an underbody mounted tire hoist
assembly equipped with a secondary latch system. It is
designed to stop the compact spare tire from suddenly
falling off your vehicle if the cable holding the spare
tire is damaged. For the secondary latch to work, the tire
must be stowed with the valve stem pointing down.
SeeStoring a Flat or Spare Tire and Tools on page 5-81
for instructions on storing the spare tire correctly.
{CAUTION:
Before beginning this procedure read all the
instructions. Failure to read and follow the
instructions could damage the hoist assembly
and you and others could get hurt. Read and
follow the instructions listed next.
{CAUTION:
Someone standing too close during the
procedure could be injured by the jack. If the
spare tire does not slide off the jack
completely, make sure no one is behind you or
on either side of you as you pull the jack out
from the spare.
To release the spare tire from the secondary latch, do
the following:
1. If the cable is not visible, start this procedure at
Step 3.
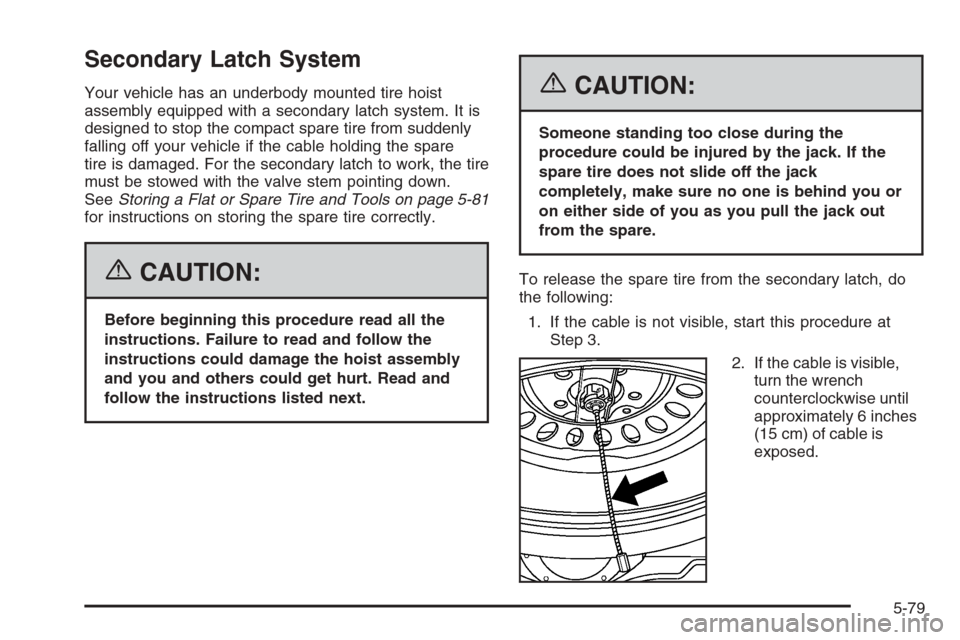
2. If the cable is visible,
turn the wrench
counterclockwise until
approximately 6 inches
(15 cm) of cable is
exposed.
5-79
Page 384 of 456
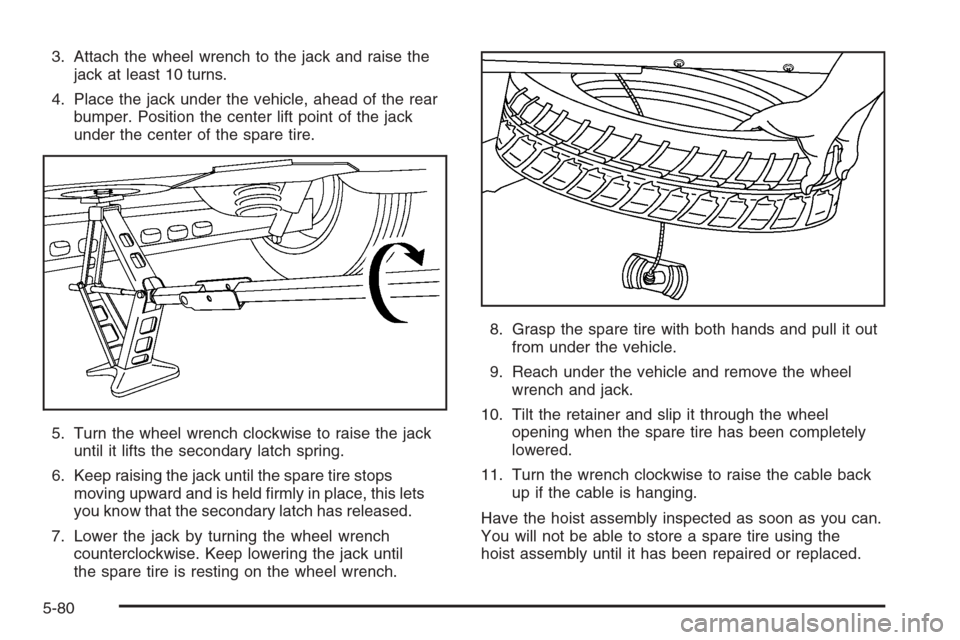
3. Attach the wheel wrench to the jack and raise the
jack at least 10 turns.
4. Place the jack under the vehicle, ahead of the rear
bumper. Position the center lift point of the jack
under the center of the spare tire.
5. Turn the wheel wrench clockwise to raise the jack
until it lifts the secondary latch spring.
6. Keep raising the jack until the spare tire stops
moving upward and is held �rmly in place, this lets
you know that the secondary latch has released.
7. Lower the jack by turning the wheel wrench
counterclockwise. Keep lowering the jack until
the spare tire is resting on the wheel wrench.8. Grasp the spare tire with both hands and pull it out
from under the vehicle.
9. Reach under the vehicle and remove the wheel
wrench and jack.
10. Tilt the retainer and slip it through the wheel
opening when the spare tire has been completely
lowered.
11. Turn the wrench clockwise to raise the cable back
up if the cable is hanging.
Have the hoist assembly inspected as soon as you can.
You will not be able to store a spare tire using the
hoist assembly until it has been repaired or replaced.
5-80
Page 387 of 456
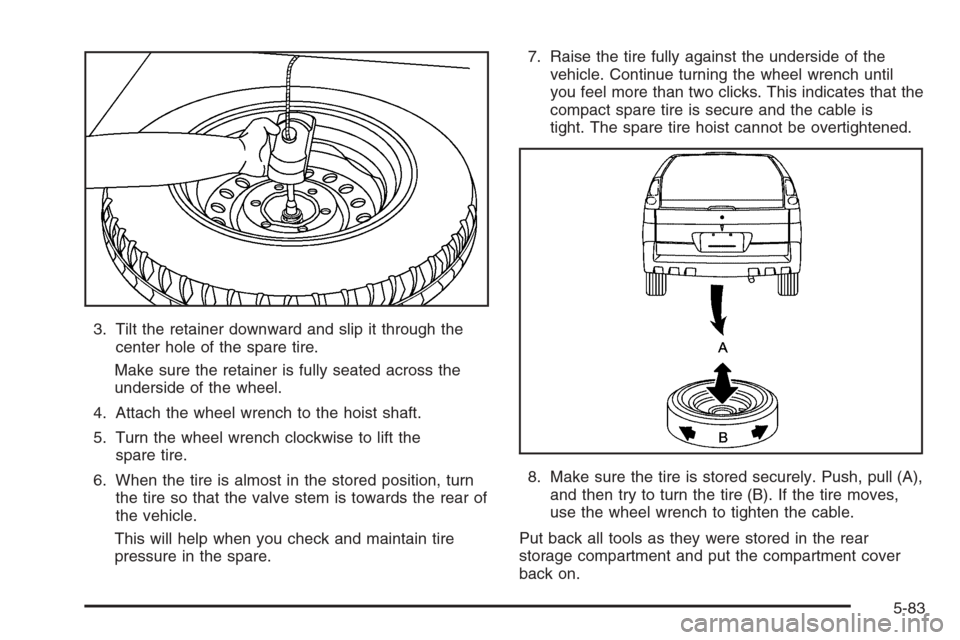
3. Tilt the retainer downward and slip it through the
center hole of the spare tire.
Make sure the retainer is fully seated across the
underside of the wheel.
4. Attach the wheel wrench to the hoist shaft.
5. Turn the wheel wrench clockwise to lift the
spare tire.
6. When the tire is almost in the stored position, turn
the tire so that the valve stem is towards the rear of
the vehicle.
This will help when you check and maintain tire
pressure in the spare.7. Raise the tire fully against the underside of the
vehicle. Continue turning the wheel wrench until
you feel more than two clicks. This indicates that the
compact spare tire is secure and the cable is
tight. The spare tire hoist cannot be overtightened.
8. Make sure the tire is stored securely. Push, pull (A),
and then try to turn the tire (B). If the tire moves,
use the wheel wrench to tighten the cable.
Put back all tools as they were stored in the rear
storage compartment and put the compartment cover
back on.
5-83