CADILLAC STS 2011 1.G Owners Manual
Manufacturer: CADILLAC, Model Year: 2011, Model line: STS, Model: CADILLAC STS 2011 1.GPages: 528, PDF Size: 4.96 MB
Page 391 of 528

Black plate (41,1)Cadillac STS Owner Manual - 2011
{WARNING:
Using an open flame near a battery can cause
battery gas to explode. People have been hurt
doing this, and some have been blinded. Use a
flashlight if you need more light.
Be sure the battery has enough water. You do not
need to add water to the battery installed in your
new vehicle. But if a battery has filler caps, be
sure the right amount of fluid is there. If it is low,
add water to take care of that first. If you do not,
explosive gas could be present.
Battery fluid contains acid that can burn you. Do
not get it on you. If you accidentally get it in your
eyes or on your skin, flush the place with water
and get medical help immediately.
{WARNING:
Fans or other moving engine parts can injure you
badly. Keep your hands away from moving parts
once the engine is running.
5. Check that the jumper cables do not have loose or missing insulation. If they do, you could get a
shock. The vehicles could be damaged too.
Before you connect the cables, here are some
basic things you should know. Positive (+) will go to
positive (+) or to a remote positive (+) terminal if
the vehicle has one. Negative (−) will go to a
heavy, unpainted metal engine part or to a remote
negative (−) terminal if the vehicle has one.
Do not connect positive (+) to negative (−) or you
will get a short that would damage the battery and
maybe other parts too. And do not connect the
negative (−) cable to the negative (−) terminal on
the dead battery because this can cause sparks.
6-41
Page 392 of 528
Black plate (42,1)Cadillac STS Owner Manual - 2011
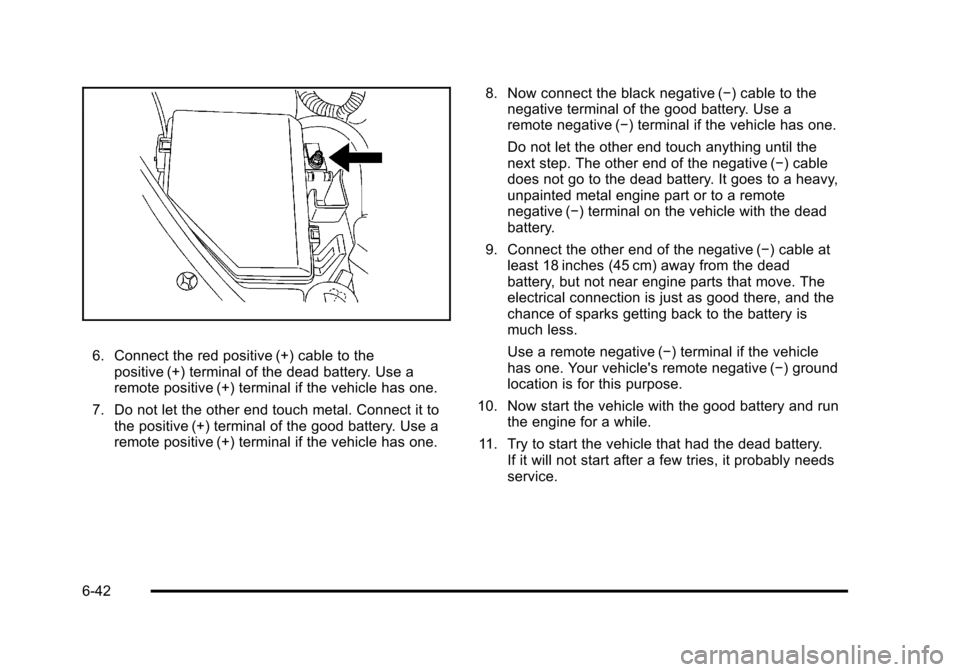
6. Connect the red positive (+) cable to thepositive (+) terminal of the dead battery. Use a
remote positive (+) terminal if the vehicle has one.
7. Do not let the other end touch metal. Connect it to the positive (+) terminal of the good battery. Use a
remote positive (+) terminal if the vehicle has one. 8. Now connect the black negative (−) cable to the
negative terminal of the good battery. Use a
remote negative (−) terminal if the vehicle has one.
Do not let the other end touch anything until the
next step. The other end of the negative (−) cable
does not go to the dead battery. It goes to a heavy,
unpainted metal engine part or to a remote
negative (−) terminal on the vehicle with the dead
battery.
9. Connect the other end of the negative (−) cable at least 18 inches (45 cm) away from the dead
battery, but not near engine parts that move. The
electrical connection is just as good there, and the
chance of sparks getting back to the battery is
much less.
Use a remote negative (−) terminal if the vehicle
has one. Your vehicle's remote negative (−) ground
location is for this purpose.
10. Now start the vehicle with the good battery and run the engine for a while.
11. Try to start the vehicle that had the dead battery. If it will not start after a few tries, it probably needs
service.
6-42
Page 393 of 528
Black plate (43,1)Cadillac STS Owner Manual - 2011
Notice:If the jumper cables are connected or
removed in the wrong order, electrical shorting may
occur and damage the vehicle. The repairs would
not be covered by the vehicle warranty. Always
connect and remove the jumper cables in the
correct order, making sure that the cables do not
touch each other or other metal.
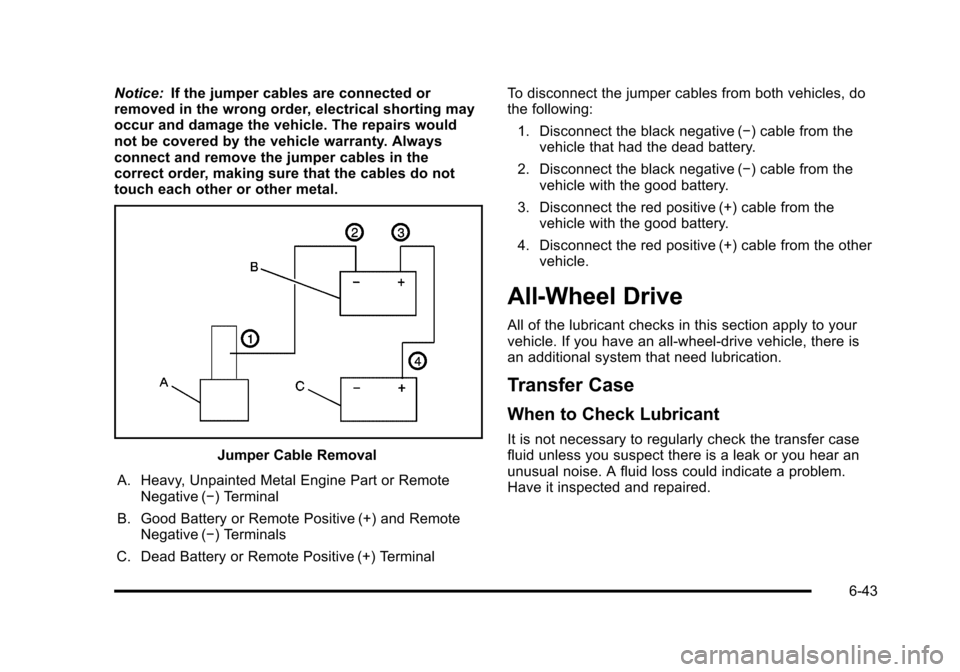
Jumper Cable Removal
A. Heavy, Unpainted Metal Engine Part or Remote Negative (−) Terminal
B. Good Battery or Remote Positive (+) and Remote Negative (−) Terminals
C. Dead Battery or Remote Positive (+) Terminal To disconnect the jumper cables from both vehicles, do
the following:
1. Disconnect the black negative (−) cable from the vehicle that had the dead battery.
2. Disconnect the black negative (−) cable from the vehicle with the good battery.
3. Disconnect the red positive (+) cable from the vehicle with the good battery.
4. Disconnect the red positive (+) cable from the other vehicle.
All-Wheel Drive
All of the lubricant checks in this section apply to your
vehicle. If you have an all-wheel-drive vehicle, there is
an additional system that need lubrication.
Transfer Case
When to Check Lubricant
It is not necessary to regularly check the transfer case
fluid unless you suspect there is a leak or you hear an
unusual noise. A fluid loss could indicate a problem.
Have it inspected and repaired.
6-43
Page 394 of 528
Black plate (44,1)Cadillac STS Owner Manual - 2011
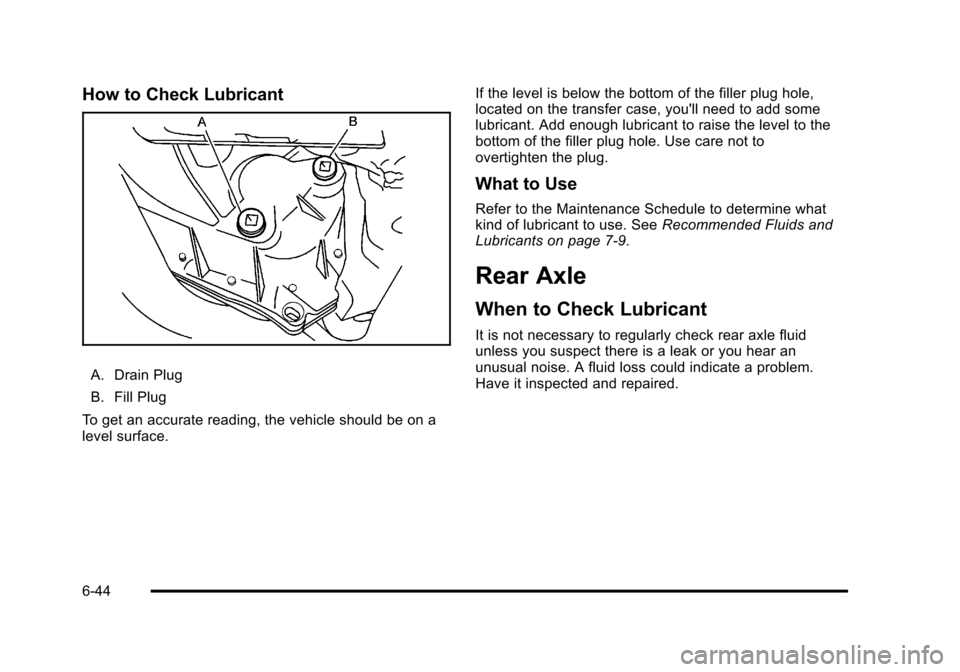
How to Check Lubricant
A. Drain Plug
B. Fill Plug
To get an accurate reading, the vehicle should be on a
level surface. If the level is below the bottom of the filler plug hole,
located on the transfer case, you'll need to add some
lubricant. Add enough lubricant to raise the level to the
bottom of the filler plug hole. Use care not to
overtighten the plug.
What to Use
Refer to the Maintenance Schedule to determine what
kind of lubricant to use. See
Recommended Fluids and
Lubricants on page 7‑9.
Rear Axle
When to Check Lubricant
It is not necessary to regularly check rear axle fluid
unless you suspect there is a leak or you hear an
unusual noise. A fluid loss could indicate a problem.
Have it inspected and repaired.
6-44
Page 395 of 528
Black plate (45,1)Cadillac STS Owner Manual - 2011
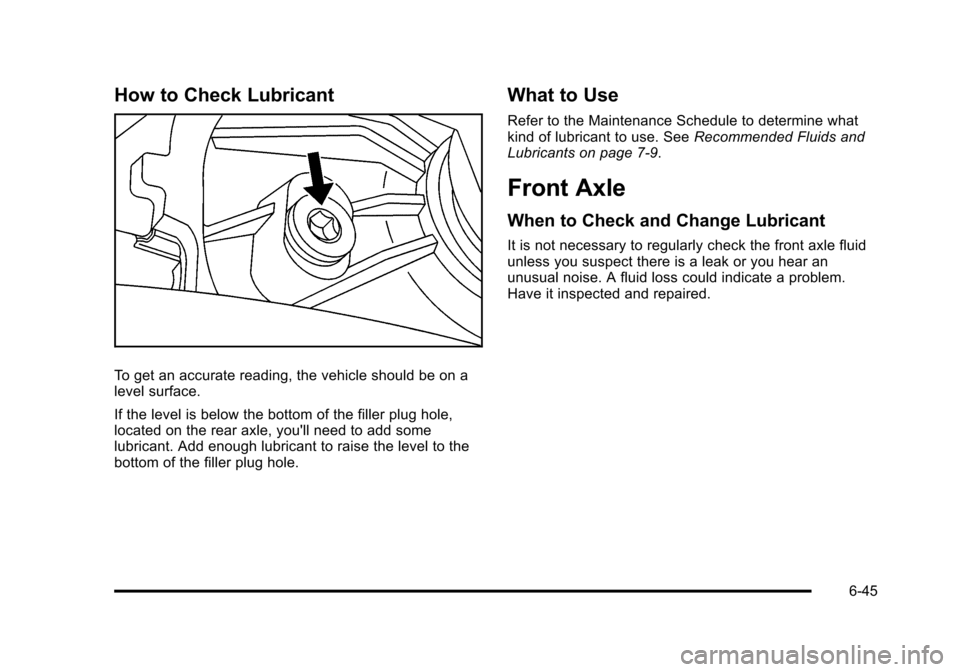
How to Check Lubricant
To get an accurate reading, the vehicle should be on a
level surface.
If the level is below the bottom of the filler plug hole,
located on the rear axle, you'll need to add some
lubricant. Add enough lubricant to raise the level to the
bottom of the filler plug hole.
What to Use
Refer to the Maintenance Schedule to determine what
kind of lubricant to use. SeeRecommended Fluids and
Lubricants on page 7‑9.
Front Axle
When to Check and Change Lubricant
It is not necessary to regularly check the front axle fluid
unless you suspect there is a leak or you hear an
unusual noise. A fluid loss could indicate a problem.
Have it inspected and repaired.
6-45
Page 396 of 528
Black plate (46,1)Cadillac STS Owner Manual - 2011
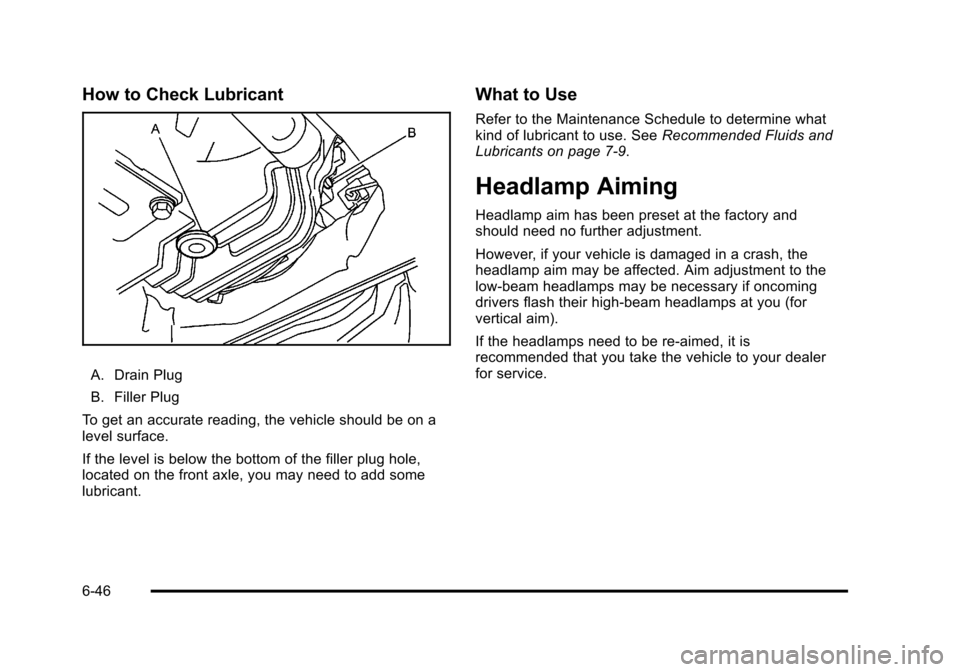
How to Check Lubricant
A. Drain Plug
B. Filler Plug
To get an accurate reading, the vehicle should be on a
level surface.
If the level is below the bottom of the filler plug hole,
located on the front axle, you may need to add some
lubricant.
What to Use
Refer to the Maintenance Schedule to determine what
kind of lubricant to use. See Recommended Fluids and
Lubricants on page 7‑9.
Headlamp Aiming
Headlamp aim has been preset at the factory and
should need no further adjustment.
However, if your vehicle is damaged in a crash, the
headlamp aim may be affected. Aim adjustment to the
low-beam headlamps may be necessary if oncoming
drivers flash their high-beam headlamps at you (for
vertical aim).
If the headlamps need to be re-aimed, it is
recommended that you take the vehicle to your dealer
for service.
6-46
Page 397 of 528
Black plate (47,1)Cadillac STS Owner Manual - 2011
Bulb Replacement
For the proper type of replacement bulbs, see
Replacement Bulbs on page 6‑48.
For any bulb changing procedure not listed in this
section, contact your dealer.
High Intensity Discharge (HID)
Lighting
{WARNING:
The low beam high intensity discharge lighting
system operates at a very high voltage. If you try
to service any of the system components, you
could be seriously injured. Have your dealer or a
qualified technician service them.The vehicle may have HID headlamps. After an HID
headlamp bulb has been replaced, you may notice that
the beam is a slightly different shade than it was
originally. This is normal.
Halogen Bulbs
{WARNING:
Halogen bulbs have pressurized gas inside and
can burst if you drop or scratch the bulb. You or
others could be injured. Be sure to read and
follow the instructions on the bulb package.
6-47
Page 398 of 528
Black plate (48,1)Cadillac STS Owner Manual - 2011
Back-Up Lamps
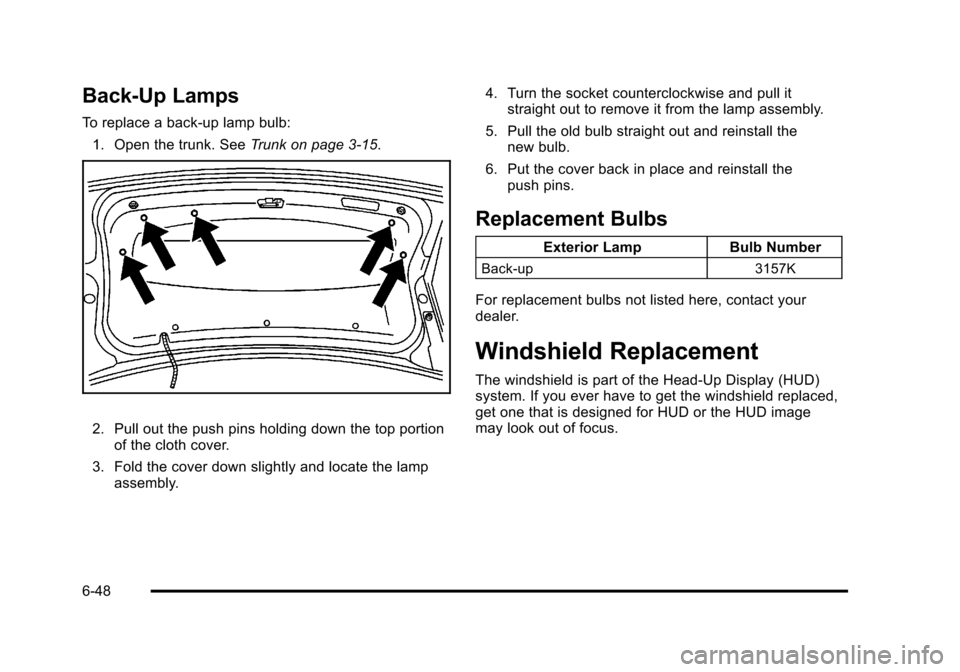
To replace a back-up lamp bulb:1. Open the trunk. See Trunk on page 3‑15.
2. Pull out the push pins holding down the top portion
of the cloth cover.
3. Fold the cover down slightly and locate the lamp assembly. 4. Turn the socket counterclockwise and pull it
straight out to remove it from the lamp assembly.
5. Pull the old bulb straight out and reinstall the new bulb.
6. Put the cover back in place and reinstall the push pins.
Replacement Bulbs
Exterior Lamp Bulb Number
Back-up 3157K
For replacement bulbs not listed here, contact your
dealer.
Windshield Replacement
The windshield is part of the Head-Up Display (HUD)
system. If you ever have to get the windshield replaced,
get one that is designed for HUD or the HUD image
may look out of focus.
6-48
Page 399 of 528

Black plate (49,1)Cadillac STS Owner Manual - 2011
Windshield Wiper Blade
Replacement
Windshield wiper blades should be inspected for wear
or cracking. SeeScheduled Maintenance on page 7‑3.
It's a good idea to clean or replace the wiper blade
assembly on a regular basis or when worn. For proper
windshield wiper blade length and type, see
Maintenance Replacement Parts on page 7‑11.
To replace the wiper blade assembly, do the following: 1. Pull the windshield wiper assembly away from the windshield.
2. Squeeze the tabs on each side of the wiper bladeassembly and slide the assembly off the end of the
wiper arm.
3. Replace the blade assembly with a new one.
Allowing the wiper blade arm to touch the
windshield when no wiper blade is installed could
damage the windshield. Any damage that occurs
would not be covered by your warranty. Do not
allow the wiper blade arm to touch the windshield.
4. Repeat the steps for the other wiper.
6-49
Page 400 of 528
Black plate (50,1)Cadillac STS Owner Manual - 2011
Tires
Your new vehicle comes with high-quality tires
made by a leading tire manufacturer. If you ever
have questions about your tire warranty and
where to obtain service, see your vehicle
Warranty booklet for details. For additional
information refer to the tire manufacturer.
{WARNING:
.Poorly maintained and improperly used tires
are dangerous.
.Overloading your tires can cause overheating
as a result of too much flexing. You could
have a blowout and a serious accident. See
Loading the Vehicle on page 5‑23.
.Under inflated tires pose the same danger as
overloaded tires. The resulting crash could
cause serious injury. Check all tires frequently
to maintain the recommended pressure. Tire
pressure should be checked when your tires
are cold.(Continued)
WARNING: (Continued)
.Over inflated tires are more likely to be
cut, punctured, or broken by a sudden
impact—such as when you hit a pothole.
Keep tires at the recommended pressure.
.Worn or old tires can cause a crash. If your
tread is badly worn, replace them.
.Replace any tires that have been damaged by
impacts with potholes, curbs, etc.
.Improperly repaired tires can cause a crash.
Only your dealer or an authorized tire service
center should repair, replace, dismount, and
mount the tires.
.Do not spin the tires in excess of 55 km/h
(35 mph) on slippery surfaces such as snow,
mud, ice, etc. Excessive spinning may cause
the tires to explode.
See High-Speed Operation
on page 6‑60for inflation
pressure adjustment for high speed driving.
6-50