CADILLAC XLR 2005 1.G Owners Manual
Manufacturer: CADILLAC, Model Year: 2005, Model line: XLR, Model: CADILLAC XLR 2005 1.GPages: 438, PDF Size: 3.69 MB
Page 191 of 438
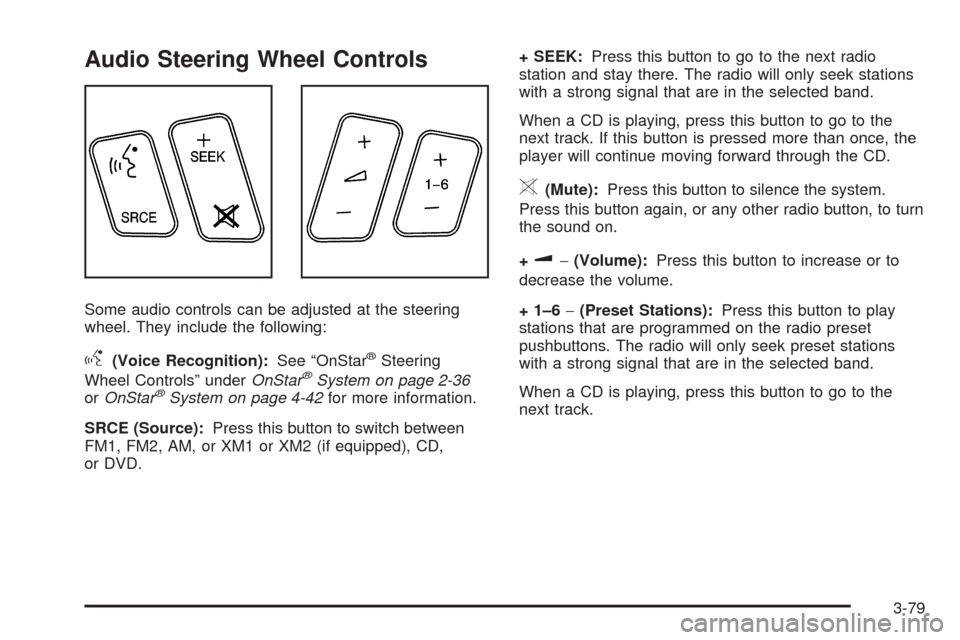
Audio Steering Wheel Controls
Some audio controls can be adjusted at the steering
wheel. They include the following:
g(Voice Recognition):See “OnStar®Steering
Wheel Controls” underOnStar®System on page 2-36
orOnStar®System on page 4-42for more information.
SRCE (Source):Press this button to switch between
FM1, FM2, AM, or XM1 or XM2 (if equipped), CD,
or DVD.+ SEEK:Press this button to go to the next radio
station and stay there. The radio will only seek stations
with a strong signal that are in the selected band.
When a CD is playing, press this button to go to the
next track. If this button is pressed more than once, the
player will continue moving forward through the CD.
>(Mute):Press this button to silence the system.
Press this button again, or any other radio button, to turn
the sound on.
+
u−(Volume):Press this button to increase or to
decrease the volume.
+ 1–6−(Preset Stations):Press this button to play
stations that are programmed on the radio preset
pushbuttons. The radio will only seek preset stations
with a strong signal that are in the selected band.
When a CD is playing, press this button to go to the
next track.
3-79
Page 192 of 438
Radio Reception
AM
The range for most AM stations is greater than for FM,
especially at night. The longer range can cause
station frequencies to interfere with each other. Static
can occur on AM stations caused by things like
storms and power lines. Try reducing the treble to
reduce this noise.
FM Stereo
FM stereo will give the best sound, but FM signals will
reach only about 10 to 40 miles (16 to 65 km). Tall
buildings or hills can interfere with FM signals, causing
the sound to fade in and out.
XM™ Satellite Radio Service
XM™ Satellite Radio Service gives digital radio
reception from coast to coast. Just as with FM, tall
buildings or hills can interfere with satellite radio signals,
causing the sound to fade in and out. The radio may
display NO XM SIGNAL to indicate interference.
Cellular Phone Usage
Cellular phone usage may cause interference with your
vehicle’s radio. This interference may occur when
making or receiving phone calls, charging the phone’s
battery, or simply having the phone on. This interference
is an increased level of static while listening to the
radio. If static is received while listening to the radio,
unplug the cellular phone and turn it off.
Care of Your CDs
Handle CDs carefully. Store them in their original cases
or other protective cases and away from direct
sunlight and dust. If the surface of a CD is soiled,
dampen a clean, soft cloth in a mild, neutral detergent
solution and clean it, wiping from the center to the edge.
Be sure never to touch the side without writing when
handling CDs. Pick up CDs by grasping the outer edges
or the edge of the hole and the outer edge.
Care of Your CD Player
The use of CD lens cleaners for CD players is not
advised, due to the risk of contaminating the lens of the
CD optics with lubricants internal to the CD mechanism.
3-80
Page 193 of 438
Diversity Antenna System
The AM-FM antennas are located under the decklid
surface in the trunk compartment. the antennas
are hidden from view and are not accessible.
If adding an aftermarket cellular telephone to your
vehicle, do not attach the antenna to the rear glass. This
would interfere with the convertible top retraction
operation and could cause damage to the
�nished/painted surfaces.
XM™ Satellite Radio Antenna
System
The XM™ Satellite Radio antenna is located on the
trunk of your vehicle. Keep this antenna clear of snow
and ice build up for clear radio reception.
3-81
Page 194 of 438

✍NOTES
3-82
Page 195 of 438
Overview.........................................................4-2
Navigation System Overview............................4-2
Getting Started...............................................4-4
Features and Controls......................................4-4
Using the Navigation System...........................4-4
Setup Menu...................................................4-7
Plan Route..................................................4-13
Edit Memory Point........................................4-13
Edit Waypoint...............................................4-17
Edit Avoid Point/Area....................................4-20
Enter Destination..........................................4-21
Route Preference..........................................4-31
Maps..........................................................4-33
Symbols......................................................4-36Remote Keyless Entry System........................4-42
OnStar®System...........................................4-42
Global Positioning System (GPS)....................4-42
Vehicle Positioning........................................4-43
Problems with Route Guidance.......................4-44
If the System Needs Service..........................4-45
Ordering Map DVDs......................................4-45
Database Coverage Explanations....................4-45
Navigation Audio System................................4-45
Six-Disc CD Changer....................................4-61
CD/DVD Player............................................4-63
Radio Personalization with Home and
Away Feature...........................................4-69
Voice Recognition..........................................4-69
Section 4 Navigation System
4-1
Page 196 of 438

Overview
Navigation System Overview
4-2
Page 197 of 438
A. BAND Key. See “Finding a Station” underNavigation
Audio System on page 4-45.
B. CD Key. SeeNavigation Audio System on page 4-45
orCD/DVD Player on page 4-63.
C. DVD Key. See “Playing a DVD” underCD/DVD
Player on page 4-63.
D. TUNE/SEEK Key. See “Playing the Radio” under
Navigation Audio System on page 4-45.
E. Audio/Adjust Key. See “Main Audio Menu” under
Navigation Audio System on page 4-45.
F. Power-Volume Knob. See “Hard Keys” underUsing
the Navigation System on page 4-4.G. Navigation System Screen
H. RPT (Repeat) Key. See “Hard Keys” underUsing
the Navigation System on page 4-4.
I. MAP Key. See “Hard Keys” underUsing the
Navigation System on page 4-4.
J. ROUTE Key. See “Hard Keys” underUsing the
Navigation System on page 4-4.
K. MENU Key. See “Hard Keys” underUsing the
Navigation System on page 4-4.
L. TILT Key. See “Hard Keys” underUsing the
Navigation System on page 4-4.
4-3
Page 198 of 438
Getting Started
Before you begin to operate the navigation system, read
this manual thoroughly to become familiar with it and
to understand how the system works.
The navigation system allows you to do the following:
Plan a route with provided turn-by-turn route
and map guidance with voice prompts. See
Plan Route on page 4-13for more information.
Select a destination using various methods and
choices.
Receive broadcast announcements on traffic and
emergency alert communications.
The information in the system may not always be
complete. Road conditions such as prohibited turns,
detours, and construction zones, change frequently. It is
important to consider whether you can follow the
directions given by the system for the current conditions.When getting started, you may set the navigation
system to your preference using various options. To do
so, reference the following topics:
To adjust screen appearance, language, clock,
English/metric measurements, or other options, see
“Main Audio Menu” underNavigation Audio
System on page 4-45.
To adjust voice guidance volume or other navigation
settings, seeSetup Menu on page 4-7.
Features and Controls
Using the Navigation System
This section presents basic information you will need to
know to operate the navigation system.
Use the keys located on each side of the navigation
screen, as well as the available touch-sensitive screen
buttons, to operate the system. SeeNavigation System
Overview on page 4-2for more information on location.
Once the vehicle is moving, various functions will be
disabled to reduce driver distraction.
4-4
Page 199 of 438
Hard Keys
The following hard keys are located to the left of the
navigation screen:
BAND:Press the BAND key to access the band screen
and switch between AM, FM1, FM2, XM1, XM2, and
WX, if equipped. See “Finding a Station” under
Navigation Audio System on page 4-45.
CD:Press the CD key to play a CD. The CD screen
will be displayed. SeeSix-Disc CD Changer on
page 4-61orCD/DVD Player on page 4-63.
DVD:Press the DVD key to play a DVD. The DVD
screen will be displayed. SeeCD/DVD Player on
page 4-63.
yTUNE/SEEKz:Press the TUNE/SEEK up or
down arrows to go to the next or previous radio station
and stay there. See “Finding a Station” under
Navigation Audio System on page 4-45.
e/z:Press the audio/adjust key to view the main
audio menu. See “Main Audio Menu” underNavigation
Audio System on page 4-45.PWR-VOL (Power/Volume Knob):Press the
power/volume knob to turn the audio and navigation
systems on and off. Turn the knob to increase or
decrease the volume to the audio system.
The following hard keys are located to the right of the
navigation screen:
RPT:Press the repeat key to repeat the current voice
guidance navigation prompt.
MAP:Press the MAP key to view the map screen
showing current vehicle position.
The map screen can also display the following
information:
North or Heading Up symbol. SeeSymbols on
page 4-36.
Map scale. SeeMaps on page 4-33.
Distance to destination.
GPS symbol if GPS signal is not being received. See
Global Positioning System (GPS) on page 4-42.
Options you have selected for reaching your current
destination.
Driver Information.
Radio band and presets.
4-5
Page 200 of 438
ROUTE:Press the ROUTE key to display the PLAN
ROUTE menu. SeePlan Route on page 4-13.
MENU:Press the MENU key to display the SETUP
MENU. SeeSetup Menu on page 4-7.
TILT
X:Press the TILT key to open the navigation
system faceplate for loading or removing the map DVD,
a video DVD, or an audio CD. This key can only be
used while the vehicle is in PARK (P).
Alpha-Numeric Keypad
Letters of the alphabet, symbols, punctuation, and
numbers, when available to you, will be displayed on
the navigation screen as an alpha or numeric keypad.
The alpha keypad will be displayed when the system
needs you to input a city or street name. You can also
touch Char at the bottom of the alpha keypad to
access the numeric keypad when inputting a house
address, punctuation mark, or other character. Touch
A - Z to return to the alpha keypad.
All characters are touch-sensitive screen buttons. Touch
a character to select it.
Select the space symbol to enter a space between
characters or the words of a name.
V:Select the backspace symbol if you have selected
an incorrect character.
To make your name selections easier, the system will
only allow you to select a character which can follow the
last one entered. For example, if you enter Z, you
would not be allowed to follow it with T. The system will
highlight the available characters and darken the
unavailable characters.
If you are unsuccessful when inputting a name, it may
need to be selected differently. It is also possible that the
map DVD database may not contain that information
or the correct search area has not been selected. See
Database Coverage Explanations on page 4-45for
more information.
Touch Sensitive Buttons
Touch-sensitive buttons, or screen buttons, are located
on the screen. When you have successfully selected
a screen button, a beep will be heard. These buttons will
be highlighted when a feature is available and dim
when they are unavailable. There are some toggle
screen buttons that will be light blue when active and
dark blue when inactive.
4-6