ECU CADILLAC XLR 2005 1.G Owner's Manual
[x] Cancel search | Manufacturer: CADILLAC, Model Year: 2005, Model line: XLR, Model: CADILLAC XLR 2005 1.GPages: 438, PDF Size: 3.69 MB
Page 95 of 438
Programming the HomeLink®
Transmitter
Do not use the HomeLink®Transmitter with any garage
door opener that does not have the “stop and reverse”
feature. This includes any garage door opener model
manufactured before April 1, 1982. If you have a newer
garage door opener with rolling codes, please be
sure to follow Steps 6 through 8 to complete the
programming of your HomeLink
®Transmitter.
Read the instructions completely before attempting to
program the HomeLink
®Transmitter. Because of
the steps involved, it may be helpful to have another
person available to assist you in programming the
transmitter.
Keep the original transmitter for use in other vehicles as
well as for future HomeLink
®programming. It is also
recommended that upon the sale of the vehicle,
the programmed HomeLink
®buttons should be erased
for security purposes. Refer to “Erasing HomeLink®
Buttons” or, for assistance, contact HomeLink®on
the internet at: www.homelink.com or by calling
1-800-355-3515.Be sure that people and objects are clear of the
garage door or gate operator you are programming.
When programming a garage door, it is advised to
park outside of the garage.
It is recommended that a new battery be installed in
your hand-held transmitter for quicker and more
accurate transmission of the radio frequency.
Programming HomeLink®
Your vehicle’s engine should be turned off while
programming the transmitter. Follow these steps to
program up to three channels:
1. Press and hold down the two outside buttons,
releasing only when the indicator light begins to
�ash, after 20 seconds. Do not hold down the
buttons for longer than 30 seconds and do not
repeat this step to program a second and/or third
transmitter to the remaining two HomeLink
®buttons.
2. Position the end of your hand-held transmitter about
1 to 3 inches (3 to 8 cm) away from the HomeLink
®
buttons while keeping the indicator light in view.
2-39
Page 100 of 438
Rear Storage Area
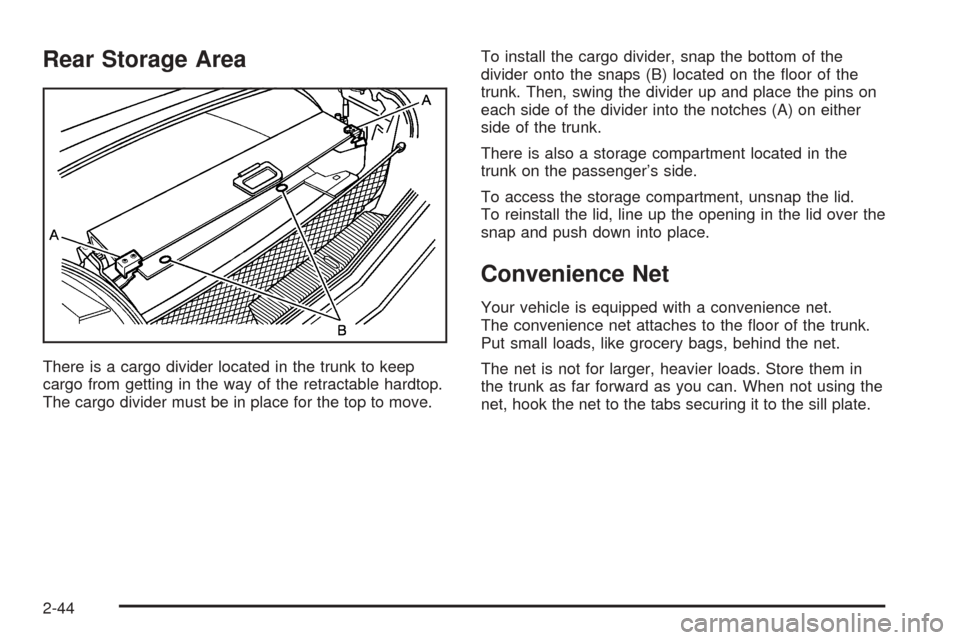
There is a cargo divider located in the trunk to keep
cargo from getting in the way of the retractable hardtop.
The cargo divider must be in place for the top to move.To install the cargo divider, snap the bottom of the
divider onto the snaps (B) located on the �oor of the
trunk. Then, swing the divider up and place the pins on
each side of the divider into the notches (A) on either
side of the trunk.
There is also a storage compartment located in the
trunk on the passenger’s side.
To access the storage compartment, unsnap the lid.
To reinstall the lid, line up the opening in the lid over the
snap and push down into place.
Convenience Net
Your vehicle is equipped with a convenience net.
The convenience net attaches to the �oor of the trunk.
Put small loads, like grocery bags, behind the net.
The net is not for larger, heavier loads. Store them in
the trunk as far forward as you can. When not using the
net, hook the net to the tabs securing it to the sill plate.
2-44
Page 114 of 438
Security Light...............................................3-59
Fog Lamp Light............................................3-59
Lights On Reminder......................................3-59
Highbeam On Light.......................................3-59
Fuel Gage...................................................3-60
Driver Information Center (DIC).......................3-61
DIC Controls and Displays.............................3-61
DIC Warnings and Messages.........................3-64
Other Messages...........................................3-72
DIC Vehicle Personalization............................3-73Trip Computer................................................3-77
Oil Life Indicator...........................................3-77
Audio System(s).............................................3-78
Theft-Deterrent Feature..................................3-78
Audio Steering Wheel Controls.......................3-79
Radio Reception...........................................3-80
Care of Your CDs.........................................3-80
Care of Your CD Player................................3-80
Diversity Antenna System..............................3-81
XM™ Satellite Radio Antenna System.............3-81
Section 3 Instrument Panel
3-2
Page 117 of 438
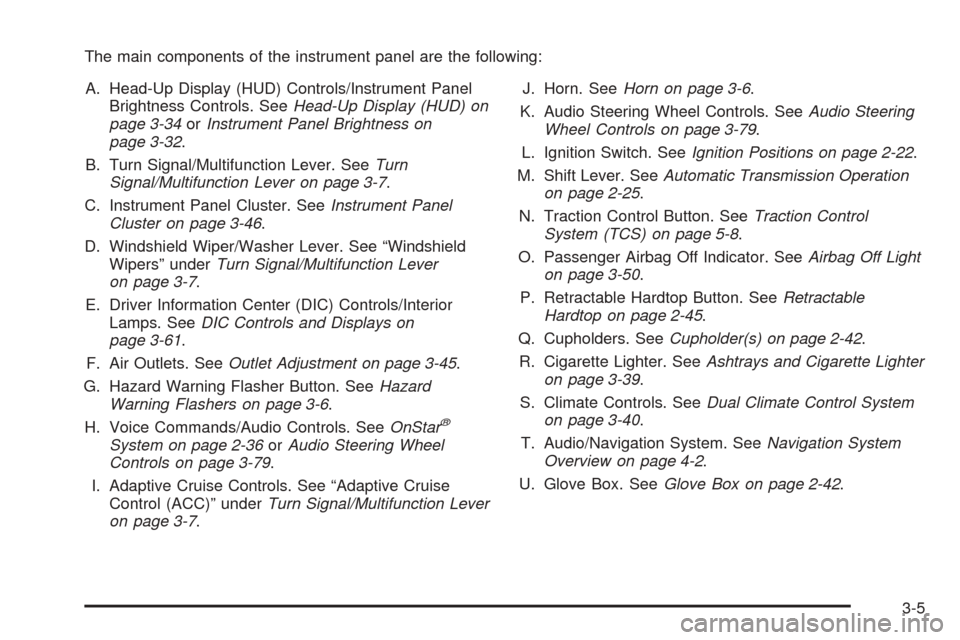
The main components of the instrument panel are the following:
A. Head-Up Display (HUD) Controls/Instrument Panel
Brightness Controls. SeeHead-Up Display (HUD) on
page 3-34orInstrument Panel Brightness on
page 3-32.
B. Turn Signal/Multifunction Lever. SeeTurn
Signal/Multifunction Lever on page 3-7.
C. Instrument Panel Cluster. SeeInstrument Panel
Cluster on page 3-46.
D. Windshield Wiper/Washer Lever. See “Windshield
Wipers” underTurn Signal/Multifunction Lever
on page 3-7.
E. Driver Information Center (DIC) Controls/Interior
Lamps. SeeDIC Controls and Displays on
page 3-61.
F. Air Outlets. SeeOutlet Adjustment on page 3-45.
G. Hazard Warning Flasher Button. SeeHazard
Warning Flashers on page 3-6.
H. Voice Commands/Audio Controls. SeeOnStar
®
System on page 2-36orAudio Steering Wheel
Controls on page 3-79.
I. Adaptive Cruise Controls. See “Adaptive Cruise
Control (ACC)” underTurn Signal/Multifunction Lever
on page 3-7.J. Horn. SeeHorn on page 3-6.
K. Audio Steering Wheel Controls. SeeAudio Steering
Wheel Controls on page 3-79.
L. Ignition Switch. SeeIgnition Positions on page 2-22.
M. Shift Lever. SeeAutomatic Transmission Operation
on page 2-25.
N. Traction Control Button. SeeTraction Control
System (TCS) on page 5-8.
O. Passenger Airbag Off Indicator. SeeAirbag Off Light
on page 3-50.
P. Retractable Hardtop Button. SeeRetractable
Hardtop on page 2-45.
Q. Cupholders. SeeCupholder(s) on page 2-42.
R. Cigarette Lighter. SeeAshtrays and Cigarette Lighter
on page 3-39.
S. Climate Controls. SeeDual Climate Control System
on page 3-40.
T. Audio/Navigation System. SeeNavigation System
Overview on page 4-2.
U. Glove Box. SeeGlove Box on page 2-42.
3-5
Page 163 of 438
{CAUTION:
If the airbag readiness light ever comes on
when you have turned off the airbags, it means
that something may be wrong with the airbag
system. The passenger’s airbags could in�ate
even though the switch is off. If this ever
happens, do not let anyone whom the national
government has identi�ed as a member of a
passenger airbag risk group sit in the
passenger’s position (for example, do not
secure a rear-facing child restraint in your
vehicle) until you have your vehicle serviced.
SeeAirbag Off Switch on page 1-44.
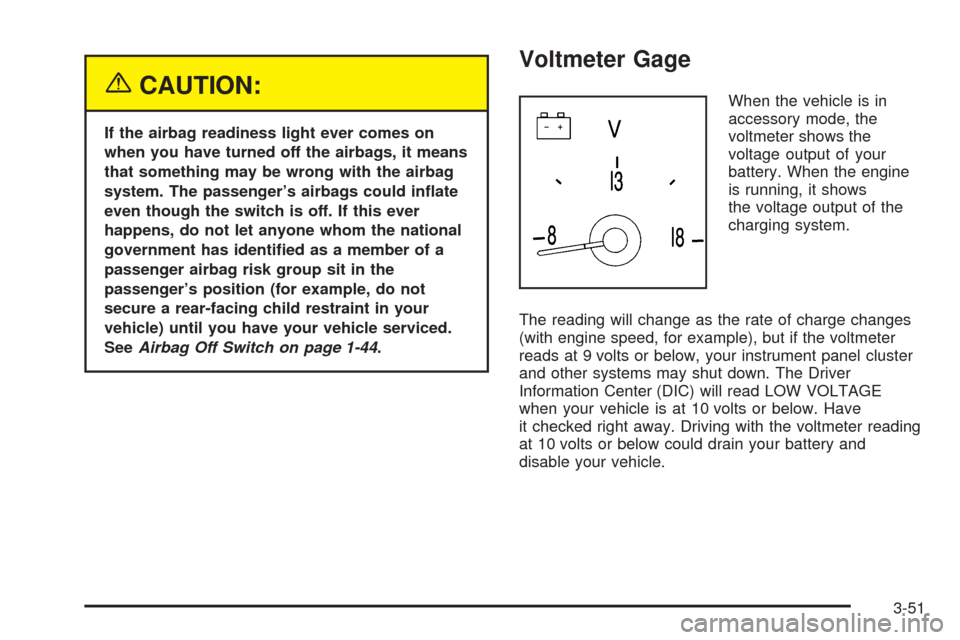
Voltmeter Gage
When the vehicle is in
accessory mode, the
voltmeter shows the
voltage output of your
battery. When the engine
is running, it shows
the voltage output of the
charging system.
The reading will change as the rate of charge changes
(with engine speed, for example), but if the voltmeter
reads at 9 volts or below, your instrument panel cluster
and other systems may shut down. The Driver
Information Center (DIC) will read LOW VOLTAGE
when your vehicle is at 10 volts or below. Have
it checked right away. Driving with the voltmeter reading
at 10 volts or below could drain your battery and
disable your vehicle.
3-51
Page 171 of 438
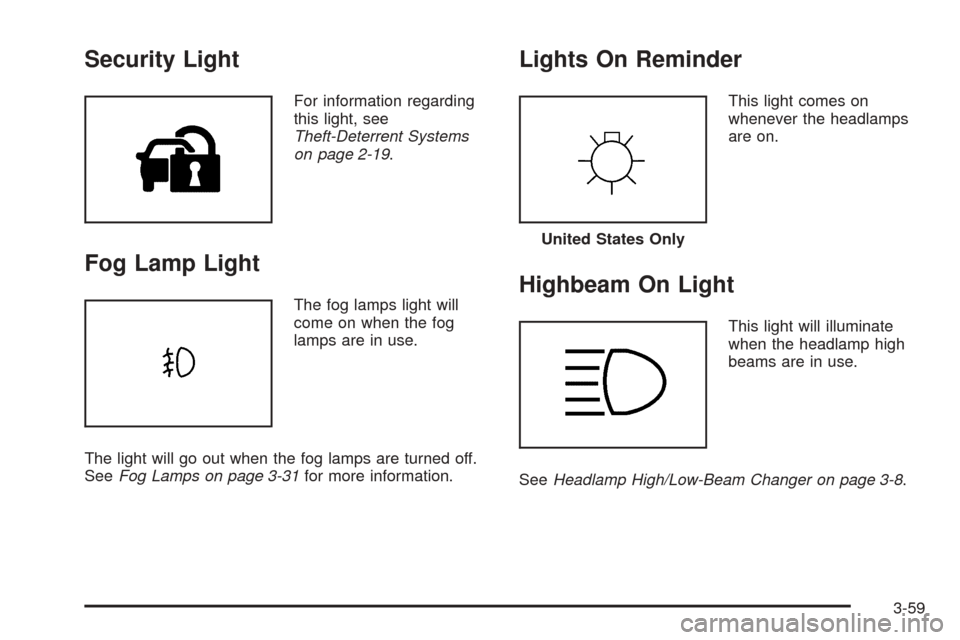
Security Light
For information regarding
this light, see
Theft-Deterrent Systems
on page 2-19.
Fog Lamp Light
The fog lamps light will
come on when the fog
lamps are in use.
The light will go out when the fog lamps are turned off.
SeeFog Lamps on page 3-31for more information.
Lights On Reminder
This light comes on
whenever the headlamps
are on.
Highbeam On Light
This light will illuminate
when the headlamp high
beams are in use.
SeeHeadlamp High/Low-Beam Changer on page 3-8.
United States Only
3-59
Page 176 of 438
DIC Warnings and Messages
These messages will appear if there is a problem
sensed in one of your vehicle’s systems. You must then
press RESET to clear the display screen for further
use. However, be sure to take any message that
appears on the display screen seriously and remember
that pressing the RESET button will only make the
message disappear, not the problem.
DIC messages can also be displayed in English,
French, German, Italian and Spanish.
ABS ACTIVE:When your anti-lock system is adjusting
brake pressure to help avoid a braking skid, the ABS
ACTIVE message will be displayed.
Slippery road conditions may exist if this message is
displayed, so adjust your driving accordingly. The
message may stay on for a few seconds after the
system stops adjusting brake pressure.
BATTERY SAVER ACTIVE:This message is displayed
when the vehicle has detected that the battery voltage
is dropping beyond a reasonable point. The battery
saver system will start reducing certain features of the
vehicle that you may not be able to notice. At the
point that features are disabled, this message is
displayed. It means that the vehicle is trying to save the
charge in the battery. Turn off unnecessary accessories
to allow the battery to recharge.CHANGE OIL NOW:This means that the life of the
engine oil has expired. SeeScheduled Maintenance on
page 7-4. After an oil change, the Oil Life Indicator
must be reset. SeeOil Life Indicator on page 3-77and
Engine Oil Life System on page 6-16.
CHARGE SYSTEM FAULT:This message will display
when a problem with the charging system has been
detected. Have your vehicle serviced by your GM dealer.
CHECK GAS CAP:This message will appear if the
gas cap has not been fully tightened. You should
recheck your gas cap to ensure that it is on properly.
CLEAN RADAR CRUISE:This message indicates the
ACC system is disabled because the radar is blocked and
cannot detect vehicles in your path. It may also activate
during heavy rain or due to road spray. To clean the
system, see “Adaptive Cruise Control (ACC)” underTurn
Signal/Multifunction Lever on page 3-7.
CLOSE CARGO DIVIDER:This message indicates that
the cargo divider is not in place. Open the trunk and
make sure the cargo divider is secure and no objects are
on the divider. SeeRear Storage Area on page 2-44
for more information.
3-64
Page 183 of 438
TOP INOP – VALET ON:This message will display
when the retractable hardtop button is pressed and the
valet switch is on. Turn off the valet switch before
using the retractable hardtop.
TOP INOP OUT OF PARK:This message will display if
the retractable hardtop button is pressed while the
vehicle is not in PARK (P).
TOP MOTOR OVER TEMP:This message will display
when the retractable hardtop button is pressed and
the hardtop pump motor temperature is over
221°F (105°C). Wait for the hardtop pump motor to cool
down before using the retractable hardtop.
TOP NOT SECURE:This message will display when
the retractable hardtop button is released before the top
open or close operation is complete. Press and hold
the retractable hardtop button to fully open or close
the top.
TRAC SYSTEM ACTIVE:When your traction control
system is limiting wheel spin, the TRACTION SYSTEM
ACTIVE message will be displayed. Slippery road
conditions may exist if this message is displayed, so
adjust your driving accordingly. This message will stay
on for a few seconds after the traction control system
stops limited wheel spin.TRAC/STABILITRAK OFF:This message indicates
that both the Traction Control System (TCS) and
StabiliTrak
®are off. The message will remain until the
systems are turned on again.
TRAC/STABILITRAK ON:This message indicates that
both the Traction Control System (TCS) and the
StabiliTrak
®are on.
TRACTION SYSTEM OFF:This message indicates
that the Traction Control System (TCS) is off but
StabiliTrak
®remains on.
TRACTION SYSTEM ON:This message indicates that
the Traction Control System (TCS) is on, but
StabiliTrak
®is off.
TRUNK AJAR:This message indicates that the trunk is
open while the vehicle is running and not in PARK (P).
WAIT FOR STABILITRAK:This message will be
displayed after driving 19 mph (30 km/h) for 10 seconds
if the steering is not centered. StabiliTrak
®is not
available until the steering centers itself and the
STABILITRAK READY message is displayed in the DIC.
3-71
Page 254 of 438
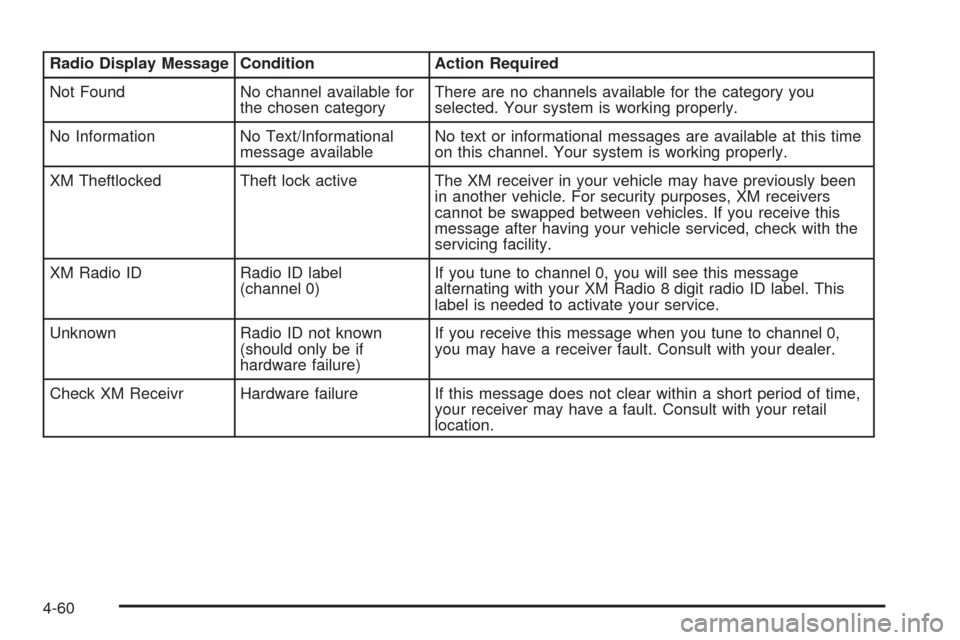
Radio Display Message Condition Action Required
Not Found No channel available for
the chosen categoryThere are no channels available for the category you
selected. Your system is working properly.
No Information No Text/Informational
message availableNo text or informational messages are available at this time
on this channel. Your system is working properly.
XM Theftlocked Theft lock active The XM receiver in your vehicle may have previously been
in another vehicle. For security purposes, XM receivers
cannot be swapped between vehicles. If you receive this
message after having your vehicle serviced, check with the
servicing facility.
XM Radio ID Radio ID label
(channel 0)If you tune to channel 0, you will see this message
alternating with your XM Radio 8 digit radio ID label. This
label is needed to activate your service.
Unknown Radio ID not known
(should only be if
hardware failure)If you receive this message when you tune to channel 0,
you may have a receiver fault. Consult with your dealer.
Check XM Receivr Hardware failure If this message does not clear within a short period of time,
your receiver may have a fault. Consult with your retail
location.
4-60
Page 297 of 438
Winter Driving
Here are some tips for winter driving:
Have your vehicle in good shape for winter.
You may want to put winter emergency supplies in
your vehicle.
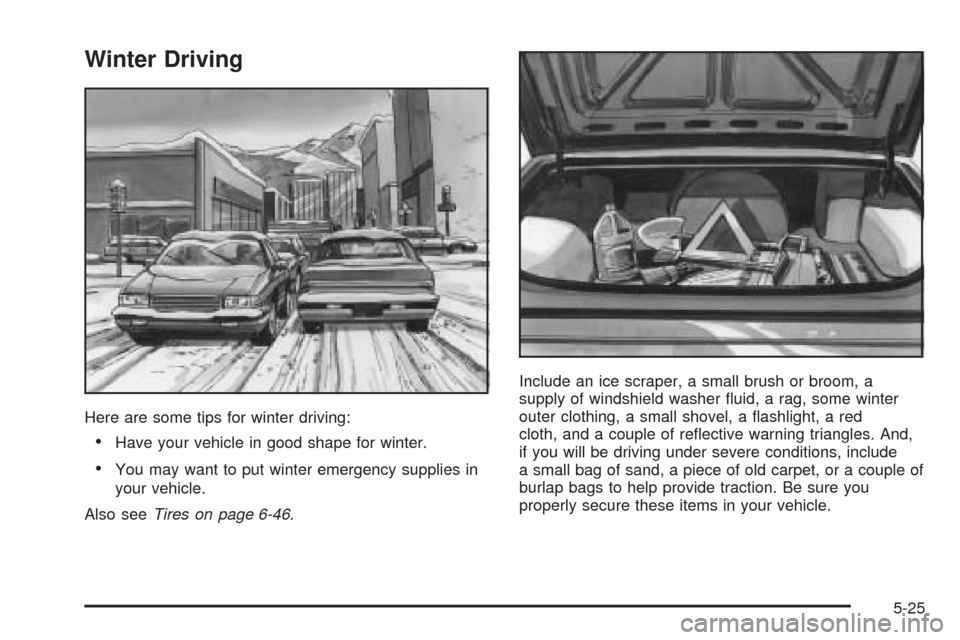
Also seeTires on page 6-46.Include an ice scraper, a small brush or broom, a
supply of windshield washer �uid, a rag, some winter
outer clothing, a small shovel, a �ashlight, a red
cloth, and a couple of re�ective warning triangles. And,
if you will be driving under severe conditions, include
a small bag of sand, a piece of old carpet, or a couple of
burlap bags to help provide traction. Be sure you
properly secure these items in your vehicle.
5-25