key CADILLAC XLR 2005 1.G Repair Manual
[x] Cancel search | Manufacturer: CADILLAC, Model Year: 2005, Model line: XLR, Model: CADILLAC XLR 2005 1.GPages: 438, PDF Size: 3.69 MB
Page 244 of 438
Language
Your vehicle has been set for the English language. If you
wish to change the language, you must do so through the
Driver Information Center (DIC). SeeDriver Information
Center (DIC) on page 3-61for more information.
If the language is changed from English, a majority of the
voice guidance prompts and screen text will change to
the selected language. Remember, the menu screens will
not match word-for-word as they appear in this manual.
Playing the Radio
PWR-VOL (Power-Volume):Press this knob to turn
the audio and navigation systems on and off. Turn
the knob to increase or decrease the volume to
the audio system.
«TUNE/SEEKª:Press the up or down arrow to go
to the next or previous station and stay there.
BAND:Press this key to switch between AM, FM1,
FM2, XM1, XM 2, or WX, if equipped. If you are on a
map screen and press this key, the screen will not
change but the audio source will.
Finding a Station
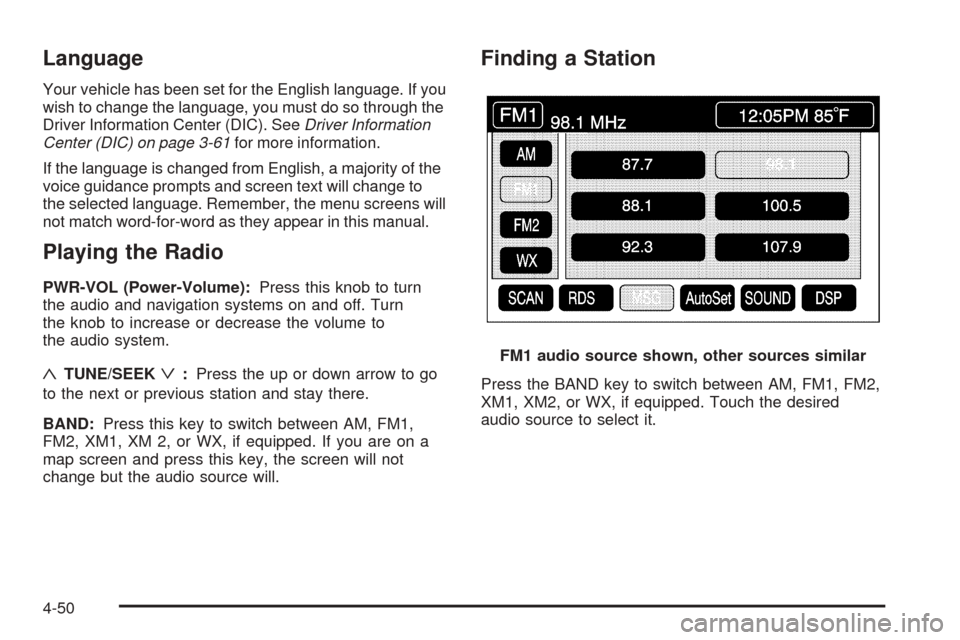
Press the BAND key to switch between AM, FM1, FM2,
XM1, XM2, or WX, if equipped. Touch the desired
audio source to select it.FM1 audio source shown, other sources similar
4-50
Page 247 of 438
To adjust the tone for each preset, do the following:
1. Press the BAND key.
2. Touch AM, FM1, FM2, XM1, XM2, or WX, if
equipped, to access the desired preset screen.
3. Touch SOUND.
4. Touch the plus (+) or minus (−) signs to adjust
treble, mid-range, and bass.
5. Touch Return to exit. This will take you to the
preset station menu.
6. Touch and hold one of the six preset screen
buttons for more than two seconds until you hear
a beep.
Whenever you touch that preset for less than two
seconds, the station and previously stored
information you have entered for each preset
station will be recalled.
7. Repeat the steps for additional presets.Adjusting the Speakers
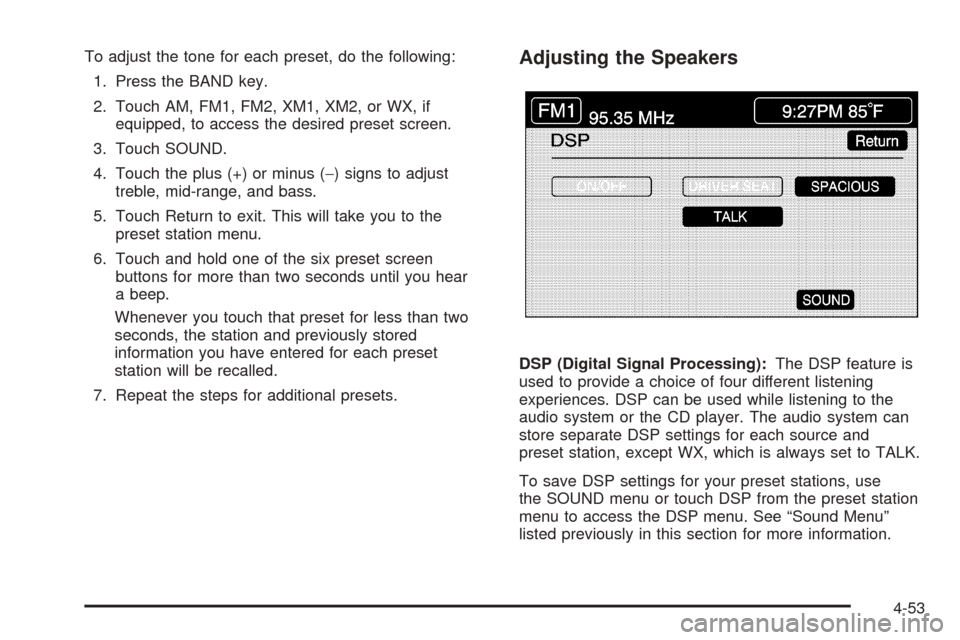
DSP (Digital Signal Processing):The DSP feature is
used to provide a choice of four different listening
experiences. DSP can be used while listening to the
audio system or the CD player. The audio system can
store separate DSP settings for each source and
preset station, except WX, which is always set to TALK.
To save DSP settings for your preset stations, use
the SOUND menu or touch DSP from the preset station
menu to access the DSP menu. See “Sound Menu”
listed previously in this section for more information.
4-53
Page 255 of 438

Six-Disc CD Changer
With the compact disc changer, you can play up to six
normal size discs continuously.
When the radio is turned on, the changer will begin
checking for discs. This will continue for up to one and
a half minutes, depending on the number of discs
loaded. You may hear noise, but this is normal. The CD
changer is initializing.
Press the CD hard key to access the six-disc CD
changer screen. You can also use the system’s DVD
player for single CD play once the map DVD is removed.
SeeCD/DVD Player on page 4-63for more information.
If no CD is loaded in the CD/DVD Player and you
press the CD hard key, the message “No CD Loaded”
will appear on the display.Once you access the CD changer screen, you can
select one of the numbered buttons to go from
one compact disc to another among those loaded in the
CD changer and use the arrows to rewind or fast
forward through the disc selected.CD Changer Screen
4-61
Page 256 of 438

The following features are also available from this screen:
LOAD
EJECT
SCAN THE DISCS or SCAN THE TRACKS
and RANDOM ALL or RANDOM DISC.
The numbered buttons (1 through 6) represent the order
of the discs loaded in the changer. If there are only
two CDs loaded, buttons 1 and 2 will only be available
to choose from.
LOAD:Touch this button once each time you wish to
load a CD into the changer. It may take up to
10 seconds for the changer to accept the CD into the
slot depending on the changer initializing. Repeat
this procedure for loading up to six discs. Press and
hold the LOAD button until a beep is heard to put
the changer in LOAD ALL mode. Once the Insert CD
message is displayed, you can load all six discs,
one after the other.
r(Play):Touch this button to begin playing a CD.
RANDOM DISC:Touch this button to hear the tracks in
random, rather than sequential, order on the disc
selected. Press the TUNE/SEEK hard key to randomly
seek through the tracks on this disc. Touch RANDOM
DISC again to turn off random play mode.SCAN TRACKS:Touch this button to hear the �rst
10 seconds of each track on the selected disc. Touch
this button again to stop scanning. The CD will mute
while scanning.
r(Rewind):Touch this button to rewind quickly
through a track selection.
EJECT:Touch this button once to eject the chosen CD.
The chosen CD may be selected by �rst touching one
of the numbered buttons from 1 to 6. Repeat this
procedure for ejecting up to six discs from the changer.
If you press and hold the EJECT button until a beep
is heard, The system will begin to eject all of the discs
from the player. Once the CD is removed the next
will come out until they are all ejected.
j(Pause):Touch this button to pause CD play.
Touch it again to resume play or touch the play button.
RANDOM ALL:Touch this button to hear the tracks
on all of the discs in the CD changer in random, rather
than sequential, order. Press the TUNE/SEEK hard
key while RANDOM ALL is on to randomly seek within
that disc. Touch RANDOM ALL again to turn off
random mode.
SCAN DISCS:Touch this button to hear the �rst
10 seconds of �rst track on each disc. Touch this button
again to stop scanning. The CD will mute while scanning.
4-62
Page 258 of 438

CD Player
To use the player as a single music CD player, you
must �rst remove the navigation map DVD. While
playing a CD in the CD/DVD Player, the navigation
system is not available. The message “The disc installed
is not a map DVD” will appear on the display if any of
the navigation hard keys are pressed.
To remove the navigation map DVD and load a music
CD, use the following steps:
1. Start the vehicle.
2. Press the TILT hard key until you hear a beep. This
will open the faceplate of the system.
3. If one is loaded, the navigation map DVD will eject
from the slot.
4. Gently remove the navigation map DVD from the
slot and return it to its case.
5. Insert the music CD into the slot. The system will
pull the CD into the player.
6. Press and release the TILT hard key to close the
faceplate.Notice:Shifting out of PARK (P) with the system’s
faceplate open will cause the faceplate to close
automatically. This could cause damage to a
CD, DVD or the system if it is partially loaded. Before
shifting out of PARK (P), make sure that the DVD
or CD is loaded properly. The vehicle must be
shifted back into PARK (P) to close the faceplate.
Once a music CD is loaded, the CD player menu will
appear on the display. When using the system as
a single CD player, the CD hard key will alternate
between the CD player and the six-disc CD changer if
CDs are loaded.CD Player Screen
4-64
Page 259 of 438

r(Play):Touch this button to begin playing a CD.
RANDOM:Touch this button to hear the tracks in
random, rather than sequential, order on the disc. Touch
RANDOM again to turn off random mode.
SCAN TRACKS:Touch this button to hear the �rst
10 seconds of each track on the disc. Touch this button
again to stop scanning. The CD will mute while scanning.
REPEAT TRACK:Touch this button to repeat the
selected track.
r(Rewind):Touch this button to rewind quickly
through a track selection.
j(Pause):Touch this button to pause CD play.
Touch it again to resume play or touch the play button.
[(Forward):Touch this button to fast forward
quickly through a track selection.
«TUNE SEEKª:Touch the up arrow on the
TUNE/SEEK hard key to seek to the next selection on
the compact disc. If playing the last track of the disc,
touching the up arrow will seek to the �rst track of the
disc. Touch the down arrow to seek to the previous
selection on the compact disc. If playing the �rst track of
the disc, touching the down arrow will seek to the last
track of the disc. The sound will mute while seeking.
DVD Player
To use the player as a video DVD player, you must �rst
remove the navigation map DVD or music CD. While
playing a video DVD, the navigation system is not
available. The message “The disc installed is not a map
DVD” will appear on the display if any of the navigation
hard keys are pressed.
This feature will not operate unless the vehicle is in
PARK (P).
To remove the navigation map DVD and load a video
DVD, use the following steps:
1. With the vehicle in PARK (P) and the vehicle
running, press the TILT hard key until a beep
is heard. The faceplate of the system will open.
2. If a map DVD or a music CD is loaded, the system
will automatically eject it. Gently remove it from the
slot and return it to its case.
4-65
Page 260 of 438
3. Load the video DVD into the slot. The system will
pull the DVD into the player.
4. Press and release the TILT hard key to close the
faceplate.
Notice:Shifting out of PARK (P) with the system’s
faceplate open will cause the faceplate to close
automatically. This could cause damage to a
CD, DVD or the system if it is partially loaded. Before
shifting out of PARK (P), make sure that the DVD
or CD is loaded properly. The vehicle must be
shifted back into PARK (P) to close the faceplate.
Once the faceplate is closed and a video DVD is loaded,
the system will automatically play the DVD.
Playing a DVD
There are three ways to play a DVD depending on
which screen you are on. They are the following:
Once a DVD is inserted, the system will
automatically play the DVD.
If you are on a map screen, touch the DVD source
button.
From the audio screen, press the DVD hard key.
DVD Menu Options
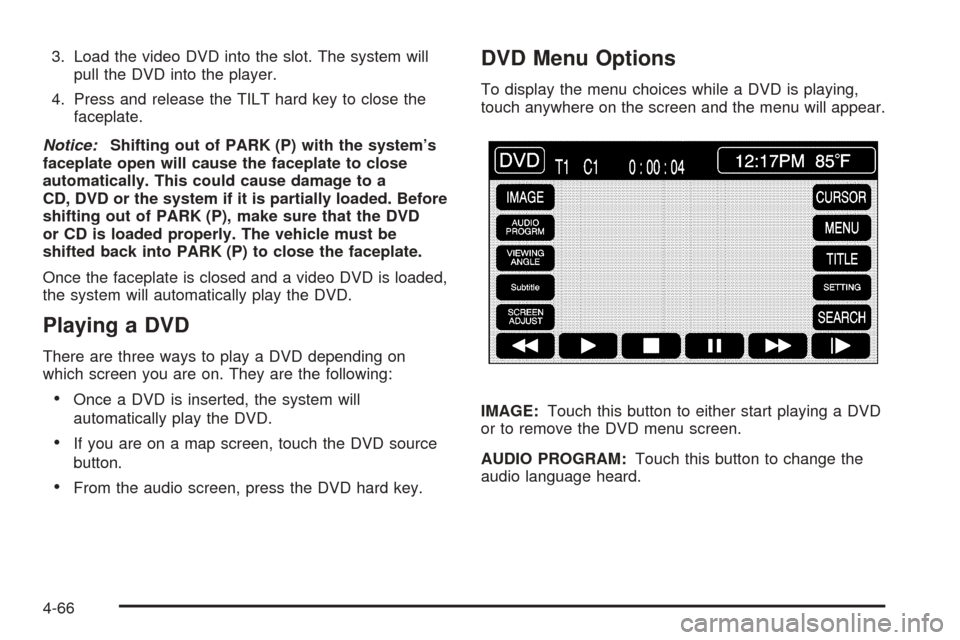
To display the menu choices while a DVD is playing,
touch anywhere on the screen and the menu will appear.
IMAGE:Touch this button to either start playing a DVD
or to remove the DVD menu screen.
AUDIO PROGRAM:Touch this button to change the
audio language heard.
4-66
Page 263 of 438
Radio Personalization with Home
and Away Feature
With this feature, you can recall the latest audio system
settings as adjusted the last time your vehicle was
operated. This feature allows two different drivers to store
and recall their own audio system settings. The settings
recalled by the audio system are determined by which
RKE transmitter (1 or 2) was used to enter the vehicle.
The number on the back of the RKE transmitter
corresponds to driver 1 or to driver 2. The audio system
settings will automatically adjust to where they were last
set by the identi�ed driver. The settings can also be
recalled by brie�y pressing the MEMORY seat switches 1
or 2 located on the driver’s door.
Your audio system can store HOME and AWAY preset
stations. HOME and AWAY preset stations allow
you to use one set of preset radio settings in the area
where you live, and another set when you go out of
town. That way, you will not need to reprogram
your preset stations every time you travel.To select HOME and AWAY preset stations, do the
following:
1. With the audio system on, touch the Audio hard key
and turn the audio system off.
2. Touch the HOME or AWAY button from the main
audio screen.
The next time the audio system is turned on, the
system will recall the last active preset selection.
When battery power is removed and later applied, you
will not have to reset your home audio system preset
stations because the audio system remembers
them. However, you will have to reset your away radio
preset stations.
Voice Recognition
The navigation system’s voice recognition allows for
hands-free operation of navigation and audio system
features. Voice recognition can be used when the ignition
is in on or when Retained Accessory Power (RAP)
is active.
This feature only works if the map DVD is inserted and
I AGREE has been selected. If you try to use voice
recognition without the map DVD inserted, the system
will display “Please insert the navigation map DVD
to use the voice recognition feature.”
4-69
Page 275 of 438
Many adults — by some estimates, nearly half the adult
population — choose never to drink alcohol, so they
never drive after drinking. For persons under 21,
it is against the law in every U.S. state to drink alcohol.
There are good medical, psychological and
developmental reasons for these laws.
The obvious way to eliminate the leading highway
safety problem is for people never to drink alcohol and
then drive. But what if people do? How much is “too
much” if someone plans to drive? It is a lot less
than many might think. Although it depends on each
person and situation, here is some general information
on the problem.
The Blood Alcohol Concentration (BAC) of someone
who is drinking depends upon four things:
The amount of alcohol consumed
The drinker’s body weight
The amount of food that is consumed before and
during drinking
The length of time it has taken the drinker to
consume the alcohol
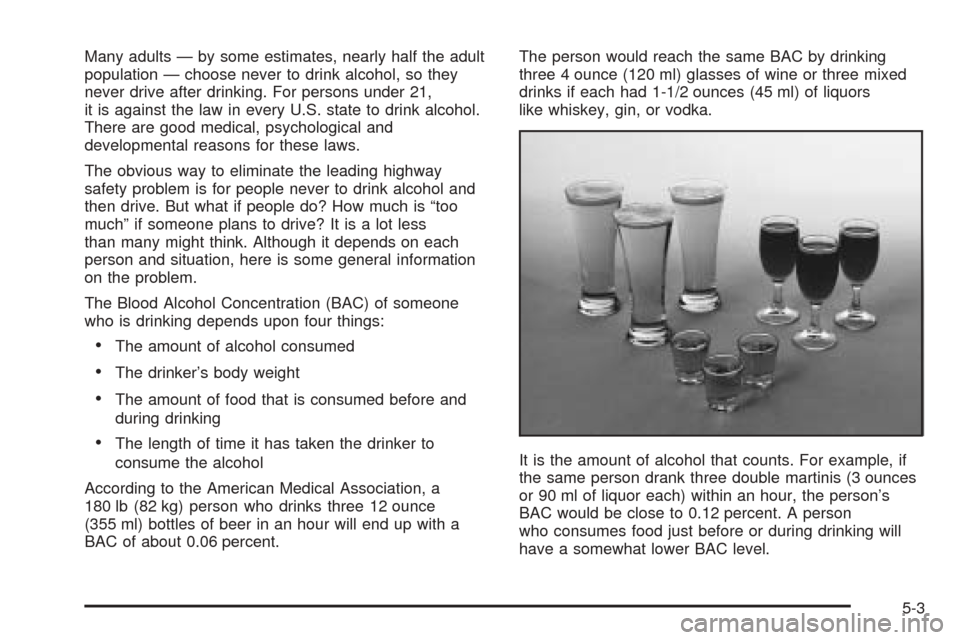
According to the American Medical Association, a
180 lb (82 kg) person who drinks three 12 ounce
(355 ml) bottles of beer in an hour will end up with a
BAC of about 0.06 percent.The person would reach the same BAC by drinking
three 4 ounce (120 ml) glasses of wine or three mixed
drinks if each had 1-1/2 ounces (45 ml) of liquors
like whiskey, gin, or vodka.
It is the amount of alcohol that counts. For example, if
the same person drank three double martinis (3 ounces
or 90 ml of liquor each) within an hour, the person’s
BAC would be close to 0.12 percent. A person
who consumes food just before or during drinking will
have a somewhat lower BAC level.
5-3
Page 339 of 438
5. Then replace the pressure cap. Be sure the cap is
fully installed.
If the LOW COOLANT message does not appear on the
Driver Information Center (DIC) after two minutes, the
coolant is at the proper �ll level. If a LOW COOLANT
message does appear, repeat Steps 1 through 3
then reinstall the pressure cap, or see your dealer.
Power Steering Fluid
SeeEngine Compartment
Overview on page 6-12for
reservoir location.
When to Check Power Steering Fluid
It is not necessary to regularly check power steering �uid
unless you suspect there is a leak in the system or
you hear an unusual noise. A �uid loss in this system
could indicate a problem. Have the system inspected
and repaired.
How to Check Power Steering Fluid
To check the power steering �uid, do the following:
1. Turn the key off and let the engine compartment
cool down.
2. Wipe the cap and the top of the reservoir clean.
3. Unscrew the cap and wipe the dipstick with a
clean rag.
4. Replace the cap and completely tighten it.
5. Remove the cap again and look at the �uid level on
the dipstick.
The level should be at the FULL COLD mark. If
necessary, add only enough �uid to bring the level up to
the mark.
What to Use
To determine what kind of �uid to use, see
Recommended Fluids and Lubricants on page 7-11.
Always use the proper �uid. Failure to use the proper
�uid can cause leaks and damage hoses and seals.
6-31