clock CADILLAC XT5 2019 Owner's Manual
[x] Cancel search | Manufacturer: CADILLAC, Model Year: 2019, Model line: XT5, Model: CADILLAC XT5 2019Pages: 388, PDF Size: 6.29 MB
Page 32 of 388
Cadillac XT5 Owner Manual (GMNA-Localizing-U.S./Canada/Mexico-
12146119) - 2019 - crc - 7/27/18
KEYS, DOORS, AND WINDOWS 31
driver door and turn the key
counterclockwise, to the unlock
position, five times within
10 seconds.
The DIC displays READY FOR
REMOTE #2, 3, 4, ETC.
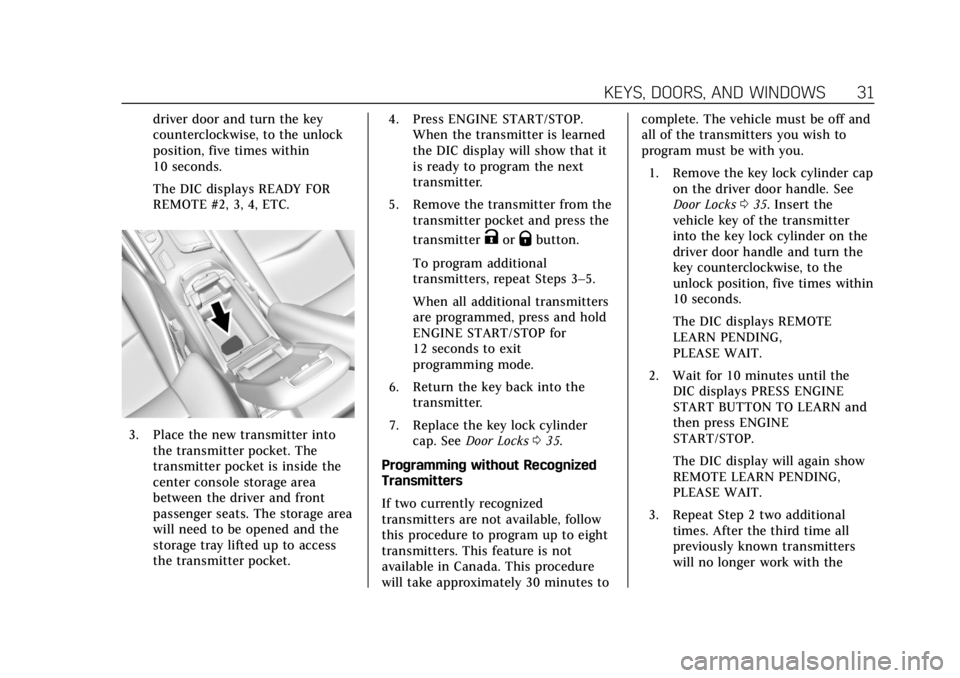
3. Place the new transmitter intothe transmitter pocket. The
transmitter pocket is inside the
center console storage area
between the driver and front
passenger seats. The storage area
will need to be opened and the
storage tray lifted up to access
the transmitter pocket. 4. Press ENGINE START/STOP.
When the transmitter is learned
the DIC display will show that it
is ready to program the next
transmitter.
5. Remove the transmitter from the transmitter pocket and press the
transmitter
KorQbutton.
To program additional
transmitters, repeat Steps 3–5.
When all additional transmitters
are programmed, press and hold
ENGINE START/STOP for
12 seconds to exit
programming mode.
6. Return the key back into the transmitter.
7. Replace the key lock cylinder cap. See Door Locks 035.
Programming without Recognized
Transmitters
If two currently recognized
transmitters are not available, follow
this procedure to program up to eight
transmitters. This feature is not
available in Canada. This procedure
will take approximately 30 minutes to complete. The vehicle must be off and
all of the transmitters you wish to
program must be with you.
1. Remove the key lock cylinder cap on the driver door handle. See
Door Locks 035. Insert the
vehicle key of the transmitter
into the key lock cylinder on the
driver door handle and turn the
key counterclockwise, to the
unlock position, five times within
10 seconds.
The DIC displays REMOTE
LEARN PENDING,
PLEASE WAIT.
2. Wait for 10 minutes until the DIC displays PRESS ENGINE
START BUTTON TO LEARN and
then press ENGINE
START/STOP.
The DIC display will again show
REMOTE LEARN PENDING,
PLEASE WAIT.
3. Repeat Step 2 two additional times. After the third time all
previously known transmitters
will no longer work with the
Page 113 of 388
Cadillac XT5 Owner Manual (GMNA-Localizing-U.S./Canada/Mexico-
12146119) - 2019 - crc - 7/27/18
112 INSTRUMENTS AND CONTROLS
Instruments and
Controls
Controls
Steering Wheel Adjustment . . . . . 113
Steering Wheel Controls . . . . . . . . . 113
Heated Steering Wheel . . . . . . . . . . 113
Horn . . . . . . . . . . . . . . . . . . . . . . . . . . . . . . . 113
Windshield Wiper/Washer . . . . . . . 113
Rear Window Wiper/Washer . . . . 116
Compass . . . . . . . . . . . . . . . . . . . . . . . . . . 116
Clock . . . . . . . . . . . . . . . . . . . . . . . . . . . . . . 117
Power Outlets . . . . . . . . . . . . . . . . . . . . . 118
Wireless Charging . . . . . . . . . . . . . . . . 118
Cigarette Lighter . . . . . . . . . . . . . . . . . . 120
Ashtrays . . . . . . . . . . . . . . . . . . . . . . . . . . 121
Warning Lights, Gauges, and
Indicators
Warning Lights, Gauges, andIndicators . . . . . . . . . . . . . . . . . . . . . . . 121
Instrument Cluster (Base Level Cluster) . . . . . . . . . . . . . . . . . . . . . . . . . . 122
Instrument Cluster (Uplevel Cluster) . . . . . . . . . . . . . . . . . . . . . . . . . . 124
Speedometer . . . . . . . . . . . . . . . . . . . . . . 126
Odometer . . . . . . . . . . . . . . . . . . . . . . . . . 126
Trip Odometer . . . . . . . . . . . . . . . . . . . . 126 Tachometer . . . . . . . . . . . . . . . . . . . . . . . 126
Fuel Gauge . . . . . . . . . . . . . . . . . . . . . . . . 126
Engine Oil Pressure Gauge
(Uplevel Cluster) . . . . . . . . . . . . . . . . 127
Engine Coolant Temperature
Gauge . . . . . . . . . . . . . . . . . . . . . . . . . . . . 128
Voltmeter Gauge (Uplevel Cluster) . . . . . . . . . . . . . . . . . . . . . . . . . . 129
Seat Belt Reminders . . . . . . . . . . . . . . 130
Airbag Readiness Light . . . . . . . . . . 131
Passenger Airbag Status Indicator . . . . . . . . . . . . . . . . . . . . . . . . . 131
Charging System Light . . . . . . . . . . . 132
Malfunction Indicator Lamp (Check Engine Light) . . . . . . . . . . . 132
Brake System Warning Light . . . . 134
Electric Parking Brake Light . . . . . 135
Service Electric Parking Brake Light . . . . . . . . . . . . . . . . . . . . . . . . . . . . . 135
Antilock Brake System (ABS) Warning Light . . . . . . . . . . . . . . . . . . 135
Lane Keep Assist (LKA) Light . . . 136
Vehicle Ahead Indicator . . . . . . . . . 136
Pedestrian Ahead Indicator . . . . . . 136
Traction Off Light . . . . . . . . . . . . . . . . 136
StabiliTrak OFF Light . . . . . . . . . . . . 137
Traction Control System (TCS)/ StabiliTrak Light . . . . . . . . . . . . . . . . 137
Engine Coolant Temperature Warning Light . . . . . . . . . . . . . . . . . . 137 Tire Pressure Light . . . . . . . . . . . . . . . 138
Engine Oil Pressure Light . . . . . . . . 138
Low Fuel Warning Light . . . . . . . . . 139
Security Light . . . . . . . . . . . . . . . . . . . . . 139
High-Beam On Light . . . . . . . . . . . . . 139
Lamps On Reminder . . . . . . . . . . . . . 139
Cruise Control Light . . . . . . . . . . . . . . 140
Door Ajar Light . . . . . . . . . . . . . . . . . . . 140
Information Displays
Driver Information
Center (DIC) . . . . . . . . . . . . . . . . . . . . . 140
Head-Up Display (HUD) . . . . . . . . . 143
Vehicle Messages
Vehicle Messages . . . . . . . . . . . . . . . . . 146
Engine Power Messages . . . . . . . . . . 147
Vehicle Speed Messages . . . . . . . . . 147
Vehicle Personalization
Vehicle Personalization . . . . . . . . . . 147
Universal Remote System
Universal Remote System . . . . . . . . 156
Universal Remote System Programming . . . . . . . . . . . . . . . . . . . 156
Universal Remote System Operation . . . . . . . . . . . . . . . . . . . . . . . . 158
Page 118 of 388
Cadillac XT5 Owner Manual (GMNA-Localizing-U.S./Canada/Mexico-
12146119) - 2019 - crc - 7/27/18
INSTRUMENTS AND CONTROLS 117
The compass system is designed to
operate for a certain number of miles
or degrees of turn before needing a
signal from the GPS satellites. When
the compass display shows CAL, drive
the vehicle for a short distance in an
open area where it can receive a GPS
signal. The compass system will
automatically determine when a GPS
signal is restored and provide a
heading again.
Clock
The infotainment system controls are
used to access the time and date
settings through the menu system.
See“Home Page ”in the infotainment
manual for information about how to
use the menu system.
Setting the Clock
Time
To set the time:
1. From the Home Page, touch SETTINGS, then touch Time
and Date. 2. Touch Set Time, then touch + or
−to increase or decrease hours
or minutes, and change AM
or PM.
3. Touch 12-24 Hr for a 12 or 24 hour clock.
4. Touch
[Back to go back to the
previous menu.
Date
To set the date: 1. From the Home Page, touch SETTINGS, then touch Time
and Date.
2. Touch Set Date, then touch + or −to increase or decrease month,
day, or year.
3. Touch
[Back to go back to the
previous menu.
Auto Set
When on, the time and date will
automatically update.
To set auto set: 1. From the Home Page, touch
SETTINGS, then touch Time
and Date.
2. Touch Set Time or Set Date.
3. Touch Auto Set, then select On-Cell Network or Off-Manual
to manually set the time
and date.
4. Touch
[Back to go back to the
previous menu.
If auto set is on, the time displayed on
the clock may not update immediately
when driving into a new time zone.
In some regions, auto set may require
an active OnStar or connected service
plan, if available.
Clock Display
When on, the digital clock will display
on the infotainment screen.
To set the clock display: 1. From the Home Page, touch SETTINGS, then touch Time
and Date.
2. Touch Clock Display, then select Off or On.
Page 149 of 388
Cadillac XT5 Owner Manual (GMNA-Localizing-U.S./Canada/Mexico-
12146119) - 2019 - crc - 7/27/18
148 INSTRUMENTS AND CONTROLS
.Language
. Teen Driver
. Valet Mode
. Radio
. Vehicle
. Bluetooth
. Apple CarPlay
. Android Auto
. Voice
. Display
. Rear Camera
. Return to Factory Settings
. Software Information
. Wi-Fi
Each menu is detailed in the following
information.
Time and Date
Manually set the time and date. See
Clock 0117.
Rear Seat Reminder
This allows for a chime and a message
when the rear door has been opened
before or during operation of the
vehicle.
Select Off or On.
Language
Select Language, then select from the
available language(s).
The selected language will display on
the system, and voice recognition will
reflect the selected language.
Teen Driver
See “Teen Driver” under“Settings ”in
the infotainment manual.
Valet Mode
This will lock the infotainment system
and steering wheel controls. It may
also limit access to vehicle storage
locations, if equipped.
To enable valet mode:
1. Enter a four-digit code on the keypad. 2. Select Enter to go to the
confirmation screen.
3. Re-enter the four-digit code.
Select Lock or Unlock to lock or
unlock the system. Touch Back to go
back to the previous menu.
Radio
Touch and the following may display:
. Manage Favorites
. Number of Favorites Shown
. Audible Touch Feedback
. Bose Audio Pilot
. Maximum Start Up Volume
Manage Favorites
This allows favorites to be edited. See
“Manage Favorites ”in “Settings” under
“Radio ”in the infotainment manual.
Number of Favorites Shown
Select to set the number of favorites
to display.
Select the desired number or select
Auto and the infotainment system will
automatically adjust the number of
favorites shown.
Page 266 of 388

Cadillac XT5 Owner Manual (GMNA-Localizing-U.S./Canada/Mexico-
12146119) - 2019 - crc - 7/27/18
VEHICLE CARE 265
Caution
Failure to follow the specific
coolant fill procedure could cause
the engine to overheat and could
cause system damage. If coolant is
not visible in the surge tank,
contact your dealer.
The coolant surge tank pressure cap
can be removed when the cooling
system, including the surge tank
pressure cap and upper radiator hose,
is no longer hot.
1. Turn the pressure cap slowly counterclockwise. If a hiss is
heard, wait for that to stop.
A hiss means there is still some
pressure left.
2. Keep turning the pressure cap slowly and remove it.
3. Fill the coolant surge tank withthe proper mixture to the mark
pointed to on the front of the
coolant surge tank.
4. With the coolant surge tank pressure cap off, start the engine
and let it run until you can feel
the upper radiator hose getting
hot. Watch out for the engine
cooling fans. By this time, the
coolant level inside the coolant
surge tank may be lower. If the
level is lower, add more of the
proper mixture to the coolant
surge tank until the level reaches
the mark pointed to on the front
of the coolant surge tank. 5. Replace the pressure cap tightly.
6. Verify coolant level after the
engine is shut off and the
coolant is cold. If necessary,
repeat coolant fill procedure
Step 1–6.
Caution
If the pressure cap is not tightly
installed, coolant loss and engine
damage may occur. Be sure the cap
is properly and tightly secured.
Engine Overheating
The vehicle has several indicators to
warn of the engine overheating.
There is an engine coolant
temperature gauge on the instrument
cluster. See Engine Coolant Temperature
Gauge 0128. The vehicle may also
display a message on the Driver
Information Center (DIC).
If the decision is made not to lift the
hood when this warning appears, get
service help right away. See Roadside
Service 0354.
Page 275 of 388

Cadillac XT5 Owner Manual (GMNA-Localizing-U.S./Canada/Mexico-
12146119) - 2019 - crc - 7/27/18
274 VEHICLE CARE
Bulb Replacement
For the proper type of replacement
bulbs, or any bulb changing procedure
not listed in this section, contact your
dealer.
Caution
Do not replace incandescent bulbs
with aftermarket LED replacement
bulbs. This can cause damage to
the vehicle electrical system.
Halogen Bulbs
{Warning
Halogen bulbs have pressurized gas
inside and can burst if you drop or
scratch the bulb. You or others
could be injured. Be sure to read
and follow the instructions on the
bulb package.
LED Lighting
This vehicle has several LED lamps.
For replacement of any LED lighting
assembly, contact your dealer.
Headlamps and Front Turn
Signal
Uplevel Headlamp Assembly
The uplevel headlamp has LED lamps.
For headlamp replacement, contact
your dealer.Base level Assembly
Driver Side Shown, Passenger Side
Similar
1. Headlamp
2. Turn Signal Lamp
High-Beam Headlamp/Low-Beam
Headlamp
1. Open the hood. See Hood0256.
2. Remove the headlamp bulb access cover.
3. Turn the bulb counterclockwise and pull straight back.
4. Disconnect the wiring harness connector from the bulb.
Page 276 of 388
Cadillac XT5 Owner Manual (GMNA-Localizing-U.S./Canada/Mexico-
12146119) - 2019 - crc - 7/27/18
VEHICLE CARE 275
5. Install the new bulb in theheadlamp assembly by turning
clockwise.
6. Reconnect the wiring harness connector.
7. Install the headlamp bulb access cover.
Turn Signal Lamp
For turn signal lamp replacement,
contact your dealer.
Electrical System
Electrical System Overload
The vehicle has fuses and circuit
breakers to protect against an
electrical system overload.
When the current electrical load is too
heavy, the circuit breaker opens and
closes, protecting the circuit until the
current load returns to normal or the
problem is fixed. This greatly reduces
the chance of circuit overload and fire
caused by electrical problems.
Fuses and circuit breakers protect
power devices in the vehicle.
Replace a bad fuse with a new one of
the identical size and rating.
If there is a problem on the road and
a fuse needs to be replaced, the
same amperage fuse can be borrowed.
Choose some feature of the vehicle
that is not needed to use and replace
it as soon as possible.
Headlamp Wiring
An electrical overload may cause the
lamps to go on and off, or in some
cases to remain off. Have the
headlamp wiring checked right away if
the lamps go on and off or remain off.
Windshield Wipers
If the wiper motor overheats due to
heavy snow or ice, the windshield
wipers will stop until the motor cools
and will then restart.
Although the circuit is protected from
electrical overload, overload due to
heavy snow or ice may cause wiper
linkage damage. Always clear ice and
heavy snow from the windshield
before using the windshield wipers.
If the overload is caused by an
electrical problem and not snow or
ice, be sure to get it fixed.
Fuses and Circuit Breakers
The wiring circuits in the vehicle are
protected from short circuits by a
combination of fuses and circuit
Page 309 of 388
Cadillac XT5 Owner Manual (GMNA-Localizing-U.S./Canada/Mexico-
12146119) - 2019 - crc - 7/27/18
308 VEHICLE CARE
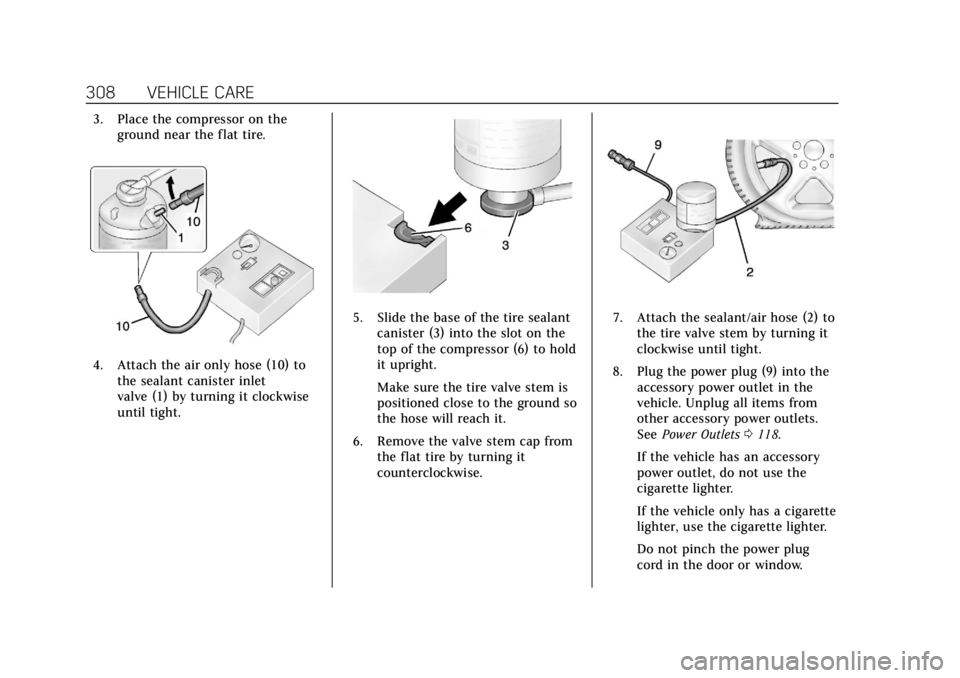
3. Place the compressor on theground near the flat tire.
4. Attach the air only hose (10) tothe sealant canister inlet
valve (1) by turning it clockwise
until tight.
5. Slide the base of the tire sealant
canister (3) into the slot on the
top of the compressor (6) to hold
it upright.
Make sure the tire valve stem is
positioned close to the ground so
the hose will reach it.
6. Remove the valve stem cap from the flat tire by turning it
counterclockwise.7. Attach the sealant/air hose (2) tothe tire valve stem by turning it
clockwise until tight.
8. Plug the power plug (9) into the accessory power outlet in the
vehicle. Unplug all items from
other accessory power outlets.
See Power Outlets 0118.
If the vehicle has an accessory
power outlet, do not use the
cigarette lighter.
If the vehicle only has a cigarette
lighter, use the cigarette lighter.
Do not pinch the power plug
cord in the door or window.
Page 310 of 388

Cadillac XT5 Owner Manual (GMNA-Localizing-U.S./Canada/Mexico-
12146119) - 2019 - crc - 7/27/18
VEHICLE CARE 309
9. Start the vehicle. The vehiclemust be running while using the
air compressor.
10. Press the on/off button (5) to turn the tire sealant and
compressor kit on.
The compressor will inject
sealant and air into the tire.
The pressure gauge (8) will
initially show a high pressure
while the compressor pushes the
sealant into the tire. Once the
sealant is completely dispersed
into the tire, the pressure will
quickly drop and start to rise
again as the tire inflates with
air only.
11. Inflate the tire to the recommended inflation pressure
using the pressure gauge (8). The
recommended inflation pressure
can be found on the Tire and
Loading Information label. See
Tire Pressure 0291.
The pressure gauge (8) may read
higher than the actual tire
pressure while the compressor is
on. Turn the compressor off to get an accurate pressure reading.
The compressor may be turned
on/off until the correct pressure
is reached.
Caution
If the recommended pressure
cannot be reached after
approximately 25 minutes, the
vehicle should not be driven farther.
The tire is too severely damaged
and the tire sealant and compressor
kit cannot inflate the tire. Remove
the power plug from the accessory
power outlet and unscrew the
inflating hose from the tire valve.
See
Roadside Service 0354.
12. Press the on/off button (5) to turn the tire sealant and
compressor kit off.
The tire is not sealed and will
continue to leak air until the
vehicle is driven and the sealant
is distributed in the tire.
Therefore, Steps 13–21 must be
done immediately after Step 12. Be careful while handling the tire
sealant and compressor kit as it
could be warm after usage.
13. Unplug the power plug (9) from the accessory power outlet in the
vehicle.
14. Turn the sealant/air hose (2) counterclockwise to remove it
from the tire valve stem.
15. Replace the tire valve stem cap.
16. Remove the tire sealant canister (4) from the slot on top
of the compressor (6).
17. Turn the air only hose (10) counterclockwise to remove it
from the tire sealant canister
inlet valve (1).
18. Turn the sealant/air hose (2) clockwise onto the sealant
canister inlet valve (1) to prevent
sealant leakage.
19. Return the air only hose (10) and power plug (9) back to their
original storage location.
Page 312 of 388
Cadillac XT5 Owner Manual (GMNA-Localizing-U.S./Canada/Mexico-
12146119) - 2019 - crc - 7/27/18
VEHICLE CARE 311
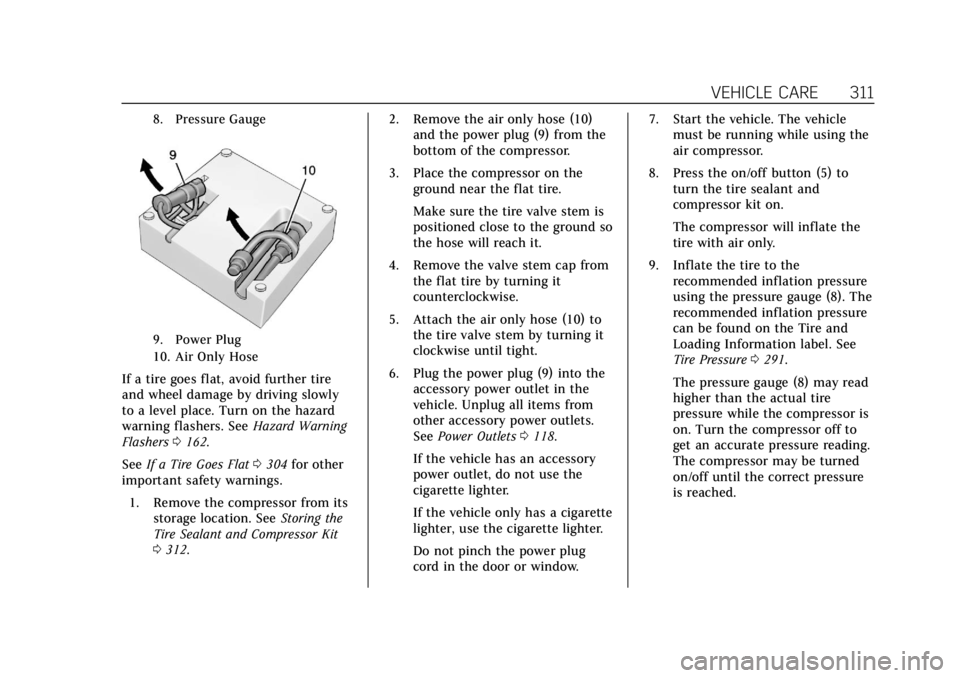
8. Pressure Gauge
9. Power Plug
10. Air Only Hose
If a tire goes flat, avoid further tire
and wheel damage by driving slowly
to a level place. Turn on the hazard
warning flashers. SeeHazard Warning
Flashers 0162.
See If a Tire Goes Flat 0304 for other
important safety warnings.
1. Remove the compressor from its storage location. See Storing the
Tire Sealant and Compressor Kit
0 312. 2. Remove the air only hose (10)
and the power plug (9) from the
bottom of the compressor.
3. Place the compressor on the ground near the flat tire.
Make sure the tire valve stem is
positioned close to the ground so
the hose will reach it.
4. Remove the valve stem cap from the flat tire by turning it
counterclockwise.
5. Attach the air only hose (10) to the tire valve stem by turning it
clockwise until tight.
6. Plug the power plug (9) into the accessory power outlet in the
vehicle. Unplug all items from
other accessory power outlets.
See Power Outlets 0118.
If the vehicle has an accessory
power outlet, do not use the
cigarette lighter.
If the vehicle only has a cigarette
lighter, use the cigarette lighter.
Do not pinch the power plug
cord in the door or window. 7. Start the vehicle. The vehicle
must be running while using the
air compressor.
8. Press the on/off button (5) to turn the tire sealant and
compressor kit on.
The compressor will inflate the
tire with air only.
9. Inflate the tire to the recommended inflation pressure
using the pressure gauge (8). The
recommended inflation pressure
can be found on the Tire and
Loading Information label. See
Tire Pressure 0291.
The pressure gauge (8) may read
higher than the actual tire
pressure while the compressor is
on. Turn the compressor off to
get an accurate pressure reading.
The compressor may be turned
on/off until the correct pressure
is reached.