battery CADILLAC XT5 2020 User Guide
[x] Cancel search | Manufacturer: CADILLAC, Model Year: 2020, Model line: XT5, Model: CADILLAC XT5 2020Pages: 384, PDF Size: 6.52 MB
Page 41 of 384
40 KEYS, DOORS, AND WINDOWS
Warning (Continued)
override, make sure that all people
and obstructions are clear of the
window path.
When the engine is on, override the
automatic reversal system by pulling
and holding the window switch if
conditions prevent it from closing.
Programming the Power
Windows
Programming may be necessary if the
vehicle battery has been disconnected
or discharged. If the window is unable
to express-up, program each
express-close window: 1. Close all doors.
2. Turn the ignition on or to ACC/ ACCESSORY.
3. Partially open the window to be programmed. Then close it and
continue to pull the switch
briefly after the window has fully
closed. 4. Open the window and continue
to press the switch briefly after
the window has fully opened.
Remote Window Operation
If equipped, this feature allows all
windows to be opened remotely.
If enabled in vehicle personalization,
press and hold
Kon the RKE
transmitter. See Vehicle Personalization
0 131.
Sun Visors
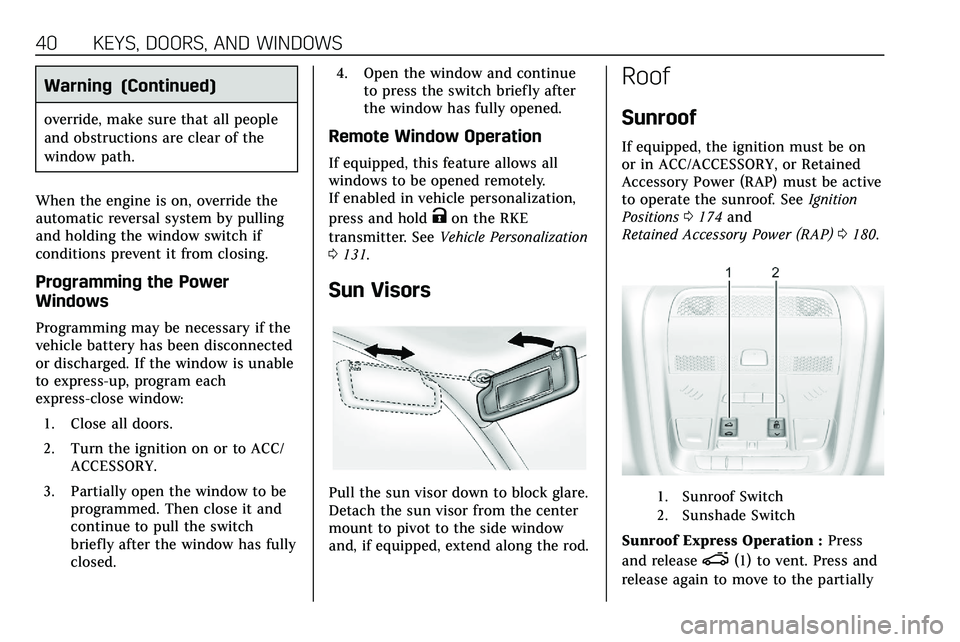
Pull the sun visor down to block glare.
Detach the sun visor from the center
mount to pivot to the side window
and, if equipped, extend along the rod.
Roof
Sunroof
If equipped, the ignition must be on
or in ACC/ACCESSORY, or Retained
Accessory Power (RAP) must be active
to operate the sunroof. See Ignition
Positions 0174 and
Retained Accessory Power (RAP) 0180.
1. Sunroof Switch
2. Sunshade Switch
Sunroof Express Operation : Press
and release
e(1) to vent. Press and
release again to move to the partially
Page 72 of 384
SEATS AND RESTRAINTS 71
A thick layer of additional material,
such as a blanket or cushion,
or aftermarket equipment such as seat
covers, seat heaters, and seat
massagers can affect how well the
passenger sensing system operates.
We recommend that you not use seat
covers or other aftermarket equipment
except when approved by GM for your
specific vehicle. SeeAdding Equipment
to the Airbag-Equipped Vehicle 071 for
more information about modifications
that can affect how the system
operates.
The ON indicator may be lit if an
object, such as a briefcase, handbag,
grocery bag, laptop, or other electronic
device, is put on an unoccupied seat.
If this is not desired, remove the
object from the seat.
{Warning
Stowing articles under the
passenger seat or between the
passenger seat cushion and
seatback may interfere with the
proper operation of the passenger
sensing system.
Servicing the
Airbag-Equipped Vehicle
Airbags affect how the vehicle should
be serviced. There are parts of the
airbag system in several places around
the vehicle. Your dealer and the
service manual have information
about servicing the vehicle and the
airbag system. To purchase a service
manual, see Publication Ordering
Information 0358.
{Warning
For up to 10 seconds after the
vehicle is turned off and the battery
is disconnected, an airbag can still
inflate during improper service. You
can be injured if you are close to an
airbag when it inflates. Avoid
yellow connectors. They are
probably part of the airbag system.
Be sure to follow proper service
procedures, and make sure the
person performing work for you is
qualified to do so.
Adding Equipment to the
Airbag-Equipped Vehicle
Adding accessories that change the
vehicle's frame, bumper system,
height, front end, or side sheet metal
may keep the airbag system from
working properly.
The operation of the airbag system
can also be affected by changing,
including improperly repairing or
replacing, any parts of the following:
.
Airbag system, including airbag
modules, front or side impact
sensors, sensing and diagnostic
module, or airbag wiring
. Front seats, including stitching,
seams or zippers
. Seat belts
. Steering wheel, instrument panel,
overhead console, ceiling trim,
or pillar garnish trim
. Inner door seals, including
speakers
Your dealer and the service manual
have information about the location of
the airbag modules and sensors,
Page 116 of 384
INSTRUMENTS AND CONTROLS 115
If the word ON, or the on symbol, is
lit on the passenger airbag status
indicator, it means that the front
outboard passenger frontal airbag is
allowed to inflate.
If the word OFF, or the off symbol, is
lit on the passenger airbag status
indicator, it means that the passenger
sensing system has turned off the
front outboard passenger frontal
airbag.
If, after several seconds, both status
indicator lights remain on, or if there
are no lights at all, there may be a
problem with the lights or the
passenger sensing system. See your
dealer for service.
{Warning
If the airbag readiness light ever
comes on and stays on, it means
that something may be wrong with
the airbag system. To help avoid
injury to yourself or others, have(Continued)
Warning (Continued)
the vehicle serviced right away. See
Airbag Readiness Light0114 for
more information, including
important safety information.
Charging System Light
The charging system light comes on
briefly when the ignition is turned on,
but the engine is not running, as a
check to show the light is working.
It should go out when the engine is
started.
If the light stays on, or comes on
while driving, there may be a problem
with the electrical charging system.
Have it checked by your dealer.
Driving while this light is on could
drain the battery. When this light comes on, or is
flashing, the Driver Information
Center (DIC) also displays a message.
If a short distance must be driven
with the light on, be sure to turn off
all accessories, such as the radio and
air conditioner.
Malfunction Indicator Lamp
(Check Engine Light)
This light is part of the vehicle’s
emission control on-board diagnostic
system. If this light is on while the
engine is running, a malfunction has
been detected and the vehicle may
require service. The light should come
on to show that it is working when
the ignition is in Service Mode. See
Ignition Positions
0174.
Page 118 of 384

INSTRUMENTS AND CONTROLS 117
If the light remains on, see your
dealer.
Emissions Inspection and
Maintenance Programs
If the vehicle requires an Emissions
Inspection/Maintenance test, the test
equipment will likely connect to the
vehicle's Data Link Connector (DLC).
The DLC is under the instrument
panel to the left of the steering wheel.
Connecting devices that are not used
to perform an Emissions Inspection/
Maintenance test or to service the
vehicle may affect vehicle operation.
SeeAdd-On Electrical Equipment 0246.
See your dealer if assistance is needed.
The vehicle may not pass
inspection if:
. The light is on when the engine is
running. .
The light does not come on when
the ignition is in Service Mode.
. Critical emission control systems
have not been completely
diagnosed. If this happens, the
vehicle would not be ready for
inspection and might require
several days of routine driving
before the system is ready for
inspection. This can happen if the
12-volt battery has recently been
replaced or run down, or if the
vehicle has been recently serviced.
See your dealer if the vehicle will not
pass or cannot be made ready for
the test.
Brake System Warning
Light
MetricEnglish This light should come on briefly
when the vehicle is turned on. If it
does not come on then, have it fixed
so it will be ready to warn you if there
is a problem.
If the light comes on and stays on at
start up, there is a brake problem.
Have the brake system inspected
right away.
If the light comes on while driving,
pull off the road and stop carefully.
The brake pedal might be harder to
push, or the brake pedal may go closer
to the floor. It could take longer to
stop. If the light is still on, have the
vehicle towed for service. See
Towing
the Vehicle 0319.
{Warning
The brake system might not be
working properly if the brake
system warning light is on. Driving
with the brake system warning light
on can lead to a crash. If the light is
still on after the vehicle has been
(Continued)
Page 127 of 384
126 INSTRUMENTS AND CONTROLS
The Oil Life display must be reset
after each oil change. It will not reset
itself. Do not reset the Oil Life display
accidentally at any time other than
when the oil has just been changed.
It cannot be reset accurately until the
next oil change. To reset the engine
oil life system, press SEL and then
select yes or no. SeeEngine Oil Life
System 0257.
Tire Pressure : Shows the
approximate pressures of all four tires.
Tire pressure is displayed in either
kilopascal (kPa) or in pounds per
square inch (psi). If the pressure is
low, the value for that tire is shown in
amber. See Tire Pressure Monitor
System 0291 and
Tire Pressure Monitor Operation 0292.
Air Filter Life : Shows an estimate of
the engine air filter’s remaining useful
life and the state of the system.
Engine Air Filter Life 95% means 95%
of the current air filter life remains.
Messages will display based on the
engine air filter life and the state of
the system. When the REPLACE AT
NEXT OIL CHANGE message displays,
the engine air filter should be replaced at the time of the next oil change.
When the REPLACE SOON message
displays, the engine air filter should
be replaced at the earliest
convenience.
The Air Filter Life display must be
reset after the engine air filter
replacement. To reset, see
Engine Air
Filter Life System 0259.
Fuel Economy : Displays average fuel
economy, the best fuel economy over
the selected distance, and a bar graph
showing instantaneous fuel economy.
Average Speed : Displays the average
vehicle speed of the vehicle in
kilometers per hour (km/h) or miles
per hour (mph). This average is based
on the various vehicle speeds recorded
since the last reset. Reset the average
speed by pressing SEL while this
display is active to show a
confirmation window to select yes
or no.
Timer : This display can be used as a
timer. To start the timer, press SEL
while this display is active. The
display will show the amount of time
that has passed since the timer was last reset. To stop the timer, press SEL
briefly while this display is active and
the timer is running.
Press SEL while this display is active
to reset the timer.
Follow Distance/Gap Setting :
When
Adaptive Cruise Control (ACC) is not
engaged, the current follow time to
the vehicle ahead is displayed as a
time value on this page. When ACC
has been engaged, the display
switches to the gap setting page. This
page shows the current gap setting
along with the vehicle ahead telltale.
Driver Assistance : If equipped,
shows information for Lane Keep
Assist (LKA) and Forward Collision
Alert (FCA).
Battery Voltage : Shows the current
battery voltage.
Coolant Temperature : Shows the
engine coolant temperature in either
degrees Celsius (°C) or degrees
Fahrenheit (°F).
Oil Temperature : Shows the engine
oil temperature in either degrees
Celsius (°C) or degrees Fahrenheit (°F).
Page 132 of 384
INSTRUMENTS AND CONTROLS 131
.Steering
. Ride Control Systems
. Driver Assistance Systems
. Cruise Control
. Lighting and Bulb Replacement
. Wiper/Washer Systems
. Doors and Windows
. Seat Belts
. Airbag Systems
. Engine and Transmission
. Tire Pressure
. Battery
Engine Power Messages
ENGINE POWER IS REDUCED
This message displays when the
vehicle's propulsion power is reduced.
A reduction in propulsion power can
affect the vehicle's ability to
accelerate. If this message is on, but
there is no observed reduction in
performance, proceed to your
destination. The performance may be
reduced the next time the vehicle is driven. The vehicle may be driven
while this message is on, but
maximum acceleration and speed may
be reduced. Anytime this message
stays on, or displays repeatedly, the
vehicle should be taken to your dealer
for service as soon as possible.
Under certain operating conditions,
propulsion will be disabled. Try
restarting after the vehicle has been
off for 30 seconds.
Vehicle Speed Messages
SPEED LIMITED TO XXX KM/
H (MPH)
This message shows that the vehicle
speed has been limited to the speed
displayed. The limited speed is a
protection for various propulsion and
vehicle systems, such as lubrication,
thermal, brakes, suspension, Teen
Driver if equipped, or tires.
Vehicle Personalization
The following are all possible vehicle
personalization features. Depending
on the vehicle, some may not be
available.
For System, Apps, and Personal
features and functions, see
“Settings”
in the infotainment manual.
To access the vehicle
personalization menu:
1. Touch the Settings icon on the Home Page of the infotainment
display.
2. Touch Vehicle to display a list of available options.
3. Touch to select the desired feature setting.
4. Touch
9orRto turn a feature
off or on.
5. Touch
zto go to the top level of
the Settings menu.
The menu may contain the following:
Page 138 of 384
INSTRUMENTS AND CONTROLS 137
Universal Remote
System
SeeRadio Frequency Statement 0358.
Universal Remote System
Programming
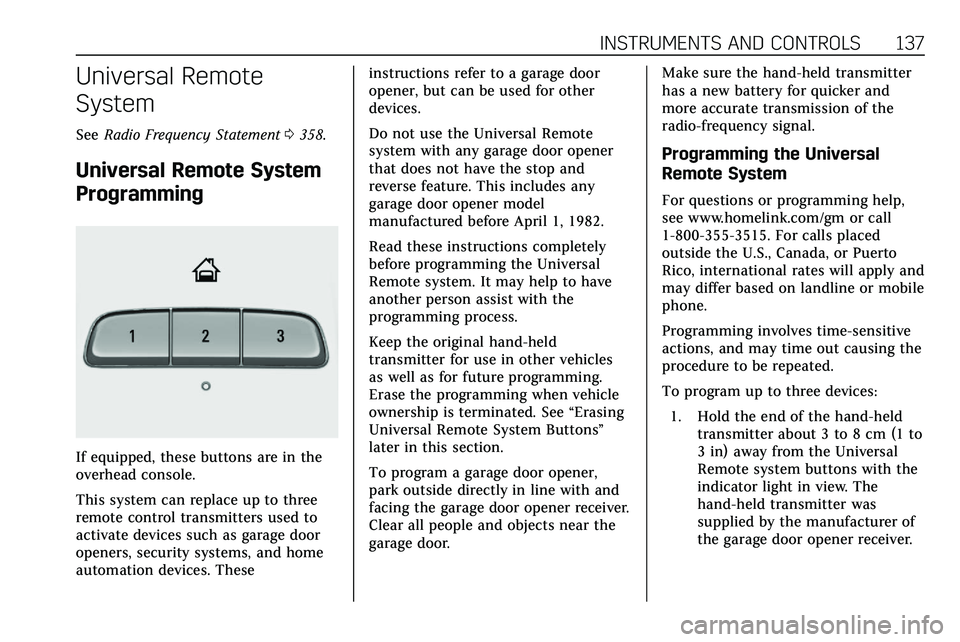
If equipped, these buttons are in the
overhead console.
This system can replace up to three
remote control transmitters used to
activate devices such as garage door
openers, security systems, and home
automation devices. These instructions refer to a garage door
opener, but can be used for other
devices.
Do not use the Universal Remote
system with any garage door opener
that does not have the stop and
reverse feature. This includes any
garage door opener model
manufactured before April 1, 1982.
Read these instructions completely
before programming the Universal
Remote system. It may help to have
another person assist with the
programming process.
Keep the original hand-held
transmitter for use in other vehicles
as well as for future programming.
Erase the programming when vehicle
ownership is terminated. See
“Erasing
Universal Remote System Buttons”
later in this section.
To program a garage door opener,
park outside directly in line with and
facing the garage door opener receiver.
Clear all people and objects near the
garage door. Make sure the hand-held transmitter
has a new battery for quicker and
more accurate transmission of the
radio-frequency signal.
Programming the Universal
Remote System
For questions or programming help,
see www.homelink.com/gm or call
1-800-355-3515. For calls placed
outside the U.S., Canada, or Puerto
Rico, international rates will apply and
may differ based on landline or mobile
phone.
Programming involves time-sensitive
actions, and may time out causing the
procedure to be repeated.
To program up to three devices:
1. Hold the end of the hand-held transmitter about 3 to 8 cm (1 to
3 in) away from the Universal
Remote system buttons with the
indicator light in view. The
hand-held transmitter was
supplied by the manufacturer of
the garage door opener receiver.
Page 141 of 384
140 LIGHTING
Lighting
Exterior Lighting
Exterior Lamp Controls . . . . . . . . . . 140
Exterior Lamps Off Reminder . . . 142
Headlamp High/Low-BeamChanger . . . . . . . . . . . . . . . . . . . . . . . . . . 142
Flash-to-Pass . . . . . . . . . . . . . . . . . . . . . 142
Daytime Running Lamps (DRL) . . . . . . . . . . . . . . . . . . . . 142
Automatic Headlamp System . . . 142
Hazard Warning Flashers . . . . . . . . 143
Turn and Lane-Change Signals . . . . . . . . . . . . . . . . . . . . . . . . . . . 143
Cornering Lamps . . . . . . . . . . . . . . . . . 144
Interior Lighting
Instrument Panel Illumination Control . . . . . . . . . . . . . . . . . . . . . . . . . . 144
Courtesy Lamps . . . . . . . . . . . . . . . . . . 144
Dome Lamps . . . . . . . . . . . . . . . . . . . . . 144
Reading Lamps . . . . . . . . . . . . . . . . . . . 145
Lighting Features
Entry Lighting . . . . . . . . . . . . . . . . . . . . 145
Exit Lighting . . . . . . . . . . . . . . . . . . . . . . 145
Battery Power Protection . . . . . . . . 146
Exterior Lighting Battery Saver . . . . . . . . . . . . . . . . . . . . . . . . . . . . . 146
Exterior Lighting
Exterior Lamp Controls
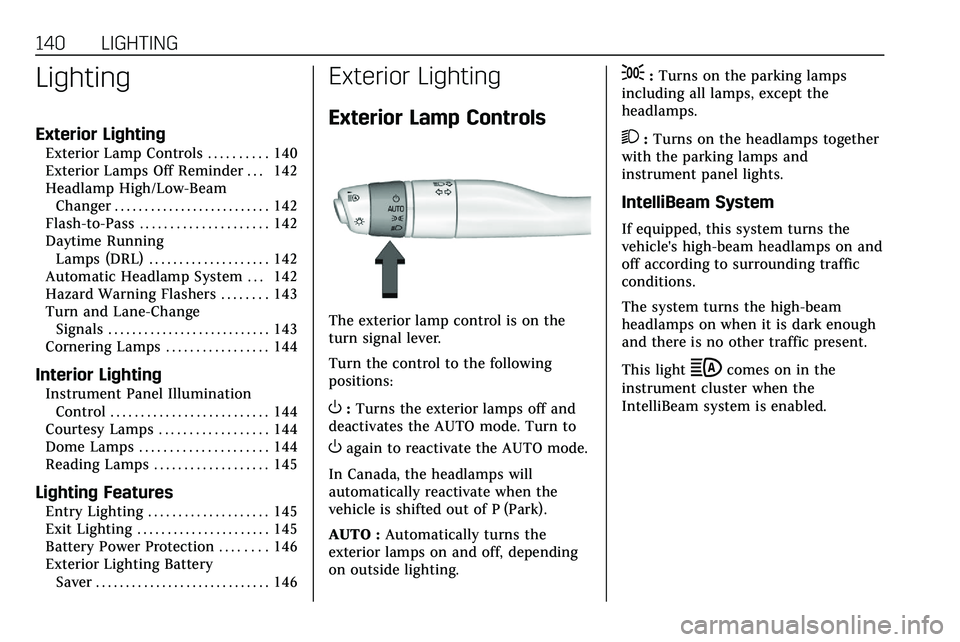
The exterior lamp control is on the
turn signal lever.
Turn the control to the following
positions:
O:Turns the exterior lamps off and
deactivates the AUTO mode. Turn to
Oagain to reactivate the AUTO mode.
In Canada, the headlamps will
automatically reactivate when the
vehicle is shifted out of P (Park).
AUTO : Automatically turns the
exterior lamps on and off, depending
on outside lighting.
;: Turns on the parking lamps
including all lamps, except the
headlamps.
2: Turns on the headlamps together
with the parking lamps and
instrument panel lights.
IntelliBeam System
If equipped, this system turns the
vehicle's high-beam headlamps on and
off according to surrounding traffic
conditions.
The system turns the high-beam
headlamps on when it is dark enough
and there is no other traffic present.
This light
bcomes on in the
instrument cluster when the
IntelliBeam system is enabled.
Page 147 of 384

146 LIGHTING
turned off. The dome lamp comes on
after the ignition is turned off. The
exterior lamps and dome lamp remain
on for a set amount of time, then
automatically turn off.
The exterior lamps turn off
immediately by turning the exterior
lamp control off.
This feature can be changed. See
Vehicle Personalization0131.
Battery Power Protection
The battery saver feature is designed
to protect the vehicle's battery.
If some interior lamps are left on and
the ignition is turned off, the battery
rundown protection system
automatically turns the lamp off after
some time.
Exterior Lighting Battery
Saver
The exterior lamps turn off about
10 minutes after the ignition is turned
off, if the parking lamps or headlamps
have been manually left on. This
protects against draining the battery. To restart the 10-minute timer, turn
the exterior lamp control to the off
position and then back to the parking
lamp or headlamp position.
To keep the lamps on for more than
10 minutes, the ignition must be on or
in ACC/ACCESSORY.
Page 171 of 384

170 DRIVING AND OPERATING
This keeps the battery charged to
restart the vehicle and to signal for
help with the headlamps. Do this as
little as possible, to save fuel.
If the Vehicle Is Stuck
Slowly and cautiously spin the wheels
to free the vehicle when stuck in sand,
mud, ice, or snow.
If stuck too severely for the traction
system to free the vehicle, turn the
traction system off and use the
rocking method. SeeTraction Control/
Electronic Stability Control 0193.
{Warning
If the vehicle's tires spin at high
speed, they can explode, and you or
others could be injured. The vehicle
can overheat, causing an engine
compartment fire or other damage.
Spin the wheels as little as possible
and avoid going above 56 km/h
(35 mph). For All-Wheel Drive (AWD), select
Off-Road or AWD mode. See
Driver
Mode Control 0195 and
All-Wheel Drive 0190.
Rocking the Vehicle to Get it Out
Turn the steering wheel left and right
to clear the area around the front
wheels. Turn off any traction system.
Shift back and forth between
R (Reverse) and a low forward gear,
spinning the wheels as little as
possible. To prevent transmission
wear, wait until the wheels stop
spinning before shifting gears. Release
the accelerator pedal while shifting,
and press lightly on the accelerator
pedal when the transmission is in
gear. Slowly spinning the wheels in
the forward and reverse directions
causes a rocking motion that could
free the vehicle. If that does not get
the vehicle out after a few tries, it
might need to be towed out. If the
vehicle does need to be towed out, see
Towing the Vehicle 0319.
Vehicle Load Limits
It is very important to know how
much weight the vehicle can carry.
This weight is called the vehicle
capacity weight and includes the
weight of all occupants, cargo, and
all nonfactory-installed options.
Two labels on the vehicle may
show how much weight it may
properly carry, the Tire and
Loading Information label and the
Certification/Tire label.
{Warning
Do not load the vehicle any
heavier than the Gross Vehicle
Weight Rating (GVWR),
or either the maximum front or
rear Gross Axle Weight Rating
(GAWR). This can cause
systems to break and change
the way the vehicle handles.
This could cause loss of control
and a crash. Overloading can
(Continued)