keyless entry CADILLAC XT5 2020 Owner's Manual
[x] Cancel search | Manufacturer: CADILLAC, Model Year: 2020, Model line: XT5, Model: CADILLAC XT5 2020Pages: 384, PDF Size: 6.52 MB
Page 10 of 384
KEYS, DOORS, AND WINDOWS 9
Keys, Doors, and
Windows
Keys and Locks
Keys . . . . . . . . . . . . . . . . . . . . . . . . . . . . . . . . . . 9
Remote Keyless Entry (RKE)System . . . . . . . . . . . . . . . . . . . . . . . . . . . . 10
Remote Keyless Entry (RKE) System Operation . . . . . . . . . . . . . . . . 10
Remote Vehicle Start . . . . . . . . . . . . . . 17
Door Locks . . . . . . . . . . . . . . . . . . . . . . . . . 19
Power Door Locks . . . . . . . . . . . . . . . . . 21
Delayed Locking . . . . . . . . . . . . . . . . . . . 21
Automatic Door Locks . . . . . . . . . . . . 22
Lockout Protection . . . . . . . . . . . . . . . . 22
Safety Locks . . . . . . . . . . . . . . . . . . . . . . . . 22
Doors
Liftgate . . . . . . . . . . . . . . . . . . . . . . . . . . . . . 23
Vehicle Security
Vehicle Security . . . . . . . . . . . . . . . . . . . . 30
Vehicle Alarm System . . . . . . . . . . . . . 30
Steering Column Lock . . . . . . . . . . . . . 31
Immobilizer . . . . . . . . . . . . . . . . . . . . . . . . 32
Immobilizer Operation . . . . . . . . . . . . 32
Exterior Mirrors
Convex Mirrors . . . . . . . . . . . . . . . . . . . . 33 Power Mirrors . . . . . . . . . . . . . . . . . . . . . . 33
Folding Mirrors . . . . . . . . . . . . . . . . . . . . 34
Heated Mirrors . . . . . . . . . . . . . . . . . . . . . 35
Automatic Dimming Mirror . . . . . . . 35
Reverse Tilt Mirrors . . . . . . . . . . . . . . . 35
Interior Mirrors
Interior Rearview Mirrors . . . . . . . . . 35
Manual Rearview Mirror . . . . . . . . . . 35
Automatic Dimming Rearview
Mirror . . . . . . . . . . . . . . . . . . . . . . . . . . . . . 35
Rear Camera Mirror . . . . . . . . . . . . . . . 35
Windows
Windows . . . . . . . . . . . . . . . . . . . . . . . . . . . 38
Power Windows . . . . . . . . . . . . . . . . . . . . 38
Sun Visors . . . . . . . . . . . . . . . . . . . . . . . . . . 40
Roof
Sunroof . . . . . . . . . . . . . . . . . . . . . . . . . . . . . 40
Keys and Locks
Keys
{Warning
Leaving children in a vehicle with a
Remote Keyless Entry (RKE)
transmitter is dangerous and
children or others could be
seriously injured or killed. They
could operate the power windows
or other controls or make the
vehicle move. The windows will
function with the RKE transmitter
in the vehicle, and children or
others could be caught in the path
of a closing window. Do not leave
children in a vehicle with an RKE
transmitter.
Page 11 of 384
10 KEYS, DOORS, AND WINDOWS
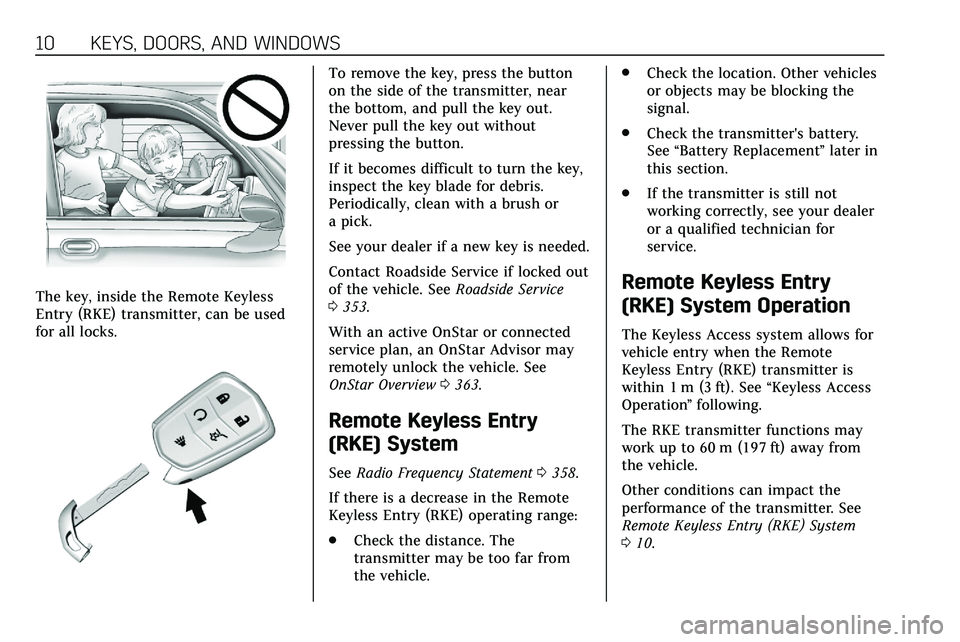
The key, inside the Remote Keyless
Entry (RKE) transmitter, can be used
for all locks.
To remove the key, press the button
on the side of the transmitter, near
the bottom, and pull the key out.
Never pull the key out without
pressing the button.
If it becomes difficult to turn the key,
inspect the key blade for debris.
Periodically, clean with a brush or
a pick.
See your dealer if a new key is needed.
Contact Roadside Service if locked out
of the vehicle. SeeRoadside Service
0 353.
With an active OnStar or connected
service plan, an OnStar Advisor may
remotely unlock the vehicle. See
OnStar Overview 0363.
Remote Keyless Entry
(RKE) System
See Radio Frequency Statement 0358.
If there is a decrease in the Remote
Keyless Entry (RKE) operating range:
. Check the distance. The
transmitter may be too far from
the vehicle. .
Check the location. Other vehicles
or objects may be blocking the
signal.
. Check the transmitter's battery.
See “Battery Replacement ”later in
this section.
. If the transmitter is still not
working correctly, see your dealer
or a qualified technician for
service.
Remote Keyless Entry
(RKE) System Operation
The Keyless Access system allows for
vehicle entry when the Remote
Keyless Entry (RKE) transmitter is
within 1 m (3 ft). See “Keyless Access
Operation ”following.
The RKE transmitter functions may
work up to 60 m (197 ft) away from
the vehicle.
Other conditions can impact the
performance of the transmitter. See
Remote Keyless Entry (RKE) System
0 10.
Page 18 of 384
KEYS, DOORS, AND WINDOWS 17
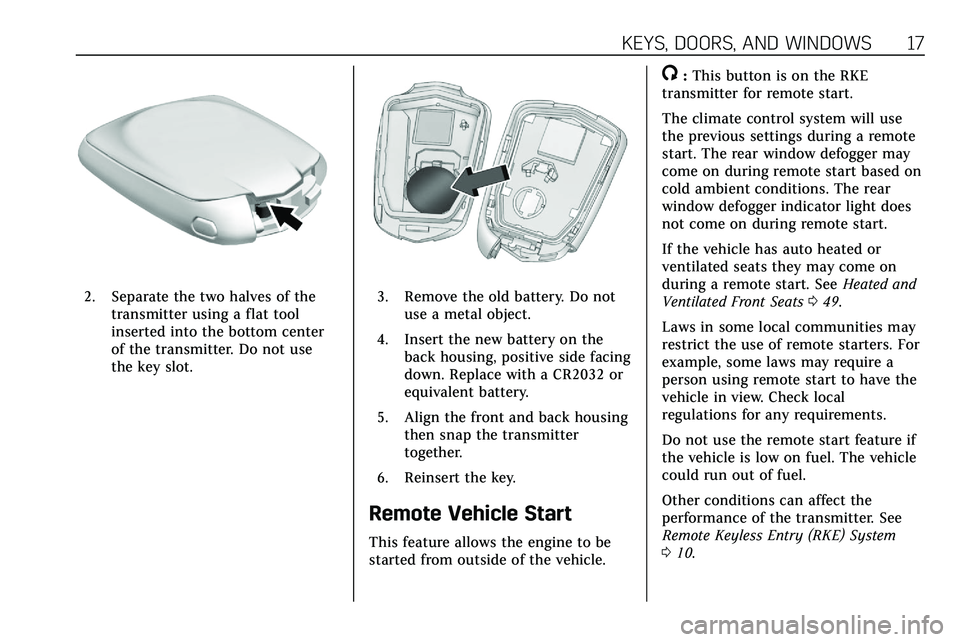
2. Separate the two halves of thetransmitter using a flat tool
inserted into the bottom center
of the transmitter. Do not use
the key slot.3. Remove the old battery. Do notuse a metal object.
4. Insert the new battery on the back housing, positive side facing
down. Replace with a CR2032 or
equivalent battery.
5. Align the front and back housing then snap the transmitter
together.
6. Reinsert the key.
Remote Vehicle Start
This feature allows the engine to be
started from outside of the vehicle.
/: This button is on the RKE
transmitter for remote start.
The climate control system will use
the previous settings during a remote
start. The rear window defogger may
come on during remote start based on
cold ambient conditions. The rear
window defogger indicator light does
not come on during remote start.
If the vehicle has auto heated or
ventilated seats they may come on
during a remote start. See Heated and
Ventilated Front Seats 049.
Laws in some local communities may
restrict the use of remote starters. For
example, some laws may require a
person using remote start to have the
vehicle in view. Check local
regulations for any requirements.
Do not use the remote start feature if
the vehicle is low on fuel. The vehicle
could run out of fuel.
Other conditions can affect the
performance of the transmitter. See
Remote Keyless Entry (RKE) System
0 10.
Page 20 of 384
KEYS, DOORS, AND WINDOWS 19
Door Locks
{Warning
Unlocked doors can be dangerous.. Passengers, especially
children, can easily open the
doors and fall out of a moving
vehicle. The doors can be
unlocked and opened while
the vehicle is moving. The
chance of being thrown out of
the vehicle in a crash is
increased if the doors are not
locked. So, all passengers
should wear seat belts
properly and the doors should
be locked whenever the
vehicle is driven.
. Young children who get into
unlocked vehicles may be
unable to get out. A child can
be overcome by extreme heat
and can suffer permanent
injuries or even death from
heat stroke. Always lock the
vehicle whenever leaving it.
(Continued)
Warning (Continued)
.Outsiders can easily enter
through an unlocked door
when you slow down or stop
the vehicle. Locking the doors
can help prevent this from
happening.
To lock/unlock the doors from outside
the vehicle:
. Press
QorKon the Remote
Keyless Entry (RKE) transmitter.
See Remote Keyless Entry (RKE)
System Operation 010.
. Use the key in the key lock
cylinder in the driver door. The
key lock cylinder is covered with
a cap.
To lock/unlock the doors from inside
the vehicle:
. Press
QorKon the power door
lock switch. See Power Door Locks
0 21.
. Pull once on the door handle to
unlock the door and again to open
the door. .
On the rear doors, push down on
the door lock knob to lock the
door manually.
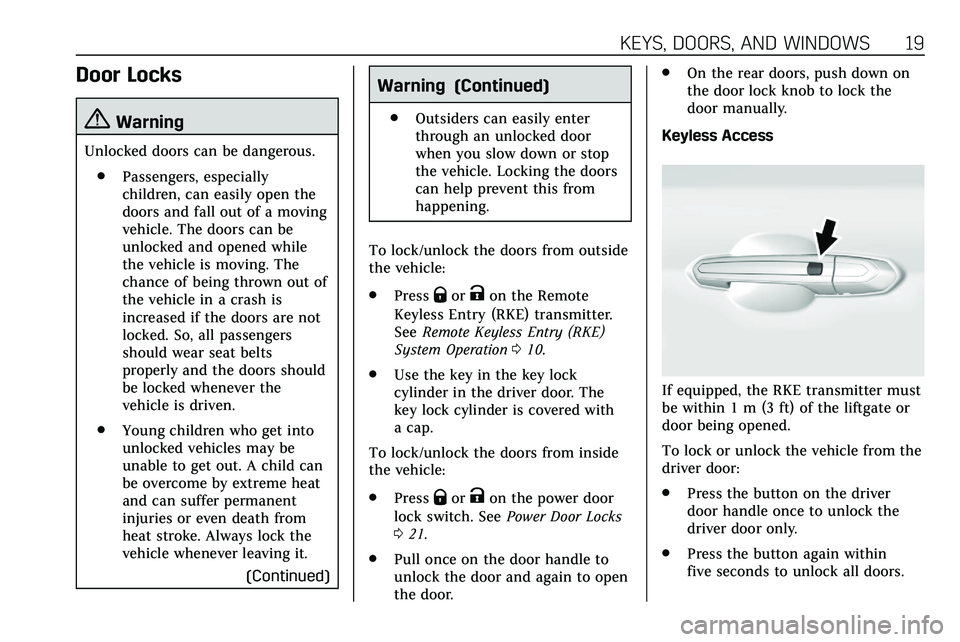
Keyless Access
If equipped, the RKE transmitter must
be within 1 m (3 ft) of the liftgate or
door being opened.
To lock or unlock the vehicle from the
driver door:
. Press the button on the driver
door handle once to unlock the
driver door only.
. Press the button again within
five seconds to unlock all doors.
Page 21 of 384
20 KEYS, DOORS, AND WINDOWS
.Press the button a third time to
lock all doors.
When leaving the vehicle, press the
button on any door handle to lock all
doors.
To lock or unlock the vehicle from any
passenger door:
. Press the button on the passenger
door handle. This will lock or
unlock all doors.
See Remote Keyless Entry (RKE) System
Operation 010.
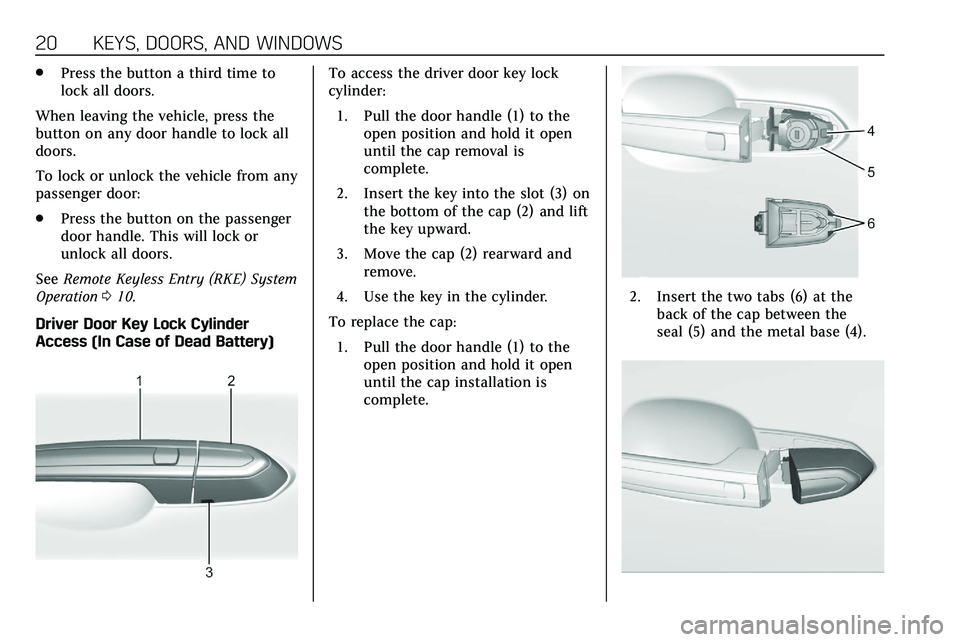
Driver Door Key Lock Cylinder
Access (In Case of Dead Battery)To access the driver door key lock
cylinder: 1. Pull the door handle (1) to the open position and hold it open
until the cap removal is
complete.
2. Insert the key into the slot (3) on the bottom of the cap (2) and lift
the key upward.
3. Move the cap (2) rearward and remove.
4. Use the key in the cylinder.
To replace the cap: 1. Pull the door handle (1) to the open position and hold it open
until the cap installation is
complete.
2. Insert the two tabs (6) at theback of the cap between the
seal (5) and the metal base (4).
Page 24 of 384
KEYS, DOORS, AND WINDOWS 23
1. Unlock the door by activating theinside handle, by pressing the
power door lock switch, or by
using the Remote Keyless
Entry (RKE) transmitter.
2. Open the door from the outside.
When the safety lock is enabled,
adults and older children will not be
able to open the rear door from the
inside. Cancel the safety locks to
enable the doors to open from the
inside.
To cancel the safety lock: 1. Unlock the door and open it from the outside.
2. Move the lever up to unlock. Do the same for the other door.Doors
Liftgate
{Warning
Exhaust gases can enter the vehicle
if it is driven with the liftgate or
trunk/hatch open, or with any
objects that pass through the seal
between the body and the trunk/
hatch or liftgate. Engine exhaust
contains carbon monoxide (CO)
which cannot be seen or smelled.
It can cause unconsciousness and
even death.
If the vehicle must be driven with
the liftgate or trunk/hatch open:
. Close all of the windows.
. Fully open the air outlets on
or under the instrument
panel.
. Adjust the climate control
system to a setting that
brings in only outside air and
(Continued)
Warning (Continued)
set the fan speed to the
highest setting. See “Climate
Control Systems” in the Index.
. If the vehicle is equipped with
a power liftgate, disable the
power liftgate function.
See Engine Exhaust 0183.
Caution
To avoid damage to the liftgate or
liftgate glass, make sure the area
above and behind the liftgate is
clear before opening it.
Page 27 of 384
26 KEYS, DOORS, AND WINDOWS
liftgate will reverse direction and open
fully. The liftgate will remain open
until it is activated again or closed
manually.
Setting the 3/4 Mode
To change the position the liftgate
stops at when opening:1. Select MAX or 3/4 mode and power open the liftgate.
2. Stop the liftgate movement at the desired height by pressing
any liftgate button. Manually
adjust the liftgate position if
needed.
3. Press and hold
lnext to the
pull cup on the outside of the
liftgate until the turn signals
flash and a beep sounds. This
indicates the setting has been
recorded.
The liftgate cannot be set below a
minimum programmable height.
If there is no light flash or sound,
then the height adjustment may be
too low.
Manual Operation
Select OFF to manually operate the
liftgate.
Caution
Attempting to move the liftgate too
quickly and with excessive force
may result in damage to the
vehicle.
Operate the liftgate manually with a
smooth motion and moderate speed.
The system includes a feature which
limits the manual closing speed to
protect the components.
To unlock the liftgate, press
Kon the
power door lock switch or press
Kon
the Remote Keyless Entry (RKE)
transmitter twice within five seconds.
See Remote Keyless Entry (RKE) System
Operation 010.
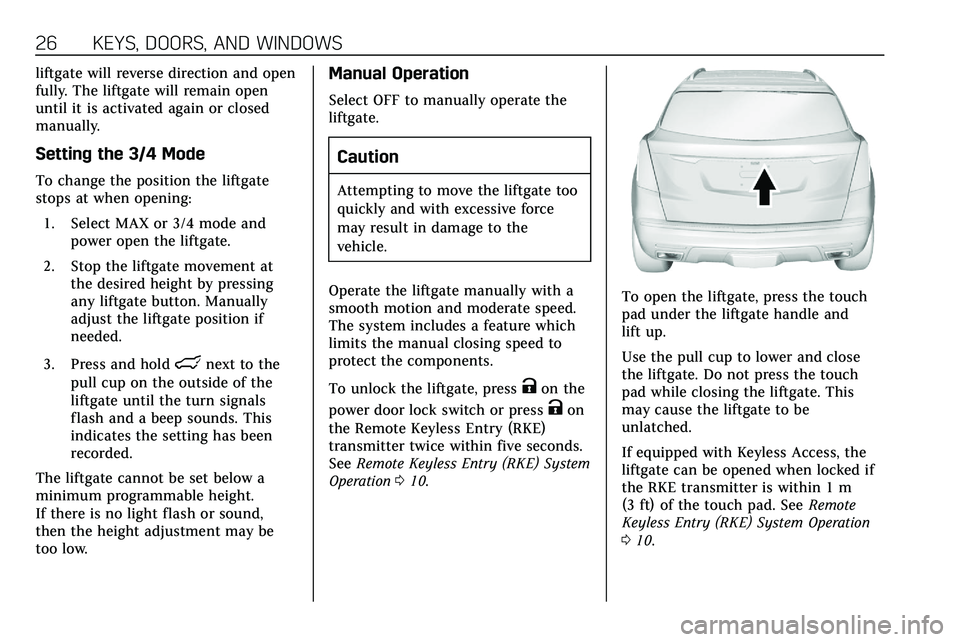
To open the liftgate, press the touch
pad under the liftgate handle and
lift up.
Use the pull cup to lower and close
the liftgate. Do not press the touch
pad while closing the liftgate. This
may cause the liftgate to be
unlatched.
If equipped with Keyless Access, the
liftgate can be opened when locked if
the RKE transmitter is within 1 m
(3 ft) of the touch pad. See Remote
Keyless Entry (RKE) System Operation
0 10.
Page 32 of 384
KEYS, DOORS, AND WINDOWS 31
.Lock the vehicle after all
occupants have left the vehicle
and all doors are closed.
. Always unlock a door with the
RKE transmitter or use the Keyless
Access system.
Unlocking the driver door with the key
will not disarm the system or turn off
the alarm.
How to Detect a Tamper
Condition
IfKis pressed and the horn chirps
and the lights flash three times, the
alarm was activated while the alarm
system was armed.
If the alarm system has been
activated, a message will appear on
the DIC.
Power Sounder, Inclination
Sensor, and Intrusion Sensor
In addition to the standard
theft-deterrent system features, this
system may also have an inclination
sensor, an intrusion sensor, and power
sounder. The power sounder provides an
audible alarm that is different from
the vehicle’s horn. It has its own
power source, and can sound an alarm
when the vehicle’s battery is
compromised.
The inclination sensor can set off the
alarm if it senses movement of the
vehicle, such as a change in vehicle
orientation.
The intrusion sensor monitors the
vehicle interior, and can set off the
alarm if it senses an unauthorized
entry into the vehicle’s interior. Do
not allow passengers or pets to remain
in the vehicle when the intrusion
sensor is activated.
Before arming the theft-deterrent
system and activating the intrusion
sensor:
.
Make sure all doors and windows
are completely closed.
. Secure any loose items such as a
sunshades.
. Make sure there are no
obstructions blocking the sensors
in the front overhead console.
Inclination and Intrusion
Sensors Disable Switch
It is recommended that the inclination
and intrusion sensors be deactivated if
pets are left in the vehicle or if the
vehicle is being transported.
With the vehicle turned off, press
o
in the overhead console. The indicator
light will come on momentarily,
indicating that the sensor has been
disabled until the next time the alarm
system is armed.
Steering Column Lock
If equipped, the steering column lock
is a theft-deterrent device. This
feature locks the steering column
when the vehicle is turned off and the
driver door is opened, or when the
driver door is opened and then the
vehicle is turned off. The steering
column unlocks when the vehicle is
turned on.
The Driver Information Center (DIC)
may display one of these messages:
Page 34 of 384
KEYS, DOORS, AND WINDOWS 33
undamaged, try another transmitter.
Or, you may try placing the
transmitter in the transmitter pocket
located in the center console. See
Remote Keyless Entry (RKE) System
Operation010.
If the ignition mode will not change
with the other transmitter or in the
transmitter pocket, your vehicle needs
service. If the ignition does change
modes, the first transmitter may be
faulty. See your dealer who can service
the theft-deterrent system and have a
new RKE transmitter programmed to
the vehicle.
It is possible for the immobilizer
system to learn new or replacement
RKE transmitters. Up to eight
transmitters can be programmed for
the vehicle. To program additional
transmitters, see “Programming
Transmitters to the Vehicle ”under
Remote Keyless Entry (RKE) System
Operation 010.
Do not leave the transmitter or device
that disarms or deactivates the
theft-deterrent system in the vehicle.Exterior Mirrors
Convex Mirrors
{Warning
A convex mirror can make things,
like other vehicles, look farther
away than they really are. If you cut
too sharply into the right lane, you
could hit a vehicle on the right.
Check the inside mirror or glance
over your shoulder before changing
lanes.
The passenger side mirror is convex
shaped. A convex mirror's surface is
curved so more can be seen from the
driver seat.
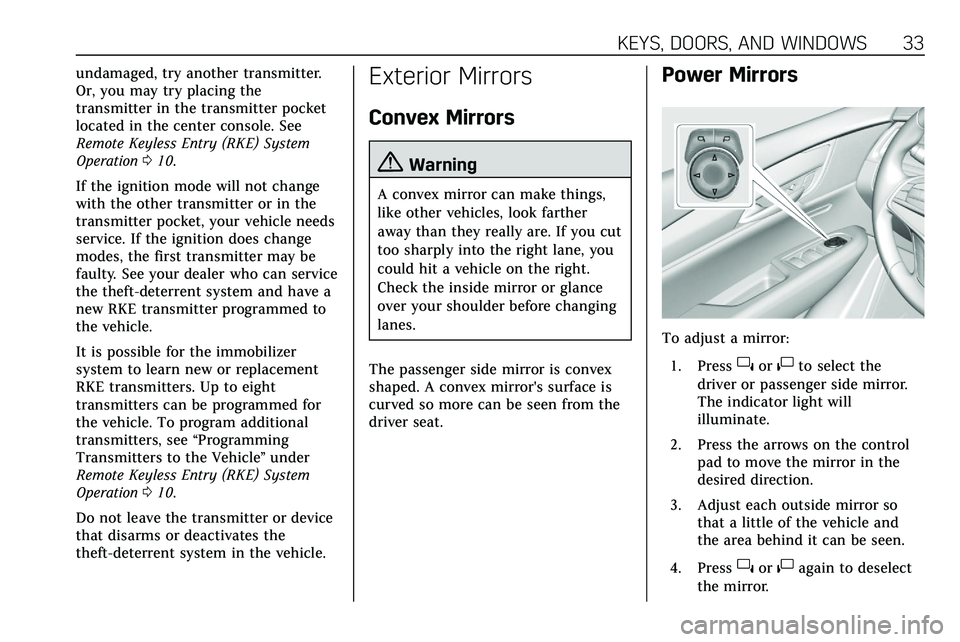
Power Mirrors
To adjust a mirror: 1. Press
}or|to select the
driver or passenger side mirror.
The indicator light will
illuminate.
2. Press the arrows on the control pad to move the mirror in the
desired direction.
3. Adjust each outside mirror so that a little of the vehicle and
the area behind it can be seen.
4. Press
}or|again to deselect
the mirror.
Page 36 of 384
KEYS, DOORS, AND WINDOWS 35
one second to unfold. SeeRemote
Keyless Entry (RKE) System Operation
0 10.
This feature is turned on or off
through vehicle personalization. See
Vehicle Personalization 0131.
Heated Mirrors
K:Press to heat the mirrors.
See “Rear Window Defogger” under
Dual Automatic Climate Control System
0 148.
Automatic Dimming Mirror
If the vehicle has the automatic
dimming mirror, the driver outside
mirror automatically adjusts for the
glare of headlamps behind you.
Reverse Tilt Mirrors
If equipped with memory seats, the
passenger and/or driver mirror tilts to
a preselected position when the
vehicle is in R (Reverse). This allows
the curb to be seen when parallel
parking. The mirror(s) return to the original
position when:
.
The vehicle is shifted out of
R (Reverse), or remains in
R (Reverse) for about 30 seconds.
. The ignition is turned off.
. The vehicle is driven in
R (Reverse) above a set speed.
To turn this feature on or off, see
Vehicle Personalization 0131.
Interior Mirrors
Interior Rearview Mirrors
Adjust the rearview mirror for a clear
view of the area behind the vehicle.
Do not spray glass cleaner directly on
the mirror. Use a soft towel dampened
with water.
Manual Rearview Mirror
Push the tab forward for daytime use
and pull it rearward for nighttime use
to avoid glare of the headlamps from
behind.
Automatic Dimming
Rearview Mirror
If equipped, automatic dimming
reduces the glare of headlamps from
behind. The dimming feature comes
on when the vehicle is started.
Rear Camera Mirror
If equipped, this automatic dimming
mirror provides a wide angle camera
view of the area behind the vehicle.