change wheel CADILLAC XT6 2020 Owner's Guide
[x] Cancel search | Manufacturer: CADILLAC, Model Year: 2020, Model line: XT6, Model: CADILLAC XT6 2020Pages: 385, PDF Size: 6.63 MB
Page 229 of 385

Cadillac XT6 Owner Manual (GMNA-Localizing-U.S./Canada-12984300) -
2020 - CRC - 3/19/19
228 DRIVING AND OPERATING
Tailgating Alert
The vehicle ahead indicator will
display amber when you are following
a vehicle ahead much too closely.
Selecting the Alert Timing
The Collision Alert control is on the
steering wheel. Press
[to set the
FCA timing to Far, Medium, or Near, or on some vehicles, Off. The first
button press shows the current setting
on the DIC. Additional button presses
will change this setting. The chosen
setting will remain until it is changed
and will affect the timing of both the
Collision Alert and the Tailgating
Alert features. The timing of both
alerts will vary based on vehicle speed.
The faster the vehicle speed, the
farther away the alert will occur.
Consider traffic and weather
conditions when selecting the alert
timing. The range of selectable alert
timings may not be appropriate for all
drivers and driving conditions.
If your vehicle is equipped with
Adaptive Cruise Control (ACC),
changing the FCA timing setting
automatically changes the following
gap setting (Far, Medium, or Near).
Following Distance Indicator
The following distance to a moving
vehicle ahead in your path is indicated
in following time in seconds on the
Driver Information Center (DIC). See
Driver Information Center (DIC)
0128.
The minimum following time is 0.5 seconds away. If there is no vehicle
detected ahead, or the vehicle ahead is
out of sensor range, dashes will be
displayed.
Unnecessary Alerts
FCA may provide unnecessary alerts
for turning vehicles, vehicles in other
lanes, objects that are not vehicles,
or shadows. These alerts are normal
operation and the vehicle does not
need service.
Cleaning the System
If the FCA system does not seem to
operate properly, this may correct the
issue:
.
Clean the outside of the
windshield in front of the rearview
mirror.
. Clean the entire front of the
vehicle.
. Clean the headlamps.
Page 239 of 385

Cadillac XT6 Owner Manual (GMNA-Localizing-U.S./Canada-12984300) -
2020 - CRC - 3/19/19
238 DRIVING AND OPERATING
{Warning
Using LKA while towing a trailer or
on slippery roads could cause loss
of control of the vehicle and a
crash. Turn the system off.
How the System Works
LKA uses a camera sensor installed on
the windshield ahead of the rearview
mirror to detect lane markings. It may
provide brief steering assist if it
detects an unintended lane departure.
It may further provide an audible alert
or the driver seat may pulse indicating
that a lane marking has been crossed.
To turn LKA on and off, press
A
on the center stack. If equipped, the
indicator light on the button comes
on when LKA is on and turns off
when LKA is disabled.
When on,
Ais white, if equipped,
indicating that the system is not ready
to assist.
Ais green if LKA is ready
to assist. LKA may assist by gently
turning the steering wheel if the vehicle approaches a detected lane
marking.
Ais amber when
assisting. It may also provide a Lane
Departure Warning (LDW) alert by
flashing
Aamber if the vehicle
crosses a detected lane marking.
Additionally, there may be three
beeps, or the driver seat may pulse
three times, on the right or left,
depending on the lane departure
direction.
Take Steering
The LKA system does not
continuously steer the vehicle. If LKA
does not detect active driver steering,
an alert and chime may be provided.
Steer the vehicle to dismiss. LKA may
become temporarily unavailable after
repeated take steering alerts.
When the System Does Not
Seem to Work Properly
The system performance may be
affected by:
. Close vehicles ahead.
. Sudden lighting changes, such as
when driving through tunnels. .
Banked roads.
. Roads with poor lane markings,
such as two-lane roads.
A system unavailable message may
display if the camera is blocked. The
LKA system does not need service.
A camera blocked message may
display if the camera is blocked. Some
driver assistance systems may have
reduced performance or not work at
all. An LKA or LDW unavailable
message may display if the systems
are temporarily unavailable. This
message could be due to a blocked
camera. The LKA system does not
need service. Clean the outside of the
windshield behind the rearview mirror.
LKA assistance and/or LDW alerts
may occur due to tar marks, shadows,
cracks in the road, temporary or
construction lane markings, or other
road imperfections. This is normal
system operation; the vehicle does not
need service. Turn LKA off if these
conditions continue.
Page 268 of 385
Cadillac XT6 Owner Manual (GMNA-Localizing-U.S./Canada-12984300) -
2020 - CRC - 3/19/19
VEHICLE CARE 267
If the system is ever reset accidentally,
the oil must be changed at 5 000 km
(3,000 mi) since the last oil change.
Remember to reset the oil life system
whenever the oil is changed.
How to Reset the Engine Oil Life
System
Reset the system whenever the engine
oil is changed so that the system can
calculate the next engine oil change.
To reset the system:1. Using the DIC controls on the right side of the steering wheel,
display REMAINING OIL LIFE on
the DIC. See Driver Information
Center (DIC) 0128. When
remaining oil life is low, the
CHANGE ENGINE OIL SOON
message will appear on the
display.
2. Press the thumbwheel on the DIC controls and hold down for a
few seconds to clear the
CHANGE ENGINE OIL SOON
message and reset the oil life
at 100%. Be careful not to reset the oil life
display accidentally at any time
other than after the oil is
changed. It cannot be reset
accurately until the next oil
change.
The oil life system can also be reset as
follows: 1. Display REMAINING OIL LIFE on the DIC. See Driver Information
Center (DIC) 0128.
2. Fully press and release the accelerator pedal three times
within five seconds.
If the CHANGE ENGINE OIL
SOON message is not on, the
system is reset.
The system is reset when the
CHANGE ENGINE OIL SOON message
is off.
If the CHANGE ENGINE OIL SOON
message comes back on when the
vehicle is started, the engine oil life
system has not been reset. Repeat the
procedure.
Automatic Transmission
Fluid
A transmission fluid leak is the only
reason for fluid loss. If a leak occurs,
take the vehicle to your dealer and
have it repaired as soon as possible.
Caution
Use of the incorrect automatic
transmission fluid may damage the
vehicle, and the damage may not be
covered by the vehicle warranty.
Always use the correct automatic
transmission fluid. See
Recommended Fluids and Lubricants
0 343.
See your dealer to have the fluid and
filter changed at the intervals listed in
the Maintenance Schedule 0333.
Engine Air Filter Life
System
If equipped, this feature provides the
engine air filter’s remaining life and
best timing for a change. The timing
Page 269 of 385
Cadillac XT6 Owner Manual (GMNA-Localizing-U.S./Canada-12984300) -
2020 - CRC - 3/19/19
268 VEHICLE CARE
to change an engine air filter depends
on driving and environmental
conditions.
When to Change the Engine Air
Filter
When the Driver Information Center
(DIC) displays a message to replace
the engine air filter at the next oil
change, follow this timing.
When the DIC displays a message to
replace the engine air filter soon,
replace the engine air filter at the
earliest convenience.
The system must be reset after the
engine air filter is changed.
If the DIC displays a message to check
the engine air filter system, see your
dealer.
How to Reset the Engine Air
Filter Life System
To reset:1. Place the vehicle in P (Park).
2. Display the Air Filter Life on the DIC. See Driver Information Center
(DIC) 0128. 3. Press
Ton the steering wheel to
move to the Reset/Disable
display area. Select Reset then
press the thumbwheel for several
seconds.
4. Press the thumbwheel to confirm the reset.
Engine Air Cleaner/Filter
The engine air cleaner/filter is in the
engine compartment on the passenger
side of the vehicle. See Engine
Compartment Overview 0263.
When to Inspect/Replace the
Engine Air Cleaner/Filter
If the vehicle is not equipped with the
engine air filter life system, see
Maintenance Schedule 0333.
How to Inspect the Engine Air
Cleaner/Filter
Do not start the engine or have the
engine running with the engine air
cleaner/filter housing open. Before
removing the engine air cleaner/filter,
make sure that the engine air cleaner/
filter housing and nearby components are free of dirt and debris. Remove the
engine air cleaner/filter. Do not clean
the engine air cleaner/filter or
components with water or
compressed air.
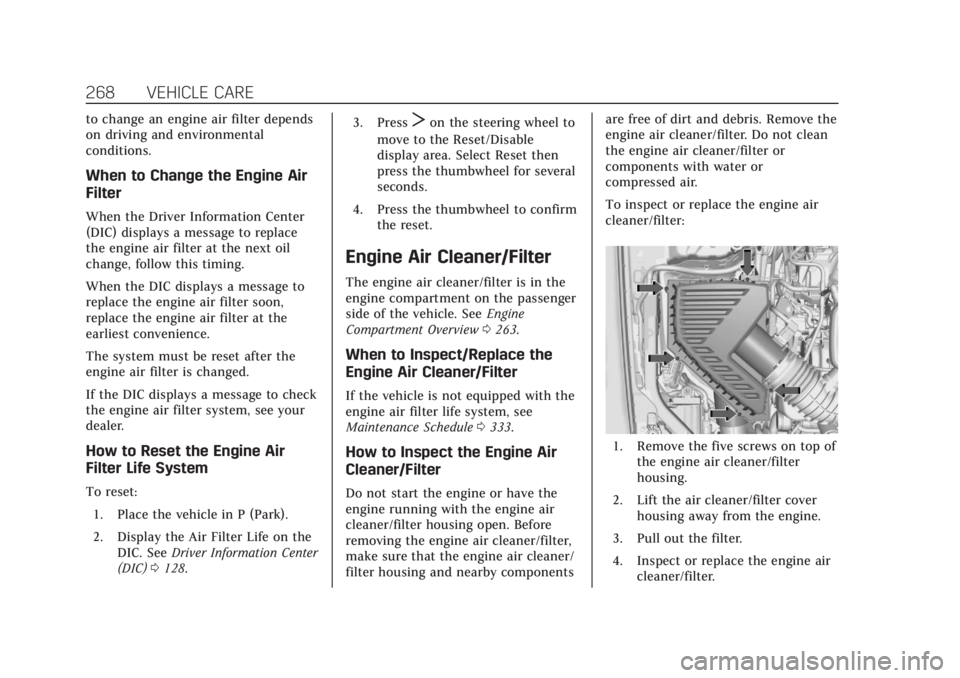
To inspect or replace the engine air
cleaner/filter:
1. Remove the five screws on top of
the engine air cleaner/filter
housing.
2. Lift the air cleaner/filter cover housing away from the engine.
3. Pull out the filter.
4. Inspect or replace the engine air cleaner/filter.
Page 275 of 385
Cadillac XT6 Owner Manual (GMNA-Localizing-U.S./Canada-12984300) -
2020 - CRC - 3/19/19
274 VEHICLE CARE
Caution (Continued)
to freeze and damage the
washer fluid tank and other
parts of the washer system.
. When using concentrated
washer fluid, follow the
manufacturer instructions for
adding water.
. Fill the washer fluid tank only
three-quarters full when it is
very cold. This allows for
fluid expansion if freezing
occurs, which could damage
the tank if it is
completely full.
Brakes
Disc brake pads have built-in wear
indicators that make a high-pitched
warning sound when the brake pads
are worn and new pads are needed.
The sound can come and go or can be
heard all the time when the vehicle is
moving, except when applying the
brake pedal firmly.
{Warning
The brake wear warning sound
means that soon the brakes will not
work well. That could lead to a
crash. When the brake wear
warning sound is heard, have the
vehicle serviced.
Caution
Continuing to drive with worn-out
brake pads could result in costly
brake repair.
Some driving conditions or climates
can cause a brake squeal when the
brakes are first applied or lightly
applied. This does not mean
something is wrong with the brakes.
Properly torqued wheel nuts are
necessary to help prevent brake
pulsation. When tires are rotated,
inspect brake pads for wear and
evenly tighten wheel nuts in the proper sequence to torque
specifications. See
Capacities and
Specifications 0347.
Brake pads should be replaced as
complete sets.
Brake Pedal Travel
See your dealer if the brake pedal does
not return to normal height, or if
there is a rapid increase in pedal
travel. This could be a sign that brake
service may be required.
Replacing Brake System Parts
Always replace brake system parts
with new, approved replacement parts.
If this is not done, the brakes may not
work properly. The braking
performance expected can change in
many other ways if the wrong
replacement brake parts are installed
or if parts are improperly installed.
Page 292 of 385
Cadillac XT6 Owner Manual (GMNA-Localizing-U.S./Canada-12984300) -
2020 - CRC - 3/19/19
VEHICLE CARE 291
roads. Consider installing winter tires
on the vehicle if frequent driving on
ice or snow covered roads is expected.
See your dealer for details regarding
winter tire availability and proper tire
selection. Also, seeBuying New Tires
0 305.
With winter tires, there may be
decreased dry road traction, increased
road noise, and shorter tread life.
After changing to winter tires, be alert
for changes in vehicle handling and
braking.
If using winter tires:
. Use tires of the same brand and
tread type on all four wheel
positions.
. Use only radial ply tires of the
same size, load range, and speed
rating as the original equipment
tires.
Winter tires with the same speed
rating as the original equipment tires
may not be available for H, V, W, Y,
and ZR speed rated tires. If winter
tires with a lower speed rating are
chosen, never exceed the tire's
maximum speed capability.Summer Tires
This vehicle may come with
235/55R20 high performance summer
tires. These tires have a special tread
and compound that are optimized for
maximum dry and wet road
performance. This special tread and
compound will have decreased
performance in cold climates, and on
ice and snow. It is recommended that
winter tires be installed on the vehicle
if frequent driving at temperatures
below approximately 5 °C (40 °F) or on
ice or snow covered roads is expected.
See Winter Tires 0290.
Caution
High performance summer tires
have rubber compounds that lose
flexibility and may develop surface
cracks in the tread area at
temperatures below −7 °C (20 °F).
Always store high performance
summer tires indoors and at
temperatures above −7 °C (20 °F)
when not in use. If the tires have
(Continued)
Caution (Continued)
been subjected to−7 °C (20 °F) or
less, let them warm up in a heated
space to at least 5 °C (40 °F) for
24 hours or more before being
installed or driving a vehicle on
which they are installed. Do not
apply heat or blow heated air
directly on the tires. Always inspect
tires before use. See Tire Inspection
0 303.
Tire Sidewall Labeling
Useful information about a tire is
molded into its sidewall. The
examples show a typical passenger
vehicle tire and a compact spare
tire sidewall.
Page 305 of 385
Cadillac XT6 Owner Manual (GMNA-Localizing-U.S./Canada-12984300) -
2020 - CRC - 3/19/19
304 VEHICLE CARE
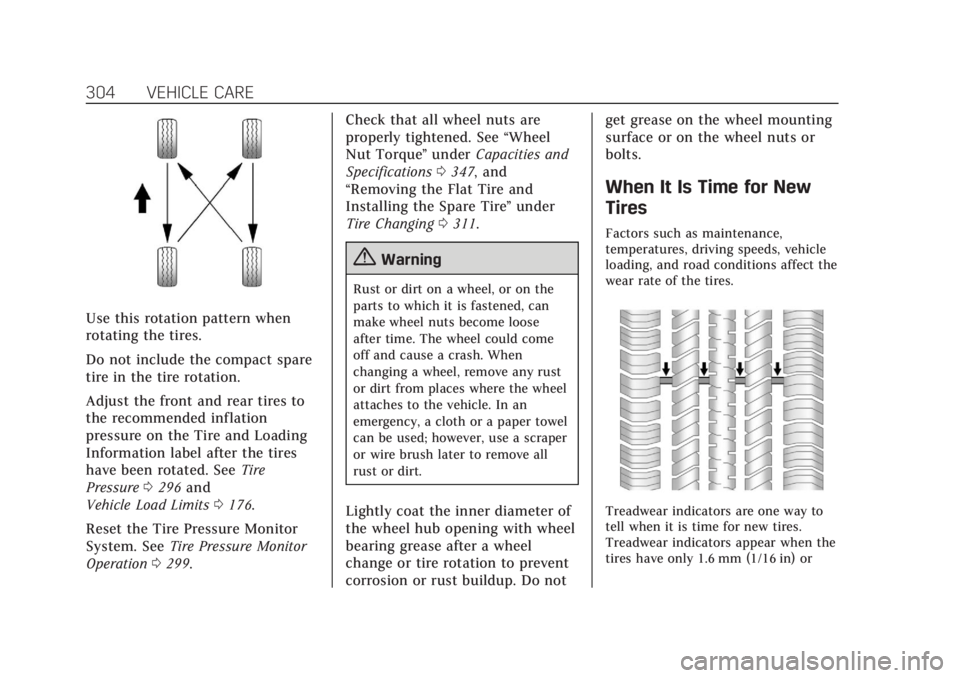
Use this rotation pattern when
rotating the tires.
Do not include the compact spare
tire in the tire rotation.
Adjust the front and rear tires to
the recommended inflation
pressure on the Tire and Loading
Information label after the tires
have been rotated. SeeTire
Pressure 0296 and
Vehicle Load Limits 0176.
Reset the Tire Pressure Monitor
System. See Tire Pressure Monitor
Operation 0299. Check that all wheel nuts are
properly tightened. See
“Wheel
Nut Torque ”under Capacities and
Specifications 0347, and
“Removing the Flat Tire and
Installing the Spare Tire ”under
Tire Changing 0311.
{Warning
Rust or dirt on a wheel, or on the
parts to which it is fastened, can
make wheel nuts become loose
after time. The wheel could come
off and cause a crash. When
changing a wheel, remove any rust
or dirt from places where the wheel
attaches to the vehicle. In an
emergency, a cloth or a paper towel
can be used; however, use a scraper
or wire brush later to remove all
rust or dirt.
Lightly coat the inner diameter of
the wheel hub opening with wheel
bearing grease after a wheel
change or tire rotation to prevent
corrosion or rust buildup. Do not get grease on the wheel mounting
surface or on the wheel nuts or
bolts.
When It Is Time for New
Tires
Factors such as maintenance,
temperatures, driving speeds, vehicle
loading, and road conditions affect the
wear rate of the tires.
Treadwear indicators are one way to
tell when it is time for new tires.
Treadwear indicators appear when the
tires have only 1.6 mm (1/16 in) or
Page 312 of 385

Cadillac XT6 Owner Manual (GMNA-Localizing-U.S./Canada-12984300) -
2020 - CRC - 3/19/19
VEHICLE CARE 311
If a tire goes flat, avoid further tire
and wheel damage by driving slowly
to a level place, well off the road,
if possible. Turn on the hazard
warning flashers. SeeHazard Warning
Flashers 0148.
{Warning
Changing a tire can be dangerous.
The vehicle can slip off the jack and
roll over or fall causing injury or
death. Find a level place to change
the tire. To help prevent the vehicle
from moving:
1. Set the parking brake firmly.
2. Put an automatictransmission in P (Park) or a
manual transmission in
1 (First) or R (Reverse).
3. Turn off the engine and do not restart while the vehicle
is raised.
4. Do not allow passengers to remain in the vehicle.
(Continued)
Warning (Continued)
5. Place wheel blocks,if equipped, on both sides of
the tire at the opposite corner
of the tire being changed.
When the vehicle has a flat tire (2),
use the following example as a guide
to assist in the placement of the
wheel blocks (1), if equipped.
1. Wheel Block (If Equipped)
2. Flat Tire
The following information explains
how to repair or change a tire.
Tire Changing
Removing the Spare Tire and
Tools
To access the spare tire and tools: 1. Open the liftgate. See Liftgate
0 21.
2. Lift the load floor.
3. Remove the cargo management system tray (2) by pulling on the
handles (1). See Cargo
Management System 0101.
Page 313 of 385
Cadillac XT6 Owner Manual (GMNA-Localizing-U.S./Canada-12984300) -
2020 - CRC - 3/19/19
312 VEHICLE CARE
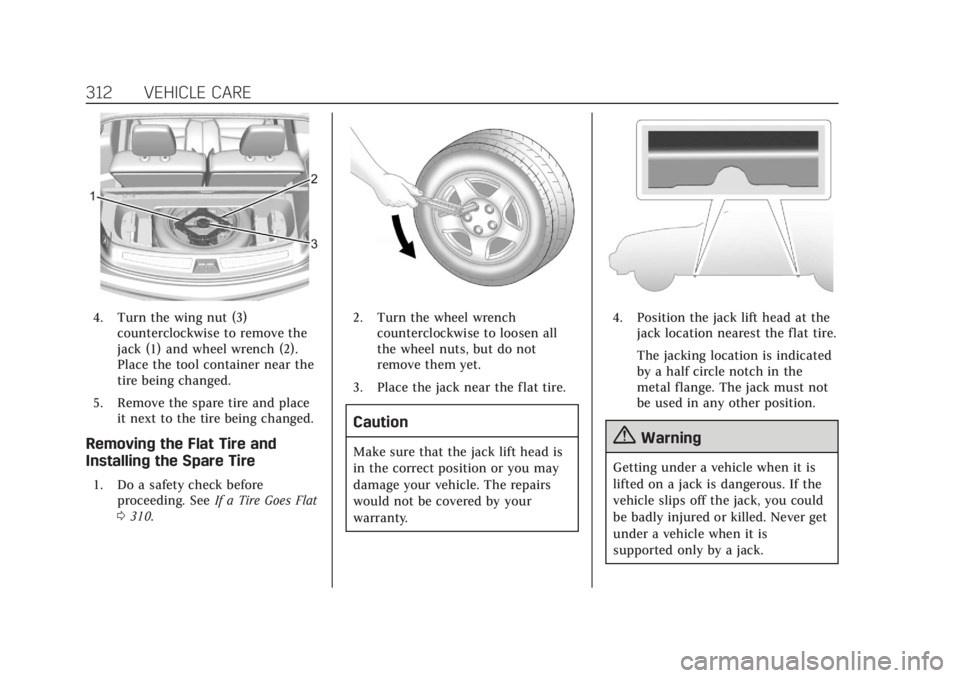
4. Turn the wing nut (3)counterclockwise to remove the
jack (1) and wheel wrench (2).
Place the tool container near the
tire being changed.
5. Remove the spare tire and place it next to the tire being changed.
Removing the Flat Tire and
Installing the Spare Tire
1. Do a safety check beforeproceeding. See If a Tire Goes Flat
0 310.
2. Turn the wheel wrench
counterclockwise to loosen all
the wheel nuts, but do not
remove them yet.
3. Place the jack near the flat tire.
Caution
Make sure that the jack lift head is
in the correct position or you may
damage your vehicle. The repairs
would not be covered by your
warranty.
4. Position the jack lift head at the jack location nearest the flat tire.
The jacking location is indicated
by a half circle notch in the
metal flange. The jack must not
be used in any other position.
{Warning
Getting under a vehicle when it is
lifted on a jack is dangerous. If the
vehicle slips off the jack, you could
be badly injured or killed. Never get
under a vehicle when it is
supported only by a jack.
Page 374 of 385

Cadillac XT6 Owner Manual (GMNA-Localizing-U.S./Canada-12984300) -
2020 - CRC - 3/19/19
INDEX 373
IndexA
Accessories and Modifications . . . . . 260
Accessory Power . . . . . . . . . . . . . . . . . . . . 186
Active Fuel Management . . . . . . . . . . . 188
Adaptive Cruise Control . . . . . . . . . . . . 205
Add-On Electrical Equipment . . . . . . 256
Additional InformationOnStar . . . . . . . . . . . . . . . . . . . . . . . . . . . . . 365
Additional Maintenance and Care . . . . . . . . . . . . . . . . . . . . . . . . . . . 340
Adjustments Lumbar, Front Seats . . . . . . . . . . . . . . . . 44
Air Cleaner/Filter, Engine . . . . . . . . . . 268
Air Conditioning . . . . . . . . . . . . . . .153, 158
Air Filter Life System . . . . . . . . . . . . . . . . . . . . . . . . 267
Air Filter, Passenger Compartment . . . . . . . . . . . . . . . . . . . . . 163
Air Vents . . . . . . . . . . . . . . . . . . . . . . . . . . . . 162
Airbag System
Check . . . . . . . . . . . . . . . . . . . . . . . . . . . . . . . . 74
How Does an Airbag Restrain? . . . . . 68
Passenger Sensing System . . . . . . . . . 69
What Makes an Airbag Inflate? . . . . 67
What Will You See after anAirbag Inflates? . . . . . . . . . . . . . . . . . . . 68
When Should an Airbag Inflate? . . . . . . . . . . . . . . . . . . . . . . . . . . . . . 66 Airbag System (cont'd)
Where Are the Airbags? . . . . . . . . . . . . 65
Airbags Adding Equipment to the
Vehicle . . . . . . . . . . . . . . . . . . . . . . . . . . . . . 73
Passenger Status Indicator . . . . . . . 119
Readiness Light . . . . . . . . . . . . . . . . . . . 119
Servicing Airbag-Equipped Vehicles . . . . . . . . . . . . . . . . . . . . . . . . . . . . 73
System Check . . . . . . . . . . . . . . . . . . . . . . . 63
Alarm Vehicle Security . . . . . . . . . . . . . . . . . . . . . 29
Alert Lane Change . . . . . . . . . . . . . . . . . . . . . . 235
Rear Pedestrian . . . . . . . . . . . . . . . . . . . 225
Side Blind Zone (SBZA) . . . . . . . . . . 235
All-Season Tires . . . . . . . . . . . . . . . . . . . . . 290
All-Wheel Drive . . . . . . . . . . . . . . . . . . . . . 196 Light . . . . . . . . . . . . . . . . . . . . . . . . . . . . . . . 123
Antilock Brake System (ABS) . . . . . . 197 Warning Light . . . . . . . . . . . . . . . . . . . . 123
Appearance Care Exterior . . . . . . . . . . . . . . . . . . . . . . . . . . . . 324
Interior . . . . . . . . . . . . . . . . . . . . . . . . . . . . 328
Armrest Storage . . . . . . . . . . . . . . . . . . . . . . 97
Assistance Systems for Driving . . . . 226
Assistance Systems for Parking and Backing . . . . . . . . . . . . . . . . . . . . . . . 217