CHEVROLET AVEO 2008 1.G Owners Manual
Manufacturer: CHEVROLET, Model Year: 2008, Model line: AVEO, Model: CHEVROLET AVEO 2008 1.GPages: 384, PDF Size: 6.67 MB
Page 171 of 384
The previous volume setting is maintained whenever
the radio is turned on. The volume can be adjusted by
using the volume knob.
Finding a Station
AM/AUX:Press this button to play an AM station while
a portable audio device is playing. Press this button
again and the system will begin playing audio from the
connected portable audio player. If a portable audio
player is not connected, “no input device found” will be
displayed.
FM:Press this button to switch between FM1 or FM2.
The display will show the selection.
¦¥SEEK:Press the up or down SEEK arrow to go
to the next or to the previous station and stay there.
The radio will only seek stations with a strong signal that
are in the selected band.
¦¥TUNE:Press the up or down TUNE arrow to go
to the next or to the previous radio station.
SCAN:Push and release this button to scan radio
stations. The radio will go to a station, play for a
few seconds, then go on to the next station.
Push this button again to stop scanning.
The radio will only scan stations with a strong signal
that are in the selected band.
Setting Preset Stations
Up to 36 stations (six FM1, six FM2, six FM-A and
six AM1, six AM2, six AM-A), can be programmed on
the six numbered pushbuttons, by performing the
following steps:
1. Turn the radio on.
2. Press AM/AUX to select AM1, AM2, or AM-A.
Press FM to select FM1, FM2 or FM-A.
3. Tune in the desired station.
4. Press and hold one of the six numbered
pushbuttons for longer than two seconds.
The channel number (CH#1 through CH#6) will
flash on the display when the station has been set.
Whenever that numbered preset button is
pressed, the station that was set will return.
5. Repeat the first four steps for each preset button.
AST (Automatic Store):Six FM1 preset stations with
the strongest reception in the region can be automatically
stored. Press the AST button for longer than one second.
The display will show AUTO SCANNING and then
SCANNING will flash on display. Once the stations are
stored, the radio will switch to FM1 and the first preset
station will begin to play. FM-A will appear on the display
when listening to the automatic stored stations. Press the
AM or FM button to cancel automatic store.
3-57
Page 172 of 384
Order of Sound Function
The order for displayed sound function is BASS, MID,
TRE, FAD, BAL, EQ OFF, and VOL.
Setting the Tone
(Bass/Midrange/Treble)
SOUND (Bass/Midrange/Treble):Press this button
until BAS appears on the display. Turn the power/volume
knob to increase or to decrease the bass. The display will
show the bass level. When finished making the selection,
press this button to select the bass level.
Press this button until MID appears on the display.
Turn the power/volume knob to increase or to decrease
the midrange. The display will show the midrange level.
When finished making the selection, press this button to
select the midrange level.
Press this button until TRE appears on the display.
Turn the power/volume knob to increase or to decrease
the treble. The display will show the treble level. When
finished making the selection, press this button to select
the treble level. If a station is weak or there is static,
decrease the treble.
Adjusting the Speakers (Balance/Fade)
SOUND (Balance/Fade):To adjust the balance
between the right and the left speakers, press this button
until BAL appears on the display. Turn the power/volume
knob to increase or to decrease. The display will show the
balance level. When finished making the selection, press
this button to select the balance level.
To adjust the fade between the front and the rear
speakers, press this button until FAD appears on the
display. Turn the power/volume knob to increase or
to decrease the fade between the front and the rear
speakers. The display will show the fade level. When
finished making the selection, press this button to select
the fade level.
Setting the EQ (Equalization)
SOUND (Equalization):Press this button until EQ OFF
appears on the display to select customized equalization
settings designed for classic, dance, rock, jazz, pop,
voice, and techno. Turn the power/volume knob until
the desired equalization setting appears on the display.
When finished making the selection, press the
SOUND button to select the equalization setting.
To cancel an equalization setting, press the SOUND
button until EQ OFF appears on the display, turn the
power/volume knob until OFF appears on the display,
then press the SOUND button again to select the
equalization setting.
3-58
Page 173 of 384
Order of Sound Function
The order for displayed sound function is EQ OFF,
CLASSIC, DANCE, ROCK, JAZZ, POP, VOICE,
TECHNO, and EQ OFF.
Using the Auxiliary Input Jack
AUX IN (Auxiliary Input):Your radio system has an
auxiliary input jack located on the lower right side of the
faceplate. This is not an audio output; do not plug the
headphone set into the front auxiliary input jack. You can
however, connect an external audio device such as an
iPod, laptop computer, MP3 player, CD changer, or XM™
receiver, etc. to the auxiliary input jack for use as another
source for audio listening.
The auxiliary input jack will also accept cell phone
connectors. Plug the cell phone connector into the
auxiliary input jack to hear the other side of a cell phone’s
conversation through the vehicle sound system.Drivers are encouraged to set up any auxiliary device
while the vehicle is in park (P). SeeDefensive Driving on
page 4-2for more information on driver distraction.
To use a portable audio player, connect a 3.5 mm
(1/8 inch) cable to the radio’s front auxiliary input jack.
When a device is connected, turn the portable audio
player on. Press and hold the radio AM/AUX button for
more than two seconds or until audio from the device
begins to play over the car speakers.
O(Power/Volume):Turn this knob clockwise or
counterclockwise to increase or decrease the volume
of the portable player. You may need to do additional
volume adjustments from the portable device if the
volume is not loud or soft enough.
AM/AUX:Press this button to listen to the radio while
a portable audio device is playing. The portable audio
device will continue playing, so you may want to stop it
or turn it off.
3-59
Page 174 of 384
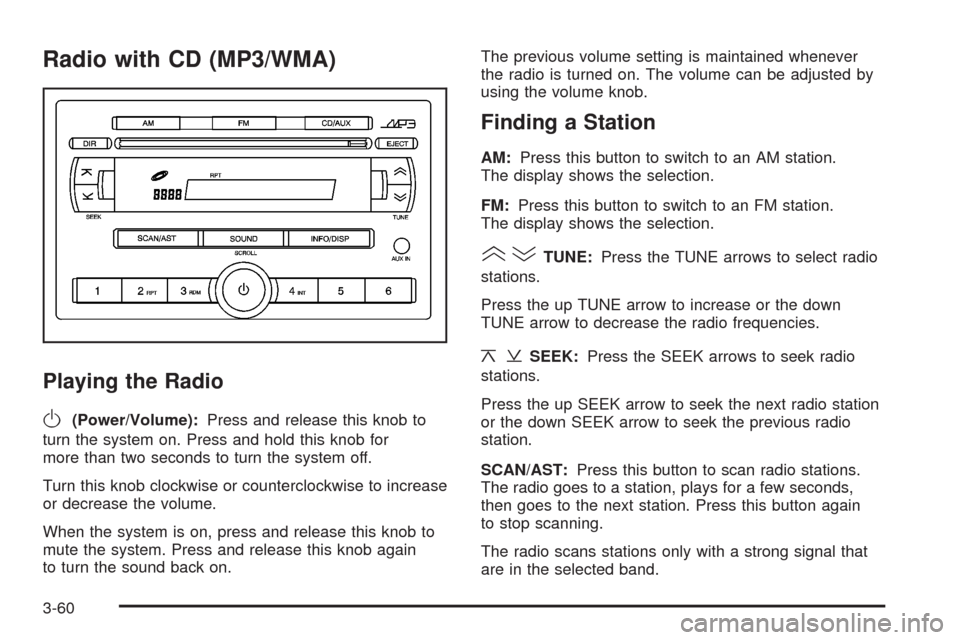
Radio with CD (MP3/WMA)
Playing the Radio
O
(Power/Volume):Press and release this knob to
turn the system on. Press and hold this knob for
more than two seconds to turn the system off.
Turn this knob clockwise or counterclockwise to increase
or decrease the volume.
When the system is on, press and release this knob to
mute the system. Press and release this knob again
to turn the sound back on.The previous volume setting is maintained whenever
the radio is turned on. The volume can be adjusted by
using the volume knob.
Finding a Station
AM:Press this button to switch to an AM station.
The display shows the selection.
FM:Press this button to switch to an FM station.
The display shows the selection.
()TUNE:Press the TUNE arrows to select radio
stations.
Press the up TUNE arrow to increase or the down
TUNE arrow to decrease the radio frequencies.
¦¥SEEK:Press the SEEK arrows to seek radio
stations.
Press the up SEEK arrow to seek the next radio station
or the down SEEK arrow to seek the previous radio
station.
SCAN/AST:Press this button to scan radio stations.
The radio goes to a station, plays for a few seconds,
then goes to the next station. Press this button again
to stop scanning.
The radio scans stations only with a strong signal that
are in the selected band.
3-60
Page 175 of 384
AST (Automatic Store)
Six FM1 preset stations with the strongest reception in
the region can be automatically stored. Press the AST
button for more than two seconds. The display shows
AUTO SCANNING and then SCANNING flashes on the
display. Once the stations are stored, the radio switches
to FM1 and the first preset station begins to play. FM-A
displays while listening to the automatic stored stations.
Press the AM or FM button to cancel automatic store.
Setting Preset Stations
Up to 24 stations (six FM1, six FM2, six AM1, and
six AM2), can be programmed on the six numbered
buttons, by performing the following steps:
1. Turn the radio on.
2. Press the AM or FM button to select FM1, FM2,
AM1 or AM2.
3. Tune in the desired station.
4. Press and hold one of the six numbered buttons for
more than two seconds. The preset button number
one through six flashes on the display when the
station has been set. When that numbered preset
button is pressed, that preset station returns.
5. Repeat the Steps 1 through 4 for each preset
button.
Order of Sound Function
The order for displayed sound function is BASS, TRE,
BAL, FADE, EQ OFF, and VOL (Bass, Treble, Fade,
Balance, Equalization Off, and Volume).
Setting the Tone (Bass/Treble)
SOUND (Bass/Treble):Press this button until
BAS (bass) displays. Turn the
Oknob to increase or
to decrease the bass. The display shows the bass level.
After making the selection, press this button to set the
bass level selection.
Press this button until TRE (treble) displays.
Turn the
Oknob to increase or to decrease the treble.
The display shows the treble level. After making the
selection, press this button to set the treble level
selection. If a station is weak or has static, decrease
the treble.
3-61
Page 176 of 384
Adjusting the Speakers (Balance/Fade)
SOUND (Balance/Fade):To adjust the balance
between the right and the left speakers, press this
button until BAL (balance) displays. Turn the
Oknob
to increase or to decrease. The display shows the
balance level. After making the selection, press
this button to set the balance level.
To adjust the fade between the front and the rear
speakers, press this button until FAD (fade) displays.
Turn the
Oknob to increase or to decrease the
fade between the front and the rear speakers. The
display shows the fade level. After making the selection,
press this button to set the fade level.
Setting the Equalization
The order for displayed customized equalization settings
are EQ OFF, CLASSIC, DANCE, ROCK, JAZZ, POP,
VOICE, TECHNO, EQ OFF.
SOUND (Equalization):Press this button until EQ OFF
(equalization) displays to select customized equalization
settings designed for classic, dance, rock, jazz, pop,
voice and techno. Turn the
Oknob until the desired
equalization setting displays. After making the selection,
press the SOUND button to set the equalization setting.
To cancel an equalization setting, press the SOUND
button until EQ OFF displays, turn the
Oknob until OFF
displays, then press the SOUND button again to set the
equalization setting.
Playing a CD
Insert a CD partway into the slot, label side up.
The player pulls it in and the CD should begin playing.
When a CD is inserted, CDP displays. As the CD is
loading, Filecheck displays. As each new track starts
to play, Track and the track number displays.
If the ignition or radio is turned off with a CD in the
player, it stays in the player. When a CD is in the player
and the ignition is turned on, the radio must be turned
on before the CD starts playback. When the ignition
and radio are turned on, the CD starts playing where
it stopped, if it was the last selected audio source.
The CD player can play the smaller 3 inch (8 cm)
single CDs with an adapter ring. Full-size CDs and
the smaller CDs are loaded in the same manner.
If playing a CD-R, the sound quality can be reduced due
to CD-R quality, the method of recording, the quality of
the music that has been recorded, and the way the CD-R
has been handled. There can be an increase in skipping,
difficulty in finding tracks, and/or difficulty in loading and
ejecting. If these problems occur, check the bottom
surface of the CD. If the surface of the CD is damaged,
such as cracked, broken, or scratched, the CD will not
play properly. If the surface of the CD is soiled, seeCare
of Your CDs on page 3-79for more information.
If there is no apparent damage, try a known good CD.
3-62
Page 177 of 384
Do not add any label to a CD, it could get caught in the
CD player. If a CD is recorded on a personal computer
and a description label is needed, try labeling the top of
the recorded CD with a marking pen.
Notice:If a label is added to a CD, or more than
one CD is inserted into the slot at a time, or an
attempt is made to play scratched or damaged CDs,
the CD player could be damaged. While using the
CD player, use only CDs in good condition without
any label, load one CD at a time, and keep the
CD player and the loading slot free of foreign
materials, liquids, and debris.
If an error displays, see “CD Messages” later in this
section.
2 RPT (Repeat):Press this button to repeat the current
track. RPT displays. Press this button again to turn
off repeat play.
3 RDM (Random):Press this button to hear the tracks
in random, rather than sequential, order. RDM displays.
Press this button again to turn off random play.
4 INT (Scan):Press this button to listen to the first
few seconds of each track on each loaded CD. INTRO
displays. To stop scanning press this button again.
The current track begins to play.()TUNE (Previous/Next Track):Press the up
TUNE arrow to go to the next track. The track number
displays. Press the down TUNE arrow to go to the
start of the current track. The player continues moving
forward or backward through the CD with each press of
the up or down arrows.
AM:Press this button to listen to the radio while a CD
is playing. The inactive CD remains inside the radio
for future listening.
FM:Press this button to listen to the radio while a CD
is playing. The inactive CD remains inside the radio
for future listening.
CD/AUX:Press this button to play a CD while listening
to the radio. CDP displays when the CD player has
been selected. The CD symbol displays when a CD is
loaded.
Press this button while a CD is playing to pause the
CD. PAUSE flashes on the display. Press this button
again to start playing the CD.
EJECT:Press this button to eject a CD. This is the
only way a CD can be ejected from the player. The CD
can eject when the ignition or the radio is turned off.
3-63
Page 178 of 384
Playing an MP3/WMA CD-R Disc
If you have a radio with a single CD (MP3), it is capable
of playing an MP3/WMA CD-R disc. For more information
on how to play an MP3/WMA CD-R disc, see “Using an
MP3” in the index.
CD Messages
CHECK CD:If this message displays and/or the CD
comes out, it could be for one of the following reasons:
•It is very hot. When the temperature returns to
normal, the CD should play.
•You are driving on a very rough road. When the
road becomes smoother, the CD should play.
•The CD is dirty, scratched, wet, or upside down.
•The air is very humid. If so, wait about an hour and
try again.
•The format of the CD might not be compatible. See
Using an MP3 (Radio with CD Player) on page 3-72
orUsing an MP3 (Radio with Six-Disc Player) on
page 3-75later in this section.
•There could have been a problem while burning
the CD.
•The label could be caught in the CD player.
If the CD is not playing correctly, for any other reason,
try a known good CD.
If any error occurs repeatedly or if an error cannot be
corrected, contact your dealer/retailer. If the radio
displays an error message, write it down and provide it
to your dealer/retailer when reporting the problem.
3-64
Page 179 of 384
Using the Auxiliary Input Jack
The radio system has an auxiliary input jack located on
the lower right side of the faceplate. This is not an audio
output. Do not plug the headphone set into the front
auxiliary input jack. An external audio device such as
an iPod, laptop computer, MP3 player, CD changer,
or cassette tape player, etc. can be connected to the
auxiliary input jack for use as another source for audio
listening.
The auxiliary input jack also accepts cell phone
connectors. Plug the cell phone connector into the
auxiliary input jack to hear a person speaking on a cell
phone during conversation through the vehicle sound
system.
Drivers are encouraged to set up any auxiliary device
while the vehicle is in PARK (P). SeeDefensive Driving
on page 4-2for more information on driver distraction.To use a portable audio player, connect a 3.5 mm
(1/8 inch) cable to the radio’s front auxiliary input jack.
While a device is connected, turn the portable audio
player on and press the radio CD/AUX button to
hear audio from the device over the vehicle speakers.
CD/AUX (CD/Auxiliary):Press this button once to
play a CD while a portable audio device is playing.
Press this button a second time for the system to begin
playing audio from the connected portable audio player.
Once in this mode, Auxinput appears on the display. If the
auxiliary jack does not detect the presence of an output
jack, the auxiliary mode does not display.
O(Power/Volume):Turn theOknob clockwise or
counterclockwise to increase or decrease the volume
of the portable player. Additional adjustments on a
portable device might be needed to get the desired
volume.
3-65
Page 180 of 384
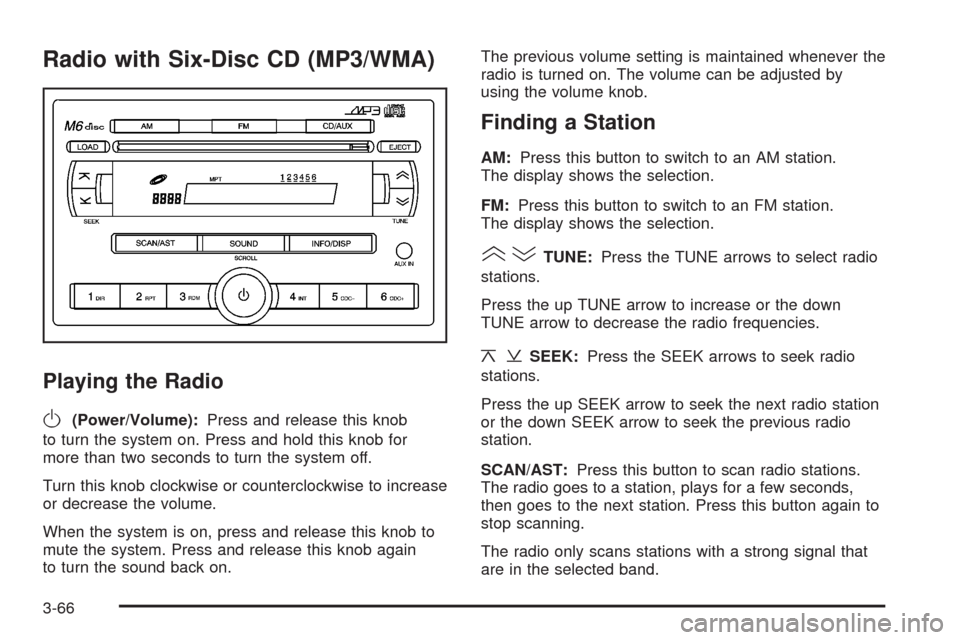
Radio with Six-Disc CD (MP3/WMA)
Playing the Radio
O
(Power/Volume):Press and release this knob
to turn the system on. Press and hold this knob for
more than two seconds to turn the system off.
Turn this knob clockwise or counterclockwise to increase
or decrease the volume.
When the system is on, press and release this knob to
mute the system. Press and release this knob again
to turn the sound back on.The previous volume setting is maintained whenever the
radio is turned on. The volume can be adjusted by
using the volume knob.
Finding a Station
AM:Press this button to switch to an AM station.
The display shows the selection.
FM:Press this button to switch to an FM station.
The display shows the selection.
()TUNE:Press the TUNE arrows to select radio
stations.
Press the up TUNE arrow to increase or the down
TUNE arrow to decrease the radio frequencies.
¦¥SEEK:Press the SEEK arrows to seek radio
stations.
Press the up SEEK arrow to seek the next radio station
or the down SEEK arrow to seek the previous radio
station.
SCAN/AST:Press this button to scan radio stations.
The radio goes to a station, plays for a few seconds,
then goes to the next station. Press this button again to
stop scanning.
The radio only scans stations with a strong signal that
are in the selected band.
3-66