CHEVROLET BLAZER 1993 Owners Manual
Manufacturer: CHEVROLET, Model Year: 1993, Model line: BLAZER, Model: CHEVROLET BLAZER 1993Pages: 386, PDF Size: 20.7 MB
Page 301 of 386
Service & Appearance Care
Hood Laiches and Hood Hinge
Your maintenance schedule will tell you how often to lubricate the hood latch
and hood hinge assembly. See “Recommended Fluids and Lubrican\
ts” in the
Index for the proper lubricant to use.
Propeller Shaft Slip Splines
See your maintenance schedule to find out how often the slip \
splines must
be lubricated, See “Recommended Fluids and Lubricants” in the Index for the
proper lubricant to use.
Constant Velocity Joints
See your maintenance schedule to find out how often the consta\
nt velocity
joints must be lubricated. See “Recommended Fluids and Lubricants”\
in the
Index for the proper lubricant to use.
Body
Normal use of your vehicle will cause metal to metal wear at some points on
the cab and body
if they are not lubricated.
For exposed surfaces, such as door checks, door lock bolts, lo\
ck striker
plates, dovetail bumper wedges, etc., a thin film of engine oil should be
applied.
The seat adjusters and seat track should be lubricated with ch\
assis grease, Door weather strips and rubber hood bumpers should be lightly \
coated with a
rubber lubricant.
Never use too much of any lubricant and be sure to wipe up any extra
lubricant when you are finished.
Your maintenance schedule will tell you how often to lubricate these items.
See “Recommended Fluids and Lubricants” in the Index
for the proper
lubricant to use.
Lock Cylinders
To be sure your locks operate properly, they must be lubricated, Your
vehicle’s maintenance schedule will tell you how often
to lubricate them. See
“Recommended Fluids and Lubricants”
in the Index for the proper lubricant to
use.
You should not use penetrating oils because they could wash out the factory
installed lubricant and cause the lock to bind. De-icers which contain alcohol
could also wash away the lubricant,
so be sure to lubricate the lock after
using a de-icer
of this type.
6-36
Page 302 of 386
Tailgate Handle
The tailgate handle pivot points on your vehicle should be lubricated to keep
it working smoothly.
Your maintenance schedule will tell you how often to lubricate the handle.
See “Recommended Fluids and Lubricants”
in the Index for the proper
lubricant
to use.
Efectricaf System
Battery
Every new GM vehicle has
add water
to one of these,
a Delco Freedom@ battery.
the original battery’s label.
Vehicle Storage
If you’re not going to drive a Delco Freedom@ battery. You never have
to
When it’s time for a new battery, we recommend
Get one that has the catalog number shown on
your vehicle for 25 days or more, take off the
black, negative
(-) cable from the battery. This will help keep your battery
from running down.
--
CAUTION
1 Batteries have acid that can burn you and gas that can explode. You I
, - , can be badly hurt if you aren’t careful. See “Jump Starting” in the
Index
for tips on working around a battery without getting hurt.
on'^ your dealer to learn how to prepare your vehicle for longer periods.
Bulb Rep/acement
Before you replace any bulbs, be sure that all the lights are off and the
engine isn’t running.
6-37
Page 303 of 386
P
Service & Appearance Care
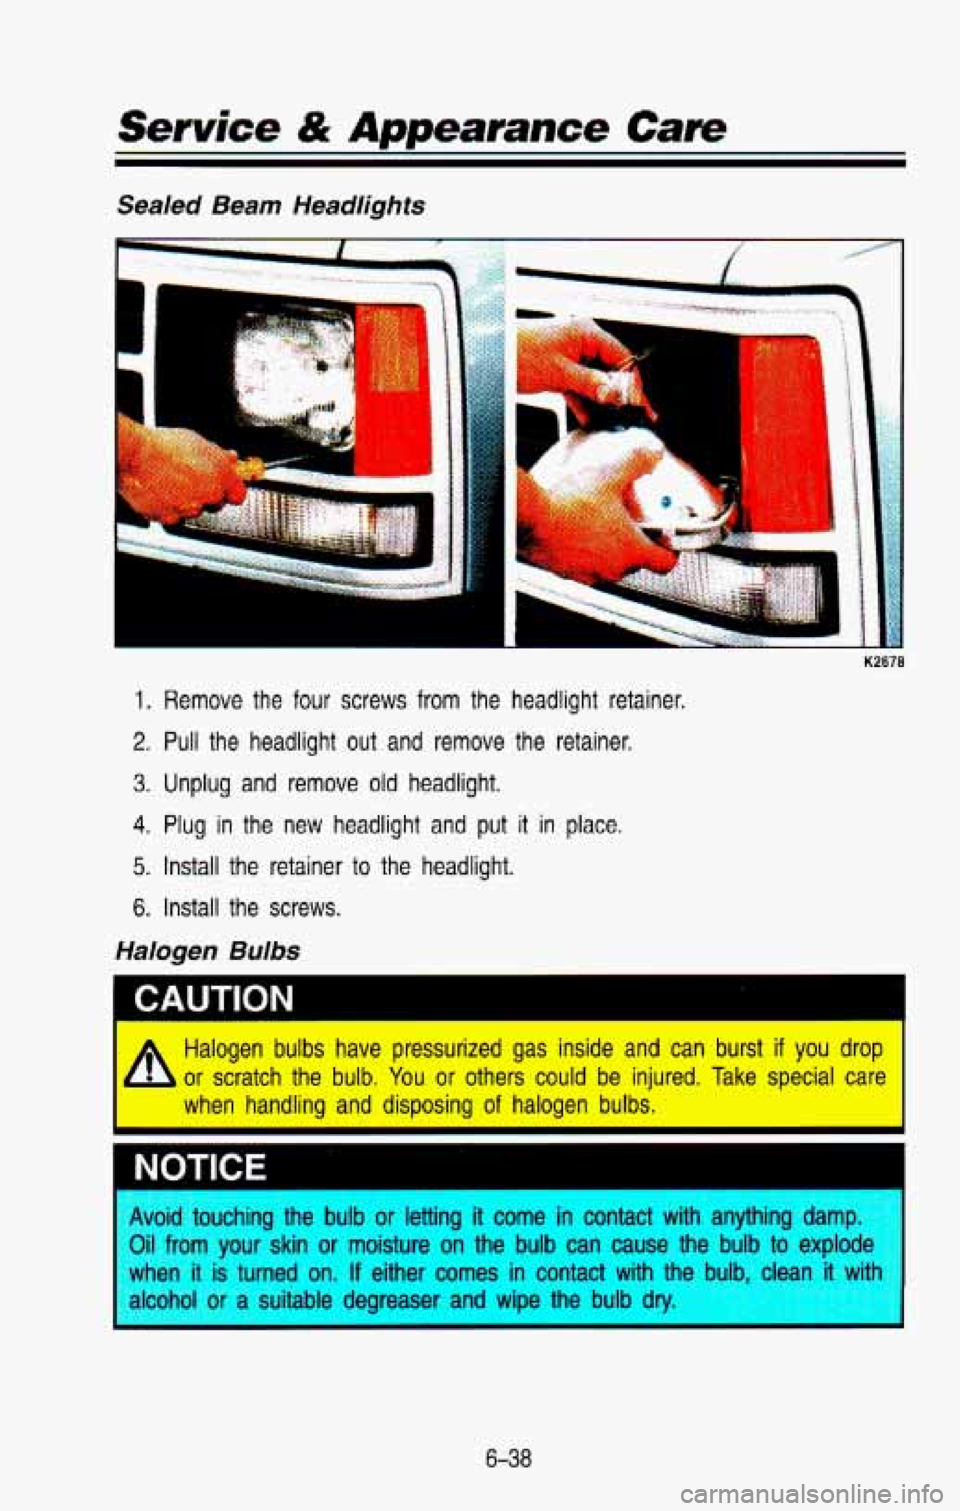
Sealed Beam Headlights
-.
1. Remove the four screws from the headlight retainer.
2. Pull the headlight out and remove the retainer.
3. Unplug and remove old headlight.
4. Plug in the new headlight and put it in place.
5. Install the retainer to the headlight.
6. Install the screws.
Halogen Bulbs
Halogen bulbs have pressurized gas inside and can burst if you drop
or scratch the bulb.
You or others could be injured. Take special car€
when handling and disposing
of halogen bulbs.
CAUTION I
NOTICE I
Avoid touching the bulb or letting it come in contact with anything da.. .~-
Oil from your skin or moisture on the bulb can cause the bulb to explode
when
it is turned on. If either comes in contact with the bulb. clean it v
alcohol or suitable deareaser and wiDe the bulb dry.
6-38
Page 304 of 386
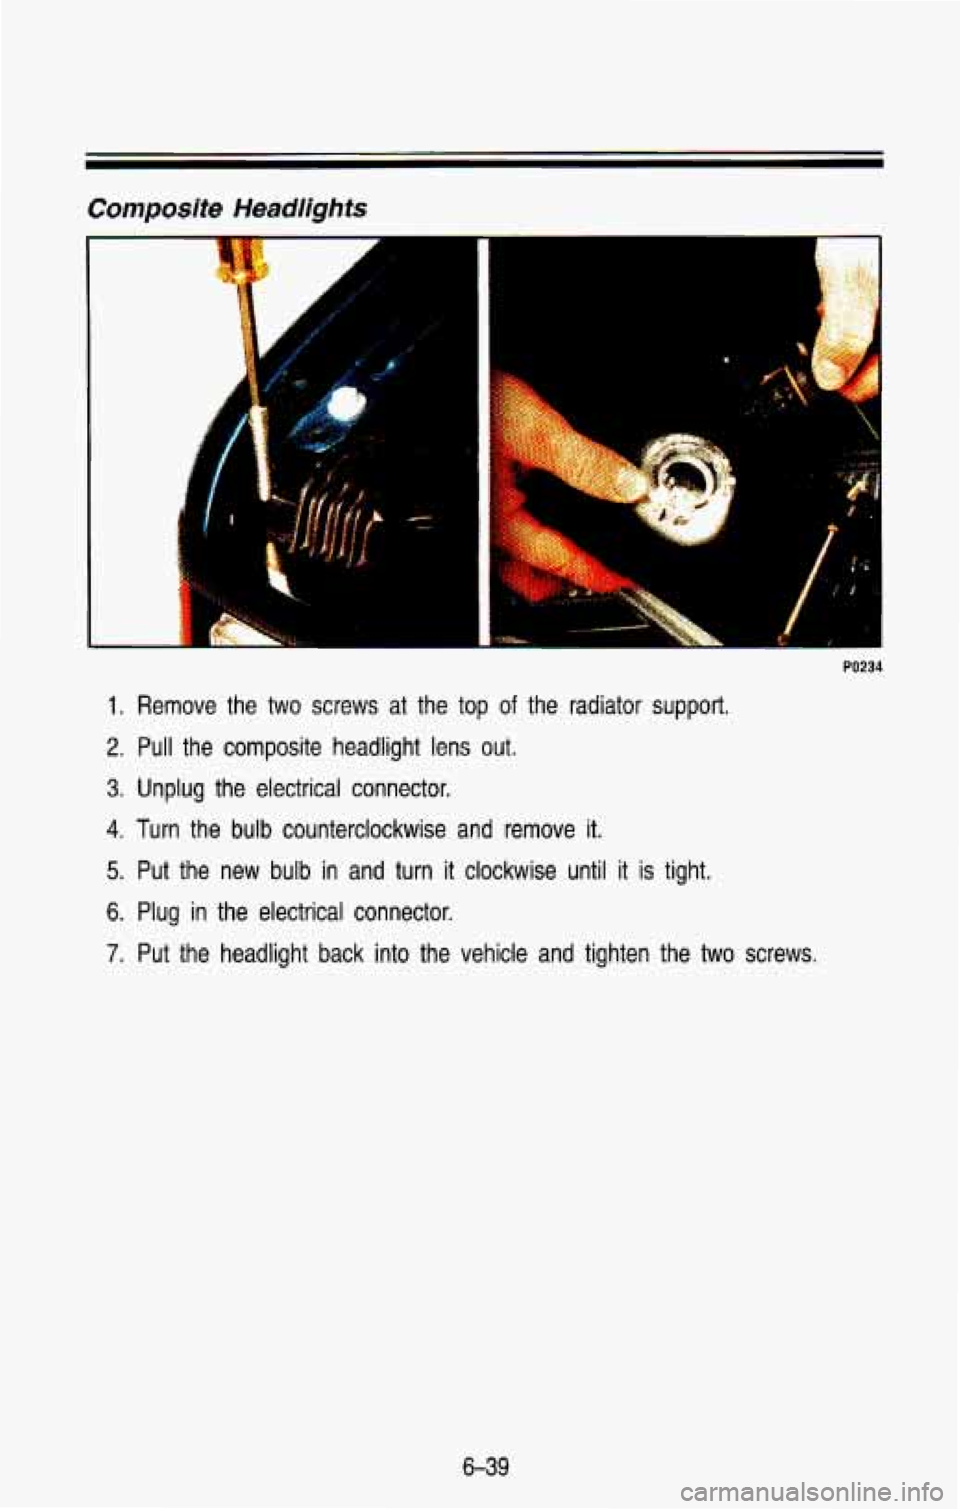
Composite Headlights
1
PO2
1. Remove the two screws at the top of the radiator support.
2. Pull the composite headlight lens out.
3. Unplug the electrical connector.
4. Turn the bulb counterclockwise and remove it.
5. Put the new bulb in and turn it clockwise until it is tight.
6. Plug in the electrical connector.
7. Put the headlight back into the vehicle and tighten the two screws.
6-39
Page 305 of 386
Service & Appearance Care
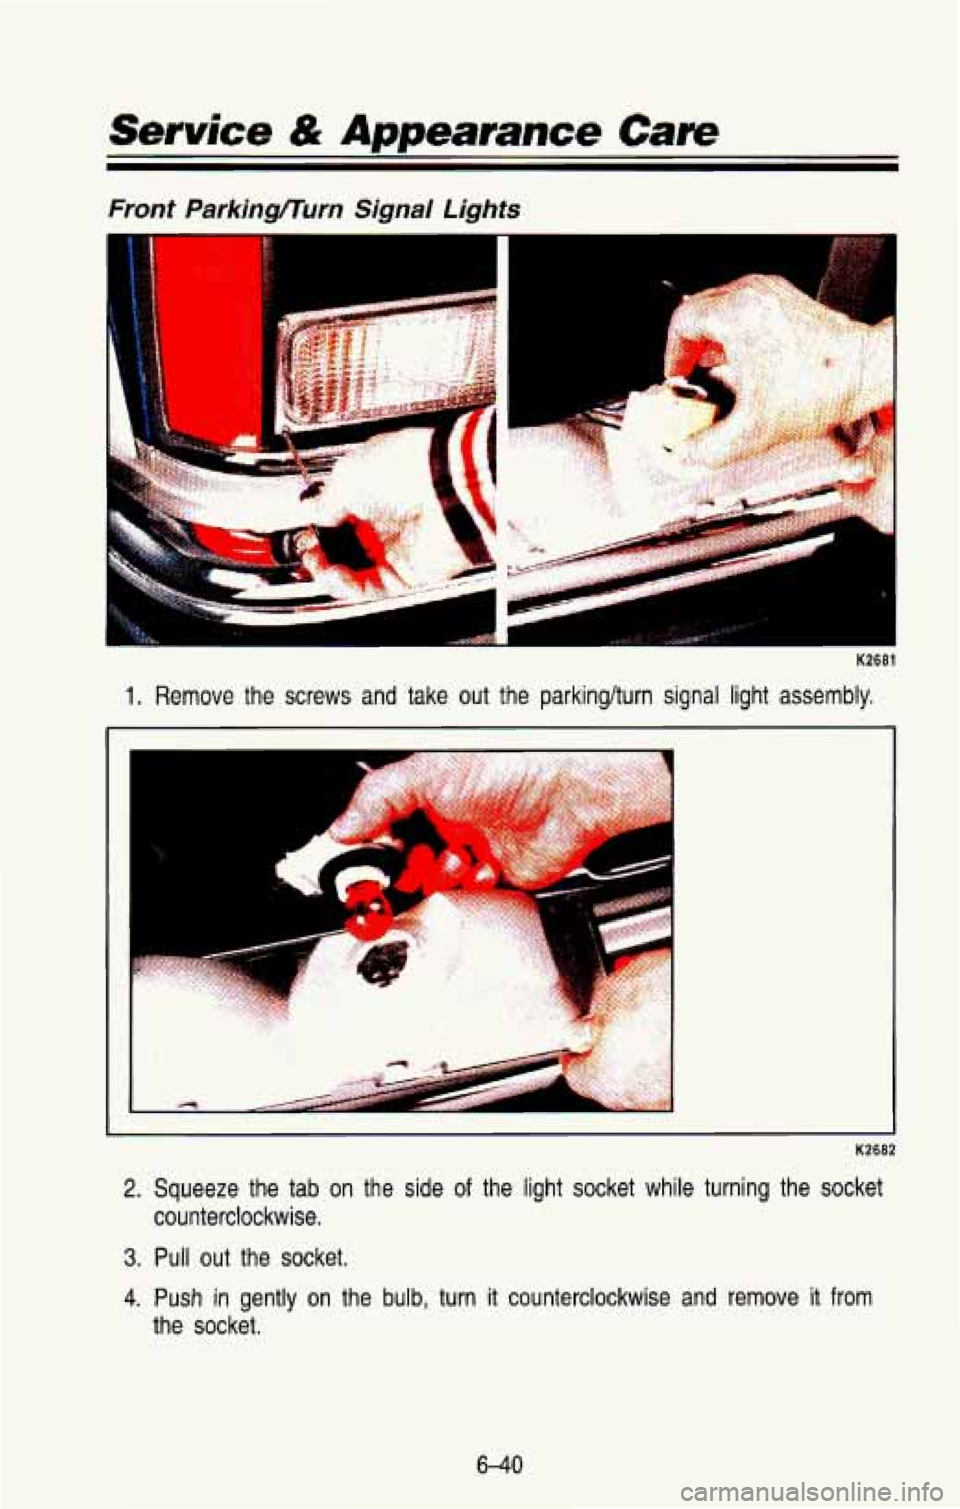
Front Parkingflurn Signal Lights
K2681
1. Remove the screws and take out the parkinglturn signal light a\
ssembly,
2. Squeeze the tab on the side of the light socket while turning the socket
counterclockwise.
3. Pull out the socket.
4. Push in gently on the bulb, turn it counterclockwise and remove it from
the socket.
6-40
Page 306 of 386
5. Put the new bulb into the socket, gently press in on the bulb and turn it
clockwise until it is tight.
6. Put the socket back into the light assembly and turn it clock\
wise until it
locks.
7. Put the parkinghurn signal light assembly back into the vehicle and
tighten the screws.
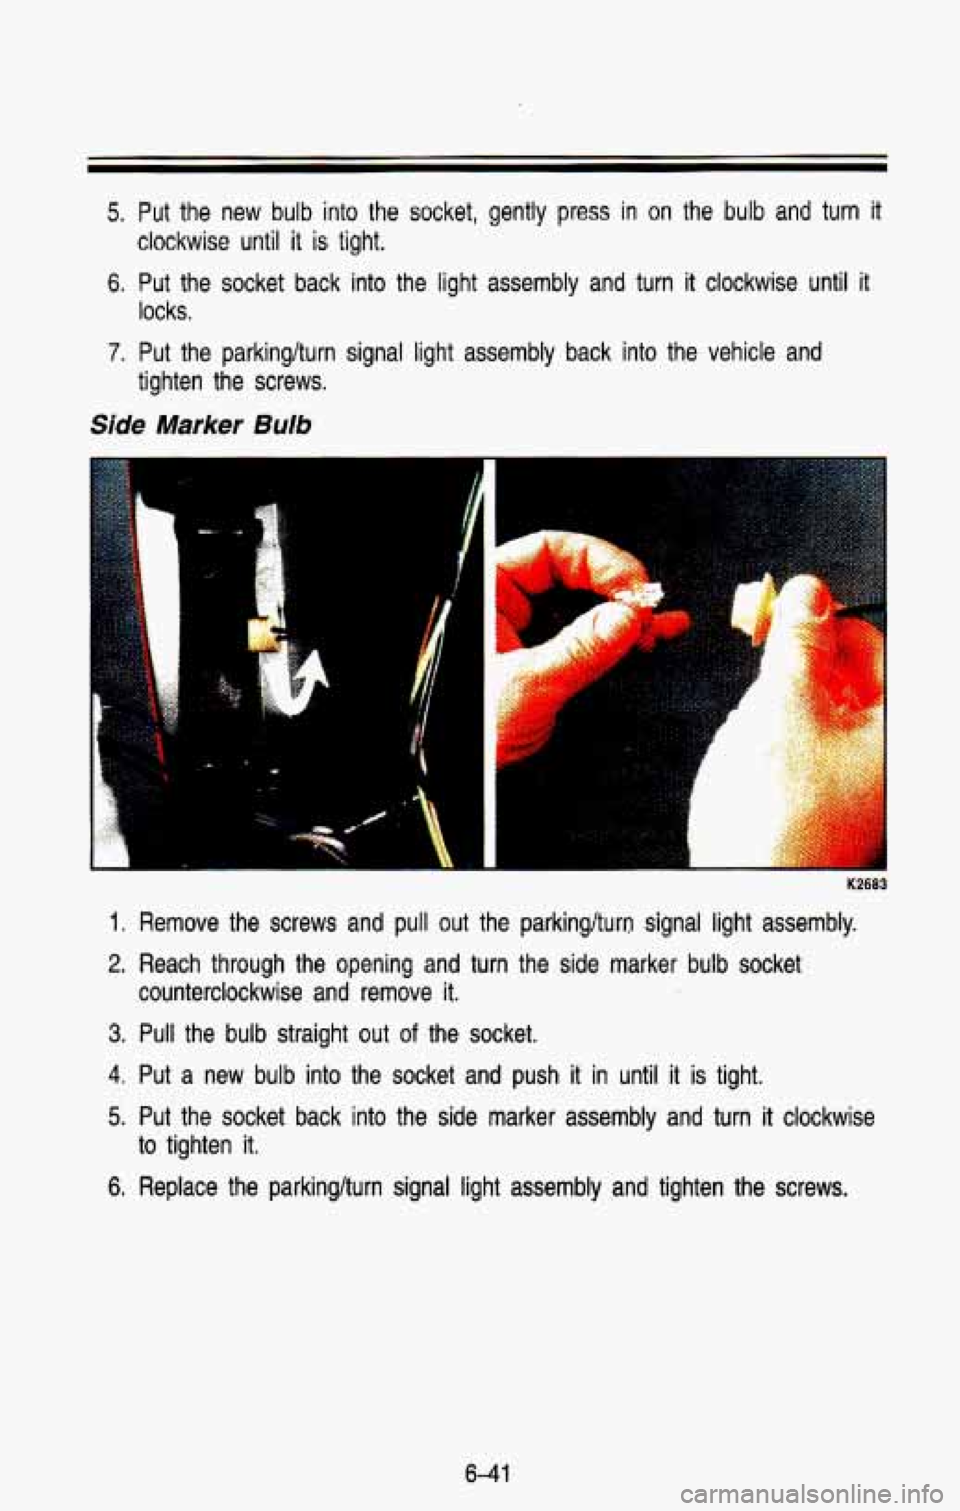
Side Marker Bulb
P
1 Remove the screws and pull out the parkinglturo signal light assembly.
2. Reach through the opening and turn the side marker bulb socket\
3. Pull the bulb straight out of the socket.
counterclockwise and remove it.
4. Put a new bulb into the socket and push it in until
it is tight.
5. Put the socket back into the side marker assembly and turn it clockwise
to tighten it.
6. Replace the parkinglturn signal light assembly and tighten the screws.
6-41
Page 307 of 386
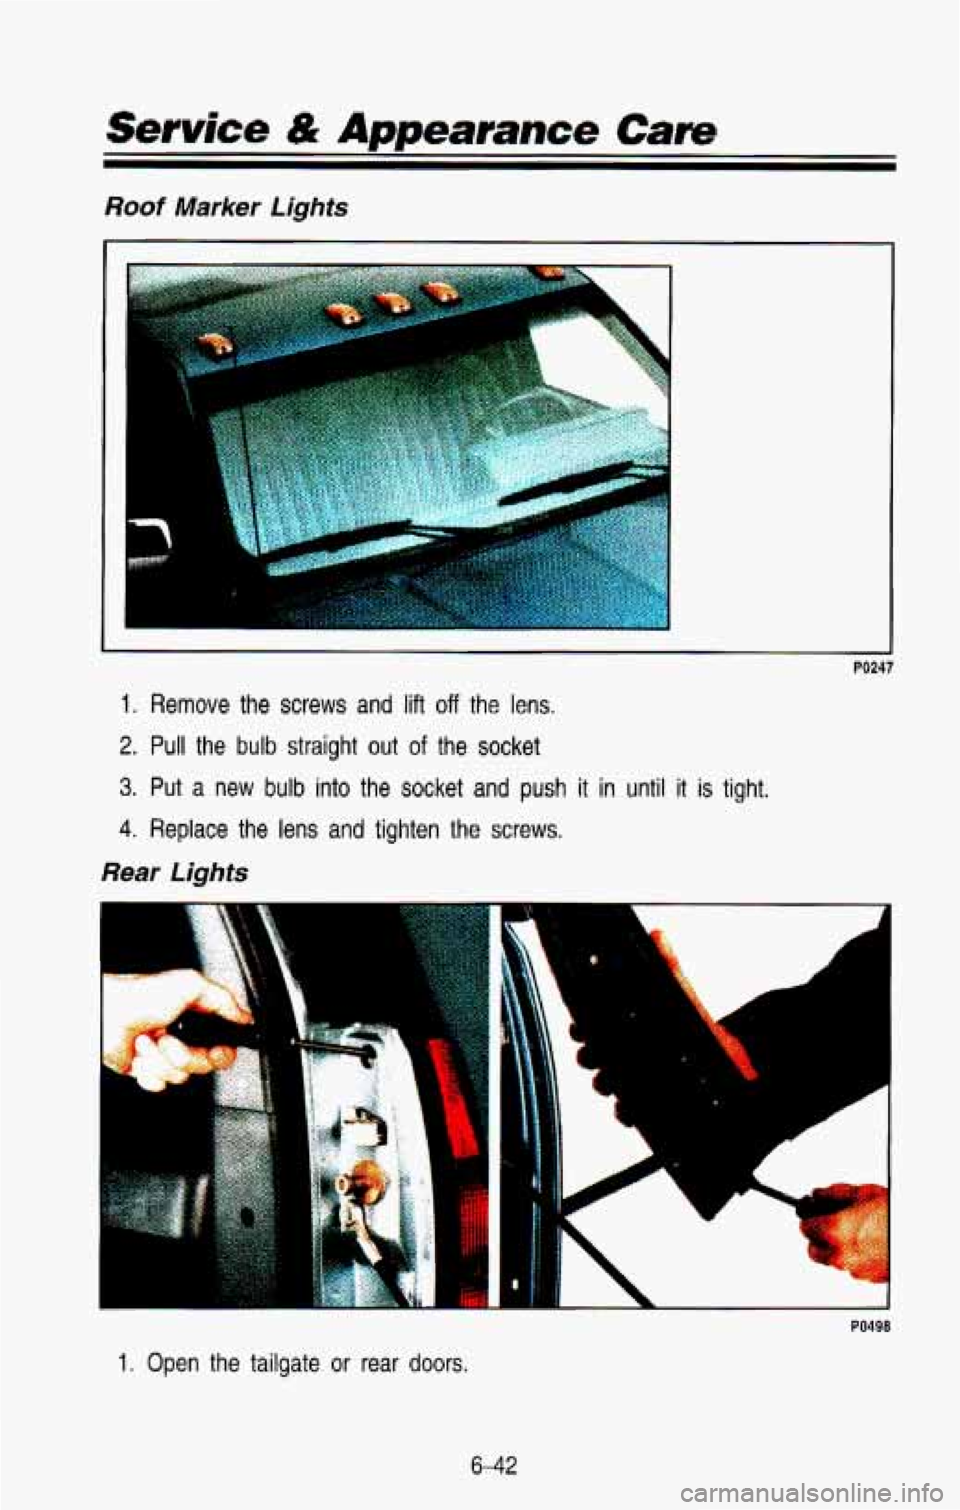
Roof Marker Lights
e
1. Remove the screws and lift off the lens.
2. Pull the bulb straight out of the socket
3. Put a new bulb into the socket and push it in until it is tight.
4. Replace the lens and tighten the screws.
Rear Lights
PO498
1 I Open the tailgate or rear doors.
6-42
Page 308 of 386
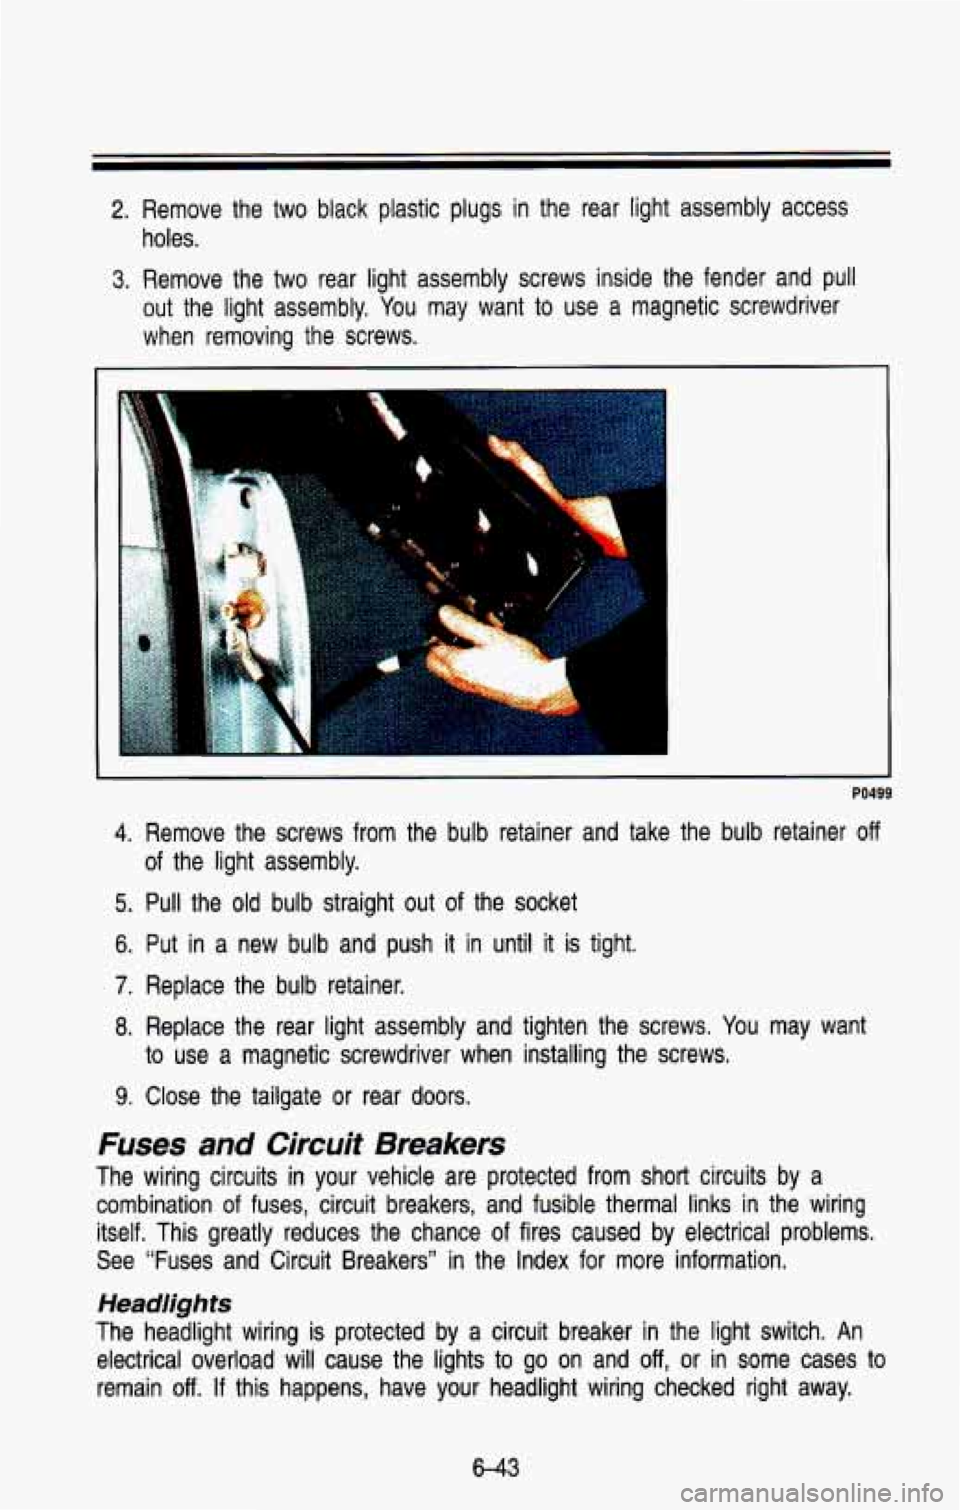
2. Remove the two black plastic plugs in the rear light assembly access
holes.
3. Remove the two rear light assembly screws inside the fender an\
d pull
out the light assembly.
You may want to use a magnetic screwdriver
when removing the screws.
I
PO499
4. Remove the screws from the bulb retainer and take the bulb retainer off
of the light assembly.
5. Pull the old bulb straight out of the socket
6. Put in a new bulb and push it in until it is tight.
7. Replace the bulb retainer.
8. Replace the rear light assembly and tighten the screws. You may want
9. Close the tailgate or rear doors.
Fuses and Circuit Breakers
The wiring circuits in your vehicle are protected from short circuits by a
combination
of fuses, circuit breakers, and fusible thermal links in the wirin\
g
itself. This greatly reduces the chance
of fires caused by electrical problems.
See “Fuses and Circuit Breakers” in the Index for more information.
to use a magnetic screwdriver when installing the screws.
Headlights
The headlight wiring is protected by a circuit breaker
in the light switch. An
electrical overload will cause the lights
to go on and off, or in some cases to
remain
off. If this happens, have your headlight wiring checked right away.
6-43
Page 309 of 386
Service & Appearance Care
Windshield Wipers
The windshield wiper motor is protected by a circuit breaker and a fuse. If
the motor overheats due to heavy snow, etc., the wiper will stop until the
motor cools.
If the overload is caused by some electrical problem and not
snow, etc., be sure to get
it fixed,
Power Windows and Other Power Options
Circuit breakers in the fuse panel protect the power windows and other power
accessories. When the current load
is too heavy, the circuit breaker opens
and
closes, protecting the circuit until the problem is fixed or goes away.
Trailer Wiring Harness
The optional seven-wire trailer wiring harness is protected by an in-line fuse
in the battery feed wire. This fuse is near the junction
block. See “Trailer
Wiring Harness” in the Index for more information.
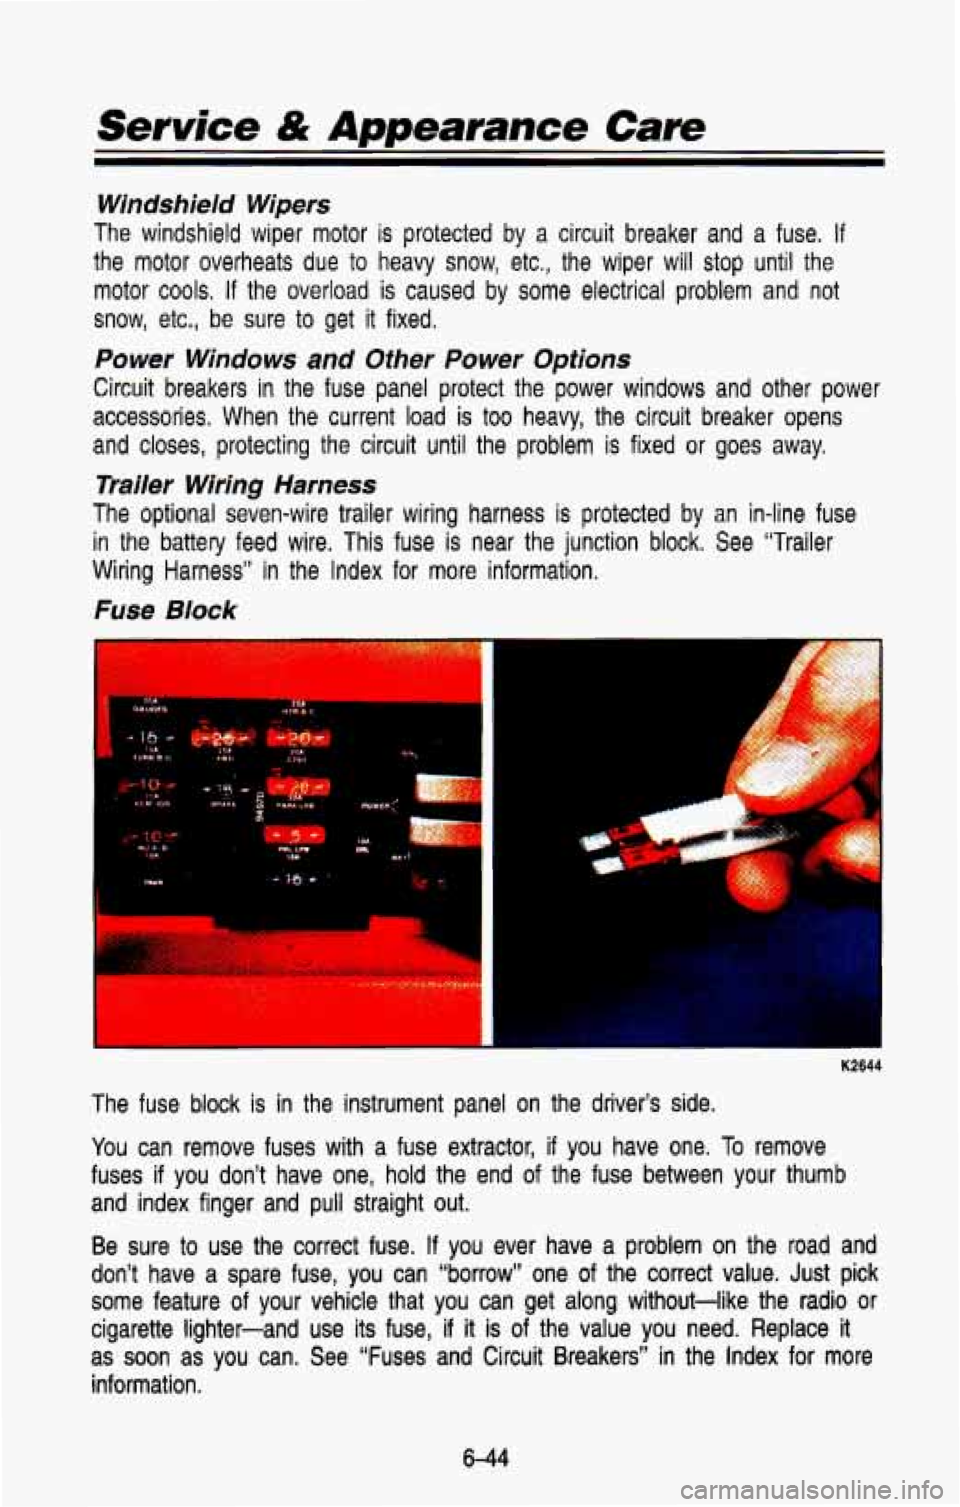
Fuse Block
m
, .. .
i
-+ lW -
-=
. . . . . . . . .
..
K2644
The fuse block is in
the instrument panel on the driver’s side.
You can remove fuses with a fuse extractor, if you have one. To remove
fuses
if you don’t have one, hold the end of the fuse between your thumb
and index finger and pull straight out.
Be sure to use the correct fuse.
If you ever have a problem on the road and
don’t have a spare fuse, you can “borrow” one of the correct value. Just pick
some feature of your vehicle that you can get along without-like the radio \
or
cigarette lighter-and use
its fuse, if it is of the value you need. Replace it
as
soon as you can. See “Fuses and Circuit Breakers” in the Index for more
information.
644
Page 310 of 386
Exhaust System
To help prevent damage to your exhaust system, do not continue to drive
your vehicle
if you notice:
Engine misfiring
Loss of performance
Other unusual operating conditions
Have your engine and exhaust system serviced regularly.
Three- Way Catalytic Converter
Your vehicle’s three-way catalytic converter is designed to reduce the
pollutants in your vehicle’s exhaust. Use only unleaded fuel in your vehic\
le. If
you use leaded fuel, you could damage your three-way catalytic \
converter,
and other engine components.
Computer Command Control System
This system has an oxygen (OS) sensor that helps keep your engine’s
air-fuel mixture at a proper level. Use only unleaded fuel in your vehicle.
If
you use leaded fuel, you could damage your oxygen (OS) sensor and
three-way catalytic converter.
The Malfunction Indicator Lamp
(SERVICE ENGINE SOON) on your
instrument panel lets you know when your emission control syste\
m needs
service. The light will come on briefly when you start your e\
ngine to let you know that the system
is working. If it does not come on when you start your
engine, or
if it comes on and stays on while you’re driving your system may \
need service. Your vehicle should still be driveable, but you should have your
system serviced right away.
Secondary Air Injection (AIR) System
You may have this system. It lets you know if your engine control module,
wiring harness or solenoid need service.
If the Malfunction Indicator Lamp
(Service Englne Soon) comes on, you need service.
645