glove box CHEVROLET BLAZER 1995 2.G Owners Manual
[x] Cancel search | Manufacturer: CHEVROLET, Model Year: 1995, Model line: BLAZER, Model: CHEVROLET BLAZER 1995 2.GPages: 380, PDF Size: 20.04 MB
Page 65 of 380
Downloaded from www.Manualslib.com manuals search engine Theft
Vehicle theft is big business, especially in some cities. Although your
vehicle has a number of theft deterrent features,
we know that nothing we
put on it can make it impossible to steal. However, there are ways you can
help.
Key in the lgnition
If you walk away from your vehicle with the keys inside, it’s an easy target
for joy riders or professional thieves
- so don’t do it.
When you park your vehicle and open the driver’s door, you’ll hear a tone
reminding you to remove your key from the ignition and take it with you.
Always do this. Your steering wheel will be locked, and
so will your
ignition.
If you have an automatic transmission, taking your key out also
locks your transmission. And remember to lock the doors.
Parking at Night
Park in a lighted spot, close all windows and lock your vehicle. Remember
to keep your valuables out of sight. Put them in a storage
area, or take them
with you.
Parking Lots
If you park in a lot where someone will be watching your vehicle, it’s best
to lock it up and take your keys. But what if you have to leave your ignition
key? What if you have to leave something valuable in your vehicle?
0 Put your valuables in a storage area, like your glove box.
0 Lock all the doors except the driver’s.
2-13
Page 108 of 380
Downloaded from www.Manualslib.com manuals search engine Storage Compartments
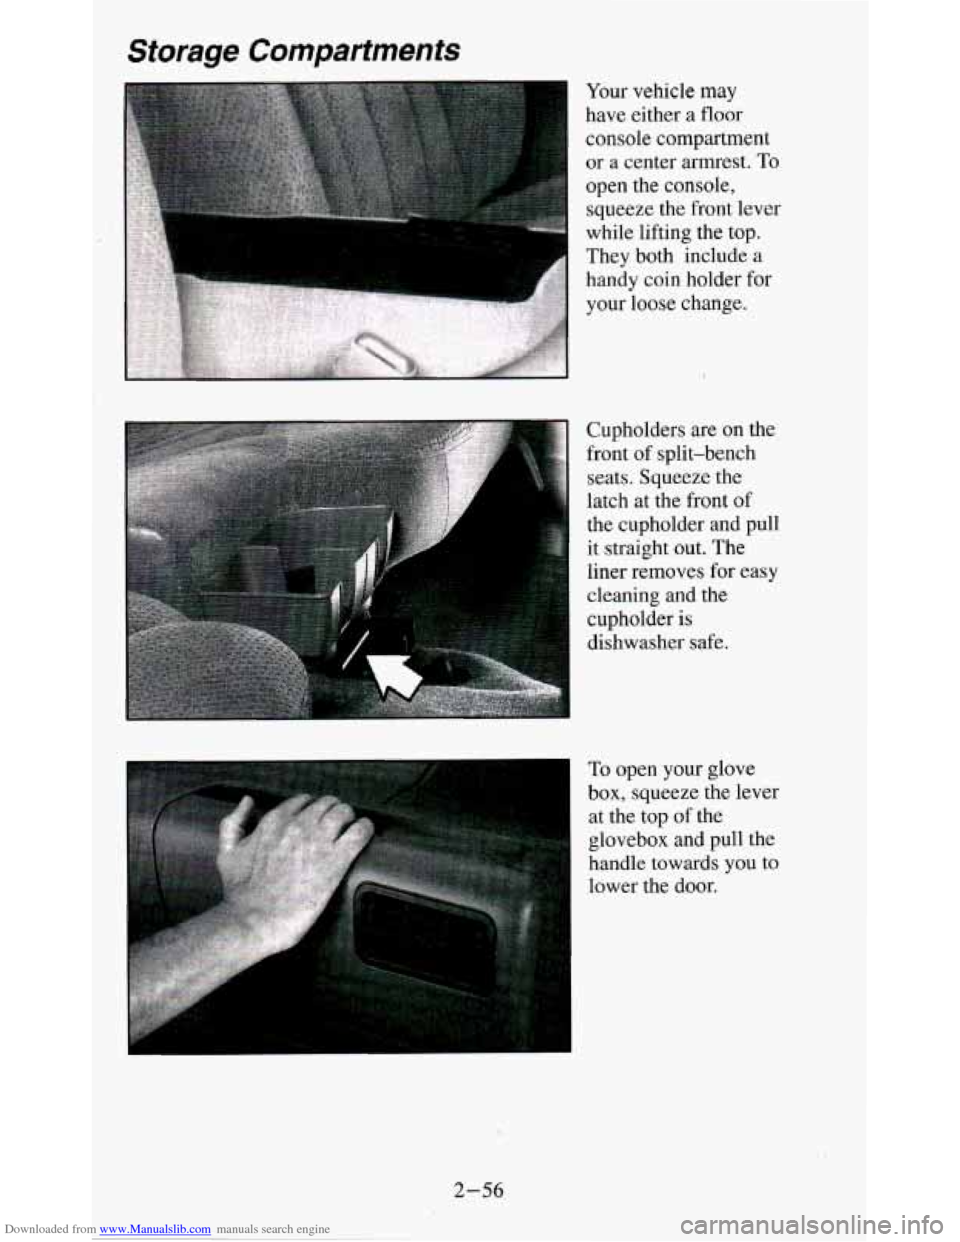
Cupholders are on the
front of split-bench
seats. Squeeze the
latch at the front of
the cupholder and pull
it straight out. The
liner removes
for easy
cleaning and the
cupholder is
dishwasher safe.
To open your glove
box, squeeze the lever
at the top of the
glovebox and pull the
handle towards
you to
lower the door.
2-56
Page 109 of 380
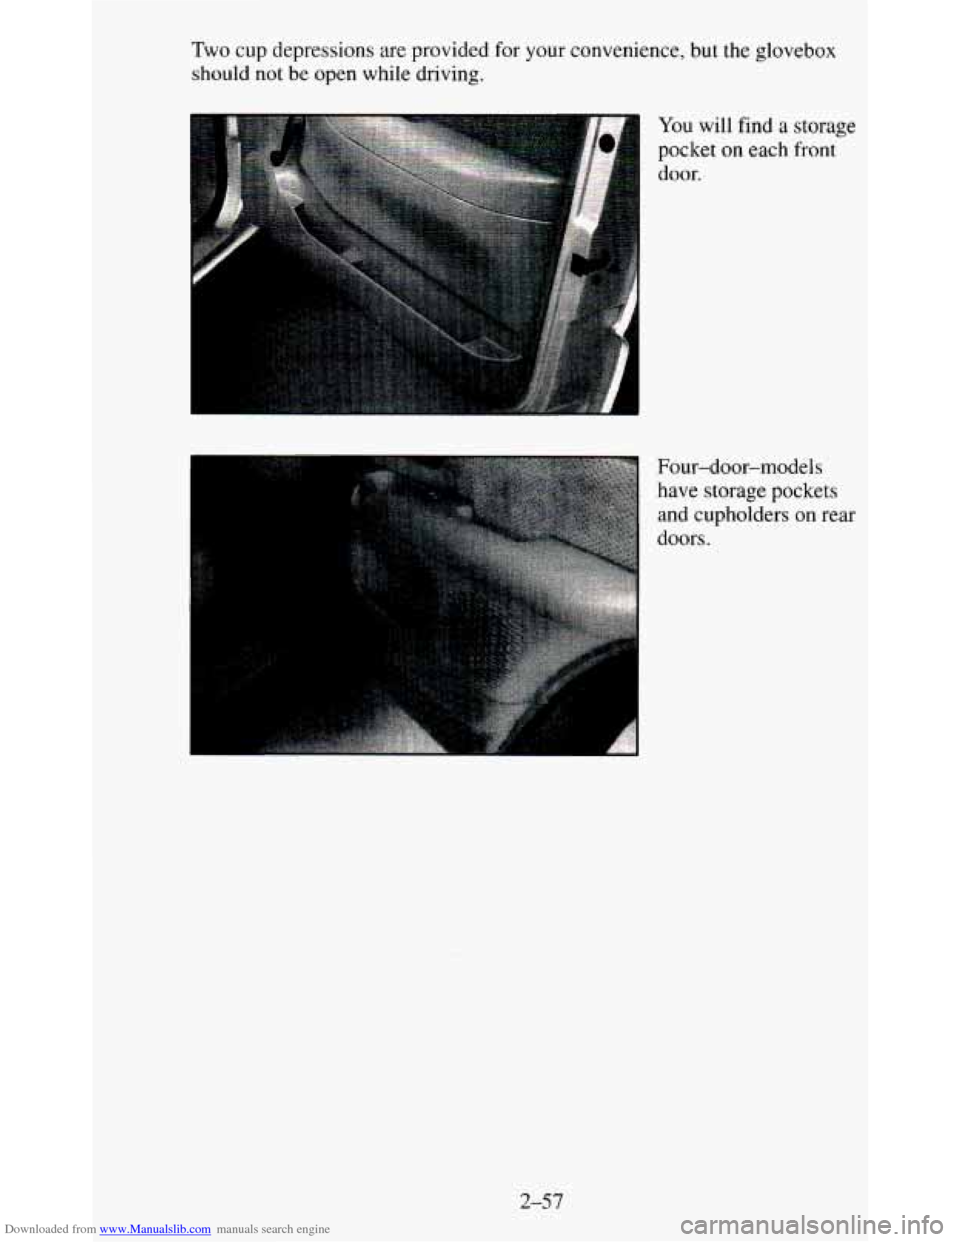
Downloaded from www.Manualslib.com manuals search engine Two cup depressions are provided for your convenience, but the glovebox
should not be open while driving.
You
will find a storage
pocket
on each front
door.
Four-door-models have storage pockets
and cupholders on rear
doors.
2-57
Page 117 of 380
Downloaded from www.Manualslib.com manuals search engine Instrument Panel
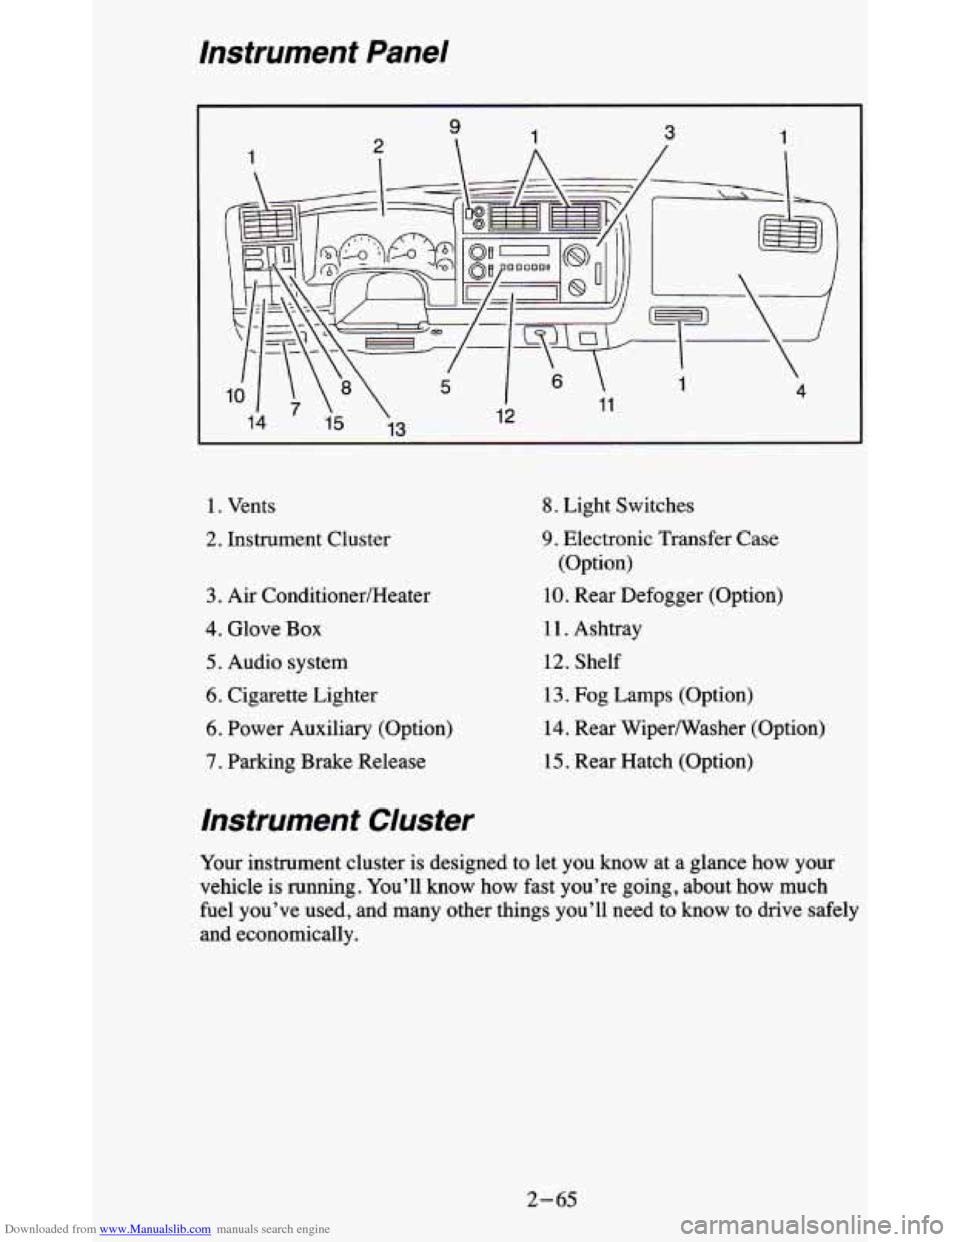
1. Vents
2. Instrument Cluster
3. Air ConditionedHeater
4. Glove Box
5. Audio system
6. Cigarette Lighter
6. Power Auxiliary (Option)
7. Parking Brake Release
8. Light Switches
9. Electronic Transfer Case
(Option)
10. Rear Defogger (Option)
11. Ashtray
12. Shelf
13. Fog Lamps (Option)
14. Rear Wipermasher (Option)
15. Rear Hatch (Option)
Instrument Cluster
Your instrument cluster is designed to let you know at a glance how your
vehicle
is running. You’ll know how fast you’re going, about how much
fuel you’ve used, and many other things you’ll need to know to drive safely
and economically.
2- 65
Page 300 of 380
Downloaded from www.Manualslib.com manuals search engine Service Parts Identification Label
You’ll find this label on the inside of the glove box.
It’s very helpful
if you ever need to order parts. On this label is:
your VIN,
the model designation,
0 paint information, and
a list of all production options and special equipment.
Be sure that this label is not removed from the vehicle.
Add-on Electrical Equipment
I NOTICE:
Don’t add anything electrical to your vehicle unless you che\
ck
with your dealer first. Some electrical equipment can damage
your vehicle and the damage wouldn’t be covered by your
warranty.
Some add-on electrical equipment can keep other
components from working as they should.
Your vehicle has an air bag system. Before attempting to add anything
electrical to your vehicle, see “Servicing Your Air Bag-Equipped Vehicle”
in the Index.
Fuses and Circuit Breakers
The wiring circuits in your vehicle are protected from short circuits by a
combination of fuses, circuit breakers, and fusible thermal links in the
wiring itself. This greatly reduces the chance
of fires caused by electrical
problems.
6-60
Page 304 of 380
Downloaded from www.Manualslib.com manuals search engine Lamp and Bulb Dafa
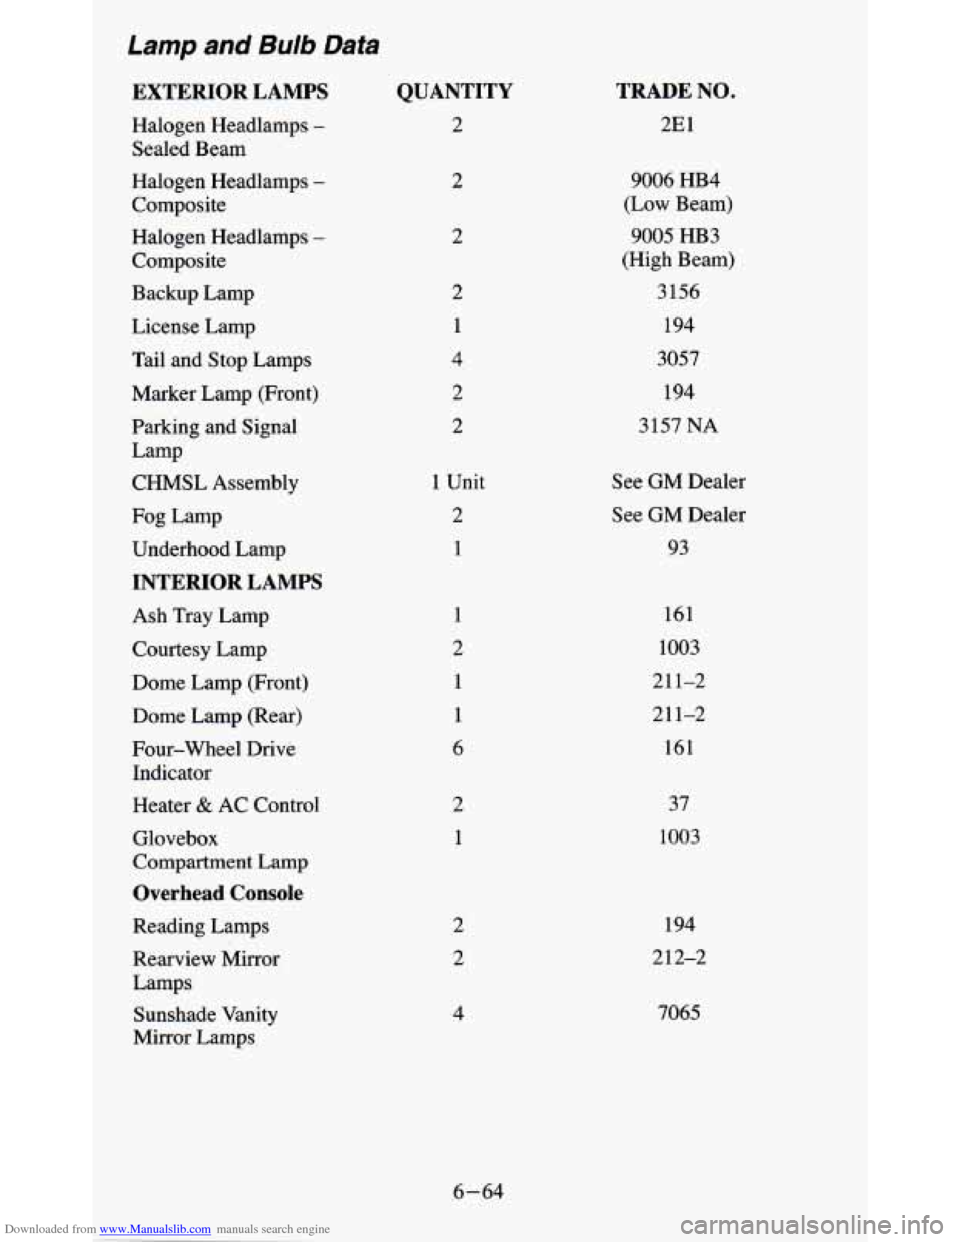
EXTERIOR LAMPS
Halogen Headlamps -
Sealed Beam
Halogen Headlamps
-
Composite
Halogen Headlamps
-
Composite
Backup Lamp
License Lamp
Tail and Stop Lamps
Marker Lamp (Front)
Parking and Signal
CHMSL Assembly
Lamp
Fog Lamp
Underhood Lamp
INTERIOR LAMPS
Ash Tray Lamp
Courtesy Lamp
Dome Lamp (Front)
Dome Lamp (Rear)
Four-wheel Drive Indicator
Heater
& AC Control
Glovebox
Compartment Lamp
Overhead Console
Reading Lamps
Rearview Mirror
Lamps
Sunshade Vanity
Mirror Lamps
QUANTITY
2
2
2
2
1
4
2
2
1 Unit 2
1
1
2 1
1
6
2
1
2
2
4
TRADE NO.
2E1
9006 HB4
(Low Beam)
9005 HB3
(High Beam)
3 156
194
3057
194
3157
NA
See GM Dealer
See GM Dealer
93
161
1003
211-2
211-2 161
37
1003
194
212-2
7065
6-64
Page 307 of 380
Downloaded from www.Manualslib.com manuals search engine NAME
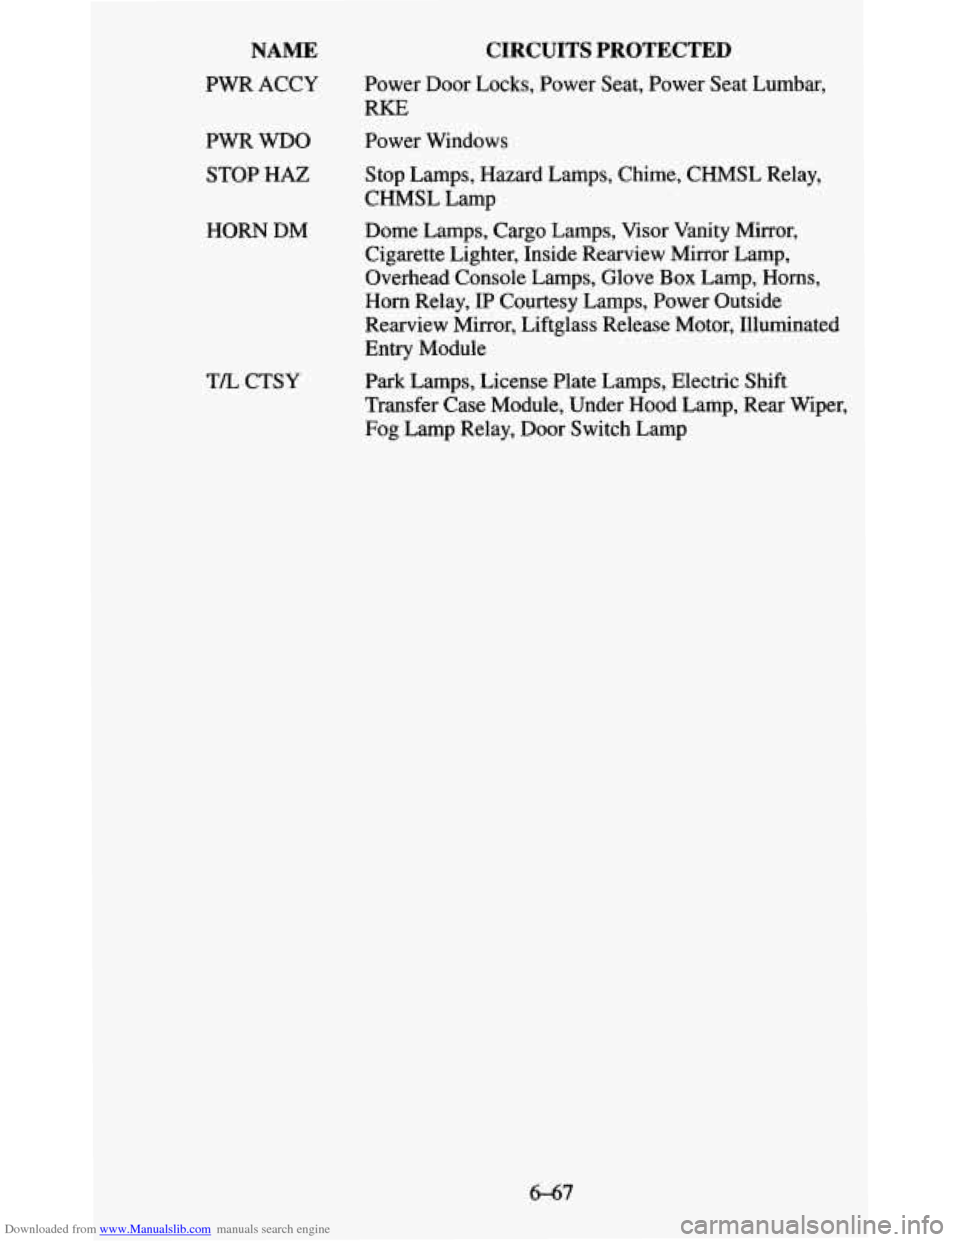
PWR ACCY
PWR WDO
STOP HAZ
HORN DM
TIL CTSY
CIRCUITS PROTECTED
Power Door Locks, Power Seat, Power Seat Lumbar,
RKE
Power Windows
Stop Lamps, Hazard Lamps, Chime, CHMSL Relay,
CHMSL Lamp
Dome Lamps, Cargo Lamps, Visor Vanity Mirror,
Cigarette Lighter, Inside Rearview Mirror Lamp,
Overhead Console Lamps, Glove
Box Lamp, Horns,
Horn Relay, IP Courtesy Lamps, Power Outside
Rearview Mirror, Liftglass Release Motor, Illuminated
Entry Module
Park Lamps, License Plate Lamps, Electric Shift
Transfer Case Module, Under Hood Lamp, Rear Wiper,
Fog Lamp Relay, Door Switch Lamp
6-67
Page 348 of 380
Downloaded from www.Manualslib.com manuals search engine €ngine Coolant Level
Check the engine coolant level and add the proper coolant mix if necessary.
See “Coolant” in the Index for further details.
Windshield Washer Fluid Level
Check the windshield washer fluid level in the windshield washe\
r tank and
add the proper fluid if necessary. See “Windshield Washer Fluid” in the
Index for further details.
At Least Once a Month
Tire Inflation
Check tire inflation. Make sure tires are inflated to the pressures specified
on the Certificatioflire label located on the driver’s door lock pillar. See
“Tires” in the Index for further details.
Cassette Deck
Clean cassette deck. Cleaning should be done every 50 hours of tape play.
See “Audio Systems” in the Index for further details.
At Least Once a Year
Key Lock Cylinders
Lubricate the key lock cylinders with the lubricant specified i\
n Part D.
Body Lubrication
Lubricate all body door hinges, the body hood, fuel door and rear
compartment hinges, latches and locks including interior glove box and
console doors, and any moving seat hardware. Lubricate the hood safety
lever pivot and prop rod pivot.
Part D tells you what to use. More frequent
lubrication may be required when exposed to
a corrosive environment.
7-36