CHEVROLET BLAZER 2021 Get To Know Guide
Manufacturer: CHEVROLET, Model Year: 2021, Model line: BLAZER, Model: CHEVROLET BLAZER 2021Pages: 20, PDF Size: 3.73 MB
Page 11 of 20
11F Optional equipment
BLUETOOTH® SYSTEM
Read your Owner’s Manual for important information about using the Bluetooth system while driving.
Before using a Bluetooth-enabled device in the vehicle, it must be paire\
d with the in-vehicle Bluetooth system. The vehicle must be stopped to pair a device. \
Not all devices will support all functions. Visit my.chevrolet.com/how-to-support for more information.
PAIR A PHONE
1. To use voice recognition, press the Push to Talk button; after the prompt, say “Pair phone”; or to use the infotainment screen, select the Phone \
icon > Connect Phone > Add Phone.
2. Start the pairing process on your phone. From the phone’s Bluetooth s\
ettings, select the name shown on the infotainment screen.
3. Follow the pairing instructions.
4. When pairing is complete, the phone screen is displayed. Depending on th\
e phone, your phone book may be downloaded automatically.
SECONDARY PHONE
A secondary phone can be paired to the Bluetooth system. The system conn\
ects to the phone that is set to First to Connect. The secondary phone can only rece\
ive calls.
To set the first and secondary phones, select the Phone icon > Phones \
> Information.
See Infotainment System in your Owner’s Manual.
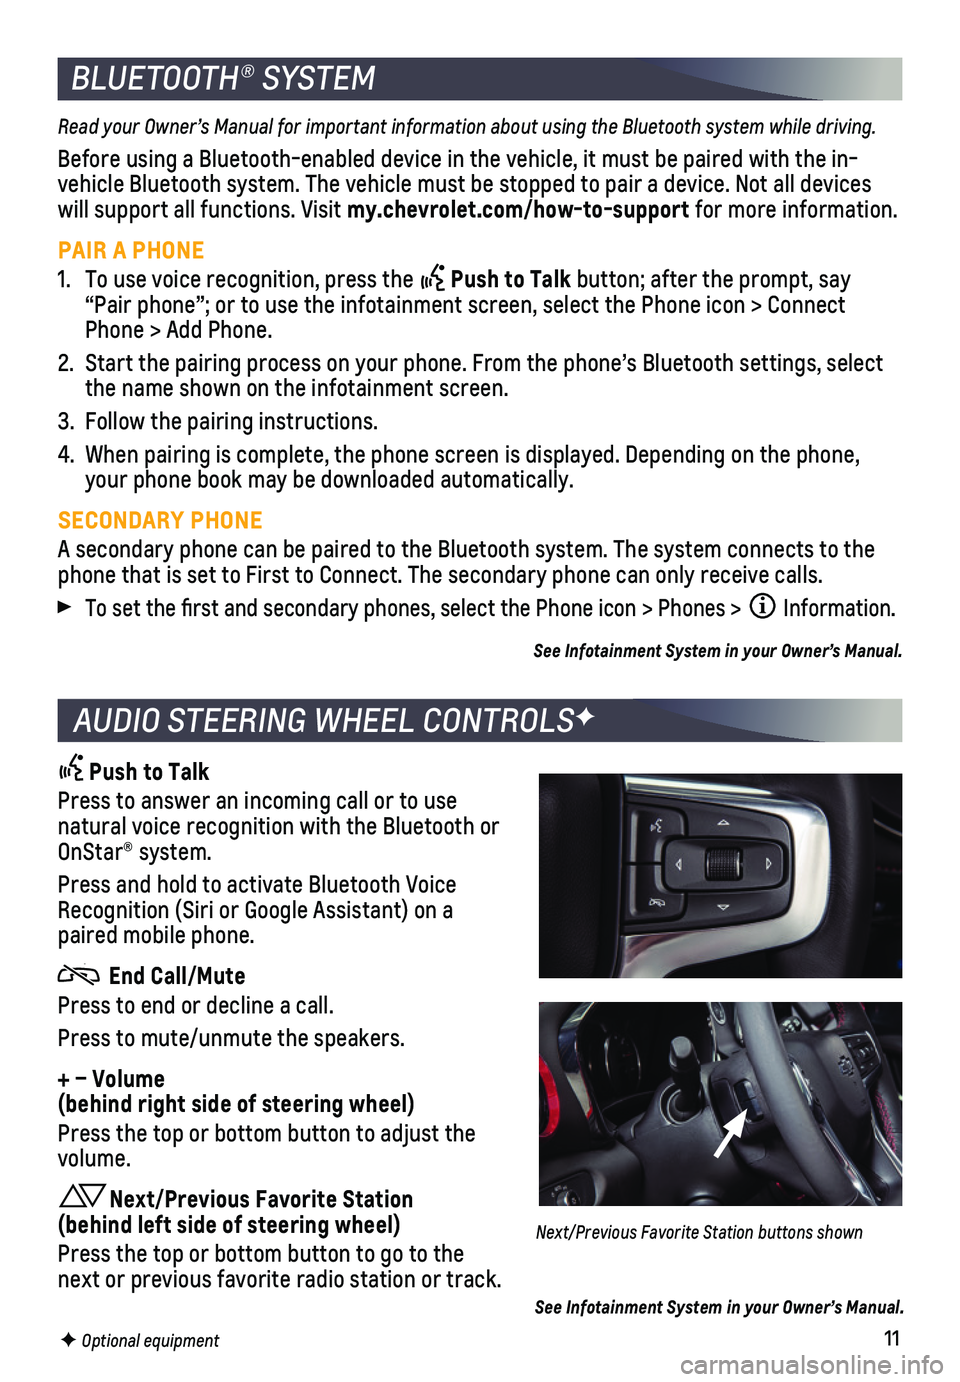
AUDIO STEERING WHEEL CONTROLSF
Push to Talk
Press to answer an incoming call or to use natural voice recognition with the Bluetooth or OnStar® system.
Press and hold to activate Bluetooth Voice Recognition (Siri or Google Assistant) on a paired mobile phone.
End Call/Mute
Press to end or decline a call.
Press to mute/unmute the speakers.
+ – Volume (behind right side of steering wheel)
Press the top or bottom button to adjust the volume.
Next/Previous Favorite Station (behind left side of steering wheel)
Press the top or bottom button to go to the next or previous favorite radio station or track.
Next/Previous Favorite Station buttons shown
See Infotainment System in your Owner’s Manual.
Page 12 of 20
12
An iPod®, iPhone®, MP3 Player, a USB flash drive or a portable U\
SB hard drive can be
connected to the USB data ports located on the center of the instrument \
panel.
To play a device, touch Audio on the infotainment screen; and then touch\
USB from the sources list or touch More to view the USB option.
See Infotainment System in your Owner’s Manual.
With the vehicle’s available 4G LTE Wi-Fi hotspot, up to 7 devices (\
smartphones, tablets and laptops) can be connected to high-speed internet. For more informat\
ion on use and system limitations, visit my.chevrolet.com/how-to-support.
To retrieve the name and password for the hotspot, select the Wi-Fi Hots\
pot icon on the infotainment screen or go to Settings > System > Wi-Fi Hotspot.
See Infotainment System in your Owner’s Manual.
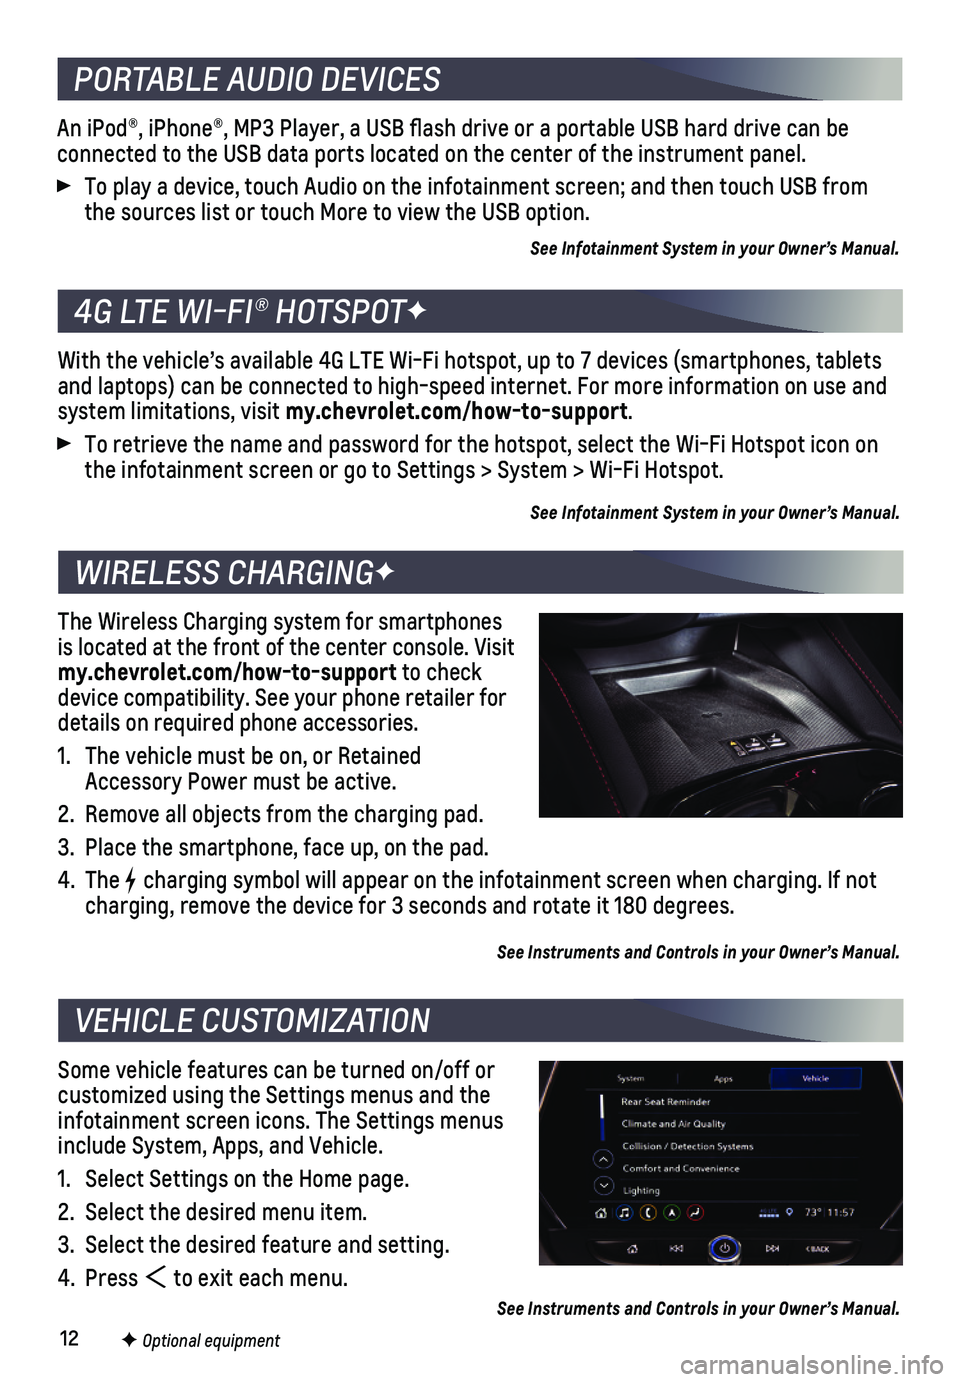
The Wireless Charging system for smartphones is located at the front of the center console. Visit my.chevrolet.com/how-to-support to check device compatibility. See your phone retailer for details on required phone accessories.
1. The vehicle must be on, or Retained Accessory Power must be active.
2. Remove all objects from the charging pad.
3. Place the smartphone, face up, on the pad.
4. The charging symbol will appear on the infotainment screen when charging. If\
not charging, remove the device for 3 seconds and rotate it 180 degrees.
See Instruments and Controls in your Owner’s Manual.
Some vehicle features can be turned on/off or customized using the Settings menus and the infotainment screen icons. The Settings menus include System, Apps, and Vehicle.
1. Select Settings on the Home page.
2. Select the desired menu item.
3. Select the desired feature and setting.
4. Press to exit each menu.
See Instruments and Controls in your Owner’s Manual.
PORTABLE AUDIO DEVICES
4G LTE WI-FI® HOTSPOTF
WIRELESS CHARGINGF
VEHICLE CUSTOMIZATION
F Optional equipment
Page 13 of 20
13
When the vehicle is on, the heated seats and heated steering wheel or ve\
ntilated seats will activate automatically based on the vehicle’s interior temperatu\
re. Manually turn off the heated or ventilated seats using the seat controls. Manually tur\
n off the heated steering wheel using the steering wheel control.
To turn the auto heated seats and auto ventilated seats on or off, go to\
Settings > Vehicle > Climate and Air Quality > Auto Heated Seats or Auto Cooled Sea\
ts.
See Seats and Restraints in your Owner’s Manual.
AUTO HEATED/VENTILATED SEATSF
F Optional equipment
CLIMATE CONTROLS
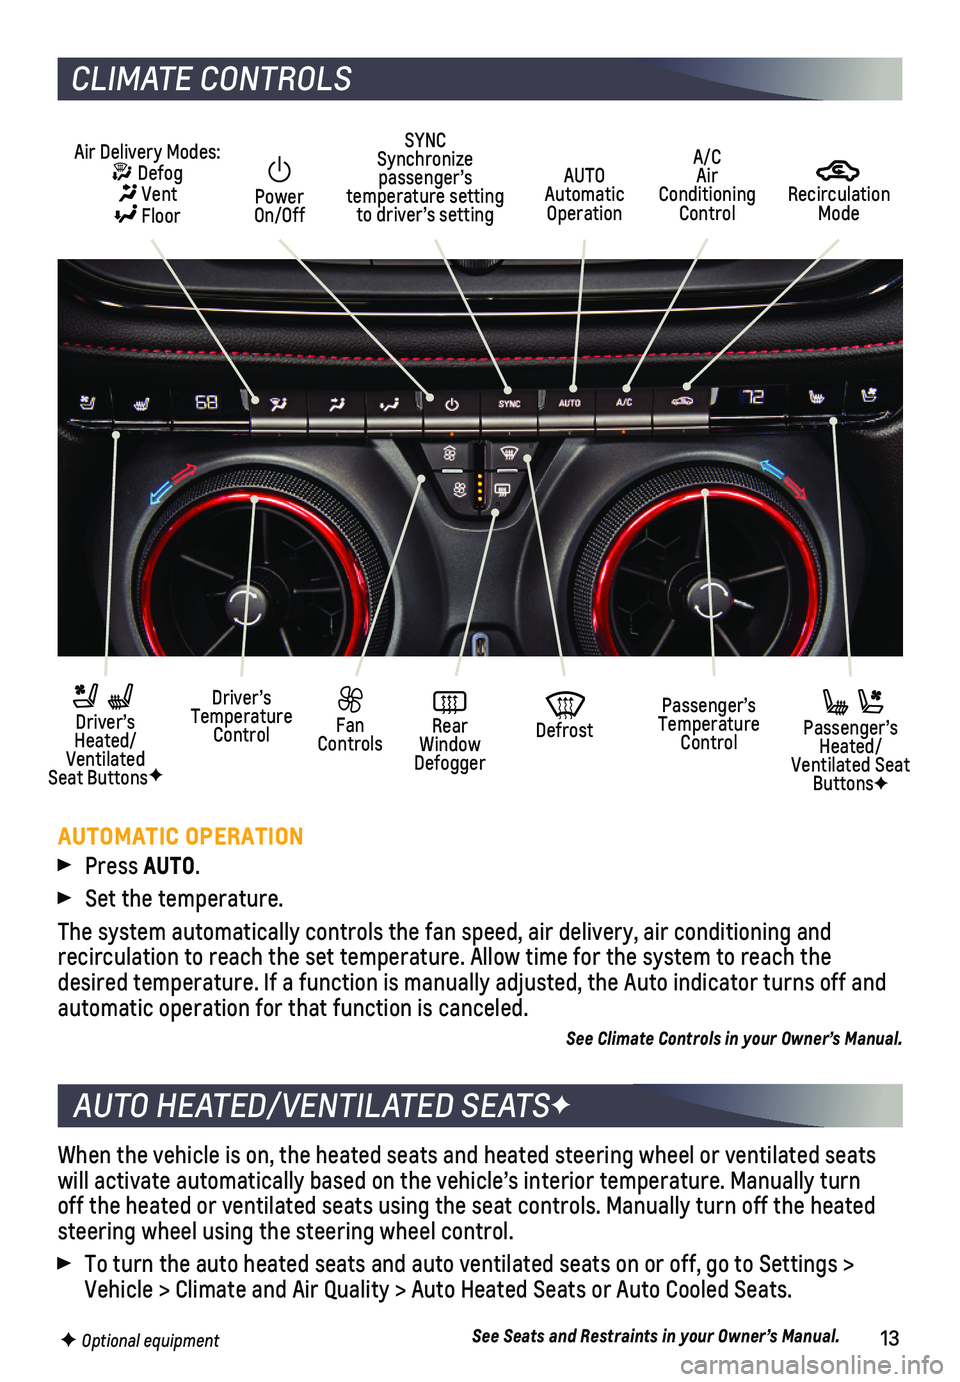
AUTOMATIC OPERATION
Press AUTO.
Set the temperature.
The system automatically controls the fan speed, air delivery, air condi\
tioning and
recirculation to reach the set temperature. Allow time for the system to\
reach the desired temperature. If a function is manually adjusted, the Auto indica\
tor turns off and automatic operation for that function is canceled.
See Climate Controls in your Owner’s Manual.
Recirculation Mode
AUTO Automatic Operation
Power On/Off
Passenger’s Temperature Control
Fan Controls
Driver’s Temperature Control
Driver’s Heated/Ventilated Seat ButtonsF
Defrost
Air Delivery Modes: Defog Vent Floor
Passenger’s Heated/Ventilated Seat ButtonsF
SYNC Synchronize passenger’s temperature setting to driver’s setting
Rear Window Defogger
A/C Air Conditioning Control
Page 14 of 20
14
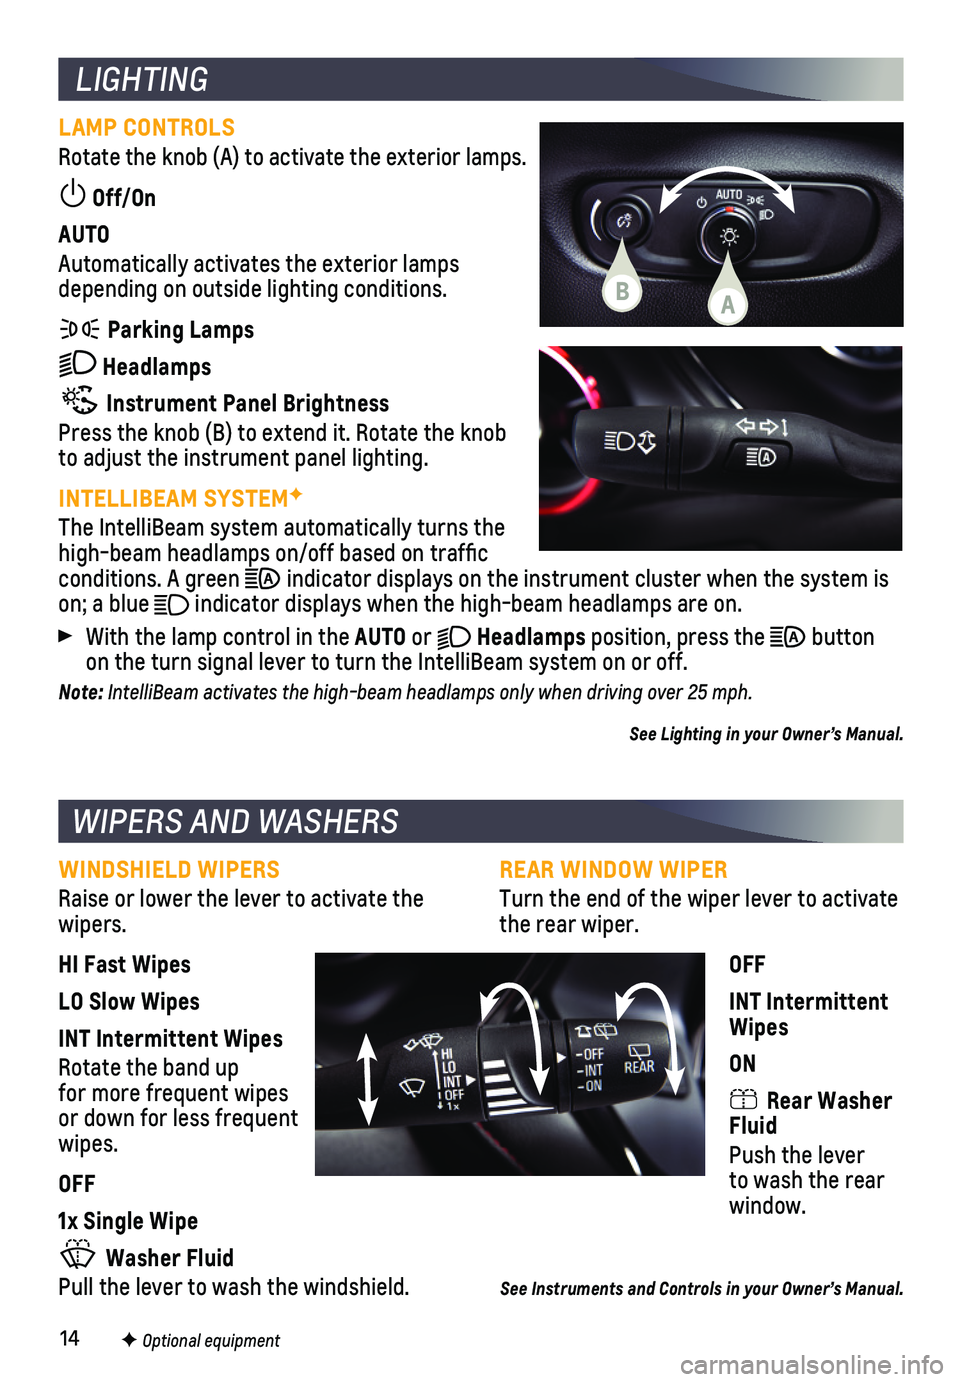
REAR WINDOW WIPER
Turn the end of the wiper lever to activate the rear wiper.
OFF
INT Intermittent Wipes
ON
Rear Washer Fluid
Push the lever to wash the rear window.
See Instruments and Controls in your Owner’s Manual.
LIGHTING
LAMP CONTROLS
Rotate the knob (A) to activate the exterior lamps.
Off/On
AUTO
Automatically activates the exterior lamps depending on outside lighting conditions.
Parking Lamps
Headlamps
Instrument Panel Brightness
Press the knob (B) to extend it. Rotate the knob to adjust the instrument panel lighting.
INTELLIBEAM SYSTEMF
The IntelliBeam system automatically turns the high-beam headlamps on/off based on traffic conditions. A green indicator displays on the instrument cluster when the system is on; a blue indicator displays when the high-beam headlamps are on.
With the lamp control in the AUTO or Headlamps position, press the button on the turn signal lever to turn the IntelliBeam system on or off.
Note: IntelliBeam activates the high-beam headlamps only when driving over 25 mph.
See Lighting in your Owner’s Manual.
WIPERS AND WASHERS
WINDSHIELD WIPERS
Raise or lower the lever to activate the wipers.
HI Fast Wipes
LO Slow Wipes
INT Intermittent Wipes
Rotate the band up for more frequent wipes or down for less frequent wipes.
OFF
1x Single Wipe
Washer Fluid
Pull the lever to wash the windshield.
F Optional equipment
AB
Page 15 of 20
15
SUNROOFF
DRIVER MODE CONTROL
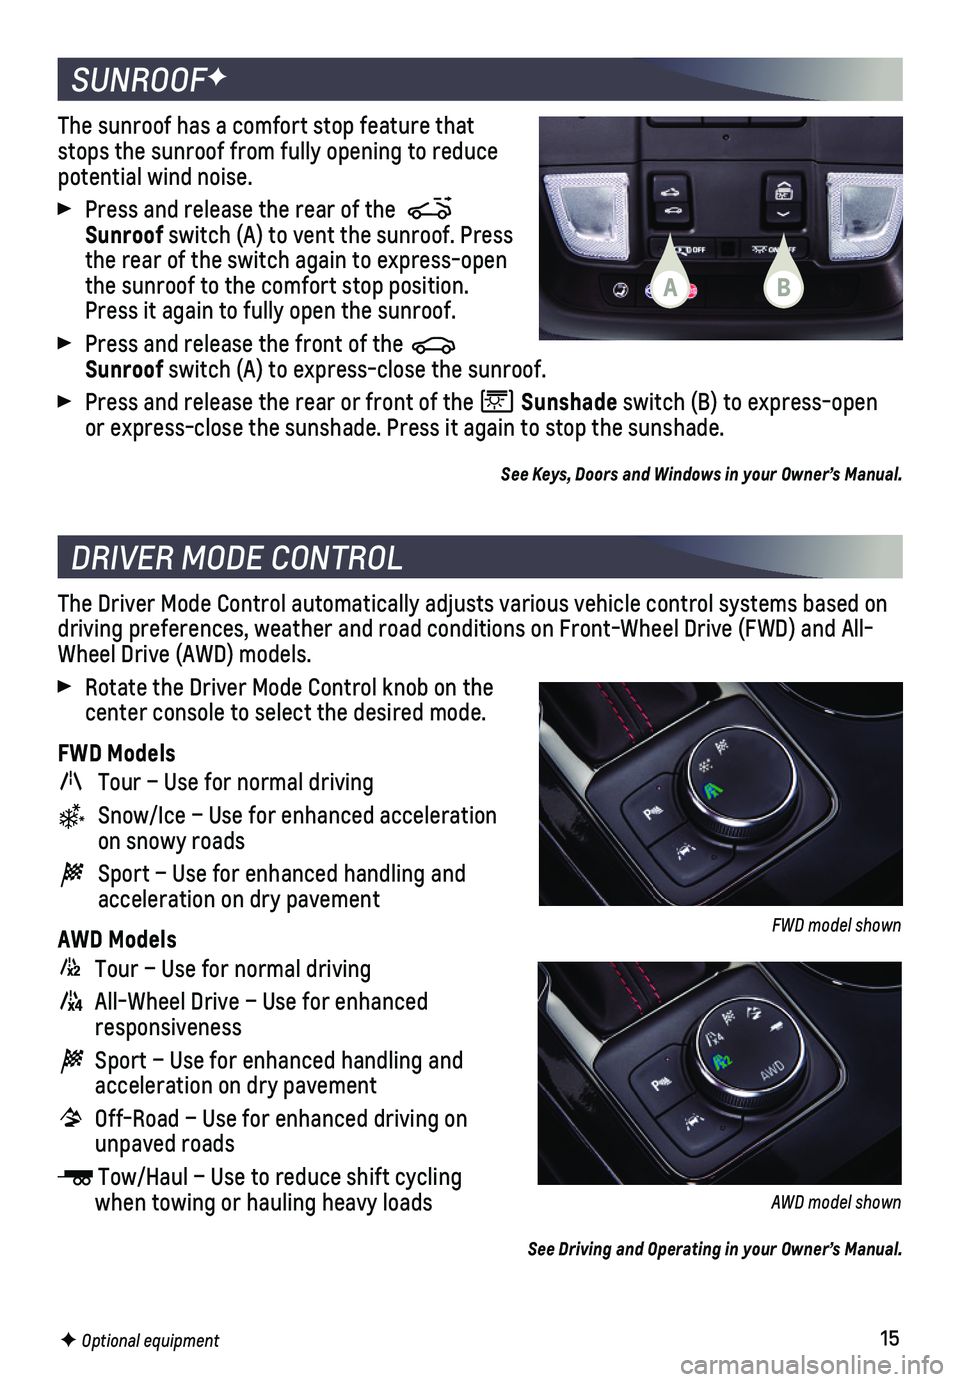
The sunroof has a comfort stop feature that stops the sunroof from fully opening to reduce potential wind noise.
Press and release the rear of the Sunroof switch (A) to vent the sunroof. Press the rear of the switch again to express-open the sunroof to the comfort stop position. Press it again to fully open the sunroof.
Press and release the front of the Sunroof switch (A) to express-close the sunroof.
Press and release the rear or front of the Sunshade switch (B) to express-open or express-close the sunshade. Press it again to stop the sunshade.
See Keys, Doors and Windows in your Owner’s Manual.
The Driver Mode Control automatically adjusts various vehicle control sy\
stems based on driving preferences, weather and road conditions on Front-Wheel Drive (\
FWD) and All-Wheel Drive (AWD) models.
Rotate the Driver Mode Control knob on the center console to select the desired mode.
FWD Models
Tour – Use for normal driving
Snow/Ice – Use for enhanced acceleration on snowy roads
Sport – Use for enhanced handling and acceleration on dry pavement
AWD Models
Tour – Use for normal driving
All-Wheel Drive – Use for enhanced responsiveness
Sport – Use for enhanced handling and acceleration on dry pavement
Off-Road – Use for enhanced driving on unpaved roads
Tow/Haul – Use to reduce shift cycling when towing or hauling heavy loads
See Driving and Operating in your Owner’s Manual.
F Optional equipment
FWD model shown
AWD model shown
AB
Page 16 of 20
16
DRIVER ASSISTANCE SYSTEMSF
Safety or driver assistance features are no substitute for the driver’\
s responsibility to operate the vehicle in a safe manner. The driver should remain attentive to traffic, surroundings and road conditions at all times. Read your Owner’s Manual for important feature limitations and information.
SAFETY ALERT SEAT – The driver’s seat pulses — left side, right side or simultan\
eously — to alert the driver of the direction of potential hazards.
Audible alerts or seat pulsing alerts may be selected. To change the ale\
rt settings, go to Settings > Vehicle > Collision/Detection Systems > Alert Type.
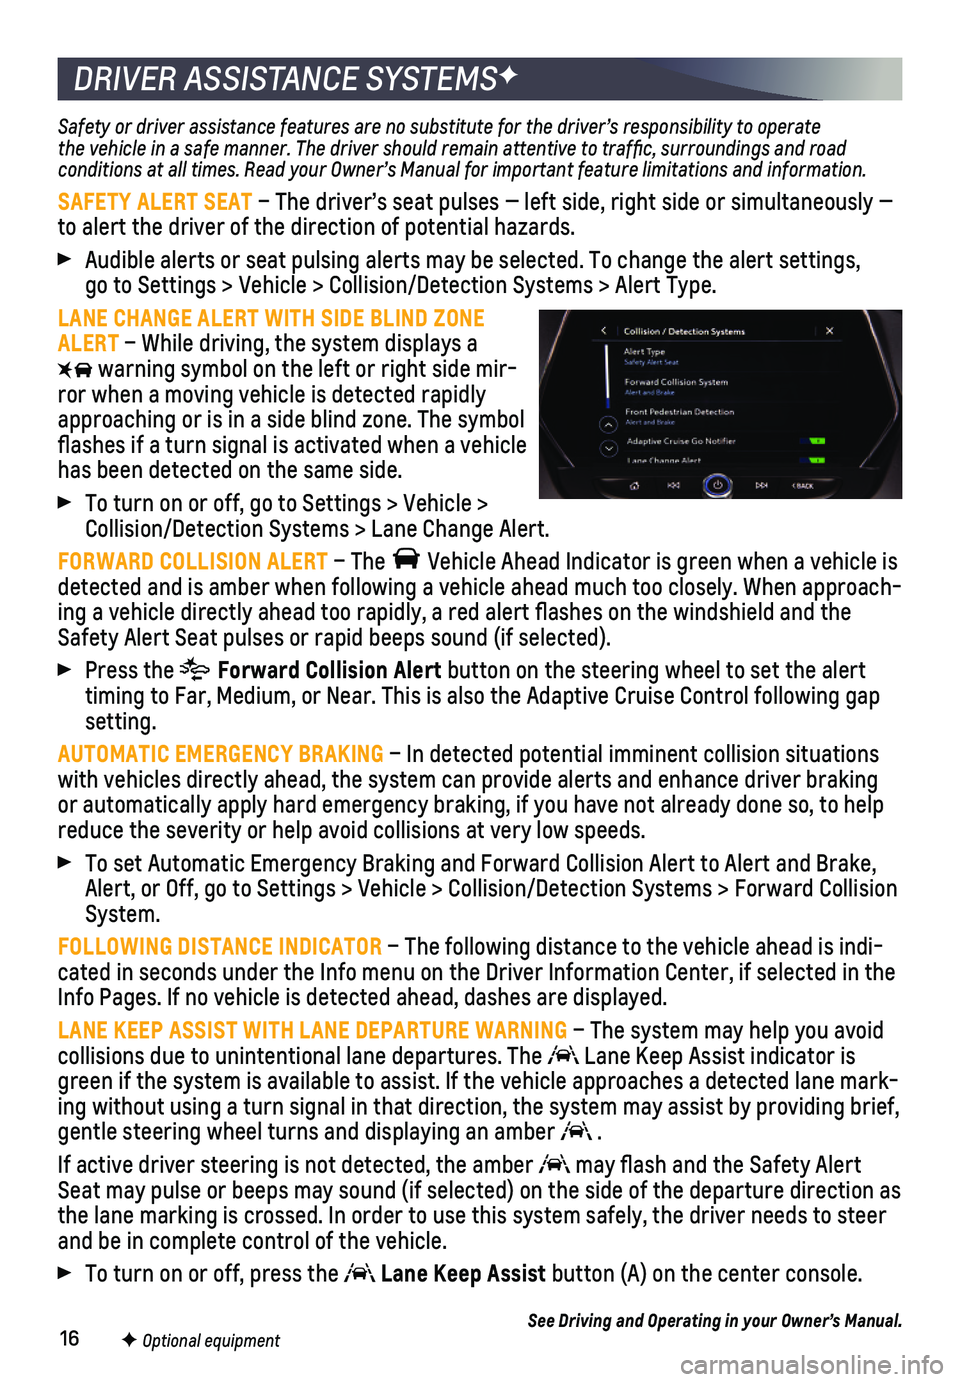
LANE CHANGE ALERT WITH SIDE BLIND ZONE ALERT – While driving, the system displays a
warning symbol on the left or right side mir-ror when a moving vehicle is detected rapidly approaching or is in a side blind zone. The symbol flashes if a turn signal is
activated when a vehicle has been detected on the same side.
To turn on or off, go to Settings > Vehicle > Collision/Detection Systems > Lane Change Alert.
FORWARD COLLISION ALERT – The Vehicle Ahead Indicator is green when a vehicle is detected and is amber when following a vehicle ahead much too closely. W\
hen approach-ing a vehicle directly ahead too rapidly, a red alert flashes on the w\
indshield and the Safety Alert Seat pulses or rapid beeps sound (if selected).
Press the Forward Collision Alert button on the steering wheel to set the alert timing to Far, Medium, or Near. This is also the Adaptive Cruise Control\
following gap setting.
AUTOMATIC EMERGENCY BRAKING – In detected potential imminent collision situations with vehicles directly ahead, the system can provide alerts and enhance \
driver braking or automatically apply hard emergency braking, if you have not already d\
one so, to help reduce the severity or help avoid collisions at very low speeds.
To set Automatic Emergency Braking and Forward Collision Alert to Alert \
and Brake, Alert, or Off, go to Settings > Vehicle > Collision/Detection Systems > \
Forward Collision System.
FOLLOWING DISTANCE INDICATOR – The following distance to the vehicle ahead is indi-cated in seconds under the Info menu on the Driver Information Center, i\
f selected in the Info Pages. If no vehicle is detected ahead, dashes are displayed.
LANE KEEP ASSIST WITH LANE DEPARTURE WARNING – The system may help you avoid collisions due to unintentional lane departures. The Lane Keep Assist indicator is green if the system is available to assist. If the vehicle approaches a \
detected lane mark-ing without using a turn signal in that direction, the system may assist\
by providing brief, gentle steering wheel turns and displaying an amber .
If active driver steering is not detected, the amber may flash and the Safety Alert Seat may pulse or beeps may sound (if selected) on the side of the dep\
arture direction as the lane marking is crossed. In order to use this system safely, the dri\
ver needs to steer and be in complete control of the vehicle.
To turn on or off, press the Lane Keep Assist button (A) on the center console.
See Driving and Operating in your Owner’s Manual.F Optional equipment
Page 17 of 20
17
DRIVER ASSISTANCE SYSTEMSF
REAR VISION CAMERA/SURROUND VISIONF
FRONT PEDESTRIAN BRAKING – During daytime driving, the system detects pedestri-ans directly ahead up to a distance of approximately 131 ft. and display\
s an amber indicator. When approaching a detected pedestrian too quickly, a red ale\
rt flashes on the windshield and the Safety Alert Seat pulses or rapid beeps sound (if se\
lected). The
system may enhance driver braking or automatically apply hard emergency \
braking, if you have not already done so.
To set to Alert and Brake, Alert, or Off, go to Settings > Vehicle > Col\
lision/Detection Systems > Front Pedestrian Detection.
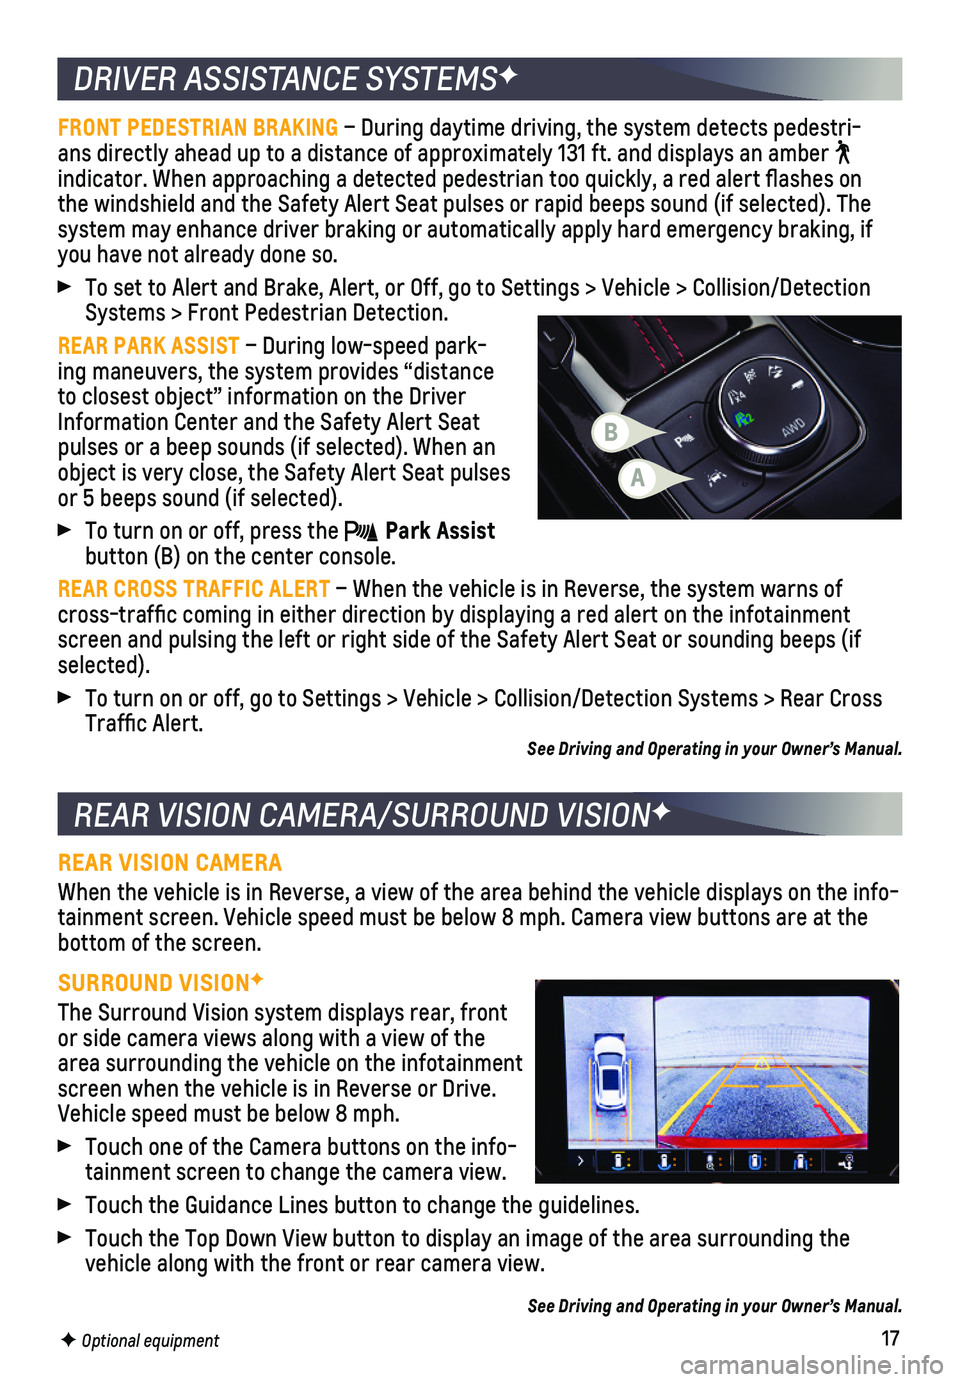
REAR PARK ASSIST – During low-speed park-ing maneuvers, the system provides “distance to closest object” information on the Driver Information Center and the Safety Alert Seat pulses or a beep sounds (if selected). When an object is very close, the Safety Alert Seat pulses or 5 beeps sound (if selected).
To turn on or off, press the Park Assist button (B) on the center console.
REAR CROSS TRAFFIC ALERT – When the vehicle is in Reverse, the system warns of cross-traffic coming in either direction by displaying a red alert on \
the infotainment screen and pulsing the left or right side of the Safety Alert Seat or so\
unding beeps (if selected).
To turn on or off, go to Settings > Vehicle > Collision/Detection System\
s > Rear Cross Traffic Alert. See Driving and Operating in your Owner’s Manual.
REAR VISION CAMERA
When the vehicle is in Reverse, a view of the area behind the vehicle di\
splays on the info-tainment screen. Vehicle speed must be below 8 mph. Camera view buttons \
are at the bottom of the screen.
SURROUND VISIONF
The Surround Vision system displays rear, front or side camera views along with a view of the area surrounding the vehicle on the infotainment screen when the vehicle is in Reverse or Drive. Vehicle speed must be below 8 mph.
Touch one of the Camera buttons on the info-tainment screen to change the camera view.
Touch the Guidance Lines button to change the guidelines.
Touch the Top Down View button to display an image of the area surroundi\
ng the vehicle along with the front or rear camera view.
See Driving and Operating in your Owner’s Manual.
F Optional equipment
A
B
Page 18 of 20
18
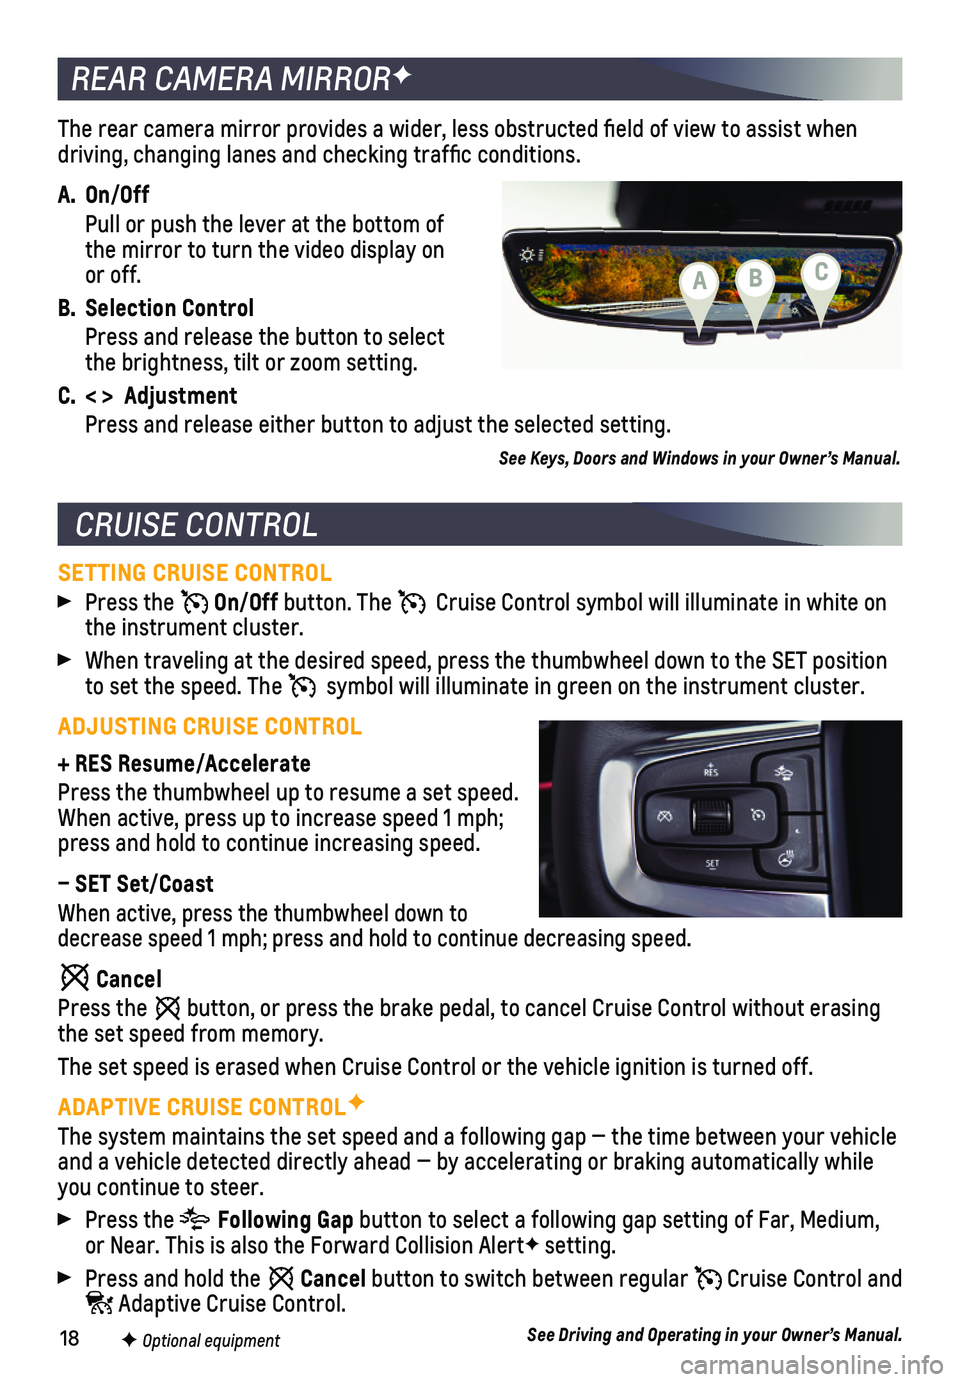
The rear camera mirror provides a wider, less obstructed field of view\
to assist when driving, changing lanes and checking traffic conditions.
A. On/Off
Pull or push the lever at the bottom of the mirror to turn the video display on or off.
B. Selection Control
Press and release the button to select the brightness, tilt or zoom setting.
C. < > Adjustment
Press and release either button to adjust the selected setting.
See Keys, Doors and Windows in your Owner’s Manual.
REAR CAMERA MIRRORF
CRUISE CONTROL
SETTING CRUISE CONTROL
Press the On/Off button. The Cruise Control symbol will illuminate in white on the instrument cluster.
When traveling at the desired speed, press the thumbwheel down to the SE\
T position to set the speed. The symbol will illuminate in green on the instrument cluster.
ADJUSTING CRUISE CONTROL
+ RES Resume/Accelerate
Press the thumbwheel up to resume a set speed. When active, press up to increase speed 1 mph; press and hold to continue increasing speed.
– SET Set/Coast
When active, press the thumbwheel down to decrease speed 1 mph; press and hold to continue decreasing speed.
Cancel
Press the button, or press the brake pedal, to cancel Cruise Control without eras\
ing the set speed from memory.
The set speed is erased when Cruise Control or the vehicle ignition is t\
urned off.
ADAPTIVE CRUISE CONTROLF
The system maintains the set speed and a following gap — the time bet\
ween your vehicle and a vehicle detected directly ahead — by accelerating or braking au\
tomatically while you continue to steer.
Press the Following Gap button to select a following gap setting of Far, Medium, or Near. This is also the Forward Collision AlertF setting.
Press and hold the Cancel button to switch between regular Cruise Control and Adaptive Cruise Control.
See Driving and Operating in your Owner’s Manual.F Optional equipment
CBA
Page 19 of 20
19
The Low Tire Pressure warning light on the instrument cluster illuminates wh\
en one or more of the vehicle’s tires is significantly underinflated. Fi\
ll the tires to the proper tire pressures listed on the Tire and Loading Information label, located belo\
w the driver’s door latch. Current tire pressures can be viewed on the Driver Informati\
on Center.
With the ignition On or in Accessory mode, the Tire Fill Alert will prov\
ide visual and audi-ble alerts to help when inflating a tire to the recommended tire press\
ure (does not apply to spare tire). When the recommended pressure is reached, the horn soun\
ds and the turn signals change from flashing to solid.
See Vehicle Care in your Owner’s Manual.
UNDERFLOOR REAR CARGO STORAGE
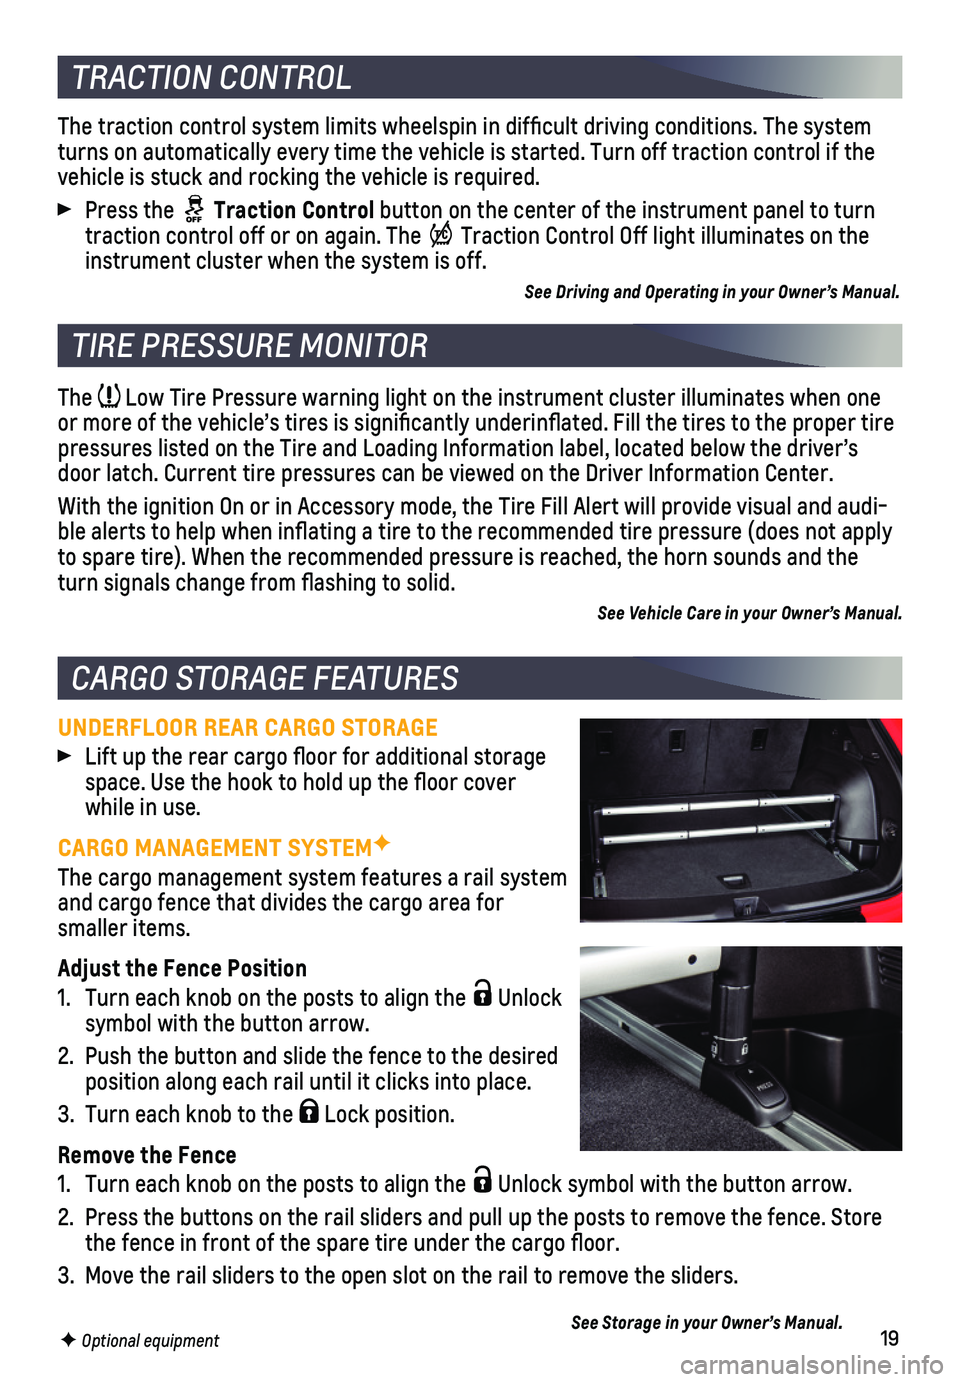
Lift up the rear cargo floor for additional storage space. Use the hook to hold up the floor cover while in use.
CARGO MANAGEMENT SYSTEMF
The cargo management system features a rail system and cargo fence that divides the cargo area for smaller items.
Adjust the Fence Position
1. Turn each knob on the posts to align the Unlock symbol with the button arrow.
2. Push the button and slide the fence to the desired position along each rail until it clicks into place.
3. Turn each knob to the Lock position.
Remove the Fence
1. Turn each knob on the posts to align the Unlock symbol with the button arrow.
2. Press the buttons on the rail sliders and pull up the posts to remove th\
e fence. Store the fence in front of the spare tire under the cargo floor.
3. Move the rail sliders to the open slot on the rail to remove the sliders\
.
See Storage in your Owner’s Manual.
TIRE PRESSURE MONITOR
CARGO STORAGE FEATURES
F Optional equipment
The traction control system limits wheelspin in difficult driving cond\
itions. The system turns on automatically every time the vehicle is started. Turn off tract\
ion control if the vehicle is stuck and rocking the vehicle is required.
Press the Traction Control button on the center of the instrument panel to turn traction control off or on again. The Traction Control Off light illuminates on the instrument cluster when the system is off.
See Driving and Operating in your Owner’s Manual.
TRACTION CONTROL
Page 20 of 20
20
ROADSIDE ASSISTANCE
1-800-CHEV-USA (1-800-243-8872) TTY Users: 1-888-889-2438
As the owner of a new Chevrolet, you are automatically enrolled in the C\
hevrolet Roadside Assistance program for up to 5 years/60,000 miles, whichever occurs fi\
rst, at no expense to you. Chevrolet’s Roadside Assistance toll-free number is staffed b\
y a team of trained advisors who are available 24 hours a day, 365 days a year, to contact a\
service provider for light services (fuel delivery, jump-starts, flat tire and lock-ou\
ts) or make arrange-ments to tow your vehicle to the nearest Chevrolet dealer for any repair\
s.
ONSTAR® ROADSIDE ASSISTANCE
If you have a current OnStar Safety & Security plan, push the blue OnStar button or red Emergency button to get the help you need. An OnStar advisor will use GPS technolo\
gy to pinpoint your vehicle location and contact the nearest service provider.\
To learn more about OnStar services, push the blue OnStar button, visit \
onstar.com, call 1-888-4-ONSTAR (1-888-466-7827), or refer to your Owner’s Manual.
CHEVROLET OWNER CENTER
MYCHEVROLET MOBILE APP
Get to know your vehicle inside and out with the Chevrolet Owner Center.\
Check out personalized information, including an online Owner’s Manual and help\
ful how-to videos, track your service history and warranty status, manage your OnStar and C\
onnected Services vehicle plans, review your current Vehicle Diagnostics report (\
active service required) and more. Create an account today at my.chevrolet.com.
!84580874=A!
Certain restrictions, precautions and safety procedures apply to your ve\
hicle. Please read your Owner’s Manual for complete instructions. All information contained in this guide is ba\
sed on the latest information available at the time of printing and is subject to change without notice. Copyright \
2020 General Motors. All rights reserved.
We recommend always using ACDelco or GM Genuine Parts.
Download the myChevrolet app to your compatible smartphone (or device)\
and, if your vehicle is properly equipped, you can start or turn off your engine, loc\
k or unlock your doors, view key diagnostic information, set parking information and more\
.
The app is available on select Apple and Android devices. Service availa\
bility, features and functionality vary by vehicle, device and data plan. Device data con\
nection required. Visit onstar.com for more details. Download the mobile app from your compatible mobile device’s app store.
84580874 A