light CHEVROLET CAMARO 1967 1.G Chassis Owners Manual
[x] Cancel search | Manufacturer: CHEVROLET, Model Year: 1967, Model line: CAMARO, Model: CHEVROLET CAMARO 1967 1.GPages: 659, PDF Size: 114.24 MB
Page 473 of 659
STEERING
9-33
POWER STEERING
INDEX
Page
General Description
. 9-33
Maintenance
and
Adjustments
9-33
Bleeding Hydraulic System
9-33
Fluid Level
. 9-33
Adjustments
. 9-34
Power Steering Gear
. . 9-34
Pump Belt Tension
9-34
Hydraulic System Checks
9-34
Component Replacement
and
Repairs
. 9-35
Power Steering Pump.
. 9-35
Power Steering Gear
9-36
Control Valve
and
Adapter Assembly
9.35
Power Cylinder
9.37
Power Steering Hoses
9.39
GENERAL DESCRIPTION
Two types
of
power steering
are
used
for 1967.
One
is
the conventional linkage type
for
Chevy
n and
Corvette
vehicles
and the
other
is the
integral gear type
for
Chevrolet, Chevelle,
and
Camaro.
For
both types
the
hydraulic pressure
is
provided
by an
engine-driven vane-
type pump.
On
the
Chevy
n and
Corvette linkage type power steer-
ing, hydraulic pressure
is
delivered through
a
hose from
the pump
to a
valve which senses
the
requirement
for
power assistance
and
supplies
the
power cylinder
ac-
cordingly.
The
steering gear used with this power steer-
ing
is the
same basic unit used
on
manually steered
vehicles;
it is
serviced
as
outlined
in the
manual steering
part
of
this section except
for
adjustment, which
is
covered
in the
following pages.
The
steering linkage also
is serviced the same
as
manual counterparts.
The Chevrolet, Chevelle
and
Camaro integral gear type
power steering
has the
hydraulic pressure delivered
from
the
pump through two hoses
to the
steering gear.
In
the power steering gear
the
steering shaft, hydraulic
valve, worm, and rack-piston
nut are all in
line making
a
compact
and
space saving assembly.
All oil
passages
are
internal within
the
gear except
the
pressure
and
return
hoses.
The steering gear
is a
recirculating ball system
in
which steel balls
act as a
rolling thread between
the
steering worm
and
rack-piston
nut. The
rack-piston
nut
is
all one
piece
and is
geared
to the
sector
of
the piston
shaft.
The
valve
is
contained
in the
gear housing elimi-
nating
the
need
of
bolts
or
seals
to
attach
a
separate
valve housing.
The valve
is an
open-center, rotary-type three
way
valve.
The
spool
is
held
in
neutral position by means
of a
torsion
bar. The
spool
is
attached
by
means
of
the stub
shaft
to one end of the
torsion
bar
and
to the
valve body
on
the
other
end.
Twisting
of the
torsion bar allows
the
spool
to
move
in
relation
to the
valve body thereby oper-
ating
the
valve.
MAINTENANCE
AND
ADJUSTMENTS
BLEEDING HYDRAULIC SYSTEM
1.
Fill
oil
reservoir
to
proper level and
let oil
remain
undistrubed
for at
least two minutes.
2.
Start engine
and run
only
for
about
two
seconds.
3.
Add
oil if
necessary.
4.
Repeat above procedure until
oil
level remains
con-
stant after running engine.
5. Raise front
end of
vehicle
so
that wheels
are off
the
ground.
6. Increase engine speed
to
approximately
1500 rpm.
7. Turn
the
wheels
(off
ground) right
and
left, lightly
contacting
the
wheel stops.
8. Add
oil if
necessary.
9. Lower
the car and
turn wheels right and left
on the
ground.
10.
Check
oil
level and refill
as
required.
11.
If oil is
extremely foamy, allow vehicle
to
stand
a
few minutes with engine
off and
repeat above
procedure.
,
a.
Check belt tightness
and
check
for a
bent
or
loose
pulley. (Pulley should
not
wobble with engine
running.)
b.
Check
to
make sure hoses
are not
touching
any
other parts
of the car,
particularly sheet metal.
c. Check
oil
level, filling
to
proper level
if
neces-
sary, following operations
1
through
10.
This
step
and
Step
"D" are
extremely important
as
low
oil
level and/or
air in the oil are the
most
frequent causes
of
objectionable pump noise.
d. Check
the
presence
of air in the oil. If air is
present, attempt
to
bleed system
as
described
in
operations
1
through
10. If it
becomes obvious
that
the
pump will
not
bleed after
a few
trials,
proceed
as
outlined under Hydraulic System
Checks.
FLUID
LEVEL
1.
Check
oil
level
in the
reservoir
by
checking
the dip
stick when
oil is at
operating temperature.
On
Chevelle models equipped with remote reservoir,
the reservoir should
be
maintained approximately
3/4 full when
oil is at
operating temperature.
2.
Fill,
if
necessary,
to
proper level with
GM
Power
Steering Fluid
or, if
this
is not
available, automatic
CHEVROLET CHASSIS SERVICE MANUAL
Page 482 of 659
WHEELS AND TIRES 10-2
either case, tires will revolve with a side motion and
scrape the tread rubber off. If misalignment is severe,
the rubber will be scraped off of both tires (or all four
tires if front toe is not correct); if slight, only one will
be affected.
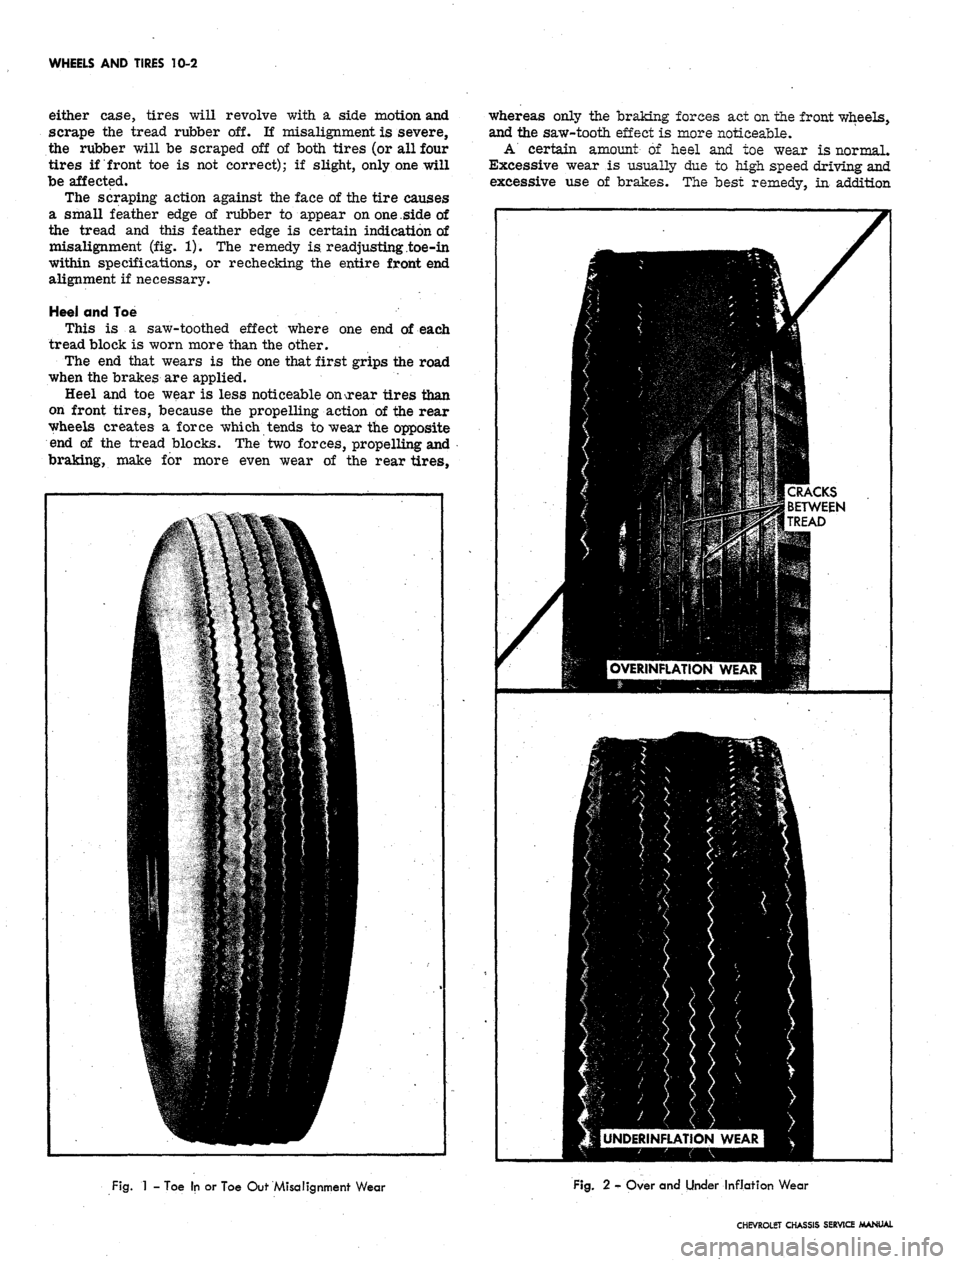
The scraping action against the face of the tire causes
a small feather edge of rubber to appear on
one .side
of
the tread and this feather edge is certain indication of
misalignment (fig. 1). The remedy is. readjusting toe-in
within specifications, or rechecking the entire front end
alignment if necessary.
Heei and Toe
This is a saw-toothed effect where one end of each
tread block is worn more than the other.
The end that wears is the one that first grips the road
when the brakes are applied.
Heel and toe wear is less noticeable onsrear tires than
on front tires, because the propelling action of the rear
wheels creates a force which tends to wear the opposite
end of the tread blocks. The two forces, propelling and
braking, make for more even wear of the rear tires,
whereas only the braking forces act on the front wheels,
and the saw-tooth effect is more noticeable.
A' certain amount of heel and toe wear is normal.
Excessive wear is usually due to high speed driving and
excessive use of brakes. The best remedy, in addition
UNDERINFLATION WEAR
Fig.
1 - Toe In or Toe Out Misalignment Wear
Fig.
2 - Over and Under Inflation Wear
CHEVROLET CHASSIS SERVICE MANUAL
Page 483 of 659
WHEELS AND TIRES 10-3
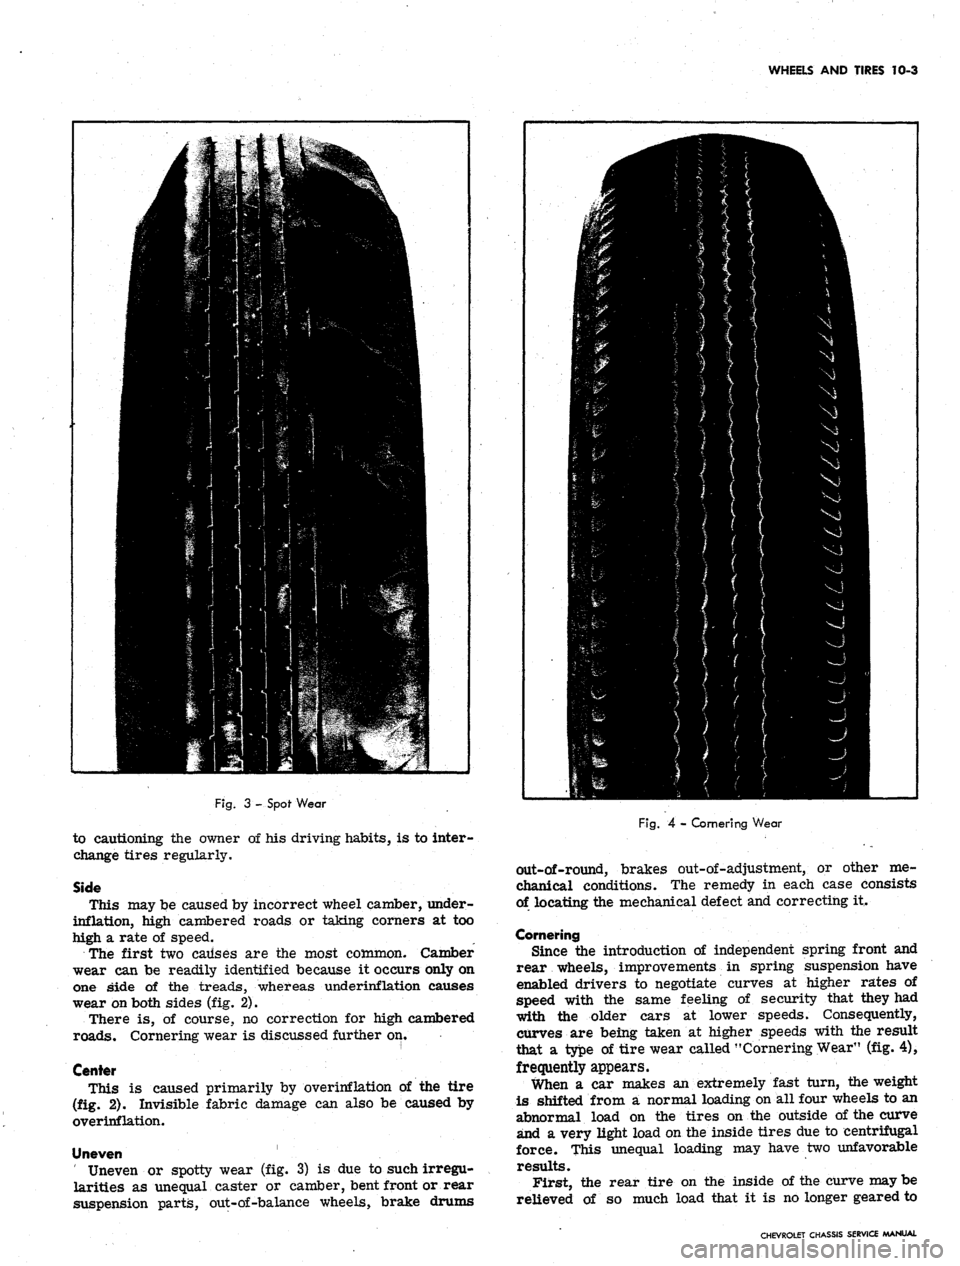
Fig.
3 - Spof Wear
to cautioning the owner of his driving habits, is to inter-
change tires regularly.
Side
This may be caused by incorrect wheel camber, under-
inflation, high cambered roads or taking corners at too
high a rate of speed.
The first two causes are the most common. Camber
wear can be readily identified because it occurs only on
one side of the treads, whereas underinflation causes
wear on both sides (fig. 2).
There is, of course, no correction for high cambered
roads.
Cornering wear is discussed further on.
Center
This is caused primarily by overinflation pf the tire
(fig. 2). Invisible fabric damage can also be caused by
overinflation.
Uneven
Uneven or spotty wear (fig. 3) is due to such irregu-
larities as unequal caster or camber, bent front or rear
suspension parts, out-of-balance wheels, brake drums
Fig.
4 - Cornering Wear
out-of-round, brakes out-of-adjustment, or other me-
chanical conditions. The remedy in each case consists
of locating the mechanical defect and correcting it.
Cornering
Since the introduction of independent spring front and
rear wheels, improvements in spring suspension have
enabled drivers to negotiate curves at higher rates of
speed with the same feeling of security that they had
with the older cars at lower speeds. Consequently,
curves are being taken at higher speeds with the result
that a type of tire wear called "Cornering Wear" (fig. 4),
frequently appears.
When a car makes an extremely fast turn, the weight
is shifted from a normal loading on all four wheels to an
abnormal load on the tires on the outside of the curve
and a very light load on the inside tires due to centrifugal
force. This unequal loading may have two unfavorable
results.
First, the rear tire on the inside of the curve may be
relieved of so much load that it is no longer geared to
CHEVROLET CHASSIS SERVICE MANUAL
Page 485 of 659
WHEELS AND TIRES 10-5
WHEELS
The wheel and tire assembly should be removed from
vehicles equipped with disc brakes to properly perform
balancing operations. This is necessary due to drag of
the spring loaded brake shoes on the disc.
Static Balancing (W/Tire)
Static Balance (still balance) is the equal distribution
of weight of the wheel and tire assembly about the axis
of rotation so that the assembly has no tendency to rotate
by
itself.
Static unbalance causes the pounding action of
the front wheels that is called "tramp".
To correct static unbalance (front and rear): The
quickest and best methods to correct static unbalance
are through the use of wheel balancers which are com-
mercially available. Refer to the Information and in-
structions included with these balaricers.
Dynamic Balancing (W/Tire)
Dynamic Balance (running balance) requires the wheel
to be not only in static balance, but balanced and running
smoothly while turning on an axis which runs through the
centerline of the wheel and tire perpendicular to the axis
of rotation.
The quickest and best methods of testing and correcting
dynamic unbalance are by the use of dynamic wheel
balancers which are commercially available. These bal-
ancers include all necessary information on where and
how the balancing weights should be placed. The follow-
ing information, however, will help in the correction of
dynamic balance.
NOTE:
Before attempting to balance the
wheels, check to be certain that no foreign
matter has been trapped in the wheel ventila-
tion slots or in the accessory wheel discs. This
is especially important if the vehicle has been
run in soft mud and then parked in freezing
weather.
When a wheel that is statically unbalanced is dynam-
ically in balance the dynamic balance can be retained
while correcting "the static balance by installing the cor-
rective weights so that half of the weight required is
placed on the inner edge of the rim and the other half
on the outer edge of the rim.
Dynamic unbalance can be corrected without destroying
static balance by installing weights so half of weight
required for dynamic balance is placed on the rim op-
posite the heavy point, while the other half is placed 180°
away and on the opposite side of the rim.
NOTE:
Vehicles with wire wheel covers should
have the wheels balanced with the wire wheel
covers installed on the wheels.
Run Out (W/OTire)
The wheels should not run out (wobble) more than
1/16" as measured on the side of the rim at the base
of the tire. Excessive run-out is the result of a bent
wheel, an improperly mounted wheel, worn knuckle bear-
ings or steering connections. These parts should be
checked for correct adjustment, proper alignment and
wear whenever excessive run-out is encountered.
The wheels should also run concentric with the steering
knuckle spindle within 1/16 inch as measured on the tire
bead seat of the rim with the tire removed.
Wheel run-out, eccentricity and balance are closely
associated with steering and front wheel alignment.
Further information on these subjects will be found under
"Suspension".
Cleaning Aluminum Wheels
Do not use wire brush or abrasive cleaners when
cleaning wheels. Use only cleaners that will not react
with aluminum.
SERVICE OPERATIONS
TIRES
Removal
Dismounting tubeless tires presents no problems if the
correct procedures are used and the following precau-
tions observed.
1.
Remove the valve cap and valve core. Let out all the
air.
2.
Press the inner side of the tire into the rim well.
Use bead loosening tool or if regular tire irons are
used, take particular care not to injure or tear the
sealing ribs on the bead.
CAUTION: Never use tire irons with sharp
edges or corners.
3.
Using tire irons on the opposite side, remove bead,
taking small "bites" around the rim.
4.
Turn the tire over, and use two tire irons, one be-
tween the rim flange and the bead to pry the rim
upward, the other iron to pry outward between the
bead seat and the bead.
Installation
Extreme care must be exercised to prevent injury to
the sealing bead and circumferential bead when forcing
tire over rim.
1.
Apply a light film of Ruglyde or other suitable rubber
lubricant to sealing bead of tire.
NOTE:
The use of excessive lubrication may
lead to rim slippage and subsequent breaking of
air seal.
2.
Carefully mount the outer bead in usual manner by
using tire irons, taking small "bites" around rim,
being careful not to injure the tire bead.
CAUTION: DO NOT use a hammer, as damage
to the bead will result.
3.
Install the inner bead in the same manner.
NOTE:
If a seal cannot be effected in the fore-
going manner with the rush of air it can be
, accomplished by applying to the circumference
of the tire a tire mounting band or heavy sash
cord and tightening with the use of a tire iron.
On tire mounting machines, bouncing the tire
assembly is not required. The tire should be
CHEVROLET CHASSIS SERVICE MANUAL
Page 488 of 659
SECTION 11
CHASSIS SHEET METAL
CONTENTS OF THIS SECTION
Chevrolet and Chevelle 11-1
Chevy II . . 11.-11
Camaro 11-19
Corvette (See Section IB)
Special Tools 11-25
CHEVROLET AND CHEVELLE
INDEX
Page
General Description 11-1
Maintenance and Adjustments •. il-1
Hood Adjustment 11-1
Hinges 11-1
Bumpers 11-1
Catch Assembly and Lock 11-1
Fenders 11-4
Sheet Metal 11-4
Component Part Replacement 11-4
Battery Tray 11-4
Page
Radiator Support 11-4
Fender Assembly . . 11-4
Skirt 11-4
Trim 11-5
Hood Assembly 11-6
Lock and Catch 11-7
Trim and Insulation 11-7
Cowl Vent Grille 11-7
Rear Wheel Cover 11-7
Simulated Wood Grain Moulding . . . . 11-7
GENERAL DESCRIPTION
The new front end appearance of the 1967 Chevrolet
and Chevelle passenger cars affects the servicing and
replacement of the chassis sheet metal. Refer to Section
13 for Radiator and Grille service procedures, Section
14 for Bumpers, and Section 1A for Air Conditioning
components. Figures 1 and 2 illustrate the Chevrolet
and Chevelle sheet metal components.
MAINTENANCE AND ADJUSTMENTS
HOOD ADJUSTMENT
The alignment of the hood is controlled by the position
of the hood hinges and the height of the two bumpers lo-
cated one at each side of the radiator support. The ad-
justment at the hood lock must be made after the hinges
and bumpers are properly adjusted. To align the hood
and lock proceed as follows:
HOOD HINGE (Fig. 3)
NOTE:
The body mounted portion of the hood
hinges are slotted to provide up and down move-
ment. The hood mounted end is slotted to pro-
vide forward and rearward movement.
1.
Scribe a line around the entire hinge plate to be re-
positioned.
2.
Loosen the appropriate screws and shift the position
of the hood into correct alignment using the scribe
marks to check amount of movement. Check align-
ment by tightening screws and closing the hood.
HOOD BUMPERS
Adjust hood bumpers so that hood top surface is flush
with the fender and grille top surfaces. Refer to Fig-
ures 4 and 5 for correct sheet metal adjustment dimen-
sions.
HOOD CATCH AND LOCK
The hood catch assembly (fig. 6) mounting holes are
slotted to provide adjustment for the hood lock bolt. Ad-
just the hood lock bolt until hood engages securely when
closed and hood bumpers are slightly compressed.
CHEVROLET CHASSIS SERVICE MANUAL
Page 494 of 659
CHASSIS SHEET METAL 11-7
Fig.
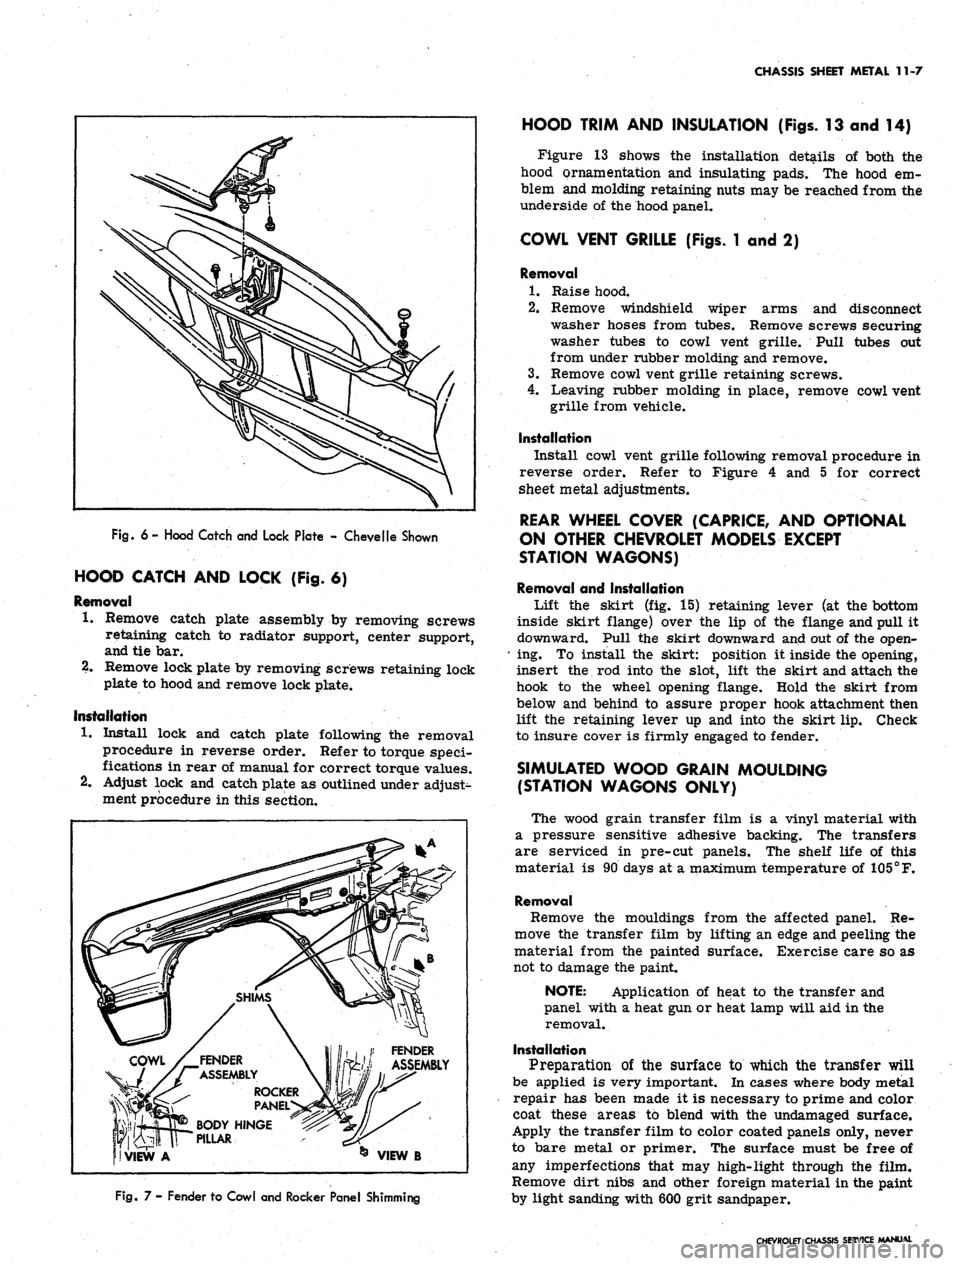
6 - Hood Catch and Lock Plate - Chevelle Shown
HOOD CATCH AND LOCK {Fig. 6)
Removal
1.
Remove catch plate assembly by removing screws
retaining catch to radiator support, center support,
and tie bar.
2.
Remove lock plate by removing screws retaining lock
plate to hood and remove lock plate.
Installation
1.
Install lock and catch plate following the removal
procedure in reverse order. Refer to torque speci-
fications in rear of manual for correct torque values.
2.
Adjust lock and catch plate as outlined under adjust^
ment procedure in this section.
FENDER
ASSEMBLY
ROCKER
PANEL
BODY HINGE
PILLAR
VIEW B
Fig.
7 - Fender to Cowl and Rocker Panel Shimming
HOOD TRIM AND INSULATION (Figs. 13 and 14)
Figure 13 shows the installation details of both the
hood ornamentation and insulating pads. The hood em-
blem and molding retaining nuts may be reached from the
underside of the hood panel.
COWL VENT GRILLE (Figs. 1 and 2)
Removal
1.
Raise hood.
2.
Remove windshield wiper arms and disconnect
washer hoses from tubes. Remove screws securing
washer tubes to cowl vent grille. Pull tubes out
from under rubber molding and remove.
3.
Remove cowl vent grille retaining screws.
4.
Leaving rubber molding in place, remove cowl vent
grille from vehicle.
Installation
Install cowl vent grille following removal procedure in
reverse order. Refer to Figure 4 and 5 for correct
sheet metal adjustments.
REAR WHEEL COVER (CAPRICE, AND OPTIONAL
ON OTHER CHEVROLET MODELS EXCEPT
STATION WAGONS)
Removal and Installation
Lift the skirt (fig. 15) retaining lever (at the bottom
inside skirt flange) over the lip of the flange and pull it
downward. Pull the skirt downward and out of the open-
*
ing. To install the skirt: position it inside the opening,
insert the rod into the slot, lift the skirt and attach the
hook to the wheel opening flange. Hold the skirt from
below and behind to assure proper hook attachment then
lift the retaining lever up and into the skirt lip. Check
to insure cover is firmly engaged to fender.
SIMULATED WOOD GRAIN MOULDING
(STATION WAGONS ONLY)
The wood grain transfer film is a vinyl material with
a pressure sensitive adhesive backing. The transfers
are serviced in pre-cut panels. The shelf life of this
material is 90 days at a maximum temperature of
105°
F.
Removal
Remove the mouldings from the affected panel. Re-
move the transfer film by lifting an edge and peeling the
material from the painted surface. Exercise care so as
not to damage the paint.
NOTE: Application of heat to the transfer and
panel with a heat gun or heat lamp will aid in the
removal.
Installation
Preparation of the surface to which the transfer will
be applied is very important. In cases where body metal
repair has been made it is necessary to prime and color
coat these areas to blend with the undamaged surface.
Apply the transfer film to color coated panels only, never
to bare metal or primer. The surface must be free of
any imperfections that may high-light through the film.
Remove dirt nibs and other foreign material in the paint
by light sanding with 600 grit sandpaper.
CHEVROLET CHASSIS SERVICE MANUAL
Page 500 of 659
CHASSIS SHEET METAL 11-13
HOOD ADJUSTMENT
The alignment of the hood in relation
to*
other sheet
metal parts is controlled by the position of the hood
hinges and the height of the two bumpers, located one at
each end of the radiator support. The adjustments at
the hood latch must be made after the hinges and bumpers
are positioned to yield the dimensions shown in Figure
17.
Latch adjustments are made so that effort required
to open and close the hood is reasonable, and hood align-
ment obtained by hinge and bumper adjustment is main-
tained when the hood is closed. Note that the hood latch
is not designed or intended to correct basic hood align-
ment faults.
To align the hood and lock, proceed as follows:
HOOD HINGE (Fig. 18)
1.
Note that the mounting holes in the body-mounted
end of the hinge are slotted to provide up and down
movement of the hood assembly while the hood
mounted end is slotted to provide fore and aft move-
ment.
2.
Scribe a mark around the entire hinge plate which
will be involved in the adjustment.
3.
Loosen the appropriate screws and shift the position
of the hood on the hinge plate the approximate amount
to correct misalignment, using the scribed marks to
check amount of movement. Check condition of ad-
justment by tightening cap screws and closing hood.
Fig.
18 - Hood Hinge - Chevy II
Fig.
19 - Hood Lock, Catch and Support - Chevy II
HOOD BUMPERS
Hood bumpers must be adjusted until hood and fender
line up as shown in Figure 17.
HOOD CATCH AND LOCK (Fig. 19)
Hood lock plate mounting holes are slotted to provide
fore and aft adjustment of the hood lock bolt. The hood
lock bolt itself is adjustable for up and down positioning
of the lock bolt head so that its proper engagement in the
latch assembly may be provided for. The distance that
the lock bolt protrudes out of the lock plate should be
adjusted so that the hood bumpers are slightly com-
pressed by the fully latched hood and so that the effort
required to release the hood catch is reasonable.
FENDER ADJUSTMENT (Figs. 17 and 20)
DO NOT CHANGE SKIRT ASSEMBLY-TO-DASH SHIM-
MING IN AN EFFORT TO ADJUST THE DOOR-TO-
FENDER GAP OR ANY OTHER SHEET METAL AP-
PEARANCE ITEM.
The front fenders are shimmed independently of the
skirt assemblies, unlike conventional- vehicles on which
almost the entire front end sheet metal assembly is
shimmed and adjusted as a unit.
Figure 20 shows the locations of front fender shims.
1.
The rocker panel extension location allows adjust-
ment to make fender outer surface flush with door
outer surface.
2.
The upper or plenum chamber location provides a
means of adjusting fender upper surface so that it
is flush with the upper surface of the cowl.
3.
The locations atop the skirt assembly are shimmed
to close the gap created between the fender mounting
flange and skirt assembly when the plenum chamber
CHEVROLET CHASSIS SWVICE MANUAL
Page 507 of 659

CHASSIS SHEET METAL 11-20
GENERAL DESCRIPTION
The Camaro sheet metal components are much the
same as other Chevrolet passenger models as shown in
Figure 32. The front end design is such that servicing
of the fenders and skirts is most efficiently performed
by removing the fender and skirt as an assembly. Refer
to Section 14 for bumper service procedures, Section 13
for radiator and grille, and Section 1A for air condition-
ing components.
MAINTENANCE AND ADJUSTMENTS
HOOD ADJUSTMENT
The Camaro hood is adjusted in the conventional man-
ner, by adjustment of the hood bumpers and hinges. The
two hood bumpers are located on each side at the top of
the radiator support. Do not attempt hood latch adjust-
ments until the hinges and bumpers are correctly ad-
justed. Latch adjustments are made so that effort re-
quired to open and close the hood is reasonable, and
hood alignment obtained by hinge and bumper adjust-
ment is maintained when the hood is closed. Note that
the hood latch is not designed to correct basic hood mis-
alignment.
HOOD HINGE (Fig. 33)
NOTE: The body mounted portion of the hood
hinges are slotted to provide up and down move-
ment. The hood mounted end is slotted to pro-
vide forward and rearward movement.
1.
Scribe a. line around the entire. hinge plate to be
repositioned.
2.
Loosen the appropriate screws and shift the position
of the hood into correct alignment using the scribe
marks to check amount of movement. Check align-
ment by tightening screws and closing the hood.
HOOD BUMPERS
Adjust hood bumpers so that hood top surface is flush
with fender and header panel top surfaces. See Figure
34 for correct sheet metal adjustment dimensions.
HOOD CATCH AND LOCK (Fig. 35)
Adjust hood lock bolt so that top surface of hood is
flush with top surface'of header panel. The distance that
the lock bolt protrudes out of the lock plate should be
adjusted so that the hood bumpers are slightly com-
pressed by the fully latched hood, and effort required
to release the hood catch is reasonable. Close the hood
and insure catch engages securely.
FENDERS
Fenders are adjustable with shims at the cowl and
rocker panel. To add or remove shims, loosen bolts
Fig. 33 - Hood Hinge - Camaro
at shim locations (fig. 36) and carefully apply force with
pry bar to provide clearance for shim removal or in-
stallation.
SHEET METAL
For proper operation of doors and hood, and for pre-
sentable appearance, adjust front sheet metal to the di-
mensions shown in Figure 34.
COMPONENT PART REPLACEMENT
NOTE: When replacing sheet metal compo-
nents on Camaro, note position and attachment
of all seals and dust shielding and replace if
necessary.
BATTERY TRAY
Removal
1.
Disconnect battery cables and remove battery from
vehicle.
2.
Remove screws securing battery tray to fender skirt
and radiator support.
3.
Remove battery tray from vehicle.
Installation
Install battery tray following removal procedure in
reverse order.
RADIATOR SUPPORT
Removal
1.
Raise hood, disconnect battery cables, and remove
battery.
2.
Remove front bumper (Section 14).
3.
Remove grille and related components (Section 13).
4.
Disconnect horns, horn relay, voltage regulator,
CHEVROLET CHASSIS SERVICE MANUAL
Page 513 of 659
SECTION 12
ELECTRICAL-BODY AND CHASSIS
CONTENTS
OF
THIS
SECTION
Page
Page
System 12-1
Instruments and Gauges 12-21
Directional Signal 12r40
Windshield Wipers and Washers 12-44
Wiring Diagrams 12-56
Special Tools 12-60
LIGHTING SYSTEM
INDEX
Page
General Description
!2-i
Maintenance and Adjustments
•.................. 12-2
Headlamp Adjustment......................
12-3
Headlamp Panel Travel Adjustment.
12-5
Service Operations.
. . .. 12-5
Front Lighting
12-5
Headlamp
. 12_5
Parking Lamp
12-5
Fender Lamp
. 12_^
Headlamp Panel
12-8
Headlamp Panel Motor
^2-9
Rear Lighting
l2-10
Tail, Stop and Directional Lamps
12-10
Page
Backing Lamps
12-14
License Plate Lamp
12-14
Automatic Transmission Quadrant Lamp
12-14
Seat Separator Console Lamps
. 12-15
Lighting Switch
. . 12-15
Wiper Switch.
12-15
Stoplight Switch
12-15
Dimmer Switch
12-15
Backing Lamp Switches
12-15
Neutral Safety Switches
12-17
Parking Brake Alarm Switch
................. 12-19
Instrument Panel Compartment Lamp/Switch
12-19
Cirgarette Lighter
12-19
GENERAL DESCRIPTION
.
The lighting system includes: the main lighting switch,
stop light, dimmer, and backing lamp switches, head-
lamps, parking lamps, stop, tail and directional lamps,
instrument illumination and indicator lamps, and the
necessary wiring to complete the various circuits. A
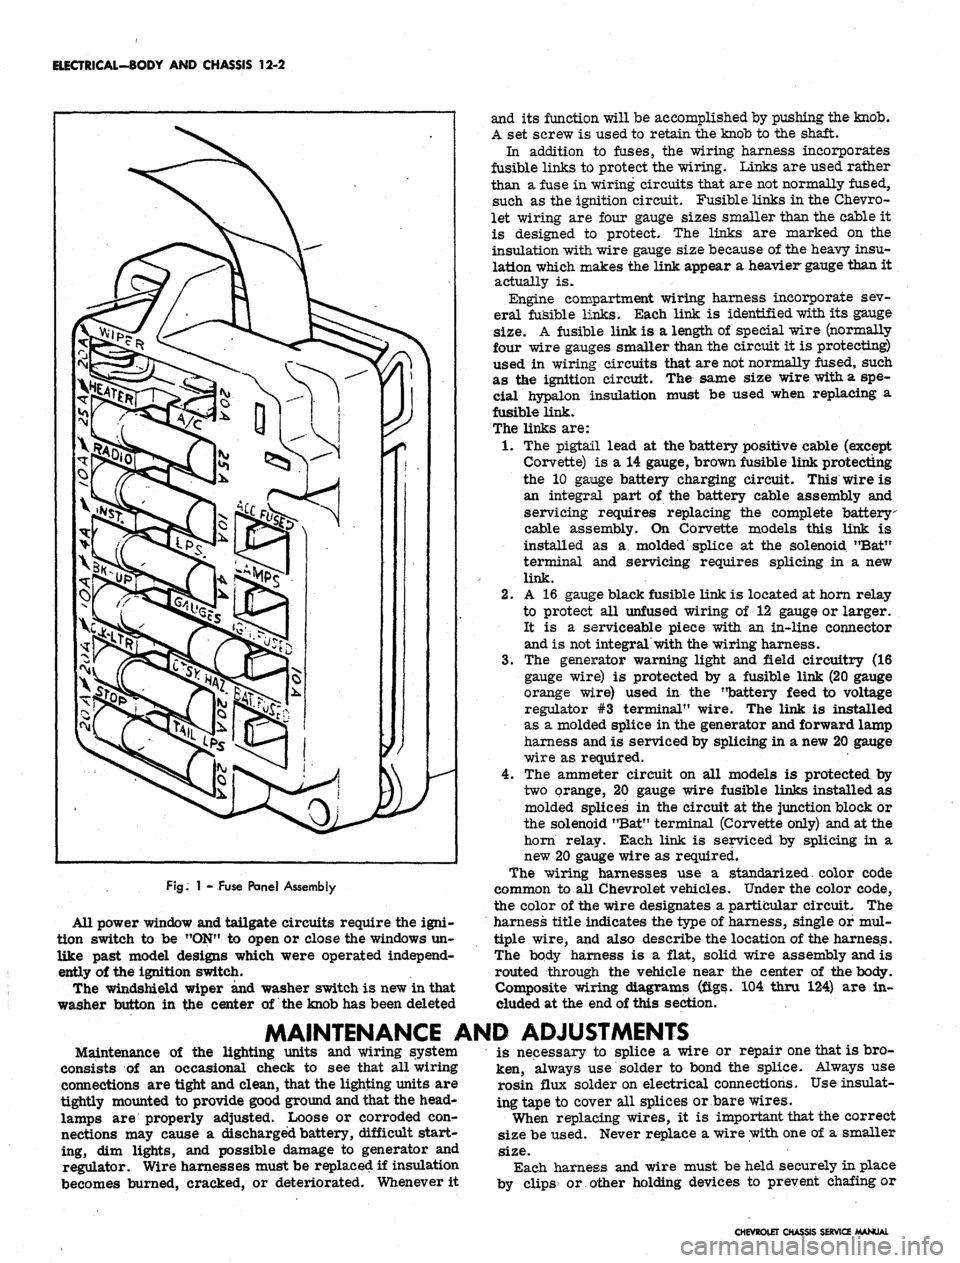
fuse panel provides convenient power take offs and fuse
clips for the appropriate circuits (fig. 1).
Chevrolet and Chevelle headlamp installation is all
new in that the headlamps are located in the radiator
support with adjusting screws and springs. Eliminating
the need for having separate headlamp housings. Chev-
rolet and Chevelle headlamp retainers and springs are
interchangeable.
Chevy n headlamp housings are new because of revised
front end styling and Corvette front end lighting is basi-
cally carryover.
Front fender lamps have been added as an option for
Chevrolet models and as standard equipment on Caprice
series.
Camaro models use single headlamps and the Rally
Sport model headlamps are covered by a retractable
section of the grille when lamps are not used. The sec-
tion of the grille covering the headlamps folds back when
lights are required; the headlamps are stationary. The
covering is retracted by a small electric motor mounted
to the headlamp housing. The headlamps are automat-
ically uncovered when the headlight switch is pulled "ON"
for illumination. If at any time the electrical circuit
becomes inoperative, the lamps can be uncovered manu-
ally. The ignition switch must be
"ON"
in order to close
the headlamp doors.
Parking lamp for Chevelle and Chevrolet models are
new due to revised front end sheet metal and bumper
styling. Parking lamps are located in the bumper on
Chevrolet, Chevelle and Chevy n models
Camaro parking lamps are located in the radiator
grille except for the Rally Sport models on which the
parking lamps are in the valance panel. For styling
reasons, the lens is white and an amber glass bulb is
used. All Camaro parking lamps require a separate
ground wire to assure a good ground contact because of
the plastic grille and painted contact surfaces.
The Chevrolet tail, stop, and directional lamps are in
one housing with a three section lens design on Impala
and Caprice sedans. The center lens for Impala series
is the back-up lamp. The center lens on the Caprice is
a tail lamp with the back-up lamps being located in the
rear bumper. Chevrolet station wagons have three indi-
vidual housings with three lenses, the center lamp being
the back-up. Biscayne and Bel-Air sedans have a single
housing and lens for tail, stop, and directional lamp with
a similarly constructed back-up lamp inboard and adja-
cent to it.
Chevelle tail, stop, and directional lamps are a single
lens design that follows through with the rear fender
styling. The back-up lamp is located in r.ear bumper.
Camaro models except Rally Sport have tail lamps
with integral back-up lamps mounted inboard of the rear
fenders between the trunk opening and bumper. The
Rally Sport model has dual tail lamps in the rear housing
and valance mounted back-up lamps.
Corvette, Chevy n, and Corvair tail and directional
signal lights are carryover. The Corvette has new back-
up lamps center mounted above the license plate opening.
CHEVROLET CHASSIS SERVICE
Page 514 of 659
ELECTRICAL-BODY AND CHASSIS 12-2
FJg.
1 - Fuse Panel Assembly
All power window and tailgate circuits require the igni-
tion switch to be "ON" to open or close the windows un-
like past model designs which were operated independ-
ently of the ignition switch.
The windshield wiper and washer switch is new in that
washer button in the center of the knob has been deleted
and its function will be accomplished by pushing the knob.
A set screw is used to retain the knob to the shaft.
In addition to fuses, the wiring harness incorporates
fusible links to protect the wiring. Links are used rather
than a fuse in wiring circuits that are not normally fused,
such as the ignition circuit. Fusible links in the Chevro-
let wiring are four gauge sizes smaller than the cable it
is designed to protect. The links are marked on the
insulation with wire gauge size because of the heavy insu-
lation which makes the link appear a heavier gauge than it
actually is.
Engine compartment wiring harness incorporate sev-
eral fusible links. Each link is identified with its gauge
size.
A fusible link is a length of special wire (normally
four wire gauges smaller than the circuit it is protecting)
used in wiring circuits that are not normally fused, such
as the ignition circuit. The same size wire with a spe-
cial hypalon insulation must be used when replacing a
fusible link.
The links are:
1.
The pigtail lead at the battery positive cable (except
Corvette) is a 14 gauge, brown fusible link protecting
the 10 gange battery charging circuit. This wire is
an integral part of the battery cable assembly and
servicing requires replacing the complete battery
cable assembly. On Corvette models this link is
installed as a molded splice at the solenoid "Bat"
terminal and servicing requires splicing in a new
link.
2.
A 16 gauge black fusible link is located at horn relay
to protect all unfused wiring of 12 gauge or larger.
It is a serviceable piece with an in-line connector
and is not integral with the wiring harness.
3.
The generator warning light and field circuitry (16
gauge wire) is protected by a fusible link (20 gauge
orange wire) used in the "battery feed to voltage
regulator #3 terminal" wire. The link is installed
as a molded splice in the generator and forward lamp
harness and is serviced by splicing in a new 20 gauge
wire as required.
4.
The ammeter circuit on all models is protected by
two orange, 20 gauge wire fusible links installed as
molded splices in the circuit at the junction block or
the solenoid "Bat" terminal (Corvette only) and at the
horn relay. Each link is serviced by splicing in a
new 20 gauge wire as required.
The wiring harnesses use a standarized. color code
common to all Chevrolet vehicles. Under the color code,
the color of the wire designates a particular circuit. The
harness title indicates the type of harness, single of mul-
tiple wire, and also describe the location of the harness.
The body harness is a flat, solid wire assembly and is
routed through the vehicle near the center of the body.
Composite wiring diagrams (figs. 104 thru 124) are in-
cluded at the end of this section.
MAINTENANCE AND ADJUSTMENTS
Maintenance of the lighting units and wiring system
consists of an occasional check to see that all wiring
connections are tight and clean, that the lighting units are
tightly mounted to provide good ground and that the head-
lamps are properly adjusted. Loose or corroded con-
nections may cause a discharged battery, difficult start-
ing, dim lights, and possible damage to generator and
regulator. Wire harnesses must be replaced if insulation
becomes burned, cracked, or deteriorated. Whenever it
is necessary to splice a wire or repair one that is bro-
ken, always use solder to bond the splice. Always use
rosin flux solder on electrical connections. Use insulat-
ing tape to cover all splices or bare wires.
When replacing wires, it is important that the correct
size be used. Never replace a wire with one of a smaller
size.
Each harness and wire must be held securely in place
by clips or other holding devices to prevent chafing or
CHEVROLET CHASSIS SERVICE MANUAL