battery CHEVROLET CAMARO 1967 1.G Chassis User Guide
[x] Cancel search | Manufacturer: CHEVROLET, Model Year: 1967, Model line: CAMARO, Model: CHEVROLET CAMARO 1967 1.GPages: 659, PDF Size: 114.24 MB
Page 29 of 659
HEATER AND AIR CONDITIONING 1A-6
CHEVROLET SHOWN AS TYPICAL
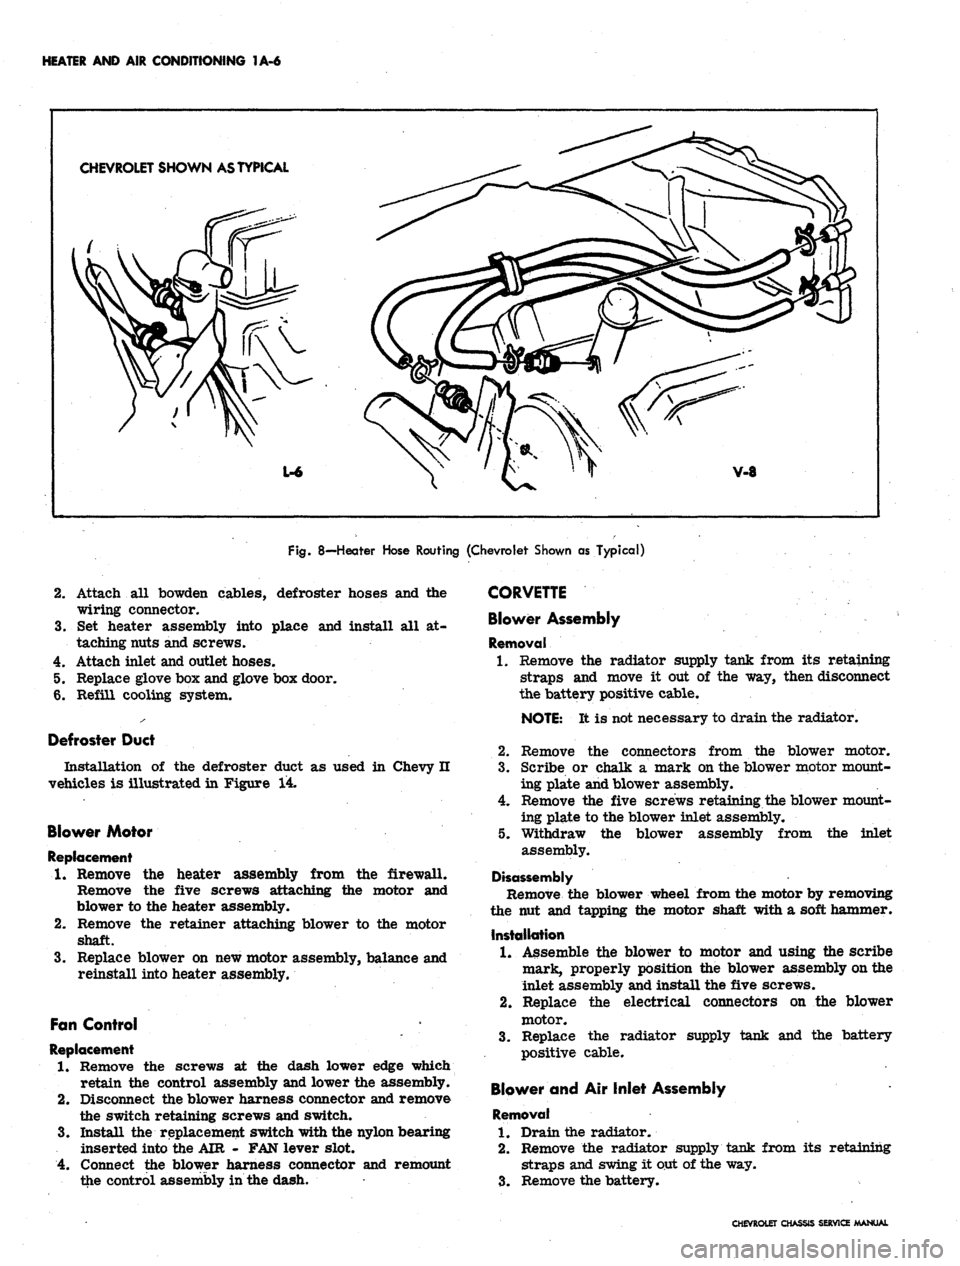
Fig.
8—Heater Hose Routing (Chevrolet Shown as Typical)
cables, defroster hoses and the
place and install all at-
4.
5.
6.
Attach all bowden
wiring connector.
Set heater assembly into
taching nuts and screws.
Attach inlet and outlet hoses.
Replace glove box and glove box door.
Refill cooling system.
Defroster Duct
Installation of the defroster duct as used in Chevy H
vehicles is illustrated in Figure 14.
Blower Motor
Replacement
1.
Remove the heater assembly from the firewall.
Remove the five screws attaching the motor and
blower to the heater assembly.
2.
Remove the retainer attaching blower to the motor
shaft.
3.
Replace blower on new motor assembly, balance and
reinstall into heater assembly.
Fan Control
Replacement
1.
Remove the screws at the dash lower edge which
retain the control assembly and lower the assembly.
2.
Disconnect the blower harness connector and remove
the switch retaining screws and switch.
3.
Install the replacement switch with the nylon bearing
inserted into the AIR - FAN lever slot.
4.
Connect the blower harness connector and remount
the control assembly in the dash.
CORVETTE
Blower Assembly
Removal
1.
Remove the radiator supply tank from its retaining
straps and move it out of the way, then disconnect
the battery positive cable.
NOTE:
It is not necessary to drain the radiator.
2.
Remove the connectors from the blower motor.
3.
Scribe or chalk a mark on the blower motor mount-
ing plate and blower assembly.
4.
Remove the five screws retaining the blower mount-
ing plate to the blower inlet assembly.
Withdraw the blower assembly from the inlet
5.
assembly.
Disassembly
Remove the blower wheel from the motor by removing
the nut and tapping the motor shaft with a soft hammer.
Installation
1.
Assemble the blower to motor and using the scribe
mark, properly position the blower assembly on the
inlet assembly and install the five screws.
2.
Replace the electrical connectors on the blower
motor.
3.
Replace the radiator supply tank and the battery
positive cable.
Blower and Air Inlet Assembly
Removal
1.
Drain the radiator.
2.
Remove the radiator supply tank from its retaining
straps and swing it out of the way.
3.
Remove the battery.
CHEVROLET CHASSIS SERVICE MANUAL
Page 31 of 659
HEATER AND AIR CONDITIONING 1A-8
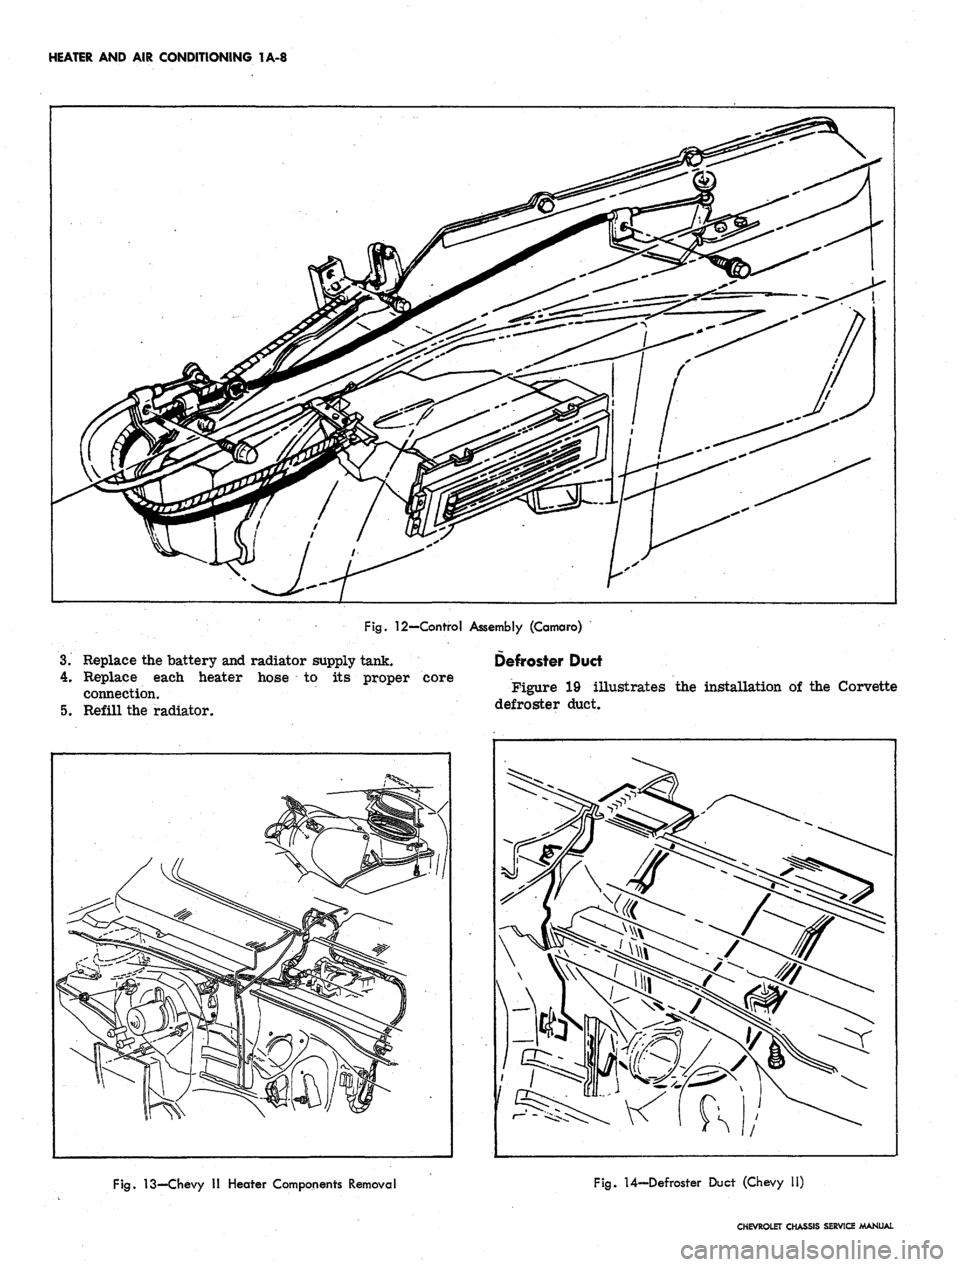
Fig.
12—Control Assembly (Camaro)
3.
Replace the battery and radiator supply tank.
4.
Replace each heater hose to its proper core
connection.
5. Refill the radiator.
Defroster Duct
Figure 19 illustrates the installation of the Corvette
defroster duct.
Fig.
13—Chevy II Heater Components Removal
Fig.
U-Defroster Duct (Chevy 11)
CHEVROLET CHASSIS SERVICE MANUAL
Page 32 of 659
HEATER AND AIR CONDITIONING 1A-9
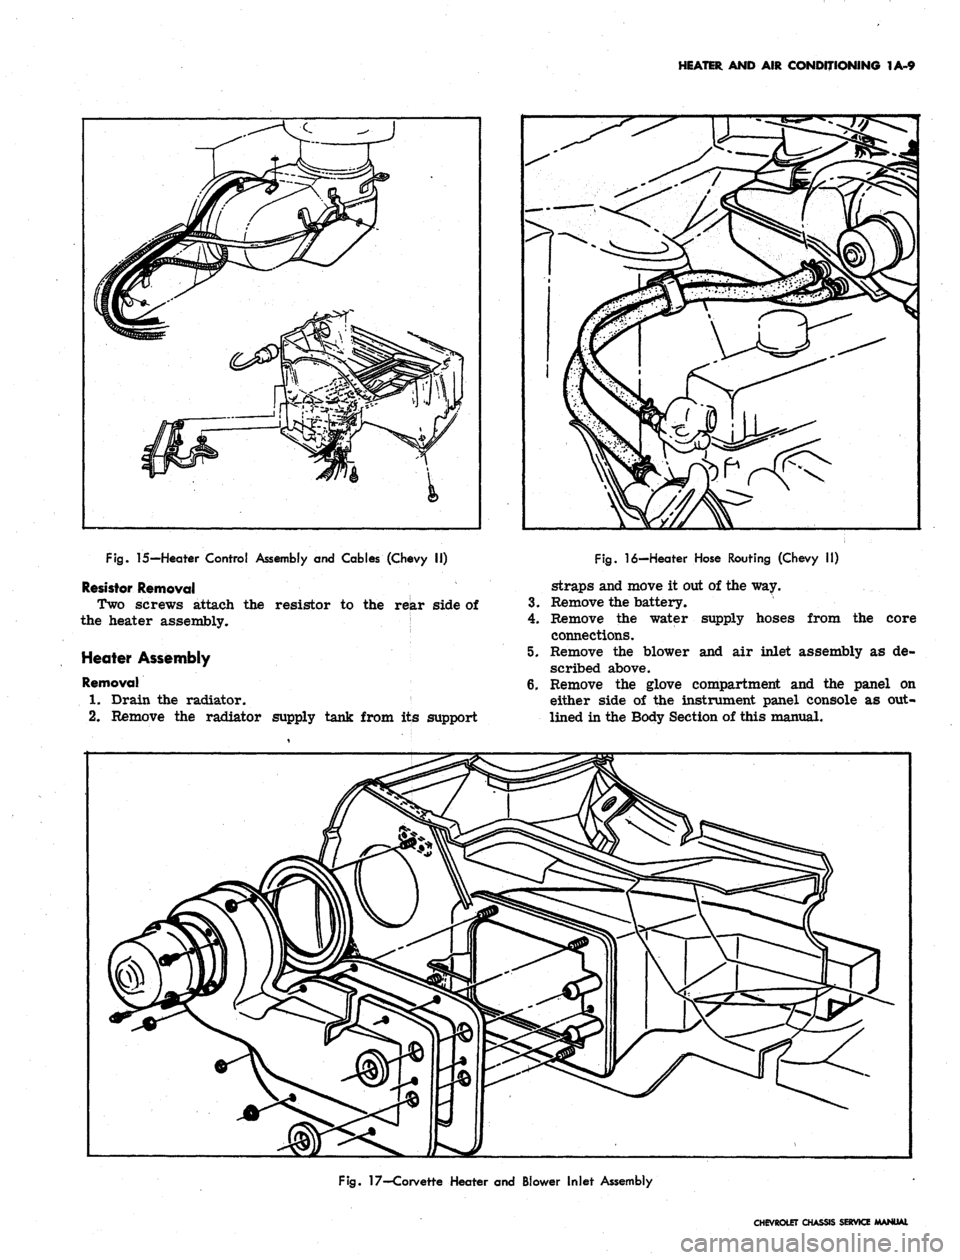
Fig.
15-Heater Control Assembly and Cables (Chevy II)
Resistor Removal
Two screws attach the resistor to the rear side of
the heater assembly.
Heater Assembly
Removal
1.
Drain the radiator.
2.
Remove the radiator supply tank from its support
Fig.
16—Heater Hose Routing (Chevy II)
straps and move it out of the way.
3.
Remove the battery.
4.
Remove the water supply hoses from the core
connections.
5. Remove the blower and air inlet assembly as de-
scribed above.
6. Remove the glove compartment and the panel on
either side of the instrument panel console as out-
lined in the Body Section of this manual.
Fig.
17—Corvette Heater and Blower Inlet Assembly
CHEVROLET CHASSIS SERVICE MANUAL
Page 33 of 659
HEATER AND AIR CONDITIONING 1A-10
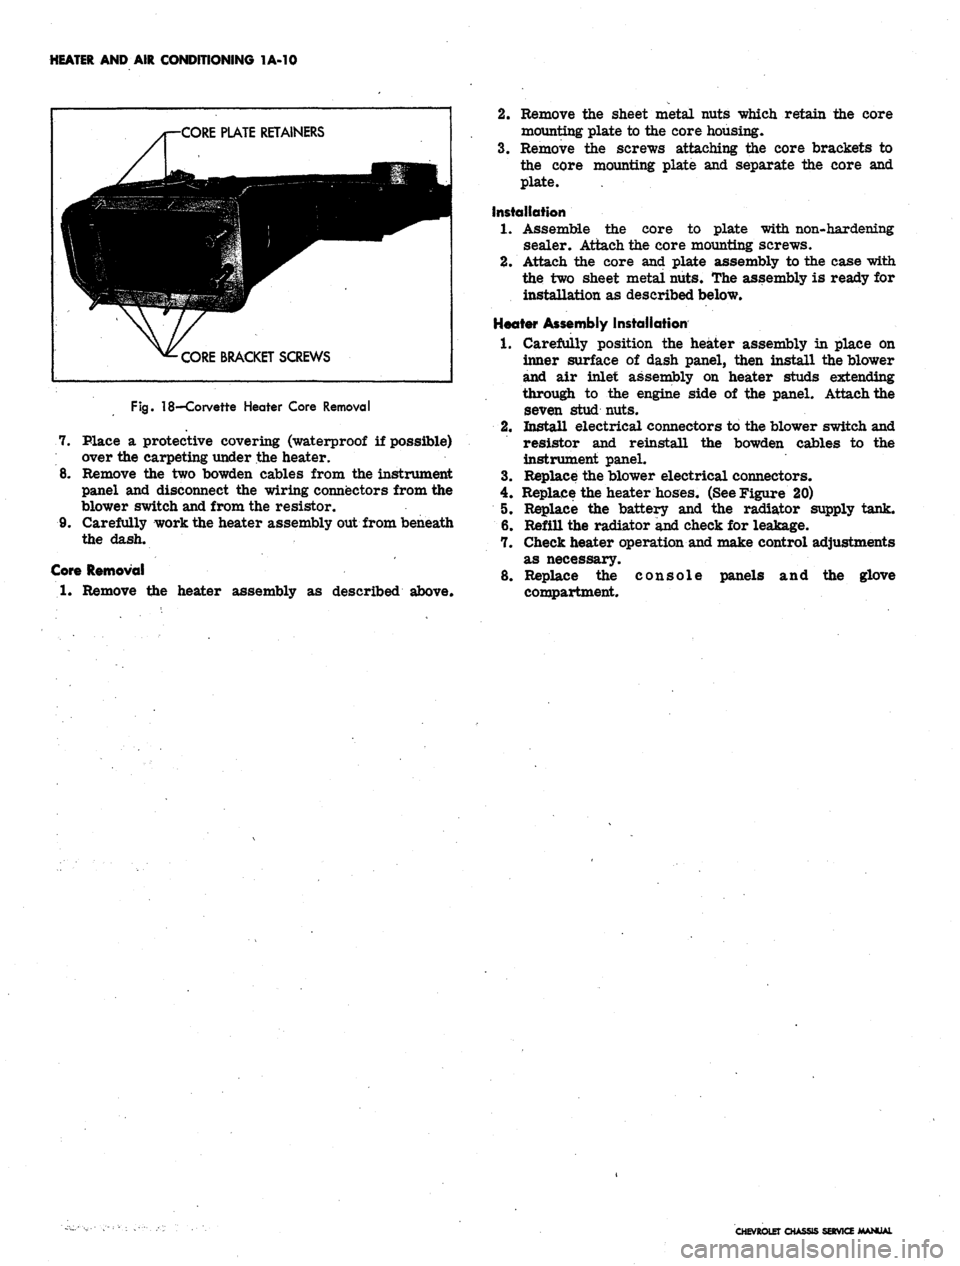
PLATE RETAINERS
CORE BRACKET SCREWS
Fig.
18—Corvette Heater Core Removal
7. Place a protective covering (waterproof if possible)
over the carpeting under the heater.
8. Remove the two bowden cables from the instrument
panel and disconnect the wiring connectors from the
blower switch and from the resistor.
9. Carefully work the heater assembly out from beneath
the dash.
Core Removal
1.
Remove the heater assembly as described above.
2.
Remove the sheet metal nuts which retain the core
mounting plate to the core housing.
3.
Remove the screws attaching the core brackets to
the core mounting plate and separate the core and
plate. .
Installation
1.
Assemble the core to plate with non-hardening
sealer. Attach the core mounting screws.
2.
Attach the core and plate assembly to the case with
the two sheet metal nuts. The assembly is ready for
installation as described below.
Heater Assembly Installation
1.
Carefully position the heater assembly in place on
inner surface of dash panel, then install the blower
and air inlet assembly on heater studs extending
through to the engine side of the panel. Attach the
seven stud nuts.
2.
Install electrical connectors to the blower switch and
resistor and reinstall the bowden cables to the
instrument panel.
3.
Replace the blower electrical connectors.
4.
Replace the heater hoses. (See Figure 20)
5. Replace the battery and the radiator supply tank.
6. Refill the radiator and check for leakage.
7. Check heater operation and make control adjustments
as necessary.
8. Replace the console panels and the glove
compartment.
CHEVROLET CHASSIS SERVICE MANUAL
Page 57 of 659
HEATER AND AIR CONDITIONING 1A-34
a. Blower comes on High speed.
b.
Cold air comes from A/C outlets.
3.
Rotate Temperature Dial to 85°F.
a. Blower speed will decrease to Low speed then
increase to Medium or High.
b.
Air temperature changes from Cold to Hot and
comes out heater outlet.
4.
Move control lever to LOW Front, with Temperature
Dial at 85°F. Blower operates at Low and Medium
speeds.
5.
Move control lever to Rear, set Temperature Dial
at 65°F.
a. Blower goes to High speed and maintains high
air flow.
b.
All air comes from A/C outlets.
6. Move control lever to DE-FOG.
a. Blower is on Medium or High Speeds.
b.
Air comes from Defroster and Heater Outlets.
7.
Move control lever to DE-ICE.
a. Blower is on High Speed.
b.
Air temperature goes to warm and most of air
comes from defroster nozzle, with small amount
of air coming from heater outlet.
c. Outside air door is open - (door valve is closed
to car body).
8. Move control lever to REAR (dial at 65°). Outside
air door moves outboard. (Door valve is open to
car body).
CHEVROLET COMFORTRON TESTER
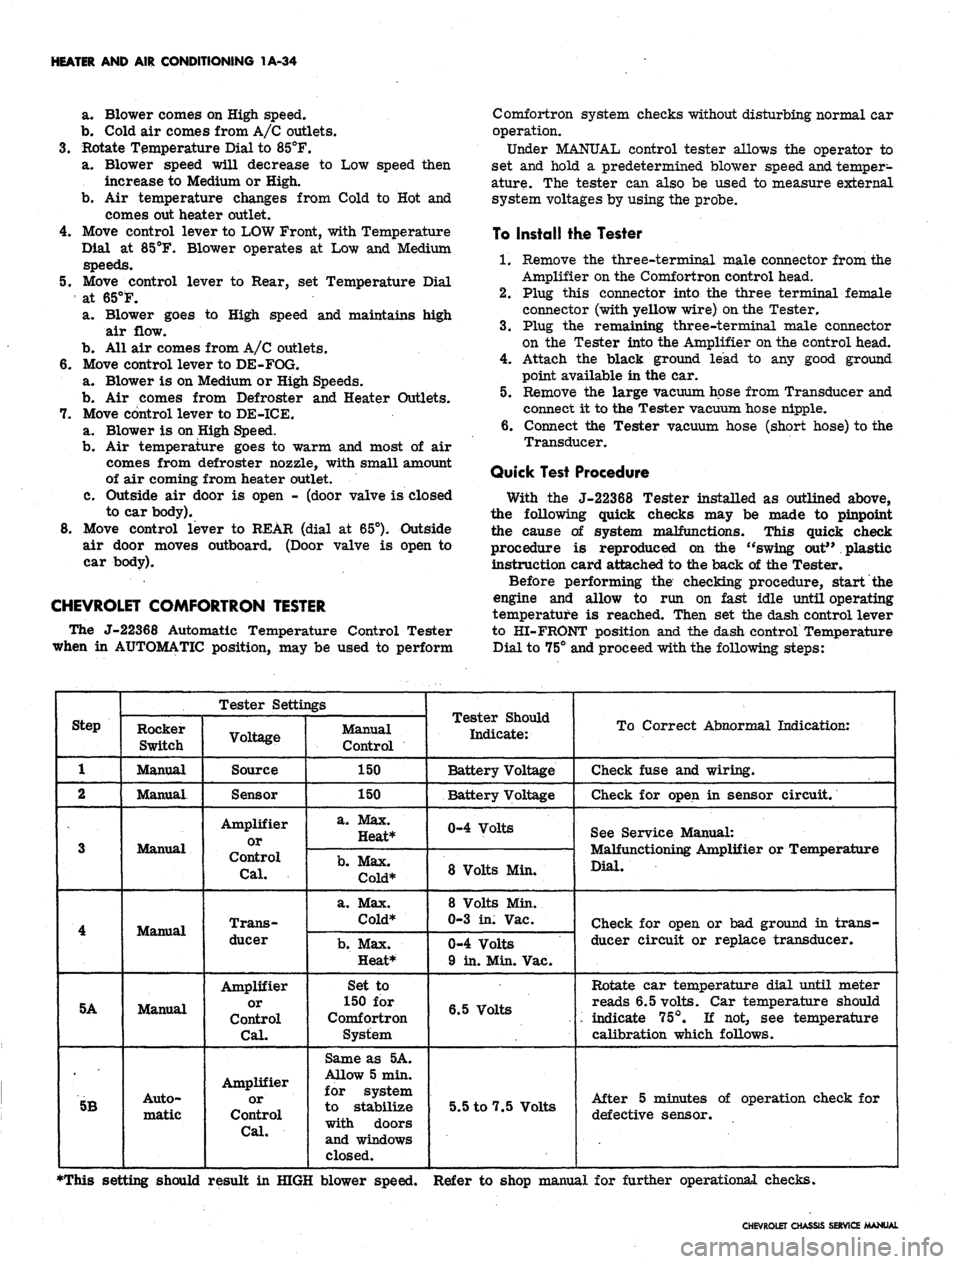
The J-22368 Automatic Temperature Control Tester
when in AUTOMATIC position, may be used to perform
Comfortron system checks without disturbing normal car
operation.
Under MANUAL control tester allows the operator to
set and hold a predetermined blower speed
and.
temper-
ature. The tester can also be used to measure external
system voltages by using the probe.
To Install the Tester
1.
Remove the three-terminal male connector from the
Amplifier on the Comfortron control head.
2.
Plug this connector into the three terminal female
connector (with yellow wire)
on
the Tester.
3.
Plug the remaining three-terminal male connector
on the Tester into the Amplifier on the control head.
4.
Attach the black ground lead to any good ground
point available in the car.
5.
Remove the large vacuum hose from Transducer and
connect it to the Tester vacuum hose nipple.
6. Connect the Tester vacuum hose (short hose) to the
Transducer.
Quick Test Procedure
With the J-22368 Tester installed as outlined above,
the following quick checks may be made to pinpoint
the cause of system malfunctions. This quick check
procedure is reproduced on the "swing out" plastic
instruction card attached to the back of the Tester.
Before performing the checking procedure, start the
engine and allow to run on fast idle until operating
temperature is reached. Then set the dash control lever
to HI-FRONT position and the dash control Temperature
Dial to 75° and proceed with the following steps:
Step
1
2
3
4
5A
5B
Tester Settings
Rocker
Switch
Manual
Manual.
Manual
Manual
Manual
Auto-
matic
Voltage
Source
Sensor
Amplifier
or
Control
Cal.
Trans-
ducer
Amplifier
or
Control
Cal.
Amplifier
or
Control
Cal.
Manual
Control
150
150
a. Max.
Heat*
b.
Max.
Cold*
a. Max.
Cold*
b.
Max.
Heat*
Set to
150 for
Comfortron
System
Same as 5A.
Allow 5 min.
for system
to stabilize
with doors
and windows
closed.
Tester Should
Indicate:
Battery Voltage
Battery Voltage
0-4 Volts
8 Volts Min.
8 Volts Min.
0-3 in. Vac.
0-4 Volts
9 in. Min. Vac.
6.5 Volts
5.5 to 7.5 Volts
To Correct Abnormal Indication:
Check fuse and wiring.
Check for open in sensor circuit.
See Service Manual:
Malfunctioning Amplifier or Temperature
Dial.
Check for open or bad ground in trans-
ducer circuit or replace transducer.
Rotate car temperature dial until meter
reads 6.5 volts. Car temperature should
'•- indicate 75°. If not, see temperature
calibration which follows.
After 5 minutes of operation check for
defective sensor.
•This setting should result in HIGH blower speed. Refer to shop manual for further operational checks.
CHEVROLET CHASSIS SERVICE MANUAL
Page 59 of 659
HEATER AND AIR CONDITIONING 1A-36
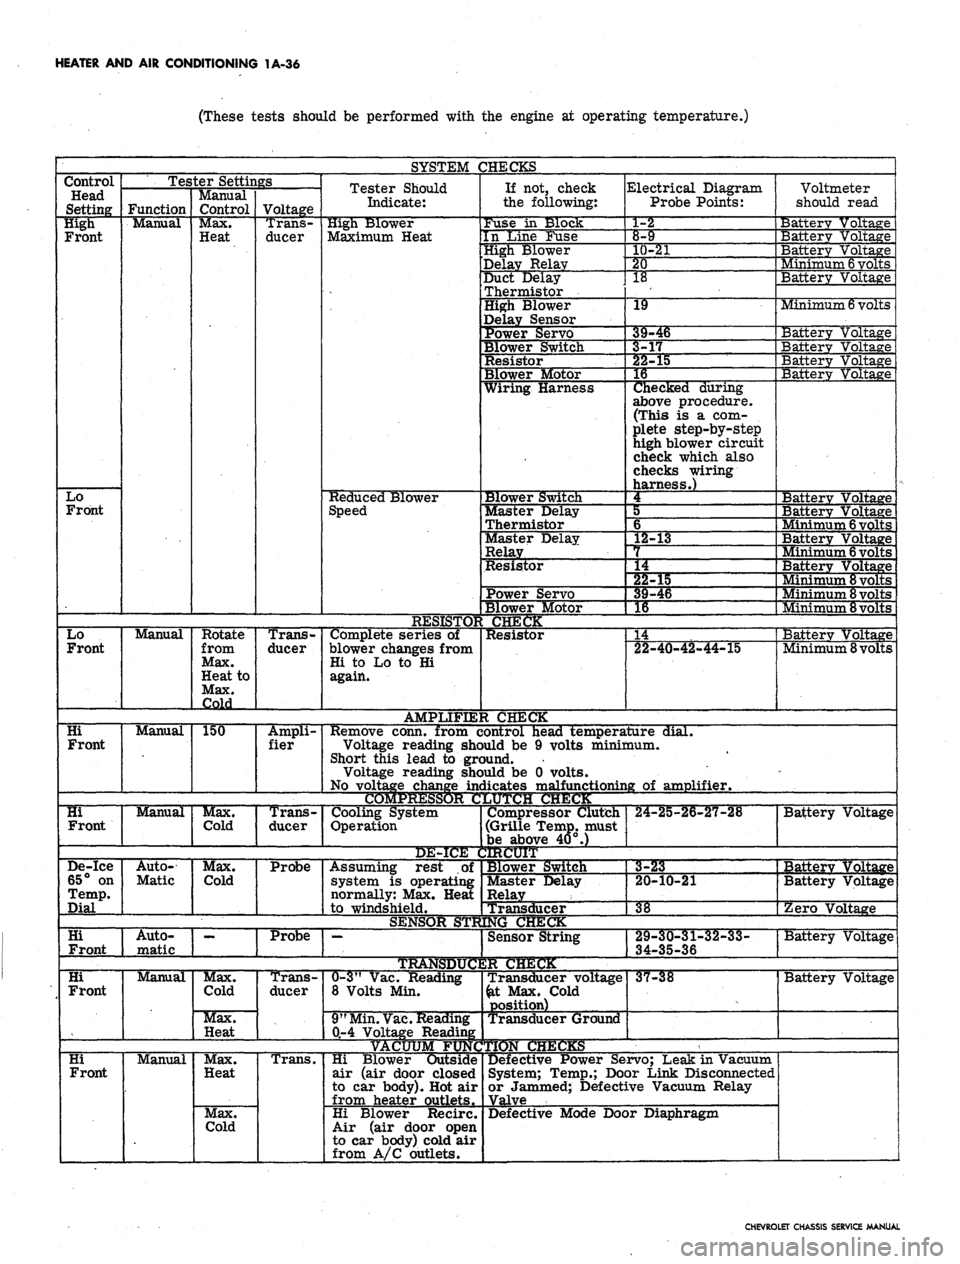
(These tests should be performed with the engine at operating temperature.)
SYSTEM CHECKS
Control
Head
Setting
High
Front
Lo
Front
Lo
Front
Hi
Front
Hi
Front
Tester Settings
Function
Manual
Manual
Manual
Manual
De-ice
65° on
Temp.
Dial
Hi
Front
Hi
Front
Hi
Front
Auto-
Matic
1 1
Auto-
matic
Manual
Manual
Manual
Control
Max.
Heat
Rotate
from
Max.
Heat to
Max.
Cold
150
Max.
Cold
Max.
Cold
Max.
Cold
Max.
Heat
Max.
Heat
Max.
Cold
Voltage
Trans-
ducer
Trans-
ducer
Ampli-
fier
Trans-
ducer
Probe
Probe
Trans-
ducer
Trans.
Tester Should
Indicate:
High Blower
Maximum Heat
Reduced Blower
Speed
Complete series of
blower changes from
Hi to Lo to Hi
again.
AMPLIFIE:
Remove conn, from c
Voltage reading she
Short this lead to grc
Voltage reading she
No voltage change in<
COMPRESSOR C
Cooling System
Operation
DE-ICE i
Assuming rest of
system is operating
normally: Max. Heat
1
to windshield.
SENSOR STR
•—
TRAtfSDtfC
0-3"
Vac. Reading
8 Volts Min.
9"
Min.
Vac.
Reading
0-4 Voltage Reading
If not, check
the following:
Fuse in Slock
In Line Fuse
High Blower
Delay Relay
Duct Delay
Thermistor
High Blower
Delay Sensor
Power Servo
Blower Switch
Resistor
Blower Motor
Wiring Harness
Blower Switch
Master Delay
Thermistor
Master Delay
Relay
Resistor
Power Servo
Blower Motor
CHECK
Resistor
I CHECK
Electrical Diagram
Probe Points:
1-2
8-9
10-21
20
18
19
*
9-46
-r
^2-3
15
16
Checked during
above procedure.
(This is a com-
plete step-by-step
high blower circuit
check which also
checks wiring
harness.)
4
5
6
L2-13
L4
""§2-15
39-46
1
16 1
14
22-40-42-44-15
.ontrol head temperature dial.
>uld be 9 volts minimum,
jund.
>uld be 0 volts,
iicates malfunctioning of amplifier.
JUTCJH CHUCK
Compressor Clutch
(Grille Temp, must
be above 40°.)
IRCUIT
Blower Switch
Master Delay
Relay
Transd
NGCl
ucer
Sensor String
2R CHECK
Transducer voltage
&t Max. Cold
position)
Transducer Ground
Hi Blower Outside
air (air door closed
to car body). Hot air
from heater outlets.
Hi Blower Recirc.
Air (air door open
to car body) cold air
from A/C outlets.
24-25-26-27-28
Voltmete
should re
ad
Battery Voltage
Battery Voltage
Battery Voltage
. Vtinimum
6
volts
Battery Voltage
Minimum
6
volts
Battery Vo]
Batterv Vo]
Ltage
Ltage
Battery Voltage
Batterv Voltage
3a
Bai
:terv Vo
tterv Vo
tage
tage
Minimum
6
volts
Batterv Voltage
Minimum
6
volts
Battery Voltage
Minimum
8
volts
Minimum 8 volts
Minimum 8 volts
Batterv Voltage
Minimum 8 volts
1 III • II »ll. —..• —•— . !!•• 1
Battery Voltage
3-23
20-10-21
38
29-30-31-32-33-
34-35-36
37-38
Defective Power Servo; Leak in Vacuum
System; Temp.; Door Link Disconnected
or Jammed; Defective Vacuum Relay
Valve
Defective Mode Door Diaphragm
Batterv Voltage
Battery Voltage
Zero Voltage
Battery Voltage
Battery Voltage
CHEVROLET CHASSIS SERVICE MANUAL
Page 85 of 659
HEATER AND AIR CONDITIONING 1A-62
2.
Insert the evaporator assembly into the outlet case
half and mount the evaporator, thermostatic switch,
and cable to the case.
3.
Install the face plate to the case and install control
retaining nuts and knobs.
4.
Assemble the case halves and mount the evaporator
pipe clamp.
5. Install the evaporator assembly as previously
described under EVAPORATOR.
BLOWER ASSEMBLY
Four-Season System
Chevrolet and Camaro
Removal
1.
Disconnect battery ground cable.
2.
Remove the right front fender and skirt assembly.
3.
Disconnect the motor wire at the flange connector.
4.
Disconnect the rubber air cooling tube from the
motor.
5. Remove the motor to case attaching screws and re-
move the blower assembly. If the sealer acts as an
adhesive, pry the assembly carefully away from the
6. Remove the blower from the motor shaft.
Fig.
86—Blower Assembly—Four-Season (Chevrolet,
Chevelle, Camaro)
Installation
1.
Mount the blower to the motor shaft with the open end
of the blower away from the motor.
2.
Mount the assembly to the case with the attaching
screws.
3.
Connect the rubber tube and blower wire to the
motor.
4.
Replace the right front fender and skirt assembly.
5. Connect battery ground cable.
Chevelle
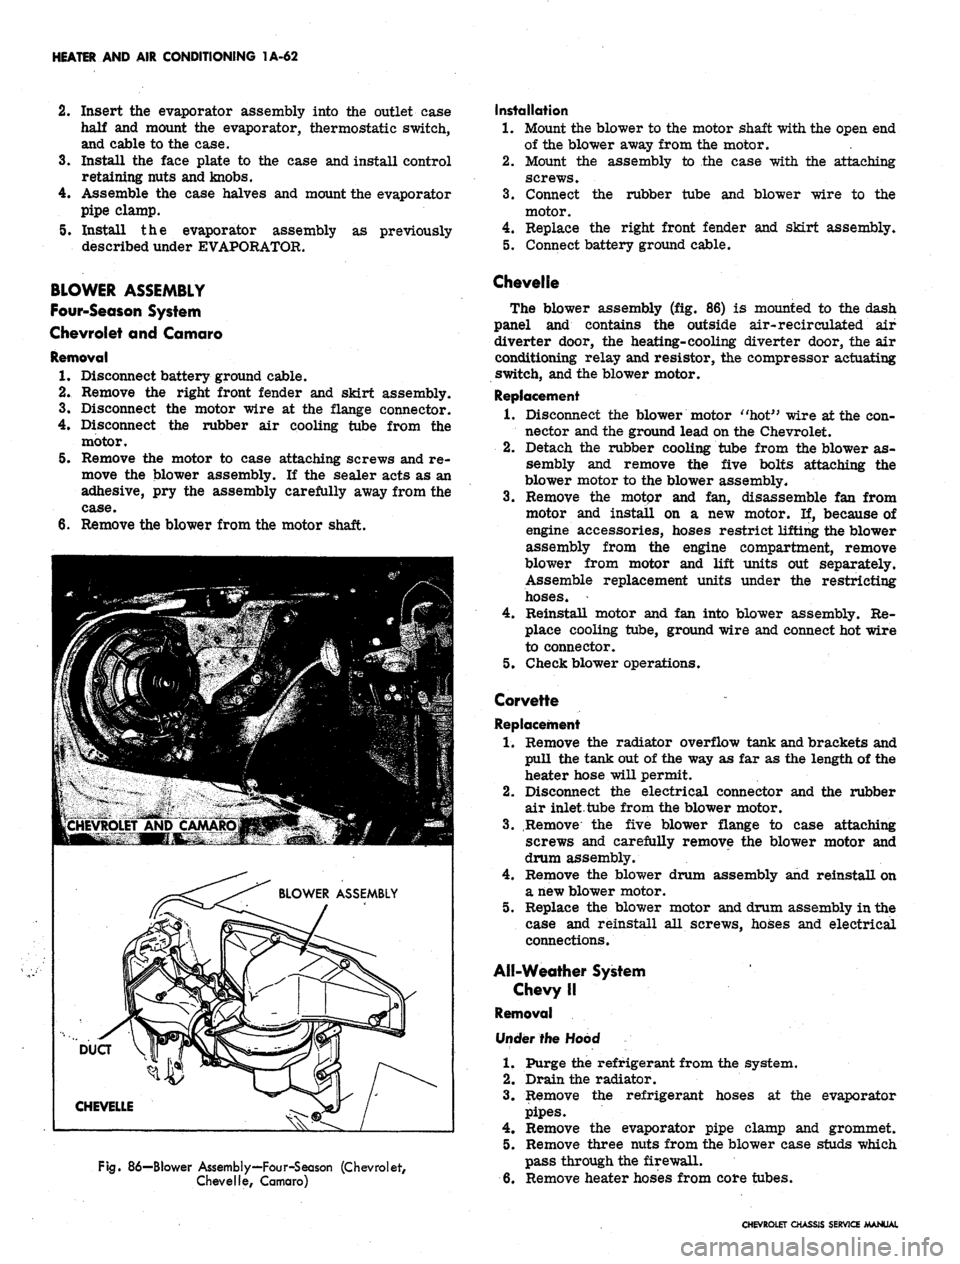
The blower assembly (fig. 86) is mounted to the dash
panel and contains the outside air-recirculated air
diverter door, the heating-cooling diverter door, the air
conditioning relay and resistor, the compressor actuating
switch, and the blower motor.
Replacement
1.
Disconnect the blower motor "hot" wire at the con-
nector and the ground lead on the Chevrolet.
2.
Detach the rubber cooling tube from the blower as-
sembly and remove the five bolts attaching the
blower motor to the blower assembly.
3.
Remove the motor and fan, disassemble fan from
motor and install on a new motor. If, because of
engine accessories, hoses restrict lifting the blower
assembly from the engine compartment, remove
blower from motor and lift units out separately.
Assemble replacement units under the restricting
hoses.
4.
Reinstall motor and fan into blower assembly. Re-
place cooling tube, ground wire and connect hot wire
to connector.
5. Check blower operations.
Corvette
Replacement
1.
Remove the radiator overflow tank and brackets and
pull the tank out of the way as far as the length of the
heater hose will permit.
2.
Disconnect the electrical connector and the rubber
air inlet tube from the blower motor.
3.
Remove the five blower flange to case attaching
screws and carefully remove the blower motor and
drum assembly.
4.
Remove the blower drum assembly and reinstall on
a new blower motor.
5. Replace the blower motor and drum assembly in the
case and reinstall all screws, hoses and electrical
connections.
All-Weather System
Chevy II
Removal
Under the Hood
1.
Purge the refrigerant from the system.
2.
Drain the radiator.
3.
Remove the refrigerant hoses at the evaporator
pipes.
4.
Remove the evaporator pipe clamp and grommet.
5. Remove three nuts from the blower case studs which
pass through the firewall.
6. Remove heater hoses from core tubes.
CHEVROLET CHASSIS SERVICE MANUAL
Page 90 of 659
HEATER AND AIR CONDITIONING 1A-67
Fig.
94—Camaro Four-Season Ducts
Heater and Air Distributor Assembly
Removal
rfooo
1.
Disconnect battery ground cable.
2.
Drain radiator (do not purge refrigerant system).
3.
Disconnect all connectors attached to the Comfortron
wiring harness which are on the engine side of the
firewall. Push the wiring harness grommet through
the firewall to the rear.
4.
Disconnect the four vacuum hoses coming from the
underdash through the large firewall grommet. Push
the hose grommet through the firewall to the rear.
5.
Remove the nuts from the heater and air distributor
case studs which project through the firewall from
the dash side.
6. Disconnect the heater hoses from the core tubes.
Under Dash
1.
Remove glove box assembly.
2.
Remove the dash center face plate, ash tray assem-
bly, and any radio and/or tape equipment.
3.
Remove the Comfortron control assembly mounting
screws and lower the control unit.
4.
Remove the vacuum line from the kick pad valve
diaphragm.
5.
Disconnect all harness connectors between the Com-
fortron harness and the rest of the dash wiring.
6. Remove the air distributor duct which supplies the
dash outlets.
7.
Remove the screws attaching the heater and air
distributor to the firewall.
8. Pull the assembly rearward then down to remove
from the dash. Pull the Comfortron wiring harness
and vacuum hose assembly through the firewall.
Installation
1.
Place the entire case assembly with wiring, vacuum
hoses,
and control assembly into the car on the floor.
2.
Pass the underhood wiring harness and vacuum hose
harness as far as possible through the appropriate
firewall holes.
3.
Lift the assembly up into position and pass the case
studs through the firewall mounting holes. Attach
the case to the firewall with the mounting screws.
4.
Mount the dash outlet air distributor duct to the face
of the case.
CHEVROLET CHASSIS SERVICE MANUAL
Page 91 of 659
HEATER AND AIR CONDITIONING 1A-68
Fig.
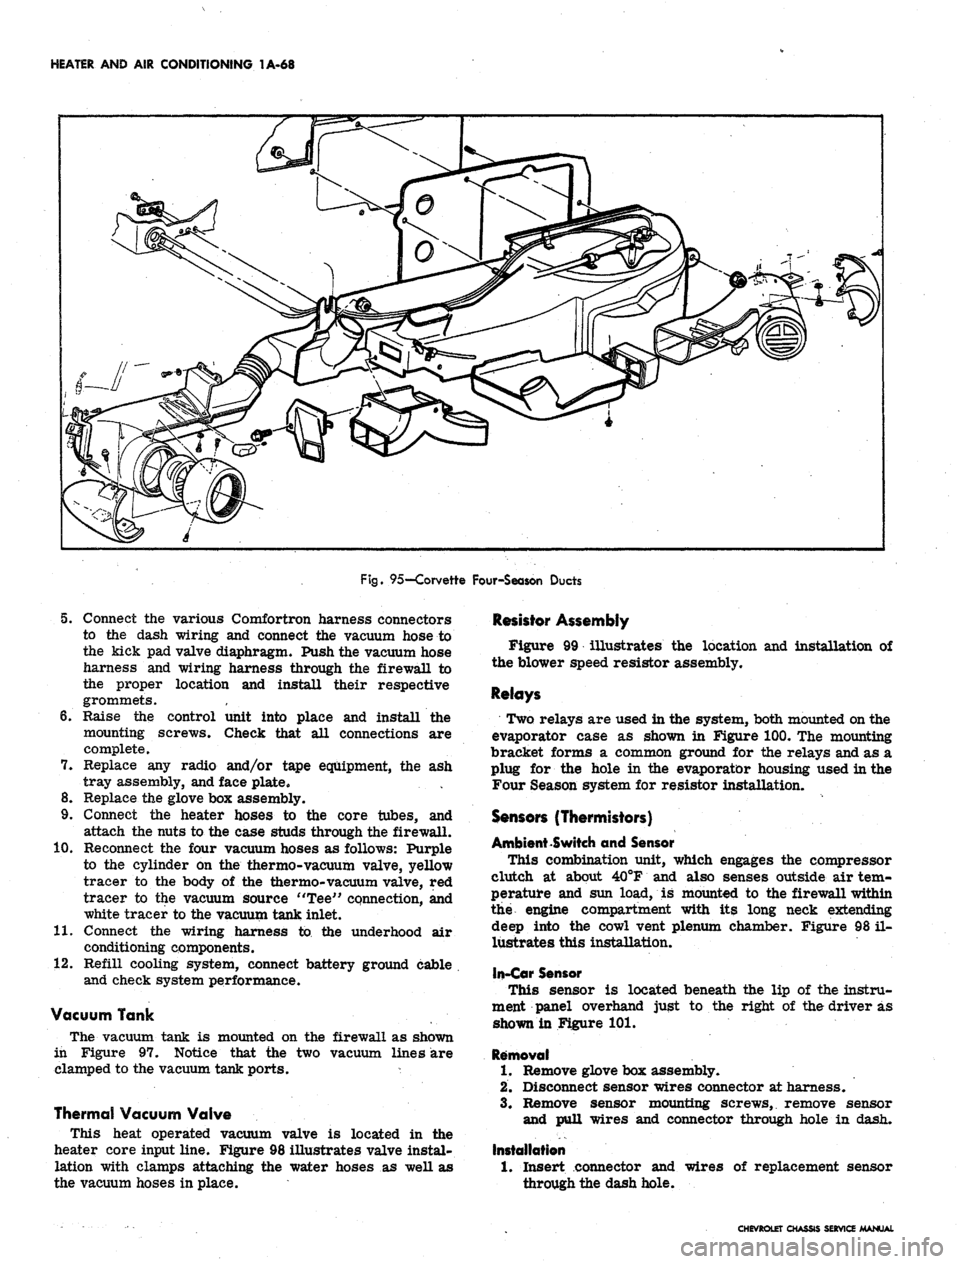
95—Corvette Four-Season Ducts
5. Connect the various Comfortron harness connectors
to the dash wiring and connect the vacuum hose to
the kick pad valve diaphragm. Push the vacuum hose
harness and wiring harness through the firewall to
the proper location and install their respective
grommets.
6. Raise the control unit into place and install the
mounting screws. Check that all connections are
complete.
7. Replace any radio and/or tape equipment, the ash
tray assembly, and face plate.
8. Replace the glove box assembly.
9. Connect the heater hoses to the core tubes, and
attach the nuts to the case studs through the firewall.
10.
Reconnect the four vacuum hoses as follows: Purple
to the cylinder on the thermo-vacuum valve, yellow
tracer to the body of the thermo-vacuum valve, red
tracer to the vacuum source "Tee" connection, and
white tracer to the vacuum tank inlet.
11.
Connect the wiring harness to the underhood air
conditioning components.
12.
Refill cooling system, connect battery ground cable
and check system performance.
Vacuum Tank
The vacuum tank is mounted on the firewall as shown
in Figure 97. Notice that the two vacuum lines are
clamped to the vacuum tank ports. *
Thermal Vacuum Valve
This heat operated vacuum valve is located in the
heater core input line. Figure 98 illustrates valve instal-
lation with clamps attaching the water hoses as well as
the vacuum hoses in place.
Resistor Assembly
Figure 99 illustrates the location and installation of
the blower speed resistor assembly.
Relays
Two relays are used in the system, both mounted on the
evaporator case as shown in Figure 100. The mounting
bracket forms a common ground for the relays and as a
plug for the hole in the evaporator housing used in the
Four Season system for resistor installation.
Sensors (Thermistors)
Ambient Switch and Sensor
This combination unit, which engages the compressor
clutch at about 40°F and also senses outside air tem-
perature and sun load, is mounted to the firewall within
the engine compartment with its long neck extending
deep into the cowl vent plenum chamber. Figure 98 il-
lustrates this installation,
In-Car Sensor
This sensor is located beneath the lip of the instru-
ment panel overhand just to the right of the driver as
shown in Figure 101.
Removal
1.
Remove glove box assembly.
2.
Disconnect sensor wires connector at harness.
3.
Remove sensor mounting screws, remove sensor
and pull wires and connector through hole in dash.
Installation
1.
Insert connector and
through the dash hole.
wires of replacement sensor
CHEVROLET CHASSIS SERVICE MANUAL
Page 96 of 659
HEATER AND AIR CONDITIONING 1A-73
Fig.
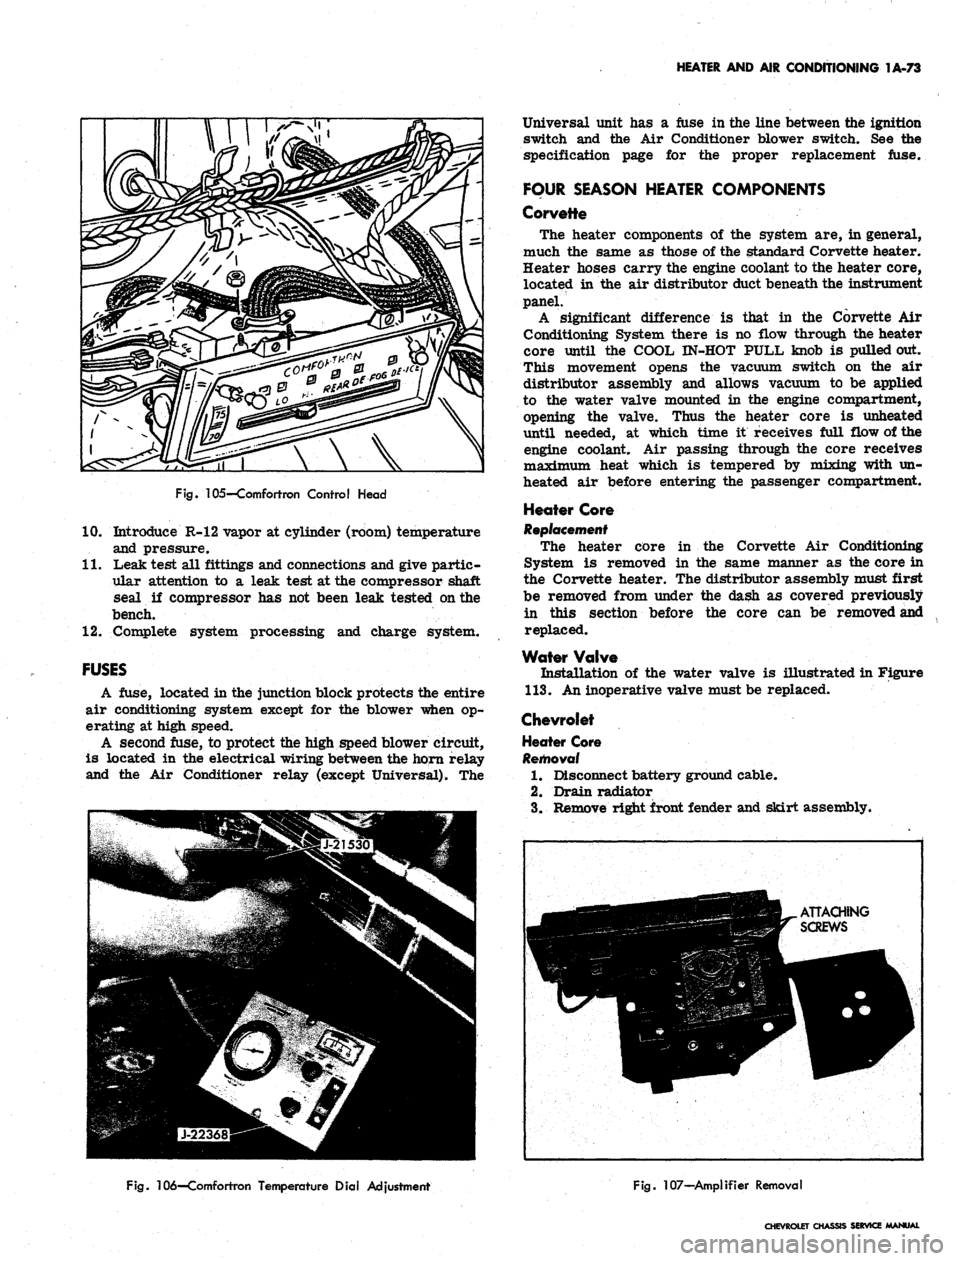
105—Comfortron Control Head
10.
Introduce R-12 vapor at cylinder (room) temperature
and pressure.
11.
Leak test all fittings and connections and give partic-
ular attention to a leak test at the compressor shaft
seal if compressor has not been leak tested on the
bench.
12.
Complete system processing and charge system.
FUSES
A fuse, located in the junction block protects the entire
air conditioning system except for the blower when op-
erating at high speed.
A second fuse, to protect the high speed blower circuit,
is located in the electrical wiring between the horn relay
and the Air Conditioner relay (except Universal). The
Universal unit has a fuse in the line between the ignition
switch and the Air Conditioner blower switch. See the
specification page for the proper replacement fuse.
FOUR SEASON HEATER COMPONENTS
Corvette
The heater components of the system are, in general,
much the same as those of the standard Corvette heater.
Heater hoses carry the engine coolant to the heater core,
located in the air distributor duct beneath the instrument
panel.
A significant difference is that in the Corvette Air
Conditioning System there is no flow through the heater
core until the COOL IN-HOT PULL knob is pulled out.
This movement opens the vacuum switch on the air
distributor assembly and allows vacuum to be applied
to the water valve mounted in the engine compartment,
opening the valve. Thus the heater core is unheated
until needed, at which time it receives full flow of the
engine coolant. Air passing through the core receives
maximum heat which is tempered by mixing with un-
heated air before entering the passenger compartment.
Heater Core
Replacement
The heater core in the Corvette Air Conditioning
System is removed in the same manner as the core in
the Corvette heater. The distributor assembly must first
be removed from under the dash as covered previously
in this section before the core can be removed and
replaced.
Water Valve
Installation of the water valve is illustrated in Figure
113.
An inoperative valve must be replaced.
Chevrolet
Heater Core
Removal
1.
Disconnect battery ground cable.
2.
Drain radiator
3.
Remove right front fender and skirt assembly.
Fig.
106—Comfortron Temperature Dial Adjustment
Fig.
107—Amplifier Removal
CHEVROLET CHASSIS SERVICE MANUAL