battery CHEVROLET CAMARO 1967 1.G Chassis Service Manual
[x] Cancel search | Manufacturer: CHEVROLET, Model Year: 1967, Model line: CAMARO, Model: CHEVROLET CAMARO 1967 1.GPages: 659, PDF Size: 114.24 MB
Page 282 of 659
ENGINE 6-17
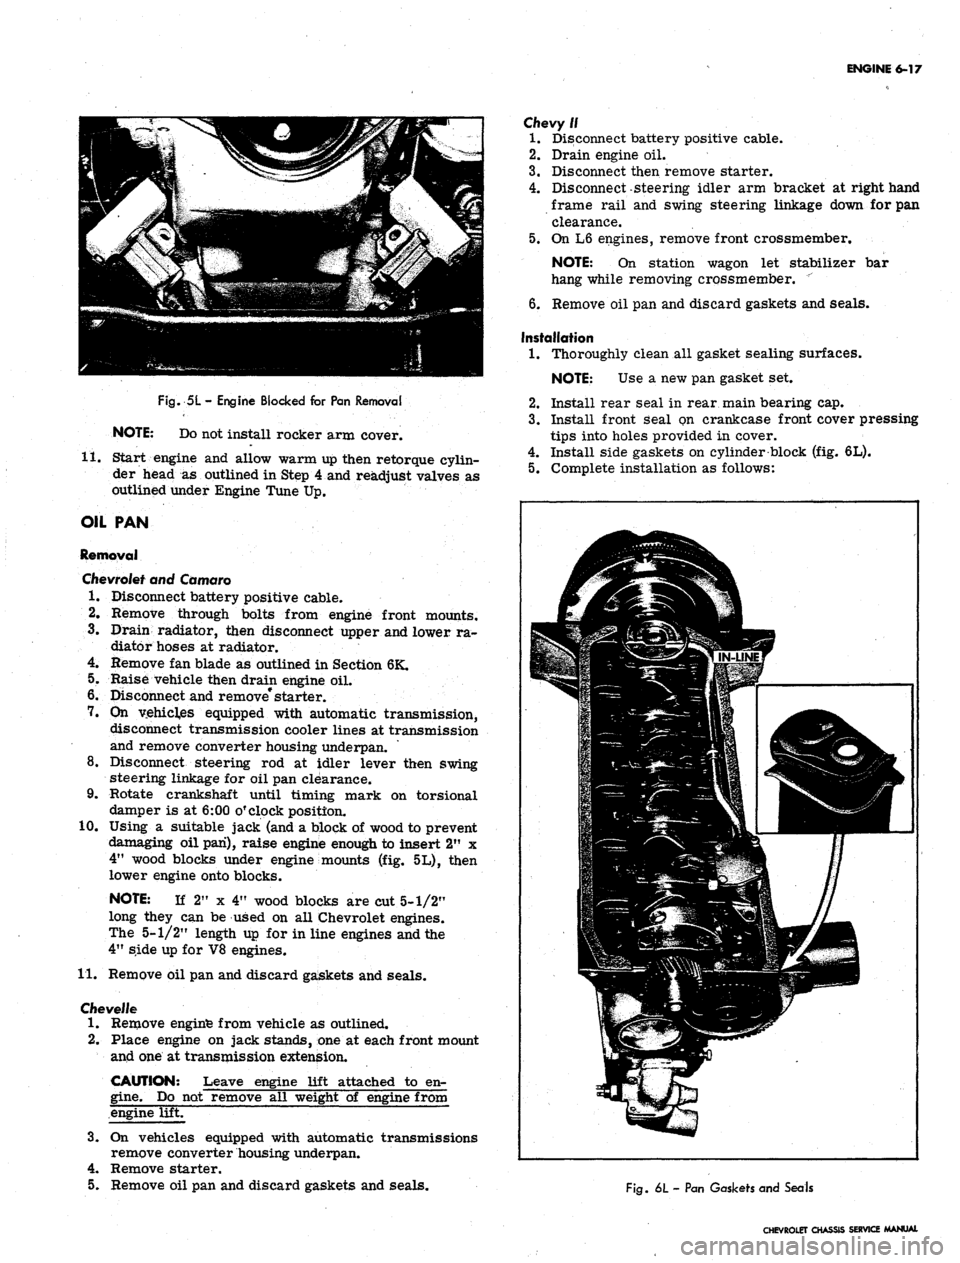
Fig.
5L
-
Engine Blocked for Pan Removal
NOTE: Do not install rocker arm cover.
11.
Start engine and allow warm up then retorque cylin-
der head
as
outlined in Step 4 and readjust valves as
outlined under Engine Tune Up.
OIL PAN
Removal
Chevrolet
and Camaro
1.
Disconnect battery positive cable.
2.
Remove through bolts from engine front mounts.
3.
Drain radiator, then disconnect upper and lower ra-
diator hoses at radiator.
4.
Remove fan blade as outlined in Section 6K.
5.
Raise vehicle then drain engine oil.
6. Disconnect and remove* starter.
7.
On
vehicles equipped with automatic transmission,
disconnect transmission cooler lines at transmission
and remove converter housing underpan.
8. Disconnect steering
rod at
idler lever then swing
steering linkage for oil pan clearance.
9. Rotate crankshaft until timing mark
on
torsional
damper is at 6:00 o'clock position.
10.
Using
a
suitable jack (and a block of wood to prevent
damaging oil pan), raise engine enough to insert 2"
x
4"
wood blocks under engine mounts (fig. 5L), then
lower engine onto blocks.
NOTE:
If
2"
x
4" wood blocks are cut 5-1/2"
long they can be used on all Chevrolet engines.
The 5-1/2" length up for in line engines and the
4"
side up for V8 engines.
11.
Remove oil pan and discard gaskets and seals.
Cfievel/e
1.
Remove enginfe from vehicle as outlined.
2.
Place engine on jack stands, one at each front mount
and one at transmission extension.
CAUTION: Leave engine lift attached
to
en-
gine.
Do not remove all weight
of
engine from
engine lift.
3.
On
vehicles equipped with automatic transmissions
remove converter housing underpan.
4.
Remove starter.
5.
Remove oil pan and discard gaskets and seals.
Chevy//
1.
Disconnect battery positive cable.
2.
Drain engine oil.
3.
Disconnect then remove starter.
4.
Disconnect-steering idler arm bracket at right hand
frame rail and swing steering linkage down for pan
clearance.
5.
On L6 engines, remove front crossmember.
NOTE:
On
station wagon
let
stabilizer
bar
hang while removing crossmember.
"
6. Remove oil pan and discard gaskets and seals.
Installation
1.
Thoroughly clean all gasket sealing surfaces.
NOTE: Use
a
new pan gasket set.
2.
Install rear seal in rear main bearing cap.
3.
Install front Seal on crankcase front cover pressing
tips into holes provided in cover.
4.
Install side gaskets on cylinder block (fig. 6L).
5.
Complete installation as follows:
Life
1
i
If ^
jfp^;.^3p
>\~^^ \s3^^r' -'••'•'-^^Hll
|^=-5p|:*iil^
mm
Fig.
6L
-
Pan Gaskets and Seals
CHEVROLET CHASSIS SERVICE MANUAL
Page 283 of 659
ENGINE 6-18
NOTE:
Bolts into crankcase cover should be
installed last. They are installed at an angle
and holes line up after rest of pan bolts are
snugged up.
Chevrolet and Camaro
a. If crankshaft was rotated while pan was off, place
timing mark at 6:00 o'clock position.
b.
Install oil pan and torque bolts to specifications.
c. Using a suitable jack (and a block of wood to prevent
damaging oil pan) raise engine enough to remove 2" x
4"
wood blocks, then lower engine.
d. On vehicles equipped with automatic transmission
install converter housing underpan, then connect
transmission cooler lines.
e. Install and connect starter.
f. Lower vehicle and install fan blades as outlined in
Section 6K.
g. Connect upper and lower radiator hoses.
h. Install through bolts in engine front mounts.
i. Connect battery positive cable.
j.
Fill radiator with coolant and fill engine with oil,
then start engine and check for leaks.
Chevelie
* a. Install oil pan and torque bolts to specifications.
b.
On vehicles equipped with automatic transmission,
install converter housing underpan.
c. Install starter.
d. Install engine as outlined.
Chevy II
a. Install oil pan and torque bolts to specifications.
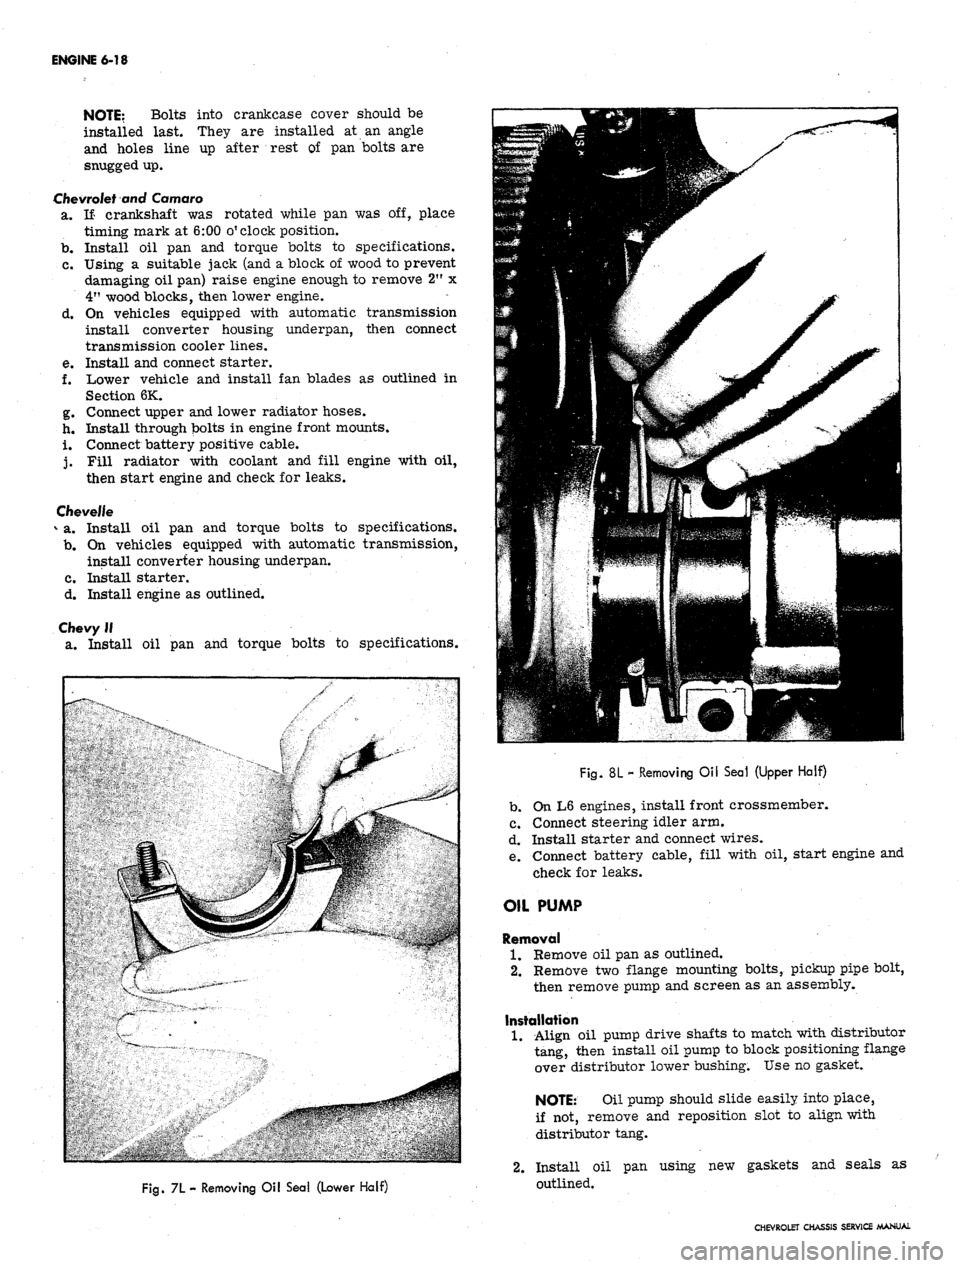
Fig.
7L- Removing Oil Sea! (Lower Half)
Fig.
8L - Removing Oil Seal (Upper Half)
b.
On L6 engines, install front crossmember.
c. Connect steering idler arm.
d. Install starter and connect wires.
e. Connect battery cable, fill with oil, start engine and
check for leaks.
OIL PUMP
Removal
1.
Remove oil pan as outlined.
2.
Remove two flange mounting bolts, pickup pipe bolt,
then remove pump and screen as an assembly.
Installation
1.
Align oil pump drive shafts to match with distributor
tang, then install oil pump to block positioning flange
over distributor lower bushing. Use no gasket.
NOTE:
Oil pump should slide easily into place,
if not, remove and reposition slot to align with
distributor tang.
2.
Install oil pan using new gaskets and seals as
outlined.
CHEVROLET CHASSIS SERVICE MANUAL
Page 290 of 659
ENGINE 6-25
refer to Section 6 of the Chassis Overhaul Manual.
Because of the interchangeability and similarity of
many engines, engine sub-assemblies and engine parts,
regardless of which passenger vehicle they are used in,
typical illustrations and procedures are used except
where specific illustrations or procedures are necessary
to clarify the operation. Although illustrations showing
bench operations are used, most single operations, when
not part of a general overhaul, should be performed (if
practical) with the engine in the vehicle.
COMPONENT REPLACEMENT AND ADJUSTMENT
ENGINE ASSEMBLY
Removal
• .1. Drain cooling system and engine oil.
2.
Remove air cleaner and disconnect battery cables at
battery.
3.
Remove hood as outlined in Section 11.
4.
Remove radiator and shroud as outlined in Sec-
tion 13.
5. Remove fan blade and pulley as outlined in Sec-
tion 6K.
6. Disconnect wires at:
• Starter solenoid
• Delcotron
• Temperature switch
• Oil pressure switch
• Coil
7. Disconnect:
• Accelerator linkage at pedal lever.
• Exhaust pipes at manifold flanges.
• Vacuum line to power brake unit at manifold (if
so equipped),
• Power steering pump lines at pump end (if so
equipped).
• Fuel line (from tank) at fuel pump.
• Engine cooler lines (if so equipped).
• Oil pressure gauge line (if so equipped).
8. Raise vehicle and place on jack stands.
9. Remove propeller shaft.
NOTE:
If plug for propeller shaft opening
in transmission is not available, drain
transmission.
10.
Disconnect:
• Shift linkage at transmission.
• Speedometer cable at transmission.
• Transmission cooler lines (if so equipped).
11.
On synchromesh equipped vehicles, disconnect clutch
linkage at cross-shaft then remove cross-shaft en-
gine bracket.
12.
Remove rocker arm covers as outlined, then attach
engine lifting adapter at the proper cylinder head bolt
locations.
13.
Remove front mount bolts.
14.
Attach lifting device and raise engine to take weight
off front mounts, then remove rear mount bolts.
15.
Raise engine to take weight off rear mount, then re-
move crossmember.
NOTE:
On Chevrolets it will be necessary to
remove mount from transmission before cross-
member can be removed.
16.
Remove engine-transmission assembly from vehicle
as a unit.
17.
Remove transmission (and clutch):
Synchromesh Transmission
a. Remove clutch housing cover plate screws.
b.
Remove bolts attaching the clutch housing to en-
gine block then remove transmission and clutch
housing as a unit.
NOTE:
Support the transmission as the last
mounting bolt is removed, and as it is being
pulled away from the engine (to prevent damage
to clutch disc).
c. Remove starter and clutch housing rear cover
plate.
d. Loosen clutch mounting bolts a turn at a time (to
prevent distortion of clutch cover) until the spring
pressure is released. Remove all bolts, clutch
disc and pressure plate assembly.
Automatic
Transmission
a. Lower engine, secured by the hoist, and support
engine on blocks.
b.
Remove starter and converter housing underpan.
c. Remove flywheel-to-converter attaching bolts.
d. Support transmission on blocks.
e. Remove transmission-to-engine mounting bolts.
f. With the hoist attached, remove blocks from the
engine only and slowly guide the engine from the
transmission.
18.
Mount engine in stand.
Installation
1.
Attach lifting device to engine and remove engine
from engine stand.
2.
Install transmission (and clutch):
Synchromesh Transmission
a. Install the clutch on flywheel as outlined in Sec-
tion 7.
b.
Install clutch housing rear cover and starter.
c. Install transmission and clutch housing as out-
lined in Section 7.
d. Install clutch housing cover screws and tighten
securely.
Automatic
Transmissions
a. Position engine adjacent to the transmission and
align the converter with the flywheel.
b.
Bolt transmission to engine, then raise engine and
transmission assembly and install flywheel to
converter attaching bolts.
c. Install converter housing underpan and starter.
3.
Tilt and lower engine and transmission assembly into
the chassis as a unit, guiding engine to align front
mounts with frame supports.
4.
Install front mount bolts and torque to specifications.
5. Raise engine enough to install rear crossmember,
then install crossmember, install rear mount, lower
engine and torque rear mount to specifications.
CHEVROLET CHASSIS SERVICE MANUAL
Page 291 of 659
ENGINE 6-26
6. Remove lifting device and lifting adapter then install
rocker arm covers as outlined.
7.
On synchromesh equipped vehicles, install clutch
cross-shaft engine bracket, then adjust and connect
clutch as outlined in Section 7.
8. Connect:
• Speedometer cable.
• Shift linkage at transmission.
• Transmission cooler lines (if so equipped).
9. Install propeller shaft.
10.
Remove jack stands and lower vehicle.
11.
Connect: \ '
Power steering pump lines (if so equipped).
Vacuum line to power brake unit (if so equipped).
Exhaust pipes at manifold flanges.
Accelerator linkage at pedal lever.
Fuel line at fuel pump.
Engine cooler lines (if so equipped).
Oil pressure gauge lines (if so equipped).
12.
Connect wires at:
Coil
Oil pressure switch
Temperature switch
Delcotron
Starter solenoid
13.
Install pulley, fan blade and fan belt as outlined in
Section 6K.
14.
Install radiator and shroud as outlined in Section 13.
15.
Install and adjust hood as outlined in Section 11.
16.
Connect battery cables.
17.
Fill with coolant, engine oil and transmission oil,
then start engine and check for leaks.
18.
Perform necessary adjustments and install air
cleaner.
INTAKE MANIFOLD
Removal
1.
Drain radiator and remove air cleaner.
2.
Disconnect:
Battery cables at battery.
Upper radiator and heater hose at manifold.
Accelerator linkage at pedal lever.
Fuel line at carburetor. ;
Wires at temperature sending switch and coil
(both sides).
Power brake hose at carburetor base.
Spark advance hose at distributor.
Crankcase ventilation hoses (as required).
3.
Remove distributor cap and mark rotor position with
chalk. Remove distributor clamp and distributor,
then position distributor cap rearward clear of
manifold.
4.
Remove coil.
5.
Remove manifold-to-head attaching bolts, then re^
move manifold, (with carburetor on) from engine and
discard gaskets and seals.
6. If manifold is to be replaced,,transfer:
Carburetor and carburetor mounting studs.
Temperature sending switch.
Water outlet and thermostat (use new gasket).
Heater hose adapter.
Choke coil.
Installation
1.
Clean gasket and seal surfaces of manifold, cylinder
heads and block.
2.
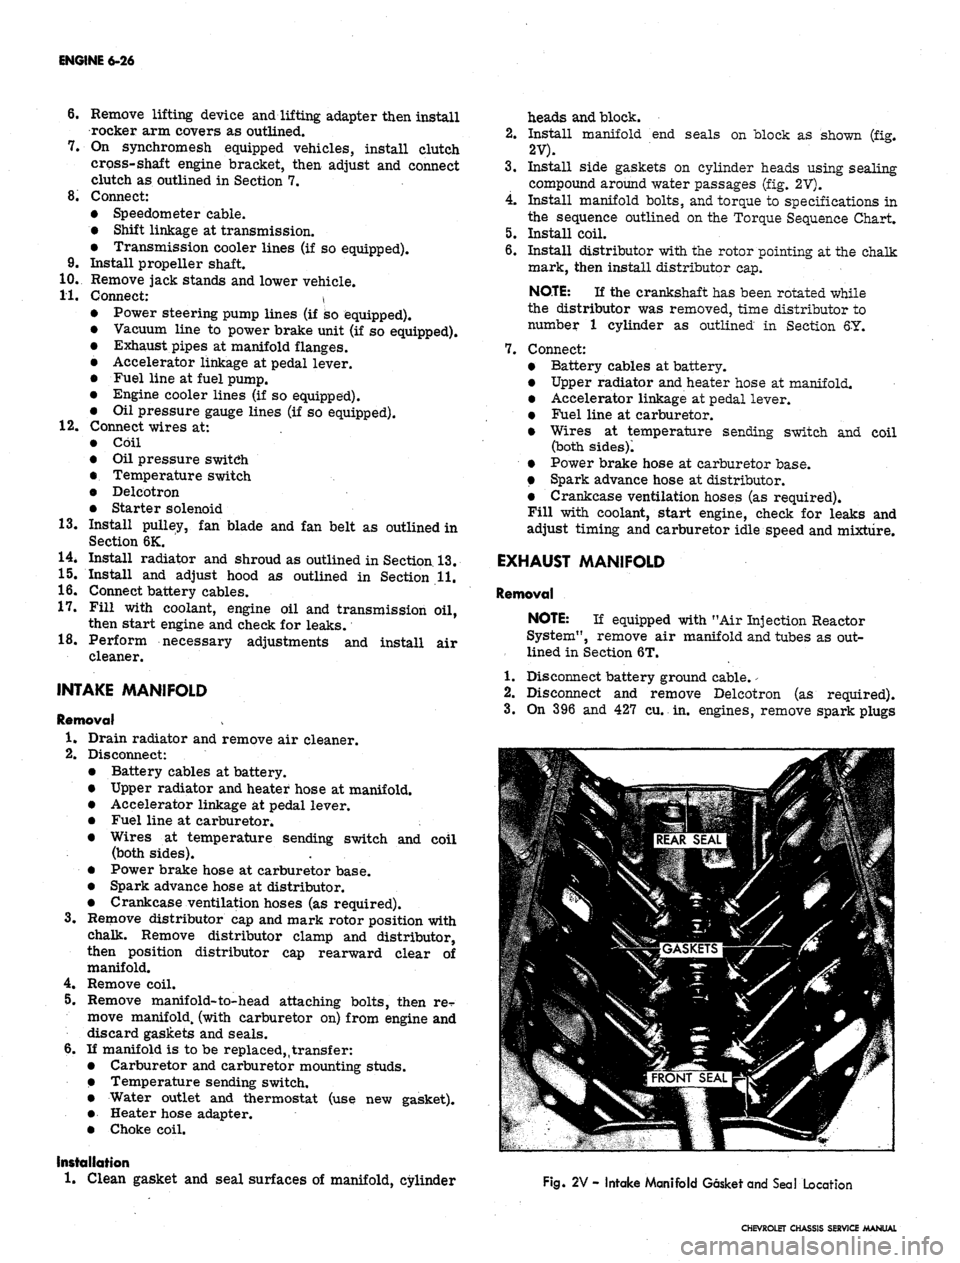
Install manifold end seals on block as shown (fig.
2V).
3.
Install side gaskets on cylinder heads using sealing
compound around water passages (fig. 2V).
4.
Install manifold bolts, and torque to specifications in
the sequence outlined on the Torque Sequence Chart.
5.
Install coil.
6. Install distributor with the rotor pointing at the chalk
mark, then install distributor cap.
NOTE:
If the crankshaft has been rotated while
the distributor was removed, time distributor to
number 1 cylinder as outlined in Section 6Y.
7.
Connect:
Battery cables at battery.
Upper radiator and heater hose at manifold.
Accelerator linkage at pedal lever.
Fuel line at carburetor.
Wires at temperature sending switch and coil
(both sides)!
Power brake hose at carburetor base.
Spark advance hose at distributor.
Crankcase ventilation hoses (as required).
Fill with coolant, start engine, check for leaks and
adjust timing and carburetor idle speed and mixture.
EXHAUST MANIFOLD
Removal
NOTE:
If equipped with "Air Injection Reactor
System", remove air manifold and tubes as out-
lined in Section 6T.
1.
Disconnect battery ground cable.
-
2.
Disconnect and remove Delcotron (as required).
3.
On 396 and 427 cu. in. engines, remove spark plugs
Fig. 2V - Intake Manifold Gasket and Seal Location
CHEVROLET CHASSIS SERVICE MANUAL
Page 292 of 659
ENGINE 6-27
and spark plug shields.
4.
Remove exhaust manifold flange nuts, then lower ex-
haust pipe assembly (hang exhaust pipe from frame
with wire).
5.
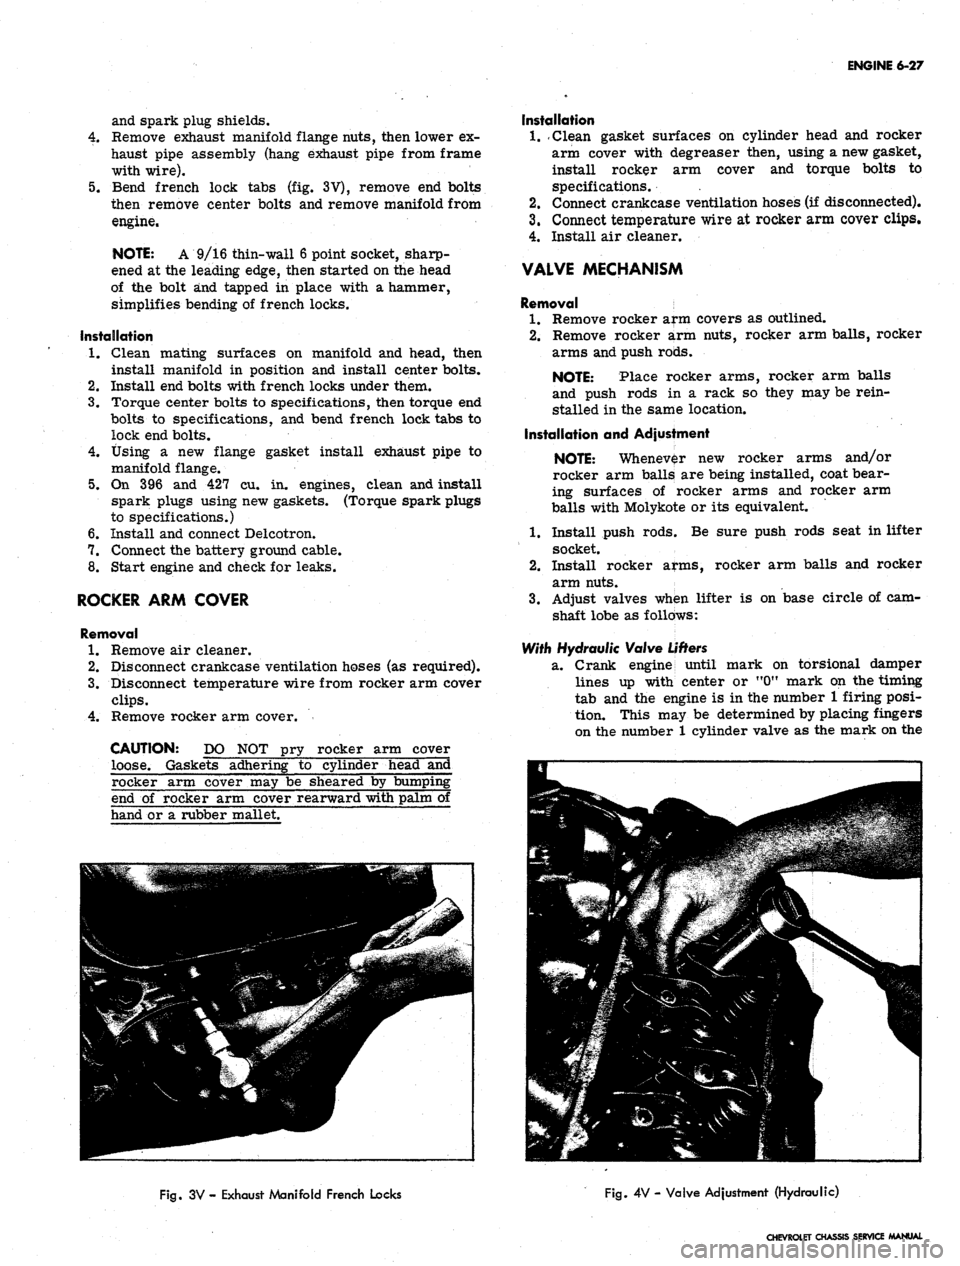
Bend french lock tabs (fig. 3V), remove end bolts
then remove center bolts and remove manifold from
engine.
NOTE: A 9/16 thin-wall 6 point socket, sharp-
ened at the leading edge, then started on the head
of the bolt and tapped in place with a hammer,
simplifies bending of french locks.
Installation
1.
Clean mating surfaces on manifold and head, then
install manifold in position and install center bolts.
2.
Install end bolts with french locks under them.
3.
Torque center bolts to specifications, then torque end
bolts to specifications, and bend french lock tabs to
lock end bolts.
4.
Using a new flange gasket install exhaust pipe to
manifold flange.
5.
On 396 and 427 cu. in. engines, clean and install
spark plugs using new gaskets. (Torque spark plugs
to specifications.)
6. Install and connect Delcotron.
7.
Connect the battery ground cable.
8. Start engine and check for leaks.
ROCKER ARM COVER
Removal
1.
Remove air cleaner.
2.
Disconnect crankcase ventilation hoses (as required).
3.
Disconnect temperature wire from rocker arm cover
clips.
4.
Remove rocker arm cover.
CAUTION: DO NOT pry rocker arm cover
loose. Gaskets adhering to cylinder head and
Installation
1.
.Clean gasket surfaces on cylinder head and rocker
arm cover with degreaser then, using a new gasket,
install rocker arm cover and torque bolts to
specifications. .
2.
Connect crankcase ventilation hoses (if disconnected).
3.
Connect temperature wire at rocker arm cover clips.
4.
Install air cleaner.
VALVE MECHANISM
Removal
1.
Remove rocker arm covers as outlined.
2.
Remove rocker arm nuts, rocker arm balls, rocker
arms and push rods.
NOTE: Place rocker arms, rocker arm balls
and push rods in a rack so they may be rein-
stalled in the same location.
Installation and Adjustment
NOTE: Whenever new rocker arms and/or
rocker arm balls are being installed, coat bear-
ing surfaces of rocker arms and rocker arm
balls with Molykote or its equivalent.
1.
Install push rods; Be sure push rods seat in lifter
socket.
2.
Install rocker arms, rocker arm balls and rocker
arm nuts.
3.
Adjust valves when lifter is on base circle of cam-
shaft lobe as follows:
With Hydraulic Valve
Lifters
2L.
Crank engine until
mark on torsional damper
lines up with center or "0M mark on the timing
tab and the engine is in the number 1 firing posi-
tion. This may be determined by placing fingers
on the number 1 cylinder valve as the mark on the
rocker arm cover may be sheared by bumpii
end of rocker arm cover rearward with palm
hand or a rubber mallet.
Fig.
3V - Exhaust Manifold French Locks
Fig.
4V - Valve Adjustment (Hydraulic)
CHEVROLET CHASSIS SERVICE MANUAL
Page 295 of 659
ENGINE 6-30
c". Install the valve locks and release the compres-
sor tool making sure the locks seat properly in
the upper groove of the valve stem.
NOTE: Grease may be used to hold the locks
in place while releasing the compressor tool.
396 and 427
cu.
in.
Engines
a. Install new valve stem oil seal (coated with oil)
in position over valve guide.
b.
Set the valve spring and damper and valve cap in
place.
c. Compress the spring with Tool J-5892 and install
the valve locks, then release the compressor tool,
making sure the locks seat properly in the groove
of the valve stem.
NOTE: Grease may be used to hold the locks
in place while releasing the compressor tool.
7.
Install spark ,plug, using a new gasket, and torque to
specifications. -
8. Install and adjust valve mechanism as outlined.
CYLINDER HEAD ASSEMBLY
Removal
1.
Remove intake manifold as outlined.
2.
Remove exhaust manifolds as outlined.
3.
Remove valve mechanism as outlined.
4.
Drain cooling system (block).
5.
Remove cylinder head bolts, cylinder head and gas-
ket. Place cylinder head on two blocks of wood to
prevent damage.
Installation
CAUTION: The gasket surfaces on both the
head and the block must be clean of any foreign
ttter and free of nicks or heavy scratches.
Under bolt threads in the block and threads on
Pie cylinder head bolt must be cleaned. (Dirt
will affect bolt torqueT)
1.
On engines using a STEEL gasket, coat both sides of
a new gasket with a good sealer, spread the sealer
thin and even. One method of applying the sealer that
will assure the proper- coat is with the use of a paint
roller. Too much sealer may hold the beads of the
gasket away from the head or block.
CAUTION: Use no sealer on engines using a
composition STEEL ASBESTOS gasket.
2.
Place the gasket in position over the dowel pins with
the bead up.
3.
Carefully guide cylinder head into place over dowel
pins and gasket.
4.
Coat threads of cylinder head bolts with sealing
compound and install finger tight.
5.
Tighten cylinder head bolts a little at a time in the
sequence shown on the torque sequence chart until
the specified torque is reached.
6. Install the exhaust manifold as outlined.
7.
Install the intake manifold as outlined.
8. Install and adjust the valve mechanism as outlined.
OIL
PAN
Removal
Chevrolet
and Camaro
1.
Disconnect battery positive cable.
2.
Disconnect distributor cap from distributor (to pr-e-
vent breaking distributor cap when engine is raised).
3.
Drain radiator, then disconnect lower radiator hose
at water pump and remove oil dip stick and tube
(where necessary). '
4.
Remove fan blade.
5.
Raise vehicle then drain engine oil;
6. Remove through bolts from engine front mounts.
Disconnect and remove starter.
7.
On vehicles equipped with automatic transmissions,
remove converter housing underpan.
8. Disconnect steering rod at idler lever then swing
steering linkage 4pwn for oil pan clearance.
9. Rotate crankshaft untii timing mark on torsional
damper is at 6:00 o'clock position.
10.
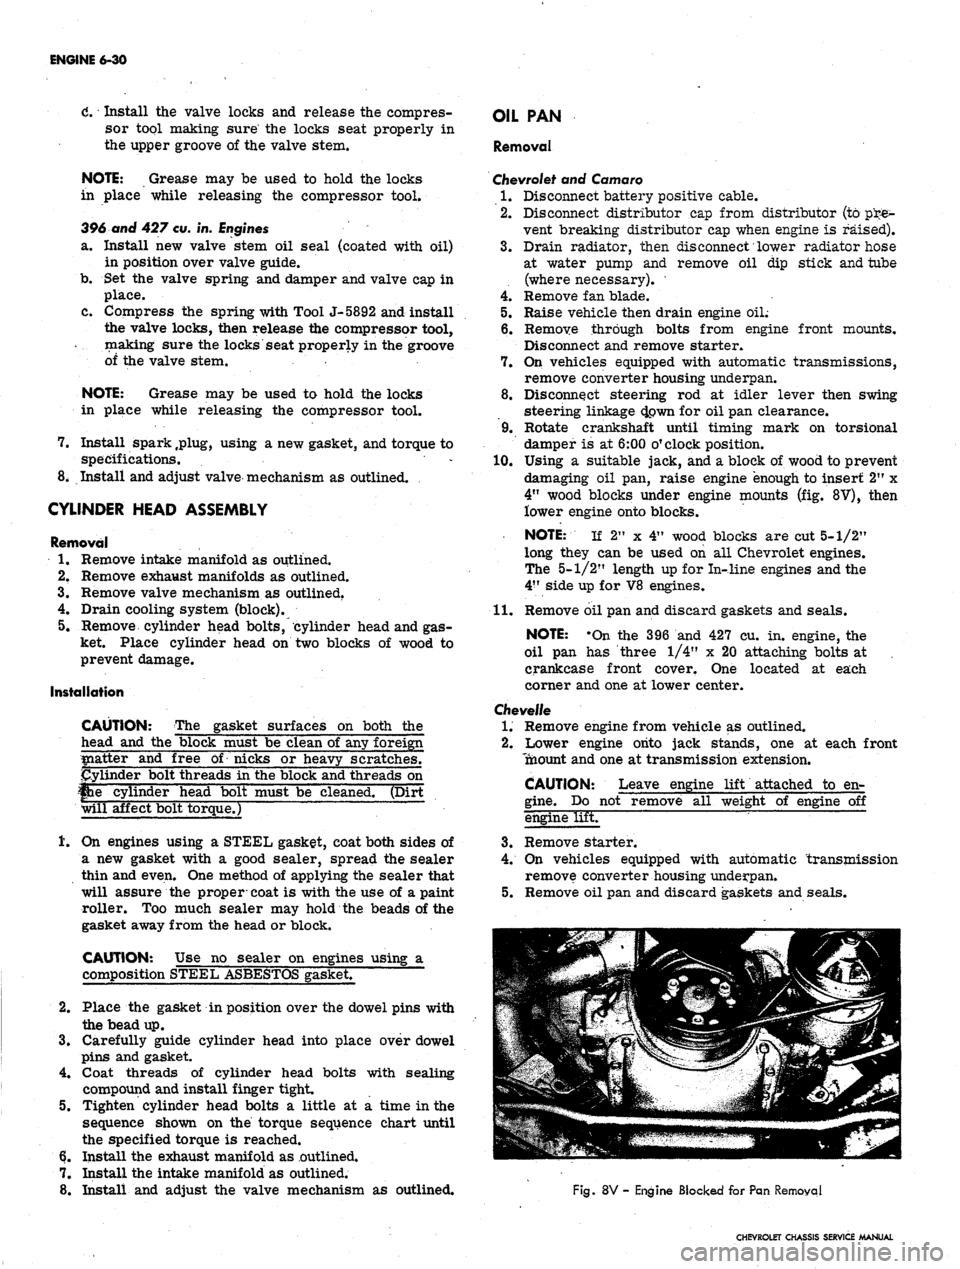
Using a suitable jack, and a block of wood to prevent
damaging oil pan, raise engine "enough to insert 2" x
4"
wood blocks under engine mounts (fig. 8V), then
lower engine onto blocks.
NOTE: If 2" x 4" wood blocks are cut 5-1/2"
long they can be used on all Chevrolet engines.
The 5-1/2" length up for In-line engines and the
4"
side up for V8 engines.
11.
Remove oil pan and discard gaskets and seals.
NOTE: -On the 396 and 427 cu. in. engine, the
oil pan has three 1/4" x 20 attaching bolts at ,
crankcase front cover. One located at each
corner and one at lower center.
Chevelle
1.
Remove engine from vehicle as outlined.
2.
Lower engine onto jack stands, one at each front
Tnaount and one at transmission extension.
CAUTION: Leave engine lift attached to en-
gine.
Do not remove all weight of engine off
engine lifET
3.
Remove starter.
4.
On vehicles equipped with automatic transmission
remove converter housing underpan.
5.
Remove oil pan and discard gaskets and seals.
Fig.
8V - Engine Blocked for Pan Removal
CHEVROLET CHASSIS SERVICE MANUAL
Page 296 of 659
ENGINE 6-31
Chevy II
1.
Disconnect battery positive cable.
2.
Drain engine oil.
3.
Disconnect and remove starter.
4 Disconnect steering idler arm bracket at right hand
frame rail and swing steering linkage down for pan
clearance.
5.
Disconnect* exhaust pipes at manifolds and allow
pipes to hang free.
6. Remove oil pan and discard gaskets and seals.
Corvette
1.
Disconnect battery positive cable then remove oil
dipstick and tube.
2.
Raise and support vehicle then drain engine oil.
3.
Remove starter and flywheel underpan.
4.
Disconnect steering linkage idler at frame and lower
the linkage.
5.
Remove oil pan and discard gaskets and seals.
6. On Hi-Performance engines, the oil baffle must
be removed before additional operations can be
performed.
NOTE: On the 427 cu. in. engine, the oil pan
has three 1/4" x 20 attaching bolts at crankcase
front cqver. One located at each corner and one
at lower center.
Installation
1.
Thoroughly clean all gasket sealing surfaces.
NOTE: Use a new pan. gasket set.
2.
Install side gaskets on pan rails, using.gasket sealer
as a retainer.
3.
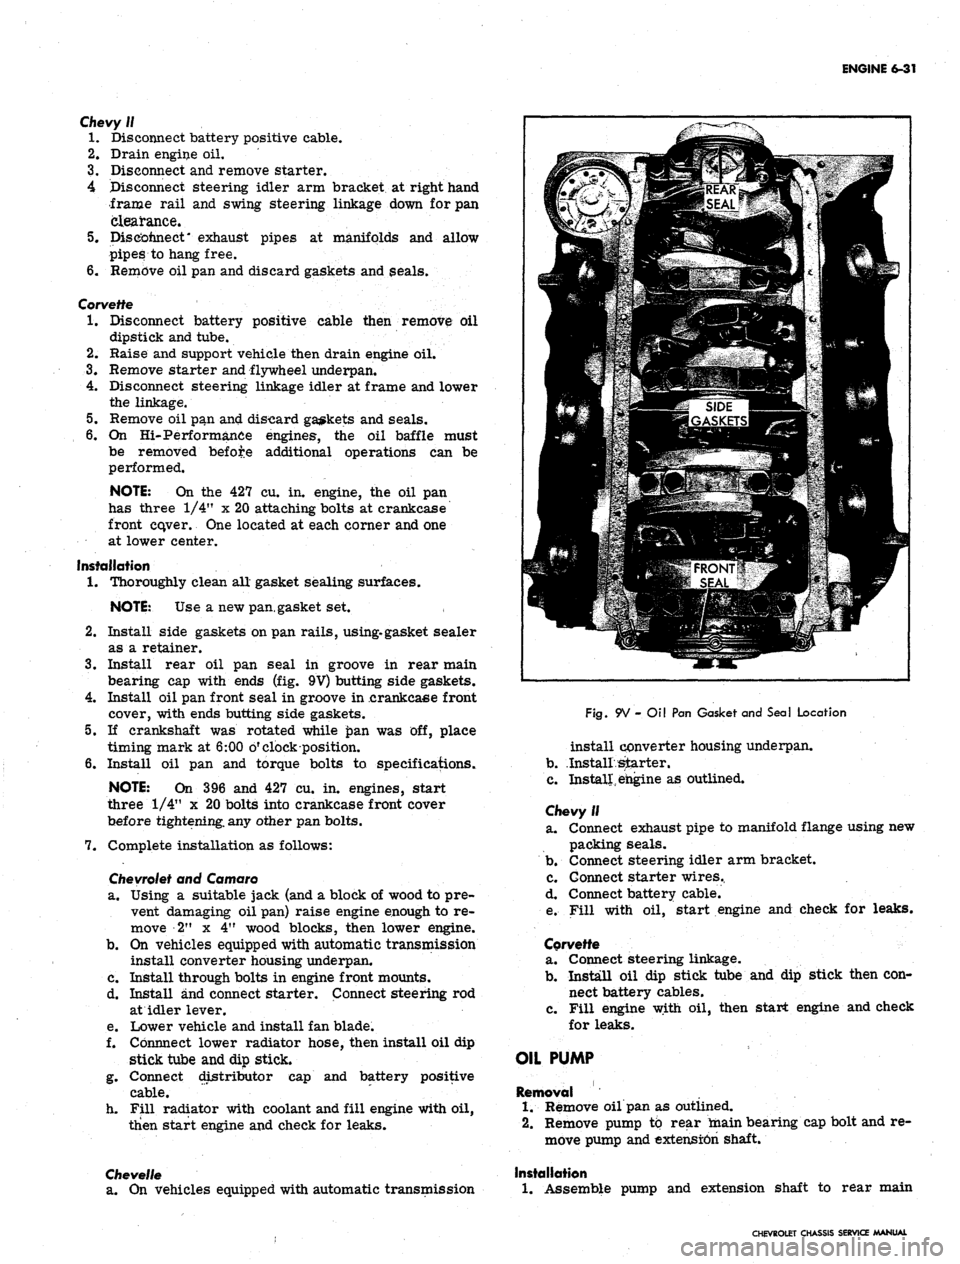
Install rear oil pan seal in groove in rear main
bearing cap with ends (fig. 9V) butting side gaskets.
4.
Install oil pan front seal in groove in .crankcaee front
cover, with ends butting side gaskets.
5.
If crankshaft was rotated while £>an was off, place
timing mark at 6:00 o'clock position.
6. Install oil pan and torque bolts to specifications.
NOTE: On 396 and 427 cu. in. engines, start
three 1/4" x 20 bolts into crankcase front cover
before tightening, any other pan bolts.
7.
Complete installation as follows:
Chevrolet
and Camaro
a. Using a suitable jack (and a block of wood to pre-
vent damaging oil pan) raise engine enough to re-
move 2" x 4" wood blocks, then lower engine.
b.
On vehicles equipped with automatic transmission
install converter housing underpan.
c. Install through bolts in engine front mounts.
d. Install and connect starter. Connect steering rod
at idler lever.
e. Lower vehicle and install fan blade.
f. Cbnnnect lower radiator hose, then install oil dip
stick tube and dip stick.
g. Connect distributor cap and battery positive
cable.
h. Fill radiator with coolant and fill engine with oil,
then start engine and check for leaks.
Chevelle
a. On vehicles equipped with automatic transmission
Fig.
9V - Oil Pan Gasket and Seal Location
install converter housing underpan.
b.
.Install starter.
c. Install, engine as outlined.
Chevy II
a. Connect exhaust pipe to manifold flange using new
packing seals.
b.
Connect steering idler arm bracket.
c. Connect starter wires..
d. Connect battery cable.
e. Fill with oil, start engine and check for leaks.
Corvette
a. Connect steering linkage.
b.
Install oil dip stick tube and dip stick then con-
nect battery cables.
c. Fill engine with oil, then start engine and check
for leaks.
OIL PUMP
Removal
1.
Remove oil pan as outlined.
2.
Remove pump to rear main bearing cap bolt and re-
move pump and extension shaft.
Installation
1.
Assemble pump and extension shaft to rear main
CHEVROLET CHASSIS SERVICE MANUAL
Page 313 of 659
ENGINE FUEL 6M-5
3.
Disconnect choke rod or choke cable.
4.
Disconnect accelerator linkage.
5.
If equipped with Automatic transmission, discon-
nect TV linkage.
6. Remove carburetor attaching nuts and/or bolts and
remove carburetor.
Test Before Installation -
It is good shop practice to fill the carburetor bowl
before installing the carburetor. This reduces the strain
on the starting motor and battery and reduces the pos-
sibility of backfiring while attempting to start the engine.
A fuel pump clamped to the bench, a small supply of fuel
and the necessary fittings enable the carburetor to be
filled1 and the operation of the float and'intake needle and
seat to be checked. Operate the throttle several times
and check the discharge from the pump jets before in-
stalling the carburetor.
Installation
1.
Be certain throttle body and intake manifold sealing
surfaces are clean.
2.
Install new carburetor to manifold flange gasket (if
required).
3.
Install carburetor over manifold studs.
4.
Start vacuum and fuel lines at carburetor.
5.
Install attaching nuts and/or bolts and tighten
securely.
6. Tighten fuel and vacuum lines.
7.
Connect and adjust accelerator and TV linkage.
8. Connect choke tube or choke rod.
9. Adjust idle speed and mixture, then install air
cleaner. #
Fuel Filter Maintenance
1.
Disconnect fuel line connection at inlet fuel filter
nut.
2.
Remove inlet fuel filter nut from carburetor with a
1"
box wrench or socket.
3.
Remove filter element and spring (fig. 4c).
Fig. 5C-Choke Coil-L6 Engine
4.
Fig. 4C-Fuel Filter
Check element for restriction by blowing on cone
end, element should allow air to pass freely.
5.
Clean element by washing in solvent and blowing out.
Blow in opposite direction of fuel flow.
NOTE: Element should be replaced if plugged
or if flooding ocpurs. A plugged filter will
result in a loss of engine power or rough (pul-
sating) engine feel, especially at high engine
speeds.
6. Install element spring, then install element in car-
buretor so small section of cone faces out.
7.
Install new gasket on inlet fitting nut then install
nut in carburetor and tighten securely.
8. Install fuel line and tighten connector.
Choke Coil Replacement
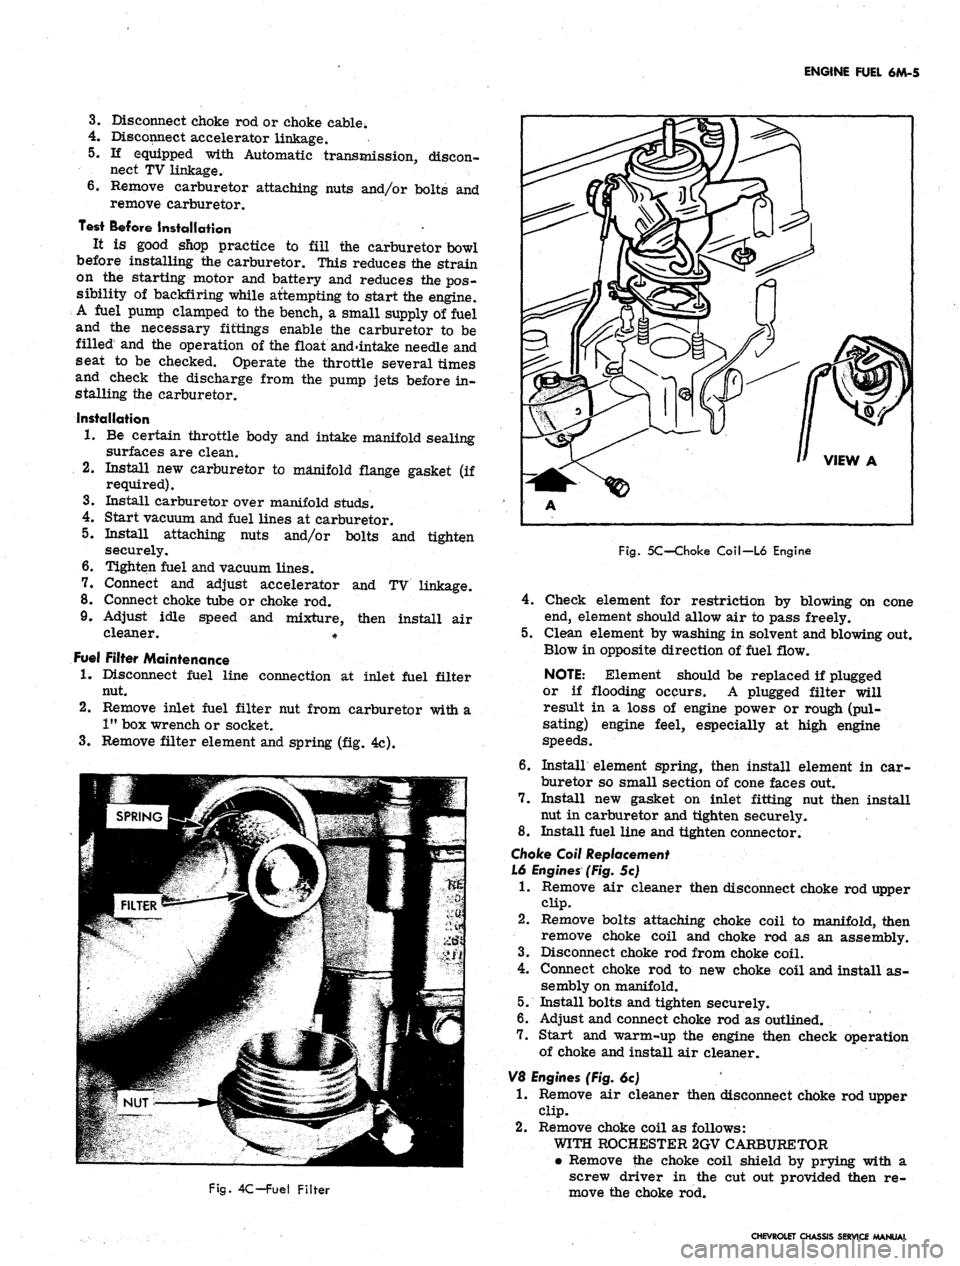
L6 Engines (Fig. 5c)
1.
Remove air cleaner then disconnect choke rod upper
clip.
2.
Remove bolts attaching choke coil to manifold, then
remove choke coil and choke rod as an assembly.
3.
Disconnect choke rod from choke coil.
4.
Connect choke rod to new choke coil and install as-
sembly on manifold.
5.
Install bolts and tighten securely.
6. Adjust and connect choke rod as outlined.
7.
Start and warm-up the engine then check operation
of choke and install air cleaner.
V8 Engines (Fig. 6c)
1.
Remove air cleaner then disconnect choke rod upper
clip.
2.
Remove choke coil as follows:
WITH ROCHESTER 2GV CARBURETOR
• Remove the choke coil shield by prying with a
screw driver in the cut out provided then re-
move the choke rod.
CHEVROLET CHASSIS SERVICE MANUAL
Page 326 of 659

SECTION 6Y
ENGINE ELECTRICAL
CONTENTS
OF
THIS SECTION
Page
System
6Y-19
6Y-32
6Y-34
BATTERY
INDEX
Page
General Description 6Y_i
Types of Batteries 6Y-1
Dry Charged Batteries 6Y-2
Activating Dry Charged Batteries 6Y-2
Wet Charged Batteries 6Y 2
Periodic Service 6Y-3
Common Causes of Failure 6Y-3
Delco Eye 6Y_3
Electrolyte Level
AY
3
Water Usage ] \ 6Y_3
Cleaning 6Y_4
Cables 6Y_4
Carrier and Holddown 6Y-4
Page
Safety Precautions 6Y-4
Charging Procedures . . gY_4
Slow Charging gY-4
Fast Charging . * 6Y-4
Emergency Boost Charging 6Y-4
Test Procedures QY-S
Visual Inspection 6Y-5
Instrument 6Y-5
Full Charge Hydrometer Test. 6Y-5
Specific Gravity Readings 6Y-5
Cell Comparison Test . 6Y-5
Installing Battery 6Y-5
GENERAL DESCRIPTION
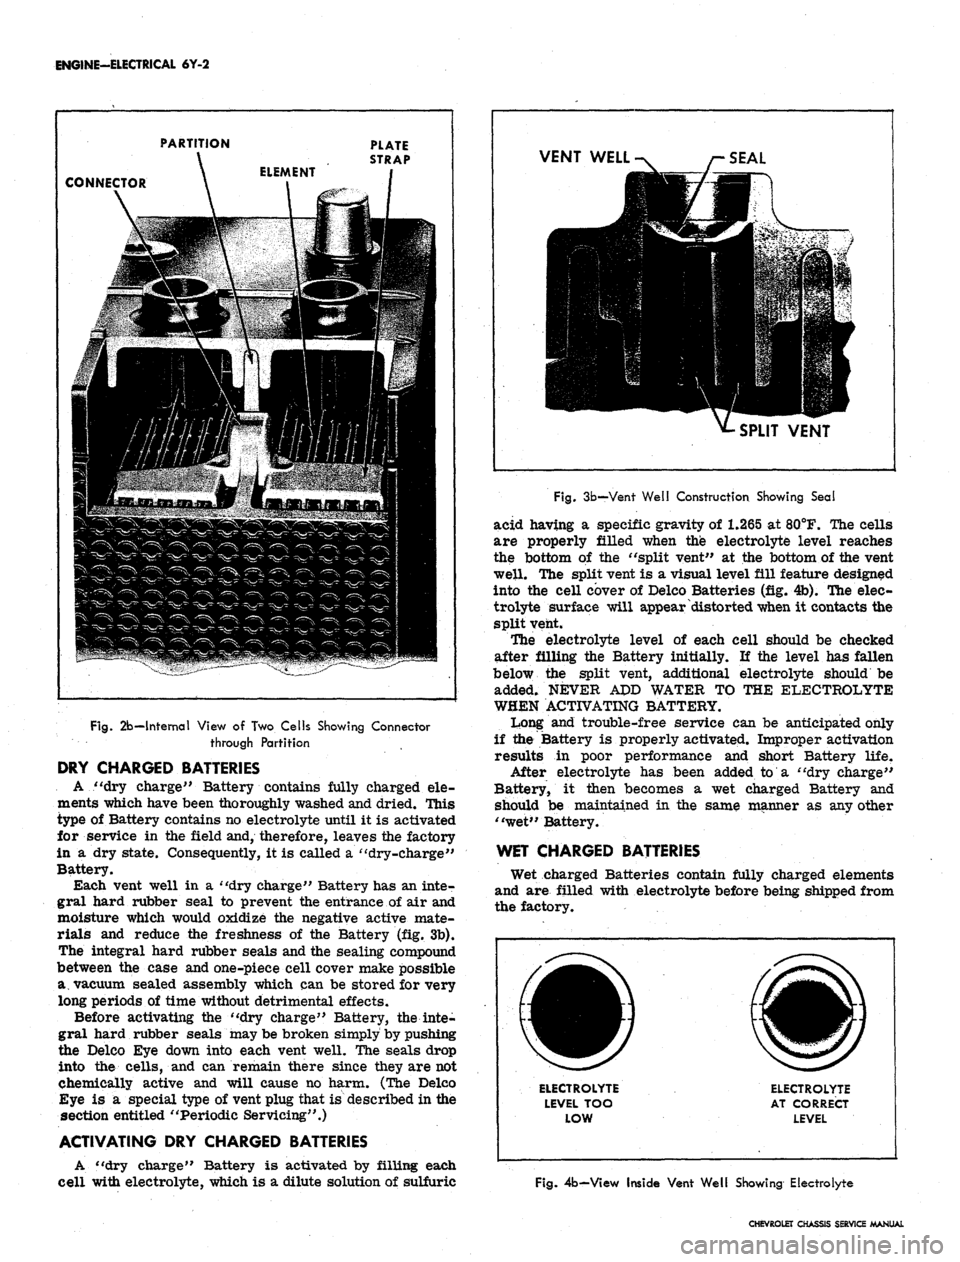
The battery (fig. lb) is made up of a number of separ-
ate elements, each located in an individual cell in a hard
rubber case. Each element consists of an assembly of
positive plates and negative plates containing dissimilar
active materials and kept apart by separators. Hie ele-
ments are immersed in an electrolyte composed of dilute
sulfuric acid. Plate straps located on the top of each ele-
ment connect all the positive plates and all the negative
plates into groups. The elements are connected in series
electrically by connectors that pass directly through the
case partitions between cells. The battery top is a one-
piece cover of hard rubber construction. Tfte cell con-
nectors, by-passing through the cell partitions, connect
the elements along the shortest practical path (fig. 2b).
With the length of the electrical circuit inside the
Battery reduced to a minimum, the internal voltage drop
is decreased resulting in improved performance, par-
ticularly during engine cranking at low temperatures.
The hard, smooth one-piece cover greatly reduces the
tendency for corrosion to form on the top of the Battery.
The cover is bonded to the case with sealing compound
that forms an air tight seal between the cover and case.
Protection for the Battery charging circuit (10 gage
wire) is provided by a pigtail lead which is a fusible Hnk
off the battery positive cable (14 gage wire). This lead is
an integral part of the Battery cable assembly and serv-
icing requires replacing the complete cable assembly.
TYPES
OF
BATTERIES
There are two types of Batteries—the "dry charge"
type and the "wet charge" type. The difference in types
depends on the method of manufacture.
ONE PIECE
CELL COVER
VENT PLUG
ELECTROLYTE LEVEL
INDICATOR
HOLD-DOWN SLOT
Fig.
lb—Battery
CHEVROLET CHASSIS SERVICE MANUAL
Page 327 of 659
ENGINE-ELECTRICAL 6Y-2
PARTITION
PLATE
STRAP
CONNECTOR
Fig.
2b—Internal View of Two Cells Showing Connector
through Partition
DRY CHARGED BATTERIES
A "dry charge" Battery contains fully charged ele-
ments which have been thoroughly washed and dried. Hiis
type of Battery contains no electrolyte until it is activated
for service in the field and, therefore, leaves the factory
in a dry state. Consequently, it is called a "dry-charge"
Battery.
Each vent well in a "dry charge" Battery has an inte-
gral hard rubber seal to prevent the entrance of air and
moisture which would oxidize the negative active mate-
rials and reduce the freshness of the Battery (fig. 3b).
The integral hard rubber seals and the sealing compound
between the case and one-piece cell cover make possible
a. vacuum sealed assembly which can be stored for very
long periods of time without detrimental effects.
Before activating the "dry charge" Battery, the inte-
gral hard rubber seals may be broken simply by pushing
the Delco Eye down into each vent well. The seals drop
into the cells, and can remain there since they are not
chemically active and will cause no harm. (The Delco
Eye is a special type of vent plug that is described in the
section entitled "Periodic Servicing".)
ACTIVATING DRY CHARGED BATTERIES
A "dry charge" Battery is activated by filling each
cell with electrolyte, which is a dilute solution of sulfuric
VENT WELL
SEAL
SPLIT VENT
Fig. 3b—Vent Well Construction Showing Seal
acid having a specific gravity of 1.265 at 80°F. The cells
are properly filled when the electrolyte level reaches
the bottom of the "split vent" at the bottom of the vent
well. The split vent is a visual level fill feature designed
into the cell cover of Delco Batteries (fig. 4b). The elec-
trolyte surface will appear distorted when it contacts the
split vent.
The electrolyte level of each cell should be checked
after filling the Battery initially. If the level has fallen
below the split vent, additional electrolyte should be
added. NEVER APD WATER TO THE ELECTROLYTE
WHEN ACTIVATING BATTERY.
Ir?ong and trouble-free service can be anticipated only
if the Battery is properly activated. Improper activation
results in poor performance and short Battery life.
After electrolyte has been added to a "dry charge"
Battery, it then becomes a wet charged Battery and
should be maintained in the same manner as any other
"wet" Battery.
WET CHARGED BATTERIES
Wet charged Batteries contain fully charged elements
and are filled with electrolyte before being shipped from
the factory.
ELECTROLYTE
LEVEL TOO
LOW
ELECTROLYTE
AT CORRECT
LEVEL
Fig. 4b-View Inside Vent Well Showing Electrolyte
CHEVROLET CHASSIS SERVICE MANUAL