clock setting CHEVROLET CAMARO 1967 1.G Chassis User Guide
[x] Cancel search | Manufacturer: CHEVROLET, Model Year: 1967, Model line: CAMARO, Model: CHEVROLET CAMARO 1967 1.GPages: 659, PDF Size: 114.24 MB
Page 531 of 659

ELECTRICAL-BODY AND CHASSIS 12-19
VIEW A
•CONTACT SUPPORT
DRIVE SLOT IN LINE
WITH HOLE IN SWITCH
PAWL
CONTACT POINT B
CONTACT SUPPORT
DRIVE SLOT IN LINE
WITH HOLE IN SWITCH
FLOOR SHIFT
(EXCEPT CAMARO)
COLUMN SH
Fig.
31 - Neutral Safety Switches
PARKING BRAKE ALARM SWITCH REPLACEMENT
Corvette (Fig. 33)
1.
Remove seat belt retainer and parking brake cover
assembly from center console.
2.
Disconnect wire from brake alarm switch.
3.
Remove retaining screw and switch from
reinforcement.
4.
Position new switch to reinforcement and install re-
taining screw.
5. Connect switch wire and check operation of switch.
6. Install cover and seat belt retainer assembly.
Chevrolet, Chevelle, Chevy II and Camaro (Fig. 34)
1.
Disconnect wiring connector at switch terminal.
2.
Remove nut and lock washer or retaining bolt and
disengage switch from brace.
3.
To install, reverse removal procedure.
INSTRUMENT PANEL COMPARTMENT
LAMP/SWITCH REPLACEMENT
1.
Disconnect battery ground cable.
2.
Reach into glove box, depress bulb in end of switch
and turn counterclockwise to remove bulb.
3..
Remove switch from socket. Carefully detach wire
and terminal from switch.
NOTE:
On some model switches, the wire and
terminal cannot be detached from the switch
making it necessary to cut and splice the switch
wire.
4.
Insert wire and terminal into new switch.
5. Push switch into place and install bulb by setting it in
place, depressing and turning it clockwise.
CIGARETTE LIGHTER REPLACEMENT
Chevrolet, Chevy II, Camaro and Corvette (Fig. 23)
1.
Disconnect battery ground cable.
2.
Disconnect wire connector at rear of lighter unit
under dash.
3.
Remove retainer from rear of housing assembly and
disengage lighter unit from panel.
4.
To install, reverse removal procedure.
Chevelle (Fig. 35)
1.
Disconnect battery ground cable.
CHEVROLET CHASSIS SERVICE MANUAL
Page 628 of 659

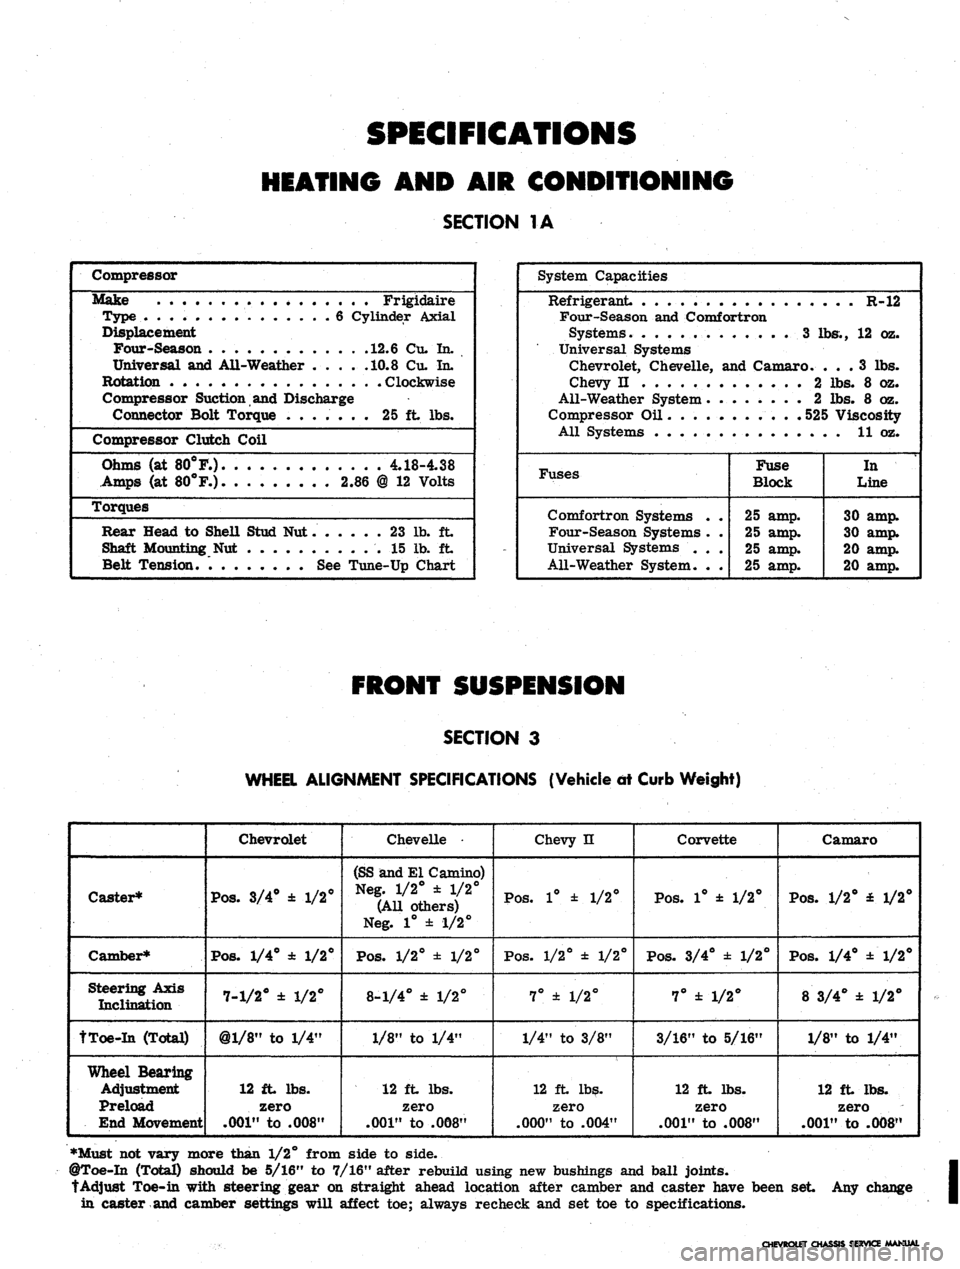
SPECIFICATIONS
HEATING
AND AIR
CONDITIONING
SECTION
1A
Compressor
Make Frigidaire
Type
. 6
Cylinder Axial
Displacement
Four-Season
12.6
Cu.
In.
Universal
and
Ail-Weather
.... .10.8 Cu. In.
Rotation Clockwise
Compressor Suction
and
Discharge
Connector Bolt Torque
.......
25 ft lbs.
Compressor Clutch Coil
Ohms
(at
80°F.).
4.18-4.38
Amps
(at
80°F.)
2.86 @ 12
Volts
Torques
Rear Head
to
SheU Stud
Nut 23 lb. ft
Shaft Mounting
Nut 15 lb. ft
Belt Tension.
See
Tune-Up Chart
System Capacities
Refrigerant
R-12
Four-Season
and
Comfortron
Systems.
............
3 lbs., 12 oz.
Universal Systems
Chevrolet, Chevelle,
and
Camaro.
... 3 lbs.
Chevy
n 2 lbs. 8 oz.
All-Weather System
2 lbs. 8 oz.
Compressor
Oil 525
Viscosity
All Systems
11 oz.
Fuses
Comfortron Systems
.
Four-Season Systems
.
Universal Systems
. .
All-Weather System.
.
Fuse
Block
25
amp.
25
amp.
25
amp.
25
amp.
In
Line
30
amp.
30
amp.
20
amp.
20
amp.
SECTION
3
WHEEL ALIGNMENT SPECIFICATIONS (Vehicle
dt
Curb Weight)
Caster*
Camber*
Steering Axis
Inclination
tToe-In (Total)
Wheel Bearing
Adjustment
Preload
End Movement
Chevrolet
Pos.
3/4° ± 1/2°
Pos.
1/4° ± 1/2°
7-1/2° ± 1/2°
@l/8"
to 1/4"
12 ft lbs.
zero
.001"
to .008"
Chevelle •
(SS and El Camino)
Neg. 1/2° ± 1/2°
(All others)
Neg. 1° ± 1/2°
Pos.
1/2° ± 1/2°
8-1/4° ± 1/2°
1/8" to 1/4"
12 ft lbs.
zero
.001"
to .008"
Chevy n
Pos.
1° ± 1/2°
Pos.
1/2° ± 1/2°
7° ± 1/2°
1/4" to 3/8"
12 ft lbs.
zero
.000"
to .004"
Corvette
Pos.
1° ± 1/2°
Pos.
3/4° ± 1/2°
7° ± 1/2°
3/16" to 5/16"
12 ft lbs.
zero
.001"
to .008"
Camaro
Pos.
1/2° £ 1/2°
Pos.
1/4° ±1/2°
8 3/4° ± 1/2°
1/8" to 1/4"
12 ft lbs.
zero
.001"
to .008"
•Must not vary more than 1/2° from side to side.
@Toe-In (Total) should be 5/16" to 7/16" after rebuild using new bushings and ball joints.
tAdjust Toe-in with steering gear on straight ahead location after camber and caster have been set Any change
in caster and camber settings will affect toe; always recheck and set toe to specifications.
LET CHASSIS SERVICE MANUAL