wheel alignment CHEVROLET CAMARO 1967 1.G Chassis User Guide
[x] Cancel search | Manufacturer: CHEVROLET, Model Year: 1967, Model line: CAMARO, Model: CHEVROLET CAMARO 1967 1.GPages: 659, PDF Size: 114.24 MB
Page 371 of 659

CLUTCH AND TRANSMISSIONS 7-12
DIAGNOSIS-OVERDRIVE
MECHANICAL
Any one of the following general complaints may be due
to non-standard mechanical conditions in the overdrive
unit:
1.
Does not drive unless locked up manually.
2.
Does not engage, or lock-up does not release.
3.
Engages with a severe jolt, or noise.
4.
Free-wheels at speeds over 30 mph.
These^ troubles may be diagnosed and remedied as de-
scribed in the following paragraphs.
1.
Does not drive unless locked up manually.
a. Occasionally, the unit may not drive the car for-
ward in direct drive, unless locked up by pulling
the dash control. This may be caused by one or
more broken rollers in the roller clutch, the
remedy for which is the replacement of the entire
set of rollers.
b.
This may also be caused by sticking of the roller
retainer upon the cam. This retainer must move
freely to push the rollers into engaging position,
under the pressure of the two actuating springs.
c. Sometimes this is due to slight indentations, worn
in the cam faces by the rollers spinning, remedied
by replacement of the cam.
2.
Does not engage, or lock-up does not release
.. a. Dash control improperly connected—-Unless the
overdrive dash control wire is connected to the
lockup lever on the left side of the overdrive
housing in such a manner as to move the lever
all the way back when the dash control knob is
pushed in, it may hold the shift rail in such a po-
sition as to interlock the pawl against full engage-
ment resulting in a buzzing noise when overdrive
engagement is attempted.
To correctly make this connection, loosen bind-
ing post at lever, pull dash control knob out 1/4",
move lever all the way to the rear, and tighten
binding post.
b.
Transmission and overdrive improperly aligned—
The same symptoms as above may also result
from misalignment, at assembly, of the overdrive
housing to the transmission case, resulting in
binding of the overdrive shift rail, so that the re-
tractor spring cannot move the rail fully forward,
when the dash control knob is pushed in, and the
transmission is not in reverse. Under such con-
ditions, the unit may remain fully locked up.
To test for this, be sure that the transmission
is not in reverse; disconnect the dash control
wire from the lockup lever, and feel the lever for
free forward movement. If the lever can be
moved forward more than 1/4", it indicates that
misalignment probably exists. To correct this,
Jposen the capscrews between the overdrive hous-
ing and transmission case, and tap the adpater
plate and overdrive housing until a position is
found where the rail shifts freely; tighten cap-
screws.
c. Kickdown switch improperly adjusted—The posi-
tion of the kickdown switch should be adjusted,
by means of the two large nuts which clamp the
switch shank, so the switch plunger travels 3/16"
before the throttle lever touches its stop.
Occasionally the large nuts which clamp the
switch through the switch bracket are tightened
sufficiently to bend the switch shank, thus pre-
venting free motion of the switch stem. This may
usually be remedied by loosening the upper of the
two nuts.
d. Improper installation of solenoid—If car cannot
be rolled backward under any circumstances and
there is no relay click when the ignition is turned
on, it probably indicates that the solenoid has
been installed directly, without twisting into the
bayonet lock between solenoid stem and pawl, thus
jamming the pawl permanently into overdrive en-
gagement. If the car will occasionally roll back-
wards, but not always, (and there is no relay click
when the ignition switch is turned on) it may indi-
cate that, upon installation, the bayonet lock was
caught, and the solenoid forcibly twisted into
alignment with the attaching flange, thus shearing
off the internal keying of the solenoid. Under
these circumstances, the end of the solenoid stem
may not catch in the pawl, and upon release of the
solenoid, the pawl will not be withdrawn promptly
from engagement, but simply drift out. If the
solenoid stem end has its two flats exactly facing
the two solenoid flange holes, it will not withdraw
the pawl properly. If the stem can be rotated
when grasped by a pair of pliers, it indicates that
the internal keying has been sheared.
e. Improper positioning of blocker ring—Occasion-
ally, either in assembly at the factory, or in
service operations in the field, the internal parts
of the overdrive unit may have been rotated with
the solenoid pawl removed, causing the blocker
ring to rotate, so that its two lugs are not located
with respect to- the pawl as shown in Figure 12B.
In other words, the solid portion of the blocker
ring may be in alignment with the pawl, which will
prevent fill} engagement of the pawl with the sun
gear control plate/
To test for this condition, remove solenoid
cover, pull dash control knob out, roll car 2 ft.
forward. Push dash control in, turn ignition
switch on. Then ground the "KD" terminal of
relay, and watch movement of center stem of
solenoid. It should not move more than 1/8" when
the solenoid clicks. Then, with the relay terminal
still grounded, shift into low gear, and roll car
forward by hand. Solenoid stem should then move
an additional 3/8", as the pawl engages fully.
These two tests indicate proper blocker action.
Unless both tests are met, the blocker ring is
probably not in the correct position.
3.
Engages with a severe jolt or noise
Insufficient blocker ring friction may cause the ring
to lose its grip on the hub of the sun gear control
plate. Check the fit and tension of the ring as de-
scribed under "Cleaning and Inspection".
4.
Free-wheels at speeds over 30 MPH
If cam roller retainer spring tension is weak the unit
will free wheel at all times. Check spring action as
described under "Cleaning and Inspection".
CHEVROLET CHASSIS SERVICE MANUAL
Page 383 of 659
CLUTCH AND TRANSMISSIONS 7-24
is at the full mark on the dip stick, it is just slightly be-
low the planetary gear unit. If additional oil is added,
bringing the oil level above the full mark, the planetary
unit will run in the oil, foaming and aerating the oil. This
aerated oil carried through the various oil pressure pas-
sages (low servo, reverse servo, clutch apply, converter,
etc.) may cause malfunction of the transmission assem-
bly, resulting in cavitation noise in the converter and
improper band or clutch application. Overheating may
also occur.
If the transmission is found consistently low on oil, a
thorough inspection should be made to find and correct
all external oil leaks.
PERIODIC OIL CHANGE
The transmission oil should be changed periodically as
recommended in Section 0, and whenever transmission is
to be removed from the vehicle for repairs.
1.
Run engine for one minute in neutral prior to chang-
ing.
2.
Be sure vehicle is level or raise from the rear only.
3.
Remove the oil pan drain plug and allow oil to drain
thoroughly into a pan or can.
Replace drain plug and refill with approximately two
quarts of oil specified in Section 0.
NOTE: To refill the transmission, remove dip
stick from oil filler tube and refill transmission
with oil specified in Section 0 using filler tube
and funnel J-4264. Then, after shifting into all
ranges at idle speed to fill all oil passages, the
engine should be run at 800-1000 rpm with the
transmission in Neutral until the oil warms up,
then add oil as required to raise the fluid level
to the full mark on the dip stick. Refill capacity
is approximately 2 qts.
4.
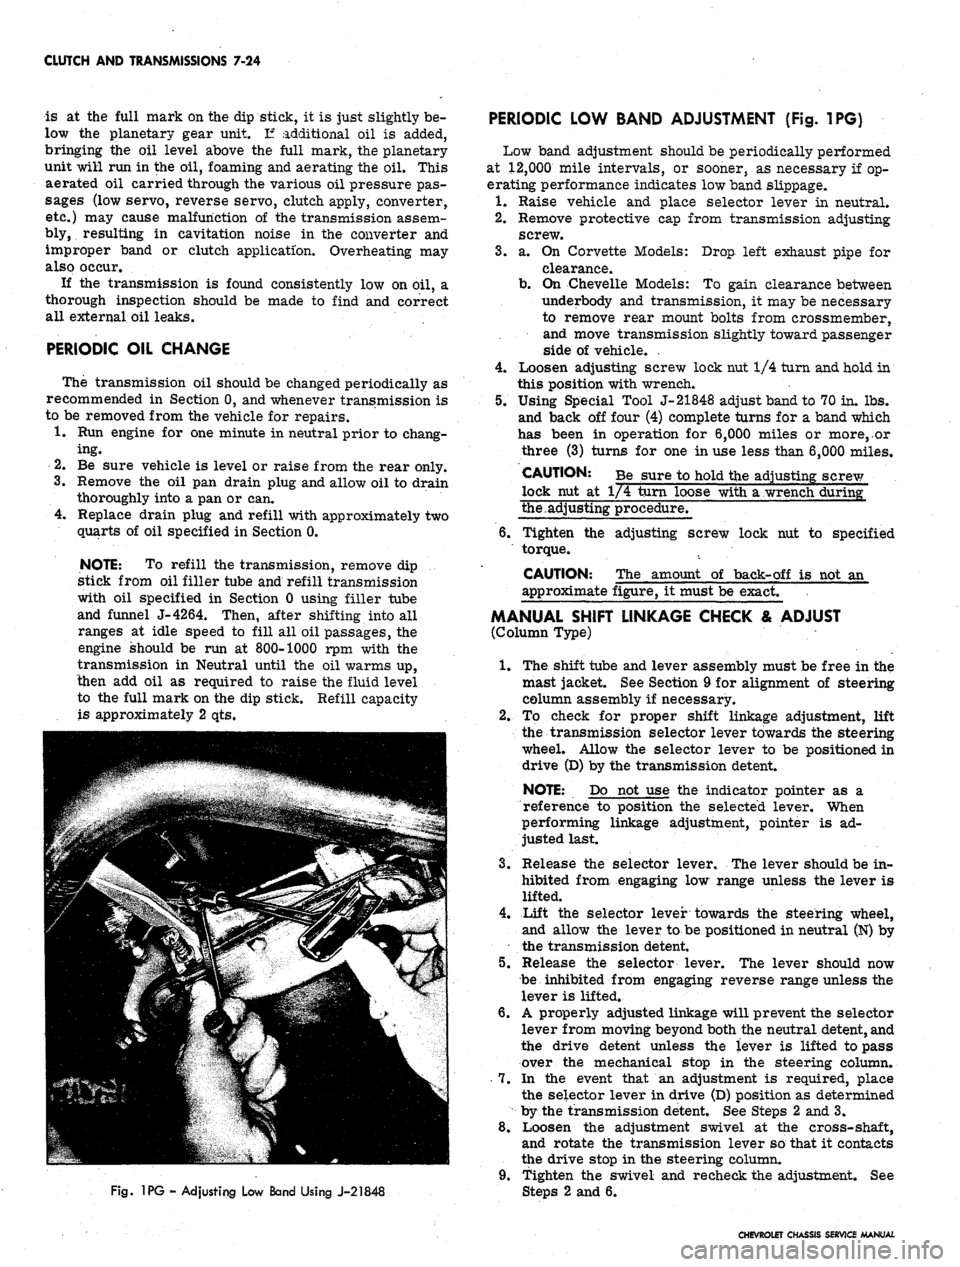
Fig.
1PG - Adjusting Low Band Using J-21848
PERIODIC LOW BAND ADJUSTMENT (Fig. 1PG)
Low band adjustment should be periodically performed
at 12,000 mile intervals, or sooner, as necessary if op-
erating performance indicates low band slippage.
1.
Raise vehicle and place selector lever in neutral.
2.
Remove protective cap from transmission adjusting
screw.
3.
a. On Corvette Models: Drop left exhaust pipe for
clearance.
b.
On Chevelle Models: To gain clearance between
underbody and transmission, it may be necessary
to remove rear mount bolts from crossmember,
and move transmission slightly toward passenger
side of vehicle. .
4.
Loosen adjusting screw lock nut 1/4 turn and hold in
this position with wrench.
5.
Using Special Tool J-21848 adjust band to 70 in. lbs.
and back off four (4) complete turns for a band which
has been in operation for 6,000 miles or more,.or
three (3) turns for one in use less than 6,000 miles.
CAUTION: Be sure to hold the adjusting screw
lock nut at 1/4 turn loose with a wrench during"
the.adjusting procedure.
6. Tighten the adjusting screw lock nut to specified
torque.
CAUTION: The amount of back-off is not an
approximate figure, it must be exact.
MANUAL SHIFT LINKAGE CHECK & ADJUST
(Column Type)
1.
The shift tube and lever assembly must be free in the
mast jacket. See Section 9 for alignment of steering
column assembly if necessary.
2.
To check for proper shift linkage adjustment, lift
the transmission selector lever towards the steering
wheel. Allow the selector lever to be positioned in
drive (D) by the transmission detent.
NOTE: Do not use the indicator pointer as a
reference to position the selected lever. When
performing linkage adjustment, pointer is ad-
justed last.
3.
Release the selector lever. The lever should be in-
hibited from engaging low range unless the lever is
lifted.
4.
Lift the selector lever towards the steering wheel,
and allow the lever to be positioned in neutral (N) by
the transmission detent.
5.
Release the selector lever. The lever should now
be inhibited from engaging reverse range unless the
lever is lifted.
6. A properly adjusted linkage will prevent the selector
lever from moving beyond both the neutral detent, and
the drive detent unless the lever is lifted to pass
over the mechanical stop in the steering column.
7.
In the event that an adjustment is required, place
the selector lever in drive (D) position as determined
by the transmission detent. See Steps 2 and 3.
8. Loosen the adjustment swivel at the cross-shaft,
and rotate the transmission lever so that it contacts
the drive stop in the steering column.
9. Tighten the swivel and recheck the adjustment. See
2 and 6.
CHEVROLET CHASSIS SERVICE MANUAL
Page 396 of 659
CLUTCH AND TRANSMISSIONS 7-37
LI.
- LI Range can be selected at any vehicle speed,
and the transmission will shift to second gear
and remain in second until vehicle speed is re-
duced to approximately 40 MPH, .depending on
axle ratio. LI Range position prevents the trans-
mission from shifting out of first gear.
It is very important that any communication concerning
the Turbo Hydra-Matic always contain the transmission
serial number and that all transmission parts returned
to Chevrolet Motor Division always be tagged with the
transmission serial number.
MAINTENANCE AND ADJUSTMENTS
TRANSMISSION FLUID
Transmission fluid level should be checked with trans-
mission warm and selector lever in "P" Park position,
every time engine oil level is checked or as specified in
Section 0 when engine oil is changed.
CAUTION: Since the Turbo Hydra-Matic trans-
mission is very sensitive to oil level, special
precautions should be taken when checking the
oil level, to insure against an overfifE
Transmission fluid should be changed as specified in
Section 0.
FLUID LEVEL INDICATOR
The fluid level indicator is located in the filler pipe at
the right rear corner of the engine. To bring the fluid
level from the add mark to the full mark add 1 pint.
Fluid level should be to the full mark with transmission
at normal operating temperature. With cold fluid the
level should be at the add mark or slightly below.
SHIFT CONTROL LINKAGE ADJUSTMENT
Adjust linkage as shown below and in Figure 2.
1.
The shift tube and lever assembly must be free in the
mast jacket See Section 9 for alignment of steering
column assembly if necessary.
2.
To check for proper shift linkage adjustment, lift the
transmission selector lever towards the steering
wheel. Allow the selector lever to be positioned in
drive (D) by the transmission detent.
NOTE: Do not use the indicator pointer as a
reference to position the selector lever. When
performing linkage adjustment, pointer is ad-
justed last.
3.
Release the selector lever. The lever should be in-
hibited from engaging low range unless the lever is
lifted.
4.
Lift the selector lever towards the steering wheel,
and allow the lever to be positioned in neutral (N) by
the transmission detent.
5.
Release the selector lever. The lever should now be
inhibited from engaging reverse range unless the
lever is lifted.
6. A properly adjusted linkage will prevent the selector
lever from moving beyond both the neutral detent,
and the drive detent unless the lever is lifted to pass
over the mechanical stop in the steering column.
See schematic diagram.
7.
In the event that an adjustment is required, place the
selector lever in drive (D) position as determined by
the transmission detent. See Steps 2 and 3.
8. Loosen the adjustment swivel at the cross-shaft, and
rotate the transmission lever so that it contacts the
drive stop in the steering column.
9. Tighten the swivel and recheck the adjustment. See
Steps 2 and 6. -
l(h Readjust indicator needle if necessary to agree with
the transmission detent" positions. See Section 9.
11.
Readjust neutral safety switch if necessary to pro-
vide the correct relationship to the transmission de-
tent positions. See Section 12.
12.
When properly adjusted the following conditions must
be met by manual operation of the steering column
shift lever:
a. From reverse to drive position travel, the trans-
mission detent feel must be noted and related to
indicated position on dial.
b.
When in drive and reverse positions, pull lever
rearward (towards steering wheel) and then re-
lease. It must drop back into position with no
restrictions.
NEUTRAL SAFETY SWITCH ADJUSTMENT
The neutral safety switch must be adjusted so that the
car will start in the park or neutral position, but will not
start in the other positions. For replacement refer to
Section 12 of this Manual.
DRAINING AND REFILLING TRANSMISSION
Drain oil immediately after operation before it has had
an opportunity to cool.
To drain oil proceed as follows:
1.
Remove bottom pan attaching screws, pan, and gas-
ket.
2.
Remove oil strainer. Remove "O" ring seal from
pick-up pipe and discard.
3.
Discard strainer if dirty.
4.
Install new "O" ring seal on pick-up pipe and install
strainer and pipe assembly.
5.
Thoroughly clean bottom pan.
6.. Affix new gasket to bottom pan with petroleum jelly.
7.
Install bottom pan with attaching screws and torque
to specifications;
8. If only the pan has been removed, pour approximately
7-1/2 pints of fluid into the transmission. If the
valve body has also been removed use 9-1/2 pints.
After a complete overhaul approximately 19 pints
are required. Be sure container, spout, or funnel is
clean.
9. Start engine and let idle (carburetor off fast idle
step).
Place selector lever in P position and apply
hand brake.
10.
With transmission warm (approximately 150°F), add
fluid to bring level to full mark on indicator.
CAUTION: Do not overfill. Foaming will re-
sult.
CHEVROLET CHASSIS SERVICE MANUAL
Page 430 of 659
FUEL TANK
AND
EXHAUST SYSTEMS
8-24
EXHAUST SYSTEMS
INDEX
Page
General Description. ..........
8-24
Service Operations
8-24
Muffler Assembly.
8-24
Side Mounted Exhaust.
. . . 8-25
GENERAL DESCRIPTION
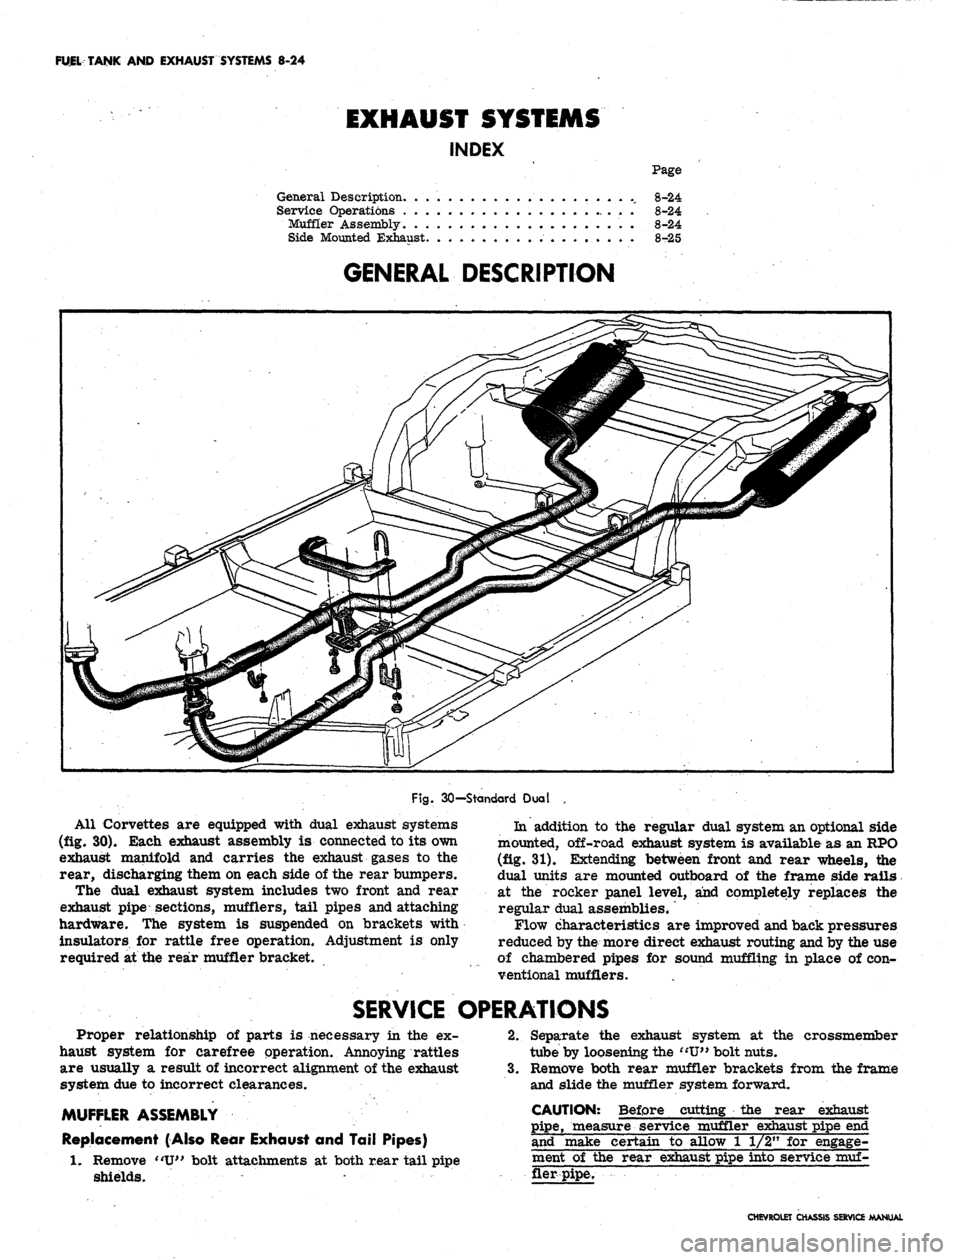
Fig.
30—Standard Dual
All Corvettes
are
equipped with dual exhaust systems
(fig.
30).
Each exhaust assembly
is
connected
to its own
exhaust manifold
and
carries
the
exhaust gases
to the
rear, discharging them
on
each side
of
the rear bumpers.
The dual exhaust system includes
two
front
and
rear
exhaust pipe sections, mufflers, tail pipes and attaching
hardware.
The
system
is
suspended
on
brackets with
insulators
for
rattle free operation. Adjustment
is
only
required
at the
rear muffler bracket.
In addition
to the
regular dual system
an
optional side
mounted, off-road exhaust system
is
available
as an
RPO
(fig.
31).
Extending between front
and
rear wheels,
the
dual units
are
mounted outboard
of the
frame side rails
at
the
rocker panel level,
and
completely replaces
the
regular dual assemblies*
Flow characteristics
are
improved and back pressures
reduced
by
the more direct exhaust routing and
by the use
of chambered pipes
for
sound muffling
in
place
of con-
ventional mufflers.
SERVICE OPERATIONS
Proper relationship
of
parts
is
necessary
in the ex-
haust system
for
carefree operation. Annoying rattles
are usually
a
result
of
incorrect alignment
of
the exhaust
system
due to
incorrect clearances.
MUFFLER ASSEMBLY
Replacement (Also Rear Exhaust
and
Tail Pipes)
Remove
"U"
bolt attachments
at
both rear tail pipe
shields.
2.
crossmember
1.
Separate
the
exhaust system
at the
tube
by
loosening the
"IT"
bolt nuts.
3.
Remove both rear muffler brackets from
the
frame
and slide
the
muffler system forward.
CAUTION: Before cutting
the
rear exhaust
pipe, measure service muffler exhaust pipe
end
and make certain
to
allow
1 1/2" for
engage-
ment
of the
rear exhaust pipe into service
muf-
fler pipe.
CHEVROLET CHASSIS SERVICE MANUAL
Page 441 of 659
SECTION
9
STEERING
CONTENTS
OF
THIS SECTION
Standard Steering
9-1
Power Steering
9-33
Special Tools
9-40
STANDARD STEERING
INDEX
Page
General Description 9.x
Maintenance and Adjustments 9.1
Adjustments
........................
9-2
Steering Gear 9-2
Steering Wheel Alignment and Higji
Point Centering. . . . 9-4
Toe-in Adjustment 9-4
Corvette Steering Ratio . . . . 9-4
Component Replacement and Repairs . . . . 9-4
Steering Wheel . . . 9-4
Regular Production 9-4
Simulated Wood . . . . 9-5
Corvette Telescoping 9-5
Steering Coupling . 9-6
Steering Gear . 9-9
Sector Shaft Seal Replacement 9-10
Steering Column 9-10
Removal 9-10
Disassembly—Syncromesh Column 9-12
Page
Assembly—Syncromesh Column . . 9-14
Disassembly—Column Mounted Powerglide
Lever or Floor Shift Column 9-16
Assembly-^Column Mounted Powerglide
Lever or Floor Shift Column g_x7
Disassembly—Tilt Column 9-19
Assembly—Tilt Column 9-21
Disassembly—Standard Corvette Column 9-23
Assembly—Standard Corvette Column 9-25
Disassembly—Corvette Telescoping Column .... 9.26
Assembly—Corvette Telescoping Column 9-27
Installation 9.27
Steering Linkage 9.29
Tie
Rods.
. 9-29
Relay Rod . . 9-31
Idler Arm . . . . 9-31
Pitman Arm. . 9-32
Steering Arms • • • • 9-32
Steering Damper 9-32
GENERAL DESCRIPTION
The regular production steering gear
is the
recirculat-
ing ball type. This gear provides
for
ease
of
handling
by
transmitting forces from worm
to
sector gear through
ball bearings.
The
steering linkage
is of
the relay type,
and extended interval lubrication design, with the pitman
arm connected
to one end of
the relay
rod. The
other
end
of
the
relay
rod is
connected
to an
idler
arm
which
is
connected
to the
frame side rail opposite
the
steering
gear.
Two
adjustable
tie
rods connect
the
relay
rod to
the steering arms.
All passenger
car
models
for 1967 are
equipped with
new energy absorbing steering columns.
The
mast jacket,
shift tube,
and
steering shaft
are
designed
to
collapse
under various front impact conditions.
All new
columns
are
of
this design, including
the
tilt option and telescope
option.
MAINTENANCE
AND
ADJUSTMENTS
The manual steering gear
is
filled
at the
factory with
a
water resistant grease. Seasonal change
of
this lubrica-
tion
is
unnecessary and
the
housing should
not be
drained.
The steering gear lubricant level should
be
checked every
36,000 miles. Whenever required, additions should
be
made using
a
water resistant
EP
chassis lubricant.
Check and fill steering gear
as
follows:
1.
Remove lower
and
outboard cover retaining screws
(fig.
1).
2.
Insert filling device
in
lower screw hole.
3.
Inject lubricant until
it
appears
in
outboard screw
hole; gear
is now
filled
to
correct level.
The steering linkage should
be
lubricated with water
resistant
EP
chassis lubricant every 6,000 miles
or six
months, whichever occurs first. Lubrication points
and
additional information
on the
chassis lubricant
to be
used
can
be
found
in
Section
0 --
General Information
and
Lubrication.
CHEVROLET CHASSIS SERVICE MANUAL
Page 442 of 659

STEERING 9-2
Fig.
1—Cover
Attaching Bolts—Chevy li Shown
ADJUSTMENTS
STEERING
GEAR
Before any adjustments are made to the steering gear
in an attempt to correct such conditions as shimmy,
loose or hard steering etc., a careful check should be
made of front end alignment, shock absorbers, wheel
balance and tire pressure for possible cause.
Correct adjustment of the steering gear is very im-
portant. Perform adjustments following the sequence
listed below,
1.
Remove pitman arm nut and mark relation of pitman
arm position to sector shaft. Remove pitman arm
with Tool J- 6632 as shown in Figure 2.
2.
Loosen the pitman shaft lash adjuster screw locknut
and turn the adjuster screw a few turns in a counter-
clockwise direction (fig. 3). This removes the load
Fig. 2—Removing Pitman Arm
imposed on the worm bearings by the close meshing
of rack and sector teeth. Turn steering wheel gently
in one direction until stopped by gear, then back away
about one turn.
CAUTION: Do not turn steering wheel hard
against stops when steering relay rod is discon-
nected as damage to ball guides may result.
3.
All except Corvette and telescopic columns:
a. Disconnect steering column harness at chassis
wiring connector plug.
b.
Remove horn cap or ornament and using an inch
pound torque wrench and socket on steering wheel
nut, measure torque required to keep the wheel
in motion.
LASH ADJUSTER
SCREW
LOCK NUT
WORM BEARING
ADJUSTER
\
WORM
ADJUSTER
Fig.
3—Steering Gear Adjustment Points
CHEVROLET CHASSIS SERVICE MANUAL
Page 443 of 659
STEERING 9-3
Fig.
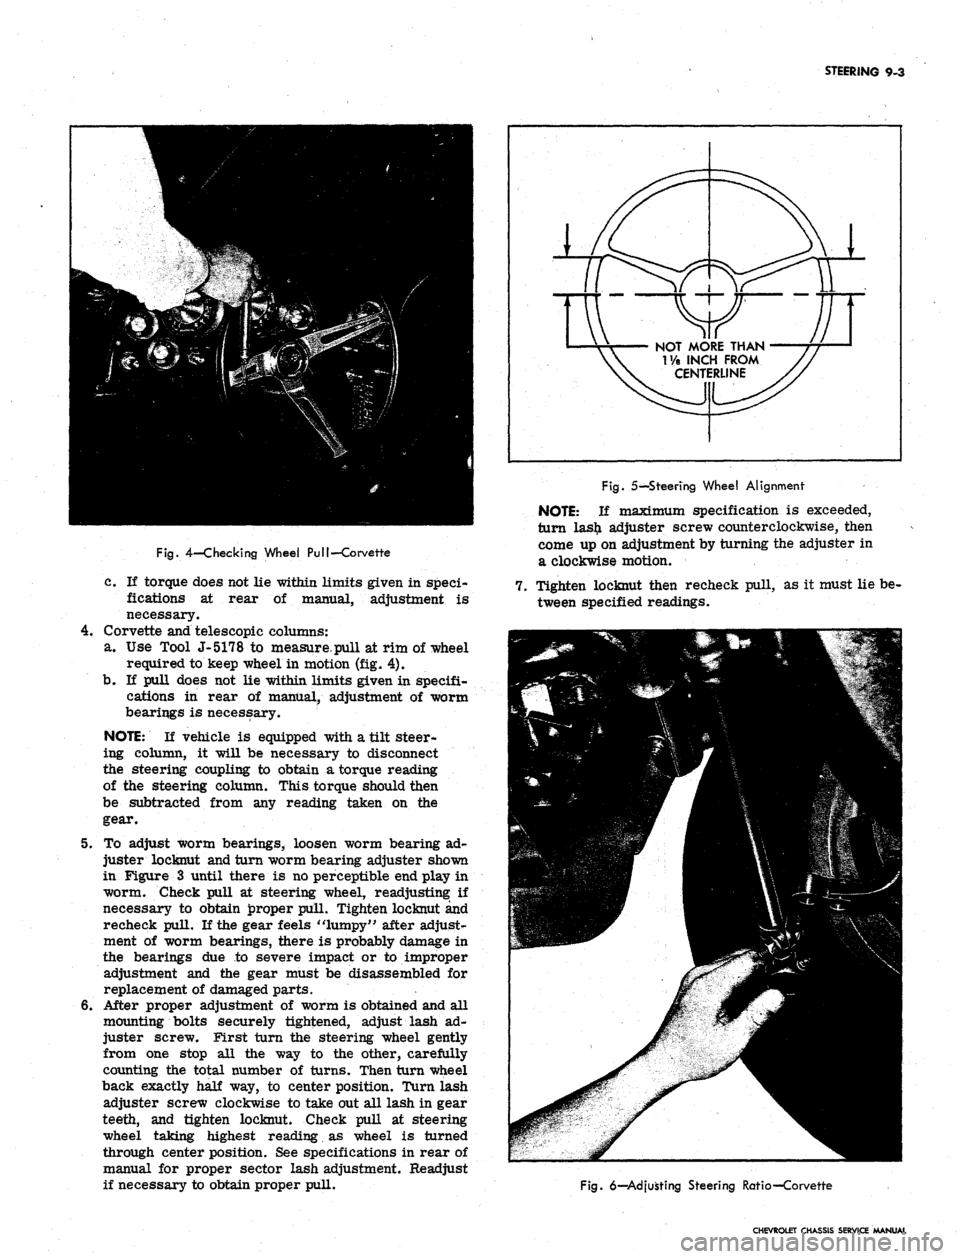
4-Checking Wheel PuI!-Corvette
c. If torque does not lie within limits given in speci-
fications at rear of manual, adjustment is
necessary.
4.
Corvette and telescopic columns:
a. Use Tool J-5178 to measure.pull at rim of wheel
required to keep wheel in motion (fig. 4).
b.
If pull does not lie within limits given in specifi-
cations in rear of manual, adjustment of worm
bearings is necessary.
NOTE:
If vehicle is equipped with a tilt steer-
ing column, it will be necessary to disconnect
the steering coupling to obtain a torque reading
of the steering column. This torque should then
be subtracted from any reading taken on the
gear.
5. To adjust worm bearings, loosen worm bearing ad-
juster locknut and turn worm bearing adjuster shown
in Figure 3 until there is no perceptible end play in
worm. Check pull at steering wheel, readjusting: if
necessary to obtain proper pull. Tighten locknut and
recheck pull. If the gear feels "lumpy" after adjust-
ment of worm bearings, there is probably damage in
the bearings due to severe impact or to improper
adjustment and the gear must be disassembled for
replacement of damaged parts.
6. After proper adjustment of worm is obtained and all
mounting bolts securely tightened, adjust lash ad-
juster screw. First turn the steering wheel gently
from one stop all the way to the other, carefully
counting the total number of turns. Then turn wheel
back exactly half way, to center position. Turn lash
adjuster screw clockwise to take out all lash in gear
teeth, and tighten locknut. Check pull at steering
wheel taking highest reading as wheel is turned
through center position. See specifications in rear of
manual for proper sector lash adjustment. Readjust
if necessary to obtain proper pull.
NOT MORE THAN
T/a INCH FROM
CENTERLINE
Fig.
5—Steering Wheel Alignment
NOTE:
If maximum specification is exceeded,
turn las£ adjuster screw counterclockwise, then
come up on adjustment by turning the adjuster in
a clockwise motion.
7. Tighten locknut then recheck pull, as it must lie be-
tween specified readings.
Fig.
6—Adjusting Steering Ratio—Corvette
CHEVROLET CHASSIS SERVICE MANUAL
Page 444 of 659
STEERING 9-4
8. Reassemble pitman arm to sector shaft, lining up
marks made during disassembly. Refer to torque
specifications at rear of manual for correct torque
value.
9. Install horn cap or ornament and connect steering
column harness at chassis connector.
NOTE:
Chevy.n models are equipped with a
shim at the frame to steering gear mounting
bolts.
Shims may be removed or installed as
required for proper steering gear alignment.
STEERING WHEEL ALIGNMENT AND
HIGH POINT CENTERING
1.
Set front wheels in straight ahead position. This can
be checked by driving vehicle a short distance on a
flat surface to determine steering wheel position at
which vehicle follows a straight path.
2.
With front wheels set straight ahead, check position
of mark on wormshaft designating steering gear high
point. This mark should be at the top side of the shaft
at 12 o'clock position and lined up with the mark in
the coupling lower clamp.
3.
If gear has been moved off high point when setting
wheels in straight ahead position, loosen adjusting
sleeve clamps on both left and right hand tie rods,
then turn both sleeves an equal number of turns in
the same direction to bring gear back on high point.
CAUTION: Turning the sleeves an unequal
number of turns or in differential directions will
disturb the toe-in setting of the wheels.
4.
Readjust toe-in as outlined in Section 3 (if necessary).
5. With wheels in a straight ahead position and the
steering gear on highpoint, check the steering wheel
alignment by measuring the distance from each hori-
zontal spoke to the horizontal centerline of the
steering wheel (fig. 5). If the horizontal spokes are
over 1-1/8 inches from the horizontal position the
wheel should be removed and centered. (See steering
wheel removal in this section.)
TOE-IN ADJUSTMENT
Adjust the steering linkage for proper toe-in setting as
outlined in Section 3.
CORVETTE STEERING RATIO (Fig. 6)
The Corvette steering ratio may be changed as follows:
CAUTION: Do not use the rearward hole in the
steering arm with power steering equipment or
interference may result.
1.
Remove tie rod ball stud nut at steering arm and
disconnect tie rod from steering arm.
2.
Move tie rod end to forward hole for 17.6:1 ratio
(fast ratio) or rear hole for 20.2:1 ratio (standard
ratio).
3.
Install tie rod stud nut and tighten securely. Repeat
operation on opposite steering arm.
COMPONENT REPLACEMENT AND REPAIRS
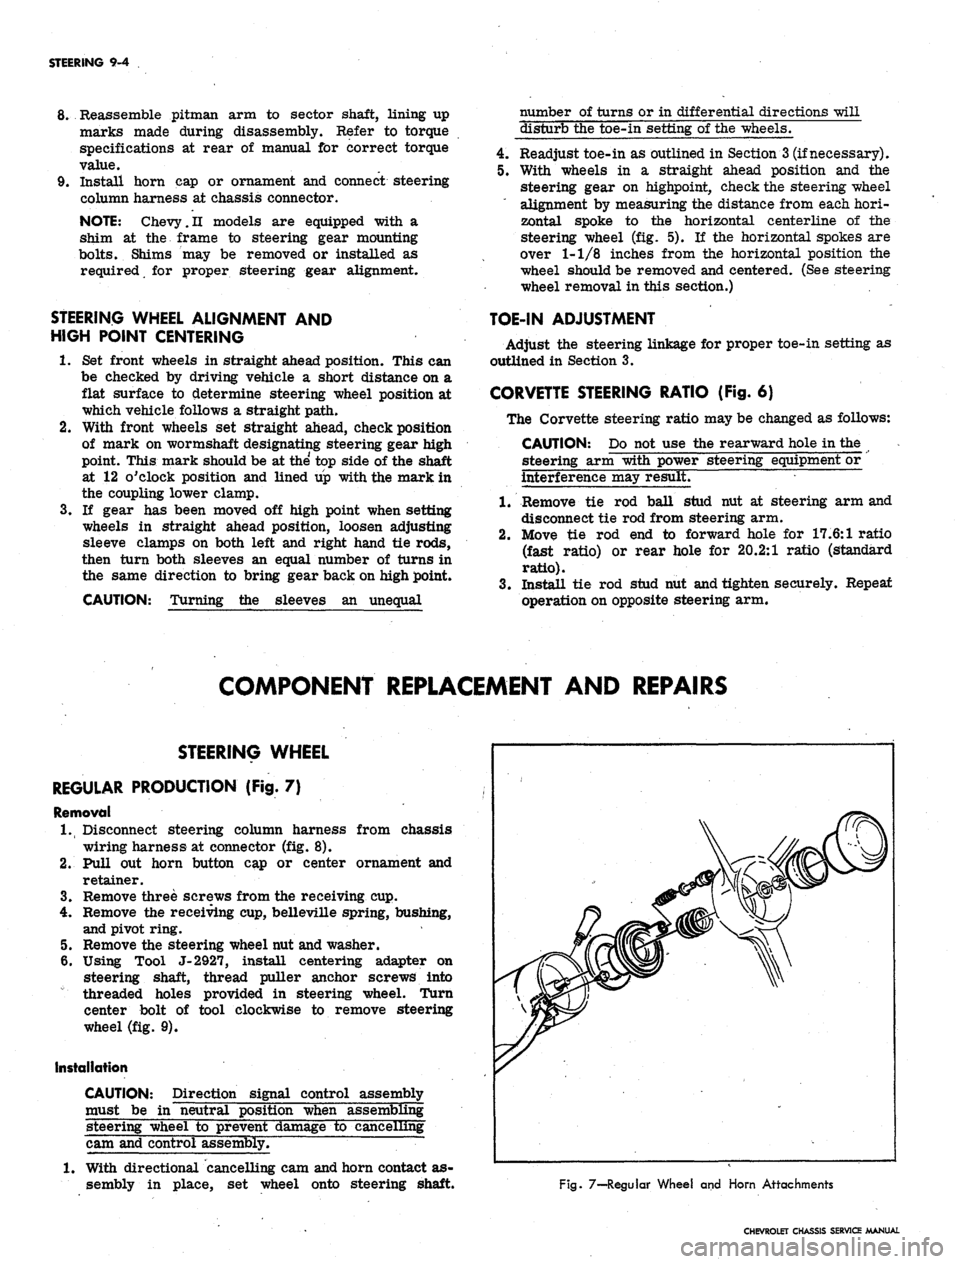
STEERING WHEEL
REGULAR PRODUCTION (Fig. 7)
Removal
1.
Disconnect steering column harness from chassis
wiring harness at connector (fig. 8).
2.
Pull out horn button cap or center ornament and
retainer.
3.
Remove three screws from the receiving cup.
4.
Remove the receiving cup, belleville spring, bushing,
and pivot ring.
5. Remove the steering wheel nut and washer.
6. Using Tool J-2927, install centering adapter on
steering shaft, thread puller anchor screws into
threaded holes provided in steering wheel. Turn
center bolt of tool clockwise to remove steering
wheel (fig. 9).
Installation
CAUTION: Direction signal control assembly
must be in "neutral position when assembling
steering wheel to prevent damage to cancelling
cam and control assembly.
1.
With directional cancelling cam and horn contact as-
sembly in place, set wheel onto steering shaft.
Fig. 7—-Regular Wheel and Horn Attachments
CHEVROLET CHASSIS SERVICE MANUAL
Page 469 of 659

STEERING 9-29
column mounting bracket, and place bracket in cor-
rect position on underside of instrument panel.
Loosely install bracket using bracket to column
mounting screws and bracket to instrument panel
washers and bolts.
NOTE: Steering shaft to gear clamp must be
tightened before column attaching bolts are
torqued. Refer to "Steering Gear-Chevy n",
installation procedure, for correct Chevy II
steering column alignment procedure.
5.
Camaro only (fig. 60):
Lay wedge shim in position on instrument panel
column mounting bracket and place bracket in cor-
rect position on underside of instrument panel.
Loosely install bracket using bracket to column
mounting screws, nuts, and washer and bolt as shown
in Figure 60.
6. Corvette only (fig. 61):
Loosely secure column mounting bracket to sup-
port plate and instrument panel with washers and
bolts.
7.
Secure flanged end of column to steering coupling
with lockwashers and nuts. On Chevy n, connect col-
umn to steering gear with clamp, clamp bolt, and
nut. On Corvette, slide steering shaft flange into
lower coupling
half,
and install upper clamp bolt
loosely; also secure support, seal and clamp loosely
at dash on engine side.
8. Tighten instrument panel mounting bracket bolts and
nuts.
Refer to torque specifications at rear of manual
for correct torque values.
9. Chevrolet only (fig. 15):
Place upper and lower mast jacket covers in po-
sition and secure covers together and to instrument
panel using nuts and screws as shown in Figure 15.
10.
Chevy H only (fig. 18):
Place lower mast jacket cover in position under
mast jacket and secure to upper cover with screws.
11.
CheveUe only (fig. 15):
Place mast jacket trim cover in position over col-
Fig.
61—Instrument Panel Mounting Bracket and
Support Plqte—Corvette
umn on underside of instrument panel and secure
with screws.
12.
Corvette only (fig. 14):
Slide escutcheon into position at instrument panel
and secure with screws. Place upper end lower
covers in position and secure with screws.
13.
On Chevrolet and CheveUe models with column
mounted powerglide controls, secure transmission
shift indicator pointer into position with set screw
(fig. 15). ,
14.
Chevrolet only (fig. 19):
a. Secure seal and cover to dash panel with screws.
b.
Place clamp assembly in position and install
clamp screw.
c. Install dash panel trim cover with mounting
screws.
15.
Chevelle only (fig. 20):
a. Secure seal and inner and outer covers to dash
panel with screws.
b.
Secure inner and outer covers together with
screws.
c. Install trim cover to dash panel with two
retainers.
16.
Chevy H only (fig. 21):
a. Secure seal, retainer, and clamp to dash panel
with screws.
b.
Install clamp screw.
c. Slide collar into position. Pinch and staple upper
tabs together.
17.
Camaro only (fig. 22):
a. Secure seal, upper cover, and lower cover to
dash panel with screws.
b.
Secure upper and lower cover together with
screws.
c. Fold rubber boot over securely against dash panel
to conceal covers.
18.
Corvette only (fig. 23):
a. Secure seal and support assembly to dash panel
on engine compartment side.
b.
Tighten clamp, washer, and clamp bolt on engine
compartment side.
19.
Connect transmission linkage to lower shift tube
levers in engine compartment, if column is so
equipped. Adjust levers as outlined in Section 7.
20.
Install steering wheel as outlined in this section.
21.
Connect directional signal, horn, back-up lamp, and
neutral start switch at wiring harness plugs. Adjust
back-up lamp, neutral start switch as outlined in
Section 12.
22.
Adjust steering gear and align and center steering
wheel as outlined in this section.
STEERING LINKAGE (Fig. 62)
TIE RODS
There are two tie rod assemblies used on all models.
Each assembly is of three piece construction, consisting
of a sleeve and two tie rod ends. The ends are threaded
into the sleeve and locked with clamps. Right and left
hand threads are provided to facilitate toe-in adjustment
and steering gear centering.
The tie rod ends are self-adjusting for wear and re-
quire no attention in service other than periodic lubrica-
tion and occasional inspection to see that ball studs are
tight. Replacement of tie rod ends should be made when
CHEVROLET CHASSIS SERVICE MANUAL
Page 471 of 659

STEERING 9-31
Fig.
63—Freeing Ball Stud
rod threads with EP Chassis lube and install ends on
tie rod making sure both ends are threaded ah equal
distance from the tie rod.
2.
Make sure that threads on ball stud and in ball stud
nuts are perfectly clean and smooth. Install neoprene
seals on ball studs.
NOTE: If threads are not clean and smooth,
ball studs may turn in tie rod ends when at-
tempting to tighten nut.
3.
Install ball studs in steering arms and relay rod.
4.
Install ball stud nut, and install cotter pins. Lubri-
cate tie rod ends.
5.
Adjust toe-in as described in Section 3.
NOTE: Before locking clamp bolts on the rods,
make sure that the tie rod ends are in alignment
with their ball studs (each ball joint is in the
center of its travel). If the tie rod is not in
alignment with the studs, binding will result.
RELAY ROD-ALL MODELS EXCEPT CORVETTE
Removal
1.
Remove inner ends of tie rods from relay rod as
described under Tie Rod - Removal.
2.
Remove cotter pin and nut from relay rod ball stud
attachment at pitman arm.
3.
Detach relay rod from pitman arm. Shift steering
linkage as required to free pitman arm from relay
rod.
4.
Remove cotter pin and nut from idler arm and re-
move relay rod from idler arm.
Installation
1.
Install relay rod to idler arm, making certain idler
stud seal is in place, then install and tighten nut.
Advance nut just enough to align castellation with
cotter pin hole and install pin.
2.
Raise end of rod and install on pitman arm. Secure
with nut and cotter pin.
3.
Install tie rod ends to relay rod as previously
described under Tie Rods. Lubricate tie rod ends.
4.
Adjust toe-in (see Section 3) and align steering wheel
as described previously in this section under Steer-
ing Wheel Alignment and High Point Centering.
RELAY ROD-CORVETTE
Removal
1.
Remove steering damper from relay rod as outlined
under Steering Damper-Removal. Remove anchor
bracket from relay rod by disconnecting two mount-
ing bolts.
2.
Remove inner ends of tie rods from relay rod as
described under Tie Rod--Removal.
3.
Remove cotter pin from end of relay rod at pitman
arm ball stud attachment, and remove stud nut.
4.
Tap brJl stud out of pitman arm and lower relay rod.
5.
Remove cotter key and nut from idler arm and re-
move relay rod from idler arm. Remove washer and
seal from idler arm.
Installation
1.
Place relay rod on idler arm stud, making certain
idler stud seal and washer are in place, then install
and tighten nut. Advance nut just enough to align
castellation with cotter pin hole and install pin.
2.
Install new seal and clamp over ball at end of pitman
arm.
3.
Install inner spring seat and spring to relay rod.
4.
Raise end of rod and install on pitman arm.
5.
Install spring seat, spring, and end plug.
6. Tighten end plug until springs are compressed and
plug bottoms, then back off 3/4 turn plug amount
necessary to insert cotter pin. Insert cotter pin to
lock adjustment.
7.
Install tie rod ends to relay rod as previously de-
scribed under Tie Rods.
8. Lubricate tie rod ends and pitman arm to relay rod
ball joint.
9. Install steering damper bracket and tighten bolts.
Install damper as outlined under Steering Damper--
Installation.
10.
Adjust toe-in and align steering wheel as described
previously in this section.
IDLER ARM
Chevrolet, Chevelle, Comoro, and Corvette (Fig. 62)
Removal
1.
Remove idler arm to frame nut, washer, and bolt.
No washer is used on Corvette.
2.
Remove cotter pin and nut from idler arm to relay
rod ball stud.
3.
Remove relay rod from idler arm by tapping relay
rod with a hammer using a heavy hammer as a
backing.
4.
Remove idler arm.
Installation
1.
On Chevrolet, place seal in position on idler arm
stud; position stud up through frame, and secure with
lock washer and nut.
2.
On Chevelle, Camaro, and Corvette, position idler
CHEVROLET CHASSIS SERVICE MANUAL