ECO mode CHEVROLET CAMARO 1967 1.G Chassis Owner's Manual
[x] Cancel search | Manufacturer: CHEVROLET, Model Year: 1967, Model line: CAMARO, Model: CHEVROLET CAMARO 1967 1.GPages: 659, PDF Size: 114.24 MB
Page 373 of 659

CLUTCH AND TRANSMISSIONS 7-14
SPEED HEAVY DUTY TRANSMISSION
(WARNER MODEL T 16)
INDEX
General Description ......
Maintenance and Adjustments
Shift Linkage Adjustment
Side Cover ........
Removal .........
Disassembly
7-14
7-14
7-14
7-14
7-14
7-14
Assembly 7-14
Installation • 7-15
Other Maintenance
&
Adjustment
Operations See 3-Speed Saginaw Section
Transmission Replacement . . . See 3-Speed Saginaw Section
GENERAL DESCRIPTION
The Borg-Warner heavy duty three speed fully syn-
chronized (all forward gears) transmission incorporates
helical gears throughout specially designed to provide
high torque capacity, and gear teeth proportion to operate
at high speeds with neither excessive heat generation nor
excessive frictional losses. Shafts, bearings, high ca-
pacity clutches and other precision parts are held to
close limits providing proper clearances necessary for
durability during extended heavy usage.
The main drive gear is supported by a heavy duty ball
bearing at the front end of the transmission case and is
piloted at its front end in an oil impregnated bushing
mounted in the engine crankshaft. The front end of the
mainshaft is piloted in a row of roller bearings set into
the hollow end of the main drive gear and the rear end
is carried by a heavy duty ball bearing mounted in the
front of the extension housing.
The countergear is carried on a double row of rollers
at both ends while thrust is taken on thrust washers lo-
cated between the ends of the gear and the thrust bosses
in the case. An anti-rattle plate assembly at the front
of the countergear provides a constant spring tension be-
tween the counter and clutch gears to reduce torsional
vibrations. The reverse idler gear is carried on 25
roller bearings while thrust is taken on thrust washers
located between the ends of the gear and the thrust bosses
of the case.
Gear shifting is manual through shift control rods from
the shifter tube in the mast jacket to the rearward shift
lever of the side cover assembly for first and reverse
gear; and through a cross shaft assembly attached to the
forward side cover lever for second and third gear. All
three forward gears are fully synchronized. The syn-
chronizer assemblies consist of a clutch hub, clutch
sleeve, two clutch key springs and three energizer clutch
keys and are retained as an assembly on the main shaft
by a snap ring. The transmission may be used as an aid
in deceleration by downshifting in sequence without
double-clutching or any gear clashing. Reverse is not
synchronized, however, it is a helical gear to insure
quiet operation.
MAINTENANCE AND ADJUSTMENTS
Refer to similar procedures under the 3-speed Saginaw
Transmission Section for—Column Mounted Shift Linkage
Adjustment, Speedometer Driven Gear and Oil Seal Re-
placement, Extension Oil Seal Replacement and Trans-
mission Replacement. ~~
Camaro and Corvette Floor Shift Linkage Adjustment
(Fig.
lc)
1.
Set Lever (L), (K) in neutral position.
2.
Move Lever Assembly (A) and Levers (C), (D) to
neutral position and insert Locating Gauge (B) into
control Lever Bracket Assembly.
3.,
Install Rod (H) with Retainer (M) on Lever (L).
4.
With two Jam Nuts (G), (E) and Swivel (F) loose on
Rod (H) insert and attach Swivel with Retainer (N)
to Lever (D).
5.
Repeat steps 3 and 4 for Rod (J) and Levers (C
&
K).
6. Remove' Locating Gauge and check shift to insure
proper operation.
SIDE COVER ASSEMBLY
Removal
1.
Drain transmission and disconnect control rod and
cross shaft from side cover levers. *
2.
Remove nine cap screws securing the transmission
side cover assembly to transmission, case and re-
move cover assembly, shifting forks, and gasket.
Disassembly (Fig. 2C) '
1.
Remove shifting forks from shift lever assemblies.
2.
Remove nut and lock washer from each shift lever
shaft.
3.
Remove outer shift levers and lightly tap shift lever
shafts from assembly.
4.
Remove two steel balls, poppet spring, interlock pin
and interlock sleeve from cover.
5.
Remove "O" ring seals from shift lever shafts.
Assembly (Fig. 2C)
1.
Install new "O" ring seals to shift lever shafts.
2.
Install low and reverse shifter shaft and plate as-
sembly to cover.
3.
Place shifter shaft and plate assembly in neutral po-
sition, middle detent, and install interlock sleeve,
ball, poppet spring and interlock pin.
4.
Install remaining poppet ball and then install second
and third shifter shaft and plate assembly.
NOTE: Installation is easiest if shifter shaft
and plate assembly passes over ball in its neu-
tral position.
5.
Check clearance between end of interlock sleeve and
shifter shaft and plate cams when one plate is in
neutral and the other is shifted into gear position.
CHEVROLET CHASSIS SERVICE MANUAL
Page 383 of 659
CLUTCH AND TRANSMISSIONS 7-24
is at the full mark on the dip stick, it is just slightly be-
low the planetary gear unit. If additional oil is added,
bringing the oil level above the full mark, the planetary
unit will run in the oil, foaming and aerating the oil. This
aerated oil carried through the various oil pressure pas-
sages (low servo, reverse servo, clutch apply, converter,
etc.) may cause malfunction of the transmission assem-
bly, resulting in cavitation noise in the converter and
improper band or clutch application. Overheating may
also occur.
If the transmission is found consistently low on oil, a
thorough inspection should be made to find and correct
all external oil leaks.
PERIODIC OIL CHANGE
The transmission oil should be changed periodically as
recommended in Section 0, and whenever transmission is
to be removed from the vehicle for repairs.
1.
Run engine for one minute in neutral prior to chang-
ing.
2.
Be sure vehicle is level or raise from the rear only.
3.
Remove the oil pan drain plug and allow oil to drain
thoroughly into a pan or can.
Replace drain plug and refill with approximately two
quarts of oil specified in Section 0.
NOTE: To refill the transmission, remove dip
stick from oil filler tube and refill transmission
with oil specified in Section 0 using filler tube
and funnel J-4264. Then, after shifting into all
ranges at idle speed to fill all oil passages, the
engine should be run at 800-1000 rpm with the
transmission in Neutral until the oil warms up,
then add oil as required to raise the fluid level
to the full mark on the dip stick. Refill capacity
is approximately 2 qts.
4.
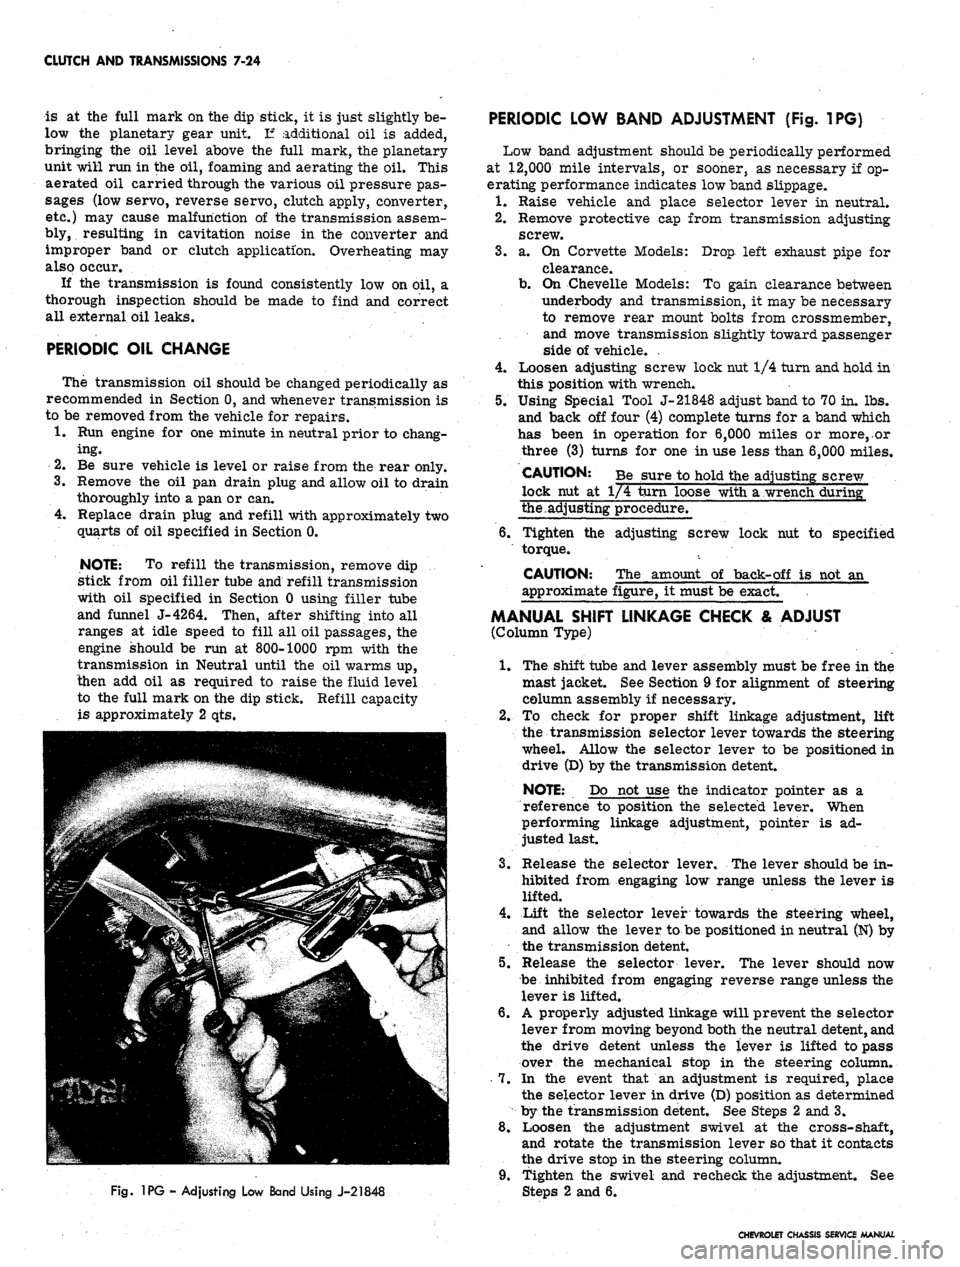
Fig.
1PG - Adjusting Low Band Using J-21848
PERIODIC LOW BAND ADJUSTMENT (Fig. 1PG)
Low band adjustment should be periodically performed
at 12,000 mile intervals, or sooner, as necessary if op-
erating performance indicates low band slippage.
1.
Raise vehicle and place selector lever in neutral.
2.
Remove protective cap from transmission adjusting
screw.
3.
a. On Corvette Models: Drop left exhaust pipe for
clearance.
b.
On Chevelle Models: To gain clearance between
underbody and transmission, it may be necessary
to remove rear mount bolts from crossmember,
and move transmission slightly toward passenger
side of vehicle. .
4.
Loosen adjusting screw lock nut 1/4 turn and hold in
this position with wrench.
5.
Using Special Tool J-21848 adjust band to 70 in. lbs.
and back off four (4) complete turns for a band which
has been in operation for 6,000 miles or more,.or
three (3) turns for one in use less than 6,000 miles.
CAUTION: Be sure to hold the adjusting screw
lock nut at 1/4 turn loose with a wrench during"
the.adjusting procedure.
6. Tighten the adjusting screw lock nut to specified
torque.
CAUTION: The amount of back-off is not an
approximate figure, it must be exact.
MANUAL SHIFT LINKAGE CHECK & ADJUST
(Column Type)
1.
The shift tube and lever assembly must be free in the
mast jacket. See Section 9 for alignment of steering
column assembly if necessary.
2.
To check for proper shift linkage adjustment, lift
the transmission selector lever towards the steering
wheel. Allow the selector lever to be positioned in
drive (D) by the transmission detent.
NOTE: Do not use the indicator pointer as a
reference to position the selected lever. When
performing linkage adjustment, pointer is ad-
justed last.
3.
Release the selector lever. The lever should be in-
hibited from engaging low range unless the lever is
lifted.
4.
Lift the selector lever towards the steering wheel,
and allow the lever to be positioned in neutral (N) by
the transmission detent.
5.
Release the selector lever. The lever should now
be inhibited from engaging reverse range unless the
lever is lifted.
6. A properly adjusted linkage will prevent the selector
lever from moving beyond both the neutral detent, and
the drive detent unless the lever is lifted to pass
over the mechanical stop in the steering column.
7.
In the event that an adjustment is required, place
the selector lever in drive (D) position as determined
by the transmission detent. See Steps 2 and 3.
8. Loosen the adjustment swivel at the cross-shaft,
and rotate the transmission lever so that it contacts
the drive stop in the steering column.
9. Tighten the swivel and recheck the adjustment. See
2 and 6.
CHEVROLET CHASSIS SERVICE MANUAL
Page 414 of 659
FUEL TANK AND EXHAUST SYSTEMS
8-8
CHEVELLE
FUEL TANKS
INDEX
Page
General Description.
g.g
Component Part Replacement
8-8
Fuel Tanks
. 8-8
Fuel Lines
8-8
Metering Units (Gauge, Sending Unit)
Fuel Tank Filler Neck Caps.
. .
Fuel Tank Vent Lines
Page
8-8
8-8
8-9
GENERAL DESCRIPTION
All models
use a 20
gallon capacity (approx.) fuel tank
mounted between
the
frame rails behind
the
rear axle.
The fuel tanks
are
basically
the
same
for
sedan, 2-seat
station wagon
and
pickup models except
for
filler neck
location
and
venting
(fig. 8).
All fuel tanks
are
vented
to the
atmosphere. Sedan
model tanks have
an
external vent hose and pipe assem-
bly
(fig. 11) and use a
non-vented fuel cap. Station wagon
and pickup model tanks
are
vented through
a
hose
and
vent pipe assembly
to the
filler neck
(fig. 8)
and
use a
vented, anti-surge type
gas cap. The
fuel caps
are two
different designs conforming
to SAE
standards
and are
not interchangeable.
The filler neck assembly
on
sedan models
is a
rear
fill design located behind
the
center
bar of the
bumper.
Station wagon
and
sedan pickup model filler neck assem-
blies
are
located
in
the left rear quarter panel.
The fuel pickup pipe
is
built integrally with
the
tank
gauge, located
at the
top-front center
of
the tank.
A
fine
mesh screen
is
located
at
the bottom-end
of the
fuel pick-
up pipe
to
prevent
the
entrance
of
foreign material into
the fuel system.
The sedan fuel tanks
are
held
in
place
by
two metal
straps attached individually
to the
underbody
at
each
end.
The straps hinge
at the
forward end and secure
the
tank
at
the
rear with
an
adjustable bolt
and nut
assembly.
The station wagon
and
pickup models have
a
frame
mounted fuel tank secured with straps
to
front and rear
supports.
COMPONENT PART REPLACEMENT
FUEL TANK
Draining Tank
The absence
of a
drain plug
in the gas
tanks makes
it
necessary
to
siphon fuel from
the
tank when draining
is
needed. Refer
to the
recommended draining procedures
previously outlined under Chevrolet Models
in
this
section.
Removal
and
Installation (Sedan Models)
1.
Raise vehicle.
2.
Drain fuel tank.
3.
Disconnect fuel pickup line
and
gauge wires from
tank unit.
4.
Disconnect vent hose from tank.
5. Remove tank support straps and lower tank carefully.
6.
To
install, reverse
the
removal procedure.
Removal
and
Installation
(Station Wagon
and
Pickup)
1.
Follow Steps
1
thru
3
outlined under sedan models.
2.
Remove tank support straps.
3.
Remove frame screw attachments from
the
front
support
(fig. 8).
4.
Guide tank forward
and
remove.
5.
To
install, reverse removal procedure.
FUEL LINES
The fuel lines, extending from fuel tank toiiuelpump,
are routed
on the
underside
of the
underbody along
the
right side
of the
vehicle opposite
the
single exhaust
sys-
tem.
The
fuel lines should occasionally
be
inspected
for
leaks,
kinks,
or
dents.
If
evidence
of
dirt
is
found
in the
carburetor
or
fuel pump
on
disassembly,
the
lines should
be disconnected
and
blown
out.
Check
the
fuel tank
strainer
for
damage
or
omission. Fuel lines
are of 5/16"
diameter tubing with beaded type ends
for
connections
of
hoses.
FUEL PIPE RETAINER
CUP
Removal
and
Installation
If fuel pipes
and
retainer clips
are
removed, Tool
J-7777 should
be
used
to
install
new
retainer clips
(fig.
10).
After removal
of the old
clip from
the
frame, position
the
new
clip
in the
location
of the old
clip. Index
the
"blind rivet"
and
press hard (hand pressure should
do)
to expand rivet.
GAUGE UNIT
AND
FUEL STRAINER
Removal
and
Installation
(Fig. 11)
1.
Drain tank
to a
level below
the
unit.
2.
Disconnect fuel pickup line
and
gauge unit wire.
3.
Use
special Tool J-8950
to
remove
cam
lock.
Re-
move unit
and
rubber gasket.
CAUTION: Carefully remove unit
so as not to
damage screen
on the end of
the pipe.
4.
Clean screen
by
blowing
out
with compressed
air.
5. Reverse procedure
to
install.
FUEL TANK FILLER NECK CAPS
The fuel tank filler neck caps
are
non-vented with
an
anti-surge feature. Station wagons have vented caps.
(Refer
to
"Fuel Tank Vent Lines").
CHEVROLET CHASSIS SERVICE MANUAL
Page 419 of 659
FUEL TANK
AND
EXHAUST SYSTEMS
8-13
CHEVY II
FUEL TANKS
INDEX
Page
Page
General Description.
8-13
Component Part Replacement
8-13
Fuel Tanks
8-13
Fuel Lines
8-14
Metering Units (Gauge Sending Unit)
8-13
Fuel Tank Filler- Neck Caps.
. . 8-14
Fuel Tank Vent Lines .......
8-14
GENERAL DESCRIPTION
ANTI-SQUEAK
MA'
ANTI-SQUEAK
MATERIAL
SEDANS
STATION WAGON
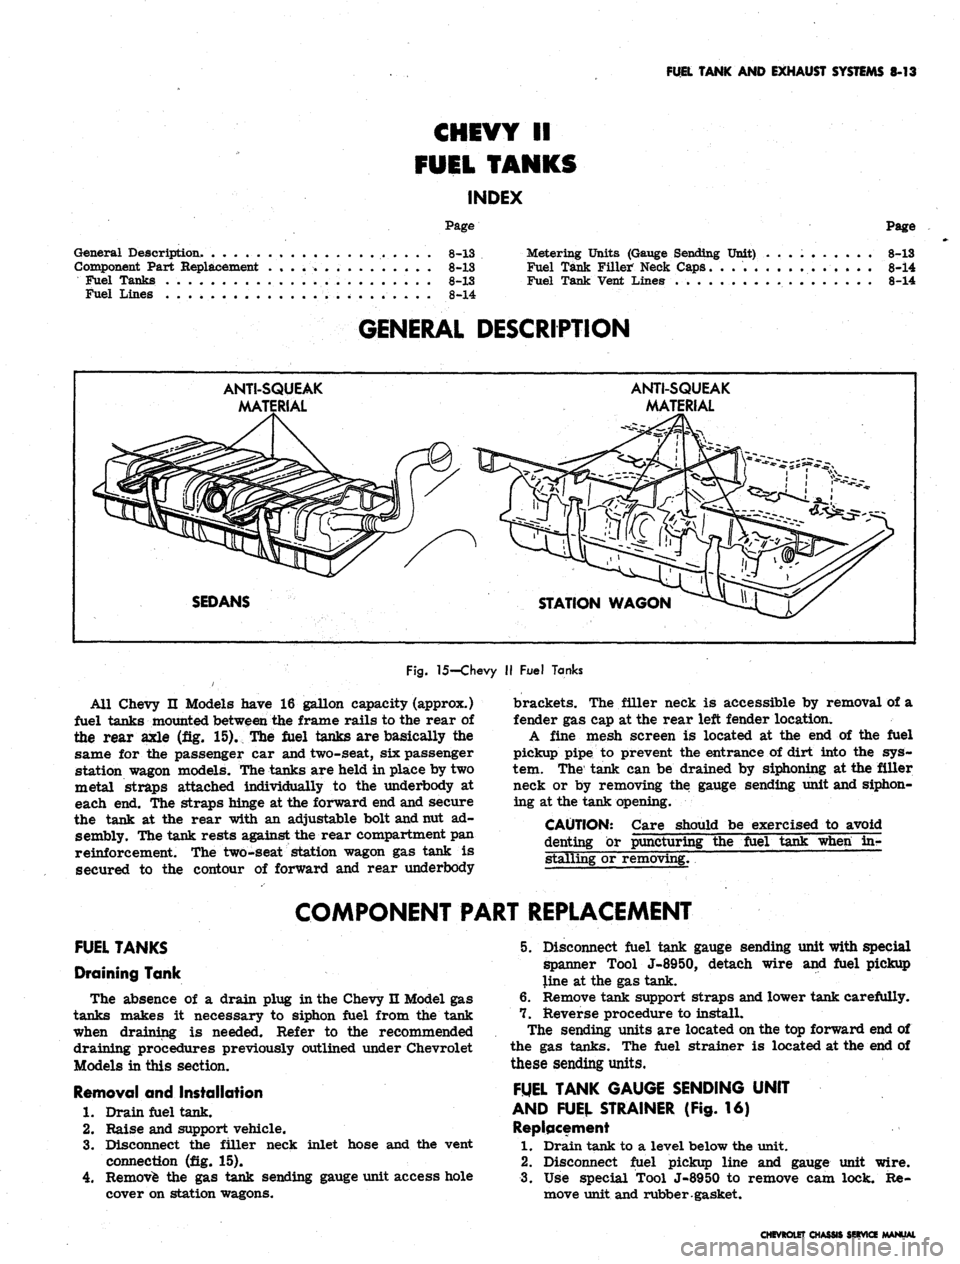
Fig.
15-Chevy
II
Fuel Tanks
All Chevy
II
Models have
16
gallon capacity (approx.)
fuel tanks mounted between
the
frame rails
to the
rear
of
the rear axle
(fig. 15). The
fuel tanks
are
basically
the
same
for the
passenger
car
and two-seat,
six
passenger
station wagon models. The tanks
are
held
in
place
by two
metal straps attached individually
to the
underbody
at
each
end. The
straps hinge
at the
forward
end
and secure
the tank
at the
rear with
an
adjustable bolt and nut
ad-
sembly. The tank rests against the rear compartment
pan
reinforcement.
The
two-seat station wagon
gas
tank
is
secured
to the
contour
of
forward
and
rear underbody
brackets.
The
filler neck
is
accessible
by
removal
of a
fender
gas cap at the
rear left fender location.
A fine mesh screen
is
located
at the end of the
fuel
pickup pipe
to
prevent
the
entrance
of
dirt into
the sys-
tem.
The
tank
can be
drained
by
siphoning
at the
filler
neck
or by
removing
the
gauge sending unit and siphon-
ing
at the
tank opening.
CAUTION: Care should
be
exercised
to
avoid
denting
or
puncturing
the
fuel tank when
in-
stalling
or
removing.
~
COMPONENT PART REPLACEMENT
FUEL TANKS
Draining Tank
The absence
of a
drain plug
in
the Chevy
n
Model
gas
tanks makes
it
necessary
to
siphon fuel from
the
tank
when draining
is
needed. Refer
to the
recommended
draining procedures previously outlined under Chevrolet
Models
in
this section.
Removal
and
Installation
1.
Drain fuel tank.
2.
Raise
and
support vehicle.
3.
Disconnect
the
filler neck inlet hose
and the
vent
connection
(fig. 15).
4.
Remove
the gas
tank sending gauge unit access hole
cover
on
station wagons.
5. Disconnect fuel tank gauge sending unit with special
spanner Tool J-8950, detach wire
and
fuel pickup
line
at the gas
tank.
6. Remove tank support straps and lower tank carefully.
7. Reverse procedure
to
install.
The sending units
are
located on
the top
forward
end of
the
gas
tanks.
The
fuel strainer
is
located
at the end of
these sending units.
FUEL TANK GAUGE SENDING UNIT
AND FUEL STRAINER
(Fig. 16)
Replacement
1.
Drain tank
to a
level below
the
unit.
2.
Disconnect fuel pickup line
and
gauge unit wire.
3.
Use
special Tool J-8950
to
remove
cam
lock.
Re-
move unit and rubber gasket.
CHEVROLET CHASSIS SERVICE MANUAL
Page 472 of 659

STEERING
9-32
arm on frame and install mounting bolts, washers
and nuts. No washer is used on Corvette.
Install relay rod to idler arm, ^making certain seal
is on stud. Install and tighten nut.
Install cotter pin.
Refer to torque specifications at rear of manual for'
correct torque values.
Chevy II (Fig. 62}
Removal
1.
Remove cotter pin, nut and washer securing idler
arm to relay rod.
2.
Remove relay rod from idler arm.
3.
If equipped with power steering disconnect power
cylinder shaft from idler arm bracket.
4.
Remove three idler bracket to frame bolts and nuts
and remove bracket and idler arm assembly.
5.
Remove cotter pin, nut, washer and bolt securing the
idler arm to the bracket.
6. Press out the idler arm bushing for replacement.
Installation
NOTE: Installation must be done with front
wheels straight ahead or the car will lead to one
side.
1.
Install idler arm bushing, if previously removed.
NOTE: Make certain the outer sleeve of the
bushing does not protrude above surface of idler
arm.
2.
Reverse removal procedure and torque all nuts ac-
cording to specifications.
PITMAN ARM
Removal
1.
Remove cotter pin from pitman arm ball stud and
remove nut.
2.
Remove relay rod from pitman arm by tapping on
side of rod or arm in which the stud mounts with a
hammer while using a heavy hammer or similar tool
as a backing. Pull down on relay rod to remove
from stud.
3.
Remove pitman arm nut from sector shaft and mark
relation of arm position to shaft.
4.
Remove pitman arm with Tool J-6632 as shown in
Figure 2.
Installation
1.
Install pitman arm on sector shaft, lining up the
• marks made upon removal.
2.
Install sector shaft nut.
3.
Position relay rod on to pitman arm. Install nut.
Continue to tighten arm enough to align castellation
with hole in stud and install cotter pin.
STEERING ARM
If, through collision or other damage, it becomes nec-
essary to remove and replace either steering arm, pro-
ceed as follows:
Removal
1.
Remove tie rod from steering arm as outlined in this
section.
2.
Remove front wheel, hub and brake drum as a unit
by removing hub cap and dust cap, cotter pin from
spindle nut and the spindle nut. Pull assembly to-
ward outside of vehicle. If removal is difficult, it
may be necessary to back off brake adjustment to
increase brake shoe-to-drum clearance; see Hy-
draulic Brake Adjustment, Section 5. On models
with disc brakes, remove caliper and disc.
3.
With wheel and drum assembly or caliper and disc
removed, steering arm retaining bolt heads are ac-
cessible and removal of steering arm from vehicle
may be accomplished by removing retaining nuts.
Installation
1.
Place steering arm in position on vehicle and install
retaining bolts*
2.
Install nuts. Use only the special locknut listed for
this use in the Chevrolet Parts Catalog.
3.
Pack wheel bearings using a high quality wheel
bearing lubricant. Install bearings and wheel-hub-
brake drum assembly removed previously. On disc
brake models, install disc and caliper.
4.
Install keyed washer and spindle nut. Proceed as out-
lined under t{ Front Wheel Bearing Adjustment" in
Section 3.
5.
Install tie rod ball stud in steering arm. Be sure that
the dust cover is in place on ball stud.
6. Install castellated nut on ball stud, tighten securely
and install cotter pin.
7.
Following directions given in Section 3 to check cor-
nering wheel relationship and toe-in; correct as
required.
STEERING DAMPER-CORVETTE
Removal
1.
Remove bolt from damper pivot bracket at relay rod.
2.
Remove nut from damper pivot at frame bracket and
withdraw damper assembly.
Damper is serviced as a unit. Replace damper if
3.
damaged or excessively worn.
Installation
1.
Place piston rod end into frame bracket and install
retainers, bushings, and nut.
2.
Insert cylinder end pivot into relay rod bracket and
install through bolt.
CHEVROLET CHASSIS SERVICE MANUAL
Page 473 of 659
STEERING
9-33
POWER STEERING
INDEX
Page
General Description
. 9-33
Maintenance
and
Adjustments
9-33
Bleeding Hydraulic System
9-33
Fluid Level
. 9-33
Adjustments
. 9-34
Power Steering Gear
. . 9-34
Pump Belt Tension
9-34
Hydraulic System Checks
9-34
Component Replacement
and
Repairs
. 9-35
Power Steering Pump.
. 9-35
Power Steering Gear
9-36
Control Valve
and
Adapter Assembly
9.35
Power Cylinder
9.37
Power Steering Hoses
9.39
GENERAL DESCRIPTION
Two types
of
power steering
are
used
for 1967.
One
is
the conventional linkage type
for
Chevy
n and
Corvette
vehicles
and the
other
is the
integral gear type
for
Chevrolet, Chevelle,
and
Camaro.
For
both types
the
hydraulic pressure
is
provided
by an
engine-driven vane-
type pump.
On
the
Chevy
n and
Corvette linkage type power steer-
ing, hydraulic pressure
is
delivered through
a
hose from
the pump
to a
valve which senses
the
requirement
for
power assistance
and
supplies
the
power cylinder
ac-
cordingly.
The
steering gear used with this power steer-
ing
is the
same basic unit used
on
manually steered
vehicles;
it is
serviced
as
outlined
in the
manual steering
part
of
this section except
for
adjustment, which
is
covered
in the
following pages.
The
steering linkage also
is serviced the same
as
manual counterparts.
The Chevrolet, Chevelle
and
Camaro integral gear type
power steering
has the
hydraulic pressure delivered
from
the
pump through two hoses
to the
steering gear.
In
the power steering gear
the
steering shaft, hydraulic
valve, worm, and rack-piston
nut are all in
line making
a
compact
and
space saving assembly.
All oil
passages
are
internal within
the
gear except
the
pressure
and
return
hoses.
The steering gear
is a
recirculating ball system
in
which steel balls
act as a
rolling thread between
the
steering worm
and
rack-piston
nut. The
rack-piston
nut
is
all one
piece
and is
geared
to the
sector
of
the piston
shaft.
The
valve
is
contained
in the
gear housing elimi-
nating
the
need
of
bolts
or
seals
to
attach
a
separate
valve housing.
The valve
is an
open-center, rotary-type three
way
valve.
The
spool
is
held
in
neutral position by means
of a
torsion
bar. The
spool
is
attached
by
means
of
the stub
shaft
to one end of the
torsion
bar
and
to the
valve body
on
the
other
end.
Twisting
of the
torsion bar allows
the
spool
to
move
in
relation
to the
valve body thereby oper-
ating
the
valve.
MAINTENANCE
AND
ADJUSTMENTS
BLEEDING HYDRAULIC SYSTEM
1.
Fill
oil
reservoir
to
proper level and
let oil
remain
undistrubed
for at
least two minutes.
2.
Start engine
and run
only
for
about
two
seconds.
3.
Add
oil if
necessary.
4.
Repeat above procedure until
oil
level remains
con-
stant after running engine.
5. Raise front
end of
vehicle
so
that wheels
are off
the
ground.
6. Increase engine speed
to
approximately
1500 rpm.
7. Turn
the
wheels
(off
ground) right
and
left, lightly
contacting
the
wheel stops.
8. Add
oil if
necessary.
9. Lower
the car and
turn wheels right and left
on the
ground.
10.
Check
oil
level and refill
as
required.
11.
If oil is
extremely foamy, allow vehicle
to
stand
a
few minutes with engine
off and
repeat above
procedure.
,
a.
Check belt tightness
and
check
for a
bent
or
loose
pulley. (Pulley should
not
wobble with engine
running.)
b.
Check
to
make sure hoses
are not
touching
any
other parts
of the car,
particularly sheet metal.
c. Check
oil
level, filling
to
proper level
if
neces-
sary, following operations
1
through
10.
This
step
and
Step
"D" are
extremely important
as
low
oil
level and/or
air in the oil are the
most
frequent causes
of
objectionable pump noise.
d. Check
the
presence
of air in the oil. If air is
present, attempt
to
bleed system
as
described
in
operations
1
through
10. If it
becomes obvious
that
the
pump will
not
bleed after
a few
trials,
proceed
as
outlined under Hydraulic System
Checks.
FLUID
LEVEL
1.
Check
oil
level
in the
reservoir
by
checking
the dip
stick when
oil is at
operating temperature.
On
Chevelle models equipped with remote reservoir,
the reservoir should
be
maintained approximately
3/4 full when
oil is at
operating temperature.
2.
Fill,
if
necessary,
to
proper level with
GM
Power
Steering Fluid
or, if
this
is not
available, automatic
CHEVROLET CHASSIS SERVICE MANUAL
Page 479 of 659
STEERING 9-39
4.
Remove cotter pin, nut and ball stud at relay rod.
5. Remove the power cylinder from the vehicle.
Inspection
1.
Inspect the seals for leaks; if leaks are present,
replace the seals using the procedure outlined under
"Disassembly."
2.
Examine the brass fitted hose connection seats for
cracks or damage and replace if necessary.
3.
For service other than ball seat or seal replacement
and ball stud removal, replace the power cylinder.
4.
Check the frame bracket parts for wear.
Disassembly
1.
To remove the piston rod seal remove the snap ring;
then pull out on the rod, being careful not to spray
oil.
2.
Remove the piston rod scraper and scraper element,
back up washer and piston rod seal from the rod.
3.
At the ball stud end of the cylinder, remove the ball
stud seal.
4.
Remove the snap ring retaining the end plug with the
lube fitting.
5. Push on the end of the ball stud and remove the end
plug, spring, spring seat and ball stud.
6. Remove the "O" ring seal from the top lip of the
power cylinder ball stud opening.
7. If the ball seat is to be replaced, it must be pressed
out using Tool J-8937.
Assembly
1.
Reassemble the piston rod seal components by re-
versing the disassembly procedure. Apply a thin
coat of Lubriplate or equivalent on the inner sur-
faces of the seal and scraper before assembly.
2.
Reverse the disassembly procedure when reassem-
bling the ball stud.
3.
In each case be sure that the snap ring is securely,
seated in the ring groove.
Installation
1.
Install the power cylinder on the vehicle by reversing
the removal procedure.
2.
Reconnect the two hydraulic lines, fill the system
with fluid and bleed out air using the procedure out-
lined under "Maintenance and Adjustments." Grease
ball joint.
POWER STEERING HOSES
When servicing the power steering hoses be sure to
align the hoses in their correct position as shown in
Figure 71. On Chevelle models with 396 engine, install
the upper hose so that there is at least .6 inch clearance
between the hose and the Delcotron or the inner fender
skirt.
It is important that the power steering hoses be in-
stalled correctly. Hoses installed out of position may be
subjected to chafing or other abuses during sharp turns.
Always make hose installations with front wheels in
straight ahead position. Do not twist hoses unneces-
sarily during installation.
CAUTION: Do not start engine with any power
steering hose disconnected.
CHEVROLET CHASSIS SERVICE MANUAL
Page 481 of 659
SECTION 10
WHEELS AND TIRES
INDEX
Page
General Description
10-1
Maintenance
and
Adjustments
.............. 10—1
Tires
10-1
Pressures . 10-1
Inspection 10-1
Wear 10-1
Rotation 10-4
Noise 10-4
Cleaning 10-4
Change (W/Wheels) 10-4
Wheels 10-5
Static Balancing (w/Tire) 10-5
Page
Dynamic Balancing (w/Tire) . 10-5
Run Out (w/o Tire) 10-5
Cleaning 10-5
Service Operations 10-5
Tires 10-5
Removal 10-5
Installation 10-5
Repair 10^6
Wheels . 10-6
Valve Assembly 10-6
Repair (Rim) 10-7
GENERAL DESCRIPTION
WHEELS
Chevrolet, Chevelle, Camaro, Chevy n, and Corvette
are base equipped with welded steel wheels. Five studs
with nuts fasten each wheel to the front hub or rear axle
flange. Disc brake equipped vehicles (except Chevrolet
and Corvette) require special 14 inch diameter wheels
with a revised design for clearance, Chevrolet disc brake
equipped vehicles have 15 in. diameter wheels as do all
Corvettes.
Chevrolet station wagons, Chevelle Super Sport 396,
Corvette and Camaro Super Sport 350 are base equipped
with 6 in. width wheels. All other vehicles have 5 in.
width wheels, except Chevy n 100, 300 and 500 Series
Sedans, which have 4 in. width wheels.
Do not install 6 inch width wheels or snow chains on
Chevrolets equipped with rear fender skirts.
TIRES
The factory installed tires on Chevrolet passenger
cars are selected to provide the best all around tire
performance for all normal operation. They are de-
signed to operate satisfactorily with loads up to and in-
cluding the specified full rated load capacity of the
automobile when inflated as recommended in the Vehicle
Capacity Rating and Recommended Tire Inflation Pres-
sures Table (see Specifications).
Optional Oversize and 8-Ply Rating Tires
{Chevrolet and Chevelle Only)
Oversize or 8-ply rating tires are not necessary on
passenger cars for normal requirements. However, an
extra margin of tire service is available when these
options are used at loads up to and including full rated
load.
Optional oversize 4-ply rating and/or 8-ply rating
tires are available on models as indicated in the Tire
Usage Chart (see Specifications). On some models (ex-
ample—Station Wagon), space limitations do not permit
the use of a larger size tire; hence, the 8-ply rating
tire is an available option.
In either case, these tires are applicable to extended
operation at or near full rated load or for trailer towing
when an extra margin of tire service is desired. How-
ever, use of a larger tire or an 8-ply rating tire should
not be construed as permitting an increase in the full
rated vehicle load (see Specifications).
MAINTENANCE AND ADJUSTMENTS
TIRES
Inflation Pressures
To ensure the proper tire inflation pressure for the
owners particular requirements follow the recommenda-
tions in the Vehicle Capacity Rating and Recommended
Tire Inflation Pressures Table (seeSpecifications). Keep
tires properly inflated, and check inflation pressures
periodically. This will ensure the best tire life and riding
comfort, over the full range of driving conditions.
Inspection
Every few thousand miles and at each lubrication, tires
should be checked for sharp objects or stones in the
tread. H tire is punctured, it should be repaired using
one of several repair kits available through tire manu-
facturers1 outlets.
Wear
Misalignment
This is wear due to excessive toe-in or toe-out. In
CHEVROLET CHASSIS SERVICE MANUAL
Page 484 of 659
WHEELS AND TIRES 10-4
the road and it slips, grinding off the tread on the inside
half of the tire at an excessive rate. This type of tire
shows much the same appearance of tread wear as tire
wear caused by negative camber.
Second, the transfer of weight may also over-load the
outside tires so much that they are laterally distorted
resulting in excessive wear on the outside half of the
tire producing a type of wear like that caused by ex-
cessive positive camber.
Cornering wear can be most easily distinguished from
abnormal camber wear by the rounding of the outside
shoulder or edge of the tire and by the roughening of the
tread surface which denotes abrasion.
Cornering wear often produces a fin or raised portion
along the inside edge of each row in the tread pattern.
In some cases this fin is almost as pronounced as a
toe-in fin, and in others, it tapers into a row of tread
blocks to such an extent that the tire has a definite step
wear appearance.
The only remedy for cornering wear is proper in-
struction of owners.
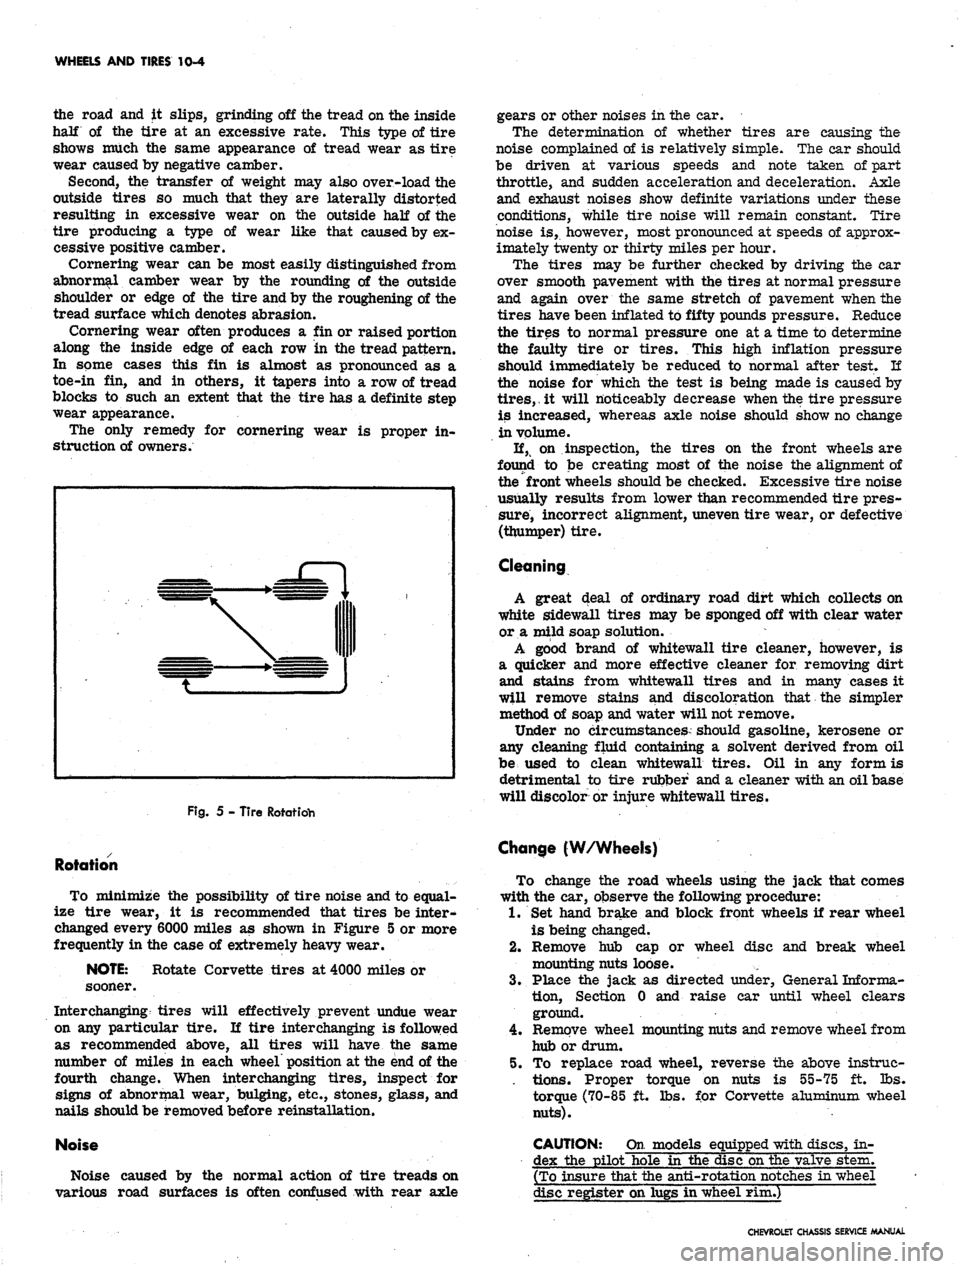
Fig.
5 - Tire Rotatidh
Rotation
To minimize the possibility of tire noise and to equal-
ize tire wear, it is recommended that tires be inter-
changed every 6000 miles as shown in Figure 5 or more
frequently in the case of extremely heavy wear.
NOTE:
Rotate Corvette tires at 4000 miles or
sooner.
Interchanging tires will effectively prevent undue wear
on any particular tire. II tire interchanging is followed
as recommended above, all tires will have the same
number of miles in each wheel position at the end of the
fourth change. When interchanging tires, inspect for
signs of abnormal wear, bulging, etc., stones, glass, and
nails should be removed before reinstallation.
Noise
Noise caused by the normal action of tire treads on
various road surfaces is often confused with rear axle
gears or other noises in the car.
The determination of whether tires are causing the
noise complained of is relatively simple. The car should
be driven at various speeds and note taken of part
throttle, and sudden acceleration and deceleration. Axle
and exhaust noises show definite variations under these
conditions, while tire noise will remain constant. Tire
noise is, however, most pronounced at speeds of approx-
imately twenty or thirty miles per hour.
The tires may be further checked by driving the ear
over smooth pavement with the tires at normal pressure
and again over the same stretch of pavement when the
tires have been inflated to fifty pounds pressure. Reduce
the tires to normal pressure one at a time to determine
the faulty tire or tires. This high inflation pressure
should immediately be reduced to normal after test. If
the noise for which the test is being made is caused by
tires,.
it will noticeably decrease when the tire pressure
is increased, whereas axle noise should show no change
in volume.
If, on inspection, the tires on the front wheels are
found to be creating most of the noise the alignment of
the front wheels should be checked. Excessive tire noise
usually results from lower than recommended tire pres-
sure, incorrect alignment, uneven tire wear, or defective
(thumper) tire.
Cleaning
A great deal of ordinary road dirt which collects on
white sidewall tires may be sponged off with clear water
or a mild soap solution.
A good brand of whitewall tire cleaner, however, is
a quicker and more effective cleaner for removing dirt
and stains from whitewall tires and in many cases it
will remove stains and discoloration that the simpler
method of soap and water will not remove.
Under no circumstances should gasoline, kerosene or
any cleaning fluid containing a solvent derived from oil
be used to clean whitewall tires. Oil in any form is
detrimental to tire rubber and a cleaner with an oil base
will discolor or injure whitewall tires.
Change (W/Wheels)
To change the road wheels using the jack that comes
with the car, observe the following procedure:
1.
Set hand brake and block front wheels if rear wheel
is being changed.
2.
Remove hub cap or wheel disc and break wheel
mounting nuts loose.
3.
Place the jack as directed tinder, General Informa-
tion,
Section 0 and raise car until wheel clears
ground.
4.
Remove wheel mounting nuts and remove wheel from
hub or drum.
5. To replace road wheel, reverse the above instrue-
. tions. Proper torque on nuts is 55-75 ft. lbs.
torque (70-85 ft. lbs. for Corvette aluminum wheel
nuts).
CAUTION: On models equipped with discs, in-
dex the pilot hole in the disc on the valve stem.
(To insure that the anti-rotation notches in wheel
disc register on lugs in wheel rim.)
CHEVROLET CHASSIS SERVICE MANUAL
Page 505 of 659
CHASSIS SHEET METAL 11-18
b.
Check and adjust front wheel alignment as out-
lined in Section 3.
c. Check and adjust headlamp aiming as outlined in
Section 12.
HOOD ASSEMBLY
Hood may be removed either with or without hinges.
To shorten aligning time, hood hinge plates may be lo-
cated by scribing a mark on hood and/or body which
outlines entire plate. See Maintenance and Adjustments -
Hood Hinge for hood adjustment procedure. Hood hinge
springs may be easily and safely removed and installed.
through the use of Tool J-9559 as follows:
1.
With hood opened only far enough to allow passage of
mechanic's arm between hood and fender, insert ends
of J-9559 (through bolt removed) between coils of
spring until barrel of tool contacts outer diameter
of spring.
2.
Open hood fully while still holding spring (with tool
installed) in hand; when hood is near fully opened
position, spring may be removed as shown in Figure
28.
3.
As soon as spring is removed, insert long bolt sup-
plied with J-9559 through holes in end of tool, pass-
ing it through spring, and install nut on bolt.
Spring may be removed from J-9559 or J-9559 may be
installed in a new spring by the following method:
1.
Place a closed 6 or 8 inch "C" clamp in a vise or
fasten it to a heavy bench top (bench should be fas-
tened to floor).
2.
Hook one end of spring in clamp and the other end
in hook of a hoist as shown in Figure 29.
3.
Stretch the spring enough to allow insertion of
J-9559. Install through bolt if spring is not to be
installed on hinge at once.
HOOD CATCH AMD LOCK (Fig. 19)
Removal
1.
Remove catch assembly as follows:
a. Remove screws retaining catch assembly to radi-
ator support.
b.
Remove screws retaining catch assembly to catch
support assembly.
c* Remove screws retaining catch assembly to grille
upper bar.
2.
Before removing hood lock plate from hood, locate
position on hood by scribing around base of lock
plate. Remove screws retaining lock plate to hood
and remove lock plate from vehicle.
Installation
1.
Install both catch and lock assemblies in reverse
order of removal procedure.
2.
Align as outlined under Maintenance and Adjust-
ments - Hood Catch.
HOOD TRIM
Crown Molding
Hood crown molding is retained by clips installed on
underside of hood. Clips may be removed by carefully
pressing them off molding mounting studs with screw
driver.
When installing a new molding, force clips onto mount-
ing studs as far as possible and then clench clips with
long-nosed pliers to eliminate gap between molding and
hood, as shown in Figure 30.
Emblem
The hood emblem is retained by four nuts which are
accessible from under the hood.
COWL VENT GRILLE
The cowl vent grille replacement procedure for Chevy
U is the same as for Chevrolet and Chevelle. Refer to
Chevrolet and Chevelle Cowl Vent Grille replacement
procedure and see Figure 16.
FRONT END ASSEMBLY
The Chevy n front end body design allows for removal
of the entire front end of the vehicle without disassembly
of front suspension of sheet metal. One man may remove
and transport the front end assembly using only a floor
jack placed under the crossmember and the vehicle front
wheels. Figure 31 illustrates the assembly in process
of removal with jack stand in position under rocker panel.
Proceed with removal
as.
follows:
Removal
1.
Remove hood assembly as outlined in this section.
2.
Remove engine assembly as outlined in Section 6.
On 4 cylinder models, replace crossmember.
3.
Raise car from floor and install jack stands as
shown in Figure 31.
4.
Remove pitman arm from steering gear as outlined
in Section 9.
5.
Remove steering gear mounting bolts from skirt
assembly.
6. Remove 4 bolts securing each skirt assembly to
lower dash brace.
7.
Remove fender-to-rocker extension mounting screws
and record shimming.
8. Remove brake hydraulic line and fuel line from right
hand skirt.
9. Position floor jack or equivalent under front cross-
member.
10.
Remove hydraulic line from main cylinder.
11.
Remove fender-to-cowl mounting screws and record
shimming.
12.
Remove upper skirt-to-dash mounting screws and
record shimming.
13.
Remove front end from vehicle as shown in Figure
31.
Inspection
If car has been involved in a collision, it is advisable
to carefully inspect cowl and dash area for damage. Pay
particular attention to welds, cage nuts, weld nuts and
skirt mounting surfaces. Cage and weld nuts may be
repaired by outright replacement (the best method), or
by the installation of spiral thread inserts. If the spiral
inserts are used, follow the instructions furnished by the
manufacturer. -
Installation
%, position front end assembly at upper dash mounts
and lower dash support, align screw holes with drift
punch and install all mounting screws and bolts
loosely; do not tighten until all screws and bolts are
started. Replace original shimming.
CHEVROLET CHASSIS SERVICE MANUAL