ECO mode CHEVROLET CAMARO 1967 1.G Chassis Owner's Guide
[x] Cancel search | Manufacturer: CHEVROLET, Model Year: 1967, Model line: CAMARO, Model: CHEVROLET CAMARO 1967 1.GPages: 659, PDF Size: 114.24 MB
Page 513 of 659
SECTION 12
ELECTRICAL-BODY AND CHASSIS
CONTENTS
OF
THIS
SECTION
Page
Page
System 12-1
Instruments and Gauges 12-21
Directional Signal 12r40
Windshield Wipers and Washers 12-44
Wiring Diagrams 12-56
Special Tools 12-60
LIGHTING SYSTEM
INDEX
Page
General Description
!2-i
Maintenance and Adjustments
•.................. 12-2
Headlamp Adjustment......................
12-3
Headlamp Panel Travel Adjustment.
12-5
Service Operations.
. . .. 12-5
Front Lighting
12-5
Headlamp
. 12_5
Parking Lamp
12-5
Fender Lamp
. 12_^
Headlamp Panel
12-8
Headlamp Panel Motor
^2-9
Rear Lighting
l2-10
Tail, Stop and Directional Lamps
12-10
Page
Backing Lamps
12-14
License Plate Lamp
12-14
Automatic Transmission Quadrant Lamp
12-14
Seat Separator Console Lamps
. 12-15
Lighting Switch
. . 12-15
Wiper Switch.
12-15
Stoplight Switch
12-15
Dimmer Switch
12-15
Backing Lamp Switches
12-15
Neutral Safety Switches
12-17
Parking Brake Alarm Switch
................. 12-19
Instrument Panel Compartment Lamp/Switch
12-19
Cirgarette Lighter
12-19
GENERAL DESCRIPTION
.
The lighting system includes: the main lighting switch,
stop light, dimmer, and backing lamp switches, head-
lamps, parking lamps, stop, tail and directional lamps,
instrument illumination and indicator lamps, and the
necessary wiring to complete the various circuits. A
fuse panel provides convenient power take offs and fuse
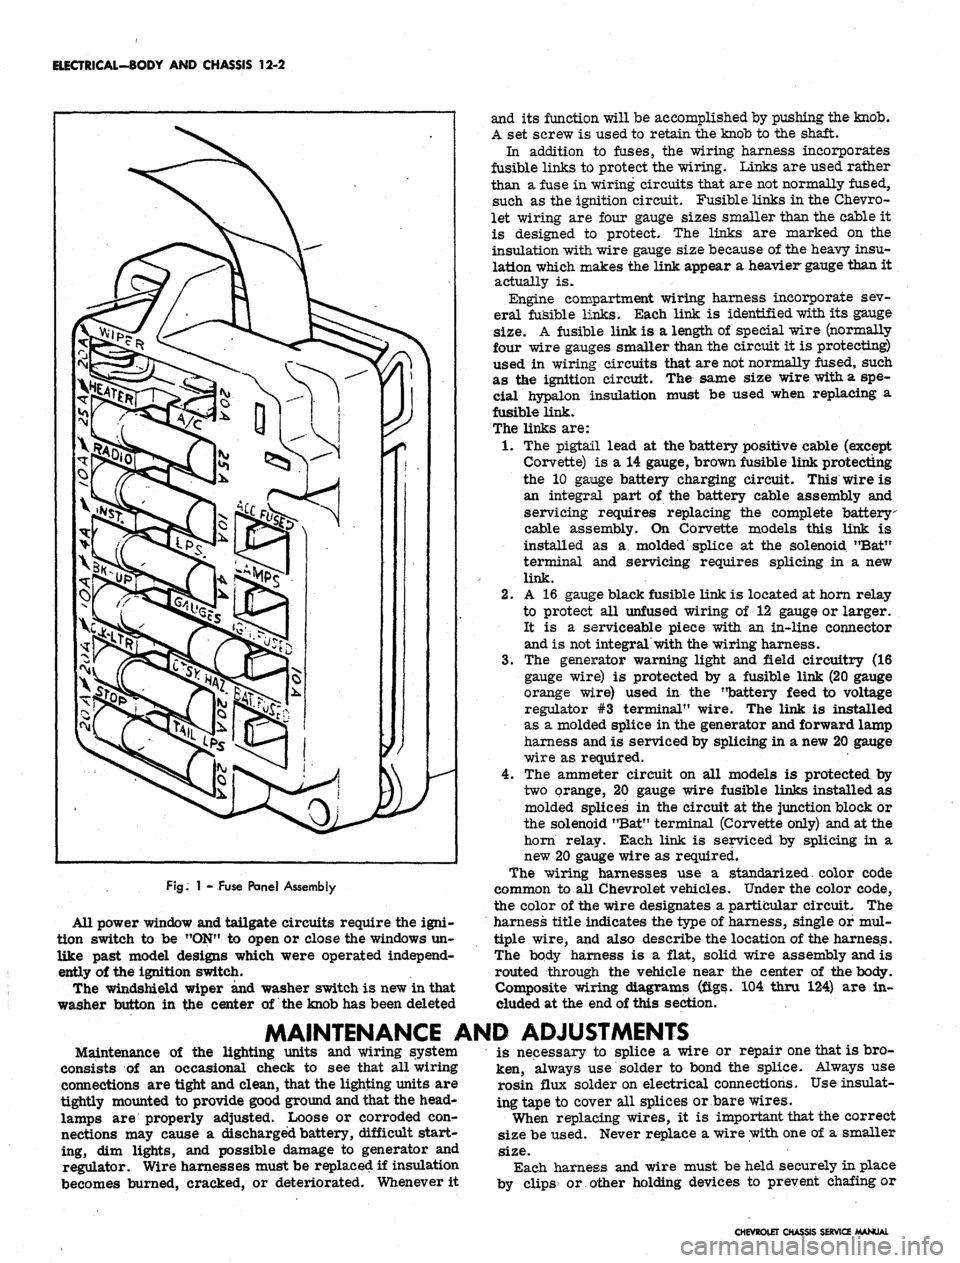
clips for the appropriate circuits (fig. 1).
Chevrolet and Chevelle headlamp installation is all
new in that the headlamps are located in the radiator
support with adjusting screws and springs. Eliminating
the need for having separate headlamp housings. Chev-
rolet and Chevelle headlamp retainers and springs are
interchangeable.
Chevy n headlamp housings are new because of revised
front end styling and Corvette front end lighting is basi-
cally carryover.
Front fender lamps have been added as an option for
Chevrolet models and as standard equipment on Caprice
series.
Camaro models use single headlamps and the Rally
Sport model headlamps are covered by a retractable
section of the grille when lamps are not used. The sec-
tion of the grille covering the headlamps folds back when
lights are required; the headlamps are stationary. The
covering is retracted by a small electric motor mounted
to the headlamp housing. The headlamps are automat-
ically uncovered when the headlight switch is pulled "ON"
for illumination. If at any time the electrical circuit
becomes inoperative, the lamps can be uncovered manu-
ally. The ignition switch must be
"ON"
in order to close
the headlamp doors.
Parking lamp for Chevelle and Chevrolet models are
new due to revised front end sheet metal and bumper
styling. Parking lamps are located in the bumper on
Chevrolet, Chevelle and Chevy n models
Camaro parking lamps are located in the radiator
grille except for the Rally Sport models on which the
parking lamps are in the valance panel. For styling
reasons, the lens is white and an amber glass bulb is
used. All Camaro parking lamps require a separate
ground wire to assure a good ground contact because of
the plastic grille and painted contact surfaces.
The Chevrolet tail, stop, and directional lamps are in
one housing with a three section lens design on Impala
and Caprice sedans. The center lens for Impala series
is the back-up lamp. The center lens on the Caprice is
a tail lamp with the back-up lamps being located in the
rear bumper. Chevrolet station wagons have three indi-
vidual housings with three lenses, the center lamp being
the back-up. Biscayne and Bel-Air sedans have a single
housing and lens for tail, stop, and directional lamp with
a similarly constructed back-up lamp inboard and adja-
cent to it.
Chevelle tail, stop, and directional lamps are a single
lens design that follows through with the rear fender
styling. The back-up lamp is located in r.ear bumper.
Camaro models except Rally Sport have tail lamps
with integral back-up lamps mounted inboard of the rear
fenders between the trunk opening and bumper. The
Rally Sport model has dual tail lamps in the rear housing
and valance mounted back-up lamps.
Corvette, Chevy n, and Corvair tail and directional
signal lights are carryover. The Corvette has new back-
up lamps center mounted above the license plate opening.
CHEVROLET CHASSIS SERVICE
Page 514 of 659
ELECTRICAL-BODY AND CHASSIS 12-2
FJg.
1 - Fuse Panel Assembly
All power window and tailgate circuits require the igni-
tion switch to be "ON" to open or close the windows un-
like past model designs which were operated independ-
ently of the ignition switch.
The windshield wiper and washer switch is new in that
washer button in the center of the knob has been deleted
and its function will be accomplished by pushing the knob.
A set screw is used to retain the knob to the shaft.
In addition to fuses, the wiring harness incorporates
fusible links to protect the wiring. Links are used rather
than a fuse in wiring circuits that are not normally fused,
such as the ignition circuit. Fusible links in the Chevro-
let wiring are four gauge sizes smaller than the cable it
is designed to protect. The links are marked on the
insulation with wire gauge size because of the heavy insu-
lation which makes the link appear a heavier gauge than it
actually is.
Engine compartment wiring harness incorporate sev-
eral fusible links. Each link is identified with its gauge
size.
A fusible link is a length of special wire (normally
four wire gauges smaller than the circuit it is protecting)
used in wiring circuits that are not normally fused, such
as the ignition circuit. The same size wire with a spe-
cial hypalon insulation must be used when replacing a
fusible link.
The links are:
1.
The pigtail lead at the battery positive cable (except
Corvette) is a 14 gauge, brown fusible link protecting
the 10 gange battery charging circuit. This wire is
an integral part of the battery cable assembly and
servicing requires replacing the complete battery
cable assembly. On Corvette models this link is
installed as a molded splice at the solenoid "Bat"
terminal and servicing requires splicing in a new
link.
2.
A 16 gauge black fusible link is located at horn relay
to protect all unfused wiring of 12 gauge or larger.
It is a serviceable piece with an in-line connector
and is not integral with the wiring harness.
3.
The generator warning light and field circuitry (16
gauge wire) is protected by a fusible link (20 gauge
orange wire) used in the "battery feed to voltage
regulator #3 terminal" wire. The link is installed
as a molded splice in the generator and forward lamp
harness and is serviced by splicing in a new 20 gauge
wire as required.
4.
The ammeter circuit on all models is protected by
two orange, 20 gauge wire fusible links installed as
molded splices in the circuit at the junction block or
the solenoid "Bat" terminal (Corvette only) and at the
horn relay. Each link is serviced by splicing in a
new 20 gauge wire as required.
The wiring harnesses use a standarized. color code
common to all Chevrolet vehicles. Under the color code,
the color of the wire designates a particular circuit. The
harness title indicates the type of harness, single of mul-
tiple wire, and also describe the location of the harness.
The body harness is a flat, solid wire assembly and is
routed through the vehicle near the center of the body.
Composite wiring diagrams (figs. 104 thru 124) are in-
cluded at the end of this section.
MAINTENANCE AND ADJUSTMENTS
Maintenance of the lighting units and wiring system
consists of an occasional check to see that all wiring
connections are tight and clean, that the lighting units are
tightly mounted to provide good ground and that the head-
lamps are properly adjusted. Loose or corroded con-
nections may cause a discharged battery, difficult start-
ing, dim lights, and possible damage to generator and
regulator. Wire harnesses must be replaced if insulation
becomes burned, cracked, or deteriorated. Whenever it
is necessary to splice a wire or repair one that is bro-
ken, always use solder to bond the splice. Always use
rosin flux solder on electrical connections. Use insulat-
ing tape to cover all splices or bare wires.
When replacing wires, it is important that the correct
size be used. Never replace a wire with one of a smaller
size.
Each harness and wire must be held securely in place
by clips or other holding devices to prevent chafing or
CHEVROLET CHASSIS SERVICE MANUAL
Page 515 of 659
ELECTRICAL-BODY AND CHASSIS 12-3
Fig.
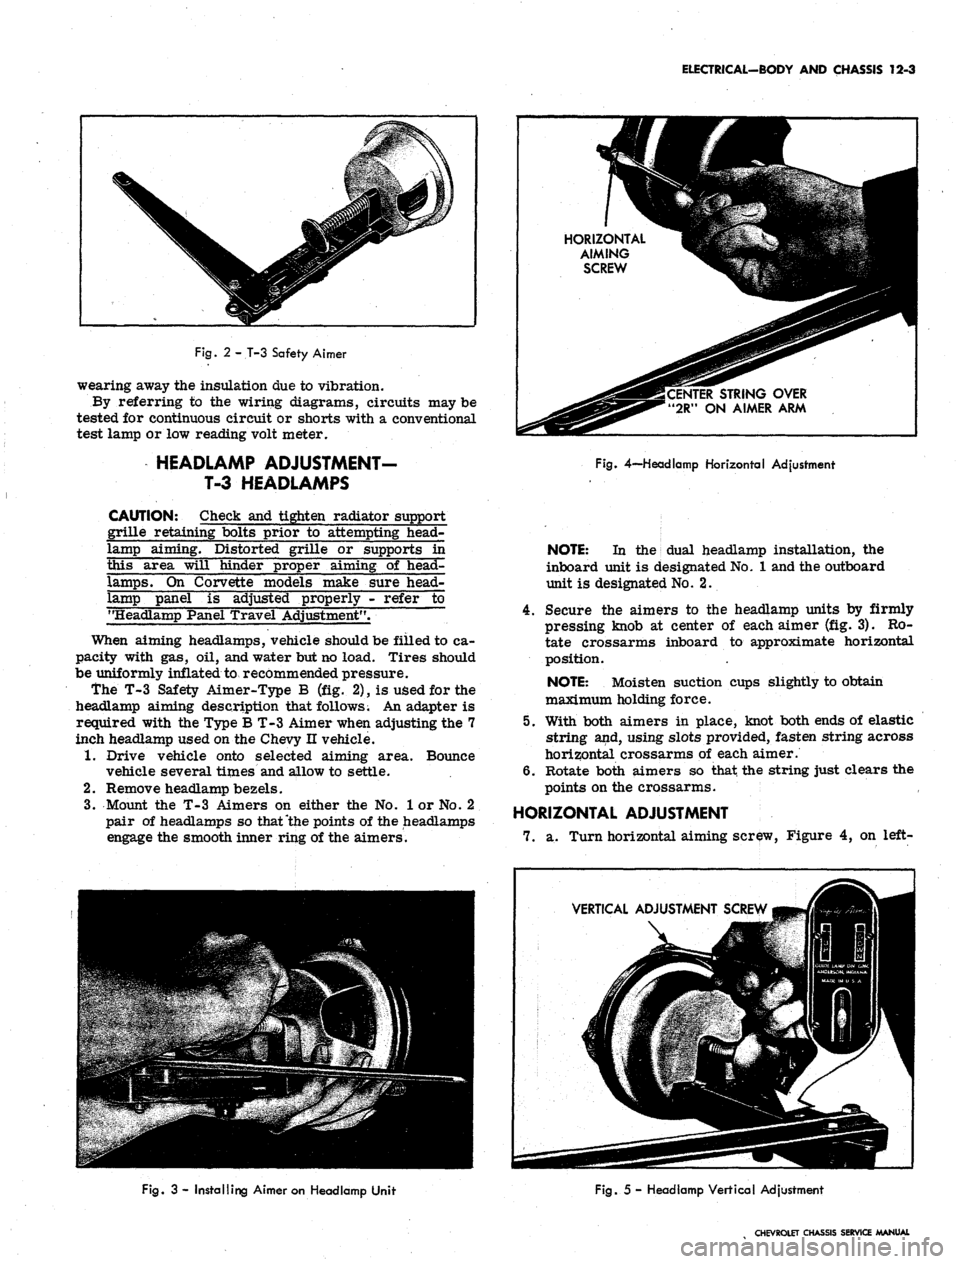
2 - T-3 Safety Aimer
wearing away the insulation due to vibration.
By referring to the wiring diagrams, circuits may be
tested for continuous circuit or shorts with a conventional
test lamp or low reading volt meter.
HEADLAMP ADJUSTMENT-
T-3 HEADLAMPS
CAUTION: Check and tighten radiator support
grille retaining bolts prior to attempting head-
lamp aiming. Distorted grille or supports in
this area will hinder proper aiming of head-
lamps. On Corvette models make sure head-
lamp panel is adjusted properly - refer to
"Headlamp Panel Travel Adjustment".
When aiming headlamps, vehicle should be filled to ca-
pacity with gas, oil, and water but no load. Tires should
be uniformly inflated to recommended pressure.
the T-3 Safety Aimer-Type B (fig. 2), is used for the
headlamp aiming description that follows. An adapter is
required with the Type B T-3 Aimer when adjusting the 7
inch headlamp used on the Chevy n vehicle.
1.
Drive vehicle onto selected aiming area. Bounce
vehicle several times and allow to settle.
2.
Remove headlamp bezels.
3.
Mount the T-3 Aimers on either the No. 1 or No. 2
pair of headlamps so that "the points of the headlamps
engage the smooth inner ring of the aimers.
HORIZONTAL
AIMING
SCREW
STRING OVER
"2R" ON AIMER ARM
Fig.
4—-Headlamp Horizontal Adjustment
NOTE:
In the dual headlamp installation, the
inboard unit is designated No. 1 and the outboard
unit is designated No. 2.
4.
Secure the aimers to the headlamp units by firmly
pressing knob at center of each aimer (fig. 3). Ro-
tate crossarms inboard to approximate horizontal
position.
NOTE:
Moisten suction cups slightly to obtain
maximum holding force.
5. With both aimers in place, knot both ends of elastic
string and, using slots provided, fasten string across
horizontal crossarms of each aimer.
6. Rotate both aimers so that the string just clears the
points on the crossarms.
HORIZONTAL ADJUSTMENT
7. a. Turn horizontal aiming screw, Figure 4, on left-
VERTICAL ADJUSTMENT SCREW
Fig.
3 - Installing Aimer on Headlamp Unit
Fig.
5 - Headlamp Vertical Adjustment
CHEVROLET CHASSIS SERVICE MANUAL
Page 533 of 659
ELECTRICAL-BODY AND CHASSIS 12-21
2.
Remove ash tray, retainer attaching screws and
retainer.
3.
Remove Air Conditioning distributor
duct'
retaining
screws and duct.
4.
Remove heater and/or Air Conditioning control panel
assembly retaining screws and push panel assembly
from console.
NOTE:
If interference between control panel
and radio is encountered, loosen radio retaining
nuts.
5. Remove radio control knobs, bezels and retaining
nuts.
6. Disconnect radio wiring harness and antenna lead-in.
7. Remove radio rear brace attaching screw and re-
move ra(Jio from vehicle.
8. Remove ignition switch bezel nut using Tool J-7607
and push switch rearward.
9. Disconnect cigarette wiring connector.
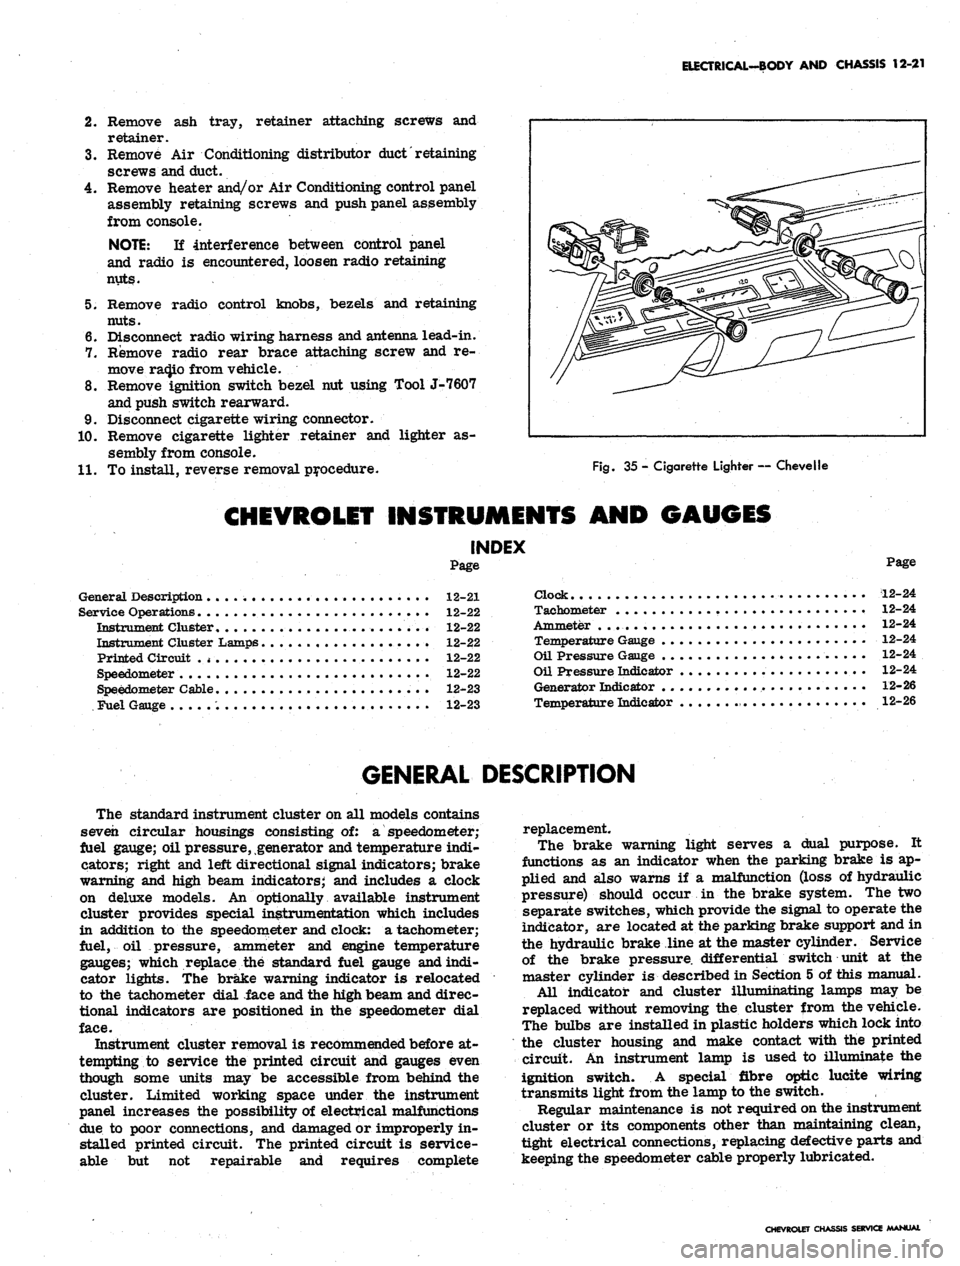
10.
Remove cigarette lighter retainer and lighter as-
sembly from console.
11.
To install, reverse removal procedure.
Fig.
35 - Cigarette Lighter — Chevelle
CHEVROLET INSTRUMENTS AND GAUGES
INDEX
Page
General Description 12-21
Service Operations 12-22
Instrument Cluster........................ 12-22
Instrument Cluster Lamps 12-22
Printed Circuit .
* •
12-22
Speedometer 12-22
Speedometer Cable 12-23
Fuel Gauge 12-23
Page
Clock 12-24
Tachometer 12-24
Ammeter . . 12-24
Temperature Gauge 12-24
Oil Pressure Gauge 12-24
Oil Pressure Indicator 12-24
Generator Indicator 12-26
Temperature Indicator 12-26
GENERAL DESCRIPTION
The standard instrument cluster on all models contains
seven circular housings consisting of: a speedometer;
fuel gauge; oil pressure, generator and temperature indi-
cators; right and left directional signal indicators; brake
warning and high beam indicators; and includes a clock
on deluxe models. An optionally available instrument
cluster provides special instrumentation which includes
in addition to the speedometer and clock: a tachometer;
fuel, oil pressure, ammeter and engine temperature
gauges; which replace the standard fuel gauge and indi-
cator lights. The brake warning indicator is relocated
to the tachometer dial face and the high beam and direc-
tional indicators are positioned in the speedometer dial
face.
Instrument cluster removal is recommended before at-
tempting to service the printed circuit and gauges even
though some units may be accessible from behind the
cluster. Limited working space under the instrument
panel increases the possibility of electrical malfunctions
due to poor connections, and damaged or improperly in-
stalled printed circuit. The printed circuit is service-
able but not repairable and requires complete
replacement.
The brake warning light serves a dual purpose. It
functions as an indicator when the parking brake is ap-
plied and also warns if a malfunction (loss of hydraulic
pressure) should occur in the brake system. The two
separate switches, which provide the signal to operate the
indicator, are located at the parking brake support and in
the hydraulic brake line at the master cylinder. Service
of the brake pressure, differential switch unit at the
master cylinder is described in Section 5 of this manual.
All indicator and cluster illumihating lamps may be
replaced without removing the cluster from the vehicle.
The bulbs are installed in plastic holders which lock into
the cluster housing and make contact with the printed
circuit. An instrument lamp is used to illuminate the
ignition switch. A special fibre optic lucite wiring
transmits light from the lamp to the switch.
Regular maintenance is not required on the instrument
cluster or its components other than maintaining clean,
tight electrical connections, replacing defective parts and
keeping the speedometer cable properly lubricated.
CHEVROLET CHASSIS SERVICE MANUAL
Page 539 of 659
ELECTRICAL-BODY AND CHASSIS 12-27
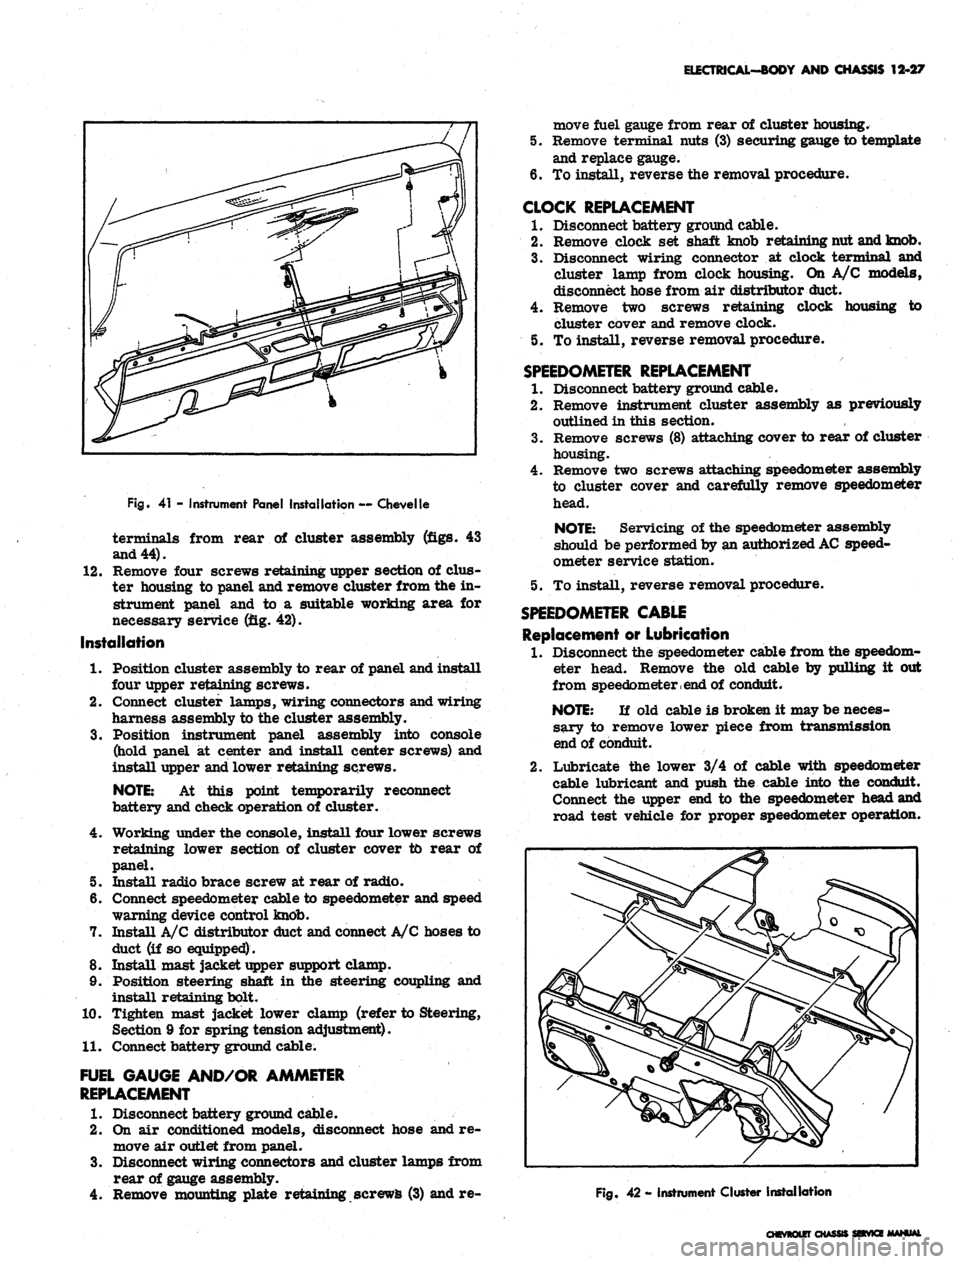
Fig.
41 - Instrument Panel Installation — Chevelle
terminals from rear of cluster assembly (figs. 43
and 44).
12.
Remove four screws retaining upper section of dus-
ter housing to panel and remove cluster from the in-
strument panel and to a suitable working area for
necessary service (fig. 42).
Installation
1.
Position cluster assembly to rear of panel and install
four upper retaining screws.
2.
Connect cluster lamps, wiring connectors and wiring
harness assembly to the cluster assembly.
3.
Position instrument panel assembly into console
(hold panel at center and install center screws) and
install upper and lower retaining screws.
NOTE:
At this point temporarily reconnect
battery and check operation of cluster.
4.
Working under the console, install four lower screws
retaining lower section of cluster cover to rear of
panel.
5. Install radio brace screw at rear of radio.
6. Connect speedometer cable to speedometer and speed
warning device control knob.
7. Install A/C distributor duct and connect A/C hoses to
duct (if so equipped).
8. Install mast jacket upper support clamp.
9. Position steering shaft in the steering coupling and
install retaining bolt.
10.
Tighten mast jacket lower clamp (refer to Steering,
Section 9 for spring tension adjustment).
11.
Connect battery ground cable.
FUEL GAUGE AND/OR AMMETER
REPLACEMENT
1.
Disconnect battery ground cable.
2.
On air conditioned models, disconnect hose and re-
move air outlet from panel.
3.
Disconnect wiring connectors and cluster lamps from
rear of gauge assembly.
4.
Remove mounting plate retaining screws (3) and re-
move fuel gauge from rear of cluster housing.
5. Remove terminal nuts (3) securing gauge to template
and replace gauge.
6. To install, reverse the removal procedure.
CLOCK REPLACEMENT
1.
Disconnect battery ground cable.
2.
Remove clock set shaft knob retaining nut and knob.
3.
Disconnect wiring connector at clock terminal and
cluster lamp from clock housing. On A/C models,
disconnect hose from air distributor duct.
4.
Remove two screws retaining clock housing to
cluster cover and remove clock.
5. To install, reverse removal procedure.
SPEEDOMETER REPLACEMENT
1.
Disconnect battery ground cable.
2.
Remove instrument cluster assembly as previously
outlined in this section.
3.
Remove screws (8) attaching cover to rear of cluster
housing.
4.
Remove two screws attaching speedometer assembly
to cluster cover and carefully remove speedometer
head.
NOTE:
Servicing of the speedometer assembly
should be performed by an authorized
AC
speed-
ometer service station.
5. To install, reverse removal procedure.
SPEEDOMETER CABLE
Replacement or Lubrication
1.
Disconnect the speedometer cable from the speedom-
eter head. Remove the old cable by pulling it out
from speedometer
, end
of conduit.
NOTE:
If old cable is broken it may be neces-
sary to remove lower piece from transmission
end of conduit.
2.
Lubricate the lower 3/4 of cable with speedometer
cable lubricant and push the cable into the conduit.
Connect the upper end to the speedometer head and
road test vehicle for proper speedometer operation.
Fig.
42 - Instrument Cluster Installation
CHEVROLET CHASSIS SEtVKE MANUAL
Page 648 of 659
SPECIFICATIONS
21
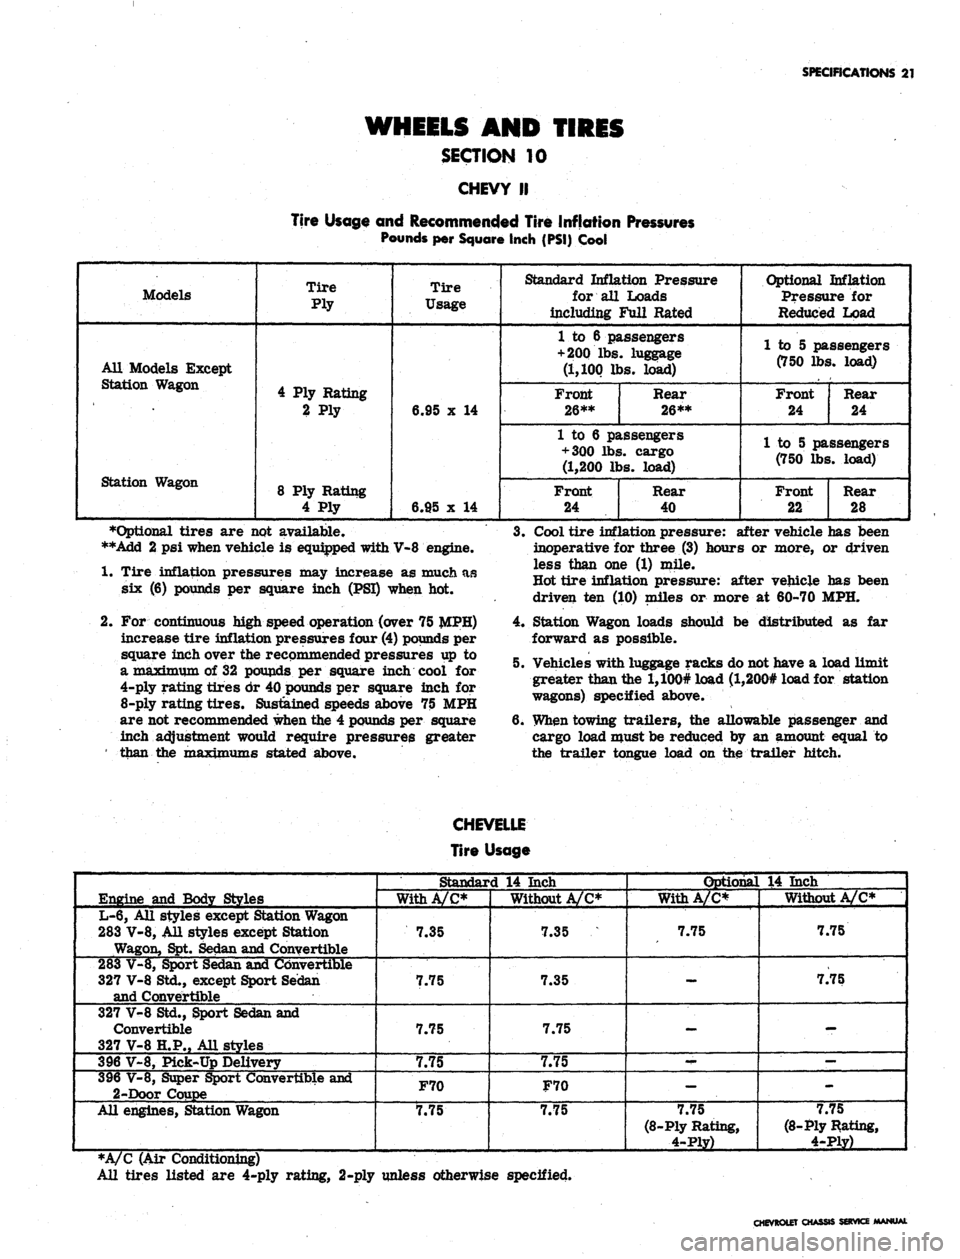
WHEELS AND TIRES
SECTION 10
CHEVY II
Tire Usage and Recommended Tire Inflation Pressures
Pounds per Square Inch (PSI) Cool
Models
All Models Except
Station Wagon
Station Wagon
Tire
Ply
4 Ply Rating
2 Ply
8 Ply Rating
4 Ply
Tire
Usage
6.95 x 14
6.95 x 14
Standard Inflation Pressure
for all Loads
including Full Rated
1 to 6 passengers
+ 200
lbs. luggage
(1,100 lbs. load)
Front
26**
Rear
26**
1 to 6 passengers
+ 300 lbs. cargo
(1,200 lbs. load)
Front
24
Rear
40
Optional Inflation
Pressure for
Reduced Load
1 to 5 passengers
(750 lbs. load)
Front
24
Rear
24
1 to 5 passengers
(750 lbs. load)
Front
22
Rear
28
•Optional tires are not available.
**Add 2 psi when vehicle is equipped with V-8 engine.
1.
Tire inflation pressures may increase as much as
six (6) pounds per square inch (PSI) when hot.
2.
For continuous high speed operation (over 75
increase tire inflation pressures four (4) pounds per
square inch over the recommended pressures up to
a maximum of 32 pounds per square inch cool for
4-ply rating tires dr 40 pounds per square inch for
8-ply
rating tires. Sustained speeds above 75 MPH
are not recommended when the 4 pounds per square
inch adjustment would require pressures greater
' than the TpaxiTP^Tns stated above.
3.
Cool tire inflation pressure: after vehicle has been
inoperative for three (3) hours or more, or driven
less than one (1) mile.
Hot tire inflation pressure: after vehicle has been
driven ten (10) miles or more at 60-70 MPH.
4.
Station Wagon loads should be distributed as far
forward as possible.
5. Vehicles with luggage racks do not have a load limit
greater than the l,100# load (l,200# load for station
wagons) specified above.
6. When towing trailers, the allowable passenger and
cargo load must be reduced by an amount equal to
the trailer tongue load on the trailer hitch.
CHEVELLE
Tire Usage
Engine and Body Styles
L-6, All styles except Station Wagon
283 V-8, All styles except Station
Wagon, Spt. Sedan and Convertible
283 V-8, Sport Sedan and Convertible
327 V-8 Std., except Sport Sedan
and Convertible
327 V-8 Std., Sport Sedan and
Convertible
327 V-8 H.P., All styles
396 V-8, Pick-Up Delivery
396 V-8, Super Sport Convertible and
2-Door Coupe
All engines, Station Wagon
Standard 14 Inch
With A/C*
7.35
7.75
7.75
7.75
F70
7.75
Without A/C*
7.35
7.35
7.75
7.75
F70
7.75
Optional 14 Inch
With A/C*
7.75
—
-
--
-
7.75
(8-Ply Rating,
4-Ply)
Without A/C*
7.75
7.75
-
—
-
7.75
(8-Ply Rating,
4-Ply)
*A/C (Air Conditioning)
All tires listed are 4-ply rating, 2-ply unless otherwise specified.
CHEVROLET CHASSIS SERVICE MANW
Page 649 of 659
SPECIFICATIONS
22
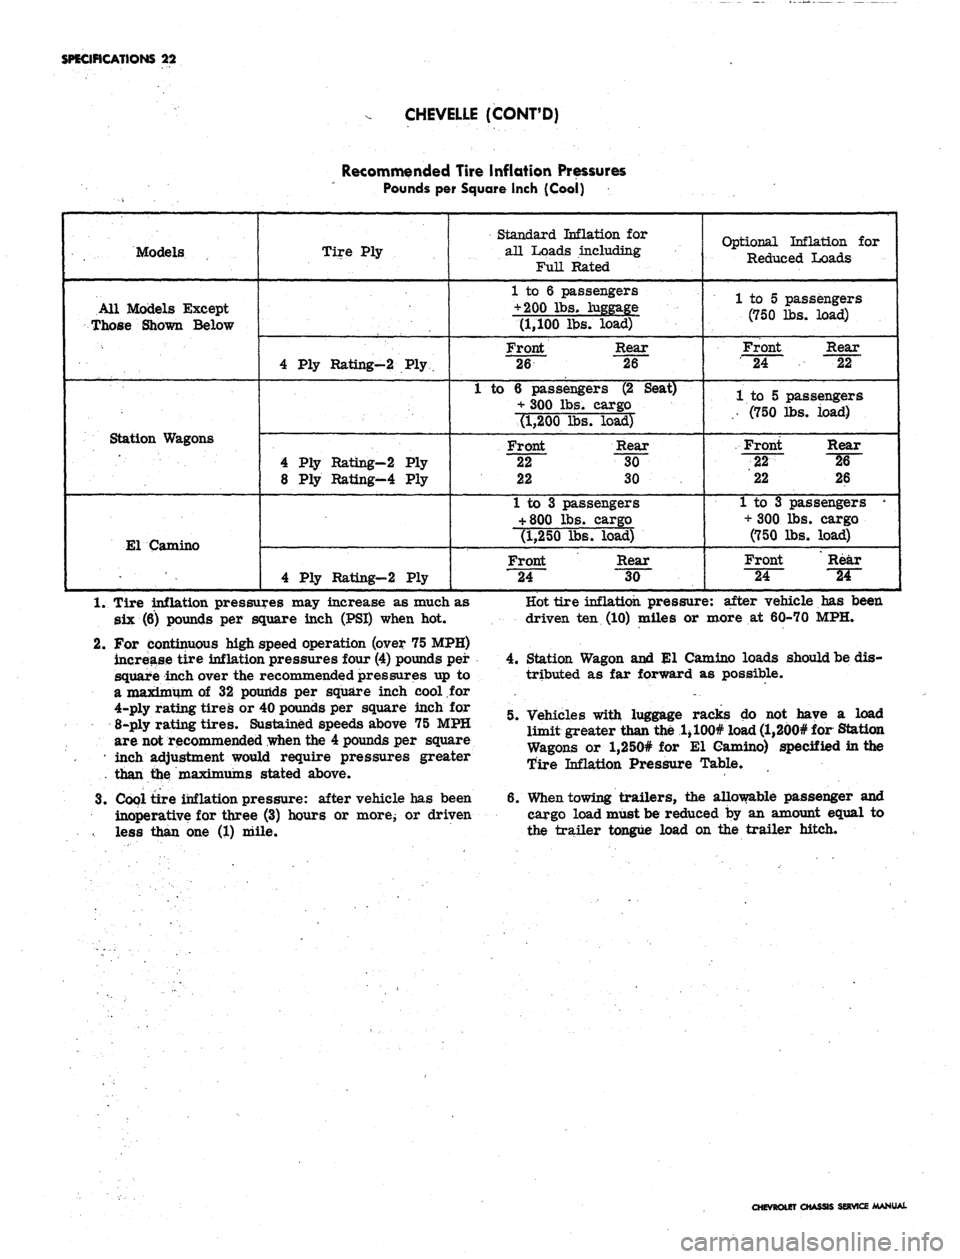
CHEVELLE (CONT'D)
Recommended Tire inflation Pressures
Pounds per Square Inch (Cool)
Models
All Models Except
Those Shown Below
Station Wagons
El Camino
Tire Ply
4 Ply Rating-2 Ply
4 Ply Rating-2 Ply
8 Ply Rating-4 Ply
4 Ply Rating-2 Ply
Standard Inflation for
all Loads including
FuH Rated
1 to 6 passengers
+ 200 lbs. luggage
(1,100 lbs. load)
Front Rear
26 26
1 to 6 passengers (2 Seat)
+ 300 lbs. cargo
(1,200 lbs. load)
Front Rear
22 30
22 30
1 to 3 passengers
+
800 lbs. cargo
(1,250 lbs. load)
Front Rear
24 30
Optional Inflation for
Reduced Loads
1 to 5 passengers
(750 lbs. load)
Front Rear
24 22
1 to 5 passengers
.. (750 lbs. load)
Front Rear
22 ^6~
22 26
1 to 3 passengers •
+ 300 lbs. cargo
(750 lbs. load)
Front Rear
"24~
~W~
1.
Tire inflation pressures may increase as much as
six (6) pounds per square inch (PSI) when hot.
2.
For continuous high speed operation (over 75 MPH)
increase tire inflation pressures four (4) pounds per
square inch over the recommended pressures up to
a maximum of 32 pounds per square inch cool for
4-ply rating tires or 40 pounds per square inch for
8-ply rating tires. Sustained speeds above 75 MPH
are not recommended when the 4 pounds per square
• inch adjustment would require pressures greater
than the maximums stated above.
3.
Cool tire inflation pressure: after vehicle has been
inoperative for three (3) hours or more; or driven
less than one (1) mile.
Hot tire inflation pressure: after vehicle has been
driven ten (10) miles or more at 60-70 MPH.
4.
Station Wagon and El Camino loads should be dis-
tributed as far forward as possible.
5. Vehicles with luggage racks do not have a load
limit greater than the 1 > 100# load (l,200# for Station
Wagons or l,250# for El Camino) specified in the
Tire Inflation Pressure Table.
6. When towing trailers, the allowable passenger and
cargo load must be reduced by an amount equal to
the trailer tongue load on the trailer hitch.
OLETO
SERVICE MANUAL
Page 650 of 659
SPECIFICATIONS 23
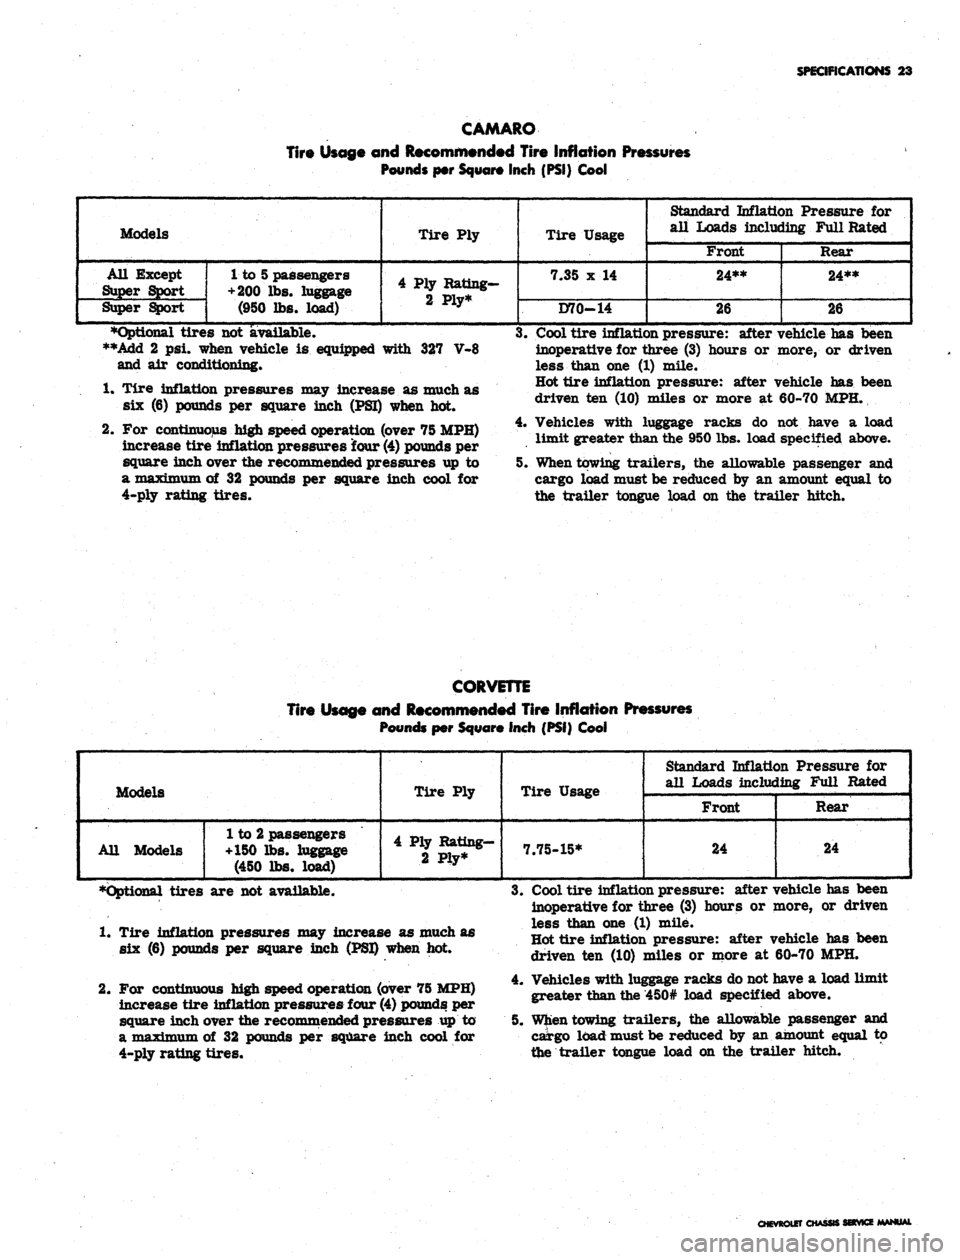
CAMARO
Tire Usage and Recommended Tire Inflation Pressures
Pounds per Square Inch (PSI) Cool
Models
All Except
Super Sport
Super Sport
1 to 5 passengers
+ 200
lbs. luggage
(950 lbs. load)
Tire Ply
4 Ply Rating-
2 Ply*
Tire Usage
7.35 x 14
D70-14
Standard Inflation Pressure for
all Loads including Full Rated
Front
24**
26
Rear
24**
26
•Optional tires not available.
**Add 2 psi. when vehicle is equipped with 327 V-8
and air conditioning*
1.
Tire inflation pressures may increase as much as
six (6) pounds per square inch (PSI) when hot.
2.
For continuous high speed operation (over 75 MPH)
increase tire inflation pressures four
(4)
pounds per
square inch over the recommended pressures up to
a maximum of 32 pounds per square inch cool for
4-ply rating tires.
3.
Cool tire inflation pressure: after vehicle has been
inoperative for three (3) hours or more, or driven
less than one (1) mile.
Hot tire inflation pressure: after vehicle has been
driven ten (10) miles or more at 60-70 MPH.
4.
Vehicles with luggage racks do not have a load
limit greater than the 950 lbs. load specified above.
5. When towing trailers, the allowable passenger and
cargo load must be reduced by an amount equal to
the trailer tongue load on the trailer hitch.
CORVETTE
Tire Usage and Recommended Tire Inflation Pressures
Pounds per Square Inch (PSI) Cool
Models
All Models
1 to 2 passengers
+150 lbs. luggage
(450 lbs. load)
Tire Ply
4 Ply Rating-
2 Ply*
Tire Usage
7.75-15*
Standard Inflation Pressure for
all Loads including Full Rated
Front
24
Rear
24
•Optional tires are not available.
1.
Tire inflation pressures may increase as much as
six (6) pounds per square inch (PSI) when hot.
2.
For continuous high speed operation (over 75 MPH)
increase tire inflation pressures four
(4)
pounds per
square inch over the recommended pressures up to
a maximum of 32 pounds per square inch cool for
4-ply rating tires.
3.
Cool tire inflation pressure: after vehicle has been
inoperative for three (3) hours or more, or driven
less than one (1) mile.
Hot tire inflation pressure: after vehicle has been
driven ten (10) miles or more at 60-70 MPH.
4.
Vehicles with luggage racks do not have a load limit
greater than the 450# load specified above.
5. When towing trailers, the allowable passenger and
cargo load must be reduced by an amount equal to
the trailer tongue load on the trailer hitch.
CHEVROLET CHASSIS SERVICE MANUAL
Page 651 of 659
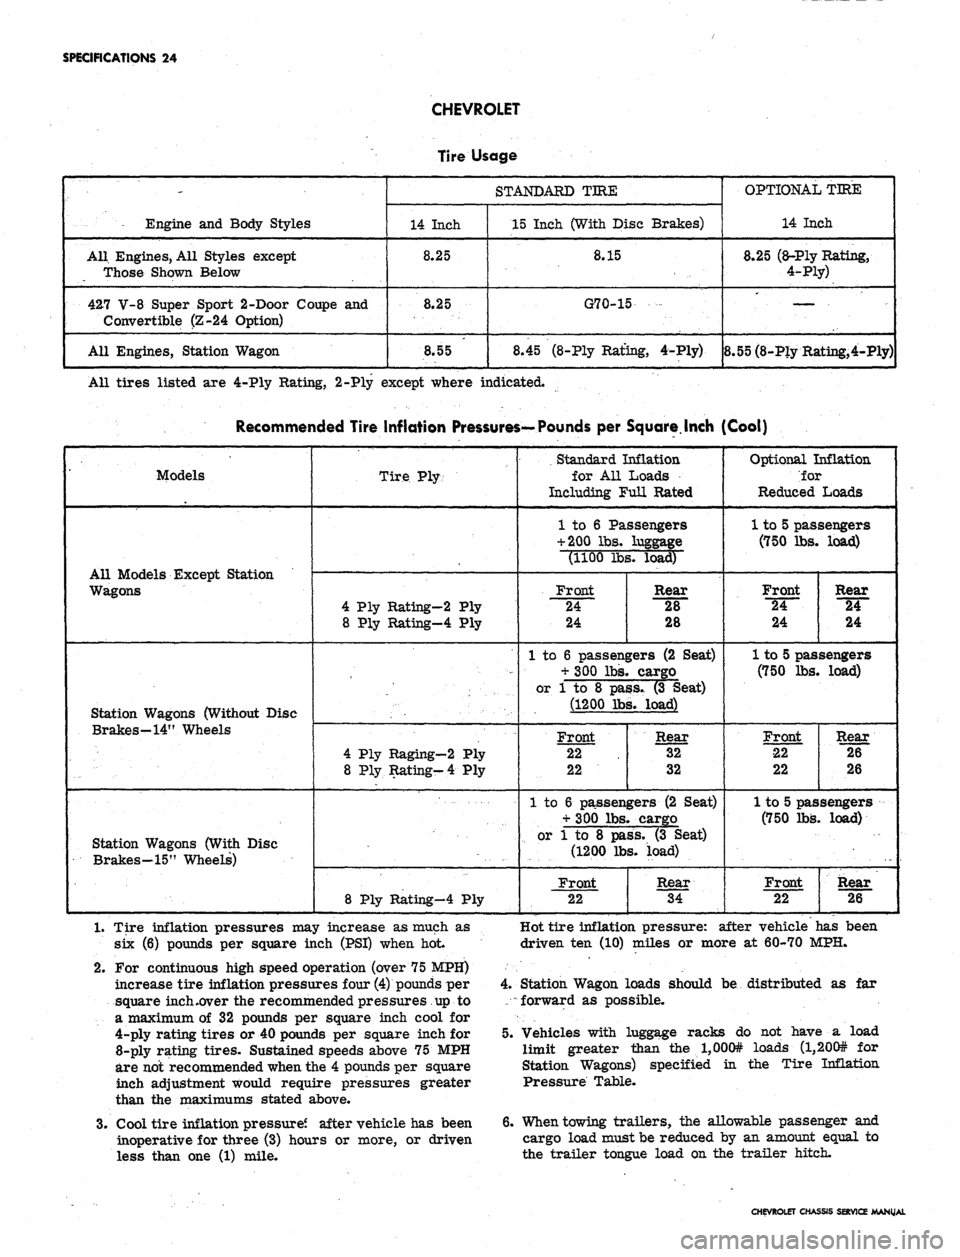
SPECIFICATIONS 24
CHEVROLET
Engine and Body Styles
All. Engines, All Styles except
Those Shown Below
427 V-8 Super Sport 2-Door Coupe and
Convertible (Z-24 Option)
All Engines, Station Wagon
Tire
14 Inch
8.25
8.25
8.55
Usage
STANDARD TIRE
15 Inch (With Disc
8.15
G70-15
8.45 (8-Ply Rating,
Brakes)
4-Ply)
OPTIONAL TIRE
14 Inch
8.25 (a-Ply Rating,
4-Ply)
. —. ...
8.55 (8-Ply Rating,4-Ply)
All tires listed are 4-Ply Rating, 2-Ply except where indicated.
Recommended Tire Inflation Pressures—Pounds per Square.Inch (Cool)
' Models
All Models Except Station
Wagons
Station Wagons (Without Disc
Brakes—14" Wheels
Station Wagons (With Disc
Brakes-15" Wheels)
Tire Ply-
4 Ply Rating-2 Ply
8 Ply Rating-4 Ply
4 Ply Raging—2 Ply
8 Ply Rating-4 Ply
8 Ply Rating-4 Ply
Standard Inflation
for All Loads
Including Full Rated
1 to 6 Passengers
+ 200 lbs. luggage
(1100 lbs. load)
Front
24
24
Rear
28
28
1 to 6 passengers (2 Seat)
+ 300 lbs. cargo
or 1 to 8 pass. (3 Seat)
(1200 lbs. load)
Front
22
22
Rear
32
32
1 to 6 passengers (2 Seat)
+ 300 lbs. cargo
or 1 to 8 pass. (3 Seat)
(1200 lbs. load)
Front
22
Rear
34
Optional Inflation
ior
Reduced Loads
1 to 5 passengers
(750 lbs. load)
Front
"24~
24
Rear
24
24
1 to 5 passengers
(750 lbs. load)
Front
22
22
Rear
26
26
1 to 5 passengers
(750 lbs. load)
Front
22
Rear
26
1.
Tire inflation pressures may increase as much as
six (6) pounds per square inch (PSI) when hot
2.
For continuous high speed operation (over 75 MPH)
increase tire inflation pressures four (4) pounds per
square inch .over the recommended pressures up to
a maximum of 32 pounds per square inch cool for
4-ply rating tires or 40 pounds per square inch for
8-ply rating tires. Sustained speeds above 75 MPH
are not recommended when the 4 pounds per square
inch adjustment would require pressures greater
than the maximums stated above.
3.
Cool tire inflation pressure? after vehicle has been
inoperative for three (3) hours or more, or driven
less than one (1) mile.
Hot tire inflation pressure: after vehicle has been
driven ten (10) miles or more at 60-70 MPH.
4.
Station Wagon loads should be distributed as far
forward as possible.
5. Vehicles with luggage racks do not have a load
limit greater than the l,000# loads (l,200# for
Station Wagons) specified in the Tire Inflation
Pressure Table.
6. When towing trailers, the allowable passenger and
cargo load must be reduced by an amount equal to
the trailer tongue load on the trailer hitch.
CHEVROLET CHASSIS SERVICE MANUAL