steering wheel CHEVROLET CAMARO 1967 1.G Chassis Workshop Manual
[x] Cancel search | Manufacturer: CHEVROLET, Model Year: 1967, Model line: CAMARO, Model: CHEVROLET CAMARO 1967 1.GPages: 659, PDF Size: 114.24 MB
Page 9 of 659
GENERAL INFORMATION 0-7
a vise using leather or wood on each side to prevent
damage to the cylinder,
7. Stake the retainer securely in place by staking the
cylinder metal over both edges of the retainer ends
using a suitable staking tool at right angles to the
top of the retainer and from the cast metal of the
cylinder over the retainer at each corner.
PUSHING, TOWING AND LIFTING
Pushing
NOTE:
Towing car to start is not recommended
due to the possibility of the disabled car ac-
celerating into tow car.
AUTOMATIC TRANSMISSION
Do not attempt to start the engine by pushing the car.
Should the battery become discharged, it will be neces-
sary to use an auxiliary battery with jumper cables to
start the engine.
CAUTION: To prevent damage to electrical
system, never connect booster batteries in ex-
cess of 12 volts and connect positive to positive
and negative to negative.
Manual Transmission
When a push start is necessary turn off all electrical
loads such as heater, radio, and if possible, lights, turn
on the key, depress the clutch, and place the shift lever
in high gear. Release the clutch when your speed reaches
10 to 15 miles per hour.
TOWING
The car may be towed safely on its rear wheels with
the (selector lever in "N" (Neutral) position at speeds
of 35 miles per hour or less under most conditions.
However, the drive shaft must be disconnected or the
car towed on its front wheels if 1) Tow speeds in excess
of 35 MPH are necessary, 2) Car must be towed for ex-
tended distances (over 50 miles) or, 3) Transmission is
not operating properly. If car is towed on its front
wheels, the steering wheel should be secured to maintain
a straight ahead position.
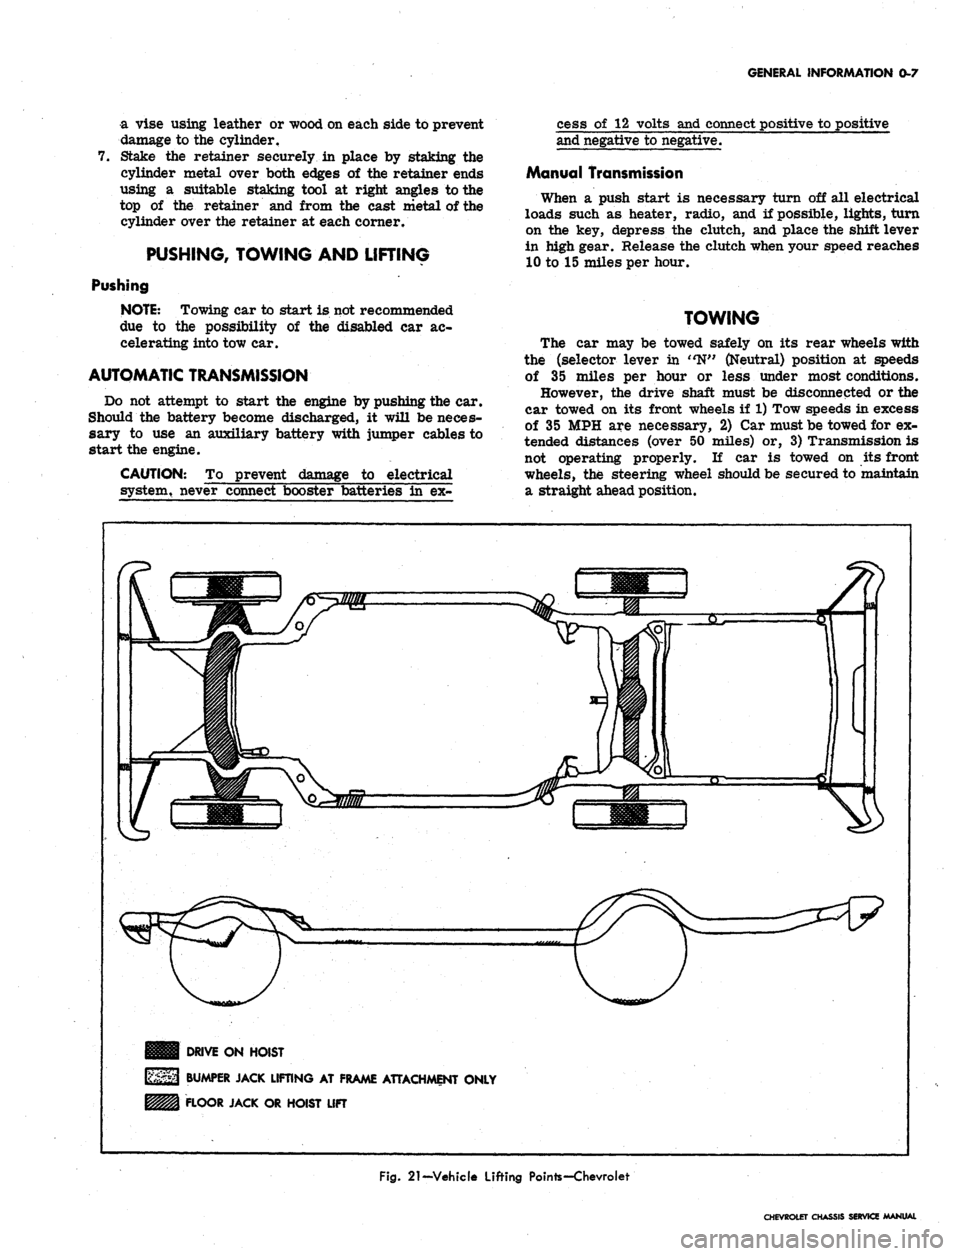
DRIVE ON HOIST
BUMPER JACK LIFTING AT FRAME ATTACHMENT ONLY
FLOOR JACK OR HOIST LIFT
Fig.
21-Vehicle Lifting Pointe-Chevroiet
CHEVROLET CHASSIS SERVICE MANUAL
Page 11 of 659
GENERAL INFORMATION
0-9
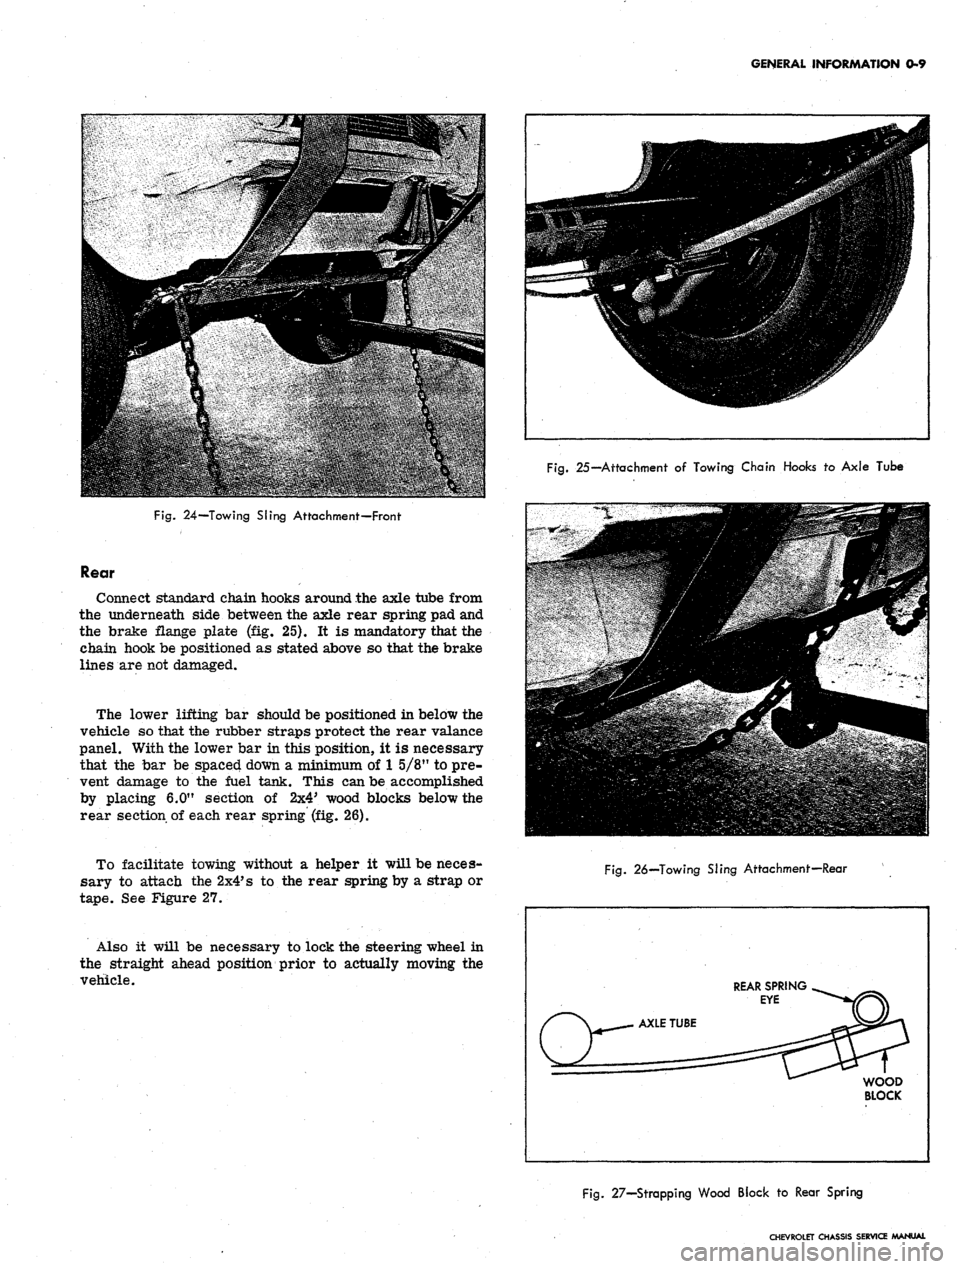
Fig.
25—Attachment
of
Towing Chain Hooks
to
Axle Tube
Fig.
24—Towing Sling Attachment—Front
Rear
Connect standard chain hooks around the axle tube from
the underneath side between the axle rear spring pad and
the brake flange plate (fig. 25). It is mandatory that the
chain hook be positioned as stated above so that the brake
lines are not damaged.
The lower lifting bar should be positioned in below the
vehicle so that the rubber straps protect the rear valance
panel. With the lower bar in this position, it is necessary
that the bar be spaced down a minimum of
1
5/8" to pre-
vent damage to the fuel tank. This can be accomplished
by placing 6.0" section of 2x4' wood blocks below the
rear section of each rear spring (fig. 26).
To facilitate towing without a helper it will be neces-
sary to attach the
2x4*
s to the rear spring by a strap or
tape.
See Figure 27.
Also it will be necessary to lock the steering wheel in
the straight ahead position prior to actually moving the
vehicle.
Fig.
26—Towing SJing Attachment—Rear
REAR SPRING
EYE
WOOD
BLOCK
Fig.
27—Strapping Wood Block
to
Rear Spring
CHEVROLET CHASSIS SERVICE MANUAL
Page 15 of 659
LUBRICATION 0-13
LUBRICATION
INDEX
Page
Engine Crankcase Oil . 0-13
Crankcase Capacities. . 0-13
Lubrication . ,
•
o-13
SAE Viscosity Oils 0-13
Types of Oils 0-14
Maintaining Oil Level 0-14
Oil and Filter Change Intervals 0-14
Oil.
. . ...:.. 0-14
Filter o-14
Crankcase Dilution . 0-14
Automatic Control Devices to Minimize
Crankcase Dilution 0-14
Crankcase Breather Cap 0-14
Crankcase Ventilation System 0-15
Valve Type 0-15
Fuel Filter 0-15
Air Cleaner . 0-15
Polyurethane Type 0-15
Oil Wetted Paper Element Type 0-15
Battery Terminal Washers 0-15
Page
Distributor 0-15
Rear Axle and 3-Speed and Overdrive
4-Speed Transmission 0-15
Recommended Lubricants 0-15
Multi-Purpose Gear Lubricants 0-15
Lubricant Additions 0-15
Lubricant Changes 0-15
Powerglide Transmission 0-15
Turbo Hydra-Matic 0-16
Front Wheel Bearings 0-16
Manual Steering Gear . . . . 0-16
Power Steering 0-16
Air Conditioning 0-16
Brake Master Cylinder. 0-16
Parking Brake 0-16
Clutch Cross-Shaft , 0-16
Chassis Lubrication 0-16
Lubrication Diagrams . . 0-19
Body Lubrication (Chevrolet, Chevelle, Chevy n, Camaro). 0-20
Body Lubrication Points (Corvette) . 0-21
The selection of the proper lubricant and its correct
application at regular intervals does much to increase the
life and operation of all moving parts of the vehicle.
Consequently, it is important that the correct grade of
oil or grease, as noted in the following pages, be used.
ENGINE CRANKCASE OIL
Crankcase Capacity
4 Cylinder 4 qt.
6 Cylinder 4 qt.
8 Cylinder (283) 4 qt.
8 Cylinder (327) 4 qt.
8 Cylinder (350) 4 qt.
8 Cylinder (396) 4 qt.
8 Cylinder (427) Chevrolet 4 qt.
8 Cylinder (427) Corvette 5 qt.
For 4 Cyl. Add .5 qt. with filter change;
1 qt. for 6 and 8 Cyl. engines.
Lubrication
Crankcase oil should be selected to give the best per-
formance under the climatic and driving conditions in the
territory in which the vehicle is driven.
During warm or hot weather, an oil which will provide
adequate lubrication under high operating temperatures
is required.
During the colder months of the year* an oil which will
permit easy starting at the lowest atmospheric tempera-
ture likely to be encountered, should be used.
When the crankcase is drained and refilled, the crank-
case oil should be selected, not on the basis of the exist-
ing temperature at the time of the change, but on the
lowest temperature anticipated for the period during
which the oil is to be used.
Unless the crankcase oil is selected on the basis of
viscosity or fluidity of the anticipated temperature, dif-
ficulty in starting will be experienced at each sudden
drop in temperature.
SAE Viscosity Oils
SAE Viscosity Numbers indicate only the viscosity or
body of the oil, that is, whether an oil is a light or a
heavy body oil, and do not consider or include other
properties or quality factors.
The lower SAE Viscosity Numbers, such as SAE 5W
and SAE 10W which represent the light body oils, are
recommended for use during cold weather to provide
easy starting and instant lubrication. The higher SAE
Viscosity Numbers such as SAE 20 and SAE 20W, which
represents heavier body oils, are recommended for use
during warm or hot weather to provide improved oil
economy and adequate lubrication under high operating
temperatures.
Oils are available which are designed to combine the
easy starting characteristics of the lower SAE Viscosity
Number with the warm weather operating characteristics
of the higher SAE Viscosity Number. These are termed
"multi-viscosity oils," SAE 5-10W, SAE 5W-20, SAE
10W-20W, and SAE 10W-30.
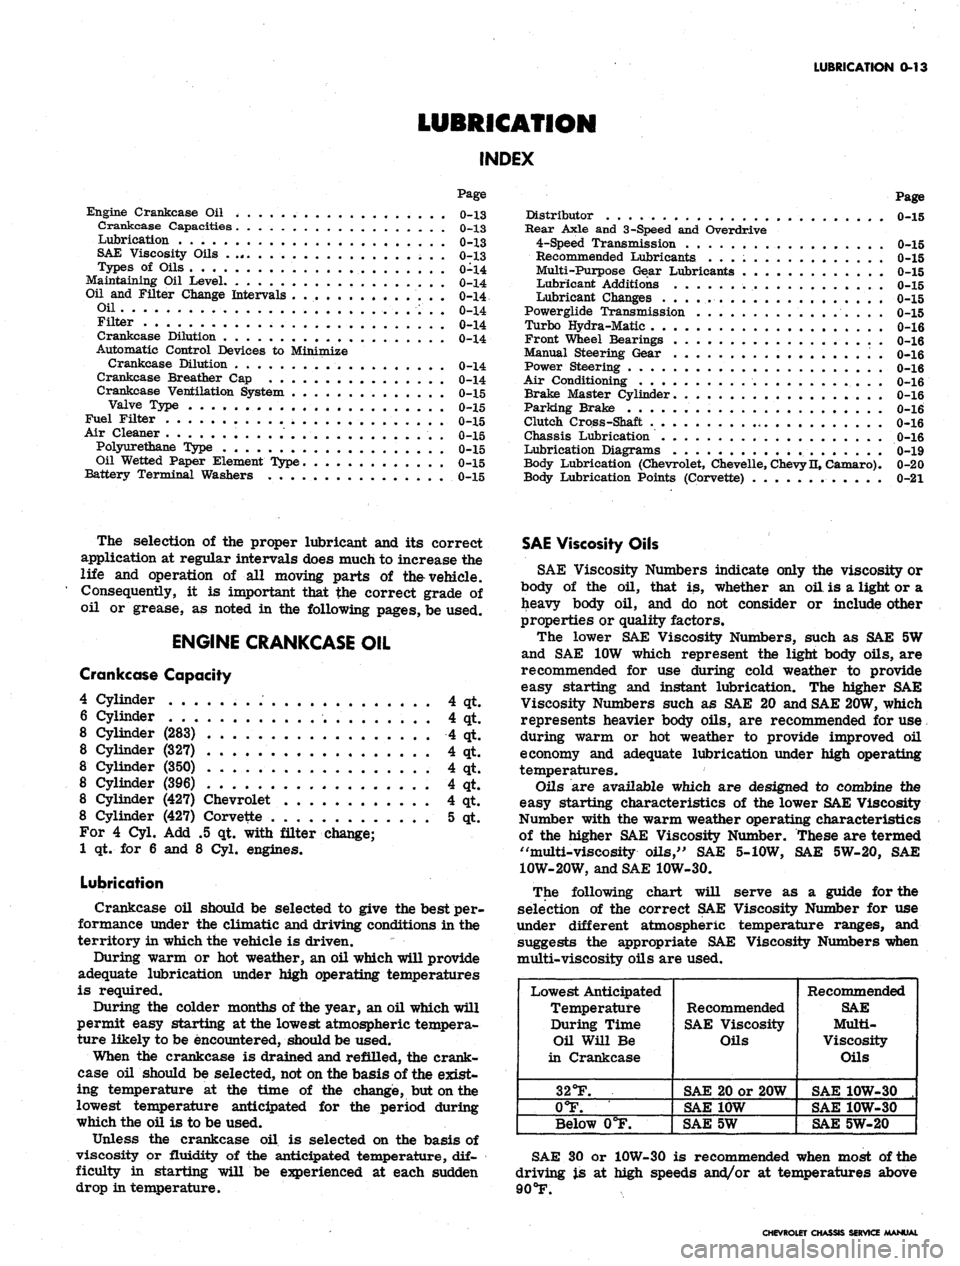
The following chart will serve as a guide for the
selection of the correct SAE Viscosity Number for use
under different atmospheric temperature ranges, and
suggests the appropriate SAE Viscosity Numbers when
multi-viscosity oils are used.
Lowest Anticipated
Temperature
During Time
Oil Will Be
in Crankcase
32°F.
0°F.
Below 0°F.
Recommended
SAE Viscosity
Oils
SAE 20 or 20W
SAE 10W
SAE 5W
Recommended
SAE
Multi-
Viscosity
Oils
SAE 10W-30 .
SAE 10W-30
SAE 5W-20
SAE 30 or 10W-30 is recommended when most of the
driving is at high speeds and/or at temperatures above
90
°F.
CHEVROLET CHASSIS SERVICE MANUAL
Page 18 of 659
LUBRICATION 0-16
Every 12,000 miles (more frequently*, depending on
severity of service, if vehicle is used to pull trailers,
carry full loads during high ambient temperatures,
operate in mountainous terrain or operate under other
severe conditions--Remove fluid from the transmission
sump and add one and a half quarts of fresh fluid for
Camaro and Chevy II and two quarts for Chevrolet,
Chevelle, and Corvette. Operate transmission through all
ranges and check fluid level as described above.
•Except if vehicle is equipped with transmission pro-
vided in heavy duty service options. If so equipped,
drain converter and pump every 12,000 miles and add
approximately seven and a half quarts of fresh fluid
for Chevy II and nine quarts for Chevrolet and Chevelle.
TURBO HYDRA-MATIC
Lubrication. recommendations for the Turbo Hydra-
Matic are the same as outlined for the Powerglide
transmission except for fluid capacity and filter change
listed below.
After checking transmission fluid level it is important
that the dip stick be pushed all the way into the fill tube.
Every 12,000 miles — after removing fluid from the
transmission sump, approximately 7 1/2 pints of fresh
fluid will be required to return level to proper mark on
the dip stick.
Every 24,000 miles, or at every other fluid change--
the transmission sump strainer should be replaced.
FRONT WHEEL BEARINGS
It is necessary to remove the wheel and hub assembly
to lubricate the bearings. The bearing assemblies should
be cleaned before repacking with lubricant. Do not pack
the hub between the inner and outer bearing assemblies
or the hub caps, as this excessive lubrication results in
the lubricant working out into the brake drums and
linings.
Front wheels of all passenger car models are equipped
with tapered roller bearings and should be packed with a
high melting point water resistant front wheel bearing
lubricant whenever wheel and hub are removed.
CAUTION: "Long fibre" or "viscous" type
lubricant should not be used. Do not mix wheel
bearing lubricants. Be sure to thoroughly clean
bearings and hubs of all old lubricant before
repacking.
The proper adjustment of front wheel bearings is one
of the important service operations- that has a definite
bearing on safety. A car with improperly adjusted front
wheel bearings lacks steering stability, has a tendency to
wander or shimmy and may have increased tire wear.
The adjustment of these bearings is very critical. The
procedure is covered in Section 3 of this manual under
Front Wheel Bearings—Adjust,
MANUAL STEERING GEAR
Check lubricant level every 36,000 miles. If required,
add EP Chassis Lubricant.
POWER STEERING
On models equipped with power steering gear, check
fluid at operating temperature in pump reservoir. Add
GM Power Steering Fluid, or, if this is not available, use
Automatic Transmission Fluid "Type A" bearing the
mark AQ-ATF followed by a number and the suffix letter
'A'
to bring level to full mark on dip stick.
AIR CONDITIONING
After the first 6,000 miles, check all hose clamp
connections for proper tightness.
Every 6,000 miles check sight glass under the hood,
after the system has been in operation for several
minutes. Sight glass should be clear but may, during
milder weather, show traces of bubbles. Foam or dirt
indicate a leak which should be repaired immediately.
BRAKE MASTER CYLINDER
Check level every 6,000 miles and maintain 1/4" below
lowest edge of each filler opening with GM Hydraulic
Brake Fluid Supreme No. 11.
PARKING BRAKE
Every 6,000 miles, apply water resistant lube to park-
ing brake cable, cable guides and at all operating links
and levers.
CLUTCH CROSS-SHAFT
Periodic lubrication of the clutch cross shaft is not
required. At 36,000 miles or sooner, if necessary;
remove plug, install lube fitting and apply CHASSIS
LUBRICANT.
CHASSIS LUBRICATION
For chassis lubrication, consult the lubrication chart.
It shows the points to be lubricated and how often the
lubricant should be applied.
The term "chassis lubricant" as used in this manual,
describes a water resistant EP chassis grease designed
for application by commercial pressure gun equipment.
CHEVROLET CHASSIS SERVICE MANUAL
Page 19 of 659
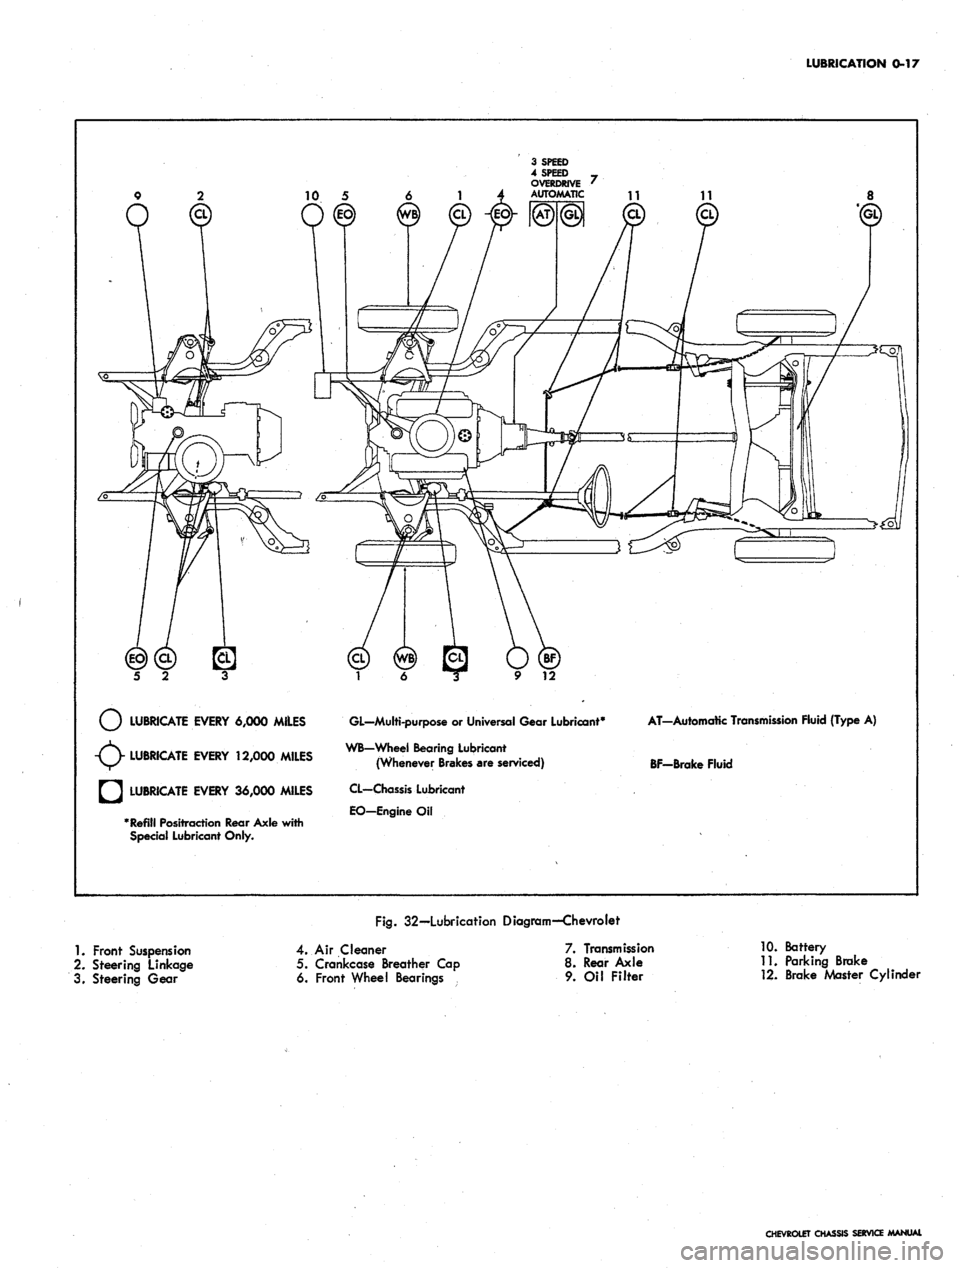
LUBRICATION 0-17
LUBRICATE EVERY 6,000 MILES
LUBRICATE EVERY 12,000 MILES
LUBRICATE EVERY 36,000 MILES
Refill Positraction Rear Axle with
Special Lubricant Only.
GL—Multi-purpose
or
Universal Gear Lubricant4
WB-Wheel Bearing Lubricant
(Whenever Brakes are serviced)
CL—Chassis Lubricant
EO-EngineOil
AT-Automatic Transmission Fluid {Type
A)
BF-Brake Fluid
Fig.
32—Lubrication Diagram—Chevrolet
1.
Front Suspension
2.
Steering Linkage
3. Steering Gear
4.
Air Cleaner
5. Crankcase Breather Cap
6. Front Wheel Bearings
7. Transmission
8. Rear Axle
9. Oil Filter
10.
Battery
11.
Parking Brake
12.
Brake Master Cylinder
CHEVROLET CHASSIS SERVICE MANUAL
Page 20 of 659
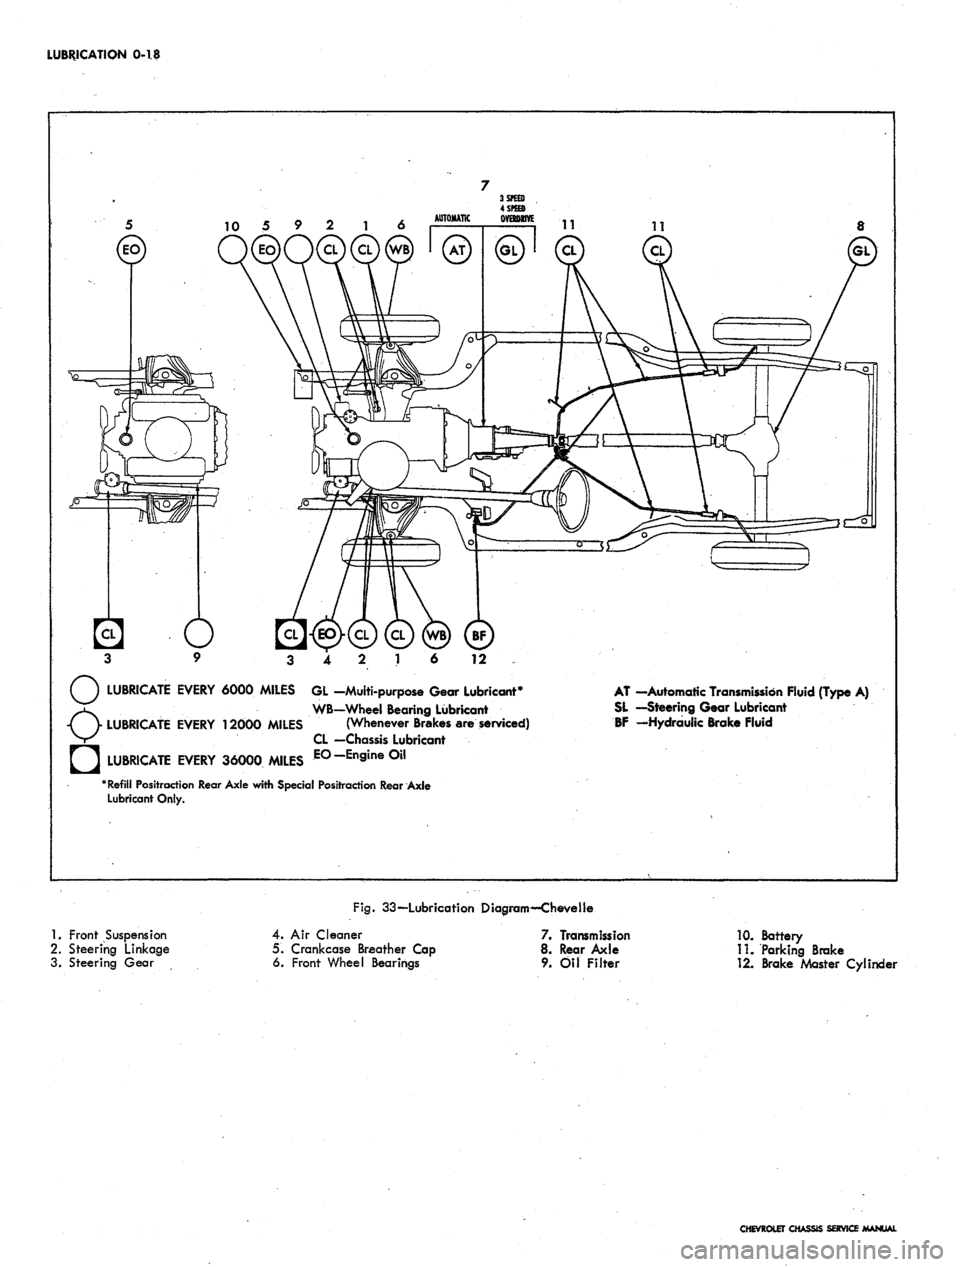
LUBRICATION 0-18
12
LUBRICATE EVERY 6000 MILES GL -Multi-purpose Gear Lubricant*
WB—Wheel Bearing Lubricant
LUBRICATE EVERY 12000 MILES (Whenever Brakes are serviced)
CL —Chassis Lubricant
LUBRICATE EVERY 36000 MILES E°-En9ine°il
"Refill Positraction Rear Axle with Special Positraction Rear Axle
Lubricant Only.
AT —Automatic Transmission Fluid (Type A)
SL —Steering Gear Lubricant
BF -Hydraulic Brake Fluid
1.
Front Suspension
2.
Steering Linkage
3. Steering Gear
Fig.
33—Lubrication Diagram—Chevelle
4.
Air Cleaner
5. Crankcase Breather Cap
6. Front Wheel Bearings
7. Transmission
8. Rear Axle
9. Oil Filter
10.
Battery
11.
Parking Brake
12.
Brake Master CylincU
CHEVROLET CHASSIS SERVICE MANUAL
Page 21 of 659
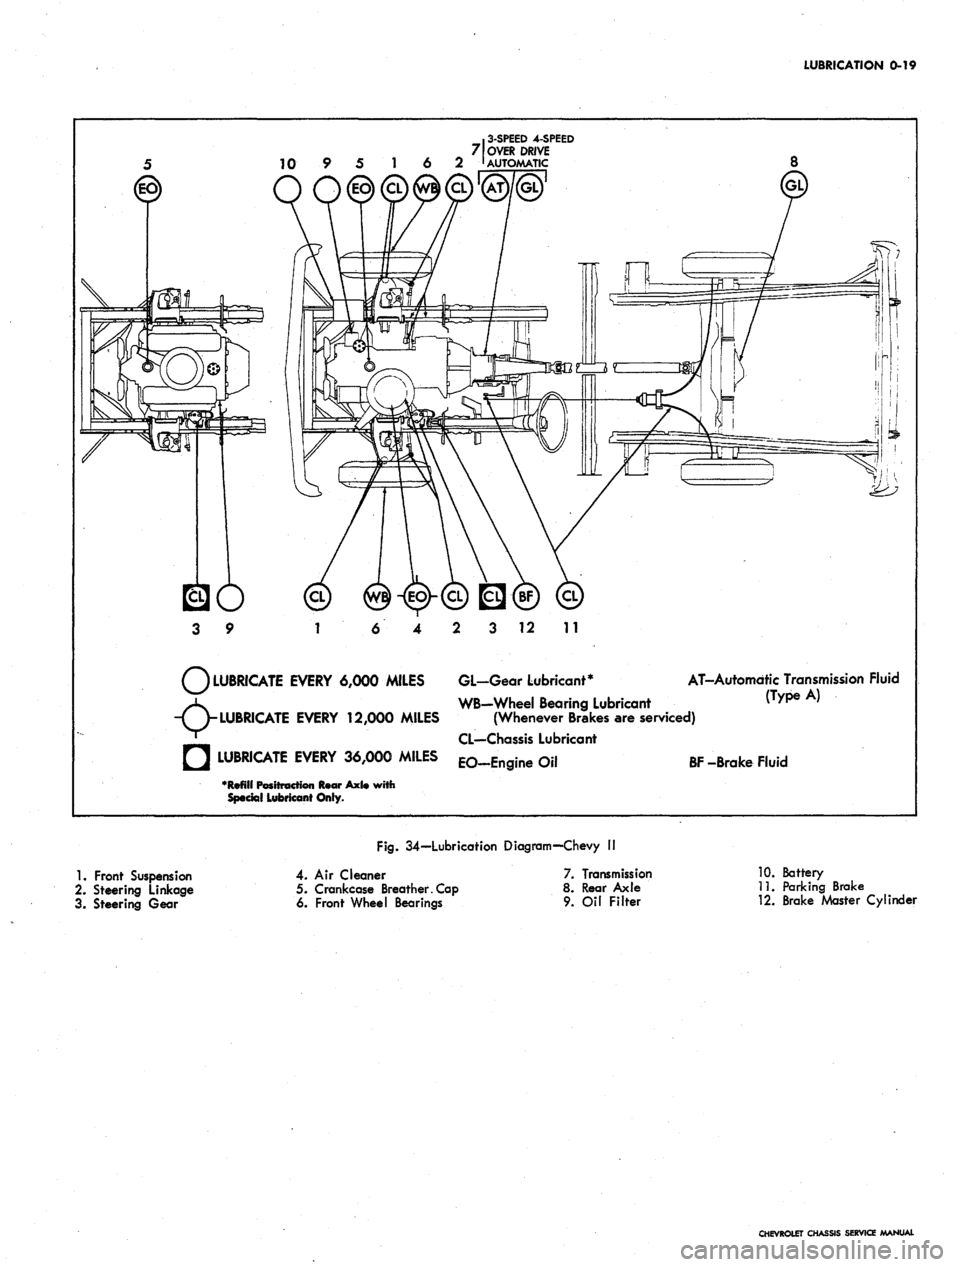
LUBRICATION
0-19
.
3-SPEED
4-SPEED
7 OVER DRIVE
10 9 5 1 6 2 '
AUTOMATIC
3 12 11
LUBRICATE EVERY 6,000 MILES GL-Gear Lubricant*
WB-Wheel Bearing Lubricant
(Wh Bk
AT-Automdtic Transmission Fluid
^ WB-Wheel Bearing Lubricant (Type A)
-TV
LUBRICATE
EVERY 12,000 MILES (Whenever Brakes are serviced)
' CL—Chassis Lubricant
• LUBRICATE EVERY 36,000 MILES EO_Engine Oil
BF
-Brake Fluid
•Refill Positt
Special Lubricant Only.
Axl«
with
1.
Front Suspension
2.
Steering Linkage
3. Steering Gear
Fig.
34—Lubrication Diagram—Chevy I!
4. Air Cleaner
5. Crankcase Breather. Cap
6. Front Wheel Bearings
7. Transmission
8. Rear Axle
9.
Oil Filter
10.
Battery
11.
Parking Brake
12.
Brake Master Cylinder
CHEVROLET CHASSIS SERVICE MANUAL
Page 22 of 659
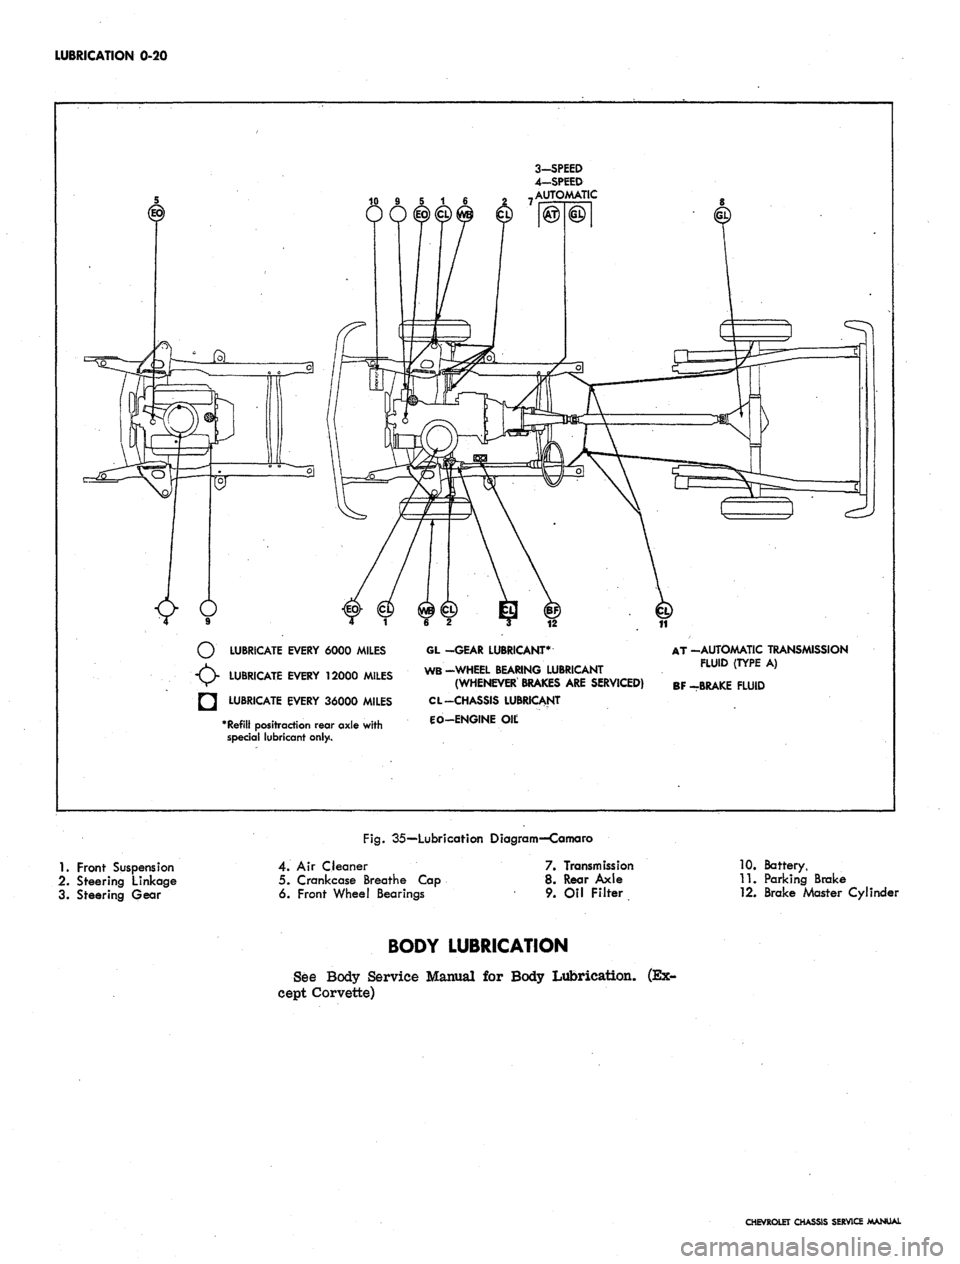
LUBRICATION 0-20
3-SPEED
4—SPEED
AUTOMATIC
LUBRICATE EVERY 6000 MILES
LUBRICATE EVERY 12000 MILES
LUBRICATE EVERY 36000 MILES
*
Refill
positraction rear axle with
special lubricant only.
GL -GEAR LUBRICANT*
WB-WHEEL BEARING LUBRICANT
(WHENEVER BRAKES
ARE
SERVICED)
CL -CHASSIS LUBRICANT
CO-ENGINE
Oil;
AT -AUTOMATIC TRANSMISSION
FLUID (TYPE
A)
BF -BRAKE FLUID
Fig.
35—Lubricafion Diagram—Camaro
1.
Front Suspension
2.
Steering Linkage
3. Steering Gear
4.
Air Cleaner
5. Crankcase Breathe Cap
6. Front Wheel Bearings
7. Transmission
8. Rear Axle
9. Oil Filter
10.
Battery,
11.
Parking Brake
12.
Brake Master Cylinder
BODY LUBRICATION
See Body Service Manual
for
Body Lubrication,
cept Corvette)
(Ex-
CHEVROLET CHASSIS SERVICE MANUAL
Page 23 of 659
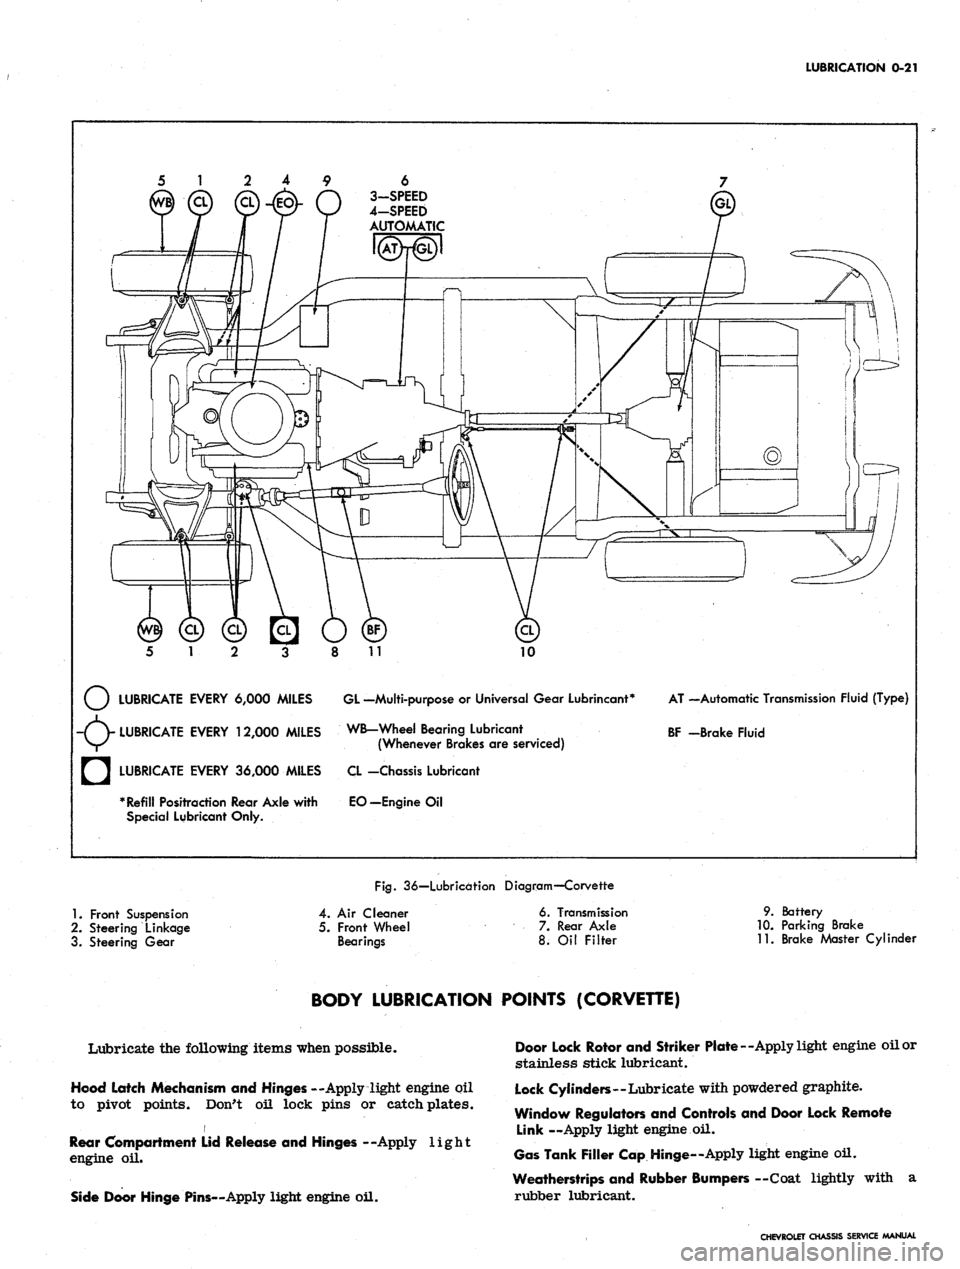
LUBRICATION
0-21
6
3-SPEED
4-SPEED
AUTOMATIC
10
LUBRICATE EVERY 6,000 MILES GL -Multi-purpose
or
Universal Gear Lubrincant*
-(V LUBRICATE EVERY 12,000 MILES WB-Wheel Bearing Lubricant
V/^ (Whenever Brakes
are
serviced)
AT —Automatic Transmission Fluid (Type)
BF -Brake Fluid
a
LUBRICATE EVERY 36,000 MILES
* Refill Positraction Rear Axle with
Special Lubricant Only.
CL -Chassis Lubricant
EO—Engine
Oil
Fig.
36—Lubrication Diagram—Corvette
1.
Front Suspension
2.
Steering Linkage
3. Steering Gear
4.
Air
Cleaner
5. Front Wheel
Bearings
6. Transmission
7. Rear Axle
8.
Oil
Filter
9. Battery
10.
Parking Brake
11.
Brake Master Cylinder
BODY LUBRICATION POINTS (CORVETTE)
Lubricate the following items when possible.
Hood Latch Mechanism and Hinges --Apply light engine oil
to pivot points. Don't oil lock pins or catch plates.
i
Rear Compartment Lid Release and Hinges --Apply light
engine
oil.
Side Door Hinge Pins—Apply light engine oil.
Door Lock Rotor and Striker Plate—Apply light engine oil or
stainless stick lubricant.
Lock Cylinders—Lubricate with powdered graphite.
Window Regulators and Controls and Door Lock Remote
Link —Apply light engine
oil.
Gas Tank Filler Cap Hinge—Apply light engine oil.
Weatherstrips and Rubber Bumpers —Coat lightly with
a
rubber lubricant.
CHEVROLET CHASSIS SERVICE MANUAL
Page 161 of 659
SECTION 2
FRAME
INDEX
Page
General Description 2-1
Chevrolet 2-1
Cheveile '. 2-1
Repair Procedures 2-1
Page
Checking Frame Alignment 2-1
Car Preparation 2-1
Tramming Sequence 2-1
Reference Point Dimensions 2-1
GENERAL DESCRIPTION
CHEVROLET AND CHEVELLE
Frames used on Chevrolet and Cheveile lines are basi-
cally the same, consisting of full length right and left
side members joined laterally by crossmembers. Sev-
eral different frames are used in each line to meet the
various vehicle size and function requirements but the
basic shape for each line remains the same. Differences
between frames in a given line exist only in metal gauge,
part size and numbers of parts necessary to meet the
particular structural requirements of the models
involved.
CORVETTE
The Corvette frame is a rigid perimeter unit, with five
crossmembers. From the rear kick-up forward, trap-
azoidal shaped, closed side members outline and protect
the passenger compartment. At the cowl area, the side
members curve inward in a sweeping "S" shape, to pro-
vide a sturdy foundation for the engine mounts and clear-
ance for front wheel movement. From the kick-up
rearward, box-sectioned side rails provide fore and aft
support for the rear axle and suspension. Lateral sup-
port is provided by five variously shaped welded-in
crossmembers, including the front unit, which formerly
was bolted-in.
CHEVY II AND CAMARO
Underbody alignment checking procedures will be found
in the Body Service Manual.
REPAIR PROCEDURES
CHECKING FRAME ALIGNMENT
Vehicles involved in an accident of any nature which
might result in a "swayed" or "sprung" frame should
always be checked for proper frame alingment in addi-
tion to steering geometry and wheel alignment.
CAR PREPARATION
Preparing the car for the frame alignment check in-
volves the following:
1.
Place the car on level surface.
2.
The weight of the car should be supported at the
wheel locations.
3.
A visual damage inspection should be made to elim-
inate needless measuring. Obviously damaged or
misaligned areas can often be located by sight.
TRAMMING SEQUENCE
When checking a frame for alignment in case of dam-
age,
the first step is horizontal "X" checking with a
tram from similar given points on opposite side of the
frame.
Frame alignment checks on all models should be made
with the tram points set at the center of each locating
point indicated and the cross bar level to insure
accuracy.
When "X" checking any section of the frame, the
measurements should agree within 3/16". If they do not,
it means that corrections will have to be made.
If a tram gauge is not available, the "plumb bob"
method of checking may be used. To assure any degree
of accuracy when using this method, the vehicle should
be on a level floor.
By using this method, it is only necessary to have a
#
piece of cord attached to an ordinary surveyor's plumb
bob.
When measuring the distance between two points,
the free end of the cord should be placed on the reference
point allowing the plumb bob to hang on the floor. A check
mark should be made on the floor just under the tip of
the plumb bob. This operation should be repeated at all
reference points. With these points located on the floor,
they may easily be measured with a rule.
The second step is checking the vertical dimensions
from the datum plane to the points to be trammed. With
the proper settings the tram bar will be on a plane
parallel to that of the frame. The exception to this would '
be when one of the reference locations is included in the
misaligned area; then the parallel plane between the
frame and the tram bar may not prevail. After com-
pletion of the repairs, the tram gauge should be set at
the specified dimension to check the accuracy of the re-
pair operation.
ALIGNMENT REFERENCE POINT DIMENSIONS
Dimensions to holes are measured to dead center of
the holes and flush to the adjacent surface metal.
CHEVROLET CHASSIS SERVICE MANUAL