check engine light CHEVROLET CAMARO 1967 1.G Chassis Owner's Guide
[x] Cancel search | Manufacturer: CHEVROLET, Model Year: 1967, Model line: CAMARO, Model: CHEVROLET CAMARO 1967 1.GPages: 659, PDF Size: 114.24 MB
Page 389 of 659
CLUTCH AND TRANSMISSIONS
7*30
V-8 Models-With Uni-Directional Linkage
1.
Remove air cleaner.
2.
Disconnect accelerator linkage at carburetor.
3.
Disconnect accelerator return and TV rod return
springs.
4.
With right hand, pull TV upper rod forward until
transmission is through detent. With left hand, open
carburetor to wide open throttle position. Carbure-
tor must reach wide open throttle position at the
same time the ball stud contacts end of slot in upper
TV rod.
5. Adjust swivel on end of upper TV rod to obtain set-
ting described in Step 4. Allowable tolerance is
approximately 1/32".
6. Connect and adjust accelerator linkage as described
in Section 6.
7. Check for throttle linkage freedom.
Neutral Safety Switch Adjustment
The adjustment at the neutral safety switch is de-
scribed in the Electrical Section 12.
Throttle Return Check Valve (Dashpot) Adjustment
The adjustment of the throttle return check valve is
described in Section 6M for each carburetor installation.
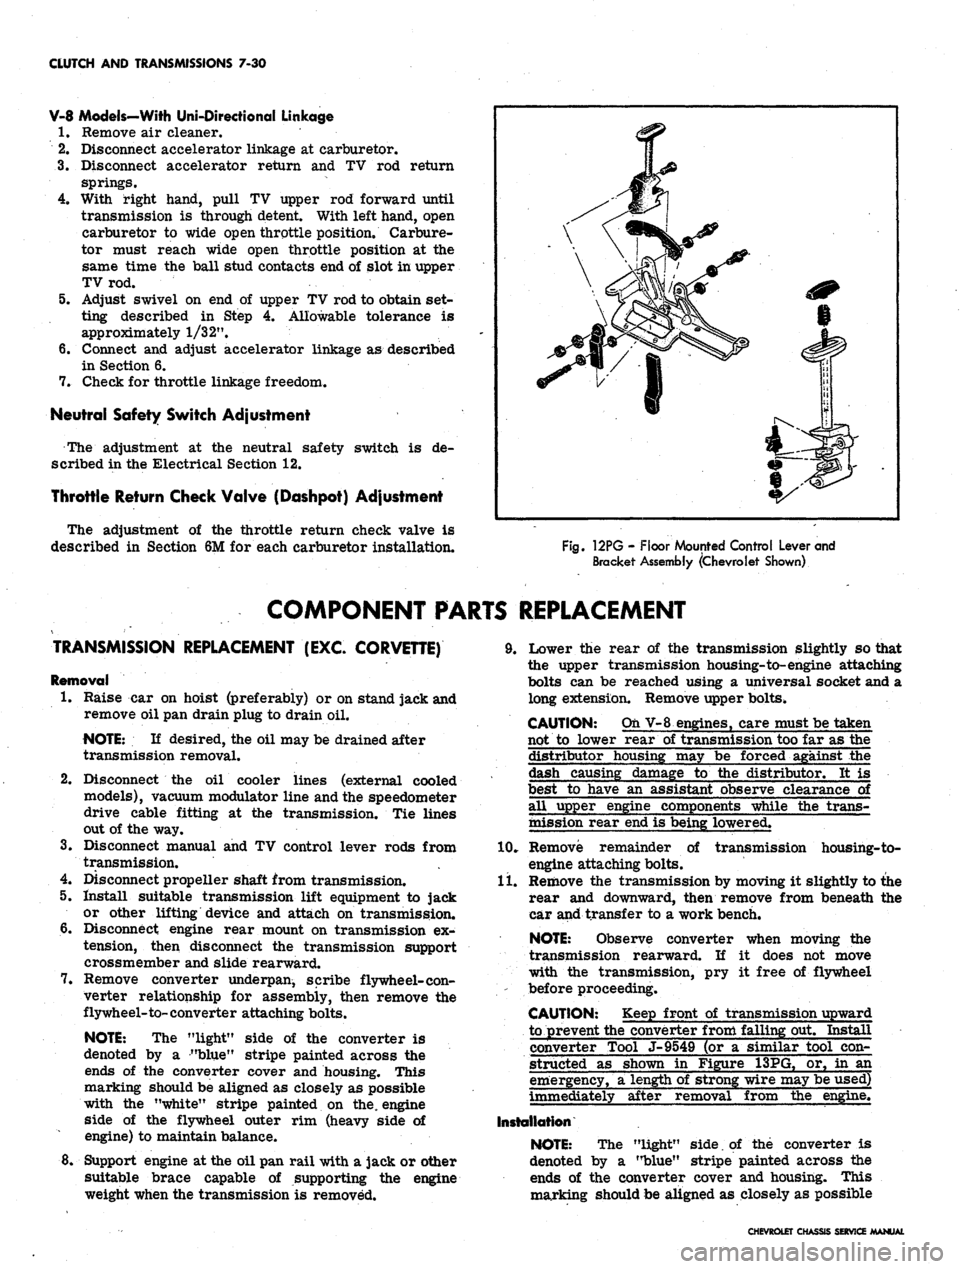
Fig.
12PG - Floor Mounted Control Lever and
Bracket Assembly (Chevrolet Shown)
COMPONENT PARTS REPLACEMENT
TRANSMISSION REPLACEMENT (EXC. CORVETTE)
Removal
1.
Raise car on hoist (preferably) or on stand jack and
remove oil pan drain plug to drain oil.
NOTE:
If desired, the oil may be drained after
transmission removal.
2.
Disconnect the oil cooler lines (external cooled
models), vacuum modulator line and the speedometer
drive cable fitting at the transmission. Tie lines
out of the way.
3.
Disconnect manual and TV control lever rods from
transmission.
4.
Disconnect propeller shaft from transmission.
5. Install suitable transmission lift equipment to jack
or other lifting device and attach on transmission.
6. Disconnect engine rear mount on transmission ex-
tension, then disconnect the transmission support
crossmember and slide rearward.
7. Remove converter underpan, scribe flywheel-con-
verter relationship for assembly, then remove the
flywheel-to-converter attaching bolts.
NOTE:
The "light" side of the converter is
denoted by a "blue" stripe painted across the
ends of the converter cover and housing. This
marking should be aligned as closely as possible
with the "white" stripe painted on the. engine
side of the flywheel outer rim (heavy side of
engine) to maintain balance.
8. Support engine at the oil pan rail with a jack or other
suitable brace capable of supporting the engine
weight when the transmission is removed.
9. Lower the rear of the transmission slightly so that
the upper transmission housing-to-engine attaching
bolts can be reached using a universal socket and a
long extension. Remove upper bolts.
CAUTION: Oh V-8 engines, care must be taken
not to lower rear of transmission too far as the
distributor housing may be forced against the
dash causing damage to the distributor. It is
best to have an assistant observe clearance of
all upper engine components while the trans-
mission rear end is being lowered.
10.
Remove remainder of transmission housing-to-
engine attaching bolts.
11.
Remove the transmission by moving it slightly to the
rear and downward, then remove from beneath the
car and transfer to a work bench.
NOTE:
Observe converter when moving the
transmission rearward. If it does not move
with the transmission, pry it free of flywheel
before proceeding.
CAUTION: Keep front of transmission upward
to prevent the converter from falling out. Install
converter Tool J-9549 (or a similar tool con-
structed as shown in Figure 13PG, or, in an
emergency, a length of strong wire may be used)
immediately after removal from the engine.
Installation
NOTE:
The "light" side, of the converter is
denoted by a "blue" stripe painted across the
ends of the converter cover and housing. This
marking should be aligned as closely as possible
CHEVROLET CHASSIS SERVICE MANUAL
Page 391 of 659
CLUTCH AND TRANSMISSIONS 7-32
21.
Remove transmission output shaft slip yoke and in-
sert a plastic shipping plug in end of extension to
prevent spillage of transmission fluid.
NOTE:
The yoke is removed to avoid tearing
the heat reflecting pad on the underbbdy, when
the transmission is being removed.
22.
Remove bright metal ignition shielding from dis-
tributor area.
23.
Remove the transmission dip stick and tube
assembly.
24.
Disconnect transmission vacuum modulator line at
distributor advance line tee.
25.
Position transmission hoist under transmission and
attach safety chain to transmission.
26.
Remove transmission converter housing-to-engine
attaching foolts and slide transmission rearward.
NOTE:
Observe converter when moving trans-
mission rearward. If converter does not move
with the transmission, pry it free of flywheel
before proceeding.
27.
Install converter retaining strap.
28.
Lower and remove transmission from vehicle by
tilting the front down and to the right while inter-
mittently lowering the transmission to facilitate its
• removal.
29.
Reinstall transmission assembly by performing the
above steps in reverse order.
Bolt Torques
Transmission Case to Flywheel
Housing Bolts 35 ft. lbs.
Converter to Flywheel Bolts. . , . . 35 ft. lbs.
OTHER SERVICE OPERATIONS
Although certain operations, such as oil pan or gasket
replacement, valve body, governor, filler pipe "O" ring,
speedometer drive gear, case extension "0" ring and
rear oil seal, vacuum modulator, and servo cover or
gasket service may be performed from underneath the
vehicle without removing the Powerglide; their service
procedure is covered in the Passenger Overhaul Manual
and is not repeated here. Refer to the- Powerglide Sec-
tion of the Passenger Overhaul Manual for all other
service operations not covered here.
DIAGNOSIS
Proper operation of the Powerglide transmission may
be affected by a number of factors, all of which must be
considered when trouble in the unit is diagnosed.
Proper trouble diagnosis can only be accomplished
when performed in a thorough step by step procedure.
The following procedure has been devised and tested and
is recommended for all trouble diagnosis complaints and
if the service man will follow this checking procedure,
accurate and dependable diagnosis may be accomplished.
This will result in a savings of time, not only to the
service man, but to the customer as well.
WARMING UP TRANSMISSION
Before attempting to check and/or correct any com-
plaints on the Powerglide transmission it is absolutely
essential that the oil level be checked and corrected if
necessary. An oil level which is either too high or too
low can be the cause of a number of abnormal conditions
from excessive noise to slippage in all ranges.
It must be remembered that cold oil will slow up the
action of the hydraulic controls in the transmission. For
this reason a trouble or oil leak diagnosis should not be
attempted until the transmission has been warmed up by
either of the following procedures:
Shop Warm Up
1.
Connect tachometer to engine.
2.
Set parking brake tight and start engine.
3.
Place selector light in
"D"
(drive) range.
4.
Adjust carburetor idle speed adjusting screw to run
engine at approximately 750 rpm and operate in this
manner for two minutes. At the end of two minutes
of operation, the transmission will be sufficiently
warmed up for diagnosis purposes.
NOTE:
At this point, readjust the engine idle
speed to 450-475 rpm in
"D"
range.
Road Warm Up
Drive the car approximately 5 miles with frequent
starts and stops.
NOTE:
At this point, make sure the engine idle
speed is set to 450-475 rpm in
"D"
range.
CHECKING FLUID LEVEL AND CONDITION
After transmission has been warmed up, check the
fluid level with the engine idling, parking brake set and
control lever in "N" (neutral). If the fluid level is low,
add fluid to bring level up to the full mark on gauge rod,
CAUTION: If fluid level is too high, fluid may
be aerated by the planet carrier. Aerated fluid
will cause turbulence in the converter which will
result in lost power, lower stall speed and lower
pressures in control circuits. Lower fluid level
to full mark, then shut off engine to allow air
bubbles to work out of fluid.
When checking oil level, aburned smell and discolora-
tion indicate burned clutches or bands and the transmis-
sion will have to be removed.
MANUAL LINKAGE
Manual linkage adjustment and the associated neutral
safety switch are important from a safety standpoint.
The neutral safety switch should be adjusted so that the
engine will start in the Park and Neutral positions only.
With the selector lever in the Park position, the park-
ing pawl should freely engage and prevent the vehicle
CHEVROLET CHASSIS SERVICE MANUAL
Page 392 of 659
CLUTCH AND TRANSMISSIONS 7-33
from rolling. The pointer on the indicator quadrant
should line up properly with the range indicators in all
ranges.
OIL LEAKS
Before attempting to correct an oil leak, the actual
source of the leak must be determined. In many cases
the source of the leak can be deceiving due to "wind flow1 f
around the engine and transmission.
The suspected area should be wiped clean of all oil
before inspecting for the source of the leak. Red dye is
used in the transmission oil at the assembly plant and
will indicate if the oil leak is from the transmission.
The use of a "black light"* to identify the oil at the
source of leak is also helpful. Comparing the oil from
the leak to that on the engine or transmission dip stick
(when viewed by black light) will determine the source
of the leak.
Oil leaks around the engine and transmission are gen-
erally carried toward the rear of the car by the air
stream. For example, a transmission "oil filter tube
to case leak" will sometimes appear as a leak at the
rear of the transmission. In determining the source of
an oil leak it is most helpful to keep the engine running.
The mating surfaces of servo cover, converter housing,
transmission case and transmission case extension
should be carefully examined for signs of leakage. The
vacuum modulator must also be checked to insure that
the diaphragm has not ruptured as this would allow trans-
mission oil to be drawn into the intake manifold. Us-
ually, the exhaust will be excessively smoky if the
diaphragm ruptures due to the transmission oil added to
the combustion. The transmission case extension rear
oil seal should also be checked. All test plugs should be
checked to make sure that they are tight and that there
is no sign of leakage at these points. The converter
underpan should also be removed. Any appreciable quan-
tity of oil in this area would indicate leakage at the pump
square seal ring, pump seal assembly, or pump bolt
sealing washers.
BASIC PRESSURE CHECKS
Four basic pressure checks are used for diagnosis and
operational checks for the Aluminum Powerglide trans-
mission. All checks should be made only after thoroughly
warming up the transmission.
• Wide Open Throttle Upshift Pressure.
• Idle Pressure in "Drive" Range.
• Manual "Low" Range Pressure.
• "Drive" Range Overrun (Coast) Pressure.
It is not recommended that stall tests be conducted
which would result in engine vacuum falling below 10" Hg.
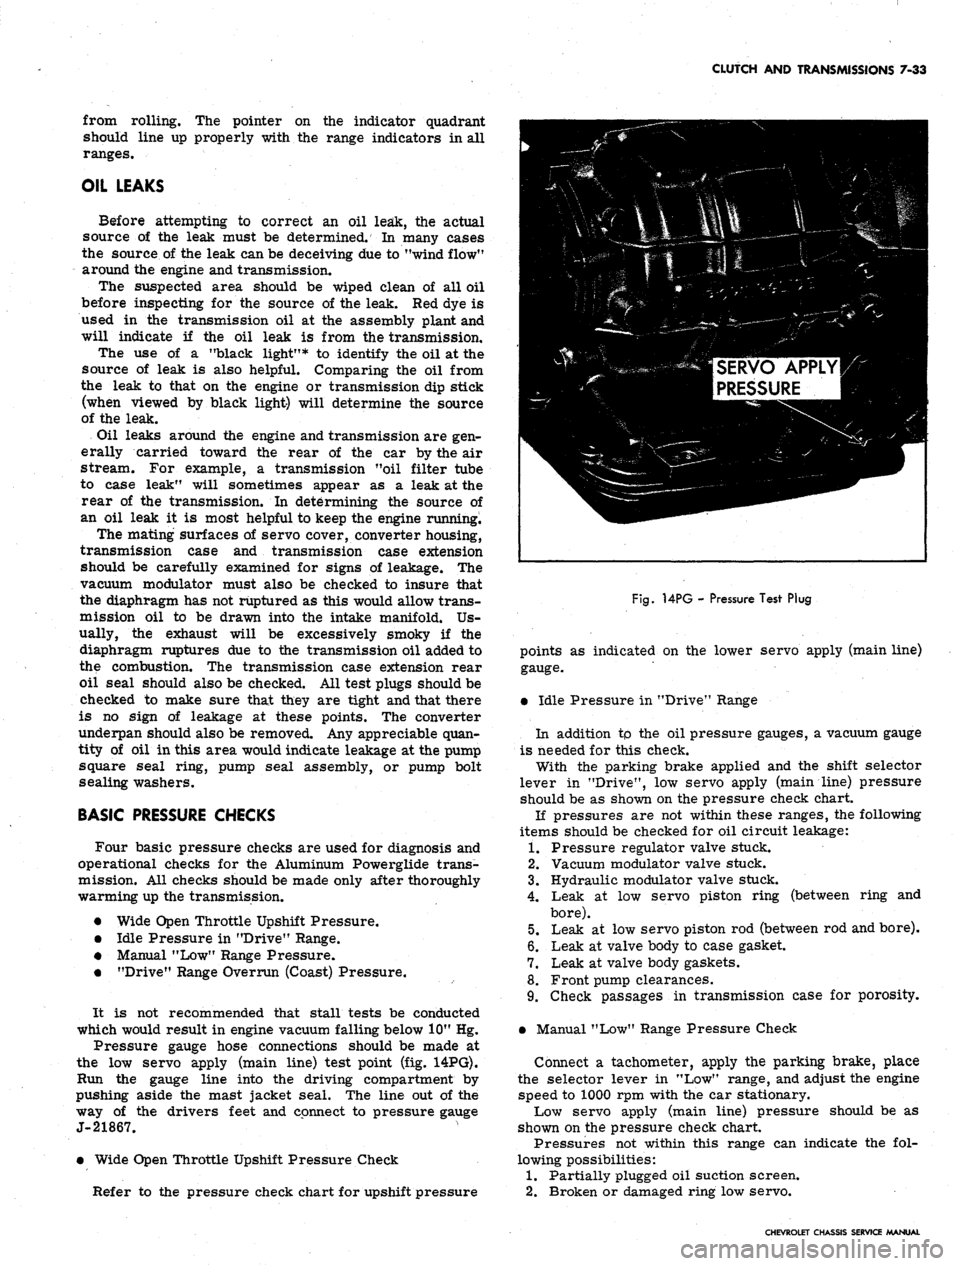
Pressure gauge hose connections should be made at
the low servo apply (main line) test point (fig. 14PG).
Run the gauge line into the driving compartment by
pushing aside the mast jacket seal. The line out of the
way of the drivers feet and connect to pressure gauge
J-21867.
• Wide Open Throttle Upshift Pressure Check
Refer to the pressure check chart for upshift pressure
SERVO APPLY
PRESSURE
Fig.
14PG - Pressure Test Plug
points as indicated on the lower servo apply (main line)
gauge.
• Idle Pressure in "Drive" Range
In addition tp the oil pressure gauges, a vacuum gauge
is needed for this check.
With the parking brake applied and the shift selector
lever in "Drive", low servo apply (main line) pressure
should be as shown on the pressure check chart.
If pressures are not within these ranges, the following
items should be checked for oil circuit leakage:
1.
Pressure regulator valve stuck.
2.
Vacuum modulator valve stuck.
3.
Hydraulic modulator valve stuck.
4.
Leak at low servo piston ring (between ring and
bore).
5.
Leak at low servo piston rod (between rod and bore).
6. Leak at valve body to case gasket.
7.
Leak at valve body gaskets.
8. Front pump clearances.
9. Check passages in transmission case for porosity.
• Manual "Low" Range Pressure Check
Connect a tachometer, apply the parking brake, place
the selector lever in "Low" range, and adjust the engine
speed to 1000 rpm with the car stationary.
Low servo apply (main line) pressure should be as
shown on the pressure check chart.
Pressures not within this range can indicate the fol-
lowing possibilities:
1.
Partially plugged oil suction screen.
2.
Broken or damaged ring low servo.
CHEVROLET CHASSIS SERVICE MANUAL
Page 396 of 659
CLUTCH AND TRANSMISSIONS 7-37
LI.
- LI Range can be selected at any vehicle speed,
and the transmission will shift to second gear
and remain in second until vehicle speed is re-
duced to approximately 40 MPH, .depending on
axle ratio. LI Range position prevents the trans-
mission from shifting out of first gear.
It is very important that any communication concerning
the Turbo Hydra-Matic always contain the transmission
serial number and that all transmission parts returned
to Chevrolet Motor Division always be tagged with the
transmission serial number.
MAINTENANCE AND ADJUSTMENTS
TRANSMISSION FLUID
Transmission fluid level should be checked with trans-
mission warm and selector lever in "P" Park position,
every time engine oil level is checked or as specified in
Section 0 when engine oil is changed.
CAUTION: Since the Turbo Hydra-Matic trans-
mission is very sensitive to oil level, special
precautions should be taken when checking the
oil level, to insure against an overfifE
Transmission fluid should be changed as specified in
Section 0.
FLUID LEVEL INDICATOR
The fluid level indicator is located in the filler pipe at
the right rear corner of the engine. To bring the fluid
level from the add mark to the full mark add 1 pint.
Fluid level should be to the full mark with transmission
at normal operating temperature. With cold fluid the
level should be at the add mark or slightly below.
SHIFT CONTROL LINKAGE ADJUSTMENT
Adjust linkage as shown below and in Figure 2.
1.
The shift tube and lever assembly must be free in the
mast jacket See Section 9 for alignment of steering
column assembly if necessary.
2.
To check for proper shift linkage adjustment, lift the
transmission selector lever towards the steering
wheel. Allow the selector lever to be positioned in
drive (D) by the transmission detent.
NOTE: Do not use the indicator pointer as a
reference to position the selector lever. When
performing linkage adjustment, pointer is ad-
justed last.
3.
Release the selector lever. The lever should be in-
hibited from engaging low range unless the lever is
lifted.
4.
Lift the selector lever towards the steering wheel,
and allow the lever to be positioned in neutral (N) by
the transmission detent.
5.
Release the selector lever. The lever should now be
inhibited from engaging reverse range unless the
lever is lifted.
6. A properly adjusted linkage will prevent the selector
lever from moving beyond both the neutral detent,
and the drive detent unless the lever is lifted to pass
over the mechanical stop in the steering column.
See schematic diagram.
7.
In the event that an adjustment is required, place the
selector lever in drive (D) position as determined by
the transmission detent. See Steps 2 and 3.
8. Loosen the adjustment swivel at the cross-shaft, and
rotate the transmission lever so that it contacts the
drive stop in the steering column.
9. Tighten the swivel and recheck the adjustment. See
Steps 2 and 6. -
l(h Readjust indicator needle if necessary to agree with
the transmission detent" positions. See Section 9.
11.
Readjust neutral safety switch if necessary to pro-
vide the correct relationship to the transmission de-
tent positions. See Section 12.
12.
When properly adjusted the following conditions must
be met by manual operation of the steering column
shift lever:
a. From reverse to drive position travel, the trans-
mission detent feel must be noted and related to
indicated position on dial.
b.
When in drive and reverse positions, pull lever
rearward (towards steering wheel) and then re-
lease. It must drop back into position with no
restrictions.
NEUTRAL SAFETY SWITCH ADJUSTMENT
The neutral safety switch must be adjusted so that the
car will start in the park or neutral position, but will not
start in the other positions. For replacement refer to
Section 12 of this Manual.
DRAINING AND REFILLING TRANSMISSION
Drain oil immediately after operation before it has had
an opportunity to cool.
To drain oil proceed as follows:
1.
Remove bottom pan attaching screws, pan, and gas-
ket.
2.
Remove oil strainer. Remove "O" ring seal from
pick-up pipe and discard.
3.
Discard strainer if dirty.
4.
Install new "O" ring seal on pick-up pipe and install
strainer and pipe assembly.
5.
Thoroughly clean bottom pan.
6.. Affix new gasket to bottom pan with petroleum jelly.
7.
Install bottom pan with attaching screws and torque
to specifications;
8. If only the pan has been removed, pour approximately
7-1/2 pints of fluid into the transmission. If the
valve body has also been removed use 9-1/2 pints.
After a complete overhaul approximately 19 pints
are required. Be sure container, spout, or funnel is
clean.
9. Start engine and let idle (carburetor off fast idle
step).
Place selector lever in P position and apply
hand brake.
10.
With transmission warm (approximately 150°F), add
fluid to bring level to full mark on indicator.
CAUTION: Do not overfill. Foaming will re-
sult.
CHEVROLET CHASSIS SERVICE MANUAL
Page 400 of 659
CLUTCH AND TRANSMISSIONS 7-41
CAUTION: Use converter holding ToolJ-5384
when lowering transmission or keep rear of
transmission lower than front so as not to lose
converter.
The installation of the transmission is the reverse of
the removal.
TURBO HYDRA-MATIC DIAGNOSIS PROCEDURE
Accurate diagnosis of transmission problems begins
with a thorough understanding of normal transmission
operation. In particular, knowing which units are in-
volved in the various speeds or shifts so that the specific
units or circuits involved in the problem can be isolated
and investigated further. Analytical diagnosis will pro-
tect the technician from come backs and certainly will
improve owner satisfaction.
An important and often overlooked aspect of diagnosis
is finding out specifically what the customer is com-
plaining of. For this purpose a short ride with the cus-
tomer will often prove beneficial. It may be found that
the condition the customer wants corrected is standard
and should not be altered.
The following sequence, based on field experience, pro-
vides the desired information quickly and in most cases
actually corrects the malfunction without requiring the
removal of the transmission. Details of the items listed
in this sequence are covered further in the text.
SEQUENCE FOR TURBO HYDRA-MATIC
DIAGNOSIS PROCEDURE
1.
Check oil level and condition.
2.
Check and correct detent switch.
3.
Check and correct vacuum line and fittings.
4.
Check and correct manual linkage.
OIL LEVEL AND CONDITION CHECK
Always check the oil level before road testing. Oil
must be visible on dip stick prior to operating the ve-
hicle. Erratic shifting, pump noise, or other malfunc-
tions can in some cases be traced to improper oil level.
Oil level should be checked with the selector lever in
the Park (P) position, engine running, and the vehicle on
level pavement.
Fluid level should be to the FULL mark with the trans-
mission at normal operating temperature (170°-190°
F.).
With warm fluid (room temperature), the level should be
at or slightly below the ADD mark.
If oil level was low, refer to Oil Leaks.
The condition of the oil is often an indication of whether
the transmission should be removed from the vehicle, or
to make further tests. When checking oil level, a burned
smell and discoloration indicate burned clutches or bands
and the transmission will have to be removed.
MANUAL LINKAGE
Manual linkage adjustment and the associated neutral
safety switch are important from a safety standpoint
The neutral safety switch should be adjusted so that the
engine will start in the Park and Neutral positions only.
With the selector lever in the Park position, the park-
ing pawl should freely engage and prevent the vehicle
from rolling. The pointer on the indicator quadrant
should line up properly with the range indicators in all
ranges.
OIL LEAKS
Before attempting to correct an oil leak, the actual
source of the leak must be determined. In many cases,
the source of the leak can be deceiving due to "wind flow"
around the engine and transmission.
The suspected area should be wiped clean of all oil be-
fore inspecting for the source of the leak. Red dye is
used in the transmission oil at the assembly plant and
will indicate if the oil leak is from the transmission.
. The use of a "black light"* to identify the oil at the
source of leak is also helpful. Comparing the oil from
the leak to that on the engine or transmission dip stick
(when viewed by black light) will determine the source
of the leak.
Oil leaks around the engine and transmission are gen-
erally carried toward the rear of the car by the air
stream. For example, a transmission "oil filler tube to
case leak" will sometimes appear as a leak at the rear of
the transmission. In determining the source of an oil
leak it is most helpful to keep the engine running.
POSSIBLE POINTS OF OIL LEAKS
• 1. TRANSMISSION OIL PAN LEAK
a. Attaching bolts not correctly torqued.
b.
Improperly installed or damaged pan gasket.
c. Oil pan gasket mounting face not flat.
2.
REAR EXTENSION LEAK
a. Attaching bolts not correctly torqued.
b.
Rear seal assembly — damaged or improperly
installed.
c. Gasket seal — (extension to case) damaged or
improperly installed.
d. Porous casting.
3.
CASE LEAK
a. Filler pipe "O" ring seal damaged or missing;
misposition of filler pipe bracket to engine —
"loading" one side of
"O"
ring.
b.
Modulator assembly "O" ring seal
—
damaged or
improperly installed.
c. Governor cover, gasket and bolts — damaged,
loose; case face leak.
d. Speedo gear
—
"O" ring damaged.
e. Manual shaft seal — damaged, improperly in-
stalled.
f. line pressure tap plug — stripped, shy sealer
compound.
g. Parking pawl shaft cup plug
—
damaged, improp-
erly installed.
h. Vent pipe (refer to Item 5).
i. Porous case.
4.
FRONT END LEAK
a. Front seal - damaged (check converter neck for
nicks,
etc., also for pump bushing moved for-
ward);
garter spring missing from pump to con-
verter seaL
b.
Pump attaching bolts and seals
—
damaged, miss-
ing, bolts loose.
CHEVROLET a
SERVICE
Page 473 of 659
STEERING
9-33
POWER STEERING
INDEX
Page
General Description
. 9-33
Maintenance
and
Adjustments
9-33
Bleeding Hydraulic System
9-33
Fluid Level
. 9-33
Adjustments
. 9-34
Power Steering Gear
. . 9-34
Pump Belt Tension
9-34
Hydraulic System Checks
9-34
Component Replacement
and
Repairs
. 9-35
Power Steering Pump.
. 9-35
Power Steering Gear
9-36
Control Valve
and
Adapter Assembly
9.35
Power Cylinder
9.37
Power Steering Hoses
9.39
GENERAL DESCRIPTION
Two types
of
power steering
are
used
for 1967.
One
is
the conventional linkage type
for
Chevy
n and
Corvette
vehicles
and the
other
is the
integral gear type
for
Chevrolet, Chevelle,
and
Camaro.
For
both types
the
hydraulic pressure
is
provided
by an
engine-driven vane-
type pump.
On
the
Chevy
n and
Corvette linkage type power steer-
ing, hydraulic pressure
is
delivered through
a
hose from
the pump
to a
valve which senses
the
requirement
for
power assistance
and
supplies
the
power cylinder
ac-
cordingly.
The
steering gear used with this power steer-
ing
is the
same basic unit used
on
manually steered
vehicles;
it is
serviced
as
outlined
in the
manual steering
part
of
this section except
for
adjustment, which
is
covered
in the
following pages.
The
steering linkage also
is serviced the same
as
manual counterparts.
The Chevrolet, Chevelle
and
Camaro integral gear type
power steering
has the
hydraulic pressure delivered
from
the
pump through two hoses
to the
steering gear.
In
the power steering gear
the
steering shaft, hydraulic
valve, worm, and rack-piston
nut are all in
line making
a
compact
and
space saving assembly.
All oil
passages
are
internal within
the
gear except
the
pressure
and
return
hoses.
The steering gear
is a
recirculating ball system
in
which steel balls
act as a
rolling thread between
the
steering worm
and
rack-piston
nut. The
rack-piston
nut
is
all one
piece
and is
geared
to the
sector
of
the piston
shaft.
The
valve
is
contained
in the
gear housing elimi-
nating
the
need
of
bolts
or
seals
to
attach
a
separate
valve housing.
The valve
is an
open-center, rotary-type three
way
valve.
The
spool
is
held
in
neutral position by means
of a
torsion
bar. The
spool
is
attached
by
means
of
the stub
shaft
to one end of the
torsion
bar
and
to the
valve body
on
the
other
end.
Twisting
of the
torsion bar allows
the
spool
to
move
in
relation
to the
valve body thereby oper-
ating
the
valve.
MAINTENANCE
AND
ADJUSTMENTS
BLEEDING HYDRAULIC SYSTEM
1.
Fill
oil
reservoir
to
proper level and
let oil
remain
undistrubed
for at
least two minutes.
2.
Start engine
and run
only
for
about
two
seconds.
3.
Add
oil if
necessary.
4.
Repeat above procedure until
oil
level remains
con-
stant after running engine.
5. Raise front
end of
vehicle
so
that wheels
are off
the
ground.
6. Increase engine speed
to
approximately
1500 rpm.
7. Turn
the
wheels
(off
ground) right
and
left, lightly
contacting
the
wheel stops.
8. Add
oil if
necessary.
9. Lower
the car and
turn wheels right and left
on the
ground.
10.
Check
oil
level and refill
as
required.
11.
If oil is
extremely foamy, allow vehicle
to
stand
a
few minutes with engine
off and
repeat above
procedure.
,
a.
Check belt tightness
and
check
for a
bent
or
loose
pulley. (Pulley should
not
wobble with engine
running.)
b.
Check
to
make sure hoses
are not
touching
any
other parts
of the car,
particularly sheet metal.
c. Check
oil
level, filling
to
proper level
if
neces-
sary, following operations
1
through
10.
This
step
and
Step
"D" are
extremely important
as
low
oil
level and/or
air in the oil are the
most
frequent causes
of
objectionable pump noise.
d. Check
the
presence
of air in the oil. If air is
present, attempt
to
bleed system
as
described
in
operations
1
through
10. If it
becomes obvious
that
the
pump will
not
bleed after
a few
trials,
proceed
as
outlined under Hydraulic System
Checks.
FLUID
LEVEL
1.
Check
oil
level
in the
reservoir
by
checking
the dip
stick when
oil is at
operating temperature.
On
Chevelle models equipped with remote reservoir,
the reservoir should
be
maintained approximately
3/4 full when
oil is at
operating temperature.
2.
Fill,
if
necessary,
to
proper level with
GM
Power
Steering Fluid
or, if
this
is not
available, automatic
CHEVROLET CHASSIS SERVICE MANUAL
Page 514 of 659
ELECTRICAL-BODY AND CHASSIS 12-2
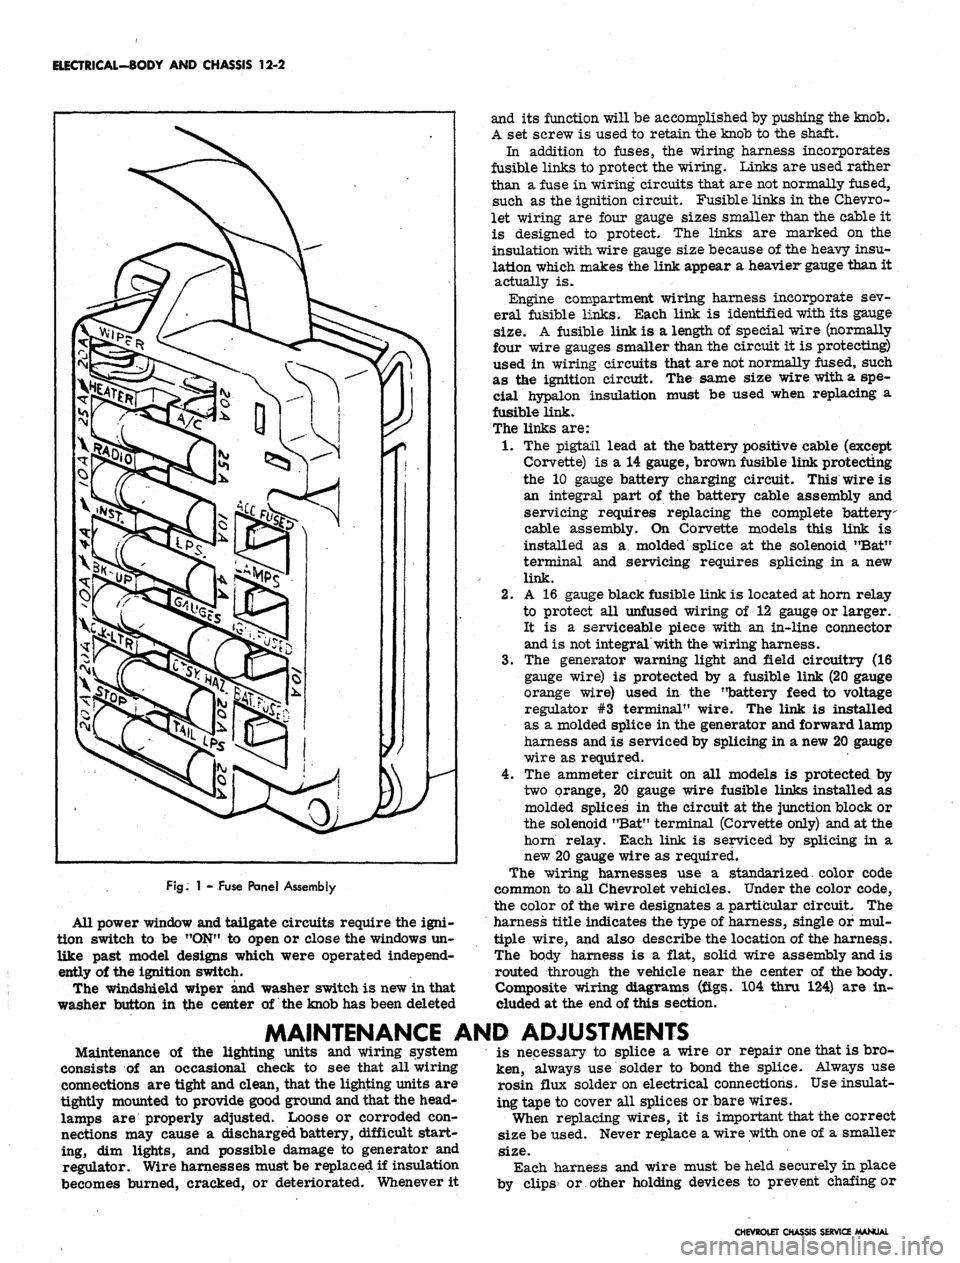
FJg.
1 - Fuse Panel Assembly
All power window and tailgate circuits require the igni-
tion switch to be "ON" to open or close the windows un-
like past model designs which were operated independ-
ently of the ignition switch.
The windshield wiper and washer switch is new in that
washer button in the center of the knob has been deleted
and its function will be accomplished by pushing the knob.
A set screw is used to retain the knob to the shaft.
In addition to fuses, the wiring harness incorporates
fusible links to protect the wiring. Links are used rather
than a fuse in wiring circuits that are not normally fused,
such as the ignition circuit. Fusible links in the Chevro-
let wiring are four gauge sizes smaller than the cable it
is designed to protect. The links are marked on the
insulation with wire gauge size because of the heavy insu-
lation which makes the link appear a heavier gauge than it
actually is.
Engine compartment wiring harness incorporate sev-
eral fusible links. Each link is identified with its gauge
size.
A fusible link is a length of special wire (normally
four wire gauges smaller than the circuit it is protecting)
used in wiring circuits that are not normally fused, such
as the ignition circuit. The same size wire with a spe-
cial hypalon insulation must be used when replacing a
fusible link.
The links are:
1.
The pigtail lead at the battery positive cable (except
Corvette) is a 14 gauge, brown fusible link protecting
the 10 gange battery charging circuit. This wire is
an integral part of the battery cable assembly and
servicing requires replacing the complete battery
cable assembly. On Corvette models this link is
installed as a molded splice at the solenoid "Bat"
terminal and servicing requires splicing in a new
link.
2.
A 16 gauge black fusible link is located at horn relay
to protect all unfused wiring of 12 gauge or larger.
It is a serviceable piece with an in-line connector
and is not integral with the wiring harness.
3.
The generator warning light and field circuitry (16
gauge wire) is protected by a fusible link (20 gauge
orange wire) used in the "battery feed to voltage
regulator #3 terminal" wire. The link is installed
as a molded splice in the generator and forward lamp
harness and is serviced by splicing in a new 20 gauge
wire as required.
4.
The ammeter circuit on all models is protected by
two orange, 20 gauge wire fusible links installed as
molded splices in the circuit at the junction block or
the solenoid "Bat" terminal (Corvette only) and at the
horn relay. Each link is serviced by splicing in a
new 20 gauge wire as required.
The wiring harnesses use a standarized. color code
common to all Chevrolet vehicles. Under the color code,
the color of the wire designates a particular circuit. The
harness title indicates the type of harness, single of mul-
tiple wire, and also describe the location of the harness.
The body harness is a flat, solid wire assembly and is
routed through the vehicle near the center of the body.
Composite wiring diagrams (figs. 104 thru 124) are in-
cluded at the end of this section.
MAINTENANCE AND ADJUSTMENTS
Maintenance of the lighting units and wiring system
consists of an occasional check to see that all wiring
connections are tight and clean, that the lighting units are
tightly mounted to provide good ground and that the head-
lamps are properly adjusted. Loose or corroded con-
nections may cause a discharged battery, difficult start-
ing, dim lights, and possible damage to generator and
regulator. Wire harnesses must be replaced if insulation
becomes burned, cracked, or deteriorated. Whenever it
is necessary to splice a wire or repair one that is bro-
ken, always use solder to bond the splice. Always use
rosin flux solder on electrical connections. Use insulat-
ing tape to cover all splices or bare wires.
When replacing wires, it is important that the correct
size be used. Never replace a wire with one of a smaller
size.
Each harness and wire must be held securely in place
by clips or other holding devices to prevent chafing or
CHEVROLET CHASSIS SERVICE MANUAL
Page 520 of 659
ELECTRICAL-BODY AND CHASSIS 12-8
is inserted through radiator support opening.
Remove two screws retaining lamp assembly to
lower sheet metal.
Remove three screws retaining lamp assembly to
lender.
To replace lamp assembly, reverse removal proce-
dure and check operation of the unit.
is aligned with flat on pivot shaft. Install stop lock
bolt and torque bolt to 45-60 in, lbs. Make sure that
side-to-side panel alignment is not changed when in-
stalling and tightening the stop.
CAUTION: Do not exceed specified torque
when tightening stop lock bolt.
HEADLAMP PANEL REPLACEMENT-CORVETTE
Refer to Figure 13 for Panel Mounting details.
1.
Remove engine compartment hood as outlined in
Section 1.
2.
Actuate headlamp panel to the open position.
NOTE:
In the event headlamp motor is inop-
erative, manual positioning of the panel can be
accomplished by turning the knurled knob at in-
board end of motor. As an assist in manual
operation of panel, apply light hand pressure to
panel in desired direction of rotation.
3.
Remove positive lead from battery terminal.
4.
Remove headlamp bezel retaining screws and bezel.
5. Remove the sealed beam housing unit as an assem-
bly - disconnect sealed beam leads at harness con-
nector and remove connector from sealed beam
leads;
remove the housing-to-panel retaining screws
and remove housing unit and wiring from panel.
6. Remove motor from panel pivot shaft - see motor
removal procedure. Then remove the panel stop
from panel inboard pivot shaft, and disconnect switch
lead wires from panel, support-mounted motor
switch.
7. Remove the panel retaining bolt access hole plugs
from inside the panel then rotate panel as required
and remove the retaining bolts and slide supports
from ends of panel pivot shaft. Remove bearing, felt
seal, retainer and washer from inboard pivot shaft.
8. Remove panel from its location by alternately disen-
gaging pivots from their retaining slots and with-
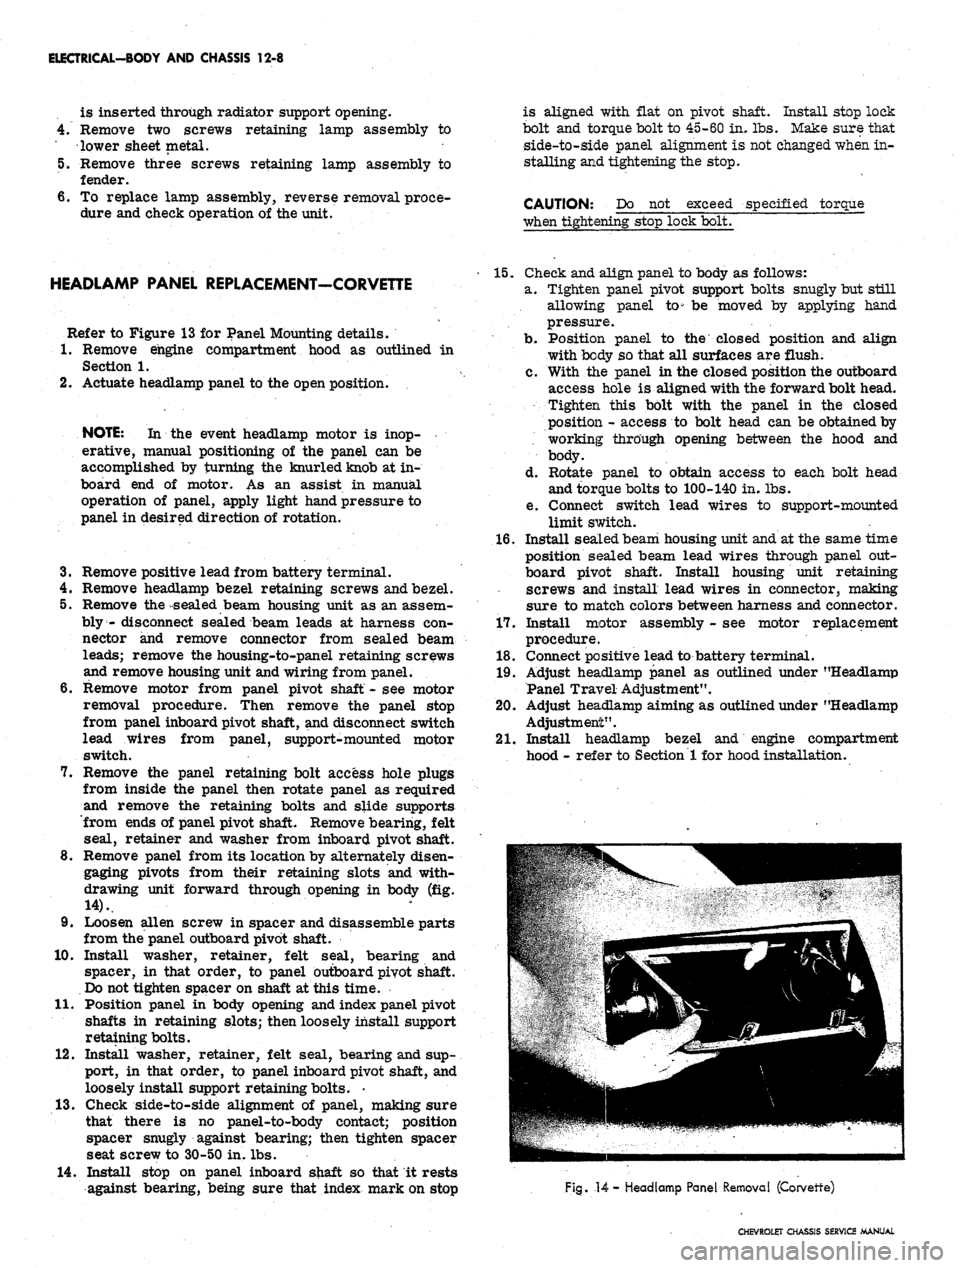
drawing unit forward through opening in body (fig.
14).
9. Loosen alien screw in spacer and disassemble parts
from the panel outboard pivot shaft.
10.
Install washer, retainer, felt seal, bearing and
spacer, in that order, to panel outboard pivot shaft.
Do not tighten spacer on shaft at this time.
11.
Position panel in body opening and index panel pivot
shafts in retaining slots; then loosely install support
retaining bolts.
12.
Install washer, retainer, felt seal, bearing and sup-
port, in that order, to panel inboard pivot shaft, and
loosely install support retaining bolts. -
13.
Check side-to-side alignment of panel, making sure
that there is no panel-to-body contact; position
spacer snugly against bearing; then tighten spacer
seat screw to 30-50 in. lbs.
14.
Install stop on panel inboard shaft so that it rests
against bearing, being sure that index mark on stop
15.
Check and align panel to body as follows:
a. Tighten panel pivot support bolts snugly but still
allowing panel to" be moved by applying hand
pressure.
b.
Position panel to the closed position and align
with body so that all surfaces are flush.
c. With the panel in the closed position the outboard
access hole is aligned with the forward bolt head.
Tighten this bolt with the panel in the closed
position - access to bolt head can be obtained by
working through opening between the hood and
body.
d. Rotate panel to obtain access to each bolt head
and torque bolts to 100-140 in. lbs.
e. Connect switch lead wires to support-mounted
limit switch.
16.
Install seaLed beam housing unit and at the same time
position sealed beam lead wires through panel out-
board pivot shaft. Install housing unit retaining
screws and install lead wires in connector, making
sure to match colors between harness and connector.
17.
Install motor assembly - see motor replacement
procedure.
18.
Connect positive lead to battery terminal.
19.
Adjust headlamp panel as outlined under "Headlamp
Panel Travel Adjustment".
20.
Adjust headlamp aiming as outlined under "Headlamp
Adjustment".
21.
Install headlamp bezel and engine compartment
hood - refer to Section 1 for hood installation.
Fig.
14
- Headlamp Panel Removal (Corvette)
CHEVROLET CHASSIS SERVICE MANUAL
Page 538 of 659
ELECTRICAL-BODY
AND
CHASSIS
12-26
•
Low oil
pressure
• High engine temperature
• Defective wiring
or
switch
connector from sender
in block above starter
on
and
at
left front
of
distributor
on V-8
Sending Unit Replacement
1.
Disconnect wiring harness
unit terminal (located
L-6 engines
engines).
2.
Remove sender unit using Tool J-21757
or 12
point
socket, replace with
new
unit
and
check operation.
GENERATOR INDICATOR
1.
Ignition
on,
Engine
not
Running
and
Telltale Light
Off.
• Indicator bulb burned out, replace bulb.
• Open circuit
or
loose connection
in the
telltale
light circuit.
2.
telltale Light Stays
on
after Engine
is
Started.
If indicator light does
not go out at
engine idle
speed, refer
to
Charging Systems under Engine
Electrical, Section
6Y.
TEMPERATURE (COOLING SYSTEM) INDICATOR
The temperature indicator circuit consists
of two re-
motely located units, indicator gauge
and
engine sender
unit.
The
indicator gauge, located
in the
instrument
panel, consists
of a
red light which will indicate
an
over-
heated engine condition.
Engine Sender Unit Replacement
1.
Drain engine cooling system
to a
level below unit.
2.
Remove sender unit (located
in the
inlet manifold
near water pump housing
on V-8
engines and
in the
cylinder head near
an
exhaust port
oh L-6
engines)
and replace with new unit.
3.
Refill cooling system
and
check operation
of
unit.
CHEVELLE INSTRUMENTS AND GAUGES
INDEX
Page
General Description
* *
i2-26
Service Operations
12-26
Instrument Panel
12-26
Instrument Cluster.
12-26
Fuel Gauge and/or Ammeter
12-27
Clock,
i 12-27
Speedometer
12-27
Page
Speedometer Cable
.
. 12-27
Temperature Gauge
12-29
Oil Pressure Gauge
12-29
Indicator Lights.
. 12-29
Oil Pressure Indicator
12-29
Generator Indicator
. . 12-29
• Temperature Indicator
12-29
GENERAL DESCRIPTION
The Chevelle instrument cluster assembly consists
of:
a speedometer;
a
fuel gauge;
a
generator,
an
engine
tem-
perature and an
oil
pressure indicator lamp, and includes
a clock
on
deluxe models.
On
super sport models,
am-
meter, coolant temperature
and oil
pressure gauges
re-
place
the
appropriate indicator lights. Except
for the
speedometer,
all of the
indicator lamps, instruments
and
gauges
of
these clusters may
be
serviced without remov-
ing
the
instrument cluster assembly from
the
vehicle.
In addition
to the
instrument indicator lamps,
a
brake
warning lamp
is
included
in the
cluster
as
standard
equipment.
The
indicator
is
connected
to the
parking
brake
and
brake pressure differential switches
and
serves
a
dual function.
It
lights when the parking brake
is applied
and
also when
the
brake pedal
is
applied,
if a
malfunction should occur
in the
brake system
due to a
loss
of
hydraulic pressure. Servicing
of the
hydraulic
pressure differential switch
is
covered
in
Section
5 of
this manual.
Regular maintenance
is not
required on the instrument
cjLuster
or its
components other than maintaining dean
and tight electrical connections, replacing defective parts
and keeping
the
speedometer cable properly lubricated.
SERVICE OPERATIONS
INSTRUMENT PANEL ASSEMBLY
INSTRUMENT CLUSTER (Figs.
41
thru
44)
Removal
1.
Disconnect battery ground cable.
2.
Remove steering coupling bolt and disconnect steer-
ing shaft from coupling.
3.
Loosen mast jacket lower clamp.
4.
Remove
air
conditioning center distributor duct
(if
so equipped).
5. Remove radio rear support bracket screw.
6. Remove mast jacket upper support clamp and retain-
ing bolts from lower support (refer
to
Section
9,
Steering).
CAUTION: Cover mast jacket
and
parl
brake handle with
a
suitable material
to
prevc
scratching.
7.
Disconnect speedometer cable
at
rear
of
cluster
housing
and
speed warning control knob
at
panel
(if
so equipped).
8. Remove instrument panel retaining screws (nine
upper and five lower).
.
9. Working under the console remove four lower retain-
ing screws from instrument cluster housing.
10.
Pull instrument panel assembly from console and
lay
forward on mast jacket.
11.
Disconnect wiring harness, cluster lamps and wiring
CHEVROLET CHASSIS SERVICE MANUAL
Page 541 of 659
ELECTRICAL-BODY AND CHASSIS 12-29
Fig.
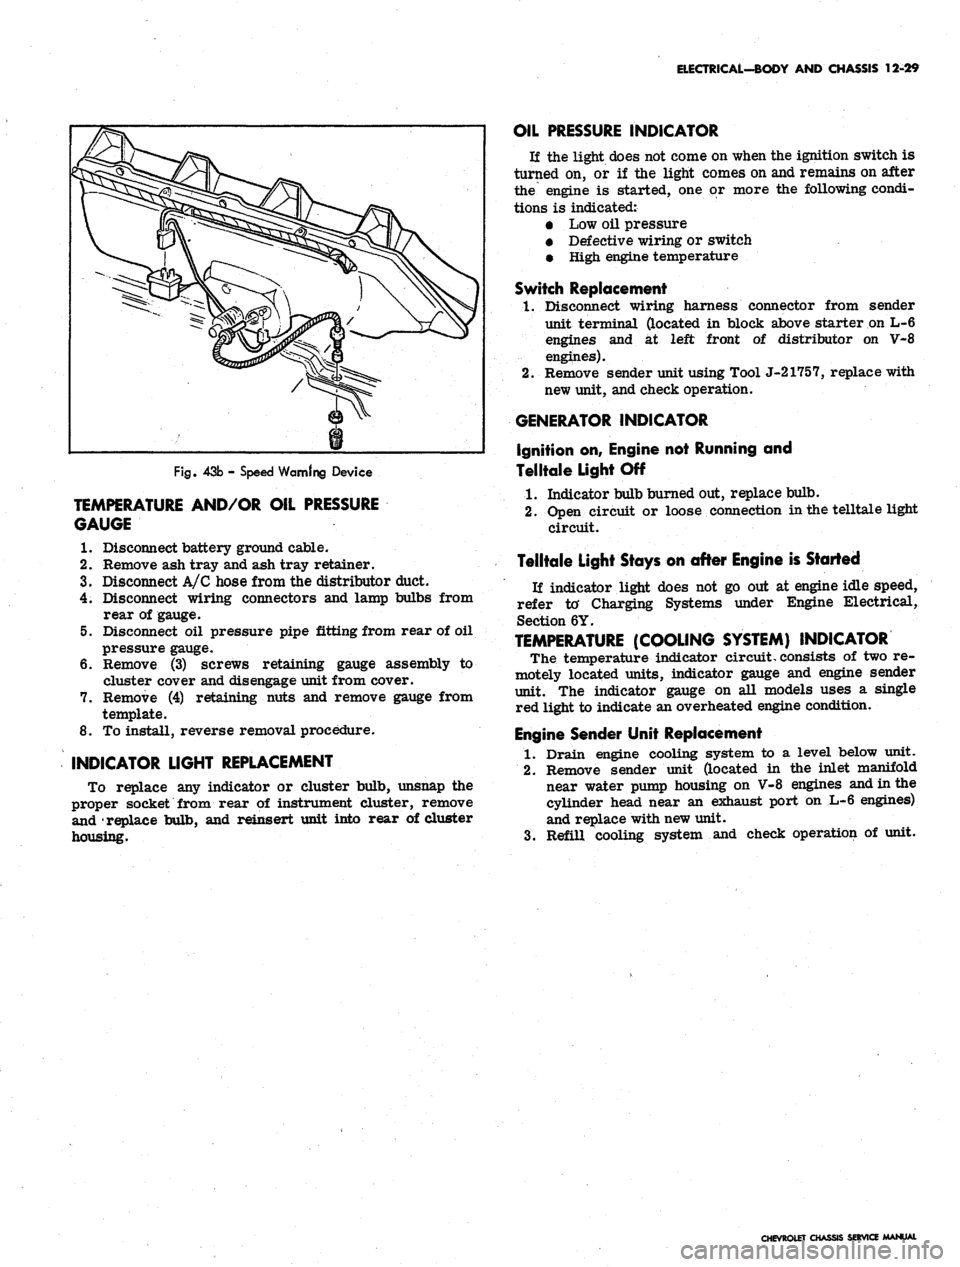
43b - Speed Warning Device
TEMPERATURE AND/OR OIL PRESSURE
GAUGE
1.
Disconnect battery ground cable.
2.
Remove ash tray and ash tray retainer.
3.
Disconnect A/C hose from the distributor duct.
4.
Disconnect wiring connectors and lamp bulbs from
rear of gauge.
5. Disconnect oil pressure pipe fitting from rear of oil
pressure gauge.
6. Remove (3) screws retaining gauge assembly to
cluster cover and disengage unit from cover.
7. Remove (4) retaining nuts and remove gauge from
template.
8. To install, reverse removal procedure.
INDICATOR LIGHT REPLACEMENT
To replace any indicator or cluster bulb, unsnap the
proper socket from rear of instrument cluster, remove
and replace bulb, and reinsert unit into rear of cluster
housing.
OIL PRESSURE INDICATOR
If the light does not come on when the ignition switch is
turned on, or if the light comes on and remains on after
the engine is started, one or more the following condi-
tions is indicated:
• Low oil pressure
• Defective wiring or switch
• High engine temperature
Switch Replacement
1.
Disconnect wiring harness connector from sender
unit terminal (located in block above starter on L-6
engines and at left front of distributor on V-8
engines).
2.
Remove sender unit using Tool J-21757, replace with
new unit, and check operation.
GENERATOR INDICATOR
Ignition on, Engine not Running and
Telltale Light Off
1.
Indicator bulb burned out, replace bulb.
2.
Open circuit or loose connection in the telltale light
circuit.
Telltale Light Stays on after Engine is Started
If indicator light does not go out at engine idle speed,
refer to' Charging Systems under Engine Electrical,
Section 6Y.
TEMPERATURE
(COOLING
SYSTEM)
INDICATOR
The temperature indicator circuit, consists of two re-
motely located units, indicator gauge and engine sender
unit. The indicator gauge on all models uses a single
red light to indicate an overheated engine condition.
Engine Sender Unit Replacement
1.
Drain engine cooling system to a level below unit.
2.
Remove sender unit (located in the inlet manifold
near water pump housing on V-8 engines and in the
cylinder head near an exhaust port on L-6 engines)
and replace with new unit.
3.
Refill cooling system and check operation of unit.
CHEVROLET CHASSIS SERVICE MANUAL