heater CHEVROLET CAMARO 1967 1.G Chassis Manual Online
[x] Cancel search | Manufacturer: CHEVROLET, Model Year: 1967, Model line: CAMARO, Model: CHEVROLET CAMARO 1967 1.GPages: 659, PDF Size: 114.24 MB
Page 102 of 659
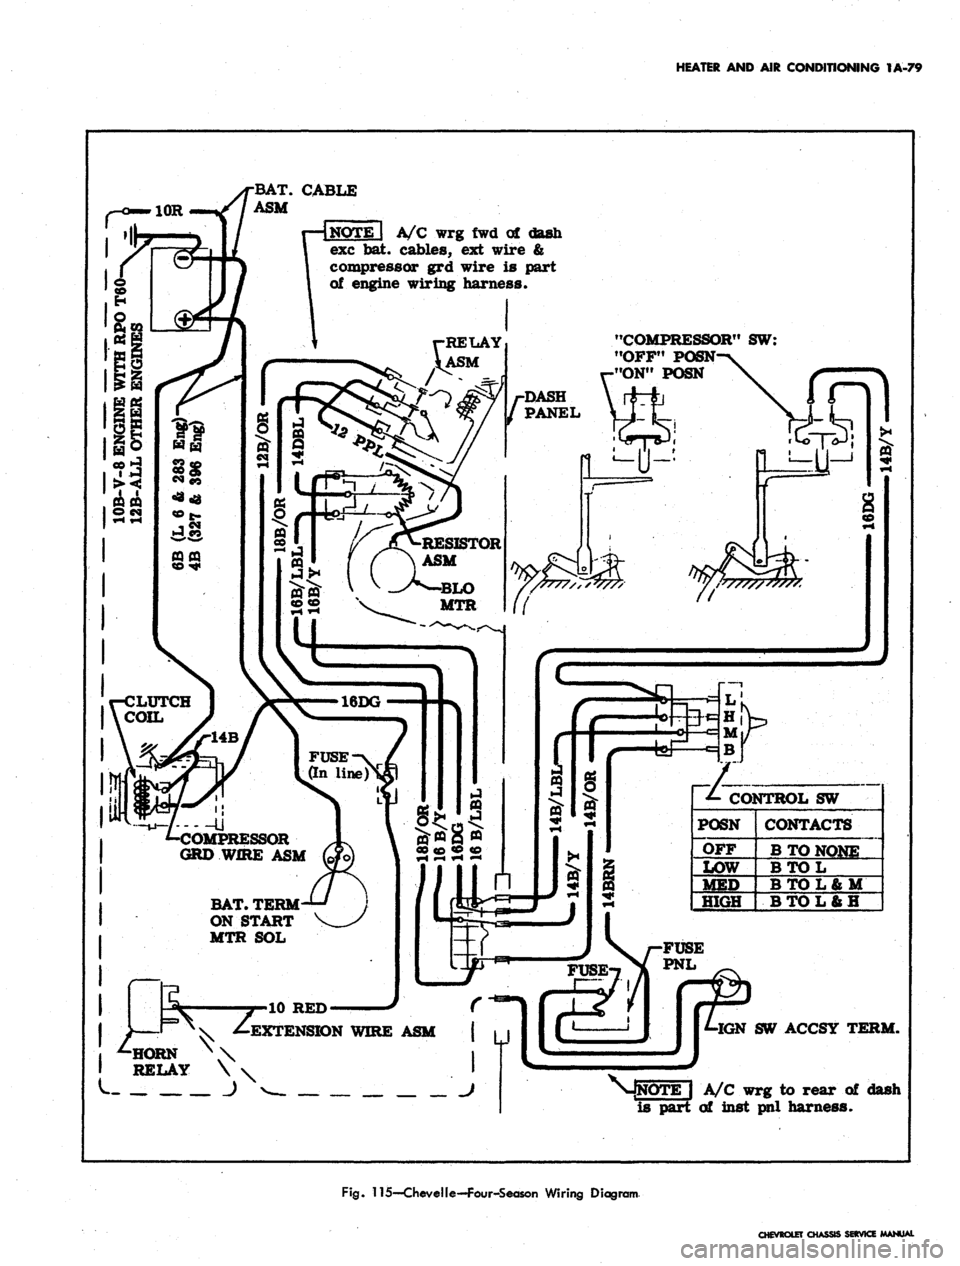
HEATER
AND AIR CONDITIONING IA-79
BAT.
CABLE
ASM
A/C
wrg fwd of
dash
exc
bat.
cables,
ext
wire
&
compressor
grd
wire
is
part
of engine wiring harness.
"COMPRESSOR"
SW:
"OFF" POSN
"ON"
POSN
RELAY
ASM
/-DASH
/
PANEL
RESISTOR
ASM
LUTCH
COIL
:OMI
GRD
WIRE
ASM
MPRESSOR
BAT.
TERM
ON START
MTR SOL
EXTENSION WIRE ASM
._
J
J
^-CONTROL
SW
CONTACTS
B TO NONE
BTOL
BTOL&M
BTOL6H
•IGN SW ACCSY TERM.
A/C wrg
to
rear
of
dash
of
inst pnl harness.
Fig.
115—CheveIle—Four-Season Wiring Diagram
CHEVROLET
CHASSIS SERVICE MANUAL
Page 103 of 659

HEATER
AND AIR
CONDITIONING
1A-80
EVAPORATOR ASM.
Blower
Motor
INSIDE VALVE
(Normally closed
-spring held)
PLENUM VALVE
(Normally open
-spring held)
Actuator
(Vacuum
operated)
Inside car air (Recirc*
CONTROL ASM
TEMP CONTROL LEVER
•(Operates temp valve
cable
&
equipment in
hart shown below)
Temp valve
begins to
16DG
Fuse (In-line^
COMPRESSOR
Clutch Coil DASH-
PANEL
•Fan Speed Selector Switch
Switch
lever
position
Off
Low
"HeST
High
Contacts
B to
None
BtoL
B to L b U
BtoL&H
Fan
speed
Low
Low
Med
High
Resistance
in series with
Bio Motor
Rl
Rl
RlR2)/(Rl+R2)
None
•Blower switch contacts must be closed
before fan switch will be operable.
-To battery positive
(-0 terminal
•
Horn relay
terminal"
"Batf
To vacuum
tank
EXTENSION
WIRE
ASM
(Normally closed
contacts-*vac
operated)
7
*- Fan speed switch
(See chart at left)
•/-Wire is
\ part of
I inst panel
harness
Legend:
— Production wiring
————
Wire Is part of equip.
•mmmmmmmmmmmmmm*
AIT
Conditioning
WTg*
Temp
Control
Lever
Position
OFF
VENT
COLD
a.A.)
COLD
(O.A.)
HOT
Blower
(Master)
switch
contacts
Open
Closed
Closed
Closed
Closed
Vac switch
connects
vac source
to hose #
#2
&
#3
#2
#3
None
#2
Compressor
switch
contacts^
Open
Open
Closed
Closed
Open
Blower
intake air
Outside car air
intake used
Inside car air
recir culated
Outside car air
intake used
Outside car air
intake used
Fig.
116—Camaro—Four-Season Wiring Diagram
CHEVROLET CHASSIS SERVICE
Page 104 of 659
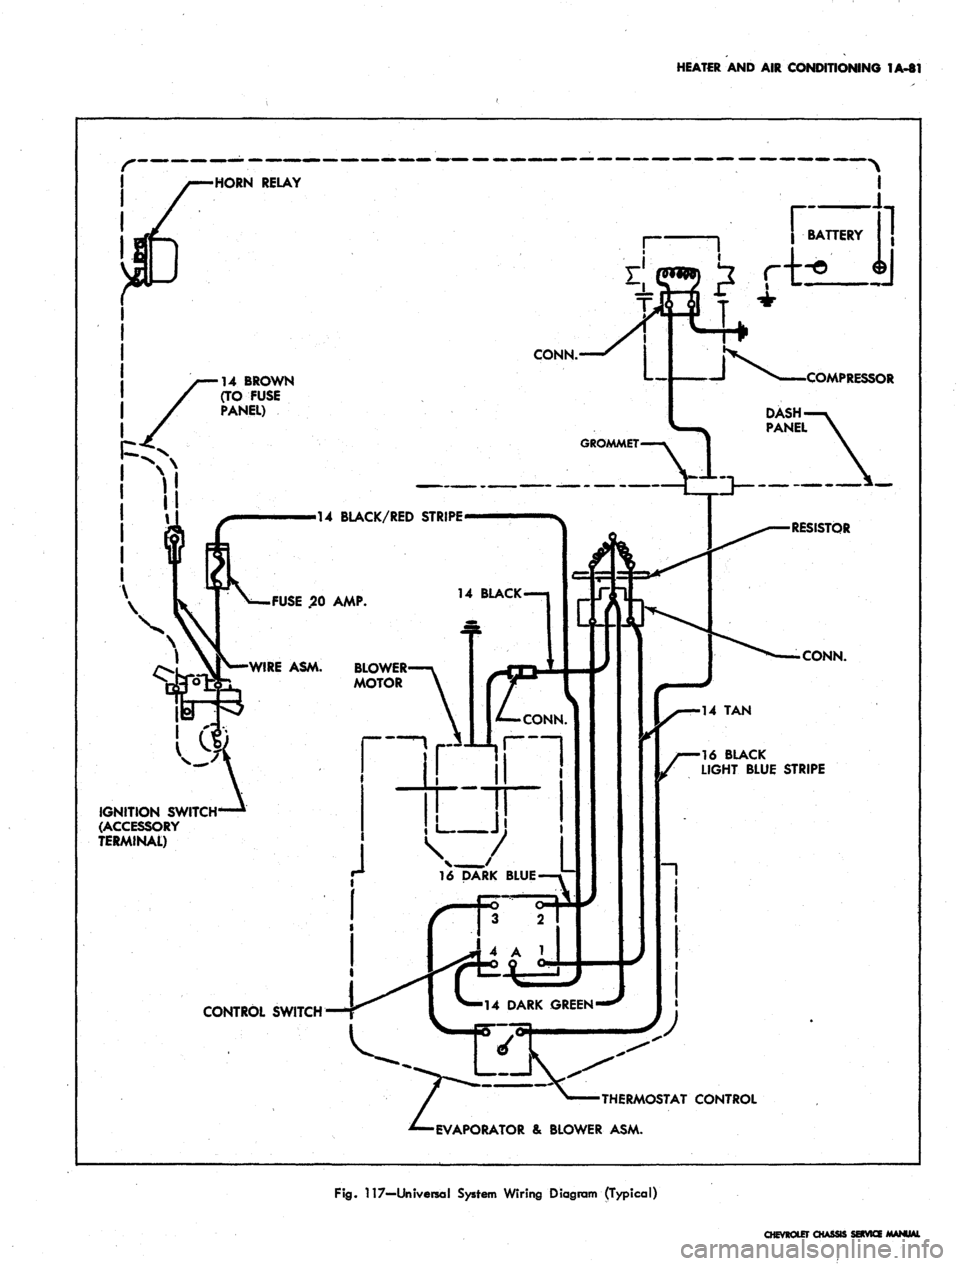
HEATER AND AIR CONDITIONING 1A-81
HORN RELAY
r
CONN.-
14 BROWN
(TO FUSE
PANEL)
BATTERY
1
—I ^ COMPR
ESSOR
DASH y
V-^ PANEL \
GROMMET—%
1 \
_ J~ ") "^
>14 BLACK/RED STRIPE-
FUSE .20 AMP.
•WIRE ASM. BLOWER-
MOTOR
14 BLACK 1
IGNITION SWITCH1
(ACCESSORY
TERMINAL)
CONTROL SWITCH
-RESISTOR
CONN.
•14 TAN
•16 BLACK
LIGHT BLUE STRIPE
•THERMOSTAT CONTROL
EVAPORATOR & BLOWER ASM.
Fig.
117—Universal System Wiring Diagram (Typical)
CHEVROLET CHASSI
Page 105 of 659
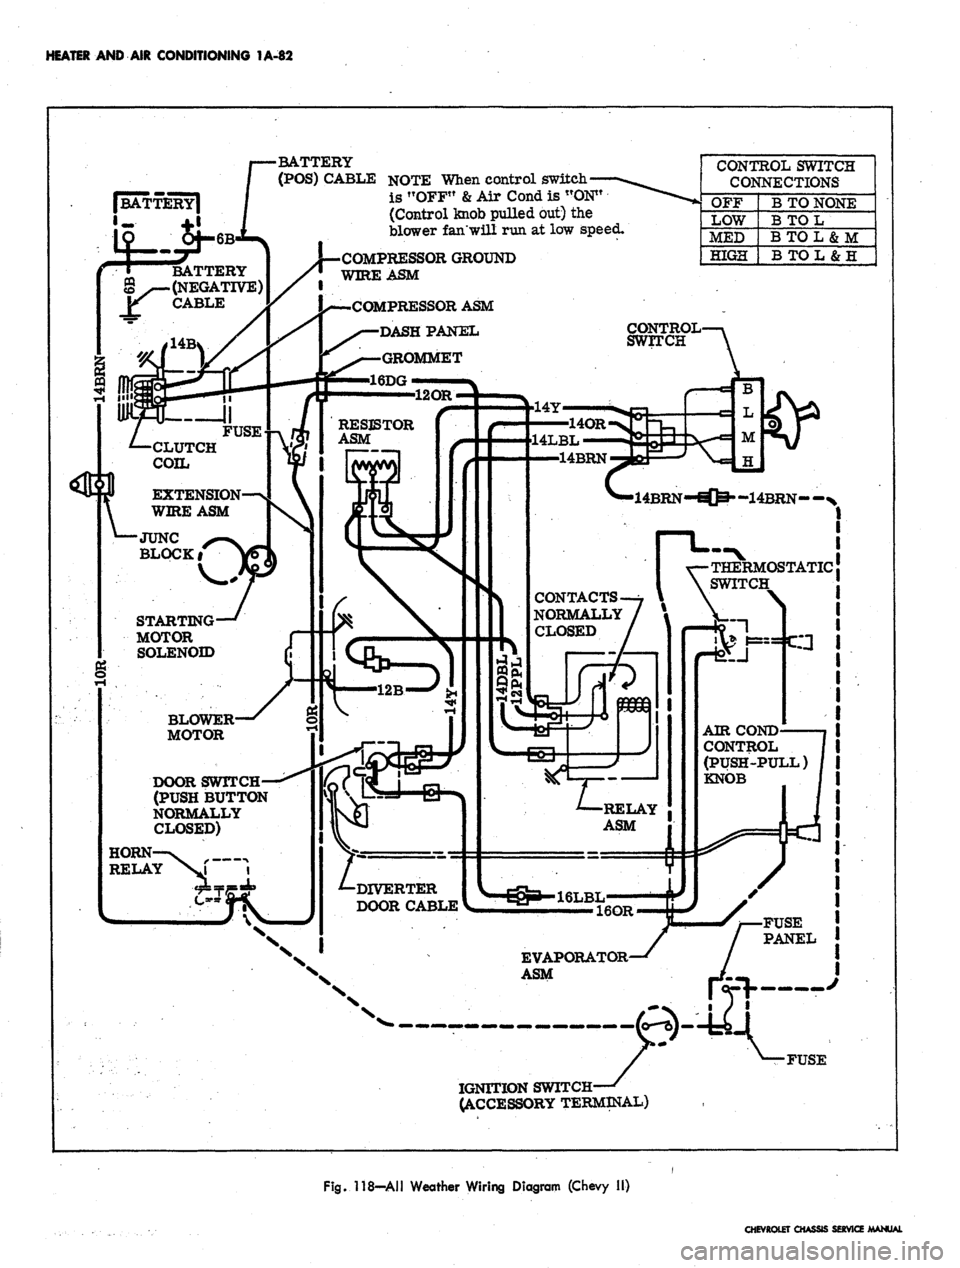
HEATER AND AIR CONDITIONING 1A-82
•BATTERY
(POS)
CABLE
NOTE
When
control
switch*
is !TOFF"
&
Air
Cond
is
"ON"
(Control
knob
pulled
but) the
blower
fan'will
run at low
speed.
CONTROL
SWITCH
CONNECTIONS
OFF
LOW
MED
HIGH
B
TO
NONE
B
TO L
BTOL&M
B
TO L
&
H
COMPRESSOR
GROUND
WIRE
ASM
BATTERY
(NEGATIVE)
CABLE
COMPRESSOR
ASM
DASHPAJSTEL
GROMMET
16DG
CONTROL
SWITCH
RESISTOR
ASM
14LBL
14BRN
CLUTCH
COIL
EXTENSION
WIRE
ASM
-14BRN--N
JUNC
BLOCKi
OSTATIC
SWITCH
CONTACTS
NORMALLY
CLOSED
STARTING
MOTOR
SOLENOID
BLOWER
MOTOR
AIR
COND
CONTROL
(PUSH-PULL)
KNOB
DOOR
SWITCH
(PUSH
BUTTON
NORMALLY
CLOSED)
RELAY
ASM
HORN
RELAY
DIVERTER
DOOR CABLE
FUSE
PANEL
EVAPORATOR
ASM
IGNITION SWITCH-
ACCESSORY TERMINAL)
Fig. 118—All Weather Wiring Diagram (Chevy II)
CHEVROLET CHASSIS SERVICE MANUAL
Page 106 of 659
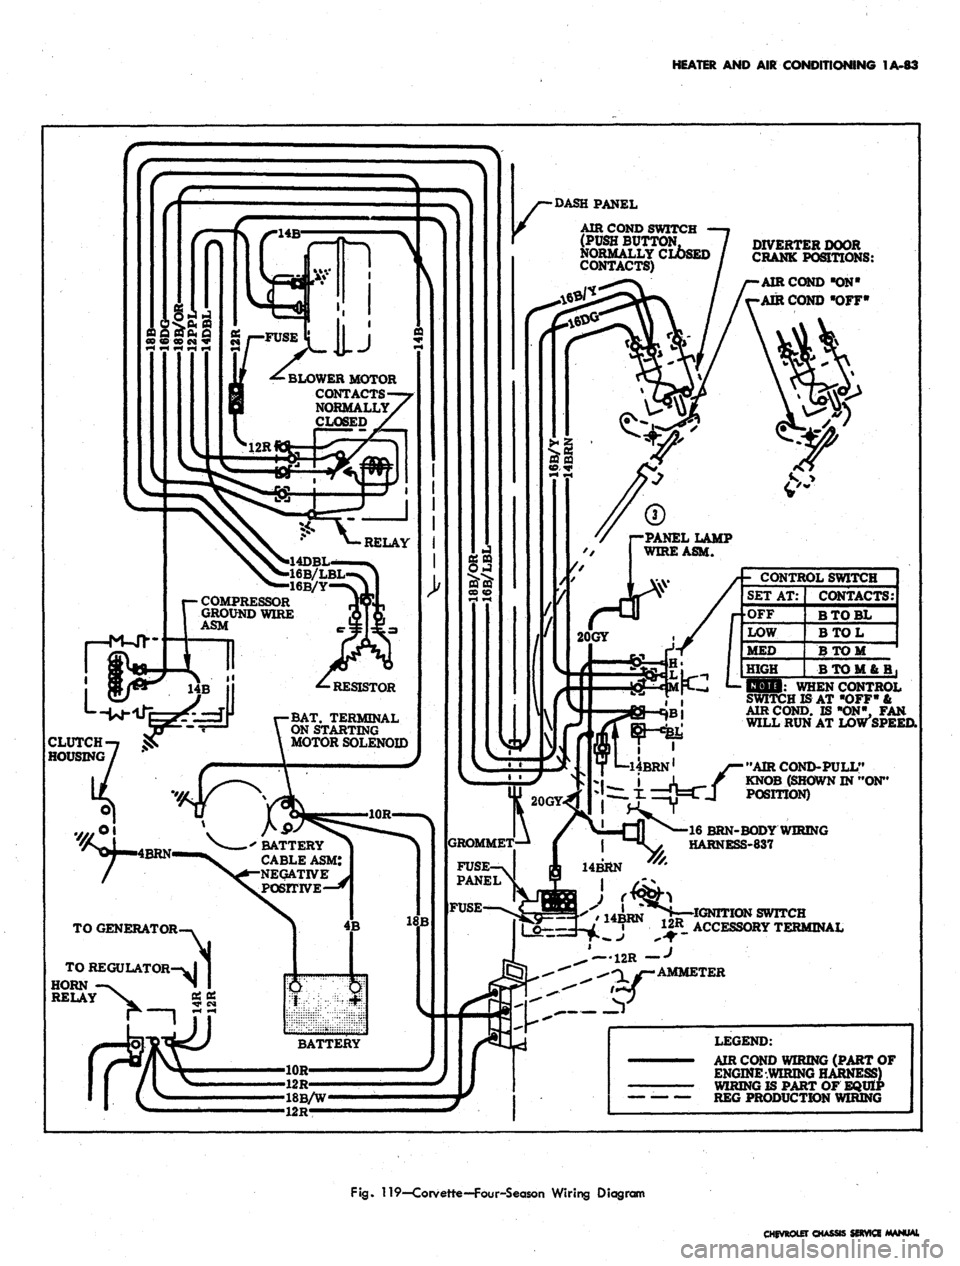
HEATER AND AIR CONDITIONING 1A-83
DIVERTER DOOR
CRANK POSITIONS:
AIR COND "ON"
AIR COND "OFF*
AIR COND SWITCH
(PUSH BUTTON,
NORMALLY CLOSED
CONTACTS)
BLOWER MOTOR
CONTACTS
NORMALLY
4D
16
16B/Y
COMPRESSOR
GROUND WIRE
ASM
BAT.
TERMINAL
ON STARTING
MOTOR SOLENOID
' BATTERY
CABLE ASM:
NEGATIVE
POSITIVE—*
- CONTROL SWITCH
SET AT:
•OFF
LOW
MED
HIGH
CONTACTS:
BTOBL
BTOL
BTOM
BT0M6B,
CLUTCH
HOUSING
liOli: WHEN CONTROL
SWITCH IS AT "OFF" &
AIR COND. IS "ON", FAN
WILL RUN AT LOW SPEED.
"AIR COND-PULL"
KNOB (SHOWN IN "ON"
POSITION)
TO REGULATOR
HORN
RELAY
16 BRN-BODY WIRING
HARNESS-837
14BRN
I
^
IA^RN
* IGNITION SWITCH
« 12R ACCESSORY TERMINAL
12R f
AMMETER
LEGEND:
AIR COND WIRING (PART OF
ENGINE WIRING HARNESS)
WIRING IS PART OF EQUIP
REG PRODUCTION WIRING
Fig.
119—Corvette—Four-Season Wiring Diagram
CHEVROLET CHASSIS SERVICE MANUAL
Page 107 of 659
HEATER
AND AIR
CONDITIONING
1A-84
SPECIAL TOOLS
18
19 20 21 23 24
28
30
32
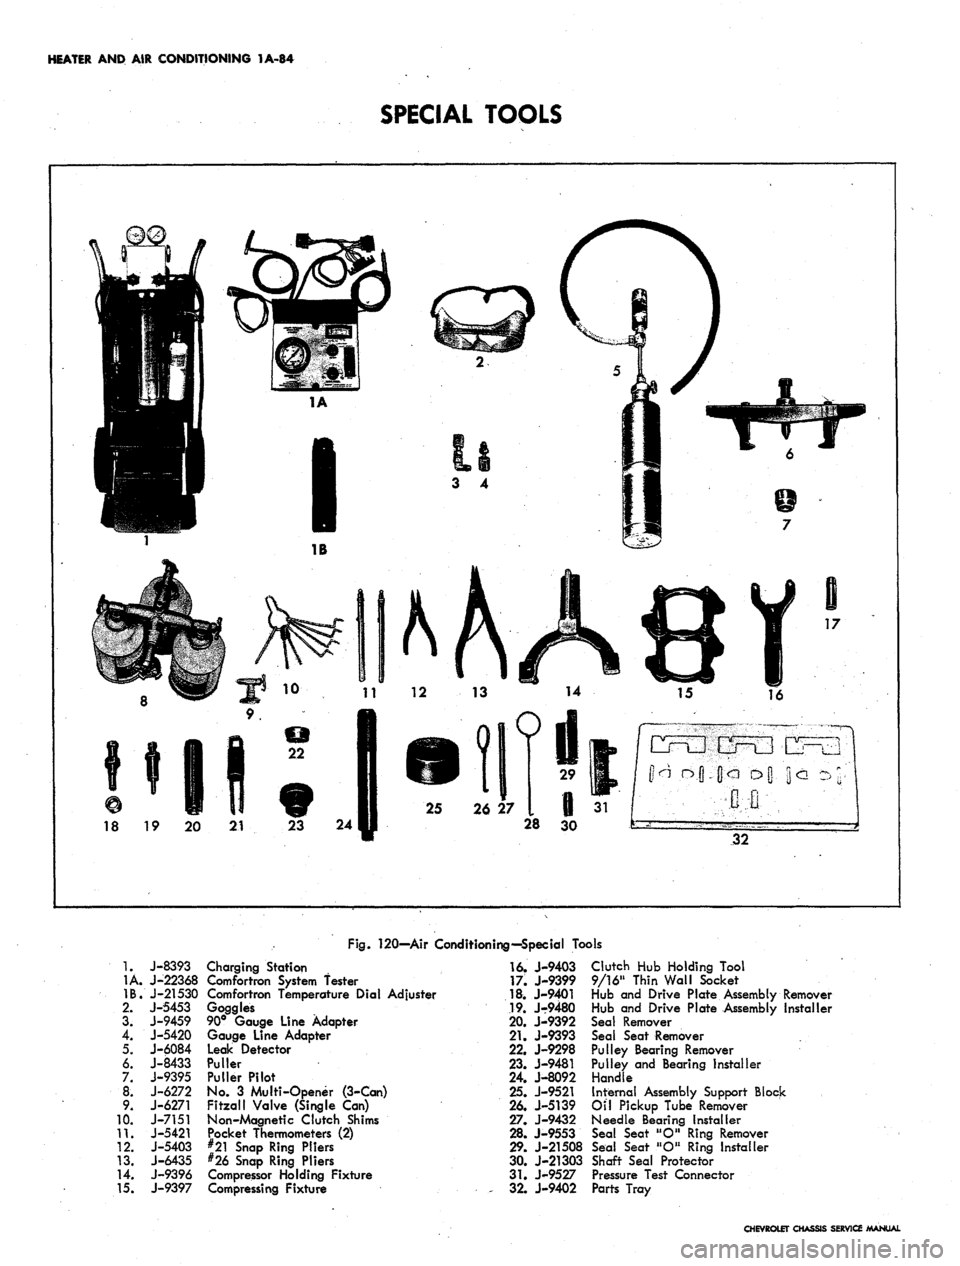
Fig.
120—Air Conditioning—Special Tools
1.
1A.
IB.
2.
3.
4.
5.
6.
7.
00*
9.
10.
11.
12.
13.
14.
15.
J-8393
J-22368
J-21530
J-5453
J-9459
J-5420
J-6084
J-8433
J-9395
J-6272
J-6271
J-7151
J-5421
J-5403
J-6435
J-9396
J-9397
Charging Station
Comfortron System fester
Comfortron Temperature Dial Adjuster
Goggles
90° Gauge Line Adapter
Gauge Line Adapter
Leak Detector
Puller
Puller Pilot
No.
3
Multi-Opener (3-Can)
Fitzall Valve (Single
Can)
Non-Magnetic Clutch Shims
Pocket Thermometers
(2)
#21 Snap Ring Pliers
#26 Snap Ring Pliers
Compressor Holding Fixture
Compressing Fixture
16.
J-9403
17.
J-9399
18.
J-9401
19.
J-9480
20.
J-9392
21.
J-9393
22.
J-9298
23.
J-9481
24.
J-8092
25.
J-9521
26.
J-5139
27.
J-9432
28.
J-9553
29.
J-21508
30.
J-21303
31.
J-9527
,
32.
J-9402
Clutch
Hub
Holding Tool
9/16" Thin Wall Socket
Hub
and
Drive Plate Assembly Remover
Hub
and
Drive Plate Assembly Installer
Seal Remover
Seal Seat Remover
Pulley Bearing Remover
Pulley and Bearing installer
Handle
Internal Assembly Support Block
Oil Pickup Tube Remover
Needle Bearing Installer
Seal Seat "O" Ring Remover
Seal Seat "O" Ring Installer
Shaft Seal Protector
Pressure Test Connector
Parts Tray
CHEVROLET CHASSIS SERVICE MANUAL
Page 291 of 659
ENGINE 6-26
6. Remove lifting device and lifting adapter then install
rocker arm covers as outlined.
7.
On synchromesh equipped vehicles, install clutch
cross-shaft engine bracket, then adjust and connect
clutch as outlined in Section 7.
8. Connect:
• Speedometer cable.
• Shift linkage at transmission.
• Transmission cooler lines (if so equipped).
9. Install propeller shaft.
10.
Remove jack stands and lower vehicle.
11.
Connect: \ '
Power steering pump lines (if so equipped).
Vacuum line to power brake unit (if so equipped).
Exhaust pipes at manifold flanges.
Accelerator linkage at pedal lever.
Fuel line at fuel pump.
Engine cooler lines (if so equipped).
Oil pressure gauge lines (if so equipped).
12.
Connect wires at:
Coil
Oil pressure switch
Temperature switch
Delcotron
Starter solenoid
13.
Install pulley, fan blade and fan belt as outlined in
Section 6K.
14.
Install radiator and shroud as outlined in Section 13.
15.
Install and adjust hood as outlined in Section 11.
16.
Connect battery cables.
17.
Fill with coolant, engine oil and transmission oil,
then start engine and check for leaks.
18.
Perform necessary adjustments and install air
cleaner.
INTAKE MANIFOLD
Removal
1.
Drain radiator and remove air cleaner.
2.
Disconnect:
Battery cables at battery.
Upper radiator and heater hose at manifold.
Accelerator linkage at pedal lever.
Fuel line at carburetor. ;
Wires at temperature sending switch and coil
(both sides).
Power brake hose at carburetor base.
Spark advance hose at distributor.
Crankcase ventilation hoses (as required).
3.
Remove distributor cap and mark rotor position with
chalk. Remove distributor clamp and distributor,
then position distributor cap rearward clear of
manifold.
4.
Remove coil.
5.
Remove manifold-to-head attaching bolts, then re^
move manifold, (with carburetor on) from engine and
discard gaskets and seals.
6. If manifold is to be replaced,,transfer:
Carburetor and carburetor mounting studs.
Temperature sending switch.
Water outlet and thermostat (use new gasket).
Heater hose adapter.
Choke coil.
Installation
1.
Clean gasket and seal surfaces of manifold, cylinder
heads and block.
2.
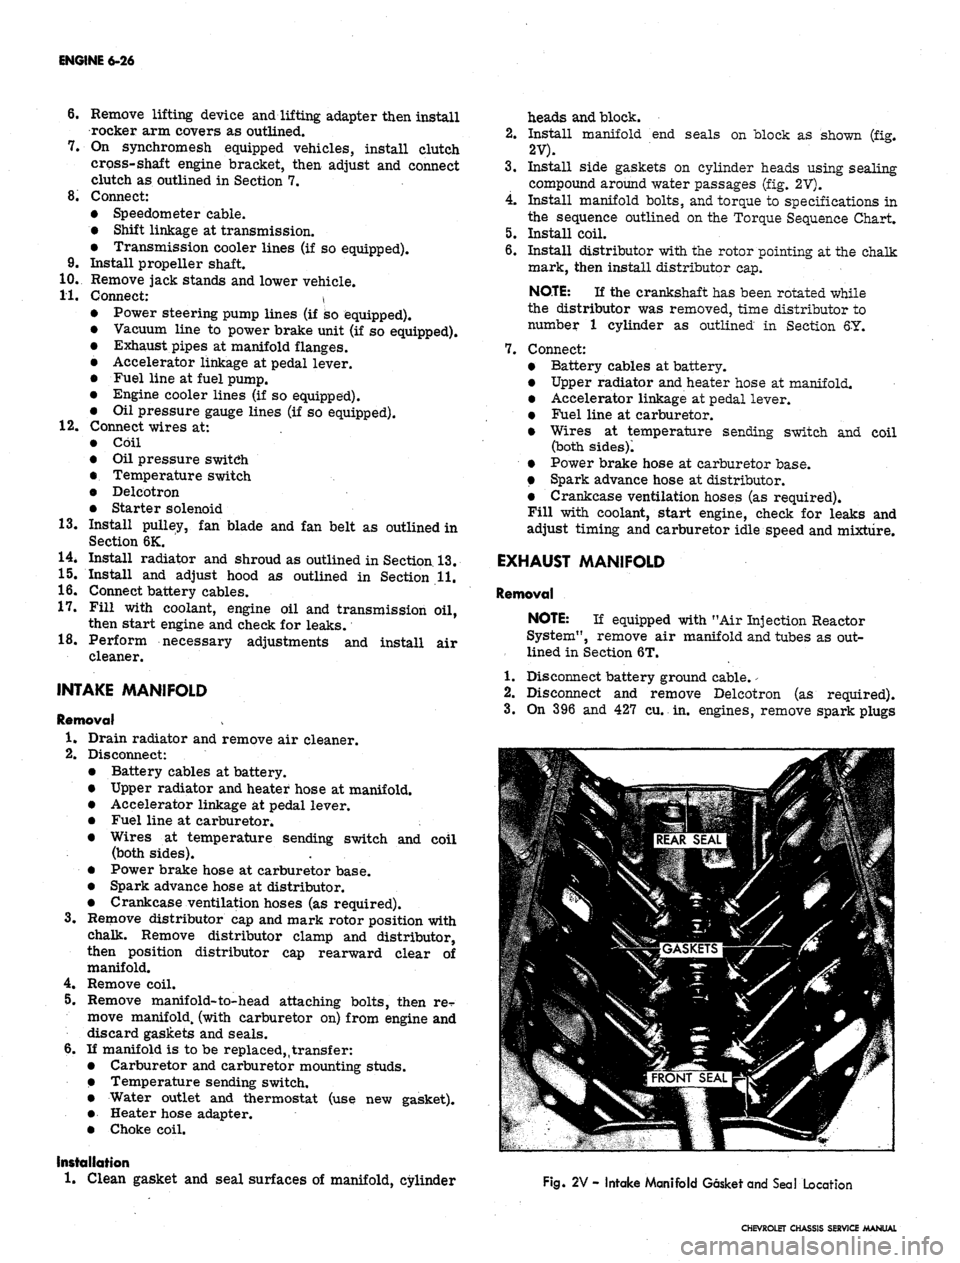
Install manifold end seals on block as shown (fig.
2V).
3.
Install side gaskets on cylinder heads using sealing
compound around water passages (fig. 2V).
4.
Install manifold bolts, and torque to specifications in
the sequence outlined on the Torque Sequence Chart.
5.
Install coil.
6. Install distributor with the rotor pointing at the chalk
mark, then install distributor cap.
NOTE:
If the crankshaft has been rotated while
the distributor was removed, time distributor to
number 1 cylinder as outlined in Section 6Y.
7.
Connect:
Battery cables at battery.
Upper radiator and heater hose at manifold.
Accelerator linkage at pedal lever.
Fuel line at carburetor.
Wires at temperature sending switch and coil
(both sides)!
Power brake hose at carburetor base.
Spark advance hose at distributor.
Crankcase ventilation hoses (as required).
Fill with coolant, start engine, check for leaks and
adjust timing and carburetor idle speed and mixture.
EXHAUST MANIFOLD
Removal
NOTE:
If equipped with "Air Injection Reactor
System", remove air manifold and tubes as out-
lined in Section 6T.
1.
Disconnect battery ground cable.
-
2.
Disconnect and remove Delcotron (as required).
3.
On 396 and 427 cu. in. engines, remove spark plugs
Fig. 2V - Intake Manifold Gasket and Seal Location
CHEVROLET CHASSIS SERVICE MANUAL
Page 306 of 659
SECTION 6K
ENGINE COOLING
INDEX
Page
General Description . . . 6K-1
Maintenance and Adjustments 6K-1
Coolant Level 6K-1
Coolant System Checks 6K-1
Periodic Maintenance 6K-2
Cleaning 6K-2
Reverse Flushing 6K-2
Radiator 6K-2
Page
Cylinder Block and Cylinder Head 6K-2
Hot Water Heater 6K-2
Fan Belt . 6K-2
Adjustment ....". 6K-2
Thermostat . 6K-2
Replacement 6K-2
Water Pump. . . . 6K-3
Removal 6K-3
Installation 6K-3
GENERAL DESCRIPTION
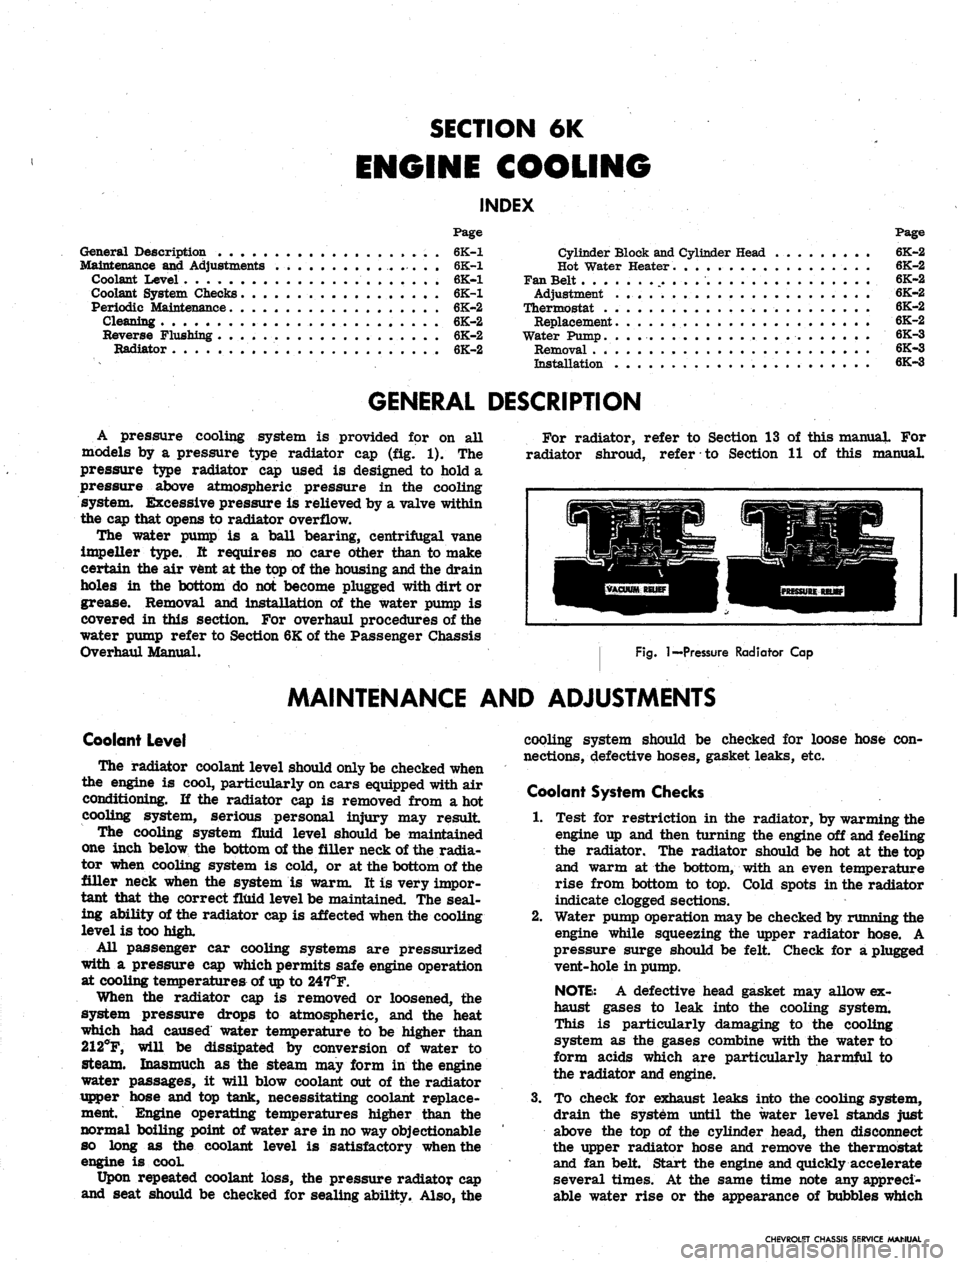
A pressure cooling system is provided for on all
models by a pressure type radiator cap (fig. 1). The
pressure type radiator cap used is designed to hold a
pressure above atmospheric pressure in the cooling
system. Excessive pressure is relieved by a valve within
the cap that opens to radiator overflow.
The water pump is a ball bearing, centrifugal vane
impeller type. It requires no care other than to make
certain the air vent at the top of the housing and the drain
holes in the bottom do not become plugged with dirt or
grease. Removal and installation of the water pump is
covered in this section. For overhaul procedures of the
water pump refer to Section 6K of the Passenger Chassis
Overhaul Manual.
For radiator, refer to Section 13 of this manual For
radiator shroud, refer to Section 11 of this manual.
Fig.
I—Pressure Radiator Cap
MAINTENANCE AND ADJUSTMENTS
Coolant Level
The radiator coolant level should only be checked when
the engine is cool, particularly on cars equipped with air
conditioning. If the radiator cap is removed from a hot
cooling system, serious personal injury may result
The cooling system fluid level should be maintained
one inch below the bottom of the filler neck of the radia-
tor when cooling system is cold, or at the bottom of the
filler neck when the system is warm. It is very impor-
tant that the correct fluid level be maintained. The seal-
ing ability of the radiator cap is affected when the cooling
level is too high.
All passenger car cooling systems are pressurized
with a pressure cap which permits safe engine operation
at cooling temperatures of
up
to 247°F.
When the radiator cap is removed or loosened, the
system pressure drops to atmospheric, and the heat
which had caused water temperature to be higher than
212°F, will be dissipated by conversion of water to
steam. Inasmuch as the steam may form in the engine
water passages, it will blow coolant out of the radiator
upper hose and top tank, necessitating coolant replace-
ment Engine operating temperatures higher than the
normal boiling point of water are in no way objectionable
so long as the coolant level is satisfactory when the
engine is cooL
Upon repeated coolant loss, the pressure radiator cap
and seat should be checked for sealing ability. Also, the
cooling system should be checked for loose hose con-
nections, defective hoses, gasket leaks, etc.
Coolant System Checks
1.
Test for restriction in the radiator, by warming the
engine up and then turning the engine off and feeling
the radiator. The radiator should be hot at the top
and warm at the bottom, with an even temperature
rise from bottom to top. Cold spots in the radiator
indicate clogged sections.
2.
Water pump operation may be checked by running the
engine while squeezing the upper radiator hose. A
pressure surge should be felt Check for a plugged
vent-hole in pump.
NOTE:
A defective head gasket may allow ex-
haust gases to leak into the cooling system.
This is particularly damaging to the cooling
system as the gases combine with the water to
form acids which are particularly harmful to
the radiator and engine.
3.
To check for exhaust leaks into the cooling system,
drain the system until the water level stands just
above the top of the cylinder head, then disconnect
the upper radiator hose and remove the thermostat
and fan belt. Start the engine and quickly accelerate
several times. At the same time note any appreci-
able water rise or the appearance of bubbles which
CHEVROLET CHASSIS SERVICE MANUAL
Page 307 of 659

ENGINE COOLING 6K-2
are indicative of exhaust gases leaking into the coolr
ing system.
Periodic Maintenance
Periodic service must be performed to the engine cool-
ing system to keep it in efficient operating condition.
These services should include a complete cleaning and
reverse flushing as well as a reconditioning service.
In the course of engine operation, rust and scale ac-
cumulate in the radiator and engine water jacket. The
accumulation of these deposits can be kept to a minimum
by the use of a good rust inhibitor but it should be
remembered that an inhibitor will not remove rust al-
ready present in the cooling system.
Two common causes of corrosion are: (1) air suction--
Air may be drawn into the system due to low liquid level
in the radiator, leaky water pump or loose hose con-
nections; (2) exhaust gas leakage—Exhaust gas may be
blown into the cooling system past the cylinder head
gasket or through cracks in the cylinder head and block.
Cleaning
A good cleaning solution should be used to loosen the
rust and scale before reverse flushing the cooling
system. There are a number of cleaning solutions avail-
able and the manufacturer's instructions with the particu-
lar cleaner being used should always be followed.
An excellent preparation to use for this purpose is GM
Cooling System Cleaner. The following directions for
cleaning the system applies only when this type cleaner
is-used.
1.
Drain the cooling system including the cylinder block
and then close both drain plugs.
2.
Remove thermostat and replace thermostat housing.
3.
Add the liquid portion (No. 1) of the cooling system
cleaner.
4.
Fill the cooling system with water to a level of about
3 inches below the top of the overflow pipe.
5. Cover the radiator and run the engine at moderate
speed until engine coolant temperature reaches 180
degrees.
6. Remove cover from radiator and continue to run the
engine for 20 minutes. Avoid boiling.
7. While the engine is still running, add the powder
portion (No. 2) of the cooling system cleaner and
continue to run the engine for 10 minutes.
8. At the end of this time, stop the engine, wait a few
minutes and then open the drain cocks or remove
pipe plugs. Also remove lower hose connection.
CAUTION: Be careful not to scald your hands.
NOTE:
Dirt and bugs may be cleaned out of
the radiator air passages by blowing out with air
pressure from the back of the core.
Reverse Flushing
Reverse flushing should always be accomplished after
the system is thoroughly cleaned as outlined above.
Flushing is. accomplished through the system in a direc-
tion opposite to the normal flow. This action causes the
water to get behind the corrosion deposits and force
them out.
Radiator
1.
Remove the upper and lower radiator hoses and re-
place the radiator cap,
2.
Attach a lead-away hose at the top of the radiator.
3.
Attach a new piece of hose to the radiator outlet
connection and insert the flushing gun in this hose.
4.
Connect the water hose of the flushing gun to a water
outlet and the air hose to an air line.
5. Turn on the water and when the radiator is full, turn
on the air in short blasts, allowing the radiator to
fill between blasts of air.
CAUTION: Apply air gradually as a clogged
radiator will stand only a limited pressure.
6. Continue this flushing until the water from the lead-
away hose runs clear.
Cylinder Block and Cylinder Head
1.
With the thermostat removed, attach a lead-away
hose to the water pump inlet and a length of new hose
to the water outlet connection at the top of the engine.
NOTE:
Disconnect the heater hose when re-
verse flushing engine.
2.
Insert the flushing gun in the new hose.
3.
Turn on the water and when the engine water jacket
is full, turn on the air in short blasts.
4.
Continue this flushing until the water from the lead-
away hose runs clear.
Hot Water Heater
1.
Remove water outlet hose from heater core pipe.
2.
Remove inlet hose from engine connection.
3.
Insert flushing gun and flush heater core. Care must
be taken when applying air pressure to prevent
damage to the core.
Fan Belt
Adjustment
1.
Loosen bolts at Delcotron slotted bracket.
2.
Pull Delcotron away from engine until desired ten-
sion reading is obtained with a strand tension gauge.
Refer to Section 6, "Engine Tune-Up".
3.
Tighten all Delcotron bolts securely.
Thermostat
The thermostat consists of a restriction valve actuated
by a thermostatic element. This is mounted in the hous-
ing at the cylinder head water outlet above the water
pump,
thermostats are designed to open and close at
predetermined temperatures and if not operating properly
should be removed and tested as follows.
Replacement
1.
Remove radiator to water outlet hose.
2.
Remove thermostat housing bolts and remove water
outlet and gasket from thermostat housing (fig. 2).
3.
Inspect thermostat valve to make sure it is in good
condition.
4.
Place thermostat in hot water 25° above the temper-
ature stamped on the thermostat valve.
5. Submerge the valve completely and agitate the water
thoroughly. Under this condition the valve should
open fully.
6. Remove the thermostat and place in water 10° below
temperature indicated on the valve.
7. With valve completely submerged and water agitated
thoroughly, the valve should close completely.
8. If thermostat checks satisfactorily, re-install, using
a new housing gasket.
9. Refill cooling system.
CHEVROLET CHASSIS SERVICE MANUAL
Page 308 of 659

ENGINE COOLING 6K-3
Fig.
2— Replacing Thermostat
Water Pump
Removal
1.
Drain radiator and break loose the fan pulley bolts.
2.
Disconnect heater hose, lower radiator hose and
by pass hose (as required) at water pump.
3.
Loosen Delcotron and remove fan belt then remove
fan bolts, fan and pulley.
4.
Remove pump to cylinder block bolts and remove
pump from engine.
NOTE:
On in line engines, pull the pump
straight out of the block first, to avoid damage
to impeller.
Installation
1.
Install pump assembly on cylinder block and tighten
bolts securely. Use on new pump to block gasket(s).
2.
Install pump pulley and fan on pump hub and tighten
bolts securely.
NOTE:
A guide stud (5/16"-24 x 1-1/2" bolt
with the head removed) installed in one hole of
the fan hub will aid in aligning hub, pulley and
fan.
Remove stud after starting the remaining
three bolts.
3.
Connect hoses and fill cooling system.
4.
Install fan belt and adjust as previously outlined.
5. Start engine and check for leaks.
CHEVROLET CHASSIS SERVICE MANUAL