carb CHEVROLET CAMARO 1982 Repair Guide
[x] Cancel search | Manufacturer: CHEVROLET, Model Year: 1982, Model line: CAMARO, Model: CHEVROLET CAMARO 1982Pages: 875, PDF Size: 88.64 MB
Page 692 of 875

GM – CAMARO 1982-1992 – Repair Guide (Checked by WxMax) 692
IDLE AIR VALVE
A cover is in place over t
he idle air bleed valve. Also , the access holes to the
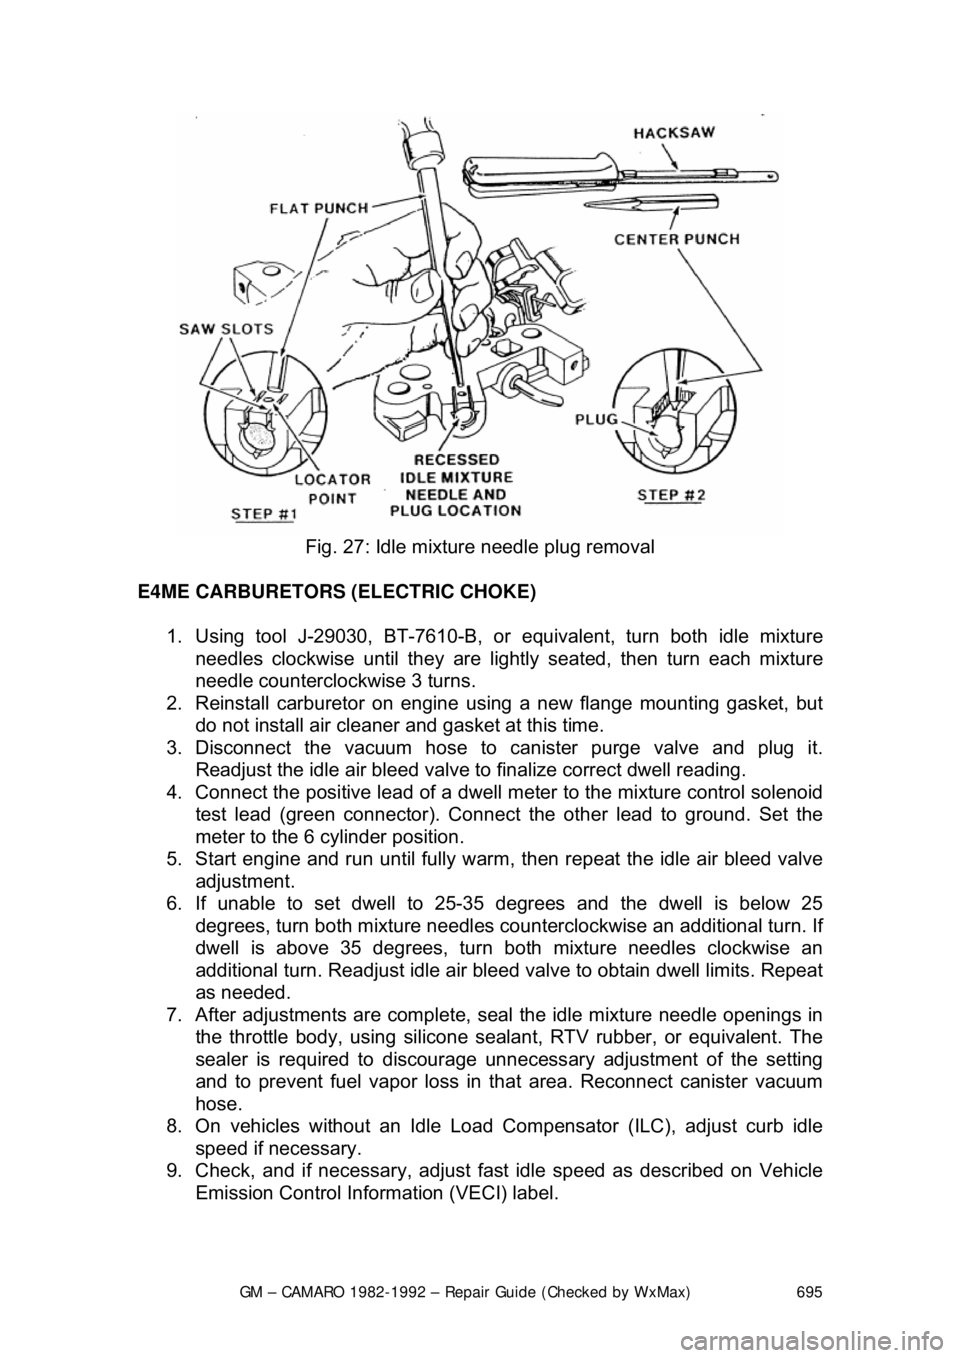
idle mixture needles are s ealed with hardened plugs. This is done to seal the
factory settings, during original equipment production. These items are NOT to
be removed unless required for cleaning, part replacement, improper dwell
readings or if the System Performance Check indicates the carburetor is the
cause of the trouble.
ROCHESTER E4ME AND E4MC
1. With engine OFF, cover the internal bowl vents and inlet to bleed valve
and the carburetor air intakes with maski ng tape. This is done to prevent
metal chips from entering.
2. Carefully drill rivet head of idle air bleed cover, with 0.110 in. (2.8mm) drill bit.
3. Remove rivet head and all pieces of rivet.
4. Lift cover off air bleed valve and bl ow out any metal shavings, or use a
magnet to remove excess metal.
CAUTION - Always wear eye protection when using compressed air.
5. Remove masking tape.
6. Start engine and allow it to reac h normal operating temperature.
7. Disconnect the vacuum hose from t he canister purge valve and plug it.
8. While idling in D for automatic transmission or N for manual
transmission, slowly turn the valve c ounterclockwise or clockwise, until
the dwell reading varies within the 25-35 degree range, attempting to be
as close to 30 degrees as possible.
Perform this step carefully. The air bleed valve is very sensitive and should be
turned in
1/8 turn increments only.
9. If the dwell reading d oes not vary and is not within the 25-35 degree
range, it will be necessary to remove the plugs and to adjust the idle
mixture needles.
Page 694 of 875

GM – CAMARO 1982-1992 – Repair Guide (Checked by WxMax) 694
IDLE MIXTURE
E2SE CARBURETORS
1. Remove the carburet or from the engine.
2. Remove the plugs coveri ng the idle mixture needles.
3. Turn the mixture needle in until slight ly seated, then back it out 4 turns.
4. If the plug in the air horn coveri ng the idle air bleed has been removed,
replace the air horn. If the plug is still in place, do not remove it.
5. Remove the vent stack screen a ssembly to gain access to the lean
mixture screw.
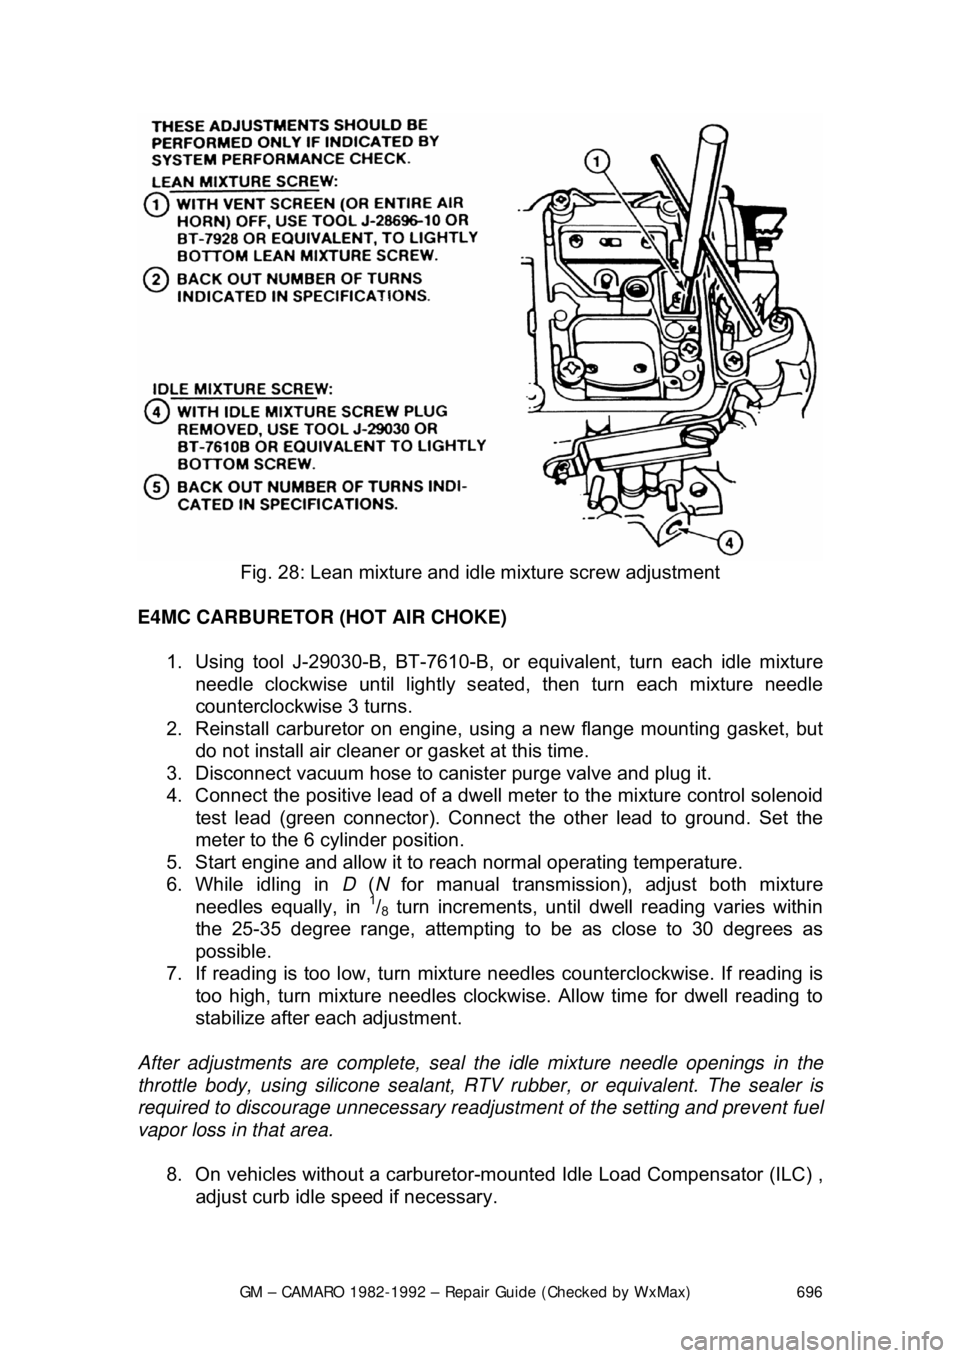
6. Using tool J-28696-10 or equivalent, turn the lean mixture screw in until
lightly seated, then back out 2
1/2 turns.
7. Install the carburetor on the engine.
8. Disconnect the bowl vent line at the carburetor.
9. Disconnect the EGR hos e and canister purge hose at the carburetor.
Cap the ports on t he carburetor.
10. Find the hose from port D of the carburetor to the temperature sensor
and secondary vacuum break thermal vacuum switch. Disconnect and
plug the vacuum hose going to the air cleaner.
11. Connect the positive lead of a dwell me ter to the mixture control solenoid
test lead (green connector). Connect the other lead to ground. Set the
meter to the 6 cylinder position.
12. Run the engine on the high step of the fast idle cam until the cooling fan
starts to cycle.
13. Run the engine at 3,0 00 rpm and adjust the lean mixture screw slowly.
Allow the reading to stabilize, obtain an average dwell of 35 degrees. It is
normal for the dwell to vary in a narrow range.
14. Return to idle.
15. Adjust the idle mixt ure screw to obtain an av erage dwell of 25 degrees.
Allow time for the reading to stabilize.
16. Run the engine at 3,000 rpm and not e the dwell reading. It should be
varying with an average reading of 35 degrees. If it does not, repeat the
earlier steps.
Page 695 of 875
GM – CAMARO 1982-1992 – Repair Guide (Checked by WxMax) 695
Fig. 27: Idle mixture needle plug removal
E4ME CARBURETORS (ELECTRIC CHOKE) 1. Using tool J-29030, BT-7610-B, or equivalent, turn both idle mixture
needles clockwise until they are lightly seated, then turn each mixture
needle counterclockwise 3 turns.
2. Reinstall carburetor on engine using a new flange mounting gasket, but
do not install air cleaner and gasket at this time.
3. Disconnect the vacuum hose to canister purge valve and plug it.
Readjust the idle air bleed valve to finalize correct dwell reading.
4. Connect the positive lead of a dwell me ter to the mixture control solenoid
test lead (green connector). Connect the other lead to ground. Set the
meter to the 6 cylinder position.
5. Start engine and run unt il fully warm, then repeat the idle air bleed valve
adjustment.
6. If unable to set dwell to 25-35 degrees and the dwell is below 25
degrees, turn both mixture needles counter clockwise an additional turn. If
dwell is above 35 degrees, turn both mixture needles clockwise an
additional turn. Readjust idle air bleed valve to obtain dwell limits. Repeat
as needed.
7. After adjustments are complete, seal the idle mixture needle openings in
the throttle body, using silicone sealant, RTV rubber, or equivalent. The
sealer is required to discourage unnecessary adjus tment of the setting
and to prevent fuel vapor loss in that area. Reconnect canister vacuum
hose.
8. On vehicles without an Idle Load Co mpensator (ILC), adjust curb idle
speed if necessary.
9. Check, and if necessary, adjust fa st idle speed as described on Vehicle
Emission Control Information (VECI) label.
Page 696 of 875
GM – CAMARO 1982-1992 – Repair Guide (Checked by WxMax) 696
Fig. 28: Lean mixture and idle mixture screw adjustment
E4MC CARBURETOR (HOT AIR CHOKE) 1. Using tool J-29030-B, BT-7610-B, or equivalent, turn each idle mixture
needle clockwise until lightly seated, then turn each mixture needle
counterclockwise 3 turns.
2. Reinstall carburetor on engine, using a new flange mounting gasket, but
do not install air cleaner or gasket at this time.
3. Disconnect vacuum hose to c anister purge valve and plug it.
4. Connect the positive lead of a dwell me ter to the mixture control solenoid
test lead (green connector). Connect the other lead to ground. Set the
meter to the 6 cylinder position.
5. Start engine and allow it to reac h normal operating temperature.
6. While idling in D ( N for manual transmission), adjust both mixture
needles equally, in
1/8 turn increments, until dwell reading varies within
the 25-35 degree range, attempting to be as close to 30 degrees as
possible.
7. If reading is too low, turn mixtur e needles counterclockwise. If reading is
too high, turn mixture needl es clockwise. Allow time for dwell reading to
stabilize after each adjustment.
After adjustments are complete, seal t he idle mixture needle openings in the
throttle body, using silicone sealant, RTV rubber, or equivalent. The sealer is
required to discourage unnece ssary readjustment of the setting and prevent fuel
vapor loss in that area.
8. On vehicles without a carburetor -mounted Idle Load Compensator (ILC) ,
adjust curb idle speed if necessary.
Page 698 of 875

GM – CAMARO 1982-1992 – Repair Guide (Checked by WxMax) 698
5. Disconnect and plug hose to canister purge port.
6. Disconnect and plug hose to idle load compensator.
7. Back out idle stop screw
on carburetor 3 turns.
8. Turn air conditioning OFF.
9. Block drive wheels, set parki ng brake, place transmission in P, start and
warm engine to normal operating temperature. Make certain choke is
OPEN .
10. With engine RUNNING place transmission in D and idle load
compensator fully extended (no vacuum applied). Using tool J-29607, or
equivalent, adjust plunger to obtain 650-750 rpm. Locknut on plunger
must be held with a wrench to prevent damage to guide tabs.
11. Measure distance from the locknut to tip of the plunger. This distance
must not exceed 1 in. (25mm). If it does check for low idle condition.
12. Reconnect vacuum hose to idle load compensator and observe idle
speed.
13. Idle speed should be between 425-475 rpm in D.
14. If idle speed is correct no further adjustment is necessary, proceed to the
next step. If idle speed is still incorrect continue as follows:
It may be necessary to remove the idle load compensator from the engine
unless a hex key wrench is m odified to clear obstructions.
a. Stop engine, remove rubber cap from the center outlet tube.
b. Using a 0.90 in. (23mm) hex wrench, insert through open center tube to
engage idle speed adjusting screw.
c. If idle speed was low, turn t he adjusting screw counterclockwise
approximately 1 turn for every 85 rpm low. If idle speed was high turn
screw 1 turn for every 85 rpm high.
15. Disconnect and plug vacuum hose to the idle load compensator.
16. Using a hand pump, apply vacuum to the idle load compensator until fully
retracted.
17. Adjust the idle stop screw on carburetor float bowl to obtain 450 rpm in
D .
18. Place transmission in P and stop engine.
19. Reconnect the idle load compensator.
20. Reconnect all vacuum hoses.
21. Install air cleaner and gasket. Remove wheel blocks.
Page 700 of 875
GM – CAMARO 1982-1992 – Repair Guide (Checked by WxMax) 700
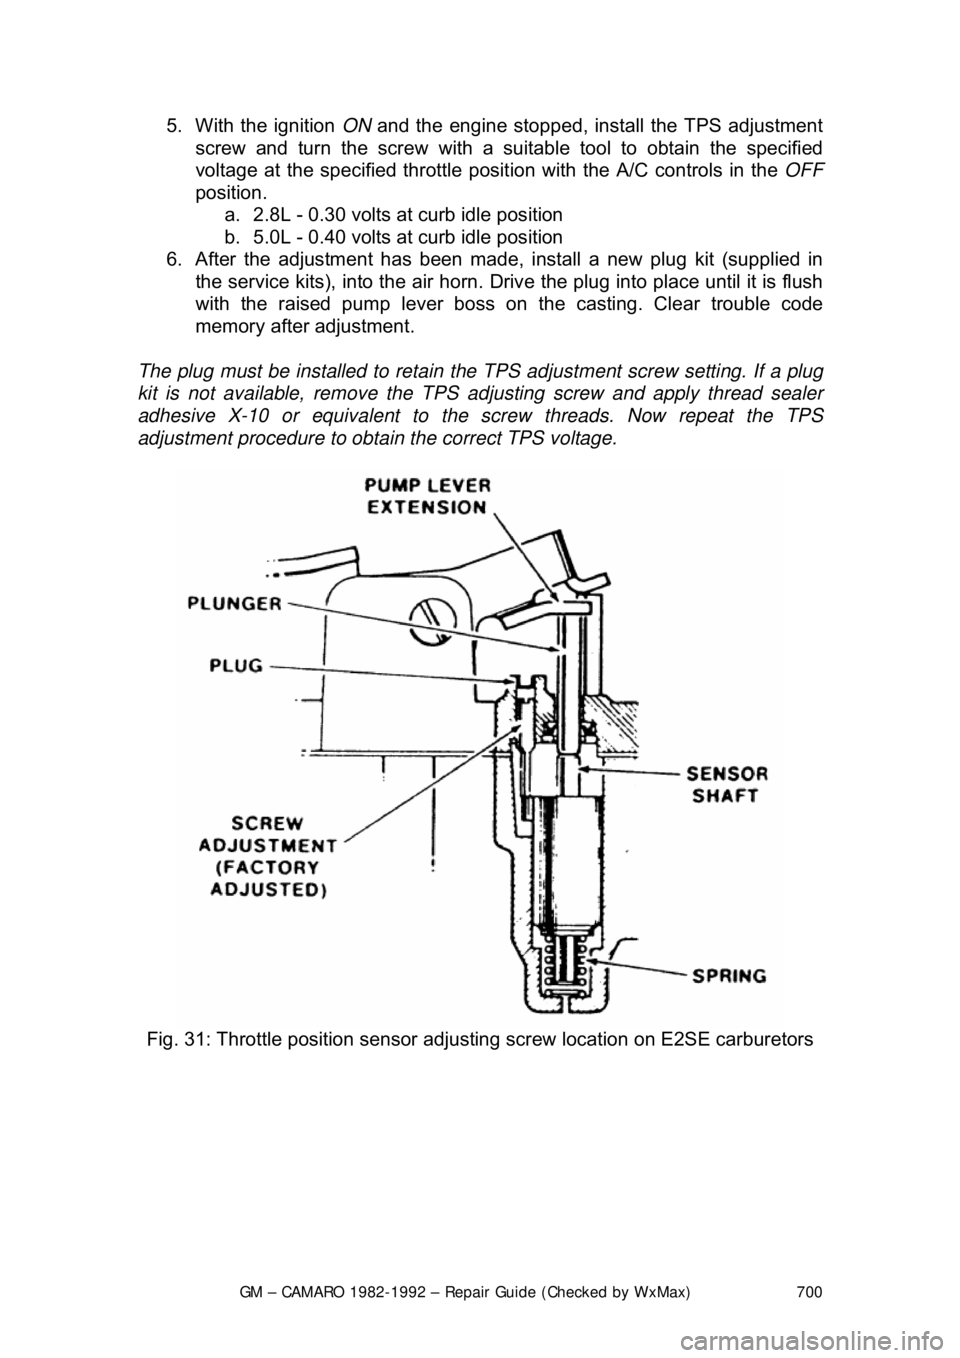
5. With the ignition
ON and the engine stopp ed, install the TPS adjustment
screw and turn the screw with a suitable tool to obtain the specified
voltage at the specified throttle posit ion with the A/C controls in the OFF
position. a. 2.8L - 0.30 volts at curb idle position
b. 5.0L - 0.40 volts at curb idle position
6. After the adjustment has been made, install a new plug kit (supplied in
the service kits), into the air horn. Driv e the plug into place until it is flush
with the raised pump lever boss on t he casting. Clear trouble code
memory after adjustment.
The plug must be installed to retain the TPS adjustment screw setting. If a plug
kit is not available, remove the T PS adjusting screw and apply thread sealer
adhesive X-10 or equivalent to the scr ew threads. Now repeat the TPS
adjustment procedure to obtain the correct TPS voltage.
Fig. 31: Throttle position sensor adjus ting screw location on E2SE carburetors
Page 701 of 875
GM – CAMARO 1982-1992 – Repair Guide (Checked by WxMax) 701
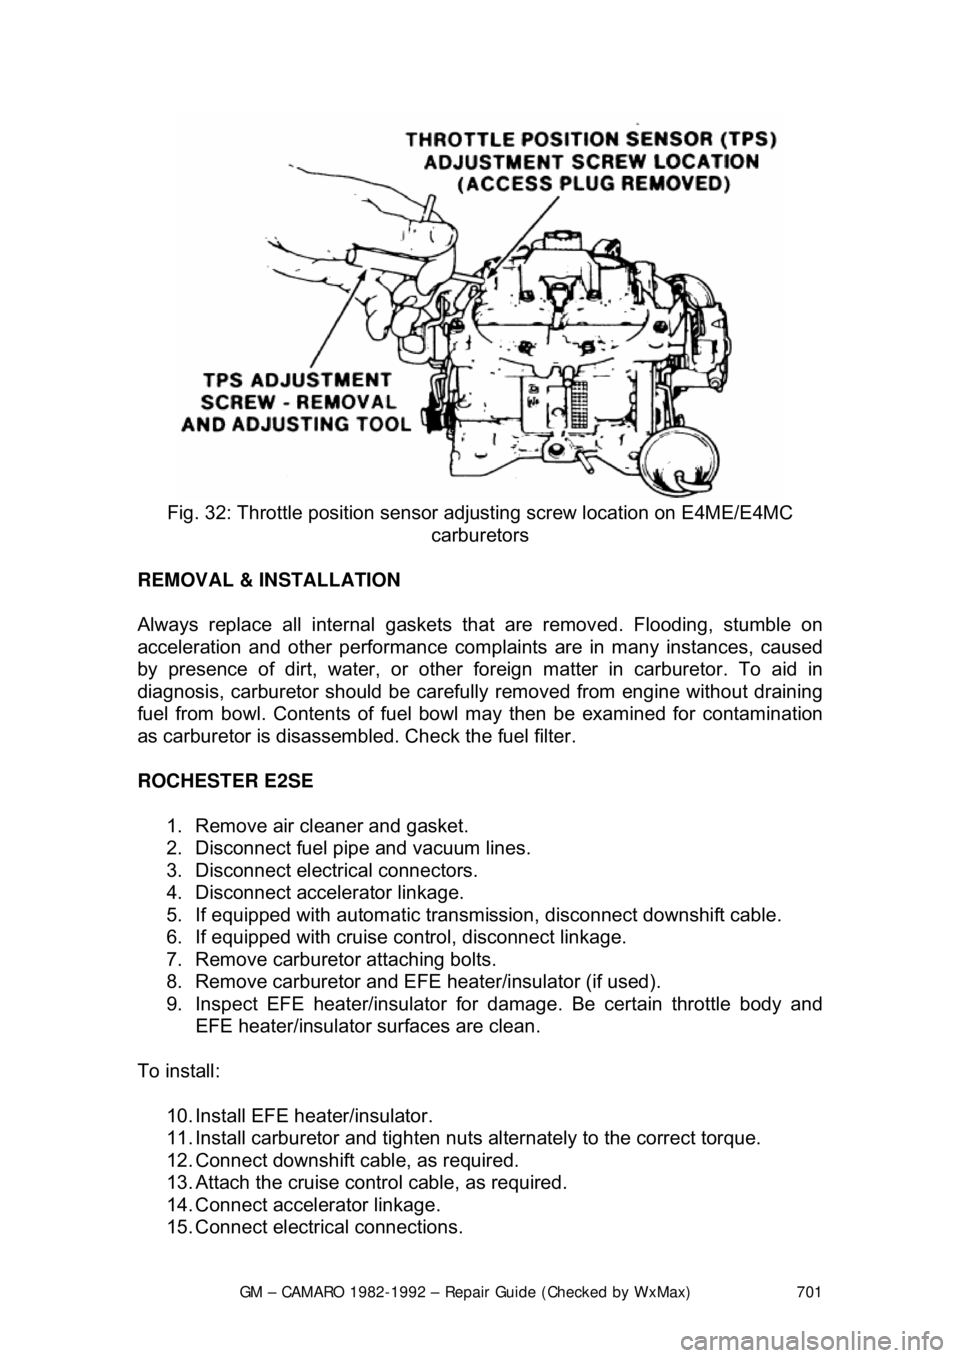
Fig. 32: Throttle position sensor adjusting screw location on E4ME/E4MC
carburetors
REMOVAL & INSTALLATION
Always replace all internal gaskets that are removed. Flooding, stumble on
acceleration and other performance comp laints are in many instances, caused
by presence of dirt, water, or other foreign matter in carburetor. To aid in
diagnosis, carburetor should be carefully removed from engine without draining
fuel from bowl. Contents of fuel bowl may then be examined for contamination
as carburetor is disassembl ed. Check the fuel filter.
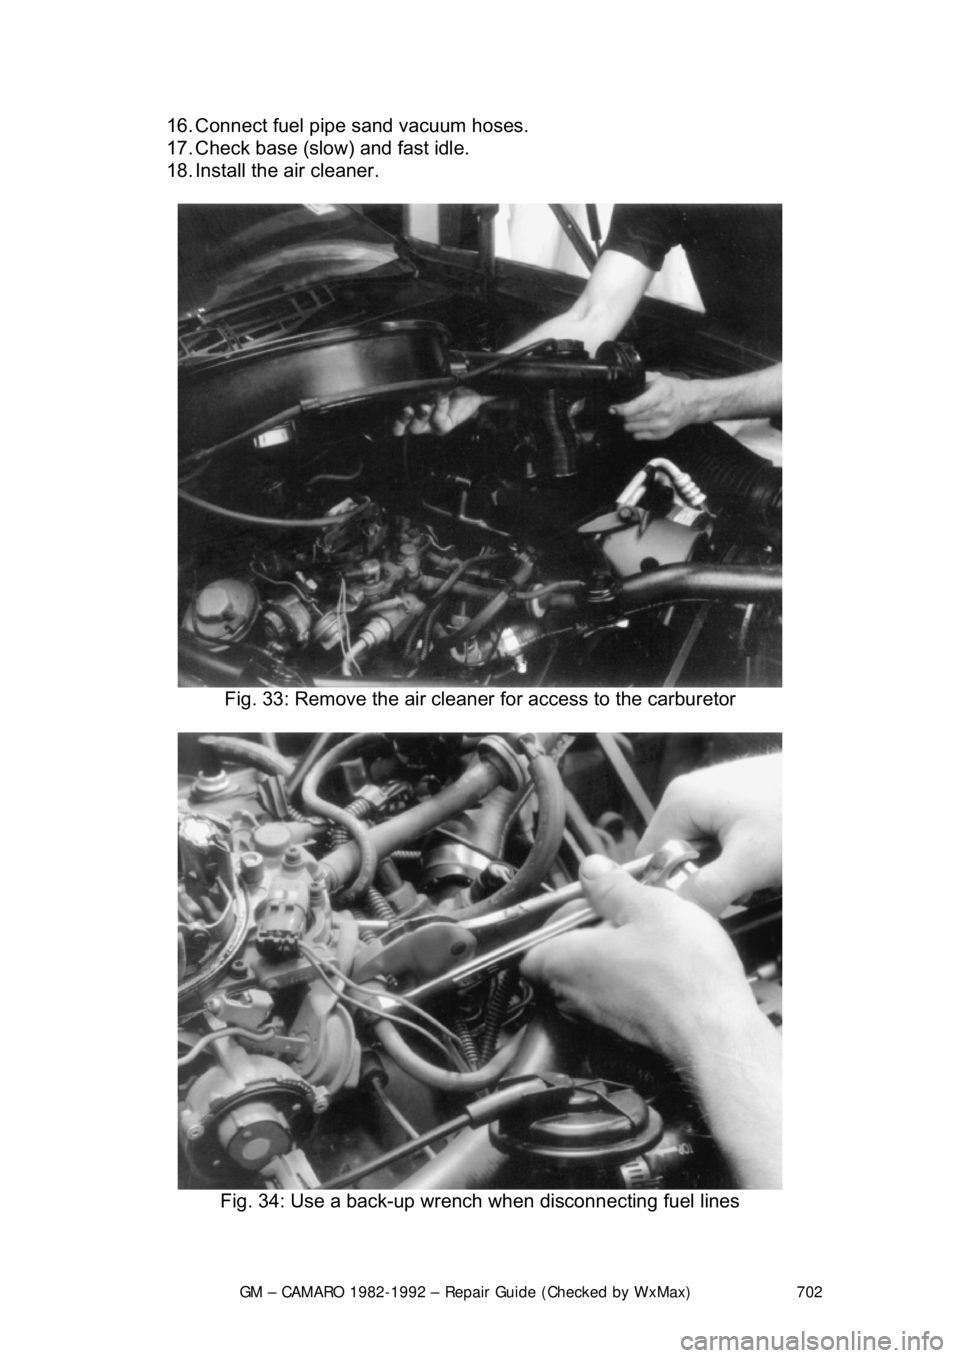
ROCHESTER E2SE 1. Remove air cleaner and gasket.
2. Disconnect fuel pipe and vacuum lines.
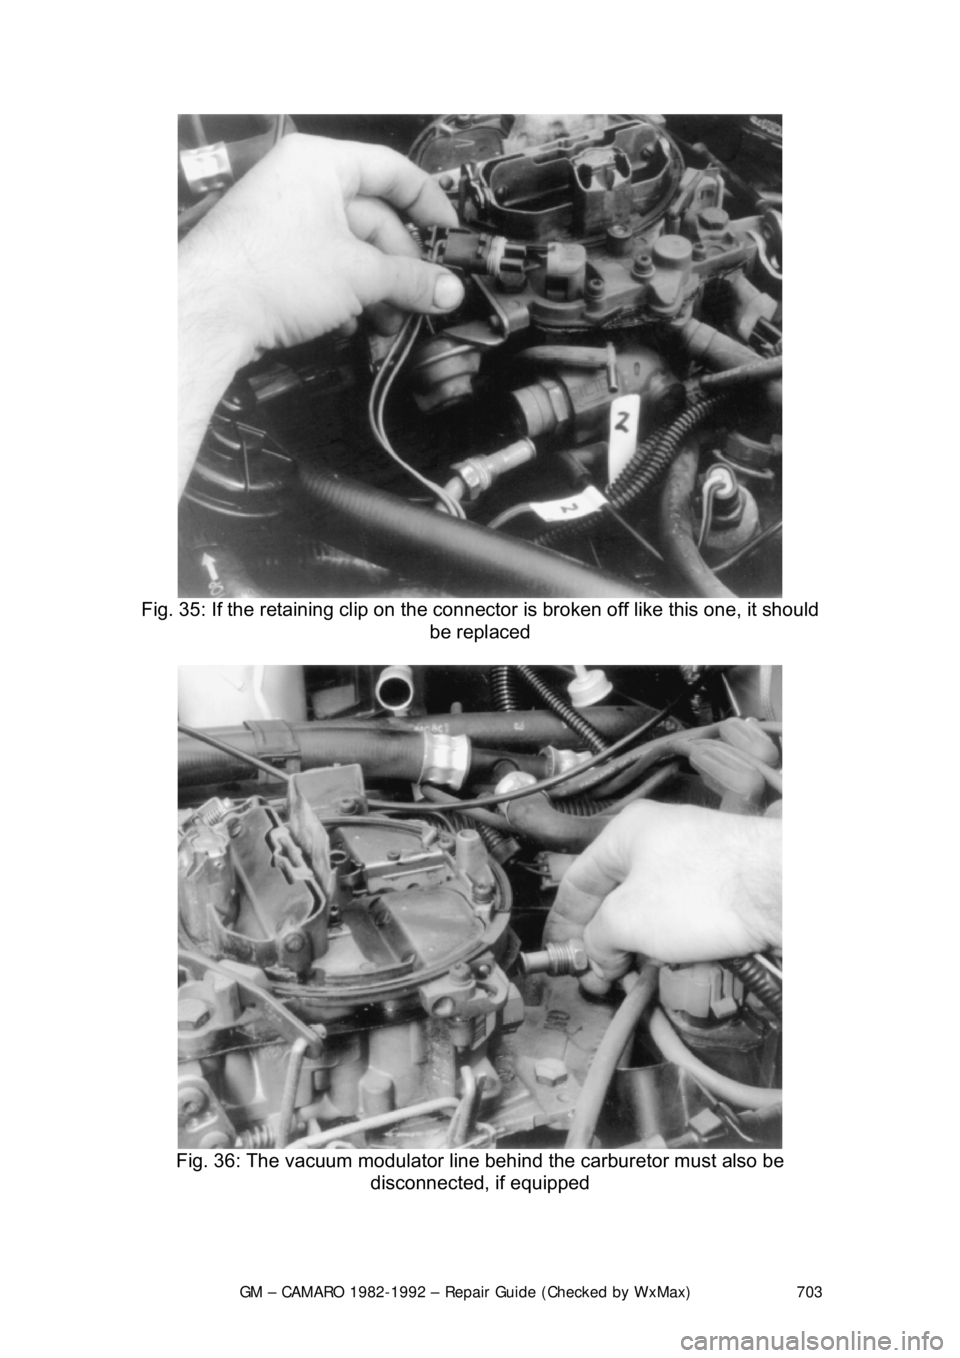
3. Disconnect electrical connectors.
4. Disconnect accelerator linkage.
5. If equipped with automatic transmi ssion, disconnect downshift cable.
6. If equipped with cruise c ontrol, disconnect linkage.
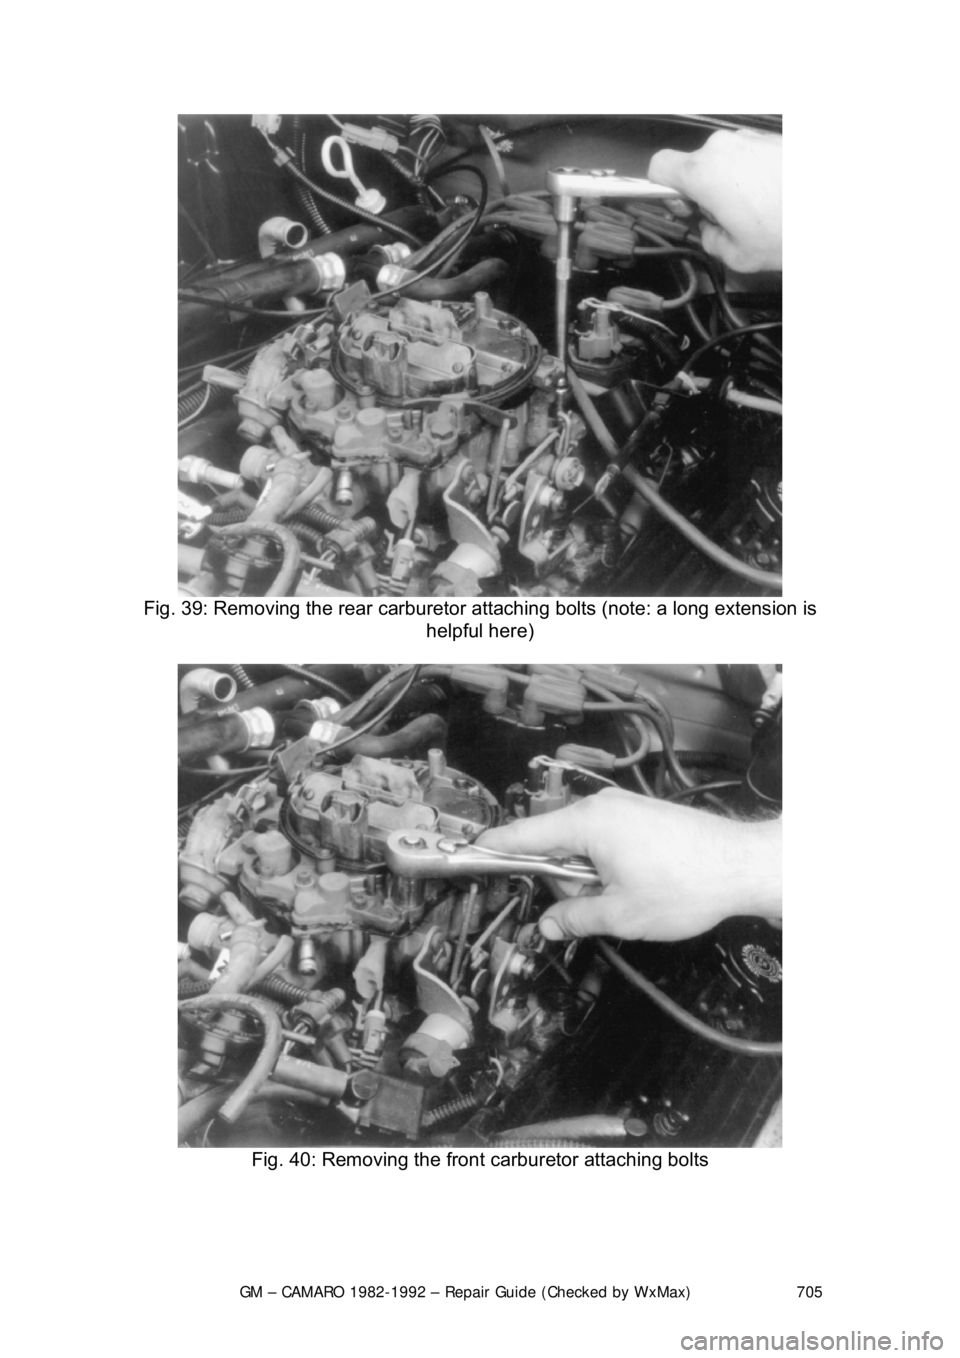
7. Remove carburetor attaching bolts.
8. Remove carburetor and EF E heater/insulator (if used).
9. Inspect EFE heater/insulator for damage. Be certain throttle body and
EFE heater/insulator surfaces are clean.
To install: 10. Install EFE heater/insulator.
11. Install carburetor and tighten nuts alternately to the correct torque.
12. Connect downshift cable, as required.
13. Attach the cruise cont rol cable, as required.
14. Connect accelerator linkage.
15. Connect electrical connections.
Page 702 of 875
GM – CAMARO 1982-1992 – Repair Guide (Checked by WxMax) 702
16. Connect fuel pipe sand vacuum hoses.
17. Check base (slow) and fast idle.
18. Install the air cleaner.
Fig. 33: Remove the air cleaner for access to the carburetor
Fig. 34: Use a back-up wrench when disconnecting fuel lines
Page 703 of 875
GM – CAMARO 1982-1992 – Repair Guide (Checked by WxMax) 703
Fig. 35: If the retaining clip on the connec tor is broken off like this one, it should
be replaced
Fig. 36: The vacuum modulator line behind the carburetor must also be
disconnected, if equipped
Page 705 of 875
GM – CAMARO 1982-1992 – Repair Guide (Checked by WxMax) 705
Fig. 39: Removing the rear carburetor at taching bolts (note: a long extension is
helpful here)
Fig. 40: Removing the front carburetor attaching bolts