carb CHEVROLET CAMARO 1982 Repair Guide
[x] Cancel search | Manufacturer: CHEVROLET, Model Year: 1982, Model line: CAMARO, Model: CHEVROLET CAMARO 1982Pages: 875, PDF Size: 88.64 MB
Page 668 of 875
GM – CAMARO 1982-1992 – Repair Guide (Checked by WxMax) 668
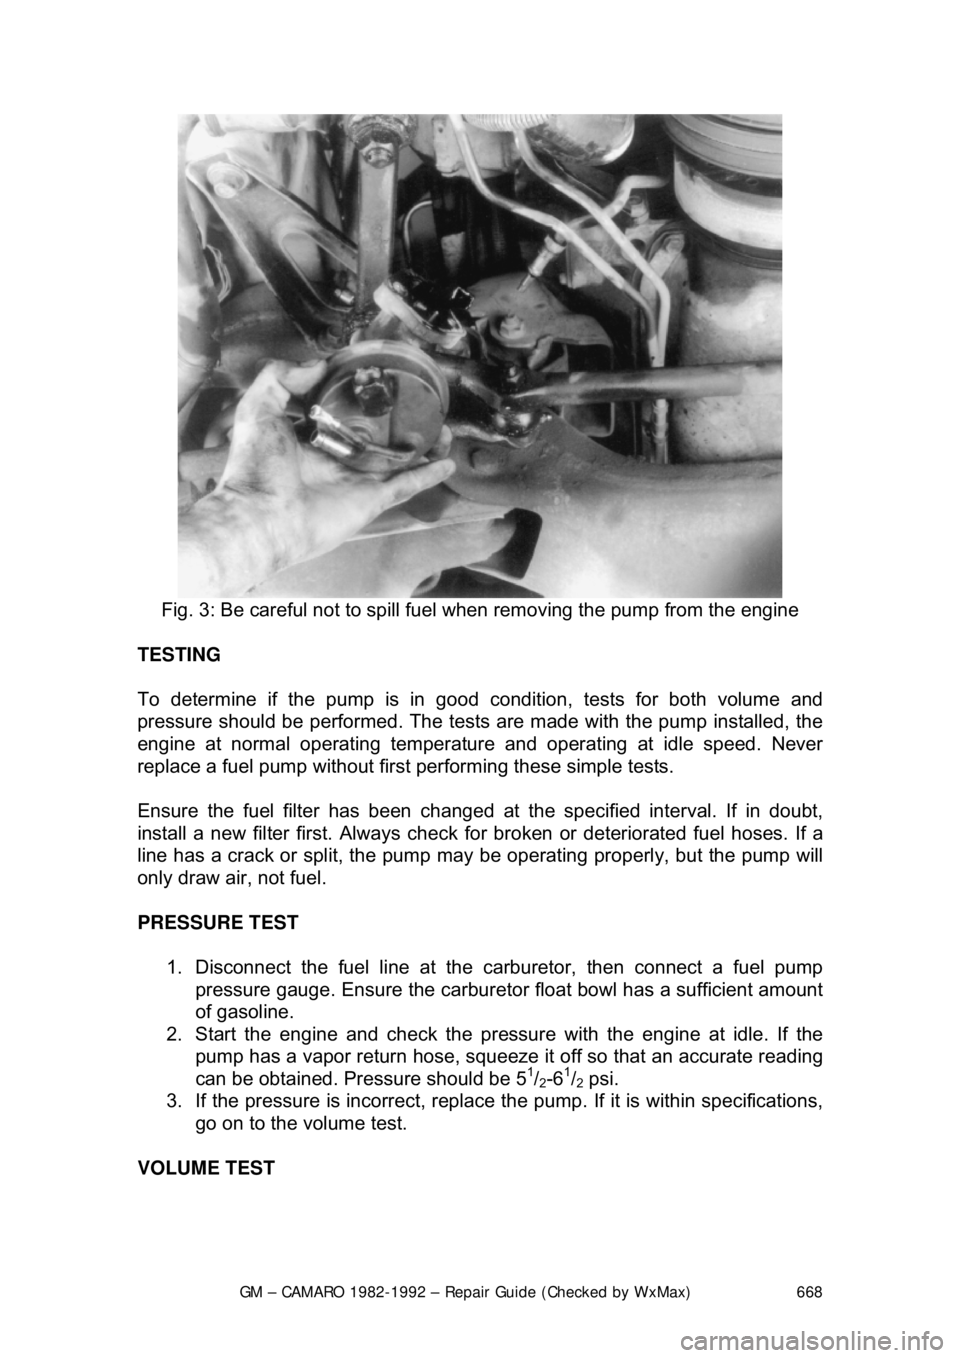
Fig. 3: Be careful not to spill fuel when removing the pump from the engine
TESTING
To determine if the pump is in good condition, tests for both volume and
pressure should be performed. The test s are made with the pump installed, the
engine at normal operating temperatur e and operating at idle speed. Never
replace a fuel pump without first performing these simple tests.
Ensure the fuel filter has been changed at the specified interval. If in doubt,
install a new filter first. Always check fo r broken or deteriorated fuel hoses. If a
line has a crack or split, the pump may be operating properly, but the pump will
only draw air, not fuel.
PRESSURE TEST
1. Disconnect the fuel line at the carburetor, then connect a fuel pump
pressure gauge. Ensure the carburet or float bowl has a sufficient amount
of gasoline.
2. Start the engine and c heck the pressure with the engine at idle. If the
pump has a vapor return hose, squeeze it off so that an accurate reading
can be obtained. Pressure should be 5
1/2-61/2 psi.
3. If the pressure is incorrect, replace t he pump. If it is within specifications,
go on to the volume test.
VOLUME TEST
Page 669 of 875

GM – CAMARO 1982-1992 – Repair Guide (Checked by WxMax) 669
1. Disconnect the pressure gauge. R
un the fuel line into a graduated
container.
2. Run the engine at idle until one pint of gasoline has been pumped. One
pint should be delivered in 30 seconds or less. There is normally enough
fuel in the carburetor float bowl to perform this test, but refill it if
necessary.
3. If the delivery rate is below the mini mum, check the lines for restrictions
or leaks, then r eplace the pump.
CARBURETORS
The V6 engine is equipped with the Ro chester E2SE carburetor, V8 engines
use the E4ME and E4MC. These carburet ors are of the downdraft design and
are used in conjunction with the CCC system for fuel cont rol. They have special
design features for optimum air/fuel mixt ure control during all ranges of engine
operation.
An electric solenoid in the carburetor controls the air/fu el ratio. The solenoid is
connected to an Electronic Control Module (ECM) which is an on-board
computer. The ECM provides a controllin g signal to the solenoid. The solenoid
controls the metering rod(s) and an id le air bleed valve, thereby closely
controlling the air/fuel ratio throughout the operating range of the engine.
MODEL IDENTIFICATION
General Motors Rochester carburetors ar e identified by their model code. The
first number indicates the number of ba rrels, while one of the last letters
indicates the type of choke used. These are V for the manifold mounted choke
coil, C for the choke coil mounted in the carburetor body, and E for electric
choke, also mounted on the carburetor. Model codes ending in A indicate an
altitude-compensatin g carburetor.
Because of their intricate nature and co mputer controls, the E2SE, E4ME and
E4MC carburetors should only be se rviced by a qualified technician.
PRELIMINARY CHECKS
The following should be observed befor e attempting any adjustments.
1. Thoroughly warm the engine. If the engine is cold, be sure that it reaches
operating temperature.
2. Check the torque of all carburet or mounting nuts and assembly screws.
Also check the intake manifold-to-cyli nder head bolts. If air is leaking at
any of these points, any attempts at adjustment will inevitably lead to
frustration.
3. Check the manifold heat control valve (if used) to be sure that it is free.
4. Check and adjust the choke as necessary.
5. Adjust the idle speed and mixture. If the mixture screws are capped,
don't adjust them unless all other c auses of rough idle have been
eliminated. If any adjustments are per formed that might possibly change
Page 670 of 875

GM – CAMARO 1982-1992 – Repair Guide (Checked by WxMax) 670
the idle speed or mixture,
adjust the idle and mixture again when you are
finished.
Before you make any carburetor adjustment s make sure that the engine is in
tune. Many problems which are thought to be carburetor related can be traced
to an engine which is simply out-of-tune. Any trouble in these areas will have
symptoms like those of carburetor problems.
ADJUSTMENTS
FAST IDLE
ROCHESTER E2SE 1. Refer to the emission label and pr epare the vehicle for adjustment.
2. Place the fast idle screw on the highest step of the fast idle cam.
3. Turn the fast idle screw to obtain the fast idle speed.
ROCHESTER E4ME AND E4MC
The fast idle adjustment must be perform ed according to the directions of the
emissions label.
FLOAT AND FUEL LEVEL
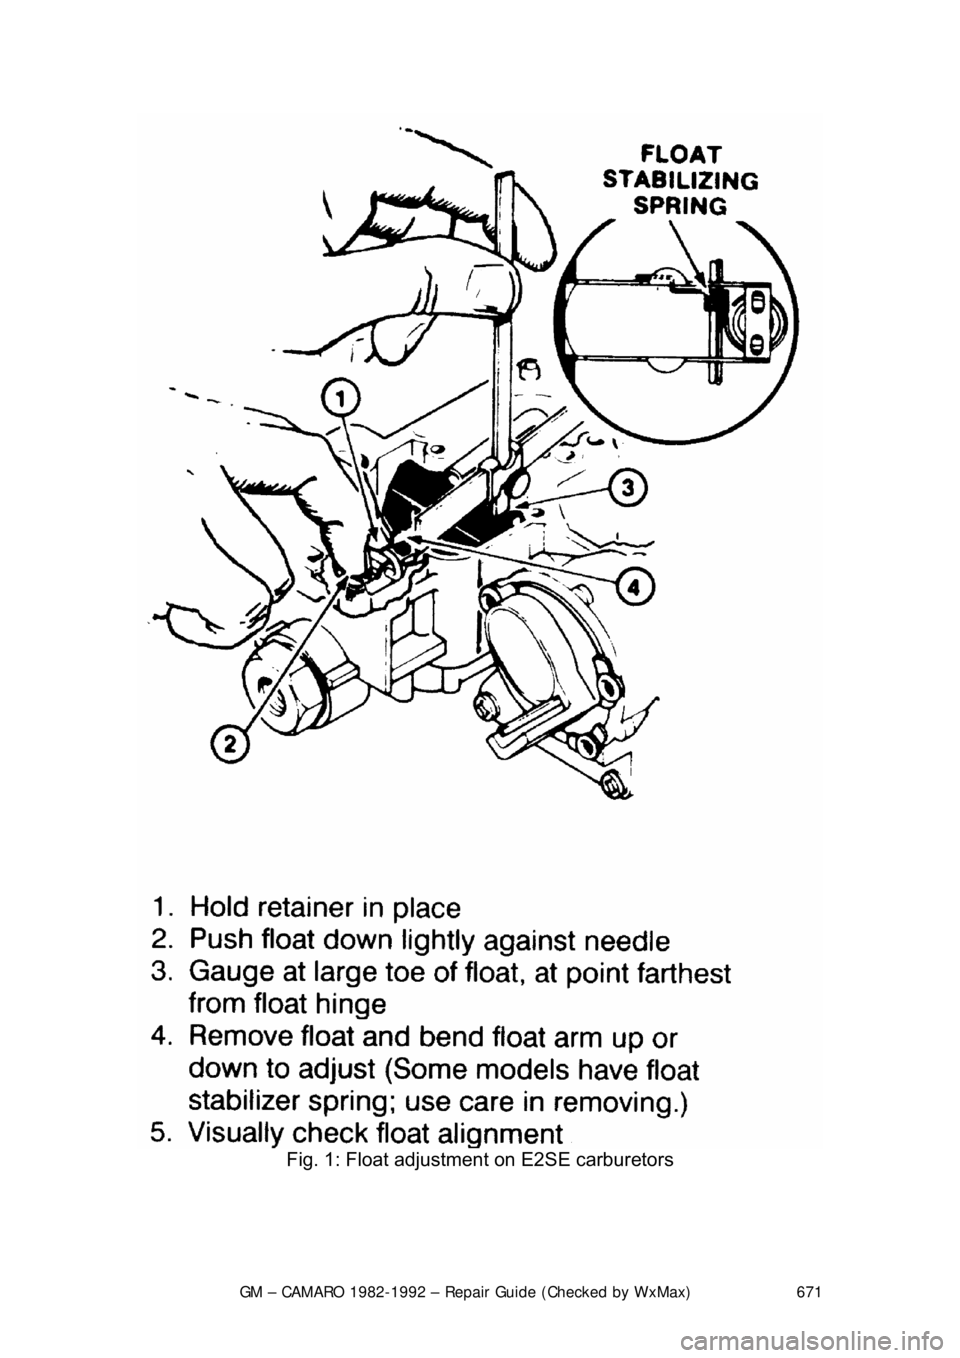
ROCHESTER E2SE
1. Remove the air horn and gasket.
2. While holding the retainer in place, push the float down lightly against the
needle.
3. Place a measuring gauge on the float at the farthest point from the float
hinge.
4. To adjust, remove the float and bend the arm up or down. Also check the
float alignment.
5. Install the air horn and gasket.
Page 671 of 875
GM – CAMARO 1982-1992 – Repair Guide (Checked by WxMax) 671
Fig. 1: Float adjustment on E2SE carburetors
Page 673 of 875
GM – CAMARO 1982-1992 – Repair Guide (Checked by WxMax) 673
3. Turn the screw counterclockwise and
remove it. Lift the solenoid and the
connector from the float bowl.
4. Remove the float and bend the arm up to adjust. The float must be
correctly aligned after adjustment.
5. To install the components, reverse the order of removal. Back out the
solenoid mixture screw t he number of turns that wa s recorded earlier.
THROTTLE LINKAGE
ROCHESTER E2SE
No adjustment of the thro ttle cable can be made.
ROCHESTER E4ME AND E4MC
Due to the design of the throttle cable, no adjustments of the throttle linkage can
be made.
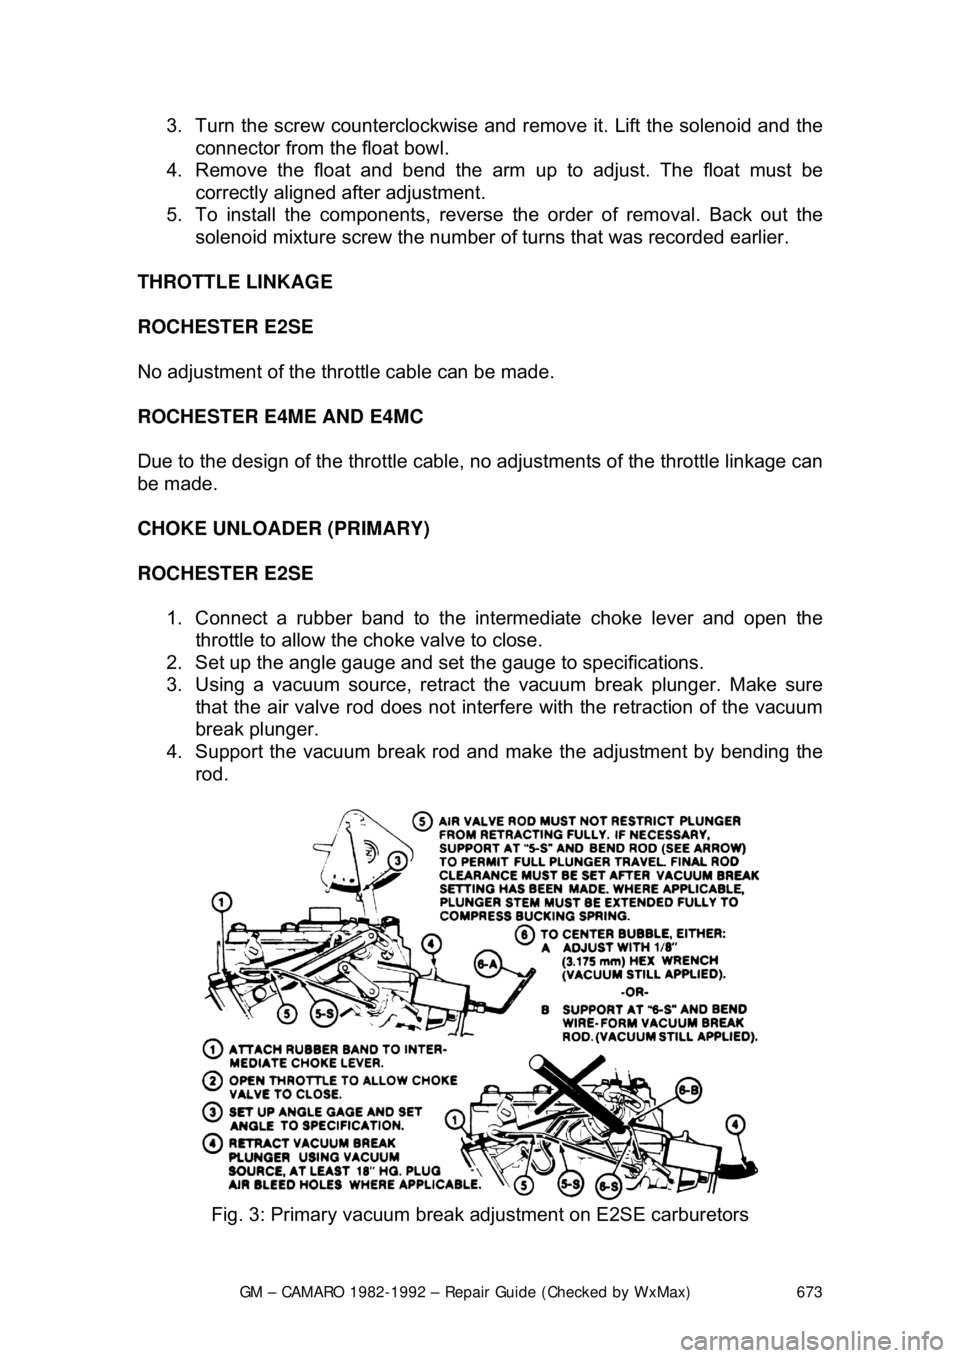
CHOKE UNLOADER (PRIMARY)
ROCHESTER E2SE
1. Connect a rubber band to the in termediate choke lever and open the
throttle to allow the choke valve to close.
2. Set up the angle gauge and set the gauge to specifications.
3. Using a vacuum source, retract the vacuum break plunger. Make sure
that the air valve rod does not interf ere with the retraction of the vacuum
break plunger.
4. Support the vacuum br eak rod and make the adjustment by bending the
rod.
Fig. 3: Primary vacuum break adjustment on E2SE carburetors
Page 674 of 875
GM – CAMARO 1982-1992 – Repair Guide (Checked by WxMax) 674
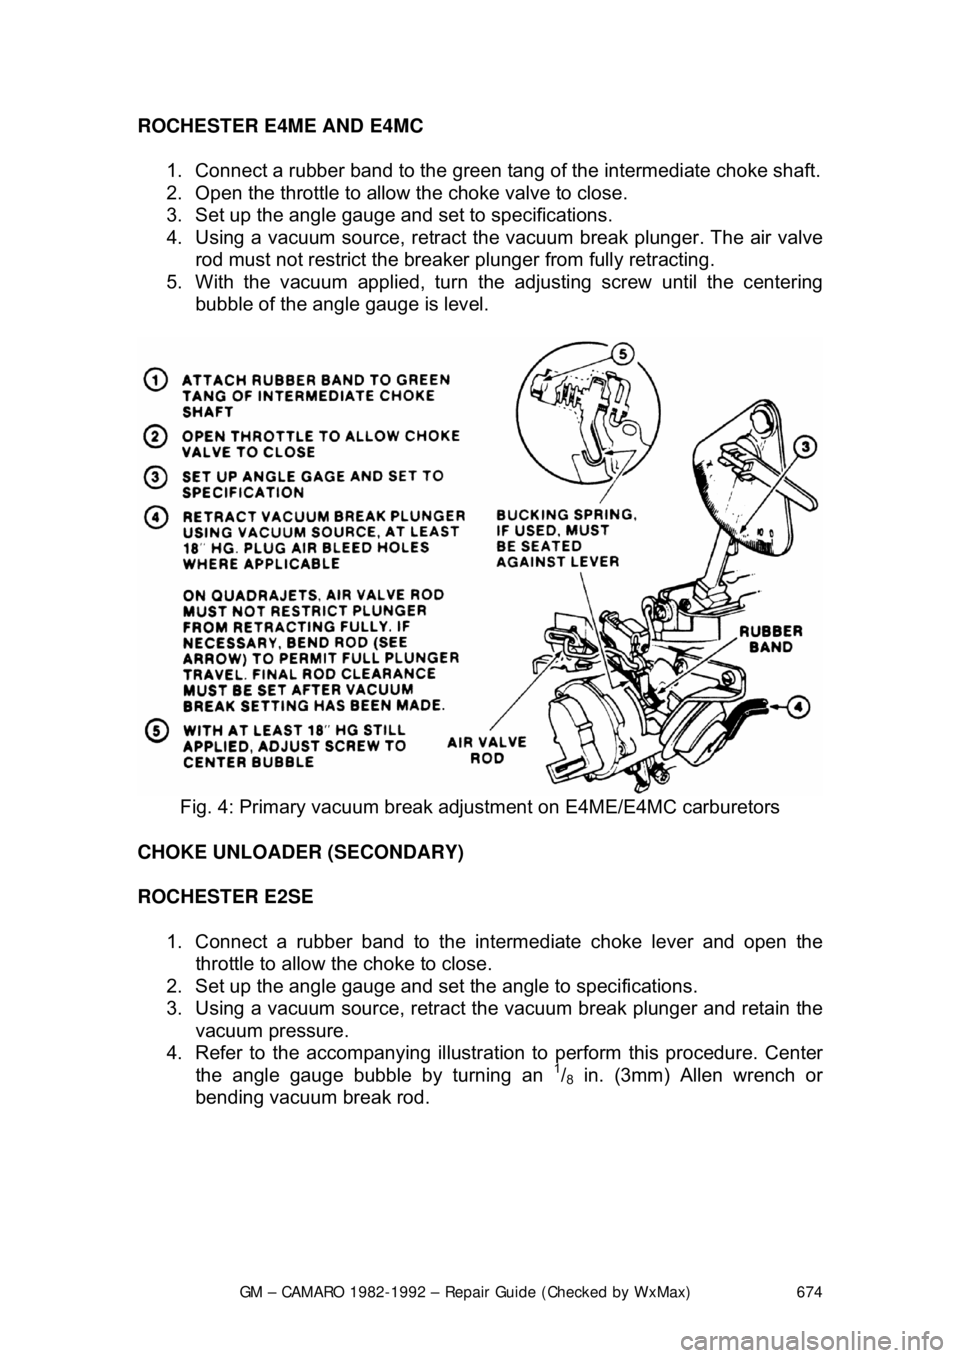
ROCHESTER E4ME AND E4MC
1. Connect a rubber band to the green tang of the intermediate choke shaft.
2. Open the throttle to allow the choke valve to close.
3. Set up the angle gauge and set to specifications.
4. Using a vacuum source, retract t he vacuum break plunger. The air valve
rod must not restrict the breaker plunger from fully retracting.
5. With the vacuum applied, turn the adjusting screw until the centering
bubble of the angle gauge is level.
Fig. 4: Primary vacuum break ad justment on E4ME/E4MC carburetors
CHOKE UNLOADER (SECONDARY)
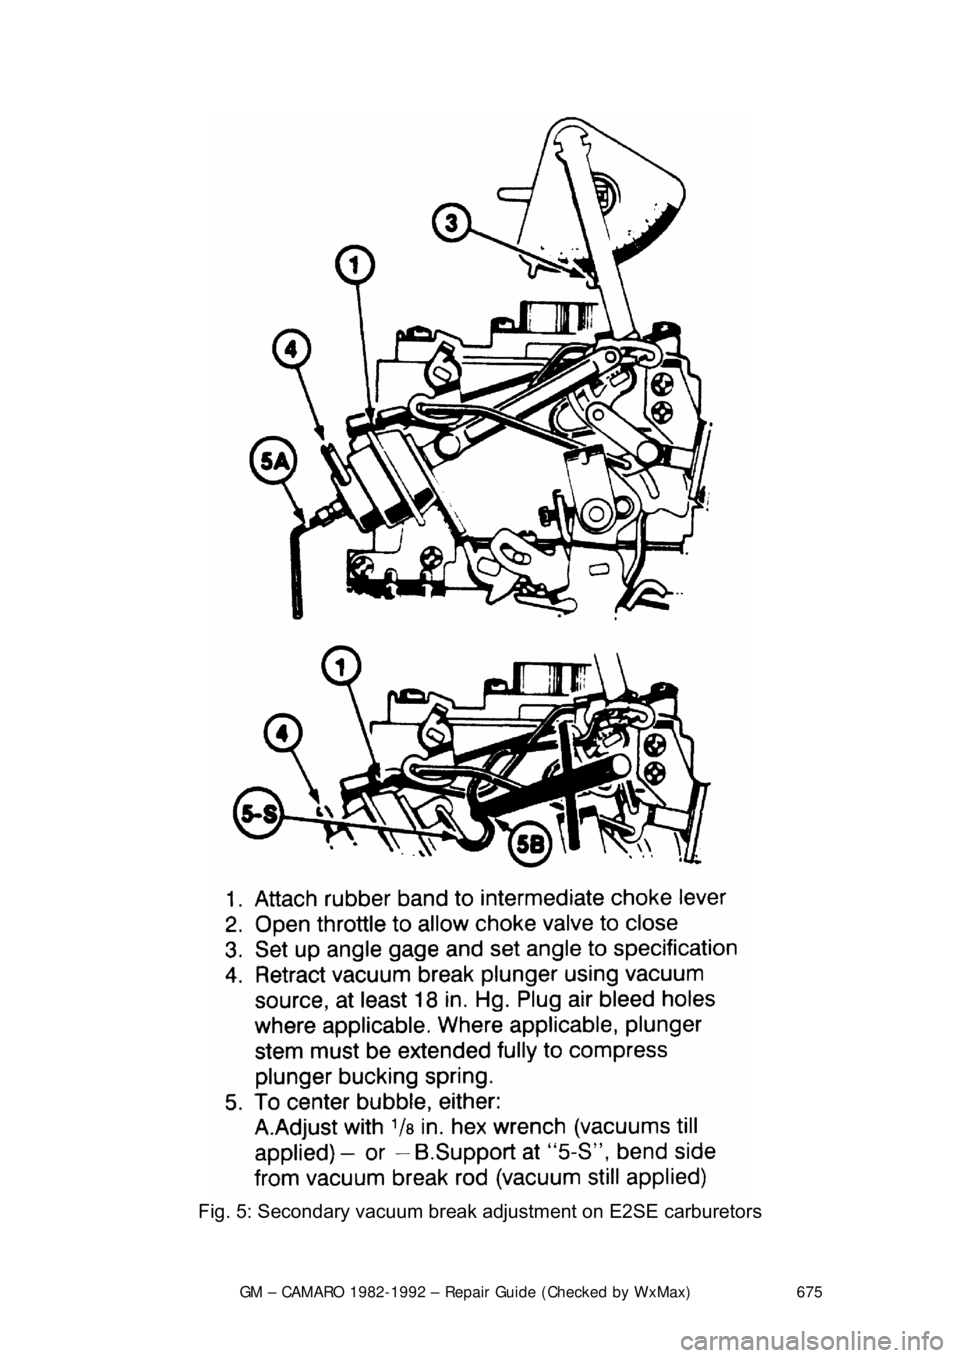
ROCHESTER E2SE 1. Connect a rubber band to the in termediate choke lever and open the
throttle to allow the choke to close.
2. Set up the angle gauge and set the angle to specifications.
3. Using a vacuum source, retract the vacuum break plunger and retain the
vacuum pressure.
4. Refer to the accompanying illustrati on to perform this procedure. Center
the angle gauge bubble by turning an
1/8 in. (3mm) Allen wrench or
bending vacuum break rod.
Page 675 of 875
GM – CAMARO 1982-1992 – Repair Guide (Checked by WxMax) 675
Fig. 5: Secondary vacuum break adjustment on E2SE carburetors
Page 676 of 875
GM – CAMARO 1982-1992 – Repair Guide (Checked by WxMax) 676
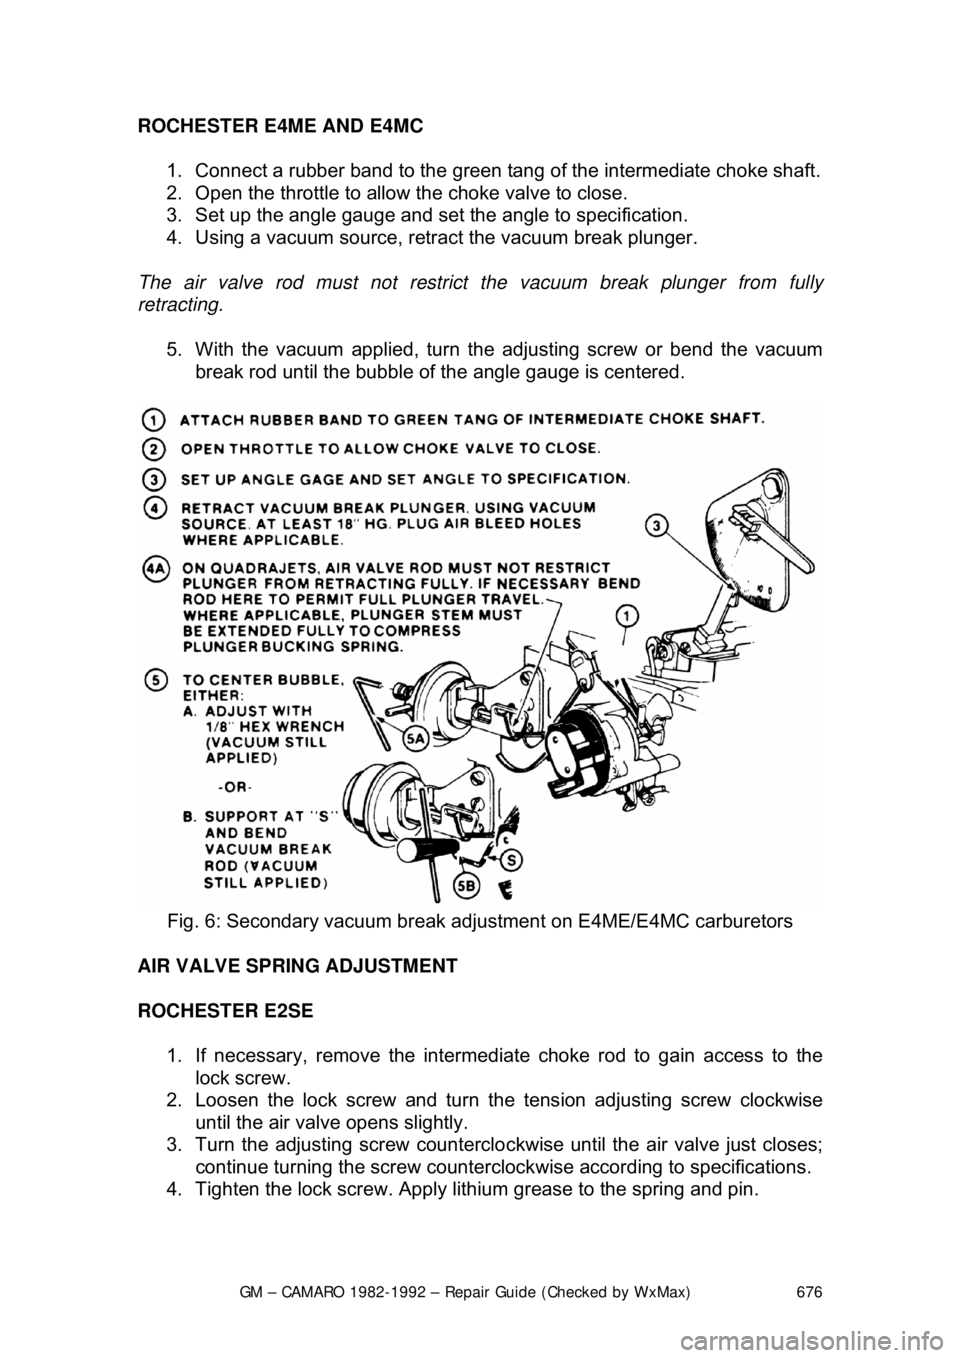
ROCHESTER E4ME AND E4MC
1. Connect a rubber band to the green tang of the intermediate choke shaft.
2. Open the throttle to allow the choke valve to close.
3. Set up the angle gauge and set the angle to specification.
4. Using a vacuum source, retr act the vacuum break plunger.
The air valve rod must not restrict the vacuum break plunger from fully
retracting.
5. With the vacuum applied, turn t he adjusting screw or bend the vacuum
break rod until the bubble of t he angle gauge is centered.
Fig. 6: Secondary vacuum break adj ustment on E4ME/E4MC carburetors
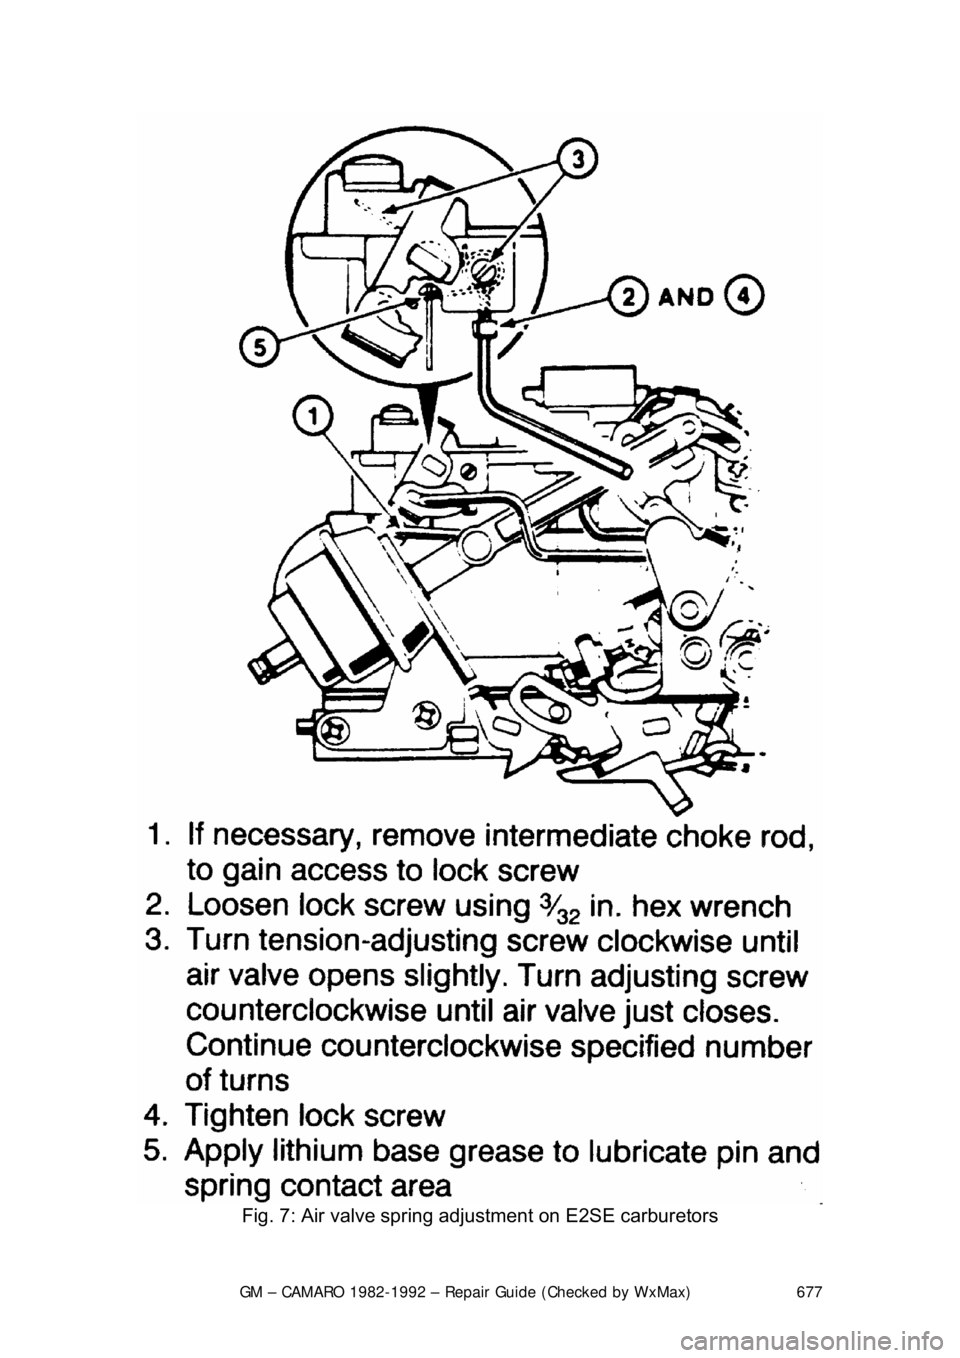
AIR VALVE SPRING ADJUSTMENT
ROCHESTER E2SE 1. If necessary, remove the intermediat e choke rod to gain access to the
lock screw.
2. Loosen the lock screw and turn t he tension adjusting screw clockwise
until the air valve opens slightly.
3. Turn the adjusting screw counterclo ckwise until the air valve just closes;
continue turning the screw counterclock wise according to specifications.
4. Tighten the lock screw. Apply lithium grease to the spring and pin.
Page 677 of 875
GM – CAMARO 1982-1992 – Repair Guide (Checked by WxMax) 677
Fig. 7: Air valve spring adj ustment on E2SE carburetors
Page 678 of 875
GM – CAMARO 1982-1992 – Repair Guide (Checked by WxMax) 678
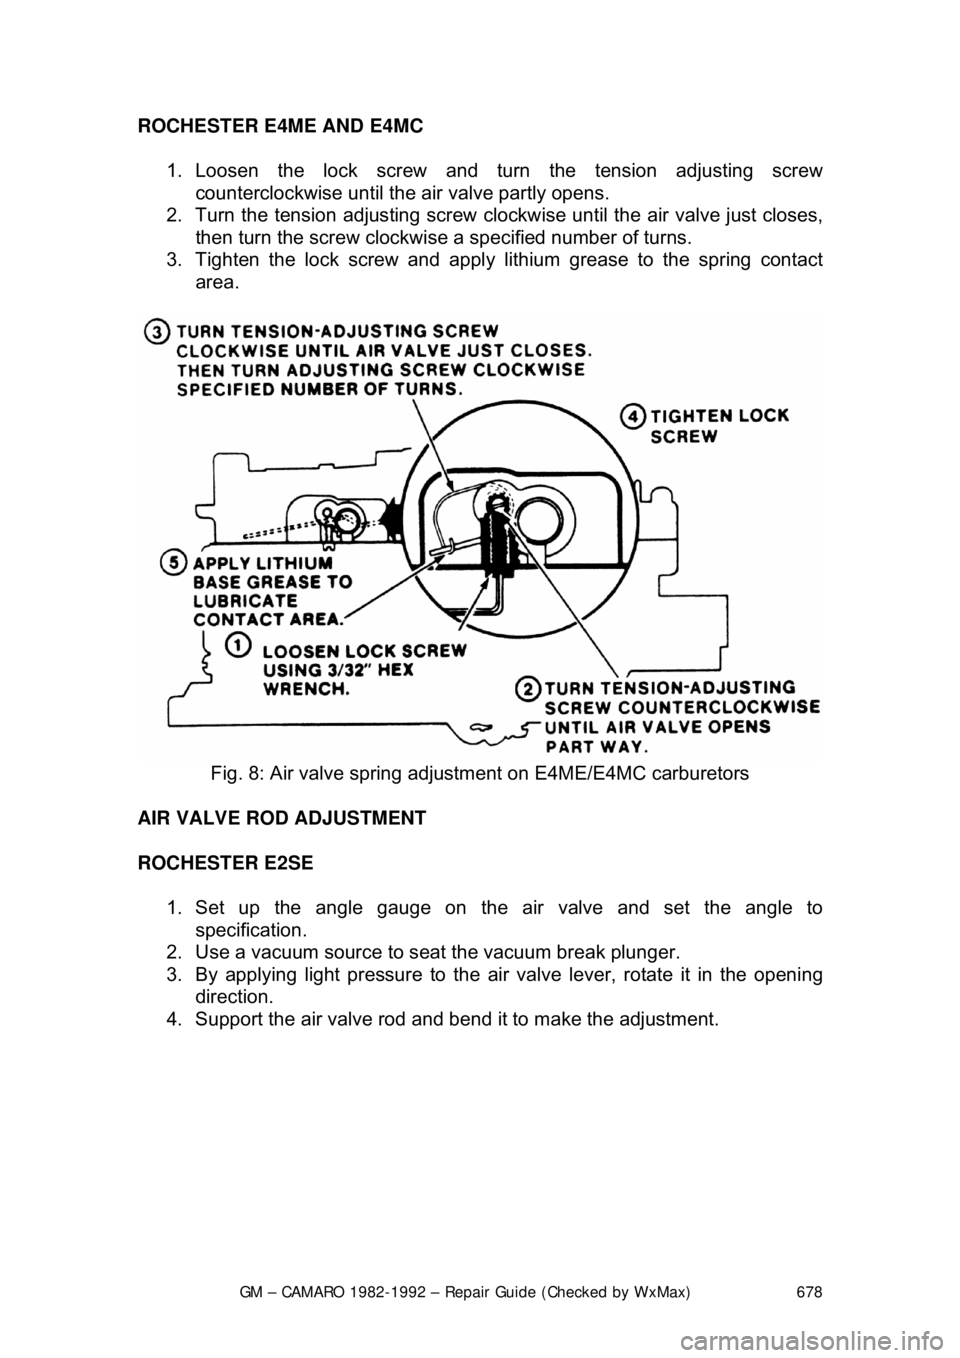
ROCHESTER E4ME AND E4MC
1. Loosen the lock screw and turn the tension adjusting screw counterclockwise until the air valve partly opens.
2. Turn the tension adjus ting screw clockwise until t he air valve just closes,
then turn the screw clockwise a specified number of turns.
3. Tighten the lock screw and apply lithium grease to the spring contact
area.
Fig. 8: Air valve spring adjus tment on E4ME/E4MC carburetors
AIR VALVE ROD ADJUSTMENT
ROCHESTER E2SE 1. Set up the angle g auge on the air valve and set the angle to
specification.
2. Use a vacuum source to s eat the vacuum break plunger.
3. By applying light pressure to the ai r valve lever, rotate it in the opening
direction.
4. Support the air valve rod and bend it to make the adjustment.