radio CHEVROLET CAVALIER 1984 1.G Owners Manual
[x] Cancel search | Manufacturer: CHEVROLET, Model Year: 1984, Model line: CAVALIER, Model: CHEVROLET CAVALIER 1984 1.GPages: 105, PDF Size: 24.23 MB
Page 39 of 105
Downloaded from www.Manualslib.com manuals search engine '" ,
t:l
STANDARD INSTRUMENT CLUSTER
IJ
12
OPTIONAL INSTRUMENT CLUSTER
~~~~-:'----,~~:
l'l
1l
10
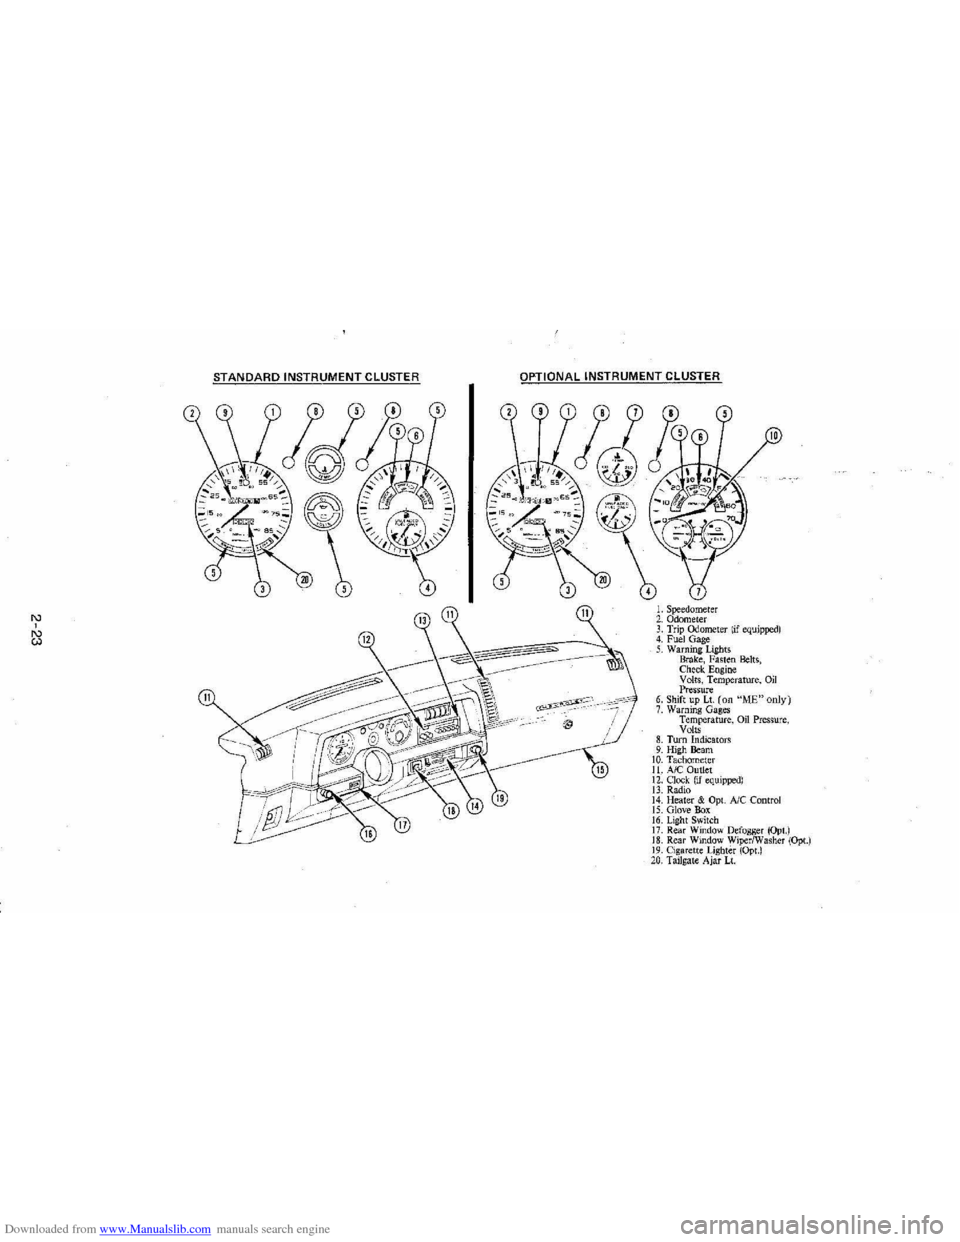
L Speedometer 2. Odometer 3. Trip ()jometer lif equipped) 4. Fuel Gage 5. Warning Lights Brake, Fasten Belts, Check. Engine Volts, Temperature, Oil Pressure 6. Shift up Lt. (on "ME"only) 7. Warning Gages Temperature, on Pressure, Volts 8. Turn Indicators 9. High Beam 10. Tachomet er 11. A/C Outlet 12. Clock. (if equipped) 13. Radio 14. Heater & Opt. Ale Control 15. Glove Box 16. Lig ht Switch 17. Rear Window Defogger (Opt.) 18. Rear Window WiperlWasher (Opt.) 19. Cigare tt e Lighter (Opt.) 20, Tailgat e Ajar Lt.
Page 46 of 105
Downloaded from www.Manualslib.com manuals search engine stereo Sound -All Delco Sound Systems with an FM stereo radio will switch
to stereo operation whenever
anFM stereo broadcast is being received , and
an indicator in the dial will light "Stereo" · operation means the radio is separating a stereo broadcast bact< into the original two channels , called "left "
and "right. " Stereo sound is noticeably more real istic to the ear.
AM or AM-FM Monaural Radio
The following controls are common to both AM and AM-FM monaura l sound
systems .
OFF ttl VOLUMS ..... TUNE
·'IL3'?i9
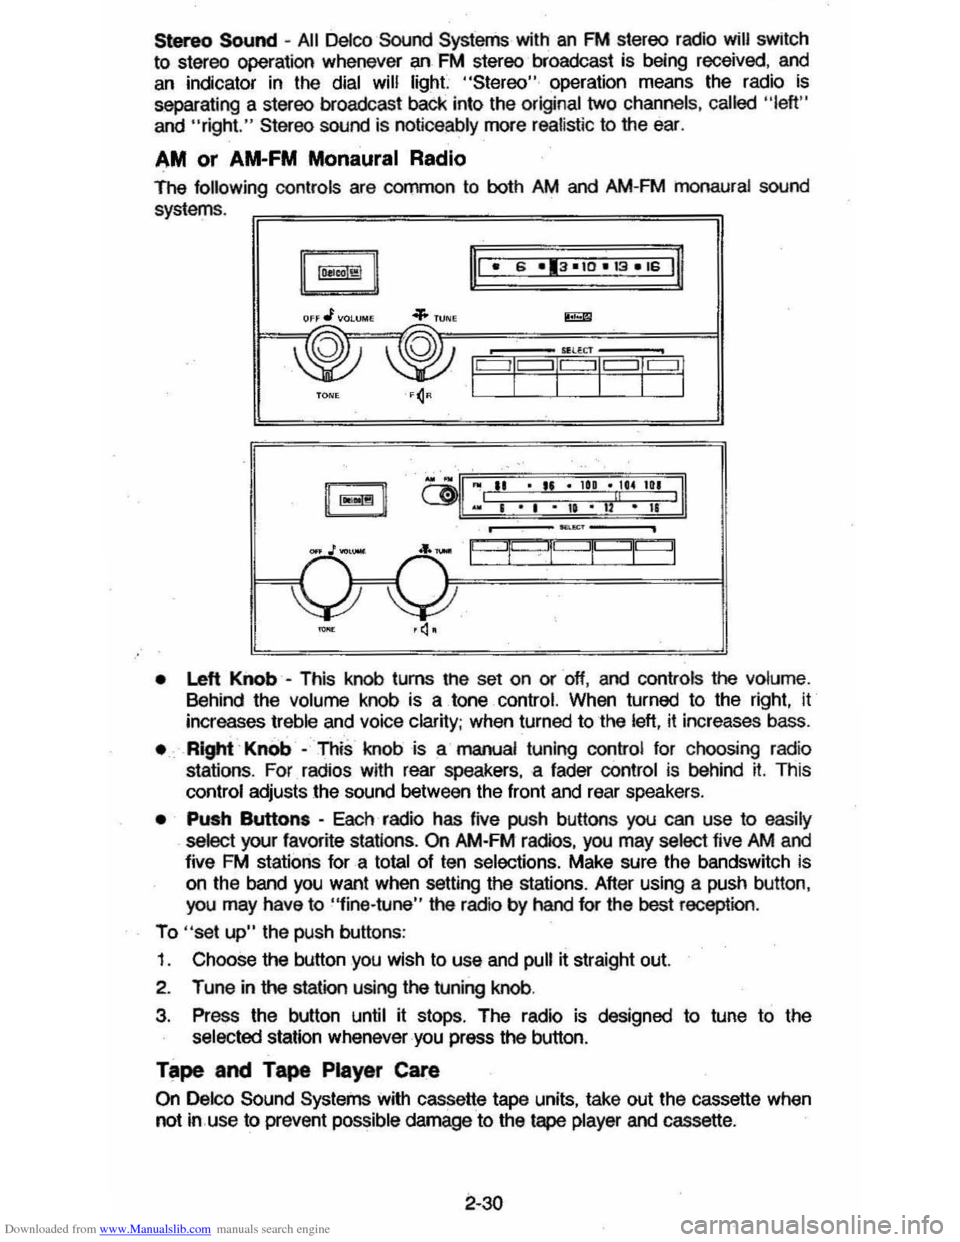
• Left Knob -This knob turns tne set on or off, and controls the volume . Behind the volume knob is a. tone control. When turned to the right, it
increases treble and voice clarity; when turned to 'the left, it increases bass.
• Right . Knob -This knob is a manual tuning conuol for choosing radio
stations. For radios with rear speakers, a fader control is behind it. This
control adjusts the sound between the front and rear speakers .
• Push Buttons -Each radio has five push buttons you can use to easily
select your favorite stations. On AM-FM radios, you may select five AM and
five FM stations for a
total of ten selections. Make sure the bandswitch is
on the band you want when setting the stations. After using a push button,
you may have
to "fine·tune" the radio by hand for the best reception .
To "set up" the push buttons:
1. Choose the button you wish to use and pull it straight out.
2 . Tune in
the station using the tuning knob.
3, Press the button
until it stops. The radio is designed to tune to the selected station whenever you press the button.
Tape and Tape Player Care
On Delco Sound Systems with cassette tape units, take out the cassette when
not in use to prevent
possible damage to the tape player and cassette.
2-30
Page 47 of 105
Downloaded from www.Manualslib.com manuals search engine Store cassettes away from extreme heat or direct sunlight. Protect the open ends from dirt or damage; store them in their original cases or other protective
cases. Cassettes eventually wear out and you may need to replace them if
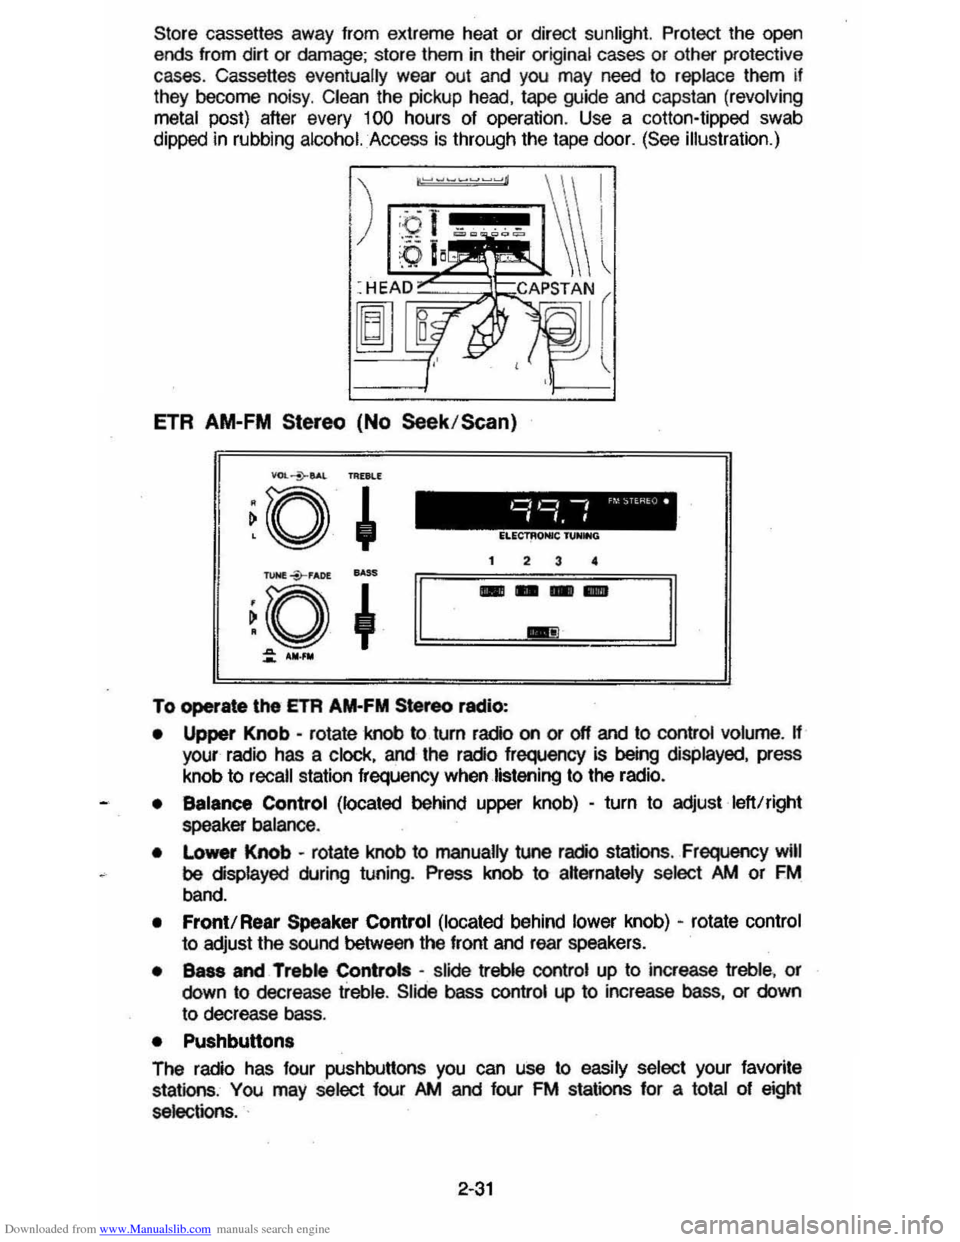
they become noisy. Clean the pickup head, tape guide and capstan (revolving
metal
post) after every 100 hours of operation . Use a colton-tipped swab
dippec in rubbing
alcohol. Access is through the tape door. (See illustration.)
ETR AM-FM Stereo (No Seek /Scan)
To operate \he ETA AM-FM Stereo radio:
• Upper Knob -rotate knob to turn radio on or off and to control volume. H your radio has a clock, and the radio frequency is being displayed, press
knob to
recall station frequency when listening to the radio.
• Balance Control (located behind upper knob) -turn to adjust left!right
speaker balance .
•
Lo_ Knob -rotate knob to manually tune radio stations , Frequency will
be displayed during tuning. Press knob to aHernately select />M or FM
band.
• Front! Rear Speaker Control (located behind lower knob) -rotate control
to adjust the sound between the front and rear speakers.
• Bass and Treble Controls -slide treble control up to increase treble, or
down to decrease treble. Slide bass control up to increase bass, or down
to decrease bass.
• Pushbutton.
The radio has four pushbuttons you can use to easily select your favorite
stations , You may select four />M and four FM stations for a total of eight
selections. .
2-31
Page 48 of 105
Downloaded from www.Manualslib.com manuals search engine To set pushbuttons:
1 .
Make sure the bandswitch is on the band you want. Then, tune in the
desired station.
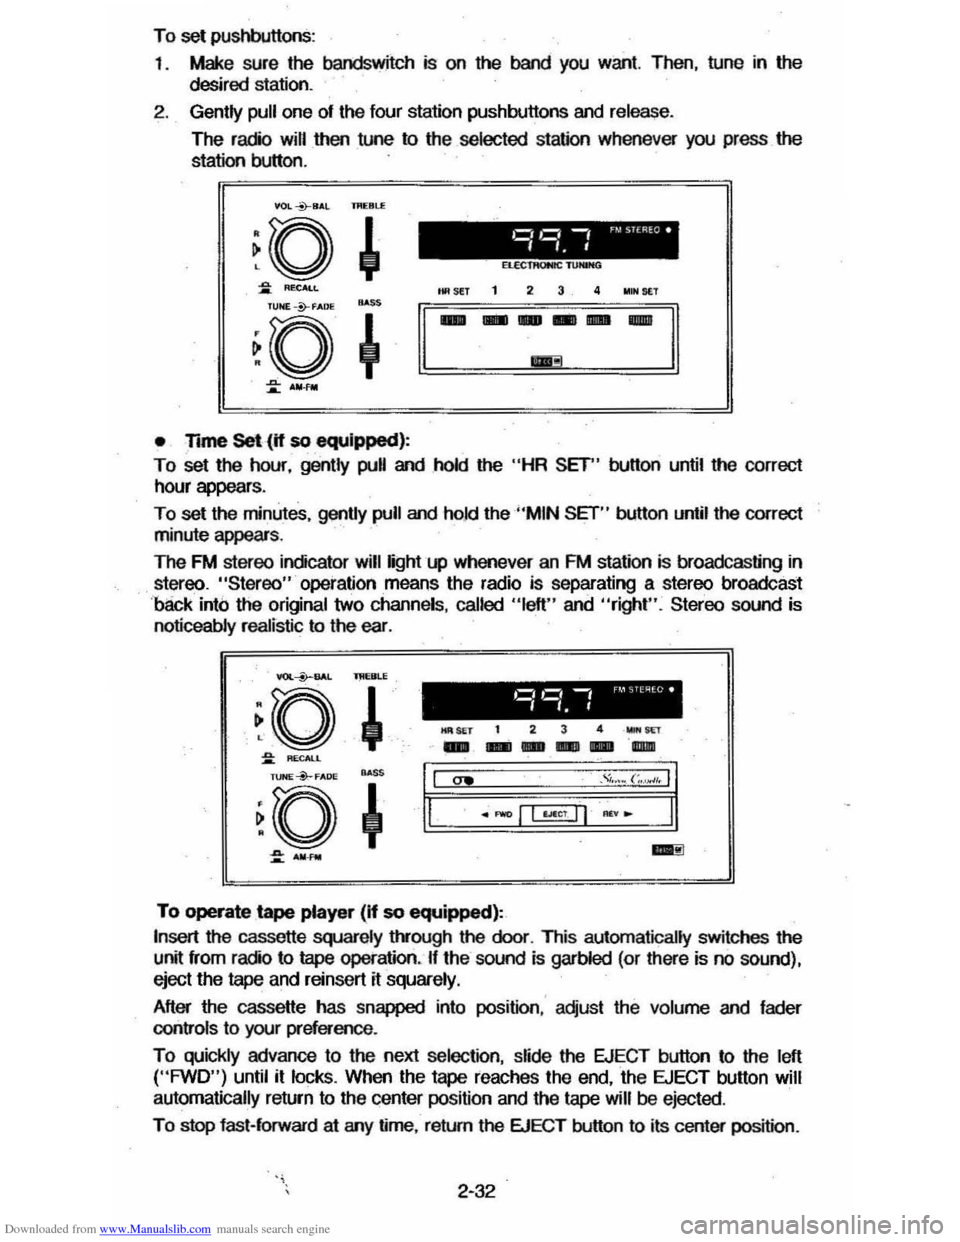
2. Gently pull one of the four station pushbuttons and release.
The radio will then tune to the selected station whenever you press the
station button.
VOL *8,1,l IJI(Bl.£
• Time Set (if so equipped):
To set the hour, gently pull and hold the "HR SET" button until the correct
hour appears .
To set the minutes, gently pull and ho.1d the "MIN SET" button until the correct
minute appears .
The FM stereo indicator will light up whenever an FM station is broadcasting in
stereo. "Stereo" operation means the radio is separating a stereo broadcast
'back into the original two channels , called "left" and "right". Stereo sound is
noticeably realistic to the ear. .
YOI.--i>--BAL lMERLE
~o ,
~ RECALL
l1li SET t 2 3 4 _wr
-- ---"l1li
~. ~a~o*" ~ ~+'I,I "" ." .... (;.~,. II
.~ ~.====·=-=±I=Lf§j=~="~I=-==·==:11.
::: ..... _ ..:!I
To operate tape player (If so equipped):
Insert the cassette squarely t!vough the door. This automatically switches the
unit from radio to tape operation. If the sound is garbled (or there is no sound),
eject the
tape and reinsert it squarely.
After the cassette has snapped into position : adjust the volume and fader
controls
to your preference .
To quickly advance to the next selection, slide the EJECT button to the left ("FWD") until it locks. When the tape reaches the end, the EJECT button will
automatically return
to the center position and the tape will be ejected .
To stop fast-forward at arry time, return the EJECT button to its center position .
2-32
Page 49 of 105
Downloaded from www.Manualslib.com manuals search engine To listen to an earlier selection, slide EJECT button to the right ("REV") until it locks. When the tape reaches the end, the EJECT button will automatically
return to center position and the tape will resume playing.
To stop reverse at any time, return the EJECT button to its center position.
NOTE: Belore turning off ignition, eject the cassette tape. Insertion 01 the
cassette tape cartridge overrides the radio and the time-ol-day
will be
displayed continuously.
For best results, use only cassettes which are 30 to 60 minutes in length.
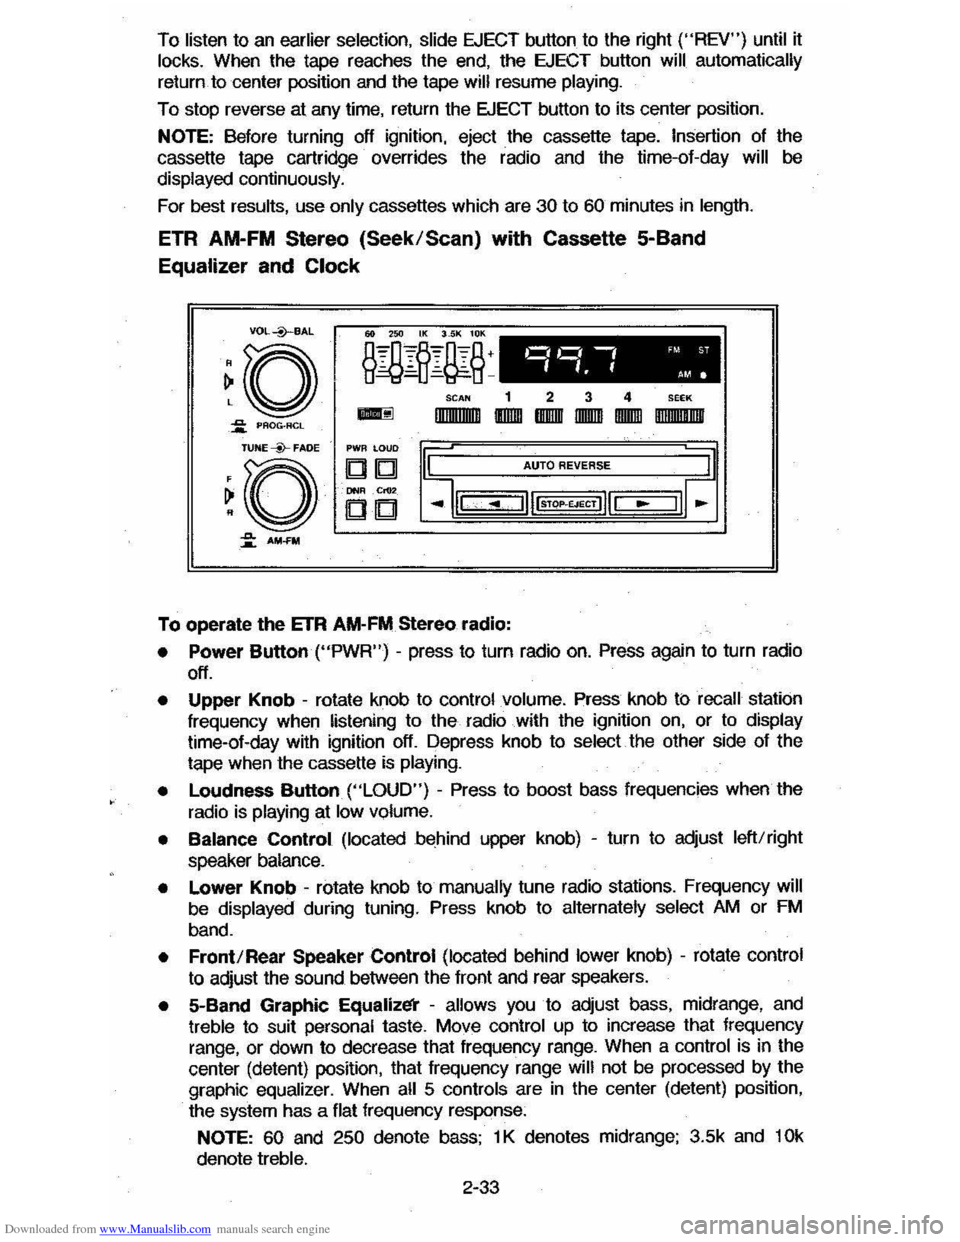
ETR AM-FM Stereo (Seek/Scan) with Cassette 5-Band
Equalizer and Clock
VDL+BAL
~o ~ PAOG·ACL
TUNE --Y-FADE
~O
~ AM-FM
o,~ -, 'M ST
".f AM.
SCAN 1 2 3 4 SEEK
-IlIIIIIIlIIIII IIDIDI IBIIIIII IIDDID IDIDID DIIIIIII!IIIII
PWR LOUD
DIb! AUTO REVERSE
DNIl .Cr02
CD
To operate the ETR AM-FM Stereo radio:
• Power Button ("PWR") -press to turn radio on. Press again to turn radio
off.
• Upper Knob -rotate knob to control volume. Press knob ti:> recall station
frequency when listening to the radio with the ignition on, or to display time-ol-day with ignition off. Depress knob to select the other side 01 the
tape when the cassette
is playing.
•
Loudness Button ("LOUD") - Press to boost bass frequencies when the
radio is
playing at low volume.
• Balance Control (located behind upper knob) -turn to adjust left/right
speaker balance.
• Lower Knob -rotate knob to manually tune radio stations. Frequency will
be displayed during tuning. Press knob to alternately select AM or FM
band.
• Front/Rear Speaker Control (located behind lower knob) -rotate control
to adjust the sound between the lront and rear speakers.
• 5-Band Graphic Equalizl!i' -allows you to adjust bass, midrange, and treble to suit personal taste. Move control up to increase that frequency
range, or down to decrease that frequency range. When a control is in the
center (detent) position, that
Irequency range will not be processed by the
graphic equalizer. When all 5 controls are in the center (detent) position,
the system has a flat frequency response:
NOTE: 60 and 250 denote bass; 1 K denotes midrange; 3.5k and 10k
denote treble.
2-33
Page 50 of 105
Downloaded from www.Manualslib.com manuals search engine • Pushbuttons
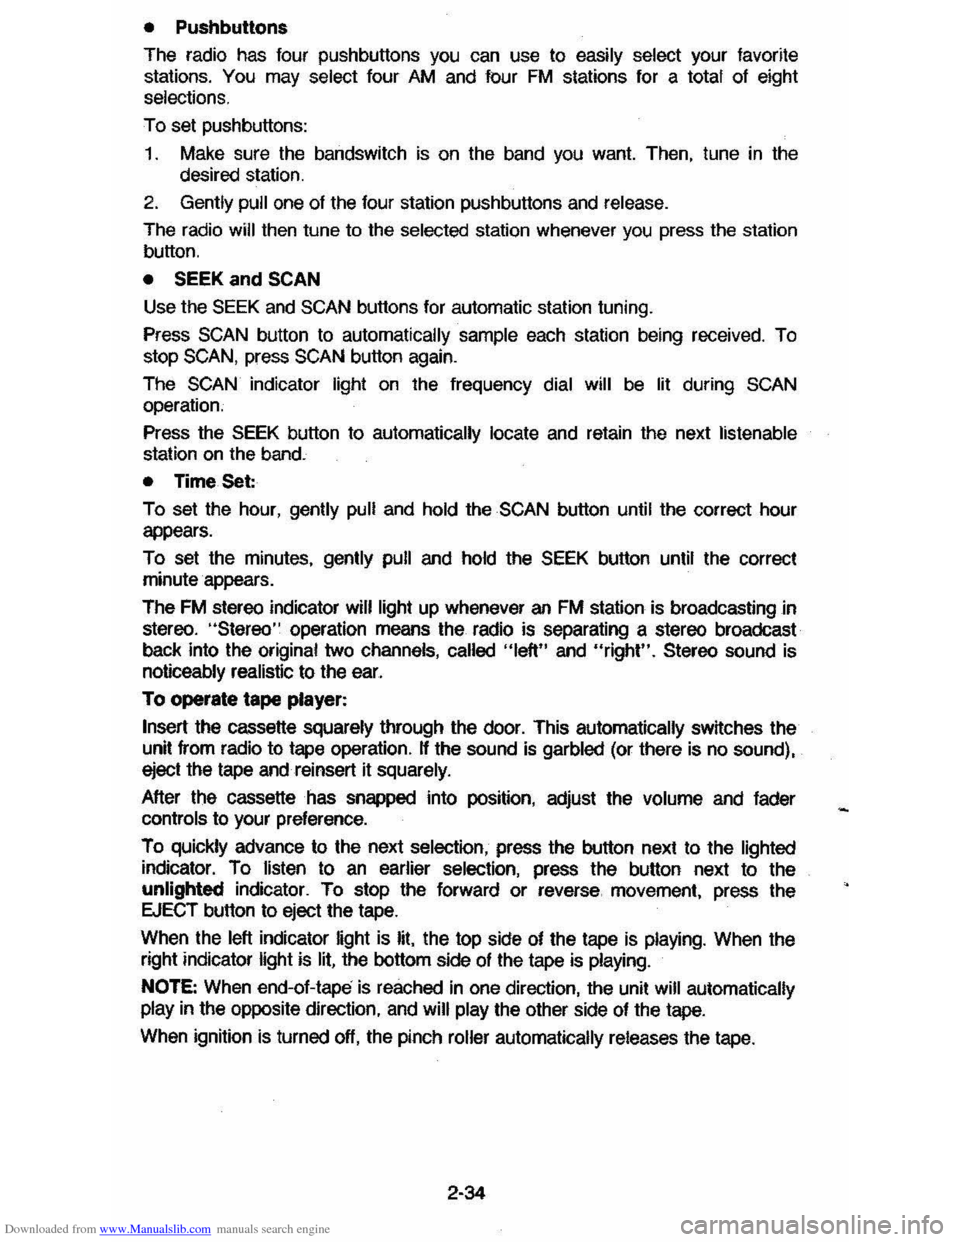
The radio has four pushbuttons
you can use to easily select your favorite
stations. You may select four AM and four FM stations for a total of eight
selections.
To set push buttons:
1. Make sure the bandswitch is on the band you want. Then, tune in the desired station.
2. Gently pull one of the four station pushbuttons and release.
The radio will then tune to the selected station whenever you press the station button.
• SEEK and SCAN
Use the SEEK and SCAN buttons for automatic station tuning.
Press
SCAN button to automatically sample each station being received. To
stop SCAN, press SCAN button again.
The SCAN indicator light on the frequency dial will be lit during SCAN operation.
Press the SEEK button to automatically locate and retain the next listenable
station on the band.
• Time Set:
To set the hour, gently pull and hold the
SCAN button untif the correct hour
appears.
To set the minutes, gently pull and hold the
SEEK button untif the correct
minute appears.
The
FM stereo indicator will light up whenever an FM station is broadcasting in
stereo. "Stereo" operation means the radio is separating a stereo broadcast
back into the original two channels, called "left" and "right". Stereo sound is
noticeably realistic to the ear.
To operate tape player:
Insert the cassette squarely through the door. This automatically
sw~ches the
unit from radio to tape operation. Ii the sound is garbled (or there is no sound),
eject the tape and reinsert it squarely.
After the cassette has snapped into position, adjust the volume and fader
controls to your preference.
To quickly advance to the next selection, press the button next to the lighted
indicator. To listen to
an earlier selection, press the button next to the
unlighted indicator. To stop the forward or reverse. movement, press the
EJECT button to eject the tape.
When the left indicator light is lit. the top side of the tape is playing. When the
right indicator light is lit. the bottom side of the tape is playing.
NOTE:
When end-of-tape is reached in one direction, the unit will automatically
play
in the opposite direction, and will play the other side of the tape.
When ignition is turned off, the pinch roller automatically releases the tape.
2-34
Page 51 of 105
Downloaded from www.Manualslib.com manuals search engine Insertion of the cassette tape cartridge overrides the radio and the time-of-day will be displayed continuously .
Press the Dynamic Noise Reduction (DNRTM) button to rerrove high
frequency background
hiss on AM. FM. FM stereo. and tape.
Select the setting
fO( proper tape equalization(CrO .)as follows:
1. Select 70 usec (push button in).
2. Select 120 usec (button is out).
The
equalization setting which is desired will vary according to the type of tape
being used. Chrome and metal tapes have 70 usec equalization. while Iron tapes have 120 usec equalization .
The tape bias is often indicated on the cassette label or case .
For best
resu~s. use only tapes which are 30 to 60 minutes in length.
MOBILE RADIO SYSTEMS
Mobile two-way radiO units and mobile telephone equipment are subject to federal rules and must be installed by trained personnel. Certain such
equipment or the manner of its installation may
possibly adversely affect
vehicle operation. Expenses incurred to protect the vehicle systems from the interaclion of these added mobile communication systems are not the
responsibiWty of Chevrolet Motor Division.
Citizen Band (CB)
racios and garage door openers normally will not affect
vehicle
operation.
Fixed Mast Antenna
The fixed mast antenna is designed to withstand most car washes without
damage .
It cannot be adjusted up or down. If the mast becomes slightly bent.
you can straighten it by hand . The mast antenna can be replaced
if severely
bent (by vandalism . etc .) . Mast antennas must be kept clean for good
performance .
OTHER CONTROLS AND FEATURES
HATCHBACK LID
To open the hatchback lid. use the oval-head key in the lock at the rear of the
car .
Close the lid firmly to be sure it locks.
LlFTGATE OPERATION (STATION WAGONS)
To open the liftgate. use the oval-head key in the outside . lock. (Two gas
support struts. one at
each side of the glass . are designed to help hold the
gate open.)
CAUTION: TIle Ilftg" or hatchback lid should be claed while driving to help avoid
drawing dangerous exhaust S .... Into the eIIr. (8M "Engine Extulust GuCautlon (Carbon Monoxide)" at the 'beginning of "Starting and Operating," Section 2 of thl, manual.)
If you have to drive with the liftgate or hatchback lid open. these precautions
should be observed :
• Close all other windows .
2-35
Page 94 of 105
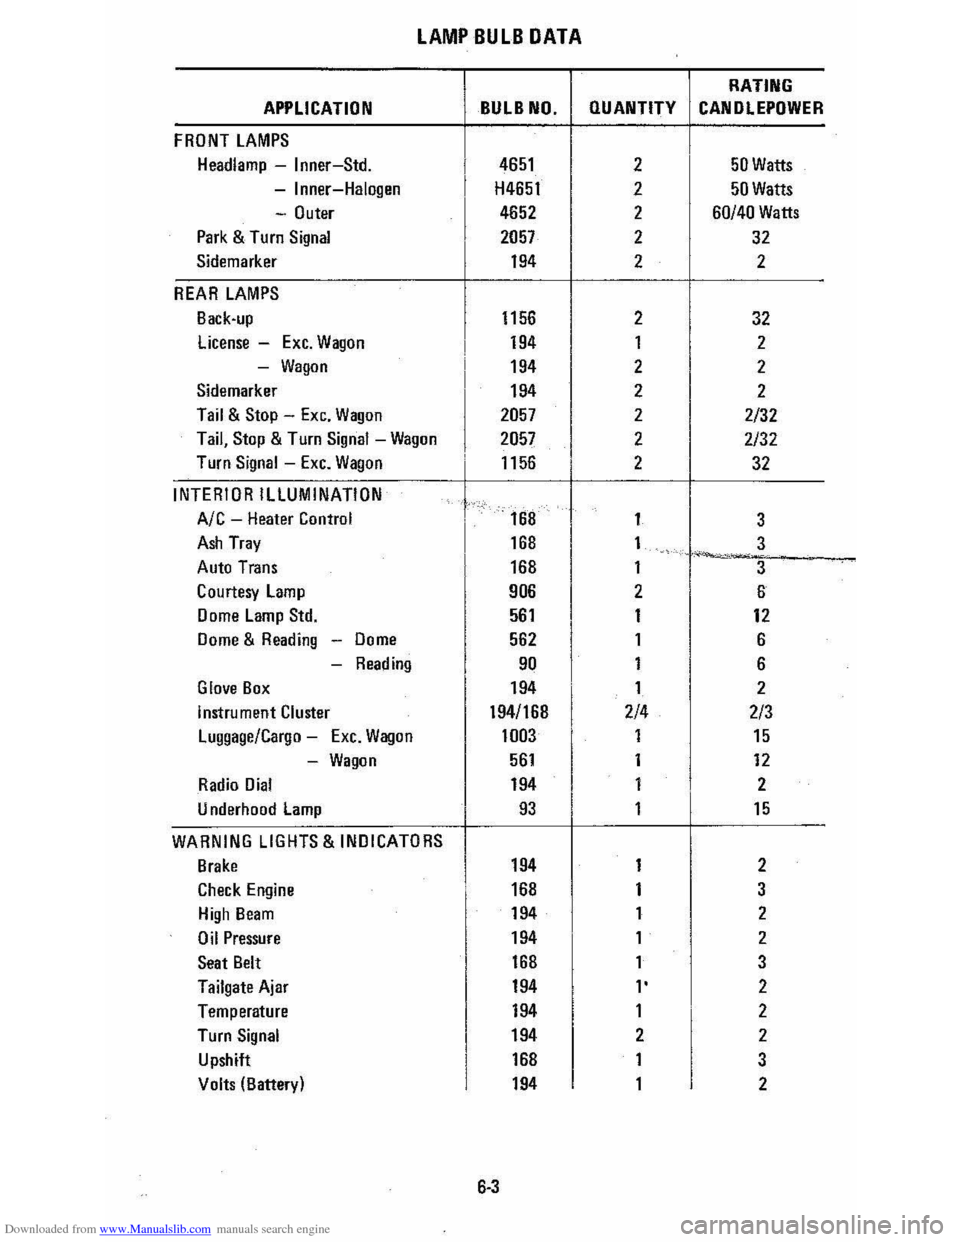
Downloaded from www.Manualslib.com manuals search engine LAMP BULB DATA
RATING
APPLICATION BULB NO. QUANTITY CANOLEPOWER
FRONT LAMPS
Headlamp -Inner-Std. 4651 2 50 Watts
-Inner-Halogen H4651 2 50 Watts
-Outer 4652 2 60/40 Watts
Park & Turn Signal 2057 2 32
Sidemarker 194 2 2
REAR LAMPS
Back-up 1156 2 32
license -Exc. Wagon 194 1 2
-Wagon 194 2 2
Sidemarker 194 2 2
Tail & Stop -Exc. Wagon 2057 2 2/32
Tail, Stop & Turn Signal -Wagon 2057 2 2/32
Turn Signal -Exc. Wagon 1156 . 2 32
INTERIOR ILLUMINATION
Ale -Heater Control
I
168 1
3
Ash Tray 168 1 3 ~-..... -Auto Trans 168 1
3
Courtesy lamp 906
I
2 6
Dome Lamp Std. 561 1 12
Dome & Reading -Dome 562
I
1 6
-Reading 90 1 6
Glove Box 194 1 2
instrument Cluster 194/168 2/4 2/3
Luggage/Cargo -Exc. Wagon 1003
I
1 15
-Wagon 561 1 12
Radio Dial 194 1 2
U nderhood lamp 93 1 15
WARNING LIGHTS & INDICATORS
Brake 194 1 2
Check Engine 168 1 3
High Beam 194 1 2
Oil Pressure 194
I
1 2
Seat Belt 168 1 3
Tailgate Ajar 194 l' 2
Temperature 194 1 2
Turn Signal 194 2 2
Upshift
I
168 1 3
Volts (Batter) 194 1 2 y
6·3
Page 96 of 105
Downloaded from www.Manualslib.com manuals search engine FUSES AND CIRCUIT BREAKERS
8, 125 AMP)
r
CCl __ CD_:
OJ_COCD
CDC!J CDc::D
CD CIIl C!D r::m
em em em C!!l
,-II I~
1, SPARE
2, 13 AMPI
COMPUTER
COMMAND CONTROL CRANKING
3, CIRCUIT BREAKER (35 AMP)
POWER ACCESSORIES
4,110AMP)
RADIO, CRUISE CONTROL
5, 15 AMPI
INSTRUMENT PANEL LAMPS
HEADLAMP MINDER
6, CIRCUIT BREAKER (35 AMP)
POWER WINDOWS
7, 120 AMP)
COURTESY LIGHTS, HORN
AUDIBLE WARNING SYSTEM
CIGAR
LIGHTER, DOOR LOCKS
CLOCK,
TRUNK RELEASE
6-5
WINDSHIELD WIPER/WASHER
9, 120 AMP)
GAGES/WARNING INDICATOR
AUDIBLE WARNING SYSTEM
COMPUTER COMMAND
CONTROL
REAR WINDOW DEFOGGER
REAR WINDOW WIPER/WASHER
10,125
AMP)
HEATER/AIR
CONDITIONER
11,120 AMP)
PARK & SIDE MARKER LAMPS
LICENSE
LAMP
12,SPARE
13,120 AMP)
TURN SIGNAL LAMPS
BACK-UP LAMPS
14,120 AMP)
CHOKE HEATER
COOLANT FAN
15,(20 AMP)
STOP LAMPS
HAZARD LAMPS
16,110 AMP)
FUEL PUMP
17,110 AMP)
COMPUTER COMMAND
CONTROL