key battery CHEVROLET CITY EXPRESS 2017 Owners Manual
[x] Cancel search | Manufacturer: CHEVROLET, Model Year: 2017, Model line: CITY EXPRESS, Model: CHEVROLET CITY EXPRESS 2017Pages: 348, PDF Size: 4.84 MB
Page 26 of 348
Chevrolet Express Owner Manual (GMNA-Localizing-U.S./Canada/Mexico-
9967827) - 2017 - crc - 9/26/16
Keys, Doors, and Windows 25
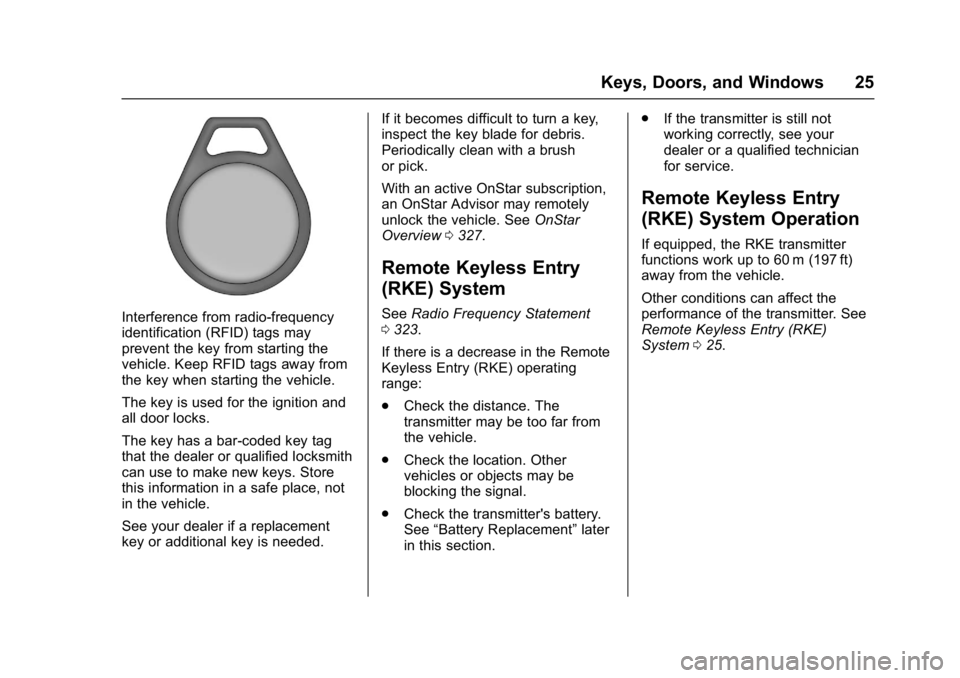
Interference from radio-frequency
identification (RFID) tags may
prevent the key from starting the
vehicle. Keep RFID tags away from
the key when starting the vehicle.
The key is used for the ignition and
all door locks.
The key has a bar-coded key tag
that the dealer or qualified locksmith
can use to make new keys. Store
this information in a safe place, not
in the vehicle.
See your dealer if a replacement
key or additional key is needed.If it becomes difficult to turn a key,
inspect the key blade for debris.
Periodically clean with a brush
or pick.
With an active OnStar subscription,
an OnStar Advisor may remotely
unlock the vehicle. See
OnStar
Overview 0327.
Remote Keyless Entry
(RKE) System
See Radio Frequency Statement
0 323.
If there is a decrease in the Remote
Keyless Entry (RKE) operating
range:
. Check the distance. The
transmitter may be too far from
the vehicle.
. Check the location. Other
vehicles or objects may be
blocking the signal.
. Check the transmitter's battery.
See “Battery Replacement” later
in this section. .
If the transmitter is still not
working correctly, see your
dealer or a qualified technician
for service.
Remote Keyless Entry
(RKE) System Operation
If equipped, the RKE transmitter
functions work up to 60 m (197 ft)
away from the vehicle.
Other conditions can affect the
performance of the transmitter. See
Remote Keyless Entry (RKE)
System 025.
Page 27 of 348
Chevrolet Express Owner Manual (GMNA-Localizing-U.S./Canada/Mexico-
9967827) - 2017 - crc - 9/26/16
26 Keys, Doors, and Windows
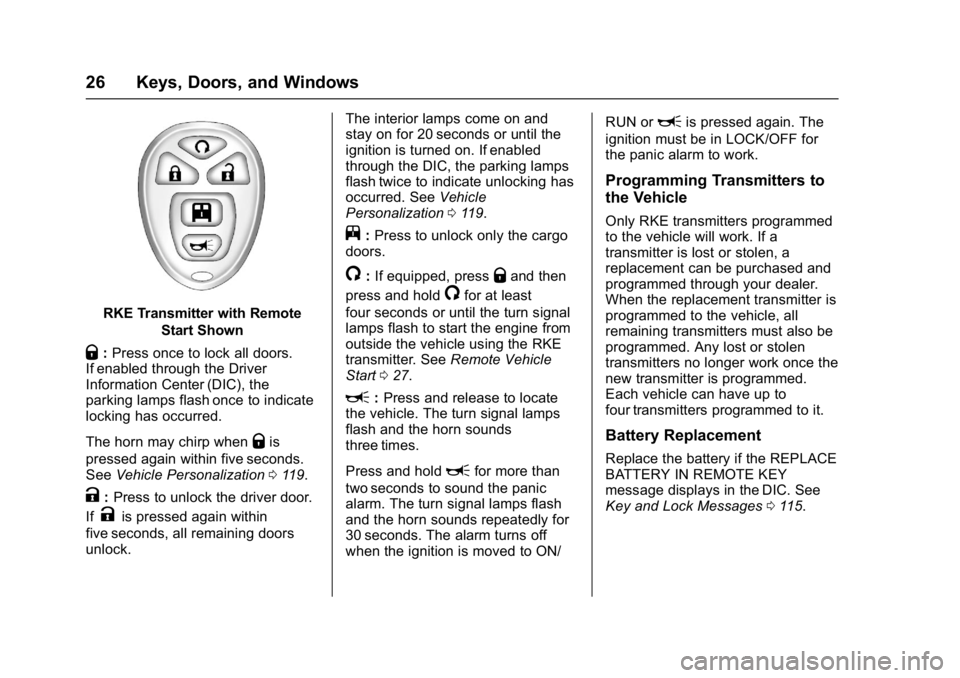
RKE Transmitter with RemoteStart Shown
Q:Press once to lock all doors.
If enabled through the Driver
Information Center (DIC), the
parking lamps flash once to indicate
locking has occurred.
The horn may chirp when
Qis
pressed again within five seconds.
See Vehicle Personalization 0119.
K:Press to unlock the driver door.
If
Kis pressed again within
five seconds, all remaining doors
unlock. The interior lamps come on and
stay on for 20 seconds or until the
ignition is turned on. If enabled
through the DIC, the parking lamps
flash twice to indicate unlocking has
occurred. See
Vehicle
Personalization 0119.
j:Press to unlock only the cargo
doors.
/: If equipped, pressQand then
press and hold
/for at least
four seconds or until the turn signal
lamps flash to start the engine from
outside the vehicle using the RKE
transmitter. See Remote Vehicle
Start 027.
L:Press and release to locate
the vehicle. The turn signal lamps
flash and the horn sounds
three times.
Press and hold
Lfor more than
two seconds to sound the panic
alarm. The turn signal lamps flash
and the horn sounds repeatedly for
30 seconds. The alarm turns off
when the ignition is moved to ON/ RUN or
Lis pressed again. The
ignition must be in LOCK/OFF for
the panic alarm to work.
Programming Transmitters to
the Vehicle
Only RKE transmitters programmed
to the vehicle will work. If a
transmitter is lost or stolen, a
replacement can be purchased and
programmed through your dealer.
When the replacement transmitter is
programmed to the vehicle, all
remaining transmitters must also be
programmed. Any lost or stolen
transmitters no longer work once the
new transmitter is programmed.
Each vehicle can have up to
four transmitters programmed to it.
Battery Replacement
Replace the battery if the REPLACE
BATTERY IN REMOTE KEY
message displays in the DIC. See
Key and Lock Messages 0115.
Page 28 of 348
Chevrolet Express Owner Manual (GMNA-Localizing-U.S./Canada/Mexico-
9967827) - 2017 - crc - 9/26/16
Keys, Doors, and Windows 27
Caution
When replacing the battery, do
not touch any of the circuitry on
the transmitter. Static from your
body could damage the
transmitter.
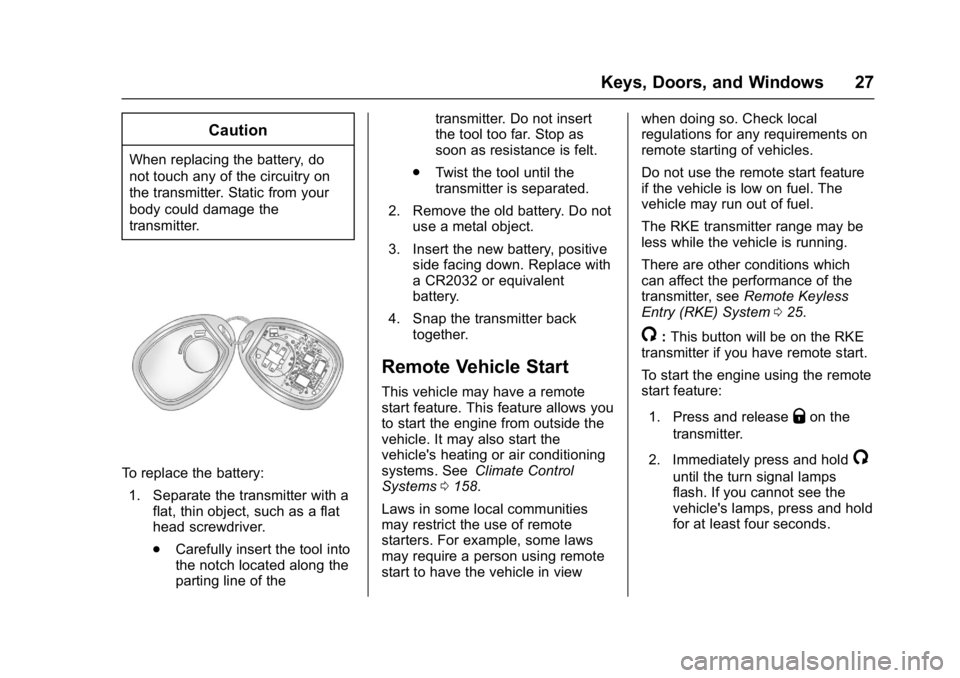
To replace the battery:1. Separate the transmitter with a flat, thin object, such as a flat
head screwdriver.
.Carefully insert the tool into
the notch located along the
parting line of the transmitter. Do not insert
the tool too far. Stop as
soon as resistance is felt.
. Twist the tool until the
transmitter is separated.
2. Remove the old battery. Do not use a metal object.
3. Insert the new battery, positive side facing down. Replace with
a CR2032 or equivalent
battery.
4. Snap the transmitter back together.
Remote Vehicle Start
This vehicle may have a remote
start feature. This feature allows you
to start the engine from outside the
vehicle. It may also start the
vehicle's heating or air conditioning
systems. See Climate Control
Systems 0158.
Laws in some local communities
may restrict the use of remote
starters. For example, some laws
may require a person using remote
start to have the vehicle in view when doing so. Check local
regulations for any requirements on
remote starting of vehicles.
Do not use the remote start feature
if the vehicle is low on fuel. The
vehicle may run out of fuel.
The RKE transmitter range may be
less while the vehicle is running.
There are other conditions which
can affect the performance of the
transmitter, see
Remote Keyless
Entry (RKE) System 025.
/:This button will be on the RKE
transmitter if you have remote start.
To start the engine using the remote
start feature:
1. Press and release
Qon the
transmitter.
2. Immediately press and hold
/
until the turn signal lamps
flash. If you cannot see the
vehicle's lamps, press and hold
for at least four seconds.
Page 88 of 348
Chevrolet Express Owner Manual (GMNA-Localizing-U.S./Canada/Mexico-
9967827) - 2017 - crc - 9/26/16
Instruments and Controls 87
Instruments and
Controls
Controls
Steering Wheel Adjustment . . . . 88
Steering Wheel Controls . . . . . . . 88
Horn . . . . . . . . . . . . . . . . . . . . . . . . . . . 89
Windshield Wiper/Washer . . . . . . 89
Compass . . . . . . . . . . . . . . . . . . . . . . 90
Clock . . . . . . . . . . . . . . . . . . . . . . . . . . 92
Power Outlets . . . . . . . . . . . . . . . . . 92
Cigarette Lighter . . . . . . . . . . . . . . . 94
Ashtrays . . . . . . . . . . . . . . . . . . . . . . . 94
Warning Lights, Gauges, and
Indicators
Warning Lights, Gauges, andIndicators . . . . . . . . . . . . . . . . . . . . 94
Instrument Cluster . . . . . . . . . . . . . 95
Speedometer . . . . . . . . . . . . . . . . . . 96
Odometer . . . . . . . . . . . . . . . . . . . . . . 96
Trip Odometer . . . . . . . . . . . . . . . . . 96
Fuel Gauge . . . . . . . . . . . . . . . . . . . . 96
Engine Oil Pressure Gauge . . . . 97
Engine Coolant Temperature Gauge . . . . . . . . . . . . . . . . . . . . . . . . 98
Voltmeter Gauge . . . . . . . . . . . . . . . 99
Safety Belt Reminders . . . . . . . . . 99
Airbag Readiness Light . . . . . . . . 99 Airbag On-Off Light . . . . . . . . . . . 100
Charging System Light . . . . . . . 101
Malfunction Indicator Lamp
(Check Engine Light) . . . . . . . . 102
Brake System Warning
Light . . . . . . . . . . . . . . . . . . . . . . . . 104
Antilock Brake System (ABS) Warning Light . . . . . . . . . . . . . . . 104
Tow/Haul Mode Light . . . . . . . . . 105
StabiliTrak OFF Light . . . . . . . . . 105
Traction Control System (TCS)/ StabiliTrak Light . . . . . . . . . . . . . 105
Tire Pressure Light . . . . . . . . . . . 106
Engine Oil Pressure Light . . . . 106
Low Fuel Warning Light . . . . . . 107
Security Light . . . . . . . . . . . . . . . . . 107
High-Beam On Light . . . . . . . . . . 107
Cruise Control Light . . . . . . . . . . 107Information Displays
Driver Information Center (DIC) . . . . . . . . . . . . . . . . 108
Vehicle Messages
Vehicle Messages . . . . . . . . . . . . 112
Battery Voltage and ChargingMessages . . . . . . . . . . . . . . . . . . . 112
Brake System Messages . . . . . 112
Compass Messages . . . . . . . . . . 113
Door Ajar Messages . . . . . . . . . . 113 Engine Cooling System
Messages . . . . . . . . . . . . . . . . . . . 113
Engine Oil Messages . . . . . . . . . 114
Engine Power Messages . . . . . 114
Fuel System Messages . . . . . . . 115
Key and Lock Messages . . . . . . 115
Lamp Messages . . . . . . . . . . . . . . 115
Object Detection System Messages . . . . . . . . . . . . . . . . . . . 115
Ride Control System Messages . . . . . . . . . . . . . . . . . . . 116
Airbag System Messages . . . . . 117
Security Messages . . . . . . . . . . . 117
Service Vehicle Messages . . . . 117
Tire Messages . . . . . . . . . . . . . . . . 118
Transmission Messages . . . . . . 118
Vehicle Reminder Messages . . . . . . . . . . . . . . . . . . . 119
Vehicle Personalization
Vehicle Personalization . . . . . . . 119
Page 116 of 348
Chevrolet Express Owner Manual (GMNA-Localizing-U.S./Canada/Mexico-
9967827) - 2017 - crc - 9/26/16
Instruments and Controls 115
stays on, the vehicle should be
taken to your dealer for service as
soon as possible.
Fuel System Messages
FUEL LEVEL LOW
This message displays and a chime
sounds if the fuel level is low. Refuel
as soon as possible.
SeeFuel Gauge 096 and Fuel
0 198 for more information.
TIGHTEN GAS CAP
This message may display along
with the check engine light on the
instrument cluster if the fuel cap is
not tightened properly. See
Malfunction Indicator Lamp (Check
Engine Light) 0102. Reinstall the
fuel cap fully. See Filling the Tank
0 200. The diagnostic system can
determine if the fuel cap has been
left off or improperly installed.
A loose or missing fuel cap allows
fuel to evaporate into the
atmosphere. A few driving trips with
the cap properly installed should
turn this light and message off.
Key and Lock Messages
REPLACE BATTERY IN
REMOTE KEY
This message displays if a Remote
Keyless Entry (RKE) transmitter
battery is low. The battery needs to
be replaced in the transmitter. See
“Battery Replacement” under
Remote Keyless Entry (RKE)
System Operation 025.
Lamp Messages
AUTOMATIC LIGHT
CONTROL OFF
This message displays when the
automatic headlamps are turned off.
See Exterior Lamp Controls 0125.
AUTOMATIC LIGHT
CONTROL ON
This message displays when the
automatic headlamps are turned on.
See Exterior Lamp Controls 0125.
TURN SIGNAL ON
This message displays and a chime
sounds if a turn signal is left on for
1.2 km (0.75 mi). Move the turn
signal lever to the off position.
Object Detection System
Messages
PARK ASST BLOCKED SEE
OWNERS MANUAL
This message displays if there is
something interfering with the Rear
Parking Assist (RPA) system. See
Parking Assist 0197.
PARK ASSIST OFF
After the vehicle has been started,
this message displays to remind the
driver that the Rear Parking Assist
(RPA) system has been turned off.
Press the set/reset button or the trip
odometer reset stem to
acknowledge this message and
clear it from the DIC display. To turn
the RPA system back on, see
Parking Assist 0197.
Page 131 of 348
Chevrolet Express Owner Manual (GMNA-Localizing-U.S./Canada/Mexico-
9967827) - 2017 - crc - 9/26/16
130 Lighting
Reading Lamps
If equipped with reading lamps,
press the button next to each lamp
to turn it on or off.
The vehicle may also have reading
lamps in other locations. The lamps
cannot be adjusted.
Lighting Features
Entry/Exit Lighting
The vehicle has an illuminated
entry/exit feature.
The dome lamps come on if the
E
DOME OFF button is in the
extended position, when a door is
opened, or the key is removed from
the ignition.
Battery Load
Management
The vehicle may have Electric
Power Management (EPM) that
estimates the battery's temperature
and state of charge. It then adjusts
the voltage for best performance
and extended life of the battery.
When the battery's state of charge
is low, the voltage is raised slightly
to quickly bring the charge back up.
When the state of charge is high,
the voltage is lowered slightly to
prevent overcharging. If the vehicle
has a voltmeter gauge or a voltage
display on the Driver InformationCenter (DIC), you may see the
voltage move up or down. This is
normal. If there is a problem, an
alert will be displayed.
The battery can be discharged at
idle if the electrical loads are very
high. This is true for all vehicles.
This is because the generator
(alternator) may not be spinning fast
enough at idle to produce all the
power that is needed for very high
electrical loads.
A high electrical load occurs when
several of the following are on, such
as: headlamps, high beams, fog
lamps, rear window defogger,
climate control fan at high speed,
heated seats, engine cooling fans,
trailer loads, and loads plugged into
accessory power outlets.
EPM works to prevent excessive
discharge of the battery. It does this
by balancing the generator's output
and the vehicle's electrical needs.
It can increase engine idle speed to
generate more power, whenever
needed. It can temporarily reduce
the power demands of some
accessories.
Page 147 of 348
Chevrolet Express Owner Manual (GMNA-Localizing-U.S./Canada/Mexico-
9967827) - 2017 - crc - 9/26/16
146 Infotainment System
To exit music navigator mode, press
the softkey below the Back tab to
return to normal MP3 playback.
CD Player Messages
CHECK DISC :If this message
displays and/or the CD ejects, it
could be for one of the following
reasons:
. It is very hot. When the
temperature returns to normal,
the CD should play.
. The road is very rough. When
the road becomes smoother, the
CD should play.
. The CD is dirty, scratched, wet,
or upside down.
. The air is very humid. If so, wait
about an hour and try again.
. There was a problem while
burning the CD.
. The label is caught in the CD
player.
If the CD is not playing correctly, for
any other reason, try a known
good CD. If any error occurs repeatedly or if
an error cannot be corrected,
contact your dealer. If the radio
displays an error message, write it
down and provide it to your dealer
when reporting the problem.
Auxiliary Devices
Using the Auxiliary Input Jack
Radios with an auxiliary input jack
on the lower right side of the
faceplate can connect to an external
audio device such as an iPod
®,
MP3 player, or CD player, for use as
another source for audio listening.
This input jack is not an audio
output; do not plug headphones into
the front auxiliary input jack.
Drivers are encouraged to set up
any auxiliary device while the
vehicle is in P (Park). See
Defensive Driving 0165 for more
information on driver distraction.
To use a portable audio player,
connect a 3.5 mm (1/8 in) cable to
the radio's front auxiliary input jack.
When a device is connected, press the radio CD/AUX button to begin
playing audio from the device over
the vehicle speakers.
For optimal sound quality, increase
the portable audio device's volume
to the loudest level.
It is always best to power the
portable audio device through its
own battery while playing.
O:
Turn clockwise or
counterclockwise to increase or
decrease the volume of the portable
player. Additional volume
adjustments might have to be made
from the portable device if the
volume is not loud or soft enough.
BAND : If equipped, press to listen
to the radio when a portable audio
device is playing. The portable
audio device continues playing.
CD/AUX : If equipped, press to play
a CD when a portable audio device
is playing. Press again and the
system begins playing audio from
the connected portable audio player.
If a portable audio player is not
connected, “No Input Device Found”
displays.
Page 149 of 348
Chevrolet Express Owner Manual (GMNA-Localizing-U.S./Canada/Mexico-
9967827) - 2017 - crc - 9/26/16
148 Infotainment System
.FAT32.
Connecting a USB Storage
Device or iPod
The USB port can be used to
control an iPod or a USB storage
device.
To connect a USB storage device,
connect the device to the USB port
on the instrument panel.
To connect an iPod, connect one
end of the USB cable that came
with the iPod to the iPod’s dock
connector and connect the other
end to the USB port on the
instrument panel. If the vehicle is on
and the USB connection works, “OK
to disconnect” and a GM logo may
appear on the iPod, and iPod
appears on the radio display. The
iPod music appears on the radio
display and begins playing.
The iPod charges while it is
connected to the vehicle if the
vehicle is in the ACC/ACCESSORY
or ON/RUN position. When the
vehicle is turned off, the iPod automatically powers off and will not
charge or draw power from the
vehicle's battery.
If you have an older iPod model that
is not supported, it can still be used
by connecting it to the auxiliary
input jack using a standard 3.5 mm
(1/8 in) stereo cable. See
“Using the
Auxiliary Input Jack” previously in
this section.
Using the Radio to Control a
USB Storage Device or iPod
The radio can control a USB
storage device or an iPod using the
radio buttons and knobs, and
display song information on the
radio display.
f: Turn to select files.
©SEEK : Press to go to the start of
the track, if more than 10 seconds
have played. Press and hold or
press multiple times to continue
moving backward through tracks.
¨SEEK : Press to go to the next
track. Press and hold or press
multiple times to continue moving
forward through tracks.
sREV : Press and hold to reverse
playback quickly. Sound is heard at
a reduced volume. Release
sREV
to resume playing. The elapsed time
of the file displays.
\FWD : Press and hold to
advance playback quickly. Sound is
heard at a reduced volume. Release
\FWD to resume playing. The
elapsed time of the file displays.
4: Press to display additional
information about the selected track.
Using Softkeys to Control a
USB Storage Device or iPod
The five softkeys below the radio
display are used to control the
functions listed below.
To use the softkeys:
1. Press the first or fifth softkey below the radio display to
display the functions listed
below, or press the softkey
below the function if it is
currently displayed.
2. Press the softkey below the tab with the function on it to use
that function.
Page 177 of 348
Chevrolet Express Owner Manual (GMNA-Localizing-U.S./Canada/Mexico-
9967827) - 2017 - crc - 9/26/16
176 Driving and Operating
This position locks the ignition and
transmission.
Do not turn the engine off when the
vehicle is moving. This will cause a
loss of power assist in the brake
and steering systems and disable
the airbags.
If the vehicle must be shut off in an
emergency:1. Brake using a firm and steady pressure. Do not pump the
brakes repeatedly. This may
deplete power assist, requiring
increased brake pedal force.
2. Shift the vehicle to N (Neutral). This can be done while the
vehicle is moving. After shifting
to N (Neutral), firmly apply the
brakes and steer the vehicle to
a safe location.
3. Come to a complete stop, shift to P (Park), and turn the
ignition to LOCK/OFF. On
vehicles with an automatic
transmission, the shift lever
must be in P (Park) to turn the
ignition switch to the LOCK/
OFF position. 4. Set the parking brake. See
Parking Brake 0189.
{Warning
Turning off the vehicle while
moving may cause loss of power
assist in the brake and steering
systems and disable the airbags.
While driving, only shut the
vehicle off in an emergency.
If the vehicle cannot be pulled over,
and must be shut off while driving,
turn the ignition to ACC/
ACCESSORY.
Caution
Using a tool to force the key to
turn in the ignition could cause
damage to the switch or break the
key. Use the correct key, make
sure it is all the way in, and turn it
only with your hand. If the key
cannot be turned by hand, see
your dealer. 1 (ACC/ACCESSORY) :
This is the
position in which you can operate
things like the radio and the
windshield wipers when the engine
is off.
2 (ON/RUN) : This position can be
used to operate the electrical
accessories and to display some
instrument cluster warning and
indicator lights. This position can
also be used for service and
diagnostics, and to verify the proper
operation of the malfunction
indicator lamp as may be required
for emission inspection purposes.
The switch stays in this position
when the engine is running.
If you leave the key in the ACC/
ACCESSORY or ON/RUN position
with the engine off, the battery could
be drained. You may not be able to
start the vehicle if the battery is
allowed to drain for an extended
period of time.
3 (START) : This is the position that
starts the engine. When the engine
starts, release the key. The ignition
switch returns to ON/RUN for
driving.
Page 178 of 348
Chevrolet Express Owner Manual (GMNA-Localizing-U.S./Canada/Mexico-
9967827) - 2017 - crc - 9/26/16
Driving and Operating 177
A warning tone will sound when the
driver door is opened, the ignition is
in ACC/ACCESSORY or LOCK/OFF
and the key is in the ignition.
Starting the Engine
If the vehicle has a diesel engine,
see the Duramax diesel
supplement.
To place the transmission in the
proper gear:
Move the shift lever to P (Park) or
N (Neutral). The engine will not start
in any other position. To restart the
engine when the vehicle is already
moving, use N (Neutral) only.
Caution
If you add electrical parts or
accessories, you could change
the way the engine operates. Any
resulting damage would not be
covered by the vehicle warranty.
SeeAdd-On Electrical Equipment
0 212.
Caution
Do not try to shift to P (Park) if the
vehicle is moving. If you do, you
could damage the transmission.
Shift to P (Park) only when the
vehicle is stopped.
Caution
If the steering wheel is turned
until it reaches the end of its
travel, and is held in that position
while starting the vehicle, damage
may occur to the hydraulic power
steering system and there may be
loss of power steering assist.
Starting Procedure 1. With your foot off the accelerator pedal, turn the
ignition key to START. When
the engine starts, let go of the
key. The idle speed will go
down as your engine gets
warm. Do not race the engine
immediately after starting it. Operate the engine and
transmission gently to allow the
oil to warm up and lubricate all
moving parts.
When the Low Fuel warning
lamp is on and the FUEL
LEVEL LOW message is
displayed in the Driver
Information Center (DIC), the
Computer-Controlled Cranking
System is disabled to prevent
possible vehicle component
damage. When this happens,
hold the ignition switch in the
START position to continue
engine cranking.
Caution
Cranking the engine for long
periods of time, by returning the
ignition to the START position
immediately after cranking has
ended, can overheat and damage
the cranking motor, and drain the
battery. Wait at least 15 seconds
between each try, to let the
cranking motor cool down.