CHEVROLET CITY EXPRESS 2018 Infotainment System Guide
Manufacturer: CHEVROLET, Model Year: 2018, Model line: CITY EXPRESS, Model: CHEVROLET CITY EXPRESS 2018Pages: 74, PDF Size: 0.86 MB
Page 51 of 74

Chevrolet City Express Infotainment System (GMNA-Localizing-U.S./Canada-
11683801) - 2018 - crc - 7/12/17
50 Navigation
.If waypoints are set, the system
calculates multiple routes
between waypoints
simultaneously, and the following
may result:
‐If one section between
waypoints cannot be
calculated, none of the route
will be displayed.
‐ The route may not connect
completely at some waypoints.
‐ The route may require a
U-turn close to some
waypoints.
. Route calculation may not be
completed in the following
cases:
‐There is no main road within a
range of 2.5 km (1.5 mi) from
the vehicle. A message will
appear on the display. Try
recalculating when the vehicle
is closer to a main road. ‐
The vehicle is too close to the
destination or there are no
roads to the destination.
A message will appear on the
display.
‐ It is impossible to reach the
destination or waypoints
because of traffic regulations.
‐ The only target route to the
destination or waypoints is
extremely complicated.
. The following may occur when
the route is displayed:
‐If a route is calculated on a
main road, the starting point of
the route may not exactly
match the current vehicle
location.
‐ The endpoint of the route may
not exactly match the
destination.
‐ If a route is calculated on a
main road, the system may
display a route from another
main road. This may be
because the position of the
vehicle icon is not accurate. In this case, park the vehicle in a
safe location and reset the
vehicle icon, or continue
driving to see if the position of
the vehicle icon is
automatically adjusted before
recalculating the route.
‐ In some cases, the system
shows an indirect route to the
destination or waypoints if you
set them from stored places
information. In order to correct,
be careful about the traffic
direction, especially when
lanes with different travel
directions are shown
separately, such as
interchanges and service
areas.
‐ Even if the freeway preference
is set to OFF, a route that uses
the freeway may be
suggested.
‐ Even if the preference is set to
OFF, a route that uses a ferry
line may be suggested.
Page 52 of 74

Chevrolet City Express Infotainment System (GMNA-Localizing-U.S./Canada-
11683801) - 2018 - crc - 7/12/17
Navigation 51
‐Ferry lines, excluding those
that are only for pedestrians,
bicycles, and motorcycles, are
stored in this system. Take
into consideration the travel
time required and operational
condition before deciding
whether to use the route.
If the System Needs
Service
If the navigation system needs
service and the steps listed here
have been followed but there are
still problems, see your dealer for
assistance.
Map Data Updates
The map data in the vehicle is the
most up-to-date information
available when the vehicle was
produced. The map data is updated
periodically, provided that the map
information has changed.
The SD card slot is on the front of
the unit. When this system is
purchased, an SD card with map
data is provided. The SD card slot can only read the
SD card with map data provided
specifically for use with the vehicle’s
navigation system. The system will
not read other SD cards.
For additional SD cards with map
data, contact your dealer.
Handling the SD Card
When handling the SD card, adhere
to the following instructions:
.
Handle the SD card with care.
Never touch the metal contacts.
. Do not use any conventional
cleaner, benzine, thinner,
or antistatic spray.
. Use a soft cloth to clean the
SD card.
. Never attempt to use an SD card
that has been cracked,
deformed, or repaired using
adhesive. Doing so may damage
the equipment.
. Do not try to bend the SD card.
Do not use any SD card that is
bent or cracked. .
Do not put on any sticker or
write anything on the SD card.
. Handle the SD card carefully to
avoid contamination or flaws.
Otherwise, the data may not be
read properly.
. Do not store the SD card in
locations exposed to direct
sunlight, or in high temperatures
or humidity.
. Always place the SD card in its
storage case when not in use.
Database Coverage
Explanations
Coverage areas vary with respect to
the level of map detail available for
any given area. Some areas feature
greater levels of detail than others.
If this happens, it does not mean
there is a problem with the system.
As the map data is updated, more
detail can become available for
areas that previously had limited
detail. See Map Data Updates 051.
Page 53 of 74
Chevrolet City Express Infotainment System (GMNA-Localizing-U.S./Canada-
11683801) - 2018 - crc - 7/12/17
52 Voice Recognition
Voice Recognition
Voice recognition allows for
hands-free operation of the
infotainment system features.
Using Voice Recognition
1. Keep the interior of the vehicleas quiet as possible. Close the
windows to eliminate the
surrounding noises such as
traffic and vibration sounds,
which may prevent the system
from recognizing the voice
commands correctly.
2. Press
g/Von the steering
wheel. The audio system
mutes. Wait until a tone sounds
before speaking a command.
Otherwise, the command will
not be received properly.
3. Start speaking a command within 3.5 seconds after
the tone.
4. Speak in a natural voice without pausing between
words.
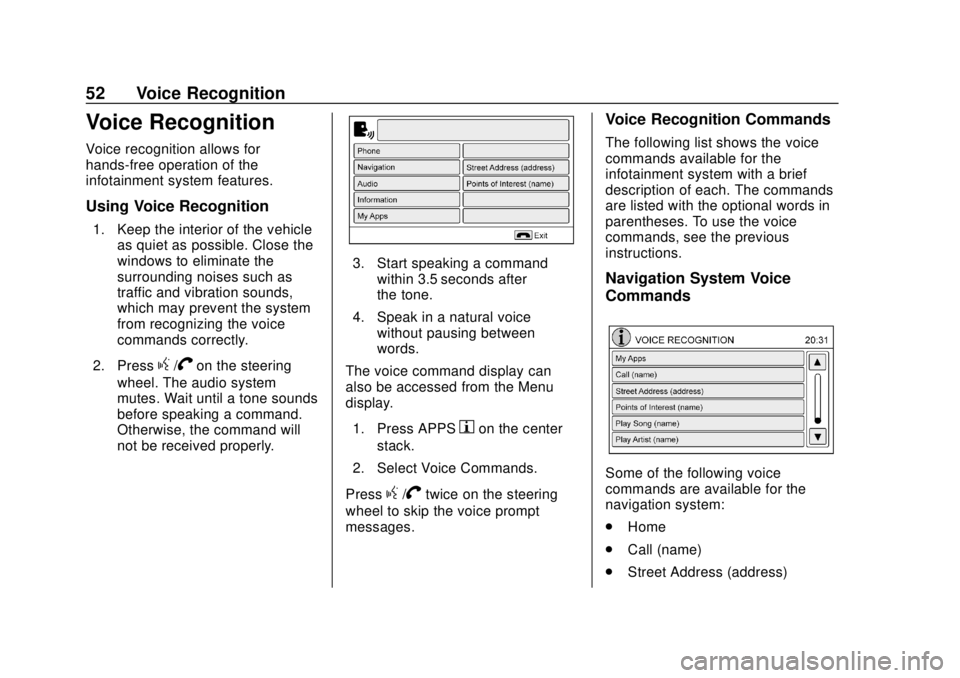
The voice command display can
also be accessed from the Menu
display.
1. Press APPS
hon the center
stack.
2. Select Voice Commands.
Press
g/Vtwice on the steering
wheel to skip the voice prompt
messages.
Voice Recognition Commands
The following list shows the voice
commands available for the
infotainment system with a brief
description of each. The commands
are listed with the optional words in
parentheses. To use the voice
commands, see the previous
instructions.
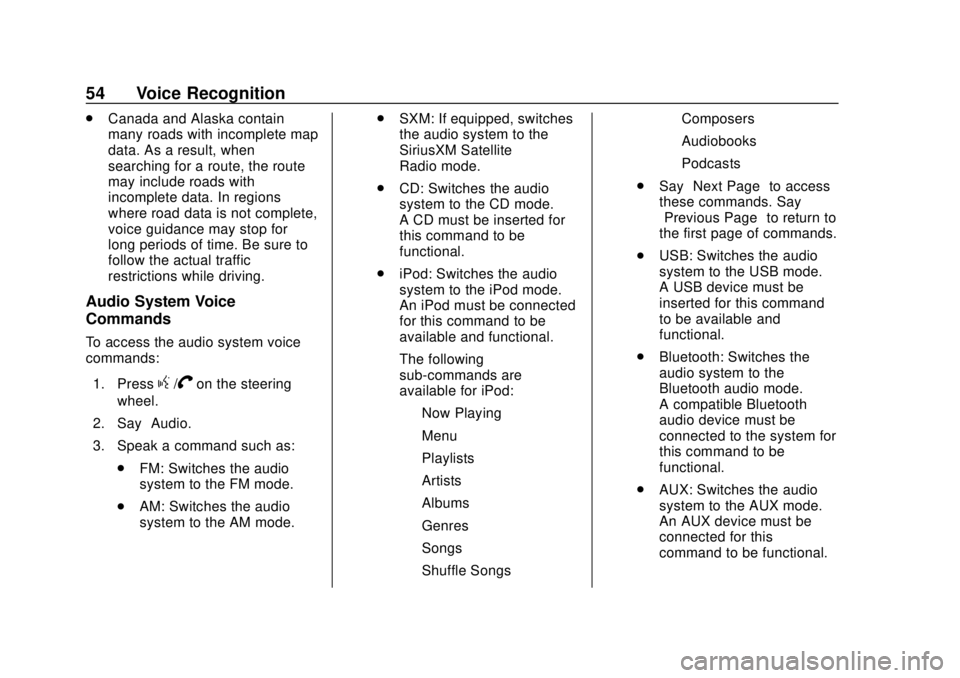
Navigation System Voice
Commands
Some of the following voice
commands are available for the
navigation system:
. Home
. Call (name)
. Street Address (address)
Page 54 of 74

Chevrolet City Express Infotainment System (GMNA-Localizing-U.S./Canada-
11683801) - 2018 - crc - 7/12/17
Voice Recognition 53
.Points of Interest (name)
. Previous Destination
Note on Voice Guidance
.Voice guidance in this system
should be regarded as a
supplementary function. When
driving the vehicle, check the
route on the map and follow the
actual roads and traffic
regulations.
. Voice guidance is activated only
for intersections with certain
conditions.
. There may be cases where the
vehicle has to turn, but voice
guidance is not provided.
. Voice guidance contents may
vary, depending on the direction
of the turn and the type of
intersection.
. The voice guidance timing will
vary depending on the situation.
. When the vehicle has deviated
from the suggested route, voice
guidance is not available. The system will not announce this to
you. Refer to the map and
recalculate the route.
. Voice guidance may not
accurately correspond with road
numbers and directions at
freeway junctions.
. Voice guidance may not
accurately correspond to street
names at freeway exits.
. The displayed street names may
sometimes differ from the actual
names, or “UNKNOWN STREET
NAME” may be displayed.
. Voice guidance is not available
when the feature is disabled in
the SETUP menu.
. Voice guidance will start when
the vehicle enters the suggested
route. Refer to the map for
directions to the starting point of
the route.
. When approaching a waypoint,
voice guidance will announce,
“You have reached your
intermediate destination on the
(left/right) side.” Voice guidance will switch to the next section of
the route. When voice guidance
is not available, refer to the map
for directions.
. In some cases, voice guidance
ends before arrival at the
destination. Refer to the
destination icon on the map to
reach the destination.
. If the system recognizes on
which side the destination
(waypoint) is located, voice
guidance will announce “on the
right/left” after announcing the
arrival at the destination.
. Voice guidance may be partially
operational or inoperative due to
the angle of roads at an
intersection.
. Because it is not possible to
consider data concerning roads
that are seasonally available or
unavailable, a route may be
displayed that does not match
the actual traffic restrictions. Be
sure to follow the actual traffic
restrictions while driving.
Page 55 of 74
Chevrolet City Express Infotainment System (GMNA-Localizing-U.S./Canada-
11683801) - 2018 - crc - 7/12/17
54 Voice Recognition
.Canada and Alaska contain
many roads with incomplete map
data. As a result, when
searching for a route, the route
may include roads with
incomplete data. In regions
where road data is not complete,
voice guidance may stop for
long periods of time. Be sure to
follow the actual traffic
restrictions while driving.
Audio System Voice
Commands
To access the audio system voice
commands:
1. Press
g/Von the steering
wheel.
2. Say “Audio.”
3. Speak a command such as: .FM: Switches the audio
system to the FM mode.
. AM: Switches the audio
system to the AM mode. .
SXM: If equipped, switches
the audio system to the
SiriusXM Satellite
Radio mode.
. CD: Switches the audio
system to the CD mode.
A CD must be inserted for
this command to be
functional.
. iPod: Switches the audio
system to the iPod mode.
An iPod must be connected
for this command to be
available and functional.
The following
sub-commands are
available for iPod:
‐Now Playing
‐ Menu
‐ Playlists
‐ Artists
‐ Albums
‐ Genres
‐ Songs
‐ Shuffle Songs ‐
Composers
‐ Audiobooks
‐ Podcasts
. Say “Next Page” to access
these commands. Say
“Previous Page” to return to
the first page of commands.
. USB: Switches the audio
system to the USB mode.
A USB device must be
inserted for this command
to be available and
functional.
. Bluetooth: Switches the
audio system to the
Bluetooth audio mode.
A compatible Bluetooth
audio device must be
connected to the system for
this command to be
functional.
. AUX: Switches the audio
system to the AUX mode.
An AUX device must be
connected for this
command to be functional.
Page 56 of 74
Chevrolet City Express Infotainment System (GMNA-Localizing-U.S./Canada-
11683801) - 2018 - crc - 7/12/17
Voice Recognition 55
Information Voice Commands
If equipped, the following voice
commands are available for the
information functions of the
navigation system:
.Traffic
. Fuel Prices
. Movie Listings
. Current Weather
. Weather Map
Help Voice Commands
The following voice commands can
be spoken to have the system
provide instructions and tips for
using the voice recognition system.
.List Commands
. What Can I Say?
. General Help
. Quit
. Exit
Page 57 of 74
Chevrolet City Express Infotainment System (GMNA-Localizing-U.S./Canada-
11683801) - 2018 - crc - 7/12/17
56 Settings
Settings
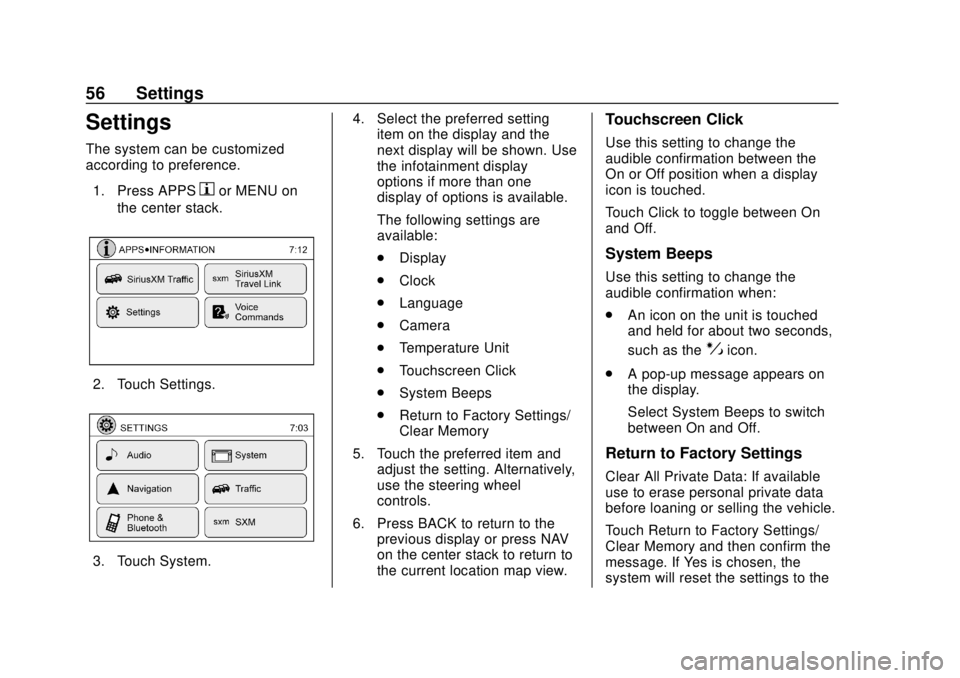
The system can be customized
according to preference.1. Press APPS
hor MENU on
the center stack.
2. Touch Settings.
3. Touch System. 4. Select the preferred setting
item on the display and the
next display will be shown. Use
the infotainment display
options if more than one
display of options is available.
The following settings are
available:
.Display
. Clock
. Language
. Camera
. Temperature Unit
. Touchscreen Click
. System Beeps
. Return to Factory Settings/
Clear Memory
5. Touch the preferred item and adjust the setting. Alternatively,
use the steering wheel
controls.
6. Press BACK to return to the previous display or press NAV
on the center stack to return to
the current location map view.
Touchscreen Click
Use this setting to change the
audible confirmation between the
On or Off position when a display
icon is touched.
Touch Click to toggle between On
and Off.
System Beeps
Use this setting to change the
audible confirmation when:
.An icon on the unit is touched
and held for about two seconds,
such as the
!icon.
. A pop-up message appears on
the display.
Select System Beeps to switch
between On and Off.
Return to Factory Settings
Clear All Private Data: If available
use to erase personal private data
before loaning or selling the vehicle.
Touch Return to Factory Settings/
Clear Memory and then confirm the
message. If Yes is chosen, the
system will reset the settings to the
Page 58 of 74
Chevrolet City Express Infotainment System (GMNA-Localizing-U.S./Canada-
11683801) - 2018 - crc - 7/12/17
Settings 57
default settings. If No is chosen, the
default settings will not be restored
and the display returns to the
system settings display.
Infotainment Display Operation
and Setting
Switching the Display On or Off
To turn on the display:
.Press the
!control.
. Press any other control to turn
the display on.
To turn off the display, press and
hold the
!control. When the
display is turned off, the clock will
still be displayed.
When an incoming call is ended, the
display returns to the clock display.
If active, voice guidance continues
even when the display is turned off.
Press and hold
!for more than
two seconds to switch the display to
a larger display of the digital clock. Changing Day-Night Brightness
Press
!for less than two seconds
to switch:
. Between day and auto (night)
when the headlamps are on.
. Between night and auto (day)
when the headlamps are off.
While the display is showing the
current brightness mode, turn the
TUNE PUSH/AUDIO knob to adjust
the brightness.
The day or night mode can also be
switched from the Display
Settings menu.
Brightness
This menu allows the brightness of
the display to be adjusted.
1. Press APPS
hor MENU on
the center stack.
2. Touch the Settings icon.
3. Touch the System icon.
4. Touch the Display icon.
5. Adjust the brightness using + and −. 6. To save the setting, press
BACK on the center stack to
return to the previous display.
Rear Vision Camera Settings
Use this setting to change the
display mode (automatic/day/night)
for the rear vision camera.
Brightness, contrast, and color can
also be adjusted.
1. Press APPS
hon the center
stack.
2. Touch Settings.
3. Touch System.
4. Scroll down and touch Camera Settings.
Switch display mode and use + or −
to adjust brightness, contrast, and
color for the rear vision camera
display.
Temperature Unit Settings
Use this setting to change the
temperature units (Fahrenheit/
Celsius).
1. Press APPS
hor MENU on
the center stack.
Page 59 of 74
Chevrolet City Express Infotainment System (GMNA-Localizing-U.S./Canada-
11683801) - 2018 - crc - 7/12/17
58 Settings
2. Touch Settings.
3. Touch System.
4. Scroll down and touch theTemperature Unit icon.
Clock Settings
This setting allows you to make
clock adjustments.
1. Press APPS
hor MENU on
the center stack.
2. Touch Settings.
3. Touch System.
4. Touch Clock.
5. Select the preferred setting item and make an adjustment.
.Time Format:
Touch to change the clock
format between 12 h and
24 h.
. Date Format:
Touch to choose one of five
available date formats. .
Clock Mode:
Select Manual to manually
set the clock with the Set
Clock Manually display
icon. Select Auto to have
the clock automatically
adjusted by the GPS
system. Select Time Zone
to have the time set to a
specific time zone.
. Set Clock Manually:
Set the clock manually. This
feature is only available if
Manual is selected for
Clock Mode.
. Daylight Savings Time:
Touch the Daylight Savings
Time display icon to switch
Daylight Savings Time on
or off. This feature is
unavailable if Clock Mode is
set to Auto.
. Time Zone:
Select and touch the time
zone of the current vehicle
location to bypass the GPS satellite. This feature is only
available if Time Zone is
selected for Clock Mode.
If Daylight Savings Time is
set to On and a time zone
is chosen for an area that
does not observe Daylight
Savings Time, the Daylight
Savings Time setting
remains On and must be
turned off manually.
6. After adjusting the desired settings, press BACK on the
center stack to return to the
previous display. Press MAP
on the center stack to return to
the previous display or the
current location map view.
Press FM, AM, CD, or AUX to
return to the audio display.
Set the Clock Manually
Adjust the hour, minute, day, month,
and year using + and −.
1. Press APPS
hor MENU on
the center stack.
2. Touch Settings.
3. Touch System.
Page 60 of 74
Chevrolet City Express Infotainment System (GMNA-Localizing-U.S./Canada-
11683801) - 2018 - crc - 7/12/17
Settings 59
4. Touch Clock.
5. Switch Clock Mode to Manual.
6. Switch MODE to AM or FM,then use + and −to adjust
hour, minute, day, month,
and year.
After adjusting the desired settings,
press BACK on the center stack to
return to the previous display.
Language Settings
This setting allows changing the
language used by the system.
1. Press APPS
hor MENU on
the center stack.
2. Touch Settings.
3. Touch System.
4. Touch Language.
5. Select the appropriate language. The available
languages are:
‐English
‐ French
‐ Spanish