CHEVROLET CITY EXPRESS 2018 Owner's Manual
Manufacturer: CHEVROLET, Model Year: 2018, Model line: CITY EXPRESS, Model: CHEVROLET CITY EXPRESS 2018Pages: 287, PDF Size: 4.19 MB
Page 161 of 287
Chevrolet City Express Owner Manual (GMNA-Localizing-U.S./Canada-
11683523) - 2018 - CRC - 7/10/17
160 Driving and Operating
dindicator flashes if this occurs. All
other functions are off and the
d
indicator will not flash.
The TCS and Electronic Stability
Control systems are automatically
reset to on when the ignition is
placed in the OFF position then
back to the ON position.
The systems have a built in
diagnostic feature that test the
systems each time the engine is
started and the vehicle moved
forward or in reverse at a slow
speed. When the test occurs a clunk
noise may be heard and/or a
pulsation in the brake pedal may be
felt. This is normal and is not an
indication of a malfunction.
Adding accessories can affect the
vehicle performance. See
Accessories and Modifications
0 178.
{Warning
.
The Traction Control
System (TCS) and
Electronic Stability Control
(ESC) system are designed
to help the driver maintain
stability but do not prevent
accidents due to abrupt
steering operation at high
speeds or by careless or
dangerous driving
techniques. Reduce vehicle
speed and be especially
careful when driving and
cornering on slippery
surfaces and always drive
carefully.
. Do not modify the vehicle’ s
suspension. If suspension
parts such as shock
absorbers, struts, springs,
stabilizer bars, bushings,
and wheels are not
recommended for your
vehicle or are extremely
deteriorated, the TCS and
(Continued)
Warning (Continued)
ESC systems may not
operate properly. This could
adversely affect vehicle
handling performance, and
the
dindicator may flash or
the
dindicator light may
illuminate.
. If brake related parts such
as brake pads, rotors, and
calipers are not
recommended or are
extremely deteriorated, the
TCS and ESC systems may
not operate properly and the
dindicator light may
illuminate.
. If engine control related
parts are not recommended
or are extremely
deteriorated, the
dindicator
light may illuminate.
. When driving on extremely
inclined surfaces such as
higher banked corners, the
(Continued)
Page 162 of 287
Chevrolet City Express Owner Manual (GMNA-Localizing-U.S./Canada-
11683523) - 2018 - CRC - 7/10/17
Driving and Operating 161
Warning (Continued)
TCS and ESC systems may
not operate properly and
the
dindicator may flash or
the
dindicator light may
illuminate. Do not drive on
these types of roads.
. When driving on an
unstable surface such as a
turntable, ferry, elevator,
or ramp, the
dindicator
may flash or the
dindicator
light may illuminate. This is
not a malfunction. Restart
the engine after driving onto
a stable surface.
(Continued)
Warning (Continued)
.If wheels or tires other than
the recommended ones are
used, the TCS and ESC
systems may not operate
properly and the
dindicator
may flash or the
dindicator
light may illuminate.
. The TCS and ESC systems
are not a substitute for
winter tires or tire chains on
a snow covered road.
Cruise Control
{Warning
Cruise control can be dangerous
where you cannot drive safely at
a steady speed. Do not use
cruise control on winding roads or
in heavy traffic.
Cruise control can be dangerous
on slippery roads. On such roads,
fast changes in tire traction can
cause excessive wheel slip, and
you could lose control. Do not use
cruise control on slippery roads.
If equipped with cruise control, a
speed of about 48 km/h (30 mph) or
more can be maintained without
keeping your foot on the
accelerator. Cruise control does not
work at speeds below about
48 km/h (30 mph).
If the brakes are applied, cruise
control disengages.
Page 163 of 287
Chevrolet City Express Owner Manual (GMNA-Localizing-U.S./Canada-
11683523) - 2018 - CRC - 7/10/17
162 Driving and Operating
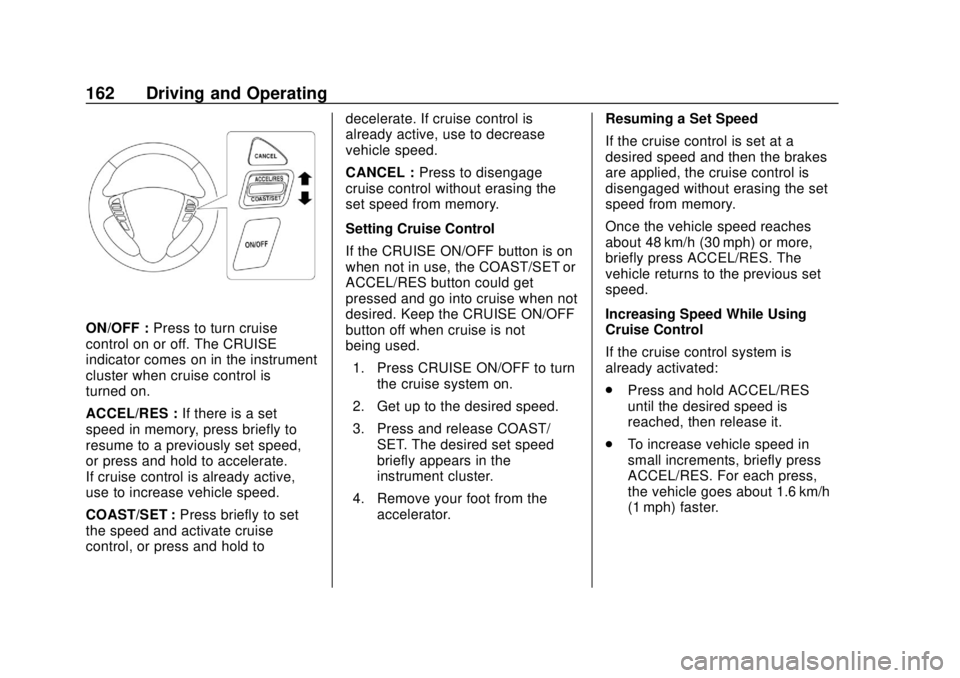
ON/OFF :Press to turn cruise
control on or off. The CRUISE
indicator comes on in the instrument
cluster when cruise control is
turned on.
ACCEL/RES : If there is a set
speed in memory, press briefly to
resume to a previously set speed,
or press and hold to accelerate.
If cruise control is already active,
use to increase vehicle speed.
COAST/SET : Press briefly to set
the speed and activate cruise
control, or press and hold to decelerate. If cruise control is
already active, use to decrease
vehicle speed.
CANCEL :
Press to disengage
cruise control without erasing the
set speed from memory.
Setting Cruise Control
If the CRUISE ON/OFF button is on
when not in use, the COAST/SET or
ACCEL/RES button could get
pressed and go into cruise when not
desired. Keep the CRUISE ON/OFF
button off when cruise is not
being used.
1. Press CRUISE ON/OFF to turn the cruise system on.
2. Get up to the desired speed.
3. Press and release COAST/ SET. The desired set speed
briefly appears in the
instrument cluster.
4. Remove your foot from the accelerator. Resuming a Set Speed
If the cruise control is set at a
desired speed and then the brakes
are applied, the cruise control is
disengaged without erasing the set
speed from memory.
Once the vehicle speed reaches
about 48 km/h (30 mph) or more,
briefly press ACCEL/RES. The
vehicle returns to the previous set
speed.
Increasing Speed While Using
Cruise Control
If the cruise control system is
already activated:
.
Press and hold ACCEL/RES
until the desired speed is
reached, then release it.
. To increase vehicle speed in
small increments, briefly press
ACCEL/RES. For each press,
the vehicle goes about 1.6 km/h
(1 mph) faster.
Page 164 of 287
Chevrolet City Express Owner Manual (GMNA-Localizing-U.S./Canada-
11683523) - 2018 - CRC - 7/10/17
Driving and Operating 163
Reducing Speed While Using
Cruise Control
If the cruise control system is
already activated:
.Press and hold COAST/SET
until the desired lower speed is
reached, then release it.
. To decrease the vehicle speed in
small increments, briefly press
COAST/SET. For each press,
the vehicle goes about 1.6 km/h
(1 mph) slower.
Passing Another Vehicle While
Using Cruise Control
Use the accelerator pedal to
increase the vehicle speed. When
you take your foot off the pedal, the
vehicle will slow down to the
previous set cruise speed. While
pressing the accelerator pedal or
shortly following the release to
override cruise control, briefly
pressing COAST/SET will result in
cruise set to the current vehicle
speed. Ending Cruise Control
There are four ways to end cruise
control:
.
Step lightly on the brake pedal.
. Press CANCEL.
. Shift the transmission to
N (Neutral).
. To turn off cruise control, press
CRUISE ON/OFF.
Erasing Speed Memory
The cruise control set speed is
erased from memory if CRUISE ON/
OFF is pressed or if the vehicle is
turned off.Driver Assistance
Systems
Rear Vision
Camera (RVC)
If equipped, when the shift lever is
shifted into R (Reverse), the display
shows the view to the rear of the
vehicle.
{Warning
. Failure to follow the
warnings and instructions
for proper use of the Rear
Vision Camera (RVC) could
result in serious injury or
death.
. The RVC is a convenience
but it is not a substitute for
proper backing. Always turn
and look out the windows,
and check mirrors to be
sure that it is safe to move
before operating the vehicle.
Always back up slowly.
(Continued)
Page 165 of 287
Chevrolet City Express Owner Manual (GMNA-Localizing-U.S./Canada-
11683523) - 2018 - CRC - 7/10/17
164 Driving and Operating
Warning (Continued)
.The system is designed as
an aid to the driver in
showing large stationary
objects directly behind the
vehicle, to help avoid
damaging the vehicle.
. The system cannot
completely eliminate blind
spots and may not show
every object.
. Underneath the bumper and
the corner areas of the
bumper cannot be viewed
on the RVC display because
of its monitoring range
limitation. The system will
not show small objects
below the bumper, and may
not show objects close to
the bumper or on the
ground.
(Continued)
Warning (Continued)
.Objects viewed on the RVC
display differ from actual
distance because a
wide-angle lens is used.
. Objects on the RVC display
will appear visually opposite
than when viewed in the
rearview and outside
mirrors.
. Make sure that the back
doors are securely closed
when backing up.
. Do no put anything on the
rearview camera. The
rearview camera is installed
on the back door.
. When washing the vehicle
with high pressure water, be
sure not to spray it around
the camera. Otherwise,
water may enter the camera
unit causing water
(Continued)
Warning (Continued)
condensation on the lens, a
malfunction, fire, or an
electric shock.
. Do not strike the camera.
It is a precision instrument.
Otherwise, it may
malfunction or cause
damage resulting in a fire or
an electric shock.
Caution
There is a plastic cover over the
camera. Do not scratch the cover
when cleaning dirt or snow from
the cover.
Page 166 of 287
Chevrolet City Express Owner Manual (GMNA-Localizing-U.S./Canada-
11683523) - 2018 - CRC - 7/10/17
Driving and Operating 165
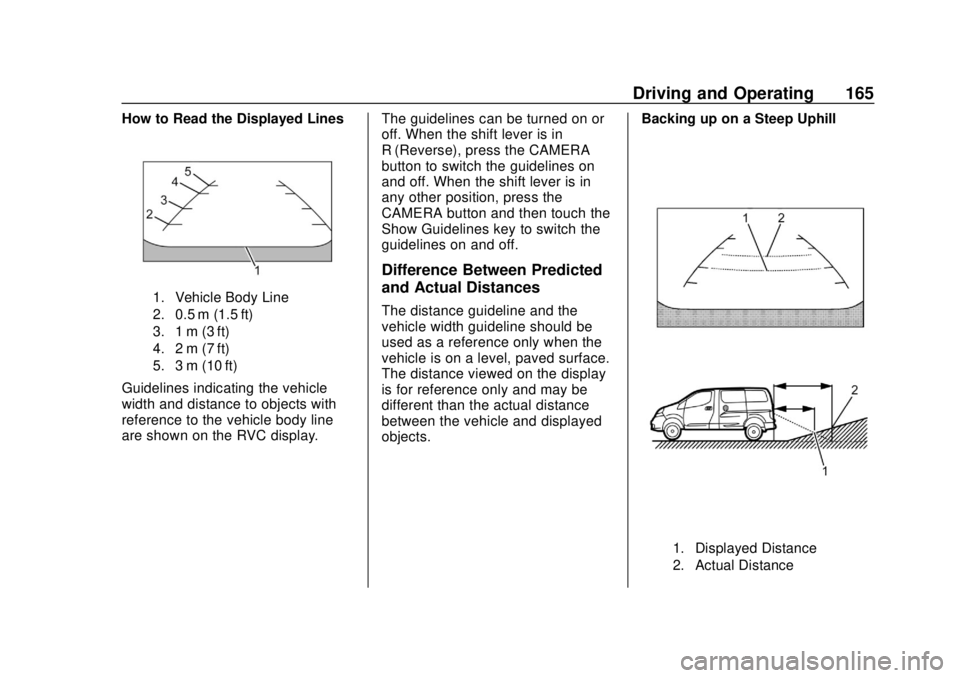
How to Read the Displayed Lines
1. Vehicle Body Line
2. 0.5 m (1.5 ft)
3. 1 m (3 ft)
4. 2 m (7 ft)
5. 3 m (10 ft)
Guidelines indicating the vehicle
width and distance to objects with
reference to the vehicle body line
are shown on the RVC display.The guidelines can be turned on or
off. When the shift lever is in
R (Reverse), press the CAMERA
button to switch the guidelines on
and off. When the shift lever is in
any other position, press the
CAMERA button and then touch the
Show Guidelines key to switch the
guidelines on and off.
Difference Between Predicted
and Actual Distances
The distance guideline and the
vehicle width guideline should be
used as a reference only when the
vehicle is on a level, paved surface.
The distance viewed on the display
is for reference only and may be
different than the actual distance
between the vehicle and displayed
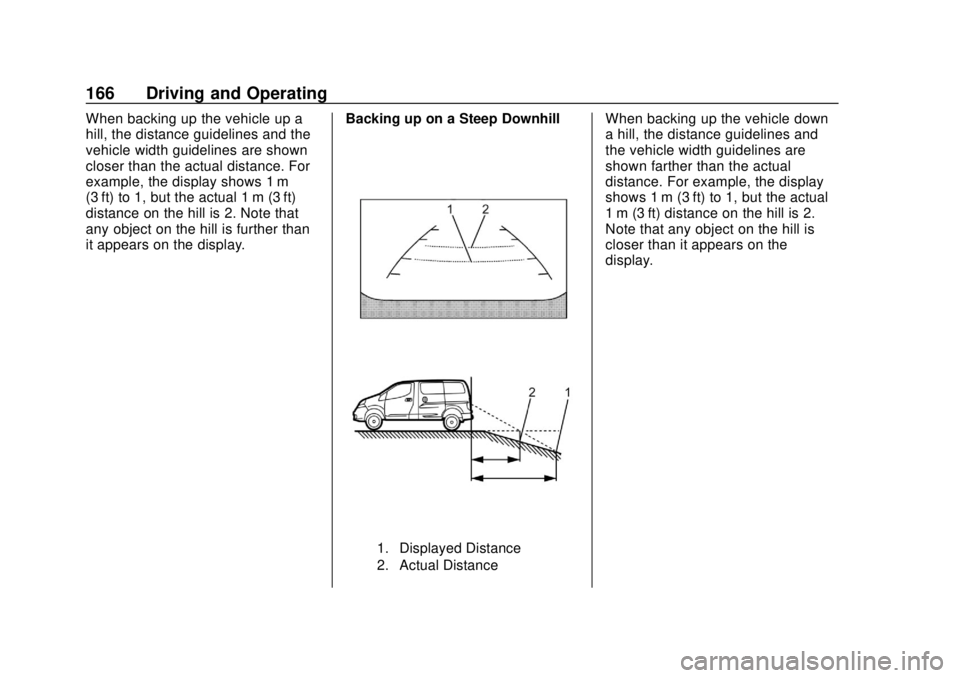
objects.Backing up on a Steep Uphill
1. Displayed Distance
2. Actual Distance
Page 167 of 287
Chevrolet City Express Owner Manual (GMNA-Localizing-U.S./Canada-
11683523) - 2018 - CRC - 7/10/17
166 Driving and Operating
When backing up the vehicle up a
hill, the distance guidelines and the
vehicle width guidelines are shown
closer than the actual distance. For
example, the display shows 1 m
(3 ft) to 1, but the actual 1 m (3 ft)
distance on the hill is 2. Note that
any object on the hill is further than
it appears on the display.Backing up on a Steep Downhill
1. Displayed Distance
2. Actual Distance
When backing up the vehicle down
a hill, the distance guidelines and
the vehicle width guidelines are
shown farther than the actual
distance. For example, the display
shows 1 m (3 ft) to 1, but the actual
1 m (3 ft) distance on the hill is 2.
Note that any object on the hill is
closer than it appears on the
display.
Page 168 of 287
Chevrolet City Express Owner Manual (GMNA-Localizing-U.S./Canada-
11683523) - 2018 - CRC - 7/10/17
Driving and Operating 167
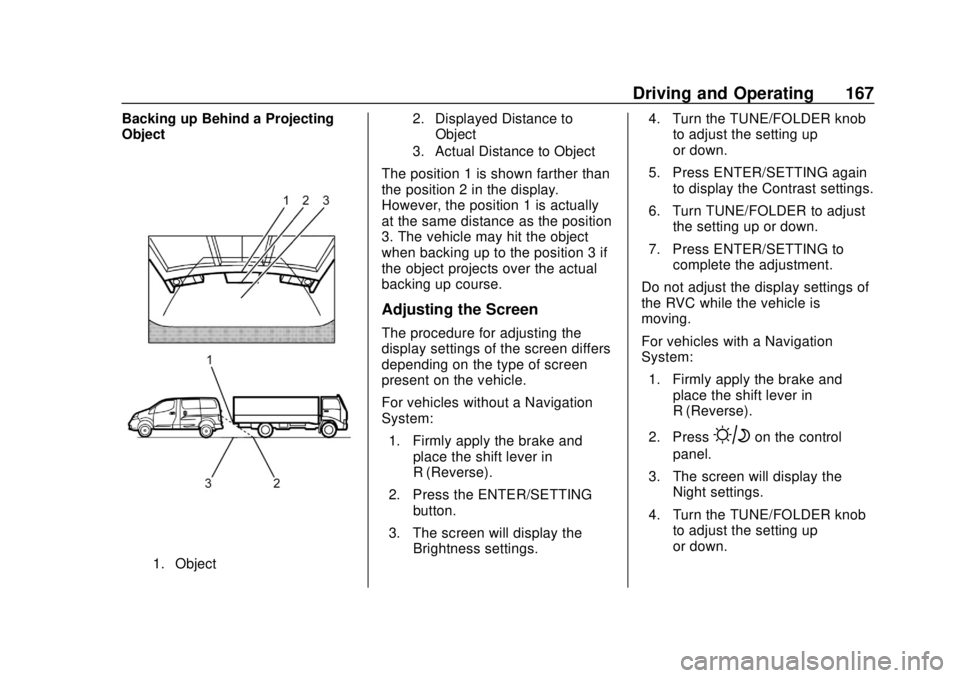
Backing up Behind a Projecting
Object
1. Object2. Displayed Distance to
Object
3. Actual Distance to Object
The position 1 is shown farther than
the position 2 in the display.
However, the position 1 is actually
at the same distance as the position
3. The vehicle may hit the object
when backing up to the position 3 if
the object projects over the actual
backing up course.
Adjusting the Screen
The procedure for adjusting the
display settings of the screen differs
depending on the type of screen
present on the vehicle.
For vehicles without a Navigation
System:
1. Firmly apply the brake and place the shift lever in
R (Reverse).
2. Press the ENTER/SETTING button.
3. The screen will display the Brightness settings. 4. Turn the TUNE/FOLDER knob
to adjust the setting up
or down.
5. Press ENTER/SETTING again to display the Contrast settings.
6. Turn TUNE/FOLDER to adjust the setting up or down.
7. Press ENTER/SETTING to complete the adjustment.
Do not adjust the display settings of
the RVC while the vehicle is
moving.
For vehicles with a Navigation
System: 1. Firmly apply the brake and place the shift lever in
R (Reverse).
2. Press
Bon the control
panel.
3. The screen will display the Night settings.
4. Turn the TUNE/FOLDER knob to adjust the setting up
or down.
Page 169 of 287
Chevrolet City Express Owner Manual (GMNA-Localizing-U.S./Canada-
11683523) - 2018 - CRC - 7/10/17
168 Driving and Operating
5. PressBagain to access
the Auto settings.
6. Turn TUNE/FOLDER to adjust the setting up or down.
Do not adjust the display settings of
the RVC while the vehicle is
moving.
Operating Tips
Caution
.Do not use alcohol, benzine
or thinner to clean the
camera. This will cause
discoloration. To clean the
camera, wipe with a cloth
dampened with a diluted
mild cleaning agent and
then wipe with a dry cloth.
. Do not damage the camera
as the monitor screen may
be adversely affected. .
When the shift lever is shifted to
R (Reverse), the screen
automatically changes to the
RVC mode. However, the radio
can be heard.
. It may take some time until the
RVC is displayed after the shift
lever has been shifted to
R (Reverse). Objects may be
distorted momentarily until the
RVC screen is displayed
completely. When the shift lever
is returned to a position other
than R (Reverse), it may take
some time until the screen
changes. Objects on the screen
may be distorted until they are
completely displayed.
. When the temperature is
extremely high or low, the
screen may not clearly display
objects. This is not a
malfunction.
. When strong light directly enters
the camera, objects may not be
displayed clearly. .
Vertical lines may be seen in
objects on the screen. This is
due to strong reflected light from
the bumper. This is not a
malfunction.
. The screen may flicker under
fluorescent light. This is not a
malfunction.
. The colors of objects on the
display may differ somewhat
from those of the actual object.
. When the contrast of objects is
low at night, pressing the
SETTING button or MENU
button may not change the
brightness.
. Objects on the display may not
be clear in a dark place or at
night.
. If dirt, rain or snow attaches to
the camera, the RVC may not
display objects. Clean the
camera.
. Do not use body wax on the
camera window. If body wax
does get on the camera window,
Page 170 of 287
Chevrolet City Express Owner Manual (GMNA-Localizing-U.S./Canada-
11683523) - 2018 - CRC - 7/10/17
Driving and Operating 169
wipe off the wax with a clean
cloth dampened with mild
detergent diluted with water.
Parking Assist
{Warning
.Always turn and look back
before backing up. The RPA
is not a substitute for proper
backing procedures.
. Read and understand the
limitations of the rear
parking assist system as
(Continued)
Warning (Continued)
contained in this section.
Inclement weather may
affect the function of the
RPA; this may include
reduced performance or a
false activation.
. This system is not designed
to prevent contact with small
or moving objects.
. The system is designed as
a aid to the driver in
detecting large stationary
objects to help avoid
damaging the vehicle. The
system will not detect small
objects below the bumper,
and may not detect objects
close to the bumper or on
the ground.
. If your vehicle sustains
damage to the rear bumper
fascia, leaving it misaligned
or bent, the sensing zone
may be altered causing
inaccurate measurement of
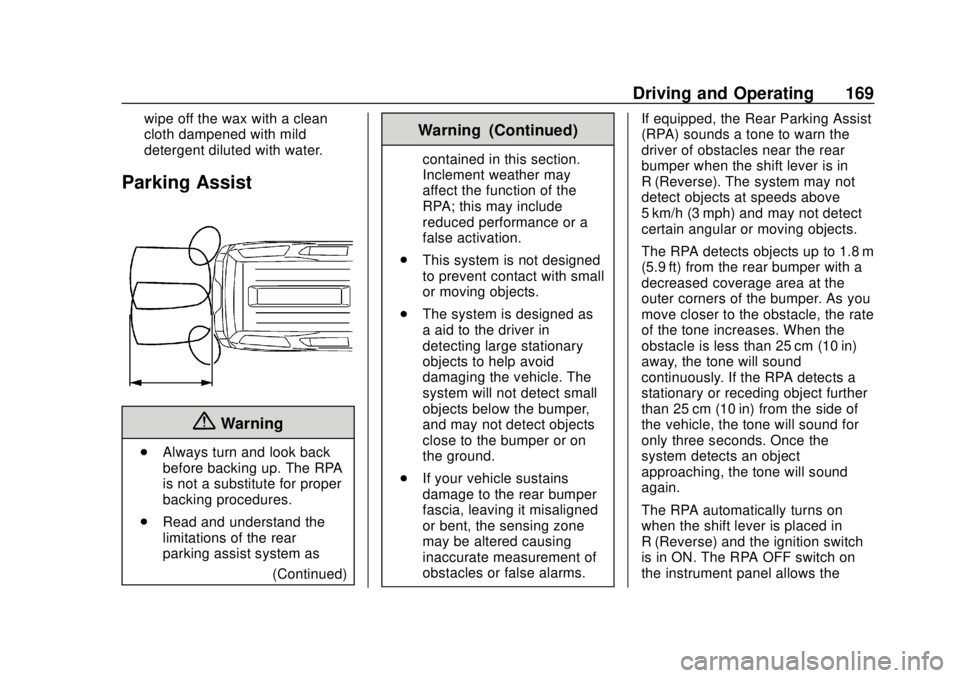
obstacles or false alarms. If equipped, the Rear Parking Assist
(RPA) sounds a tone to warn the
driver of obstacles near the rear
bumper when the shift lever is in
R (Reverse). The system may not
detect objects at speeds above
5 km/h (3 mph) and may not detect
certain angular or moving objects.
The RPA detects objects up to 1.8 m
(5.9 ft) from the rear bumper with a
decreased coverage area at the
outer corners of the bumper. As you
move closer to the obstacle, the rate
of the tone increases. When the
obstacle is less than 25 cm (10 in)
away, the tone will sound
continuously. If the RPA detects a
stationary or receding object further
than 25 cm (10 in) from the side of
the vehicle, the tone will sound for
only three seconds. Once the
system detects an object
approaching, the tone will sound
again.
The RPA automatically turns on
when the shift lever is placed in
R (Reverse) and the ignition switch
is in ON. The RPA OFF switch on
the instrument panel allows the