transmission oil CHEVROLET COLORADO 2021 Owner's Manual
[x] Cancel search | Manufacturer: CHEVROLET, Model Year: 2021, Model line: COLORADO, Model: CHEVROLET COLORADO 2021Pages: 359, PDF Size: 8.03 MB
Page 95 of 359
Chevrolet Colorado Owner Manual (GMNA-Localizing-U.S./Canada/Mexico-
14430421) - 2021 - CRC - 2/10/20
94 Instruments and Controls
time the ignition is off. Time will continue
to be counted as long as the ignition is on,
even if another display is being shown on
the DIC. The timer will record up to
99 hours, 59 minutes, and 59 seconds
(99:59:59) after which the display will return
to zero. To stop the timer, press SET/CLR
briefly while Timer is displayed. To reset the
timer to zero, press and hold SET/CLR.
Blank Display :Displays no information.
Vehicle Information Menu (VEHICLE)
Items
Press MENU on the turn signal lever until
the VEHICLE menu is displayed. Use
w x
to scroll through the menu items. Not all
items are available on every vehicle. The
following is a list of all possible menu items:
Remaining Oil Life : Displays an estimate of
the oil's remaining useful life. If REMAINING
OIL LIFE 99% is displayed, that means 99%
of the current oil life remains.
When the remaining oil life is low, the
CHANGE ENGINE OIL SOON message will
appear on the display. The oil should be
changed as soon as possible. See Engine Oil
0 243. In addition to the engine oil life
system monitoring the oil life, additional maintenance is recommended in the
Maintenance Schedule in this manual. See
Maintenance Schedule
0312.
The Oil Life display must be reset after each
oil change. Do not reset the Oil Life display
accidentally at any time other than when
the oil has just been changed. It cannot be
reset accurately until the next oil change. To
reset the engine oil life system, see Engine
Oil Life System 0245.
Oil Pressure : Oil pressure is displayed in
either kilopascal (kPa) or in pounds per
square inch (psi).
Tire Pressure : Displays a vehicle with the
approximate pressures of all four tires. Tire
pressure is displayed in either
kilopascal (kPa) or in pounds per square
inch (psi). See Tire Pressure Monitor System
0 275 and Tire Pressure Monitor Operation
0 275.
Battery Voltage : Displays the current
battery voltage, if equipped. Battery voltage
changes are normal while driving. See
Charging System Light 086. If there is a
problem with the battery charging system,
the DIC will display a message.
Engine Hours : Shows the total number of
hours the engine has run. Transmission Fluid Temperature :
Shows the
temperature of the automatic transmission
fluid in either degrees Celsius (°C) or degrees
Fahrenheit (°F).
Trailer Brake (If Equipped) : TRAILER GAIN
shows the trailer gain setting. This setting
can be adjusted from 0.0 to 10.0 with either
a trailer connected or disconnected.
OUTPUT shows the power output to the
trailer anytime a trailer with electric brakes
is connected. Output is displayed as a bar
graph. Dashes may appear in the OUTPUT
display if a trailer is not connected.
Units : Move
w xto change between
Metric or US when the Unit display is active.
Press SET/CLR to confirm the setting. This
will change the displays on the DIC to the
type of measurements you select.
ECO Drive Assist Menu (ECO) Items
This menu is only available on some
vehicles. Press MENU on the turn signal
lever until the ECO menu is displayed. Use
w xto scroll through the menu items.
Not all items are available on every vehicle.
The following is a list of all possible menu
items:
Page 98 of 359
Chevrolet Colorado Owner Manual (GMNA-Localizing-U.S./Canada/Mexico-
14430421) - 2021 - CRC - 2/10/20
Instruments and Controls 97
select“Reset Best Score.” PressVto reset
the best average fuel economy. After reset,
the best value displays “-,-”until the
selected distance has been traveled.
The display provides information on how
current driving behavior affects the running
average and how well recent driving
compares to the best that has been
achieved for the selected distance.
Engine Hours (Hourmeter) : Shows the total
number of hours the engine has run. The
display also shows the engine idle hours.
Timer : This display can be used as a timer.
To start the timer, press
Vwhile this
display is active. The display will show the
amount of time that has passed since the
timer was last reset. To stop the timer,
press
Vbriefly while this display is active
and the timer is running. To reset the timer
to zero, press and hold
Vwhile this display
is active.
Battery Voltage : Displays the current
battery voltage, if equipped. Battery voltage
changes are normal while driving. See
Charging System Light 086. If there is a
problem with the battery charging system,
the DIC will display a message. Oil Pressure :
Oil pressure is displayed in
either kilopascal (kPa) or in pounds per
square inch (psi).
Engine Hours : Shows the total number of
hours the engine has run.
Off Road Page : This page shows the
traction, four wheel drive, and steering
angle states. When the front or rear axles
are locked, a lock icon is displayed. See
Off-Road Driving 0173.
Transmission Fluid Temperature : Shows the
temperature of the automatic transmission
fluid in either degrees Celsius (°C) or degrees
Fahrenheit (°F).
Trailer Brake (If Equipped) : TRAILER GAIN
shows the trailer gain setting. This setting
can be adjusted from 0.0 to 10.0 with either
a trailer connected or disconnected.
OUTPUT shows the power output to the
trailer anytime a trailer with electric brakes
is connected. Output is displayed as a bar
graph. Dashes may appear in the OUTPUT
display if a trailer is not connected.
Blank Page : Shows no information.
Vehicle Messages
Messages displayed on the DIC indicate the
status of the vehicle or some action that
may be needed to correct a condition.
Multiple messages may appear one after
another.
The messages that do not require
immediate action can be acknowledged and
cleared by pressing
V. The messages that
require immediate action cannot be cleared
until that action is performed.
All messages should be taken seriously;
clearing the message does not correct the
problem.
If a SERVICE message appears, see your
dealer.
Follow the instructions given in the
messages. The system displays messages
regarding the following topics:
.Service Messages
.Fluid Levels
.Vehicle Security
.Brakes
.Steering
.Ride Control Systems
.Driver Assistance Systems
Page 188 of 359
Chevrolet Colorado Owner Manual (GMNA-Localizing-U.S./Canada/Mexico-
14430421) - 2021 - CRC - 2/10/20
Driving and Operating 187
Caution
Do not try to shift to P (Park) if the
vehicle is moving. If you do, you could
damage the transmission. Shift to P (Park)
only when the vehicle is stopped.
Starting Procedure
1. With your foot off the accelerator pedal,turn the ignition key to START. When
the engine starts, let go of the key. The
idle speed will go down as the engine
gets warm. Do not race the engine
immediately after starting it. Operate
the engine and transmission gently to
allow the oil to warm up and lubricate
all moving parts.
Caution
Cranking the engine for long periods of
time, by returning the ignition to the
START position immediately after
cranking has ended, can overheat and
damage the cranking motor, and drain
the battery. Wait at least 15 seconds
between each try, to let the cranking
motor cool down. 2. If the engine does not start after five to
10 seconds, especially in very cold
weather (below −18 °C or 0 °F), it could
be flooded with too much gasoline. Try
pushing the accelerator pedal all the way
to the floor and holding it there while
holding the key in START for up to
15 seconds. Wait at least 15 seconds
between each try, to allow the cranking
motor to cool down. When the engine
starts, let go of the key and accelerator
pedal. If the vehicle starts briefly but
then stops again, do the same thing.
This clears the extra gasoline from the
engine. Do not race the engine
immediately after starting it. Operate
the engine and transmission gently until
the oil warms up and lubricates all
moving parts.
Engine Heater
If the vehicle has a diesel engine, see the
Duramax diesel supplement.
{Warning
Do not plug in the engine block heater
while the vehicle is parked in a garage or
under a carport. Property damage or
personal injury may result. Always park
the vehicle in a clear open area away
from buildings or structures.
If equipped, the engine heater can provide
easier starting and better fuel economy
during engine warm-up in cold weather
conditions at or below −18 °C (0 °F). Vehicles
with an engine heater should be plugged in
at least four hours before starting. An
internal thermostat in the plug-end of the
cord may exist, which will prevent engine
heater operation at temperatures above
−18 °C (0 °F).
Page 196 of 359
Chevrolet Colorado Owner Manual (GMNA-Localizing-U.S./Canada/Mexico-
14430421) - 2021 - CRC - 2/10/20
Driving and Operating 195
Caution (Continued)
transmission. The repair will not be
covered by the vehicle warranty. If the
vehicle is stuck, do not spin the tires.
When stopping on a hill, use the brakes
to hold the vehicle in place.
Low Traction Mode
If equipped, Low Traction Mode assists in
vehicle acceleration when road conditions
are slippery, such as with ice or snow. While
the vehicle is at a stop, select L2 using
Range Selection Mode. This will limit torque
to the wheels and help to prevent the tires
from spinning.
Tow/Haul Mode
If equipped, Tow/Haul Mode adjusts the
transmission shift pattern to reduce shift
cycling. While towing heavy loads, this
mode provides increased performance and
vehicle control.
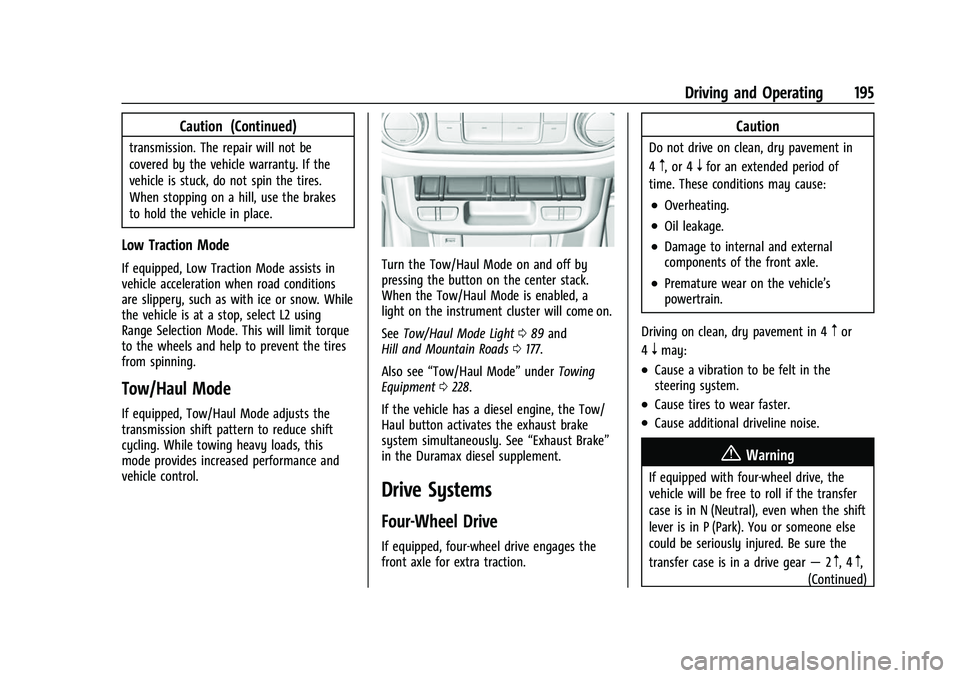
Turn the Tow/Haul Mode on and off by
pressing the button on the center stack.
When the Tow/Haul Mode is enabled, a
light on the instrument cluster will come on.
SeeTow/Haul Mode Light 089 and
Hill and Mountain Roads 0177.
Also see “Tow/Haul Mode” underTowing
Equipment 0228.
If the vehicle has a diesel engine, the Tow/
Haul button activates the exhaust brake
system simultaneously. See “Exhaust Brake”
in the Duramax diesel supplement.
Drive Systems
Four-Wheel Drive
If equipped, four-wheel drive engages the
front axle for extra traction.
Caution
Do not drive on clean, dry pavement in
4
m, or 4nfor an extended period of
time. These conditions may cause:
.Overheating.
.Oil leakage.
.Damage to internal and external
components of the front axle.
.Premature wear on the vehicle’s
powertrain.
Driving on clean, dry pavement in 4
mor
4
nmay:
.Cause a vibration to be felt in the
steering system.
.Cause tires to wear faster.
.Cause additional driveline noise.
{Warning
If equipped with four-wheel drive, the
vehicle will be free to roll if the transfer
case is in N (Neutral), even when the shift
lever is in P (Park). You or someone else
could be seriously injured. Be sure the
transfer case is in a drive gear —2
m, 4m,
(Continued)
Page 221 of 359
Chevrolet Colorado Owner Manual (GMNA-Localizing-U.S./Canada/Mexico-
14430421) - 2021 - CRC - 2/10/20
220 Driving and Operating
Warning (Continued)
trailer only if all the steps in this section
have been followed. Ask your dealer for
advice and information about towing a
trailer with the vehicle.
Driving with a Trailer
Trailering is different than just driving the
vehicle by itself. Trailering means changes in
handling, acceleration, braking, durability,
and fuel economy. Successful, safe trailering
takes correct equipment, and it has to be
used properly.
The following information has many
time-tested, important trailering tips and
safety rules. Many of these are important
for your safety and that of your passengers.
Read this section carefully before pulling a
trailer.
When towing a trailer:
.Become familiar with and follow all state
and local laws that apply to trailer
towing. These requirements vary from
state to state.
.State laws may require the use of
extended side view mirrors. Even if not
required, you should install extended side
view mirrors if your visibility is limited or
restricted while towing.
.Do not tow a trailer during the first
800 km (500 mi) of vehicle use to prevent
damage to the engine, axle, or other
parts.
.It is recommended to perform the first oil
change before heavy towing.
.During the first 800 km (500 mi) of trailer
towing, do not drive over 80 km/h
(50 mph) and do not make starts at full
throttle.
.Vehicles can tow in D (Drive). Tow/Haul
Mode is recommended for heavier trailers.
SeeTow/Haul Mode 0195. If the
transmission downshifts too often, a
lower gear may be selected using Manual
Mode. See Manual Mode 0193.
If equipped, the following driver assistance
features should be turned off when towing
a trailer:
.Adaptive Cruise Control (ACC)
.Super Cruise Control
.Lane Keep Assist (LKA)
.Park Assist
.Reverse Automatic Braking (RAB)
If equipped, the following driver assistance
features should be turned to alert or off
when towing a trailer:
.Automatic Emergency Braking (AEB)
.Intelligent Brake Assist (IBA)
.Front Pedestrian Braking (FPB)
If equipped with Lane Change Alert (LCA),
the LCA detection zones that extend back
from the side of the vehicle do not move
further back when a trailer is towed. Use
caution while changing lanes when towing a
trailer.
If equipped with Rear Cross Traffic Alert
(RCTA), use caution while backing up when
towing a trailer, as the RCTA detection zones
that extend out from the back of the vehicle
do not move further back when a trailer is
towed.
{Warning
To prevent serious injury or death from
carbon monoxide (CO), when towing a
trailer:
.Do not drive with the liftgate, trunk/
hatch, or rear-most window open. (Continued)
Page 223 of 359
Chevrolet Colorado Owner Manual (GMNA-Localizing-U.S./Canada/Mexico-
14430421) - 2021 - CRC - 2/10/20
222 Driving and Operating
The vehicle can tow in D (Drive). Shift the
transmission to a lower gear if the
transmission shifts too often under heavy
loads and/or hilly conditions.
When towing at higher altitudes, engine
coolant will boil at a lower temperature
than at lower altitudes. If the engine is
turned off immediately after towing at high
altitude on steep uphill grades, the vehicle
could show signs similar to engine
overheating. To avoid this, let the engine
run, preferably on level ground, with the
transmission in P (Park) for a few minutes
before turning the engine off. If the
overheat warning comes on, seeEngine
Overheating 0250.
Parking on Hills
{Warning
To prevent serious injury or death,
always park your vehicle and trailer on a
level surface when possible. When parking your vehicle and your trailer
on a hill:
1. Press the brake pedal, but do not shift into P (Park) yet. Turn the wheels into
the curb if facing downhill or into traffic
if facing uphill.
2. Have someone place chocks under the trailer wheels.
3. When the wheel chocks are in place, gradually release the brake pedal to
allow the chocks to absorb the load of
the trailer.
4. Reapply the brake pedal. Then apply the parking brake and shift into P (Park).
5. Release the brake pedal.
Leaving After Parking on a Hill
1. Apply and hold the brake pedal.
.Start the engine.
.Shift into a gear.
.Release the parking brake.
2. Let up on the brake pedal.
3. Drive slowly until the trailer is clear of the chocks.
4. Stop and have someone pick up and store the chocks.
Launching and Retrieving a Boat
Backing the Trailer into the Water
{Warning
.Have all passengers get out of the
vehicle before backing onto the sloped
part of the ramp. Lower the driver and
passenger side windows before
backing onto the ramp. This will
provide a means of escape in the
unlikely event the vehicle slides into
the water.
.If the boat launch surface is slippery,
have the driver remain in the vehicle
with the brake pedal applied while the
boat is being launched. The boat
launch can be especially slippery at
low tide when part of the ramp was
previously submerged at high tide. Do
not back onto the ramp to launch the
boat if you are not sure the vehicle
can maintain traction.
.Do not move the vehicle if someone is
in the path of the trailer. Some parts
of the trailer might be underwater and
not visible to people who are assisting
in launching the boat.
Page 224 of 359
Chevrolet Colorado Owner Manual (GMNA-Localizing-U.S./Canada/Mexico-
14430421) - 2021 - CRC - 2/10/20
Driving and Operating 223
Disconnect the wiring to the trailer before
backing the trailer into the water to prevent
damage to the electrical circuits on the
trailer. Reconnect the wiring to the trailer
after removing the trailer from the water.
If the trailer has electric brakes that can
function when the trailer is submerged, it
might help to leave the electrical trailer
connector attached to maintain trailer brake
functionality while on the boat ramp.
To back the trailer into the water:1. If equipped, place the vehicle in four-wheel-drive high.
2. Slowly back down the boat ramp until the boat is floating, but no further than
necessary.
3. Press and hold the brake pedal, but do not shift into P (Park) yet.
4. Have someone place chocks under the front wheels of the vehicle.
5. Gradually release the brake pedal to allow the chocks to absorb the load of
the trailer. 6. Reapply the brake pedal. Then apply the
parking brake and shift into P (Park).
7. Release the brake pedal.
Pulling the Trailer from the Water
To pull the trailer of the water: 1. Press and hold the brake pedals.
2. Start the engine and shift into gear.
3. Release the parking brake.
4. Let up on the brake pedal.
5. Drive slowly until the tires are clear of the chocks.
6. Stop and have someone pick up and store the chocks.
7. Slowly pull the trailer from the water.
8. Once the vehicle and trailer have been driven from the sloped part of the boat
ramp, the vehicle can be shifted from
four-wheel-drive high. Shift into the drive
mode that is appropriate for the road
conditions.Caution
If the vehicle tires begin to spin and the
vehicle begins to slide toward the water,
remove your foot from the accelerator
pedal and apply the brake pedal. Seek
help to have the vehicle towed up
the ramp.
Maintenance when Trailer Towing
The vehicle needs service more often when
used to tow trailers. See Maintenance
Schedule 0312. It is especially important to
check the automatic transmission fluid,
engine oil, axle lubricant, belts, cooling
system, and brake system before and during
each trip.
Check periodically to see that all nuts and
bolts on the trailer hitch are tight.
Engine Cooling When Trailer Towing
The cooling system may temporarily
overheat during severe operating conditions.
See Engine Overheating 0250.
Page 237 of 359
Chevrolet Colorado Owner Manual (GMNA-Localizing-U.S./Canada/Mexico-
14430421) - 2021 - CRC - 2/10/20
236 Vehicle Care
Vehicle Care
General Information
General Information . . . . . . . . . . . . . . . . . . . 237
California Proposition 65 Warning . . . . . 237
California Perchlorate MaterialsRequirements . . . . . . . . . . . . . . . . . . . . . . . . 237
Accessories and Modifications . . . . . . . . . 237
Vehicle Checks
Doing Your Own Service Work . . . . . . . . 238
Hood . . . . . . . . . . . . . . . . . . . . . . . . . . . . . . . . . . 238
Engine Compartment Overview . . . . . . . 240
Engine Oil . . . . . . . . . . . . . . . . . . . . . . . . . . . . . 243
Engine Oil Life System . . . . . . . . . . . . . . . . 245
Automatic Transmission Fluid . . . . . . . . . 246
Engine Air Cleaner/Filter . . . . . . . . . . . . . . 246
Cooling System . . . . . . . . . . . . . . . . . . . . . . . . 247
Engine Overheating . . . . . . . . . . . . . . . . . . . 250
Engine Fan . . . . . . . . . . . . . . . . . . . . . . . . . . . . . 251
Washer Fluid . . . . . . . . . . . . . . . . . . . . . . . . . . 252
Brakes . . . . . . . . . . . . . . . . . . . . . . . . . . . . . . . . . 252
Brake Fluid . . . . . . . . . . . . . . . . . . . . . . . . . . . . 253
Battery - North America . . . . . . . . . . . . . . . 254
Four-Wheel Drive . . . . . . . . . . . . . . . . . . . . . . 254
Front Axle . . . . . . . . . . . . . . . . . . . . . . . . . . . . . 255
Rear Axle . . . . . . . . . . . . . . . . . . . . . . . . . . . . . . 255
Starter Switch Check . . . . . . . . . . . . . . . . . . 256
Automatic Transmission Shift Lock Control Function Check . . . . . . . . . . . . . . 256 Ignition Transmission Lock Check . . . . . . 256
Park Brake and P (Park) Mechanism
Check . . . . . . . . . . . . . . . . . . . . . . . . . . . . . . . . 256
Wiper Blade Replacement . . . . . . . . . . . . . 257
Windshield Replacement . . . . . . . . . . . . . . . 257
Gas Strut(s) . . . . . . . . . . . . . . . . . . . . . . . . . . . . 257
Headlamp Aiming
Front Headlamp Aiming . . . . . . . . . . . . . . . 258
Bulb Replacement
Bulb Replacement . . . . . . . . . . . . . . . . . . . . . 258
Halogen Bulbs . . . . . . . . . . . . . . . . . . . . . . . . . 259
Headlamps, Front Turn Signal, Sidemarker, and Parking Lamps . . . . . . 259
Taillamps, Stoplamps, and Back-Up Lamps . . . . . . . . . . . . . . . . . . . . . . . . . . . . . . . 259
Electrical System
Electrical System Overload . . . . . . . . . . . . . 261
Fuses and Circuit Breakers . . . . . . . . . . . . . 261
Engine Compartment Fuse Block . . . . . . 262
Instrument Panel Fuse Block . . . . . . . . . . 266
Wheels and Tires
Tires . . . . . . . . . . . . . . . . . . . . . . . . . . . . . . . . . . 268
All-Season Tires . . . . . . . . . . . . . . . . . . . . . . . 268
Winter Tires . . . . . . . . . . . . . . . . . . . . . . . . . . . 269
All-Terrain Tires . . . . . . . . . . . . . . . . . . . . . . . 269
Tire Sidewall Labeling . . . . . . . . . . . . . . . . . 269
Tire Designations . . . . . . . . . . . . . . . . . . . . . . 271
Tire Terminology and Definitions . . . . . . 272 Tire Pressure . . . . . . . . . . . . . . . . . . . . . . . . . . 274
Tire Pressure Monitor System . . . . . . . . . 275
Tire Pressure Monitor Operation . . . . . . . 275
Tire Inspection . . . . . . . . . . . . . . . . . . . . . . . . 278
Tire Rotation . . . . . . . . . . . . . . . . . . . . . . . . . . 278
When It Is Time for New Tires . . . . . . . . 279
Buying New Tires . . . . . . . . . . . . . . . . . . . . . 280
Different Size Tires and Wheels . . . . . . . . 281
Uniform Tire Quality Grading . . . . . . . . . . 281
Wheel Alignment and Tire Balance . . . . 283
Wheel Replacement . . . . . . . . . . . . . . . . . . . 283
Tire Chains . . . . . . . . . . . . . . . . . . . . . . . . . . . . 283
If a Tire Goes Flat . . . . . . . . . . . . . . . . . . . . . 284
Tire Changing . . . . . . . . . . . . . . . . . . . . . . . . . 285
Compact Spare Tire . . . . . . . . . . . . . . . . . . . 294
Full-Size Spare Tire . . . . . . . . . . . . . . . . . . . . 295
Jump Starting
Jump Starting - North America . . . . . . . . 296
Towing the Vehicle
Towing the Vehicle . . . . . . . . . . . . . . . . . . . . 298
Recreational Vehicle Towing . . . . . . . . . . . 299
Appearance Care
Exterior Care . . . . . . . . . . . . . . . . . . . . . . . . . . 303
Interior Care . . . . . . . . . . . . . . . . . . . . . . . . . . . 307
Floor Mats . . . . . . . . . . . . . . . . . . . . . . . . . . . . 309
Page 273 of 359
Chevrolet Colorado Owner Manual (GMNA-Localizing-U.S./Canada/Mexico-
14430421) - 2021 - CRC - 2/10/20
272 Vehicle Care
tire is certified to carry. The speed
rating is the maximum speed a tire is
certified to carry a load.
Tire Terminology and Definitions
Air Pressure:The amount of air inside
the tire pressing outward on each
square inch of the tire. Air pressure is
expressed in kPa (kilopascal) or psi
(pounds per square inch).
Accessory Weight
:The combined
weight of optional accessories. Some
examples of optional accessories are
automatic transmission, power
windows, power seats, and air
conditioning.
Aspect Ratio
:The relationship of a
tire's height to its width.
Belt
:A rubber coated layer of cords
between the plies and the tread. Cords
may be made from steel or other
reinforcing materials.
Bead
:The tire bead contains steel
wires wrapped by steel cords that hold
the tire onto the rim. Bias Ply Tire
:A pneumatic tire in which
the plies are laid at alternate angles
less than 90 degrees to the centerline
of the tread.
Cold Tire Pressure
:The amount of air
pressure in a tire, measured in kPa
(kilopascal) or psi (pounds per square
inch) before a tire has built up heat
from driving. See Tire Pressure0274.
Curb Weight
:The weight of a motor
vehicle with standard and optional
equipment including the maximum
capacity of fuel, oil, and coolant, but
without passengers and cargo.
DOT Markings
:A code molded into the
sidewall of a tire signifying that the tire
is in compliance with the U.S.
Department of Transportation (DOT)
Motor Vehicle Safety Standards. The
DOT code includes the Tire Identification
Number (TIN), an alphanumeric
designator which can also identify the
tire manufacturer, production plant,
brand, and date of production.
GVWR
:Gross Vehicle Weight Rating.
See Vehicle Load Limits 0179. GAWR FRT
:Gross Axle Weight Rating
for the front axle. See Vehicle Load
Limits 0179.
GAWR RR
:Gross Axle Weight Rating
for the rear axle. See Vehicle Load
Limits 0179.
Intended Outboard Sidewall
:The side
of an asymmetrical tire that must
always face outward when mounted on
a vehicle.
Kilopascal (kPa)
:The metric unit for air
pressure.
Light Truck (LT-Metric) Tire
:A tire used
on light duty trucks and some
multipurpose passenger vehicles.
Load Index
:An assigned number
ranging from 1 to 279 that corresponds
to the load carrying capacity of a tire.
Maximum Inflation Pressure
:The
maximum air pressure to which a cold
tire can be inflated. The maximum air
pressure is molded onto the sidewall.
Maximum Load Rating
:The load rating
for a tire at the maximum permissible
inflation pressure for that tire.
Page 318 of 359
Chevrolet Colorado Owner Manual (GMNA-Localizing-U.S./Canada/Mexico-
14430421) - 2021 - CRC - 2/10/20
Service and Maintenance 317
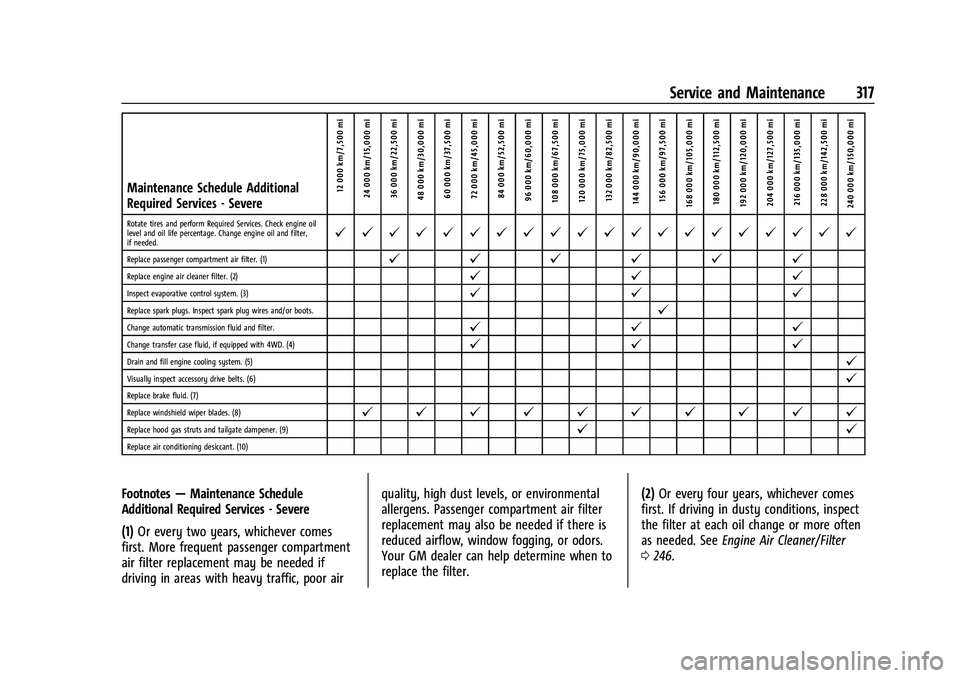
Maintenance Schedule Additional
Required Services - Severe12 000 km/7,500 mi
24 000 km/15,000 mi
36 000 km/22,500 mi
48 000 km/30,000 mi 60 000 km/37,500 mi
72 000 km/45,000 mi84 000 km/52,500 mi
96 000 km/60,000 mi
108 000 km/67,500 mi 120 000 km/75,000 mi 132 000 km/82,500 mi
144 000 km/90,000 mi 156 000 km/97,500 mi
168 000 km/105,000 mi 180 000 km/112,500 mi
192 000 km/120,000 mi 204 000 km/127,500 mi 216 000 km/135,000 mi
228 000 km/142,500 mi
240 000 km/150,000 mi
Rotate tires and perform Required Services. Check engine oil
level and oil life percentage. Change engine oil and filter,
if needed.@ @ @ @ @ @ @ @ @ @ @ @ @ @ @ @ @ @ @ @
Replace passenger compartment air filter. (1)@ @@@@@
Replace engine air cleaner filter. (2)@ @@
Inspect evaporative control system. (3)@@@
Replace spark plugs. Inspect spark plug wires and/or boots.@
Change automatic transmission fluid and filter.@@@
Change transfer case fluid, if equipped with 4WD. (4)@@@
Drain and fill engine cooling system. (5)@
Visually inspect accessory drive belts. (6)@
Replace brake fluid. (7)
Replace windshield wiper blades. (8)
@ @ @ @ @ @ @ @ @ @
Replace hood gas struts and tailgate dampener. (9)@ @
Replace air conditioning desiccant. (10)
Footnotes—Maintenance Schedule
Additional Required Services - Severe
(1) Or every two years, whichever comes
first. More frequent passenger compartment
air filter replacement may be needed if
driving in areas with heavy traffic, poor air quality, high dust levels, or environmental
allergens. Passenger compartment air filter
replacement may also be needed if there is
reduced airflow, window fogging, or odors.
Your GM dealer can help determine when to
replace the filter.
(2)
Or every four years, whichever comes
first. If driving in dusty conditions, inspect
the filter at each oil change or more often
as needed. See Engine Air Cleaner/Filter
0 246.