battery CHEVROLET CORVETTE 2010 6.G Service Manual
[x] Cancel search | Manufacturer: CHEVROLET, Model Year: 2010, Model line: CORVETTE, Model: CHEVROLET CORVETTE 2010 6.GPages: 472, PDF Size: 11.44 MB
Page 327 of 472
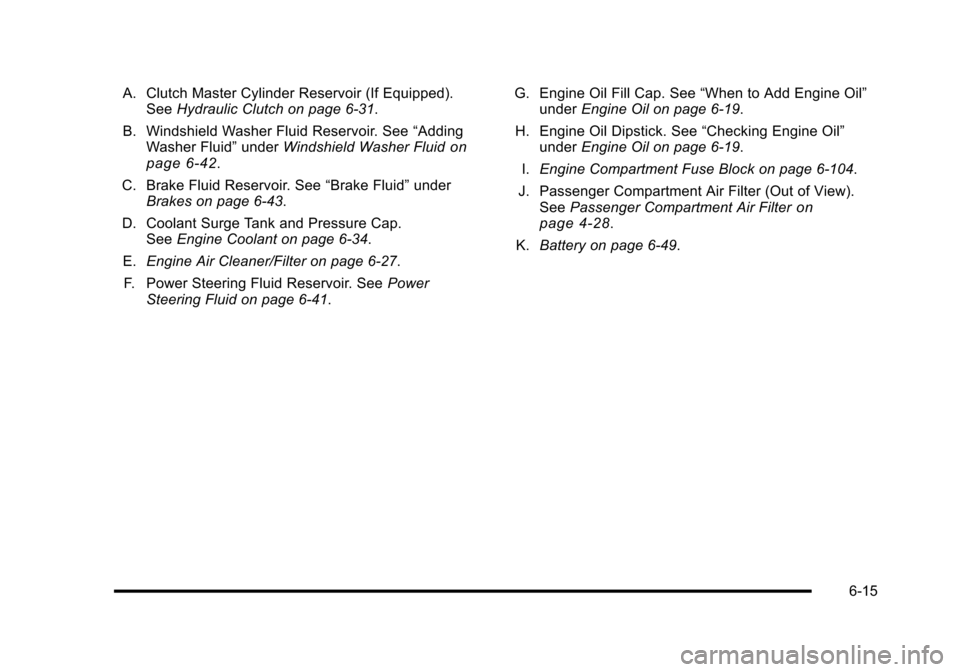
A. Clutch Master Cylinder Reservoir (If Equipped). See Hydraulic Clutch on page 6‑31.
B. Windshield Washer Fluid Reservoir. See “Adding
Washer Fluid” underWindshield Washer Fluid
on
page 6‑42.
C. Brake Fluid Reservoir. See “Brake Fluid”under
Brakes on page 6‑43.
D. Coolant Surge Tank and Pressure Cap. See Engine Coolant on page 6‑34.
E. Engine Air Cleaner/Filter on page 6‑27.
F. Power Steering Fluid Reservoir. See Power
Steering Fluid on page 6‑41. G. Engine Oil Fill Cap. See
“When to Add Engine Oil”
under Engine Oil on page 6‑19.
H. Engine Oil Dipstick. See “Checking Engine Oil”
under Engine Oil on page 6‑19.
I. Engine Compartment Fuse Block on page 6‑104.
J. Passenger Compartment Air Filter (Out of View). See Passenger Compartment Air Filter
on
page 4‑28.
K. Battery on page 6‑49.
6-15
Page 361 of 472
Battery
Refer to the replacement number on the original battery
label when a new battery is needed.
For battery replacement, see your dealer/retailer
or the service manual. To purchase a service manual,
see Service Publications Ordering Information
on
page 8‑16.
{DANGER:
Battery posts, terminals, and related accessories
contain lead and lead compounds, chemicals
known to the State of California to cause cancer
and reproductive harm. Wash hands after
handling.
Vehicle Storage
{WARNING:
Batteries have acid that can burn you and gas
that can explode. You can be badly hurt if you
are not careful. See Jump Starting
on page 6‑50
for tips on working around a battery without
getting hurt.
Infrequent Usage: Remove the black, negative (−) cable
from the battery to keep the battery from running down.
See “Power Window Initialization” inPower Windows
on
page 3‑17.
Extended Storage: Remove the black, negative (−)
cable from the battery or use a battery trickle charger.
6-49
Page 362 of 472
Jump Starting
If your battery has run down, you may want to use
another vehicle and some jumper cables to start your
vehicle. Be sure to use the following steps to do it
safely.
{WARNING:
Batteries can hurt you. They can be dangerous
because:
.They contain acid that can burn you.
.They contain gas that can explode or ignite.
.They contain enough electricity to burn you.
If you do not follow these steps exactly, some or
all of these things can hurt you.
Notice: If you try to start your vehicle by pushing or
pulling it, you could damage your vehicle. Do not
push or pull your vehicle to start it; instead, use the
jump starting procedure in this manual to start your
vehicle when the battery has run down.
1. Check the other vehicle. It must have a 12-volt battery with a negative ground system. Notice:
If the other vehicle's system is not a 12-volt
system with a negative ground, both vehicles can
be damaged. Only use vehicles with 12-volt systems
with negative grounds to jump start your vehicle.
2. Get the vehicles close enough so the jumper cables can reach, but be sure the vehicles are not
touching each other. If they are, it could cause a
ground connection you do not want. You would
not be able to start your vehicle, and the bad
grounding could damage the electrical systems.
To avoid the possibility of the vehicles rolling, set
the parking brake firmly on both vehicles involved
in the jump start procedure. Put an automatic
transmission in P (Park) or a manual transmission
in Neutral before setting the parking brakes.
Notice: If you leave the radio or other accessories
on during the jump starting procedure, they could
be damaged. The repairs would not be covered by
the warranty. Always turn off the radio and other
accessories when jump starting the vehicle.
3. Turn off the ignition on both vehicles. Unplug unnecessary accessories plugged into the
cigarette lighter or the accessory power outlet.
Turn off the radio and all lamps that are not
needed. This will avoid sparks and help save
both batteries. And it could save the radio!
6-50
Page 363 of 472
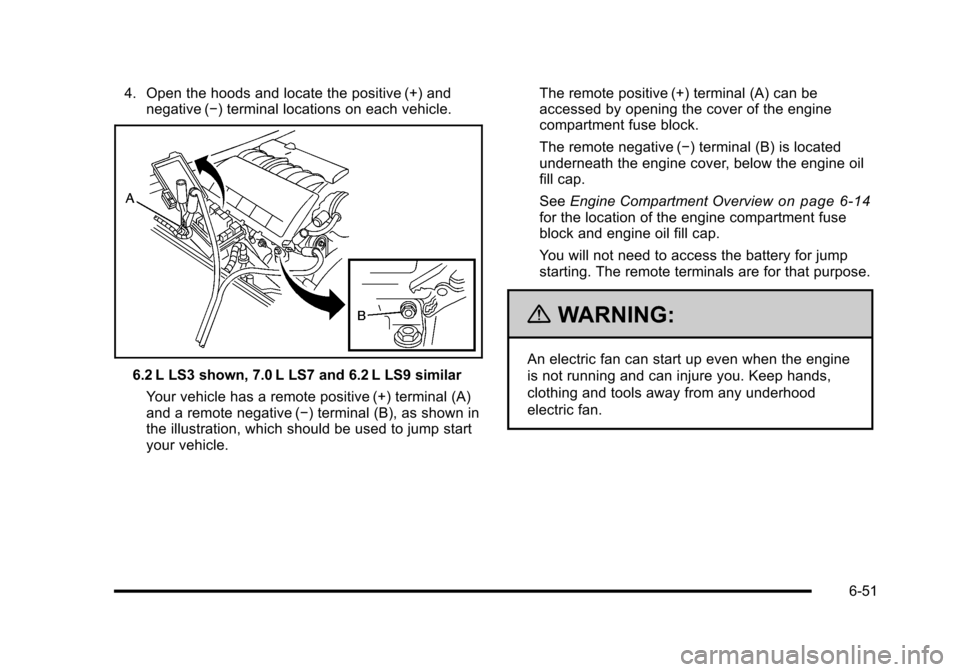
4. Open the hoods and locate the positive (+) and negative (−) terminal locations on each vehicle.
6.2 L LS3 shown, 7.0 L LS7 and 6.2 L LS9 similar
Your vehicle has a remote positive (+) terminal (A)
and a remote negative (−) terminal (B), as shown in
the illustration, which should be used to jump start
your vehicle. The remote positive (+) terminal (A) can be
accessed by opening the cover of the engine
compartment fuse block.
The remote negative (−) terminal (B) is located
underneath the engine cover, below the engine oil
fill cap.
See
Engine Compartment Overview
on page 6‑14for the location of the engine compartment fuse
block and engine oil fill cap.
You will not need to access the battery for jump
starting. The remote terminals are for that purpose.
{WARNING:
An electric fan can start up even when the engine
is not running and can injure you. Keep hands,
clothing and tools away from any underhood
electric fan.
6-51
Page 364 of 472
{WARNING:
Using an open flame near a battery can cause
battery gas to explode. People have been
hurt doing this, and some have been blinded.
Use a flashlight if you need more light.
Be sure the battery has enough water. You do not
need to add water to the battery installed in your
new vehicle. But if a battery has filler caps, be
sure the right amount of fluid is there. If it is low,
add water to take care of that first. If you do not,
explosive gas could be present.
Battery fluid contains acid that can burn you.
Do not get it on you. If you accidentally get it in
your eyes or on your skin, flush the place with
water and get medical help immediately.
{WARNING:
Fans or other moving engine parts can injure you
badly. Keep your hands away from moving parts
once the engine is running.
5. Check that the jumper cables do not have loose or missing insulation. If they do, you could get a
shock. The vehicles could be damaged too.
Before you connect the cables, here are some
basic things you should know. Positive (+) will
go to positive (+) or to a remote positive (+)
terminal if the vehicle has one. Negative (−) will
go to a heavy, unpainted metal engine part or to a
remote negative (−) terminal if the vehicle has one.
Do not connect positive (+) to negative (−) or you
will get a short that would damage the battery and
maybe other parts too. And do not connect the
negative (−) cable to the negative (−) terminal on
the dead battery because this can cause sparks.
6-52
Page 365 of 472
6. Connect the red positive (+) cable to the positive (+) terminal of the dead battery. Use a
remote positive (+) terminal if the vehicle has one.
7. Do not let the other end touch metal. Connect it to the positive (+) terminal of the good battery. Use a
remote positive (+) terminal if the vehicle has one.
8. Now connect the black negative (−) cable to the negative (−) terminal of the good battery. Use a
remote negative (−) terminal if the vehicle has one.
Do not let the other end touch anything until the
next step. The other end of the negative (−) cable
does not go to the dead battery. It goes to a heavy,
unpainted metal engine part or to a remote
negative (−) terminal on the vehicle with the dead
battery. 9. Connect the other end of the negative (−) cable
at least 18 inches (45 cm) away from the dead
battery, but not near engine parts that move.
The electrical connection is just as good there,
and the chance of sparks getting back to the
battery is much less.
Your vehicle has a remote negative (−) terminal for
this purpose.
10. Now start the vehicle with the good battery and run the engine for a while.
11. Try to start the vehicle that had the dead battery. If it will not start after a few tries, it probably needs
service.
6-53
Page 366 of 472
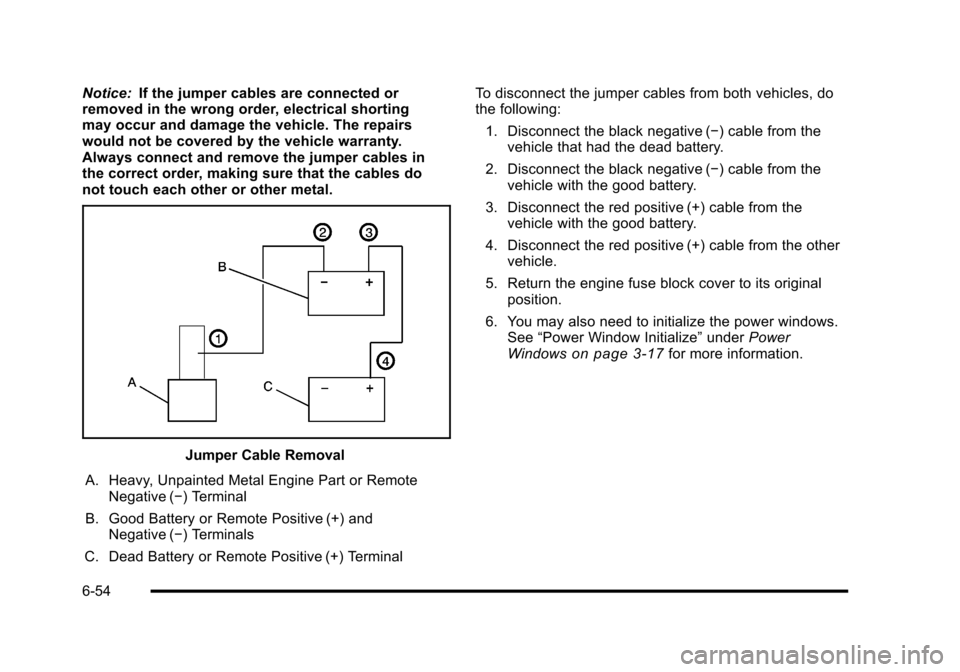
Notice:If the jumper cables are connected or
removed in the wrong order, electrical shorting
may occur and damage the vehicle. The repairs
would not be covered by the vehicle warranty.
Always connect and remove the jumper cables in
the correct order, making sure that the cables do
not touch each other or other metal.
Jumper Cable Removal
A. Heavy, Unpainted Metal Engine Part or Remote Negative (−) Terminal
B. Good Battery or Remote Positive (+) and Negative (−) Terminals
C. Dead Battery or Remote Positive (+) Terminal To disconnect the jumper cables from both vehicles, do
the following:
1. Disconnect the black negative (−) cable from the vehicle that had the dead battery.
2. Disconnect the black negative (−) cable from the vehicle with the good battery.
3. Disconnect the red positive (+) cable from the vehicle with the good battery.
4. Disconnect the red positive (+) cable from the other vehicle.
5. Return the engine fuse block cover to its original position.
6. You may also need to initialize the power windows. See “Power Window Initialize” underPower
Windows
on page 3‑17for more information.
6-54
Page 412 of 472
Service Parts Identification Label
This label, on the inside of the glove box, has the
following information:
.Vehicle Identification Number (VIN)
.Model designation
.Paint information
.Production options and special equipment
Do not remove this label from the vehicle.
Electrical System
Add-On Electrical Equipment
Notice: Do not add anything electrical to the vehicle
unless you check with your dealer/retailer first.
Some electrical equipment can damage the vehicle
and the damage would not be covered by the
vehicle's warranty. Some add-on electrical
equipment can keep other components from
working as they should.
Add-on equipment can drain the vehicle battery, even if
the vehicle is not operating. The vehicle has an airbag system. Before attempting
to add anything electrical to the vehicle, see
Servicing
Your Airbag-Equipped Vehicle
on page 2‑58and
Adding Equipment to Your Airbag-Equipped Vehicleon
page 2‑59.
Headlamp Wiring
The headlamp wiring is protected by fuses in the fuse
block. An electrical overload will cause the lamps to turn
off. If this happens, have the headlamp wiring checked
right away.
Windshield Wiper Fuses
The windshield wiper motor is protected by a circuit
breaker and a fuse. If the motor overheats due to heavy
snow, etc., the wiper will stop until the motor cools.
If the overload is caused by some electrical problem,
have it fixed.
Power Windows and Other Power
Options
Circuit breakers protect the power seats, power
windows, and other power accessories. When the
current load is too heavy, the circuit breaker opens and
closes, protecting the circuit until the problem is fixed
or goes away.
6-100
Page 413 of 472
Fuses and Circuit Breakers
The wiring circuits in the vehicle are protected from
short circuits by a combination of J-Case fuses,
mini-fuses and circuit breakers. This greatly reduces
the chance of fires caused by electrical problems.
Look at the silver-colored band inside the fuse. If the
band is broken or melted, replace the fuse. Be sure you
replace a bad fuse with a new one of the identical size
and rating.
If you ever have a problem on the road and do not
have a spare fuse, you can borrow one that has
the same amperage. Just pick some feature of the
vehicle that you can get along without –like the
radio or cigarette lighter –and use its fuse, if it is the
correct amperage. Replace it as soon as you can. Vehicles with the ZR–1 package have an intercooler
relay located on the fan shroud. See your dealer/
retailer.
Vehicles with the ZR–1 package also have a fuel
system mini-fuse. It is located near the battery in the
battery storage compartment in the rear of the vehicle.
Instrument Panel Fuse Block
The instrument panel fuse block is located on the
passenger side of the vehicle, under the instrument
panel and under the toe-board.
Remove the carpet and toe-board covering to access
the fuse block by pulling at the top of each corner of the
panel. Open the fuse block cover to access the fuses.
You can remove fuses using the fuse puller.
6-101
Page 417 of 472

For ZR1 models, the Fuel System fuse is located at the
battery. Fuse Usage
1 Transmission Control Module/
Transmission
2 Horn, Alternator Sense
Fuse Usage
3 Antilock Braking System (ABS)/Real
Time Damping
4 Wiper
5 Stoplamps/Back-Up Lamps
6-105