fuel pressure CHEVROLET DYNASTY 1993 Service Manual
[x] Cancel search | Manufacturer: CHEVROLET, Model Year: 1993, Model line: DYNASTY, Model: CHEVROLET DYNASTY 1993Pages: 2438, PDF Size: 74.98 MB
Page 1910 of 2438
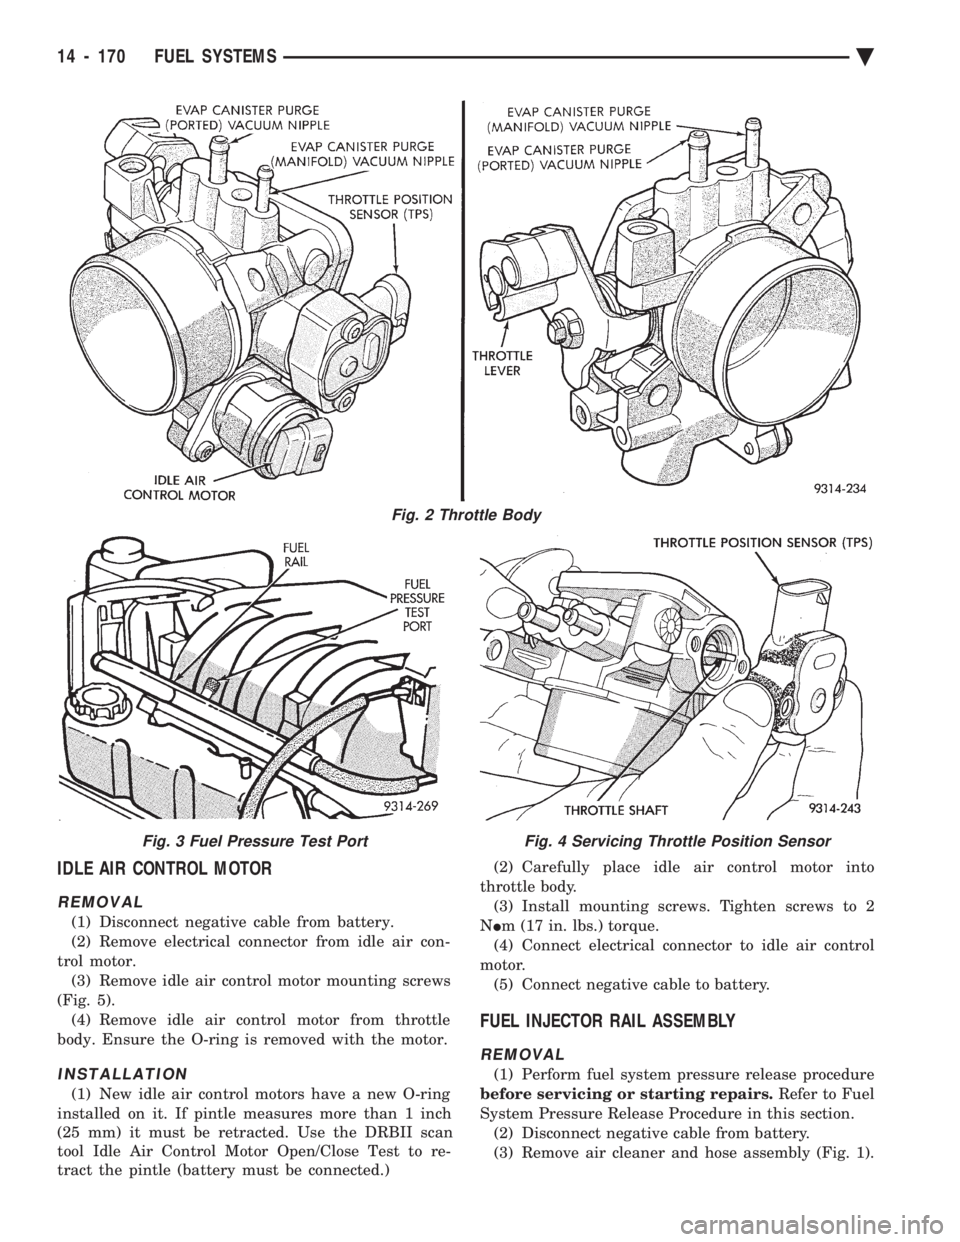
IDLE AIR CONTROL MOTOR
REMOVAL
(1) Disconnect negative cable from battery.
(2) Remove electrical connector from idle air con-
trol motor. (3) Remove idle air control motor mounting screws
(Fig. 5). (4) Remove idle air control motor from throttle
body. Ensure the O-ring is removed with the motor.
INSTALLATION
(1) New idle air control motors have a new O-ring
installed on it. If pintle measures more than 1 inch
(25 mm) it must be retracted. Use the DRBII scan
tool Idle Air Control Motor Open/Close Test to re-
tract the pintle (battery must be connected.) (2) Carefully place idle air control motor into
throttle body. (3) Install mounting screws. Tighten screws to 2
N Im (17 in. lbs.) torque.
(4) Connect electrical connector to idle air control
motor. (5) Connect negative cable to battery.
FUEL INJECTOR RAIL ASSEMBLY
REMOVAL
(1) Perform fuel system pressure release procedure
before servicing or starting repairs. Refer to Fuel
System Pressure Release Procedure in this section. (2) Disconnect negative cable from battery.
(3) Remove air cleaner and hose assembly (Fig. 1).
Fig. 2 Throttle Body
Fig. 3 Fuel Pressure Test PortFig. 4 Servicing Throttle Position Sensor
14 - 170 FUEL SYSTEMS Ä
Page 1912 of 2438
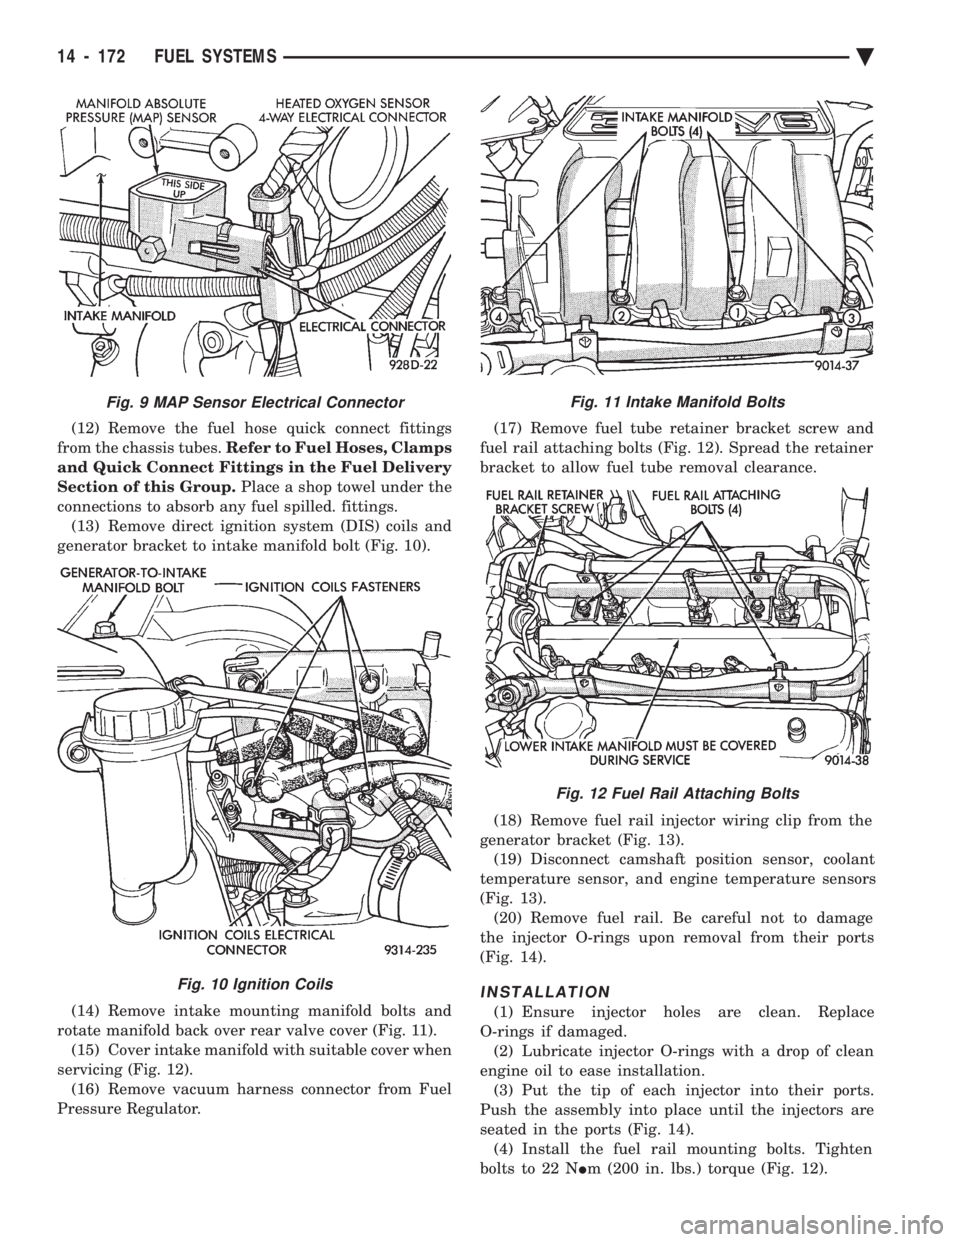
(12) Remove the fuel hose quick connect fittings
from the chassis tubes. Refer to Fuel Hoses, Clamps
and Quick Connect Fittings in the Fuel Delivery
Section of this Group. Place a shop towel under the
connections to absorb any fuel spilled. fittings. (13) Remove direct ignition system (DIS) coils and
generator bracket to intake manifold bolt (Fig. 10).
(14) Remove intake mounting manifold bolts and
rotate manifold back over rear valve cover (Fig. 11). (15) Cover intake manifold with suitable cover when
servicing (Fig. 12). (16) Remove vacuum harness connector from Fuel
Pressure Regulator. (17) Remove fuel tube retainer bracket screw and
fuel rail attaching bolts (Fig. 12). Spread the retainer
bracket to allow fuel tube removal clearance.
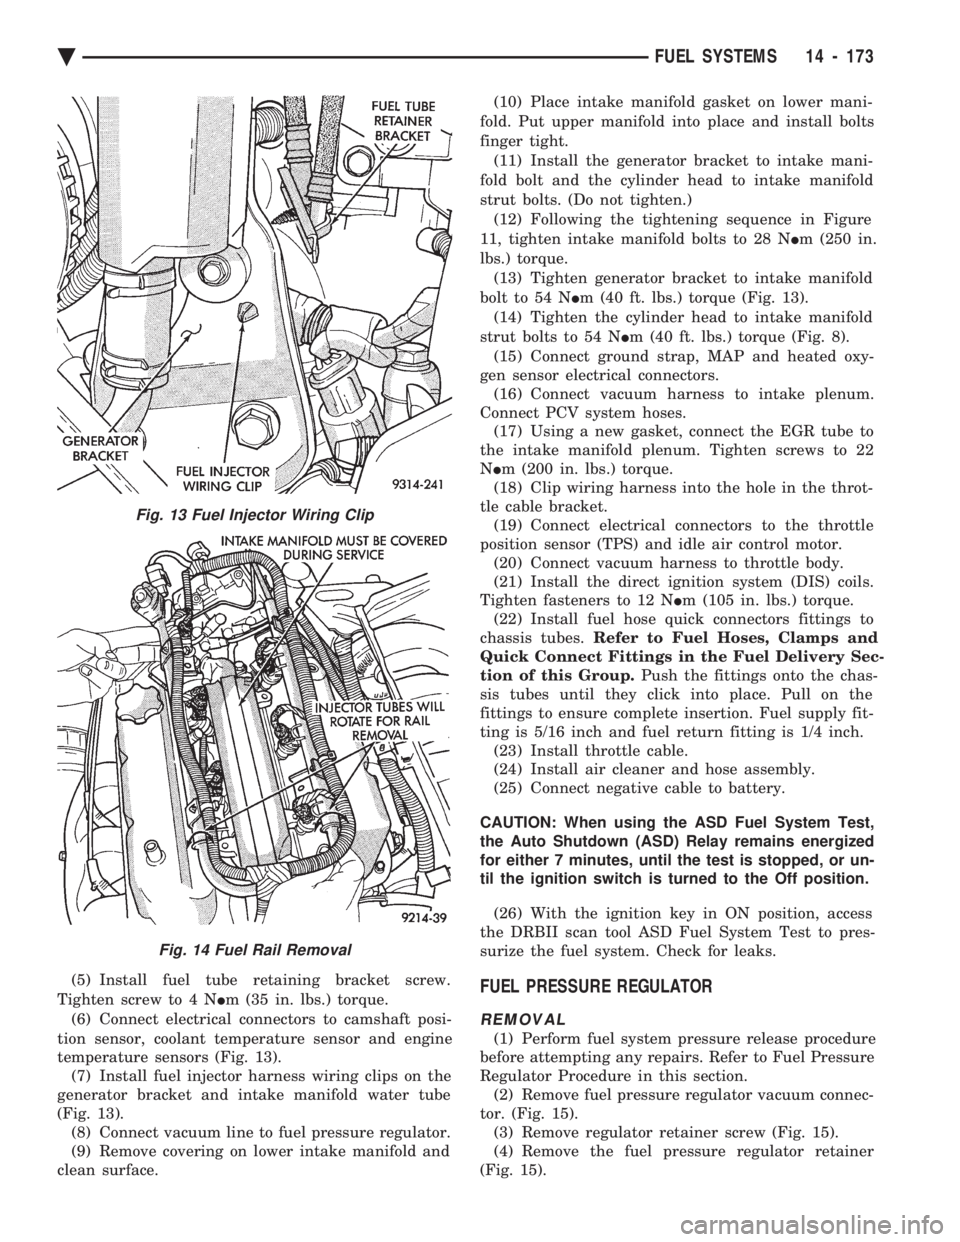
(18) Remove fuel rail injector wiring clip from the
generator bracket (Fig. 13). (19) Disconnect camshaft position sensor, coolant
temperature sensor, and engine temperature sensors
(Fig. 13). (20) Remove fuel rail. Be careful not to damage
the injector O-rings upon removal from their ports
(Fig. 14).
INSTALLATION
(1) Ensure injector holes are clean. Replace
O-rings if damaged. (2) Lubricate injector O-rings with a drop of clean
engine oil to ease installation. (3) Put the tip of each injector into their ports.
Push the assembly into place until the injectors are
seated in the ports (Fig. 14). (4) Install the fuel rail mounting bolts. Tighten
bolts to 22 N Im (200 in. lbs.) torque (Fig. 12).
Fig. 11 Intake Manifold Bolts
Fig. 12 Fuel Rail Attaching Bolts
Fig. 9 MAP Sensor Electrical Connector
Fig. 10 Ignition Coils
14 - 172 FUEL SYSTEMS Ä
Page 1913 of 2438
(5) Install fuel tube retaining bracket screw.
Tighten screw to 4 N Im (35 in. lbs.) torque.
(6) Connect electrical connectors to camshaft posi-
tion sensor, coolant temperature sensor and engine
temperature sensors (Fig. 13). (7) Install fuel injector harness wiring clips on the
generator bracket and intake manifold water tube
(Fig. 13). (8) Connect vacuum line to fuel pressure regulator.
(9) Remove covering on lower intake manifold and
clean surface. (10) Place intake manifold gasket on lower mani-
fold. Put upper manifold into place and install bolts
finger tight. (11) Install the generator bracket to intake mani-
fold bolt and the cylinder head to intake manifold
strut bolts. (Do not tighten.) (12) Following the tightening sequence in Figure
11, tighten intake manifold bolts to 28 N Im (250 in.
lbs.) torque. (13) Tighten generator bracket to intake manifold
bolt to 54 N Im (40 ft. lbs.) torque (Fig. 13).
(14) Tighten the cylinder head to intake manifold
strut bolts to 54 N Im (40 ft. lbs.) torque (Fig. 8).
(15) Connect ground strap, MAP and heated oxy-
gen sensor electrical connectors. (16) Connect vacuum harness to intake plenum.
Connect PCV system hoses. (17) Using a new gasket, connect the EGR tube to
the intake manifold plenum. Tighten screws to 22
N Im (200 in. lbs.) torque.
(18) Clip wiring harness into the hole in the throt-
tle cable bracket. (19) Connect electrical connectors to the throttle
position sensor (TPS) and idle air control motor. (20) Connect vacuum harness to throttle body.
(21) Install the direct ignition system (DIS) coils.
Tighten fasteners to 12 N Im (105 in. lbs.) torque.
(22) Install fuel hose quick connectors fittings to
chassis tubes. Refer to Fuel Hoses, Clamps and
Quick Connect Fittings in the Fuel Delivery Sec-
tion of this Group. Push the fittings onto the chas-
sis tubes until they click into place. Pull on the
fittings to ensure complete insertion. Fuel supply fit-
ting is 5/16 inch and fuel return fitting is 1/4 inch. (23) Install throttle cable.
(24) Install air cleaner and hose assembly.
(25) Connect negative cable to battery.
CAUTION: When using the ASD Fuel System Test,
the Auto Shutdown (ASD) Relay remains energized
for either 7 minutes, until the test is stopped, or un-
til the ignition switch is turned to the Off position.
(26) With the ignition key in ON position, access
the DRBII scan tool ASD Fuel System Test to pres-
surize the fuel system. Check for leaks.FUEL PRESSURE REGULATOR
REMOVAL
(1) Perform fuel system pressure release procedure
before attempting any repairs. Refer to Fuel Pressure
Regulator Procedure in this section. (2) Remove fuel pressure regulator vacuum connec-
tor. (Fig. 15). (3) Remove regulator retainer screw (Fig. 15).
(4) Remove the fuel pressure regulator retainer
(Fig. 15).
Fig. 13 Fuel Injector Wiring Clip
Fig. 14 Fuel Rail Removal
Ä FUEL SYSTEMS 14 - 173
Page 1914 of 2438
WARNING: PLACE A SHOP TOWEL UNDER FUEL
PRESSURE REGULATOR TO ABSORB ANY FUEL
SPILLAGE.
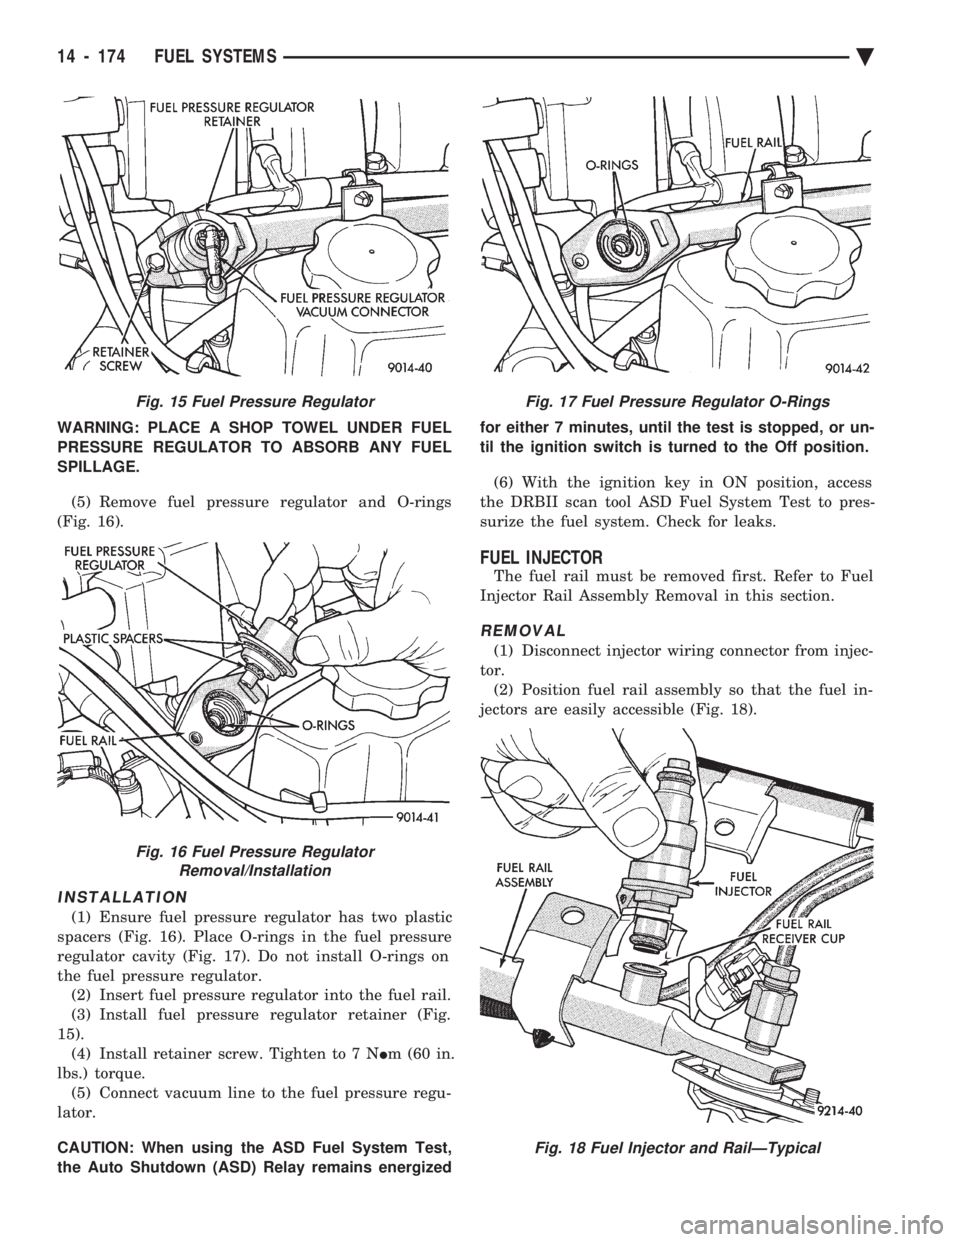
(5) Remove fuel pressure regulator and O-rings
(Fig. 16).
INSTALLATION
(1) Ensure fuel pressure regulator has two plastic
spacers (Fig. 16). Place O-rings in the fuel pressure
regulator cavity (Fig. 17). Do not install O-rings on
the fuel pressure regulator. (2) Insert fuel pressure regulator into the fuel rail.
(3) Install fuel pressure regulator retainer (Fig.
15). (4) Install retainer screw. Tighten to 7 N Im (60 in.
lbs.) torque. (5) Connect vacuum line to the fuel pressure regu-
lator.
CAUTION: When using the ASD Fuel System Test,
the Auto Shutdown (ASD) Relay remains energized for either 7 minutes, until the test is stopped, or un-
til the ignition switch is turned to the Off position.
(6) With the ignition key in ON position, access
the DRBII scan tool ASD Fuel System Test to pres-
surize the fuel system. Check for leaks.
FUEL INJECTOR
The fuel rail must be removed first. Refer to Fuel
Injector Rail Assembly Removal in this section.
REMOVAL
(1) Disconnect injector wiring connector from injec-
tor. (2) Position fuel rail assembly so that the fuel in-
jectors are easily accessible (Fig. 18).
Fig. 15 Fuel Pressure Regulator
Fig. 16 Fuel Pressure Regulator Removal/Installation
Fig. 17 Fuel Pressure Regulator O-Rings
Fig. 18 Fuel Injector and RailÐTypical
14 - 174 FUEL SYSTEMS Ä
Page 1915 of 2438
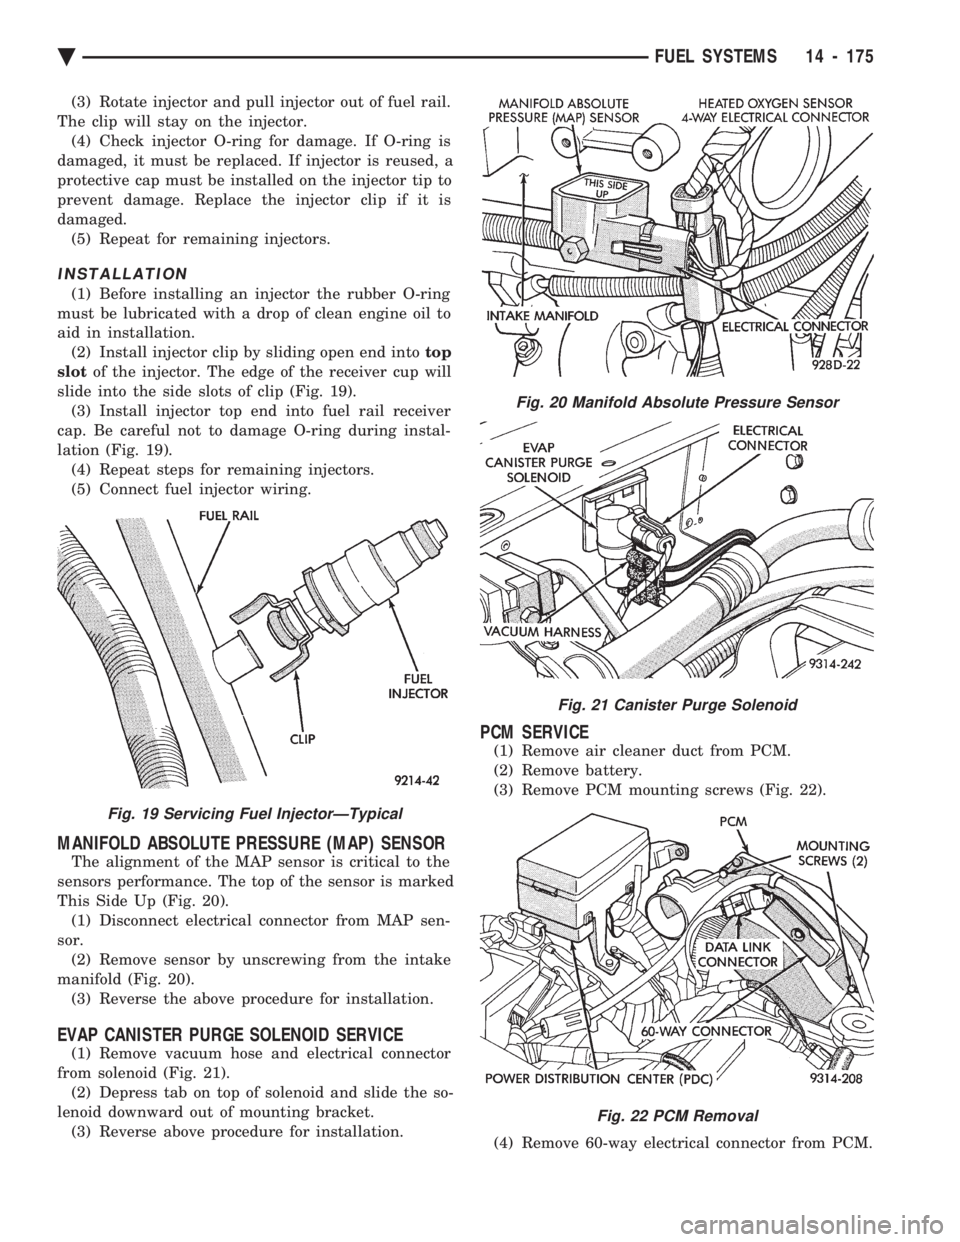
(3) Rotate injector and pull injector out of fuel rail.
The clip will stay on the injector. (4) Check injector O-ring for damage. If O-ring is
damaged, it must be replaced. If injector is reused, a
protective cap must be installed on the injector tip to
prevent damage. Replace the injector clip if it is
damaged. (5) Repeat for remaining injectors.
INSTALLATION
(1) Before installing an injector the rubber O-ring
must be lubricated with a drop of clean engine oil to
aid in installation. (2) Install injector clip by sliding open end into top
slot of the injector. The edge of the receiver cup will
slide into the side slots of clip (Fig. 19). (3) Install injector top end into fuel rail receiver
cap. Be careful not to damage O-ring during instal-
lation (Fig. 19). (4) Repeat steps for remaining injectors.
(5) Connect fuel injector wiring.
MANIFOLD ABSOLUTE PRESSURE (MAP) SENSOR
The alignment of the MAP sensor is critical to the
sensors performance. The top of the sensor is marked
This Side Up (Fig. 20). (1) Disconnect electrical connector from MAP sen-
sor. (2) Remove sensor by unscrewing from the intake
manifold (Fig. 20). (3) Reverse the above procedure for installation.
EVAP CANISTER PURGE SOLENOID SERVICE
(1) Remove vacuum hose and electrical connector
from solenoid (Fig. 21). (2) Depress tab on top of solenoid and slide the so-
lenoid downward out of mounting bracket. (3) Reverse above procedure for installation.
PCM SERVICE
(1) Remove air cleaner duct from PCM.
(2) Remove battery.
(3) Remove PCM mounting screws (Fig. 22).
(4) Remove 60-way electrical connector from PCM.
Fig. 19 Servicing Fuel InjectorÐTypical
Fig. 20 Manifold Absolute Pressure Sensor
Fig. 21 Canister Purge Solenoid
Fig. 22 PCM Removal
Ä FUEL SYSTEMS 14 - 175
Page 2150 of 2438
PRESSURE GAUGES
High quality dial type air pressure gauges are rec-
ommended. After checking pressure with the gauge,
replace valve caps and tighten finger tight.
TIRE INFLATION PRESSURES
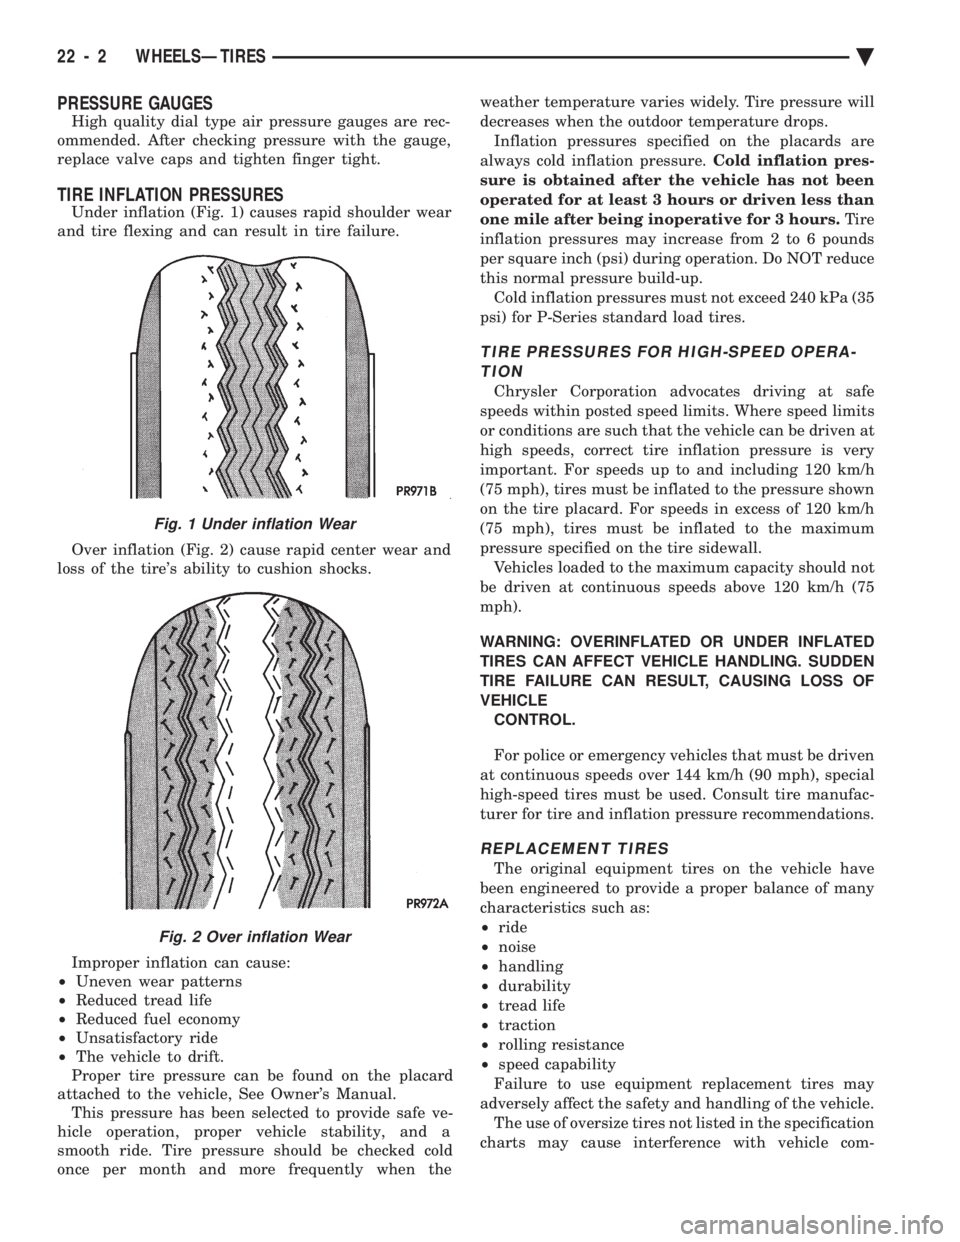
Under inflation (Fig. 1) causes rapid shoulder wear
and tire flexing and can result in tire failure.
Over inflation (Fig. 2) cause rapid center wear and
loss of the tire's ability to cushion shocks.
Improper inflation can cause:
² Uneven wear patterns
² Reduced tread life
² Reduced fuel economy
² Unsatisfactory ride
² The vehicle to drift.
Proper tire pressure can be found on the placard
attached to the vehicle, See Owner's Manual. This pressure has been selected to provide safe ve-
hicle operation, proper vehicle stability, and a
smooth ride. Tire pressure should be checked cold
once per month and more frequently when the weather temperature varies widely. Tire pressure will
decreases when the outdoor temperature drops.
Inflation pressures specified on the placards are
always cold inflation pressure. Cold inflation pres-
sure is obtained after the vehicle has not been
operated for at least 3 hours or driven less than
one mile after being inoperative for 3 hours. Tire
inflation pressures may increase from 2 to 6 pounds
per square inch (psi) during operation. Do NOT reduce
this normal pressure build-up. Cold inflation pressures must not exceed 240 kPa (35
psi) for P-Series standard load tires.
TIRE PRESSURES FOR HIGH-SPEED OPERA- TION
Chrysler Corporation advocates driving at safe
speeds within posted speed limits. Where speed limits
or conditions are such that the vehicle can be driven at
high speeds, correct tire inflation pressure is very
important. For speeds up to and including 120 km/h
(75 mph), tires must be inflated to the pressure shown
on the tire placard. For speeds in excess of 120 km/h
(75 mph), tires must be inflated to the maximum
pressure specified on the tire sidewall. Vehicles loaded to the maximum capacity should not
be driven at continuous speeds above 120 km/h (75
mph).
WARNING: OVERINFLATED OR UNDER INFLATED
TIRES CAN AFFECT VEHICLE HANDLING. SUDDEN
TIRE FAILURE CAN RESULT, CAUSING LOSS OF
VEHICLE CONTROL.
For police or emergency vehicles that must be driven
at continuous speeds over 144 km/h (90 mph), special
high-speed tires must be used. Consult tire manufac-
turer for tire and inflation pressure recommendations.
REPLACEMENT TIRES
The original equipment tires on the vehicle have
been engineered to provide a proper balance of many
characteristics such as:
² ride
² noise
² handling
² durability
² tread life
² traction
² rolling resistance
² speed capability
Failure to use equipment replacement tires may
adversely affect the safety and handling of the vehicle. The use of oversize tires not listed in the specification
charts may cause interference with vehicle com-
Fig. 1 Under inflation Wear
Fig. 2 Over inflation Wear
22 - 2 WHEELSÐTIRES Ä
Page 2401 of 2438
EVAPORATION CONTROL SYSTEM
The evaporation control system prevents the emis-
sion of fuel tank vapors into the atmosphere. When fuel
evaporates in the fuel tank, the vapors pass through
vent hoses or tubes to a charcoal canister. The canister
temporarily holds the vapors. The powertrain control
module (PCM) allows intake manifold vacuum to draw
vapors into the combustion chambers during certain
operating conditions. The PCM uses the canister purge
solenoid to regulate vapor flow. On 2.2L and 2.5L TBI, 3.3L, and 3.8L engines,
manifold vacuum purges the vapors at idle as well as
off idle. These engines use a bi-level purge system. The
system uses 2 sources of vacuum remove fuel vapors
from the canister. Turbo III engines use a tri-level canister purge sys-
tem. In this system, fuel vapors are drawn into the
engine through the throttle body and air cleaner. Fuel
vapors are drawn in at closed throttle, part throttle,
and wide open throttle (in boost). The 2.5L MPI (flexible fuel AA-Body) and 3.0L have
a duty cycle purge system. The powertrain control
module PCM controls vapor flow by operating the duty
cycle EVAP purge solenoid. Refer to Duty Cycle EVAP
Purge Solenoid in this section. The evaporative system uses specially manu-
factured hoses. If they need replacement, only
use fuel resistant hose.
PRESSURE RELIEF/ROLLOVER VALVE
All vehicles have a combination pressure relief and
rollover valve. The dual function valve relieves fuel
tank pressure. The valve also prevents fuel flow
through the fuel tank vent valve hoses if the vehicle
accidentally rolls over. All vehicles pass a 360É rollover. The pressure relief valve opens at a certain pressure.
When fuel tank pressure increases above the cali-
brated pressure, the valve opens to release fuel tank
vapors pressure. The evaporative (charcoal) canister
stores the vapors. For pressure relief/rollover valve
service, refer to the Fuel Tank section of Group 14.
EVAPORATIVE CANISTER
All vehicles use a sealed, maintenance free, evapora-
tive (charcoal) canister. The canister mounts to the
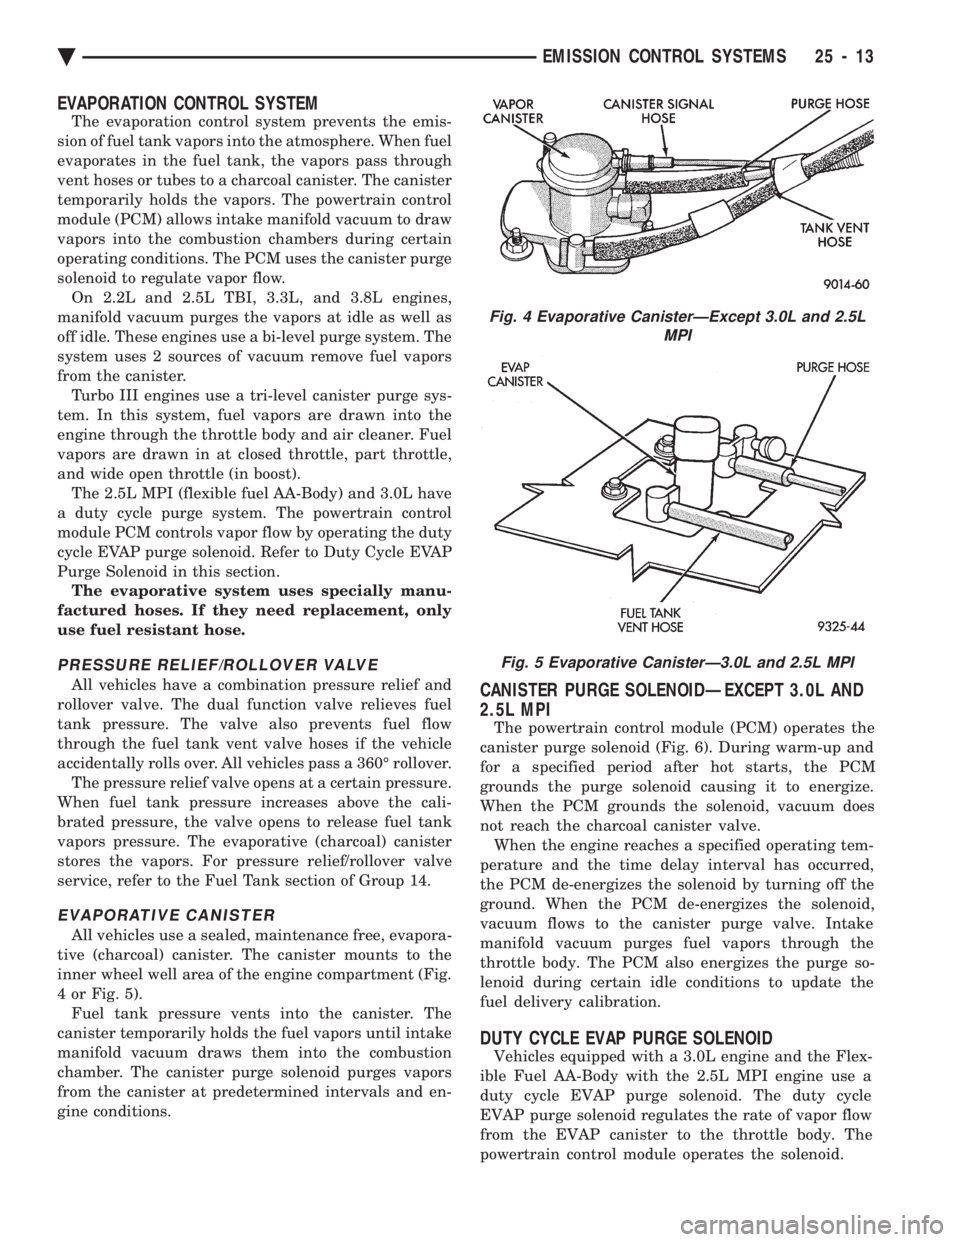
inner wheel well area of the engine compartment (Fig.
4 or Fig. 5). Fuel tank pressure vents into the canister. The
canister temporarily holds the fuel vapors until intake
manifold vacuum draws them into the combustion
chamber. The canister purge solenoid purges vapors
from the canister at predetermined intervals and en-
gine conditions.
CANISTER PURGE SOLENOIDÐEXCEPT 3.0L AND
2.5L MPI
The powertrain control module (PCM) operates the
canister purge solenoid (Fig. 6). During warm-up and
for a specified period after hot starts, the PCM
grounds the purge solenoid causing it to energize.
When the PCM grounds the solenoid, vacuum does
not reach the charcoal canister valve. When the engine reaches a specified operating tem-
perature and the time delay interval has occurred,
the PCM de-energizes the solenoid by turning off the
ground. When the PCM de-energizes the solenoid,
vacuum flows to the canister purge valve. Intake
manifold vacuum purges fuel vapors through the
throttle body. The PCM also energizes the purge so-
lenoid during certain idle conditions to update the
fuel delivery calibration.
DUTY CYCLE EVAP PURGE SOLENOID
Vehicles equipped with a 3.0L engine and the Flex-
ible Fuel AA-Body with the 2.5L MPI engine use a
duty cycle EVAP purge solenoid. The duty cycle
EVAP purge solenoid regulates the rate of vapor flow
from the EVAP canister to the throttle body. The
powertrain control module operates the solenoid.
Fig. 4 Evaporative CanisterÐExcept 3.0L and 2.5L MPI
Fig. 5 Evaporative CanisterÐ3.0L and 2.5L MPI
Ä EMISSION CONTROL SYSTEMS 25 - 13
Page 2402 of 2438
During the cold start warm-up period and the hot
start time delay, the PCM does not energize the so-
lenoid. When de-energized, no vapors are purged.
The PCM de-energizes the solenoid during open loop
operation. The engine enters closed loop operation after it
reaches a specified temperature and the time delay
ends. During closed loop operation, the PCM ener-
gizes and de-energizes the solenoid approximately 5
to 10 times per second, depending upon operating
conditions. The PCM varies the vapor flow rate by
changing solenoid pulse width. Pulse width is the
amount of time the solenoid energizes. The PCM ad-
justs solenoid pulse width based on engine air flow. A rubber boot covers the duty cycle EVAP purge
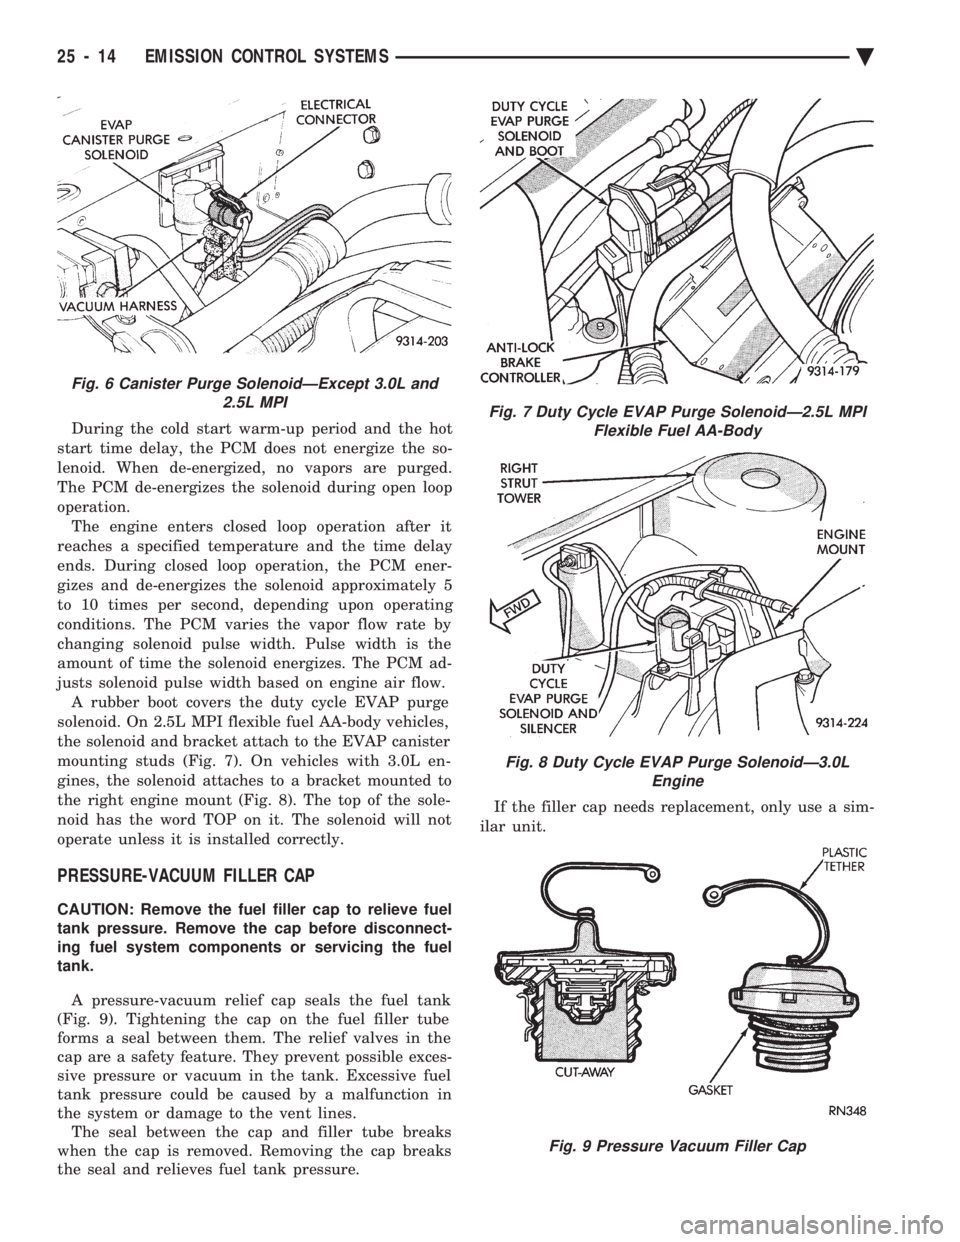
solenoid. On 2.5L MPI flexible fuel AA-body vehicles,
the solenoid and bracket attach to the EVAP canister
mounting studs (Fig. 7). On vehicles with 3.0L en-
gines, the solenoid attaches to a bracket mounted to
the right engine mount (Fig. 8). The top of the sole-
noid has the word TOP on it. The solenoid will not
operate unless it is installed correctly.
PRESSURE-VACUUM FILLER CAP
CAUTION: Remove the fuel filler cap to relieve fuel
tank pressure. Remove the cap before disconnect-
ing fuel system components or servicing the fuel
tank.
A pressure-vacuum relief cap seals the fuel tank
(Fig. 9). Tightening the cap on the fuel filler tube
forms a seal between them. The relief valves in the
cap are a safety feature. They prevent possible exces-
sive pressure or vacuum in the tank. Excessive fuel
tank pressure could be caused by a malfunction in
the system or damage to the vent lines. The seal between the cap and filler tube breaks
when the cap is removed. Removing the cap breaks
the seal and relieves fuel tank pressure. If the filler cap needs replacement, only use a sim-
ilar unit.
Fig. 6 Canister Purge SolenoidÐExcept 3.0L and 2.5L MPI
Fig. 7 Duty Cycle EVAP Purge SolenoidÐ2.5L MPIFlexible Fuel AA-Body
Fig. 8 Duty Cycle EVAP Purge SolenoidÐ3.0L Engine
Fig. 9 Pressure Vacuum Filler Cap
25 - 14 EMISSION CONTROL SYSTEMS Ä
Page 2408 of 2438
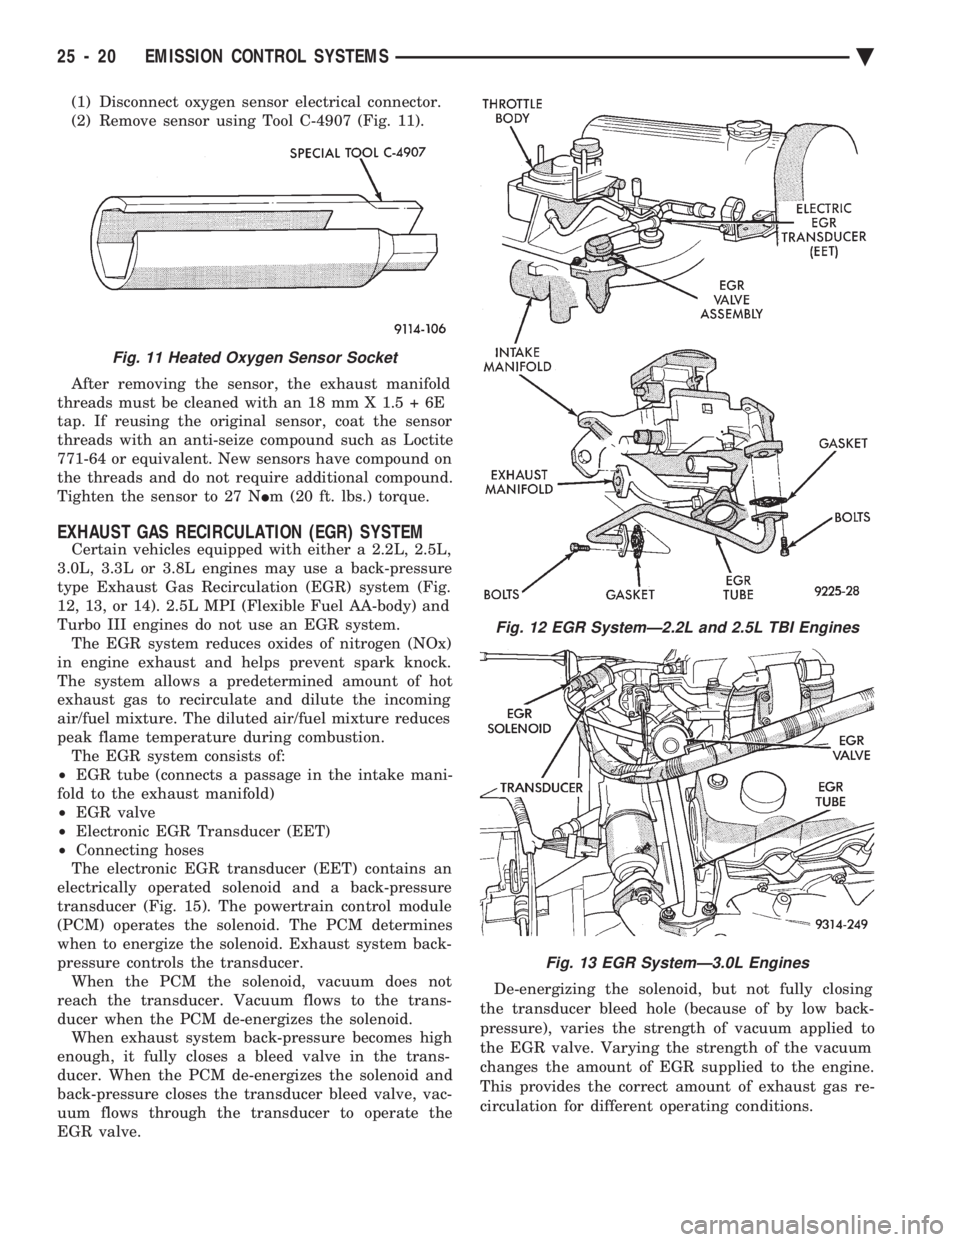
(1) Disconnect oxygen sensor electrical connector.
(2) Remove sensor using Tool C-4907 (Fig. 11).
After removing the sensor, the exhaust manifold
threads must be cleaned with an 18 mm X 1.5 + 6E
tap. If reusing the original sensor, coat the sensor
threads with an anti-seize compound such as Loctite
771-64 or equivalent. New sensors have compound on
the threads and do not require additional compound.
Tighten the sensor to 27 N Im (20 ft. lbs.) torque.
EXHAUST GAS RECIRCULATION (EGR) SYSTEM
Certain vehicles equipped with either a 2.2L, 2.5L,
3.0L, 3.3L or 3.8L engines may use a back-pressure
type Exhaust Gas Recirculation (EGR) system (Fig.
12, 13, or 14). 2.5L MPI (Flexible Fuel AA-body) and
Turbo III engines do not use an EGR system. The EGR system reduces oxides of nitrogen (NOx)
in engine exhaust and helps prevent spark knock.
The system allows a predetermined amount of hot
exhaust gas to recirculate and dilute the incoming
air/fuel mixture. The diluted air/fuel mixture reduces
peak flame temperature during combustion. The EGR system consists of:
² EGR tube (connects a passage in the intake mani-
fold to the exhaust manifold)
² EGR valve
² Electronic EGR Transducer (EET)
² Connecting hoses
The electronic EGR transducer (EET) contains an
electrically operated solenoid and a back-pressure
transducer (Fig. 15). The powertrain control module
(PCM) operates the solenoid. The PCM determines
when to energize the solenoid. Exhaust system back-
pressure controls the transducer. When the PCM the solenoid, vacuum does not
reach the transducer. Vacuum flows to the trans-
ducer when the PCM de-energizes the solenoid. When exhaust system back-pressure becomes high
enough, it fully closes a bleed valve in the trans-
ducer. When the PCM de-energizes the solenoid and
back-pressure closes the transducer bleed valve, vac-
uum flows through the transducer to operate the
EGR valve. De-energizing the solenoid, but not fully closing
the transducer bleed hole (because of by low back-
pressure), varies the strength of vacuum applied to
the EGR valve. Varying the strength of the vacuum
changes the amount of EGR supplied to the engine.
This provides the correct amount of exhaust gas re-
circulation for different operating conditions.
Fig. 11 Heated Oxygen Sensor Socket
Fig. 12 EGR SystemÐ2.2L and 2.5L TBI Engines
Fig. 13 EGR SystemÐ3.0L Engines
25 - 20 EMISSION CONTROL SYSTEMS Ä