service CHEVROLET DYNASTY 1993 Service Manual
[x] Cancel search | Manufacturer: CHEVROLET, Model Year: 1993, Model line: DYNASTY, Model: CHEVROLET DYNASTY 1993Pages: 2438, PDF Size: 74.98 MB
Page 1610 of 2438
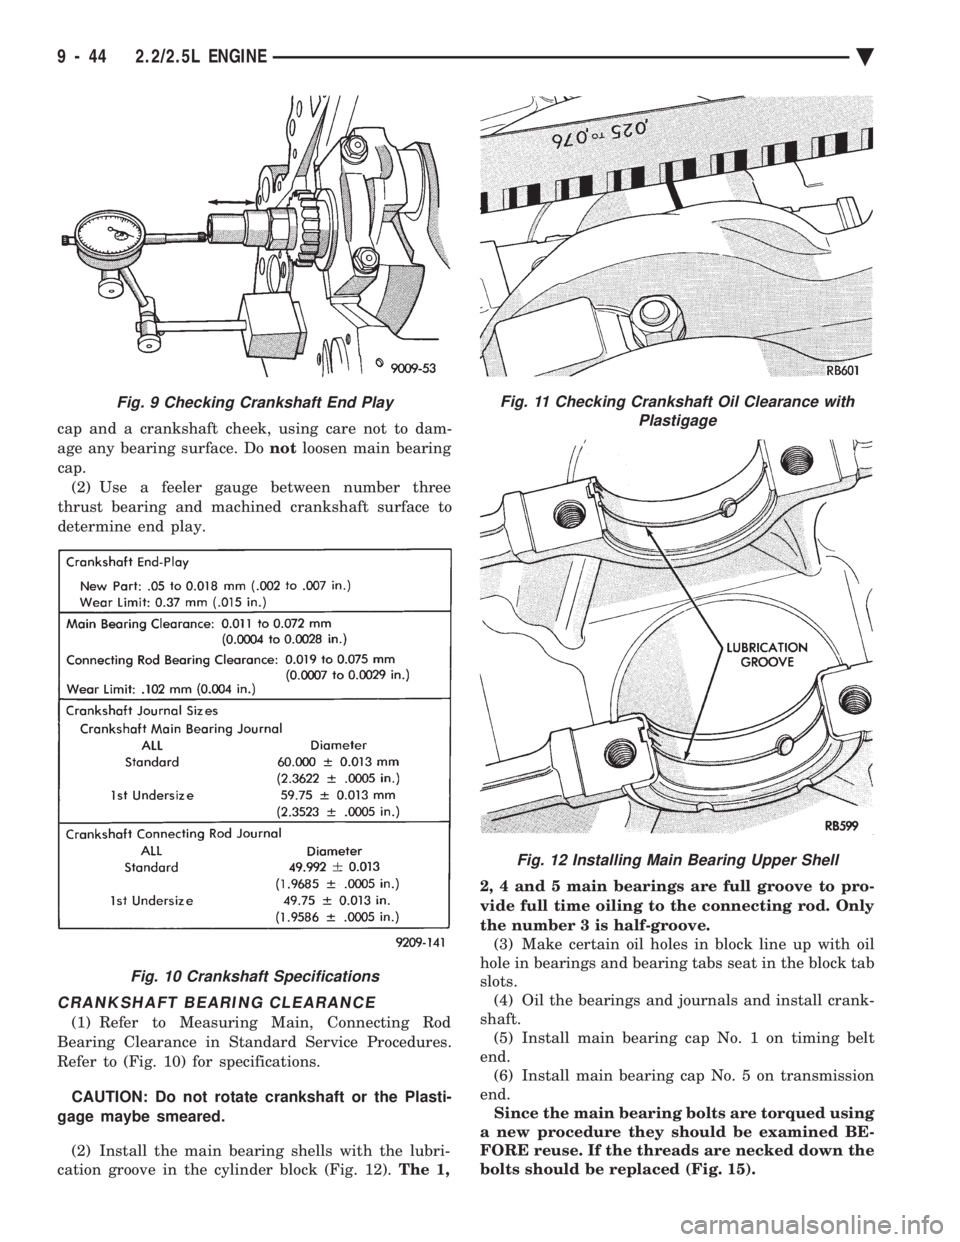
cap and a crankshaft cheek, using care not to dam-
age any bearing surface. Do notloosen main bearing
cap. (2) Use a feeler gauge between number three
thrust bearing and machined crankshaft surface to
determine end play.
CRANKSHAFT BEARING CLEARANCE
(1) Refer to Measuring Main, Connecting Rod
Bearing Clearance in Standard Service Procedures.
Refer to (Fig. 10) for specifications.
CAUTION: Do not rotate crankshaft or the Plasti-
gage maybe smeared.
(2) Install the main bearing shells with the lubri-
cation groove in the cylinder block (Fig. 12). The 1, 2, 4 and 5 main bearings are full groove to pro-
vide full time oiling to the connecting rod. Only
the number 3 is half-groove.
(3) Make certain oil holes in block line up with oil
hole in bearings and bearing tabs seat in the block tab
slots. (4) Oil the bearings and journals and install crank-
shaft. (5) Install main bearing cap No. 1 on timing belt
end. (6) Install main bearing cap No. 5 on transmission
end. Since the main bearing bolts are torqued using
a new procedure they should be examined BE-
FORE reuse. If the threads are necked down the
bolts should be replaced (Fig. 15).
Fig. 9 Checking Crankshaft End Play
Fig. 10 Crankshaft Specifications
Fig. 11 Checking Crankshaft Oil Clearance with Plastigage
Fig. 12 Installing Main Bearing Upper Shell
9 - 44 2.2/2.5L ENGINE Ä
Page 1611 of 2438

Necking can be checked by holding a scale or straight
edge against the threads or by running a M11 x 1.50
nut the full length of the thread. If all the threads
do not contact the scale or if the nut does not run
down smoothly the bolt should be replaced. (7) Before installing the bolts the threads should be
oiled with engine oil. (8) Install both bolts in each cap finger tight, then
alternately torque each bolt to assemble the cap prop-
erly. (9) Tighten the bolts to 41 N Im plus 1/4 turn (30
ft.lbs. plus 1/4 turn). (Fig. 14)
BALANCE SHAFTS
2.2L Turbo III and 2.5L engines are equipped with
two counter rotating balance shafts installed in a
carrier attached to the lower crankcase (Fig. 1). The shafts are interconnected through gears. These
gears are driven by a short chain from the crank-
shaft, to rotate at two times crankshaft speed. This
counterbalances certain engine reciprocating forces.
REMOVAL
Refer to Engine Lubrication and Timing System
and Seals Service of this group for removal procedure
of necessary components to repair balance shafts.
(1) Remove chain cover, guide and tensioner (Fig.
16). Also see Carrier Assembly Removal for service
procedures requiring only temporary relocation of as-
sembly. (2) Remove balance shaft gear and chain sprocket
retaining screws and crankshaft chain sprocket torx
screws. Remove chain and sprocket assembly. (Fig.
17) (3) Remove gear cover retaining stud (double
ended to also retain chain guide). Remove cover and
balance shaft gears (Fig. 18). (4) Remove carrier rear cover and balance shafts.
(Fig. 19). (5) Remove six carrier to crankcase attaching bolts
to separate carrier (Fig. 1).
Fig. 16 Chain Cover, Guide and Tensioner
Fig. 13 Main Bearing Caps
Fig. 14 Installing Main Bearing Caps
Fig. 15 Checking Bolts For Stretching (Necked down)
Ä 2.2/2.5L ENGINE 9 - 45
Page 1613 of 2438

(5) Turn crankshaft until number one cylinder is
at Top Dead Center (TDC). The timing marks on the
chain sprocket should line up with the parting line
on the left side of number one main bearing cap.
(Fig. 21). (6) Place chain over crankshaft sprocket so that
the nickel plated link of the chain is over the timing
mark on the crankshaft sprocket (Fig. 21). (7) Place balance shaft sprocket into the timing
chain (Fig. 17) so that the timing mark on the
sprocket (yellow dot) mates with the (lower) nickel
plated link on the chain (8) With balance shaft keyways pointing up 12
o'clock) slide the balance shaft sprocket onto the nose
of the balance shaft. The balance shaft may have to
be pushed in slightly to allow for clearance.
THE TIMING MARK ON THE SPROCKET,
THE (LOWER) NICKEL PLATED LINK, AND
THE ARROW ON THE SIDE OF THE GEAR
COVER SHOULD LINE UP WHEN THE BAL-
ANCE SHAFTS ARE TIMED CORRECTLY. (9) If the sprockets are timed correctly install the
balance shaft bolts and tighten to 28 N Im (250 in.
lbs.). A wood block placed between crankcase and
crankshaft counterbalance will prevent crankshaft
and gear rotation.CHAIN TENSIONING
(1) Install chain tensioner loosely assembled.
(2) Position guide on double ended stud making sure
tab on the guide fits into slot on the gear cover. Install
and tighten nut/washer assembly to 12 N Im (105 in.
lbs.). (3) Place a shim 1mm (.039 inch) thick x 70mm (2.75
inch) long or between tensioner and chain. Push ten-
sioner and shim up against the chain. Apply firm
pressure (5.5 to 6.6 lbs.) directly behind the ad-
justment slot to take up all slack (chain must have
shoe radius contact as shown in Fig. 22). (4) With the load applied, tighten top tensioner bolt
first, then bottom pivot bolt. Tighten bolts to 12 N Im
(105 in. lbs.), Remove shim. (5) Install carrier covers and tighten screws to 12
N Im (105 in. lbs.).
INTERMEDIATE SHAFT SERVICE
REMOVAL
CAUTION: The oil pump and distributor must be
removed before attempting to remove intermediate
shaft.
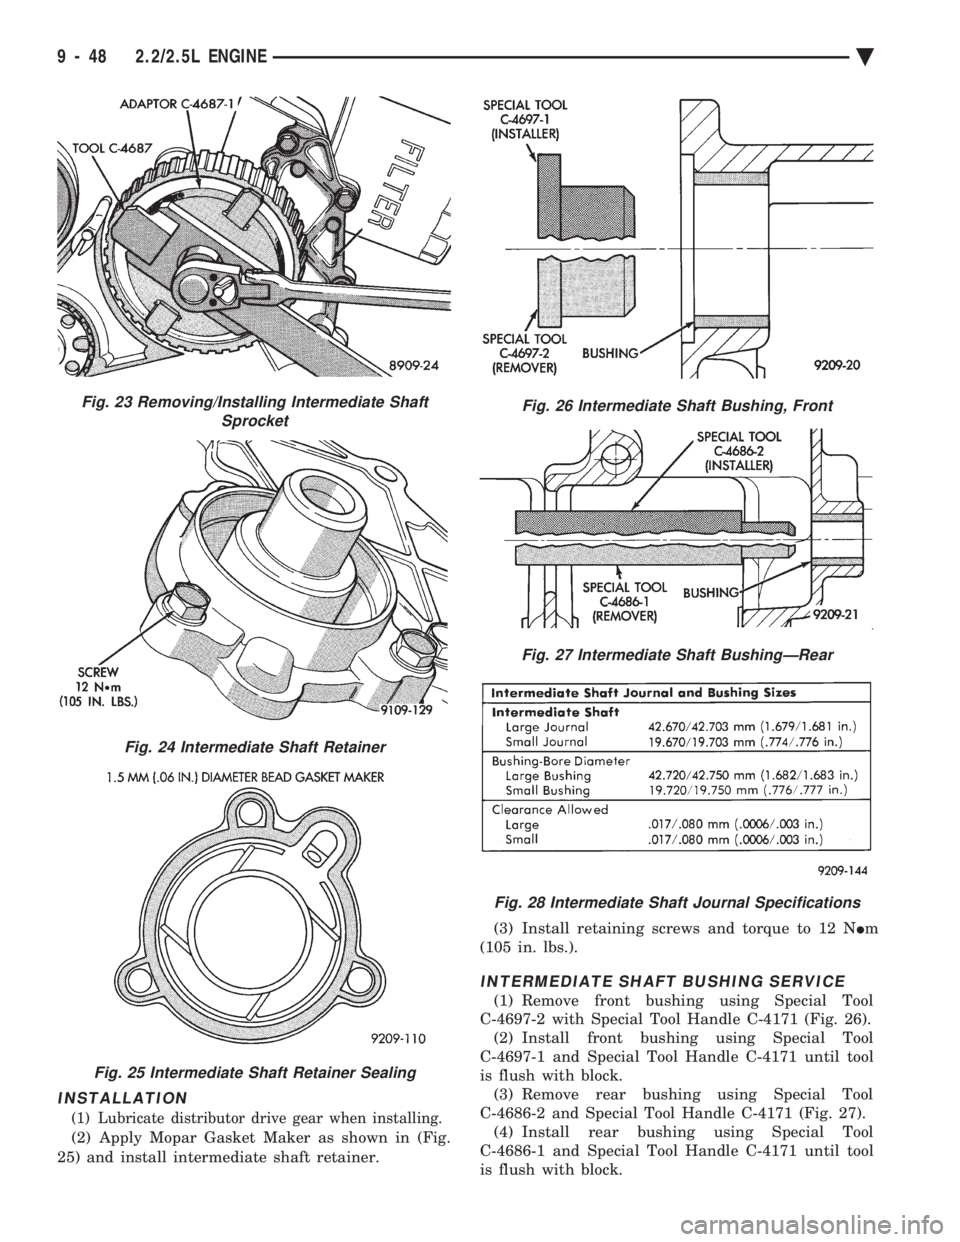
(1) Hold sprocket with Tool C-4687 and adaptor Tool
C-4687-1 when removing or installing screw (Fig. 23). (2) See Timing System and Seals for intermediate
seal removal and replacement. (3) Remove retainer screws (Fig. 24).
(4) Remove retainer and lay aside.
(5) Remove intermediate shaft.Fig. 21 Balance Shaft Timing
Fig. 22 Chain Tension Adjustment
Ä 2.2/2.5L ENGINE 9 - 47
Page 1614 of 2438
INSTALLATION
(1) Lubricate distributor drive gear when installing.
(2) Apply Mopar Gasket Maker as shown in (Fig.
25) and install intermediate shaft retainer. (3) Install retaining screws and torque to 12 N
Im
(105 in. lbs.).
INTERMEDIATE SHAFT BUSHING SERVICE
(1) Remove front bushing using Special Tool
C-4697-2 with Special Tool Handle C-4171 (Fig. 26). (2) Install front bushing using Special Tool
C-4697-1 and Special Tool Handle C-4171 until tool
is flush with block. (3) Remove rear bushing using Special Tool
C-4686-2 and Special Tool Handle C-4171 (Fig. 27). (4) Install rear bushing using Special Tool
C-4686-1 and Special Tool Handle C-4171 until tool
is flush with block.
Fig. 23 Removing/Installing Intermediate Shaft Sprocket
Fig. 24 Intermediate Shaft Retainer
Fig. 25 Intermediate Shaft Retainer Sealing
Fig. 26 Intermediate Shaft Bushing, Front
Fig. 27 Intermediate Shaft BushingÐRear
Fig. 28 Intermediate Shaft Journal Specifications
9 - 48 2.2/2.5L ENGINE Ä
Page 1615 of 2438

CYLINDER BLOCK, PISTON AND CONNECTING ROD ASSEMBLY SERVICE
PISTON AND CONNECTING RODÐREMOVAL
(1) Remove top ridge of cylinder bores with a reliable
ridge reamer before removing pistons from cylinder
block. Be sure to keep tops of pistons covered
during this operation . Mark piston with matching
cylinder number (Fig. 2).
(2) Remove oil pan. Ensure connecting rods and
connecting rod caps for cylinder identification. Identify
them if necessary (Fig. 3). (3) Valve relief toward manifold side of engine. Tur-
bocharged engine pistons will have arrow towards
front of engine. (4) Squirt hole on connecting rod must face timing
belt end of engine. (5) Pistons and connecting rods must be removed
from top of cylinder block. Rotate crankshaft so that
each connecting rod is centered in cylinder bore. (6) Remove connecting rod cap. Install connecting
rod bolt protectors on connecting rod bolts (Fig. 4).
Push each piston and rod assembly out of cylinder
bore. Be careful not to nick crankshaft journals.
(7) After removal, install bearing cap on the mat-
ing rod.
Fig. 1 Cylinder Block, Piston and Connecting Rod Assembly
Fig. 3 Identify Connecting Rod to Cylinder
Fig. 2 Piston Marking
Ä 2.2/2.5L ENGINE 9 - 49
Page 1616 of 2438

CYLINDER BLOCK CLEANING AND INSPECTION
(1) Clean cylinder block thoroughly and check all
core hole plugs for evidence of leaking. (2) If new core plugs are installed, Refer to Engine
Core Oil and Cam Plugs. (3) Examine block and cylinder bores for cracks or
fractures.
CYLINDER BORE INSPECTION
The cylinder walls should be checked for out-of-
round and taper with Tool C-119 (Fig. 5). The cylin-
der bore out-of-round is 0.050 mm (.002 inch)
maximum and cylinder bore taper is .125 mm (.005
inch) maximum. If the cylinder walls are badly
scuffed or scored, the cylinder block should be re-
bored and honed, and new pistons and rings fitted.
Whatever type of boring equipment is used, boring
and honing operation should be closely coordinated
with the fitting of pistons and rings in order that
specified clearances may be maintained. Refer to Honing Cylinder Bores outlined in the Standard
Service Procedures for specification and proce-
dures.
Measure the cylinder bore at three levels in direc-
tions A and B (Fig. 5). Top measurement should be
10mm ( 3/8 inch) down and bottom measurement
should be 10mm ( 3/8 inch.) up from bottom of bore.
Refer to (Fig. 6) for specifications.
SIZING PISTONS
Piston and cylinder wall must be clean and dry.
Piston diameter should be measured 90 degrees to
piston pin at size location shown in (Fig. 7). Cylinder
bores should be measured halfway down the cylinder
bore and transverse to the engine crankshaft center
line shown in (Fig. 5). Refer to (Fig. 6) for specifica-
Fig. 5 Checking Cylinder Bore Size
Fig. 6 Piston Size Location and Clearance Chart
Fig. 4 Connecting Rod Protectors
9 - 50 2.2/2.5L ENGINE Ä
Page 1618 of 2438

PISTON PINS
DISASSEMBLY Turbo III engine piston-pin-connecting rod assem-
blies should not be disassembled unless a malfunc-
tion is present or a damaged assembly component is
to be replaced. WARNING: APPROVED SAFETY GLASSES
MUST BE WORN DURING PISTON LOCK
RING REMOVAL OR INSTALLATION TO PRE-
VENT POSSIBLE INJURY FROM FLYING
PARTS.
(1) Carefully, remove piston pin lock rings from
piston, using a small screwdriver in removal notch
(Fig. 10). (2) Discard used lock ring.
(3) Following lock ring removal, attempt to slide
pin out of piston. If pin does not slide out freely by
hand;
² Check for burr on outer edge of lock ring groove. If
one is present, carefully scrape burr away with a
knife or other hand tool, being careful not to damage
lock ring retaining groove. (4) Slide out piston pin to complete disassembly.
(5) Inspect components, discard damaged or exces-
sively worn parts refer to specifications (Fig. 12). If a
piston is replaced, a new pin should be used.
PISTON PINS
REASSEMBLY
(1) Different lock rings are used for turbocharged
engine applications. Consult the Service Note, pro- vided with the lock ring service package, to select
the correct lock rings from the package for your ap-
plication.
(2) Carefully, install one NEWlock ring with gap
towards piston top in lock ring groove. Do not rein-
stall used lock rings. (3) Position connecting rod and slide in lightly oil
piston pinch (4) Install second NEWlock ring with gap towards
piston top in lock ring groove, use small screwdriver
if needed.
CAUTION: BOTH lock rings must be FULLY
SEATED in lock ring grooves or engine failure will
occur.
(5) Check piston pin end play pin movement be-
tween lock rings in assembly.
PISTON RINGÐREMOVAL
(1) ID mark on face of upper and intermediate pis-
ton rings must point toward piston crown. (2) Using a suitable ring expander, remove upper
and intermediate piston rings (Fig. 13). (3) Remove the upper oil ring side rail, lower oil
ring side rail and then oil ring expander from piston. (4) Clean ring grooves of any carbon deposits.
Fig. 11 Engine Piston PinsÐTurbo III, Naturally Aspirated and Flexible Fuel Vehicles
Fig. 12 Piston Pin Specifications
Fig. 13 Piston RingsÐRemoving and Installing
9 - 52 2.2/2.5L ENGINE Ä
Page 1621 of 2438
CONNECTING RODS
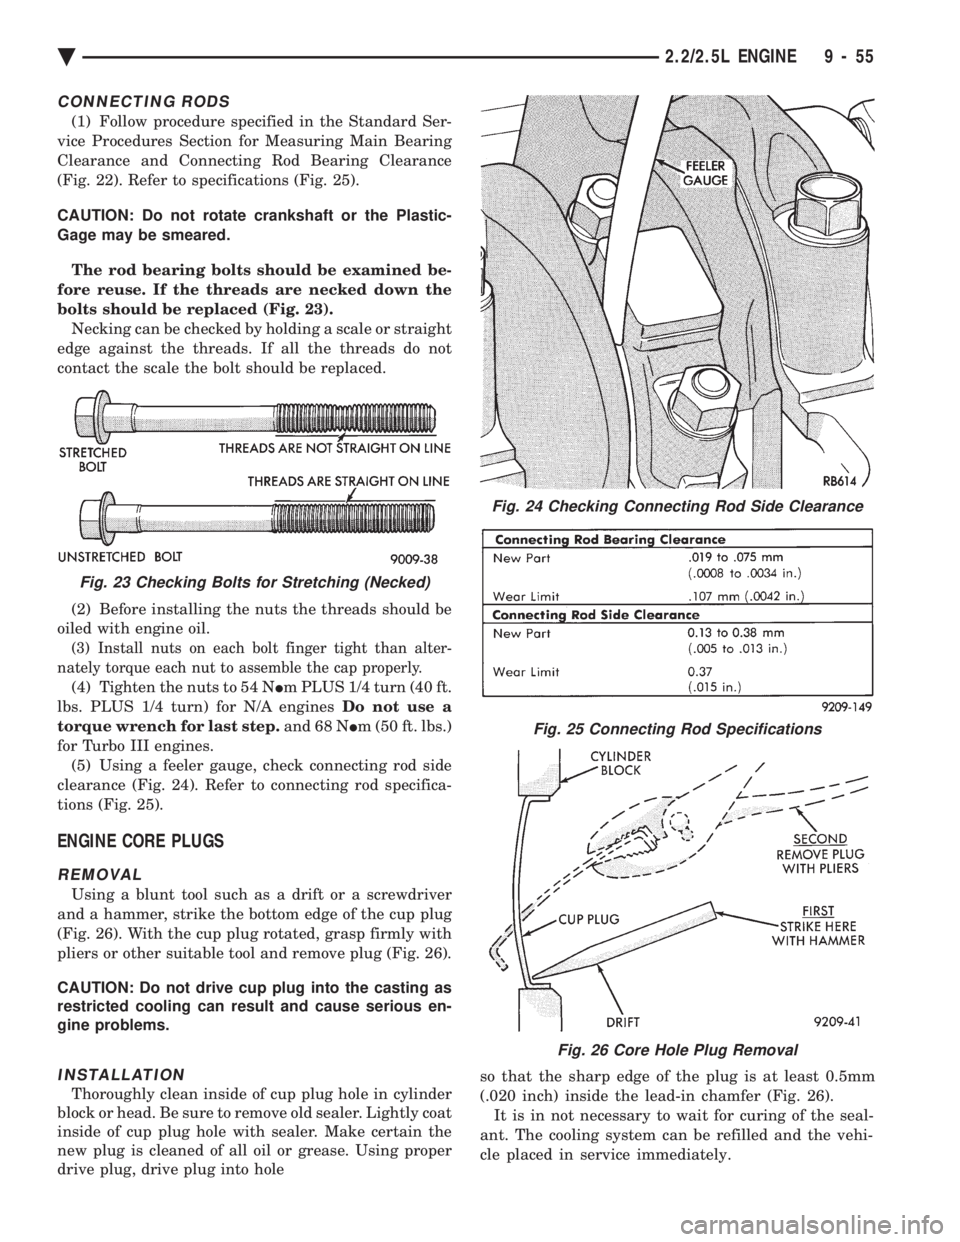
(1) Follow procedure specified in the Standard Ser-
vice Procedures Section for Measuring Main Bearing
Clearance and Connecting Rod Bearing Clearance
(Fig. 22). Refer to specifications (Fig. 25).
CAUTION: Do not rotate crankshaft or the Plastic-
Gage may be smeared.
The rod bearing bolts should be examined be-
fore reuse. If the threads are necked down the
bolts should be replaced (Fig. 23). Necking can be checked by holding a scale or straight
edge against the threads. If all the threads do not
contact the scale the bolt should be replaced.
(2) Before installing the nuts the threads should be
oiled with engine oil.
(3) Install nuts on each bolt finger tight than alter-
nately torque each nut to assemble the cap properly.
(4) Tighten the nuts to 54 N Im PLUS 1/4 turn (40 ft.
lbs. PLUS 1/4 turn) for N/A engines Do not use a
torque wrench for last step. and 68 NIm (50 ft. lbs.)
for Turbo III engines. (5) Using a feeler gauge, check connecting rod side
clearance (Fig. 24). Refer to connecting rod specifica-
tions (Fig. 25).
ENGINE CORE PLUGS
REMOVAL
Using a blunt tool such as a drift or a screwdriver
and a hammer, strike the bottom edge of the cup plug
(Fig. 26). With the cup plug rotated, grasp firmly with
pliers or other suitable tool and remove plug (Fig. 26).
CAUTION: Do not drive cup plug into the casting as
restricted cooling can result and cause serious en-
gine problems.
INSTALLATION
Thoroughly clean inside of cup plug hole in cylinder
block or head. Be sure to remove old sealer. Lightly coat
inside of cup plug hole with sealer. Make certain the
new plug is cleaned of all oil or grease. Using proper
drive plug, drive plug into hole so that the sharp edge of the plug is at least 0.5mm
(.020 inch) inside the lead-in chamfer (Fig. 26).
It is in not necessary to wait for curing of the seal-
ant. The cooling system can be refilled and the vehi-
cle placed in service immediately.
Fig. 24 Checking Connecting Rod Side Clearance
Fig. 25 Connecting Rod Specifications
Fig. 26 Core Hole Plug Removal
Fig. 23 Checking Bolts for Stretching (Necked)
Ä 2.2/2.5L ENGINE 9 - 55
Page 1624 of 2438
OIL PAN
A formed steel oil pan provides lower engine pro-
tection as well as serving as the engine oil reservoir
(Fig. 1). Pan side flanges to block are sealed with
gaskets. The oil pickup tube for some 2.2L engines
have a circular strainer and cover. The 2.5L engine
pickup is also unsupported and the lower end has a
box type strainer (Fig. 4).
PRESSURE LUBRICATION
Oil drawn up through the pickup tube is pressur-
ized by the pump and routed through the full flow
filter to the main oil gallery running the length of
the cylinder block (Fig. 2). Modified oil pickup, pump
and check valve provide increased oil flow to the
main oil gallery.
MAIN/ROD BEARINGS
A diagonal hole in each bulkhead feeds oil to each
main bearing. Drilled passages within the crankshaft
route oil from main bearing journals to crankpin
journals.
ACCESSORY SHAFT
Two separate holes supply the accessory shaft for
the N/A engines. For Turbo III engines there is a slot
in the rear shaft bushing that squirts oil onto the
oil pump drive gears (Fig. 2).
BALANCE SHAFTS
The engine balance shafts are lubricated by an ad-
ditional hole that interconnects a passage in one leg
of the balance shaft carrier to route oil down to the
carrier oil gallery. This gallery directly supplies the
balance shafts front bearings and internal machined
passages in the shafts routes oil from front to rear
shaft bearing journals.
TURBOCHARGER (WHERE EQUIPPED)
If turbocharger equipped, pressurized oil from the
main gallery to sending unit hex fitting is piped from
the fitting to the turbocharger bearing housing.
From the housing a hose and tube connection to a
machined hole in the block provides drainback.
CAMSHAFT/HYDRAULIC LIFTERS
A vertical hole at the number five bulkhead routes
pressurized oil through a restrictor up past a cylinder
head bolt to an oil gallery running the length of the
cylinder head. For 2.2/2.5L and 2.5L FFV engines
hydraulic adjusters are supplied directly from this
gallery while diagonal holes supply oil to the cam-
shaft journals. The camshaft journals are partially
slotted to allow a predetermined amount of pressur-
ized oil to pass into the bearing cap cavities with
small holes directed to spray lubricate the camshaft
lobes. For Turbo III engines oil is supplied thru oil
galleries in the head to the camshafts and rocker arm shafts which feed oil to the lash adjusters. Oil is
feed thru the rocker arms to lubricate the rollers and
the camshaft lobes.
SPLASH LUBRICATION
Oil returning to the pan from pressurized compo-
nents supplies lubrication to the valve stems. Cylinder
bores and wrist pins are splash lubricated from di-
rected holes in the connecting rods.
OIL PAN
REMOVAL
(1) Drain engine oil and remove oil pan.
(2) Clean oil pan and all gasket surfaces.
OIL PAN RAIL TO BLOCK SEALING
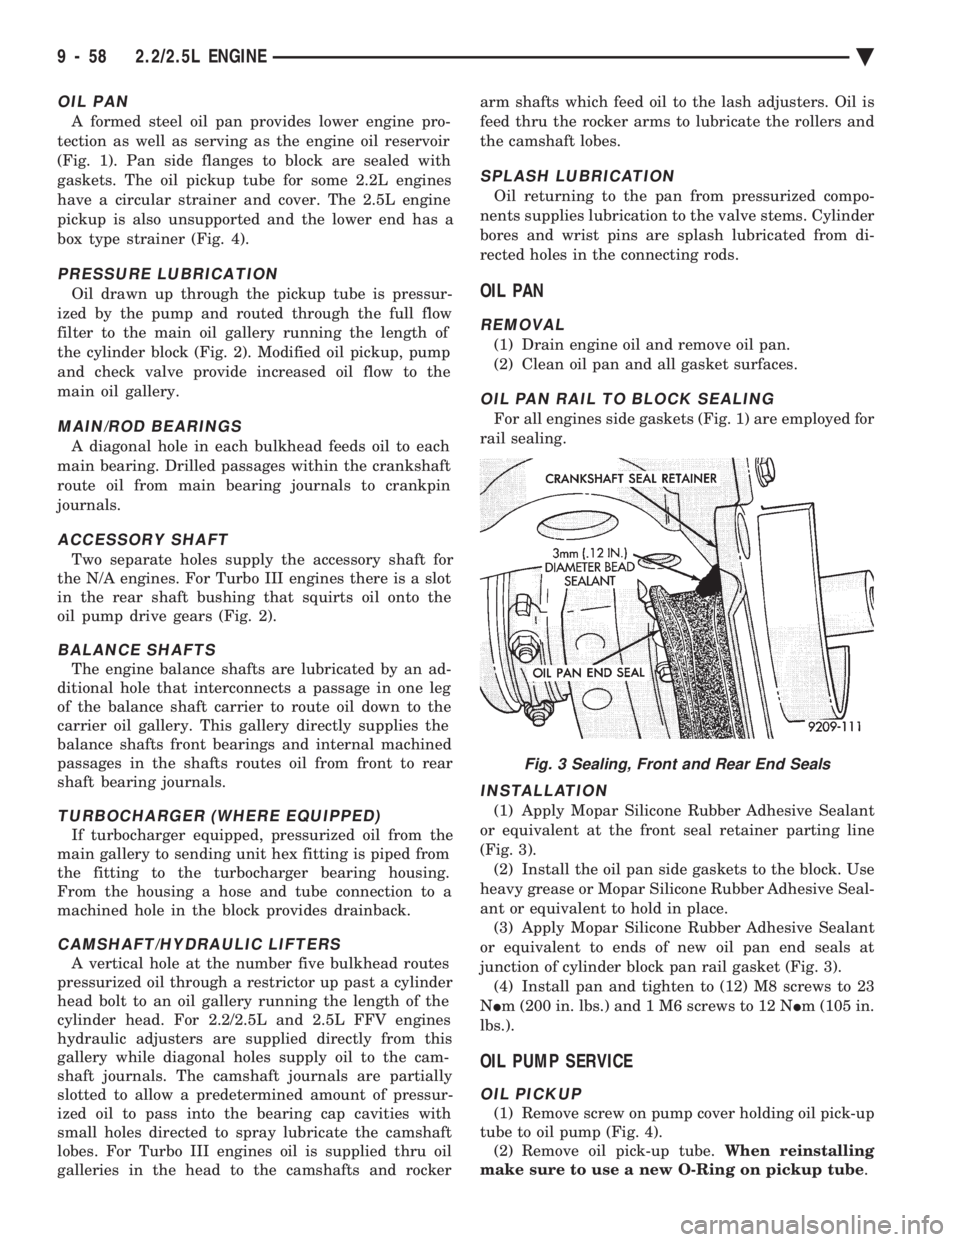
For all engines side gaskets (Fig. 1) are employed for
rail sealing.
INSTALLATION
(1) Apply Mopar Silicone Rubber Adhesive Sealant
or equivalent at the front seal retainer parting line
(Fig. 3). (2) Install the oil pan side gaskets to the block. Use
heavy grease or Mopar Silicone Rubber Adhesive Seal-
ant or equivalent to hold in place. (3) Apply Mopar Silicone Rubber Adhesive Sealant
or equivalent to ends of new oil pan end seals at
junction of cylinder block pan rail gasket (Fig. 3). (4) Install pan and tighten to (12) M8 screws to 23
N Im (200 in. lbs.) and 1 M6 screws to 12 N Im (105 in.
lbs.).
OIL PUMP SERVICE
OIL PICKUP
(1) Remove screw on pump cover holding oil pick-up
tube to oil pump (Fig. 4). (2) Remove oil pick-up tube. When reinstalling
make sure to use a new O-Ring on pickup tube .
Fig. 3 Sealing, Front and Rear End Seals
9 - 58 2.2/2.5L ENGINE Ä
Page 1632 of 2438
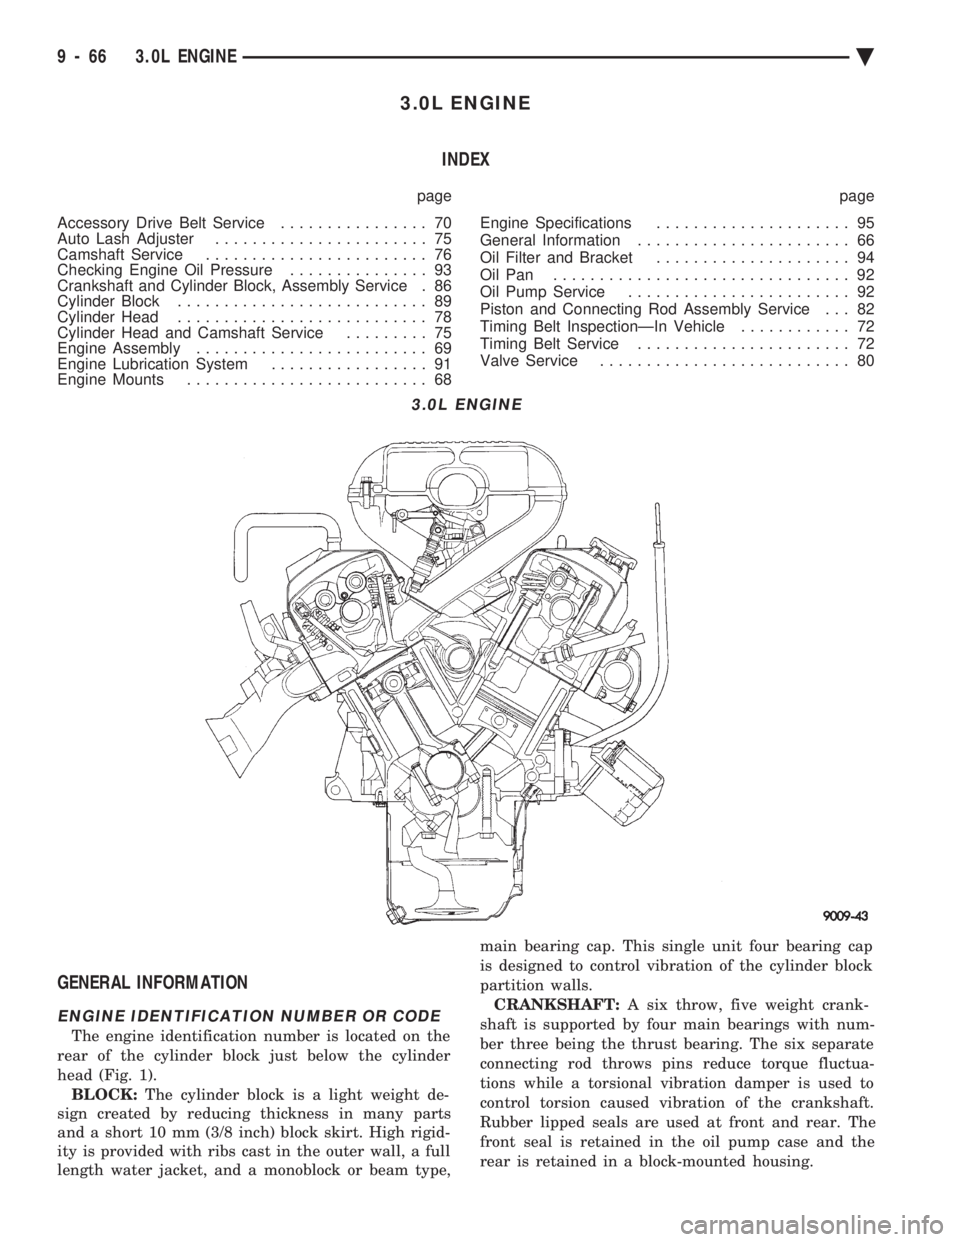
3.0L ENGINE INDEX
page page
Accessory Drive Belt Service ................ 70
Auto Lash Adjuster ....................... 75
Camshaft Service ........................ 76
Checking Engine Oil Pressure ............... 93
Crankshaft and Cylinder Block, Assembly Service . 86
Cylinder Block ........................... 89
Cylinder Head ........................... 78
Cylinder Head and Camshaft Service ......... 75
Engine Assembly ......................... 69
Engine Lubrication System ................. 91
Engine Mounts .......................... 68 Engine Specifications
..................... 95
General Information ....................... 66
Oil Filter and Bracket ..................... 94
Oil Pan ................................ 92
Oil Pump Service ........................ 92
Piston and Connecting Rod Assembly Service . . . 82
Timing Belt InspectionÐIn Vehicle ............ 72
Timing Belt Service ....................... 72
Valve Service ........................... 80
GENERAL INFORMATION
ENGINE IDENTIFICATION NUMBER OR CODE
The engine identification number is located on the
rear of the cylinder block just below the cylinder
head (Fig. 1). BLOCK: The cylinder block is a light weight de-
sign created by reducing thickness in many parts
and a short 10 mm (3/8 inch) block skirt. High rigid-
ity is provided with ribs cast in the outer wall, a full
length water jacket, and a monoblock or beam type, main bearing cap. This single unit four bearing cap
is designed to control vibration of the cylinder block
partition walls.
CRANKSHAFT: A six throw, five weight crank-
shaft is supported by four main bearings with num-
ber three being the thrust bearing. The six separate
connecting rod throws pins reduce torque fluctua-
tions while a torsional vibration damper is used to
control torsion caused vibration of the crankshaft.
Rubber lipped seals are used at front and rear. The
front seal is retained in the oil pump case and the
rear is retained in a block-mounted housing.
3.0L ENGINE
9 - 66 3.0L ENGINE Ä