trunk CHEVROLET DYNASTY 1993 Workshop Manual
[x] Cancel search | Manufacturer: CHEVROLET, Model Year: 1993, Model line: DYNASTY, Model: CHEVROLET DYNASTY 1993Pages: 2438, PDF Size: 74.98 MB
Page 2227 of 2438
AJ-VEHICLE BODY COMPONENT SERVICE INDEX
page page
A-Pillar and Roof Rail Mouldings ............. 77
Cowl Cover ............................. 73
Cowl Panel Trim and Scuff Plates ............ 77
Door Glass ............................. 76
Door Glass Lift Plate and Guide Post ......... 76
Door Latch ............................. 75
Door Trim Panel ......................... 74
Floor Carpet ............................ 80
Front Center Console ..................... 79
Front Door and Hinge ..................... 75
Front Door Silencer and Water Shield ......... 74
Front End Splash Shields .................. 73
Front Seat Belts ......................... 78
Front Seats ............................. 78
Fuel Fill Door ........................... 84
Glass Run WeatherstripÐAJ-21 Body ......... 76
Grille .................................. 71
Grille Header Molding ..................... 71
Grille Opening Panel ...................... 71
Head Lining ............................. 81
Hood and Hinges ........................ 72
Hood Latch and Release Cable .............. 72
Inside Latch Release Handle ................ 76 Lower Grille
............................. 71
Outside Door Latch Release Handle .......... 76
Overhead Console ........................ 80
Power Door Lock Actuator .................. 76
Quarter Extension Trim Panel ............... 77
Quarter Glass Module ..................... 85
Quarter Trim Panel ....................... 77
Rear Seat Belts .......................... 78
Rear Seats ............................. 79
Rear Shelf Trim Panel ..................... 78
Rear Window Glass ...................... 81
Sun Roof Air Deflector .................... 81
Sun Roof Drain Tubes .................... 81
Sun Roof Weatherstrip .................... 81
Trunk Lid .............................. 82
Trunk Lid and Fuel Fill Door Release Cables . . . 83
Trunk Lid Hinge ......................... 82
Trunk Lid Latch .......................... 83
Trunk Lid Lock .......................... 83
Trunk Lid Luggage Rack ................... 83
Trunk Lid Torsion Bar ..................... 83
Trunk Opening Weatherstrip ................ 83
Window Regulator ........................ 75
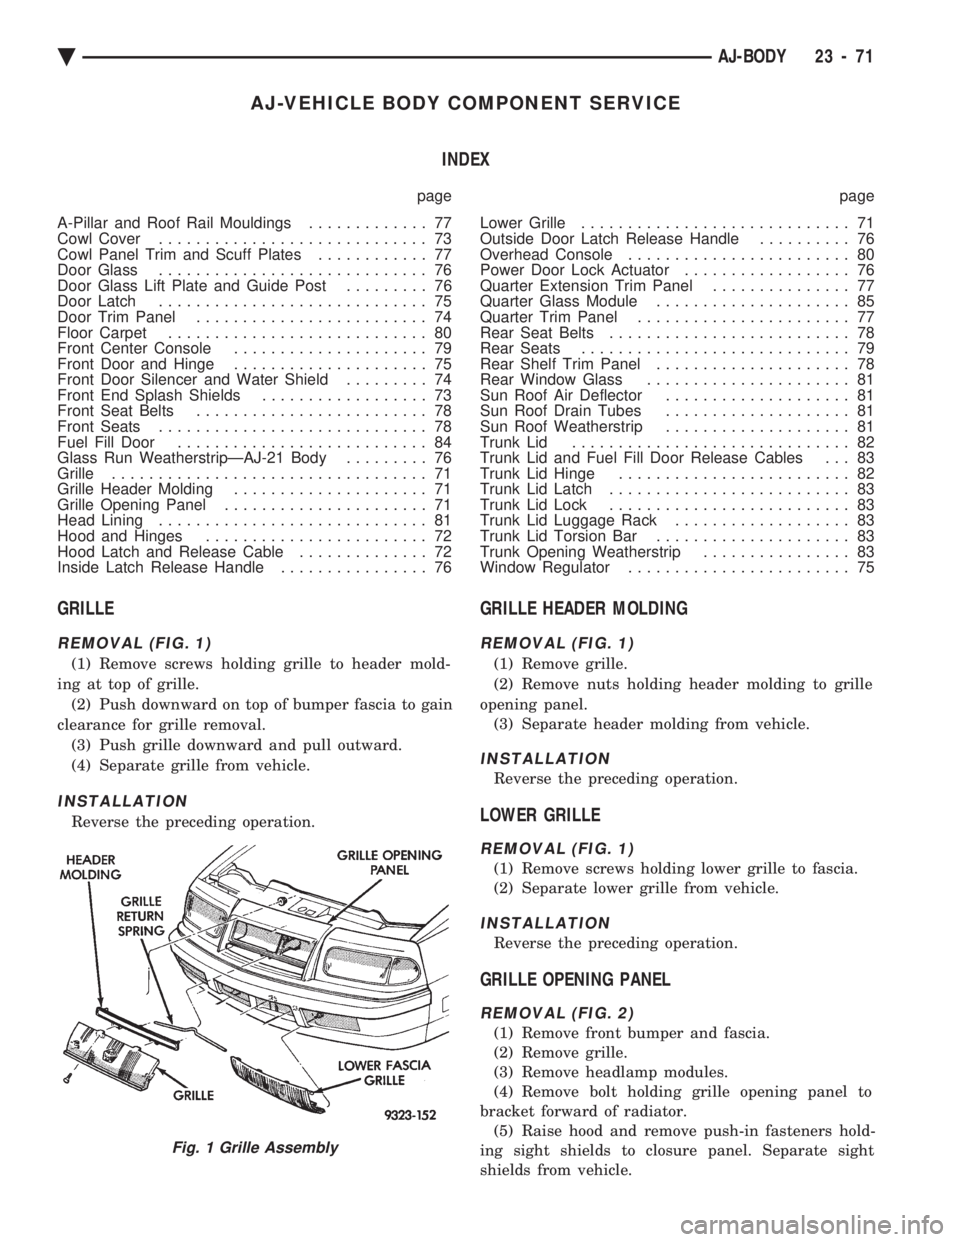
GRILLE
REMOVAL (FIG. 1)
(1) Remove screws holding grille to header mold-
ing at top of grille. (2) Push downward on top of bumper fascia to gain
clearance for grille removal. (3) Push grille downward and pull outward.
(4) Separate grille from vehicle.
INSTALLATION
Reverse the preceding operation.
GRILLE HEADER MOLDING
REMOVAL (FIG. 1)
(1) Remove grille.
(2) Remove nuts holding header molding to grille
opening panel. (3) Separate header molding from vehicle.
INSTALLATION
Reverse the preceding operation.
LOWER GRILLE
REMOVAL (FIG. 1)
(1) Remove screws holding lower grille to fascia.
(2) Separate lower grille from vehicle.
INSTALLATION
Reverse the preceding operation.
GRILLE OPENING PANEL
REMOVAL (FIG. 2)
(1) Remove front bumper and fascia.
(2) Remove grille.
(3) Remove headlamp modules.
(4) Remove bolt holding grille opening panel to
bracket forward of radiator. (5) Raise hood and remove push-in fasteners hold-
ing sight shields to closure panel. Separate sight
shields from vehicle.
Fig. 1 Grille Assembly
Ä AJ-BODY 23 - 71
Page 2235 of 2438
(6) On power seat track, remove door sill scuff
plate and disconnect wire connector. (7) Remove bolts holding seat track to cross mem-
ber. (8) Remove seat from vehicle.
FRONT SEAT INSTALLATION
Reverse the preceding operation.
REAR SEATS
REAR SEAT CUSHION REMOVAL
(1) Remove bolts holding cushion to floor.
(2) Push center occupant seat belts through open-
ings in cushion. (3) Remove cushion from vehicle.
REAR SEAT CUSHION INSTALLATION
Reverse the preceding operation.
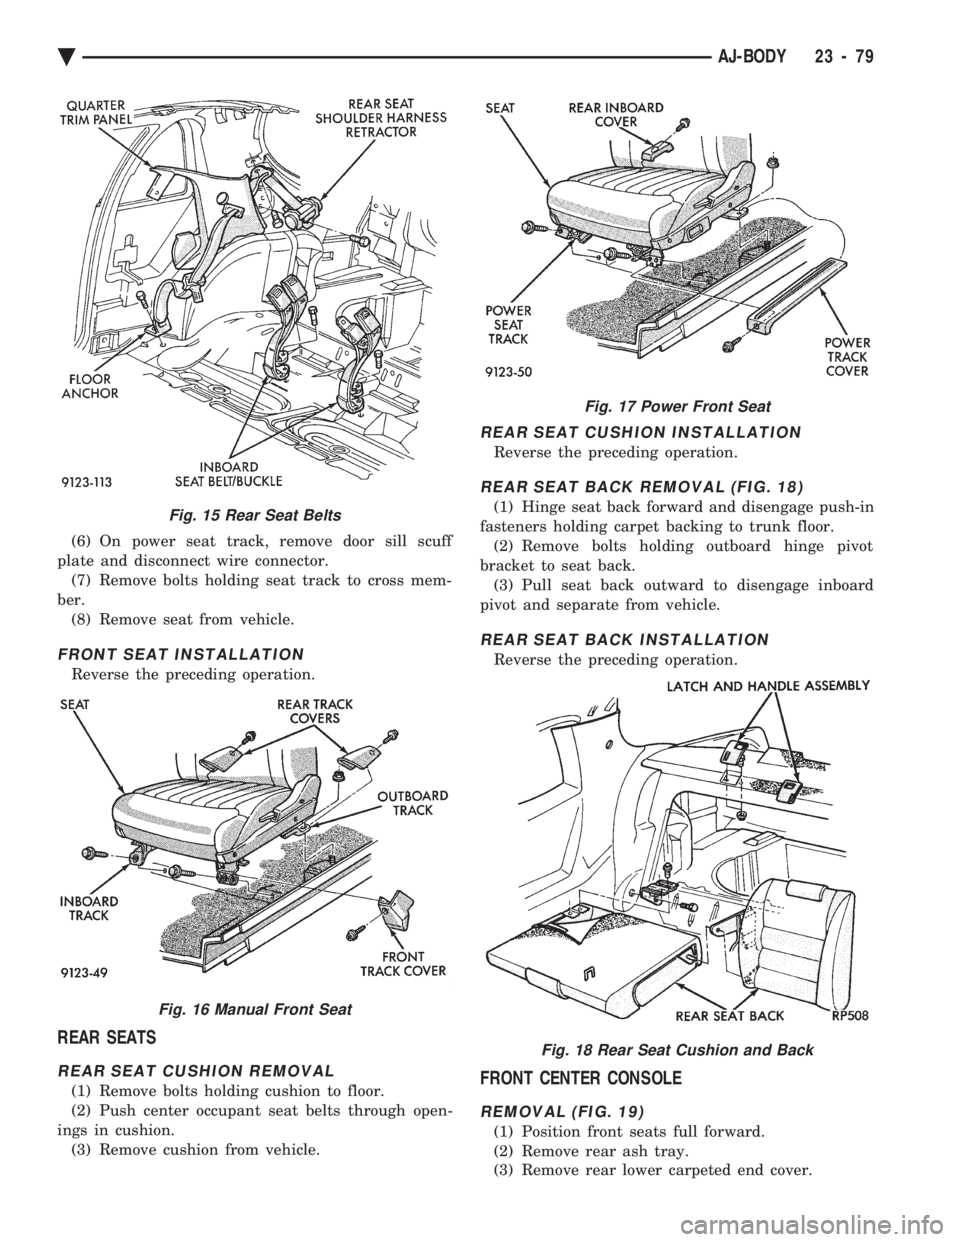
REAR SEAT BACK REMOVAL (FIG. 18)
(1) Hinge seat back forward and disengage push-in
fasteners holding carpet backing to trunk floor. (2) Remove bolts holding outboard hinge pivot
bracket to seat back. (3) Pull seat back outward to disengage inboard
pivot and separate from vehicle.
REAR SEAT BACK INSTALLATION
Reverse the preceding operation.
FRONT CENTER CONSOLE
REMOVAL (FIG. 19)
(1) Position front seats full forward.
(2) Remove rear ash tray.
(3) Remove rear lower carpeted end cover.
Fig. 15 Rear Seat Belts
Fig. 16 Manual Front Seat
Fig. 17 Power Front Seat
Fig. 18 Rear Seat Cushion and Back
Ä AJ-BODY 23 - 79
Page 2238 of 2438
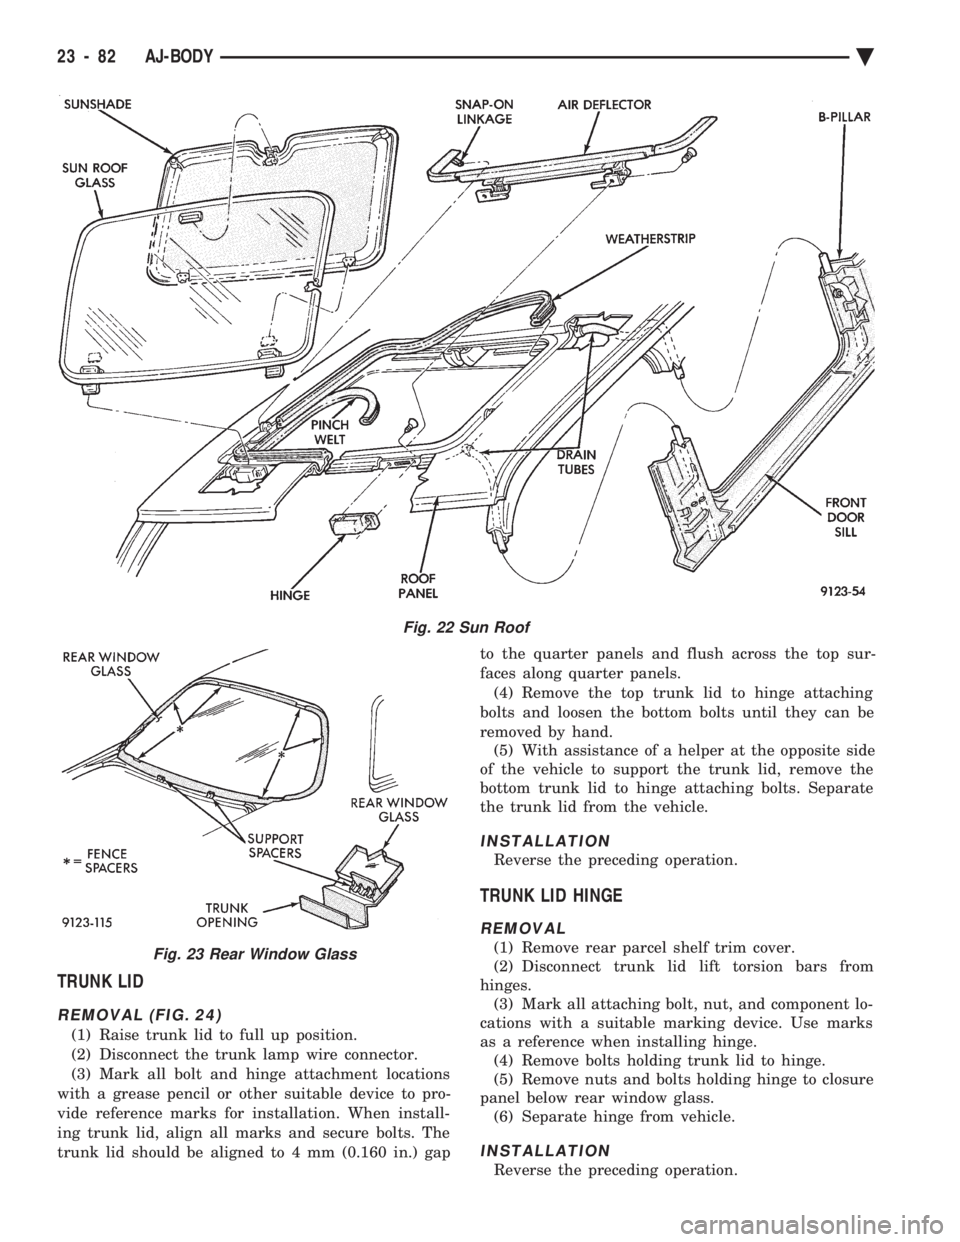
TRUNK LID
REMOVAL (FIG. 24)
(1) Raise trunk lid to full up position.
(2) Disconnect the trunk lamp wire connector.
(3) Mark all bolt and hinge attachment locations
with a grease pencil or other suitable device to pro-
vide reference marks for installation. When install-
ing trunk lid, align all marks and secure bolts. The
trunk lid should be aligned to 4 mm (0.160 in.) gap to the quarter panels and flush across the top sur-
faces along quarter panels. (4) Remove the top trunk lid to hinge attaching
bolts and loosen the bottom bolts until they can be
removed by hand. (5) With assistance of a helper at the opposite side
of the vehicle to support the trunk lid, remove the
bottom trunk lid to hinge attaching bolts. Separate
the trunk lid from the vehicle.
INSTALLATION
Reverse the preceding operation.
TRUNK LID HINGE
REMOVAL
(1) Remove rear parcel shelf trim cover.
(2) Disconnect trunk lid lift torsion bars from
hinges. (3) Mark all attaching bolt, nut, and component lo-
cations with a suitable marking device. Use marks
as a reference when installing hinge. (4) Remove bolts holding trunk lid to hinge.
(5) Remove nuts and bolts holding hinge to closure
panel below rear window glass. (6) Separate hinge from vehicle.
INSTALLATION
Reverse the preceding operation.
Fig. 22 Sun Roof
Fig. 23 Rear Window Glass
23 - 82 AJ-BODY Ä
Page 2239 of 2438
TRUNK LID TORSION BAR
REMOVAL
(1) Raise and support trunk lid in the full up posi-
tion. (2) Remove trunk lining as necessary to gain ac-
cess to torsion bars. (3) Disengage adjusting end of torsion bar from the
slot in the tension adjustment bracket. (4) Pivot torsion bar out of lift arm swivel.
(5) Disconnect torsion bar from hinge.
INSTALLATION
Reverse the preceding operation.
TRUNK LID LATCH
REMOVAL
(1) Raise trunk lid to the full up position.
(2) Remove push-in fasteners holding lining to
trunk lid as necessary. (3) Disconnect remote release cable from latch.
(4) Remove bolts holding latch to trunk lid and
separate latch from vehicle.
INSTALLATION
Insert trunk lock chill into latch release driver and
reverse the preceding operation.
TRUNK LID LOCK
REMOVAL
(1) Remove trunk lid tail light assembly. Refer to
Group 8L, Lamps for proper procedures. (2) Remove trunk latch.
(3) Remove nuts holding lock cylinder and chill to
trunk lid and separate the lock from the vehicle.
INSTALLATION
Reverse the preceding operation.
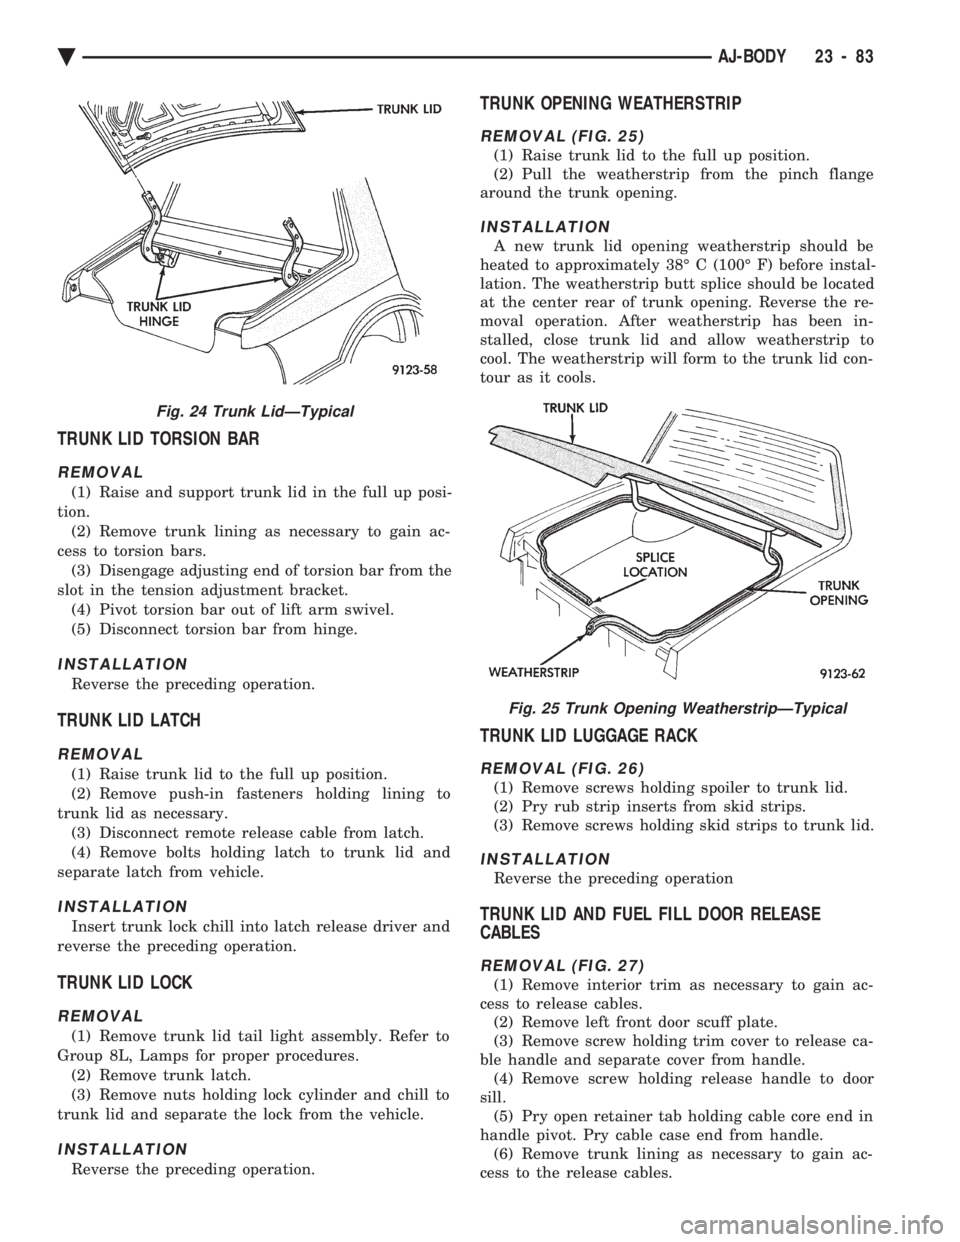
TRUNK OPENING WEATHERSTRIP
REMOVAL (FIG. 25)
(1) Raise trunk lid to the full up position.
(2) Pull the weatherstrip from the pinch flange
around the trunk opening.
INSTALLATION
A new trunk lid opening weatherstrip should be
heated to approximately 38É C (100É F) before instal-
lation. The weatherstrip butt splice should be located
at the center rear of trunk opening. Reverse the re-
moval operation. After weatherstrip has been in-
stalled, close trunk lid and allow weatherstrip to
cool. The weatherstrip will form to the trunk lid con-
tour as it cools.
TRUNK LID LUGGAGE RACK
REMOVAL (FIG. 26)
(1) Remove screws holding spoiler to trunk lid.
(2) Pry rub strip inserts from skid strips.
(3) Remove screws holding skid strips to trunk lid.
INSTALLATION
Reverse the preceding operation
TRUNK LID AND FUEL FILL DOOR RELEASE
CABLES
REMOVAL (FIG. 27)
(1) Remove interior trim as necessary to gain ac-
cess to release cables. (2) Remove left front door scuff plate.
(3) Remove screw holding trim cover to release ca-
ble handle and separate cover from handle. (4) Remove screw holding release handle to door
sill. (5) Pry open retainer tab holding cable core end in
handle pivot. Pry cable case end from handle. (6) Remove trunk lining as necessary to gain ac-
cess to the release cables.
Fig. 24 Trunk LidÐTypical
Fig. 25 Trunk Opening WeatherstripÐTypical
Ä AJ-BODY 23 - 83
Page 2240 of 2438
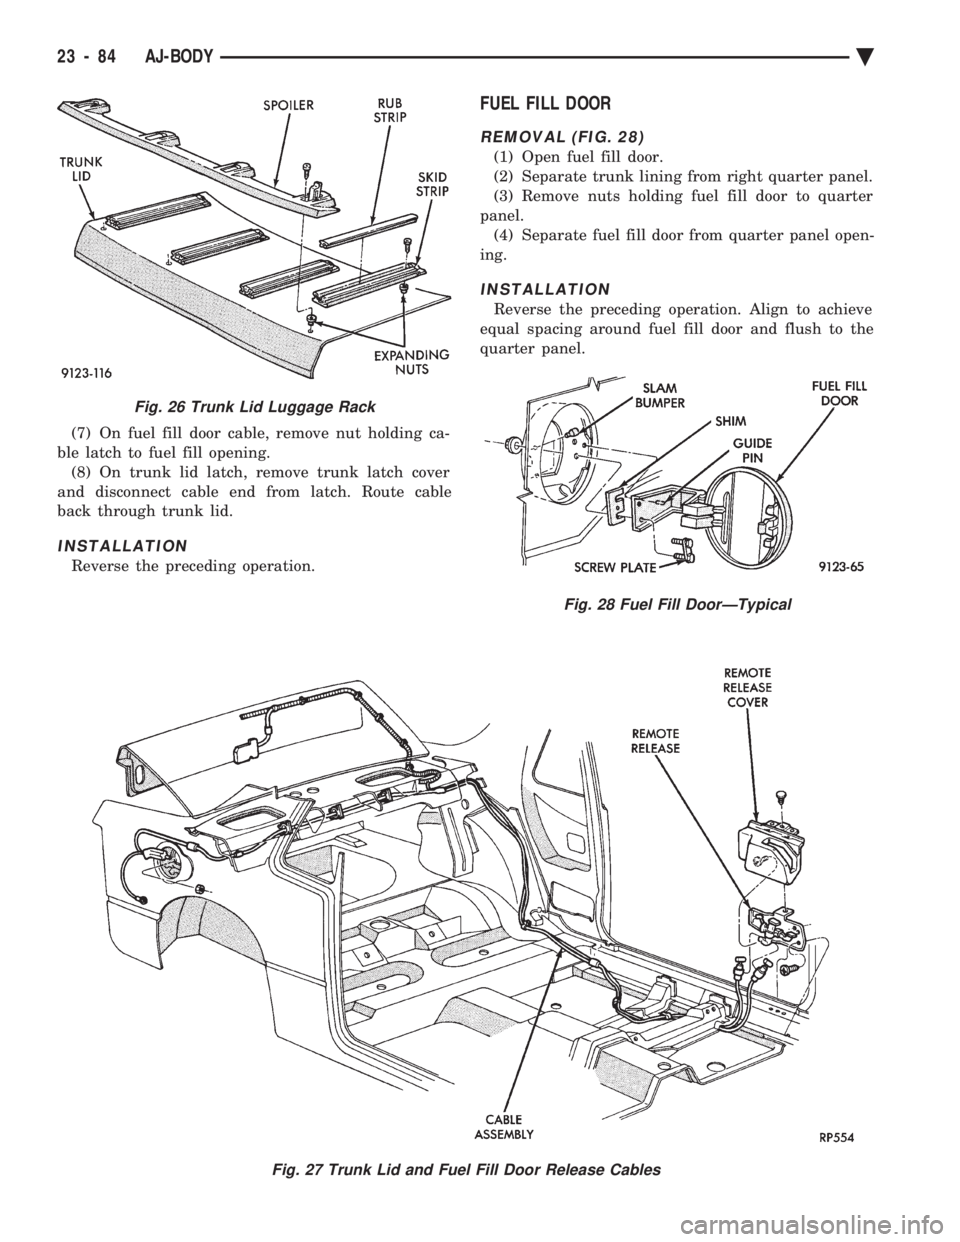
(7) On fuel fill door cable, remove nut holding ca-
ble latch to fuel fill opening. (8) On trunk lid latch, remove trunk latch cover
and disconnect cable end from latch. Route cable
back through trunk lid.
INSTALLATION
Reverse the preceding operation.
FUEL FILL DOOR
REMOVAL (FIG. 28)
(1) Open fuel fill door.
(2) Separate trunk lining from right quarter panel.
(3) Remove nuts holding fuel fill door to quarter
panel. (4) Separate fuel fill door from quarter panel open-
ing.
INSTALLATION
Reverse the preceding operation. Align to achieve
equal spacing around fuel fill door and flush to the
quarter panel.
Fig. 26 Trunk Lid Luggage Rack
Fig. 27 Trunk Lid and Fuel Fill Door Release Cables
Fig. 28 Fuel Fill DoorÐTypical
23 - 84 AJ-BODY Ä
Page 2268 of 2438
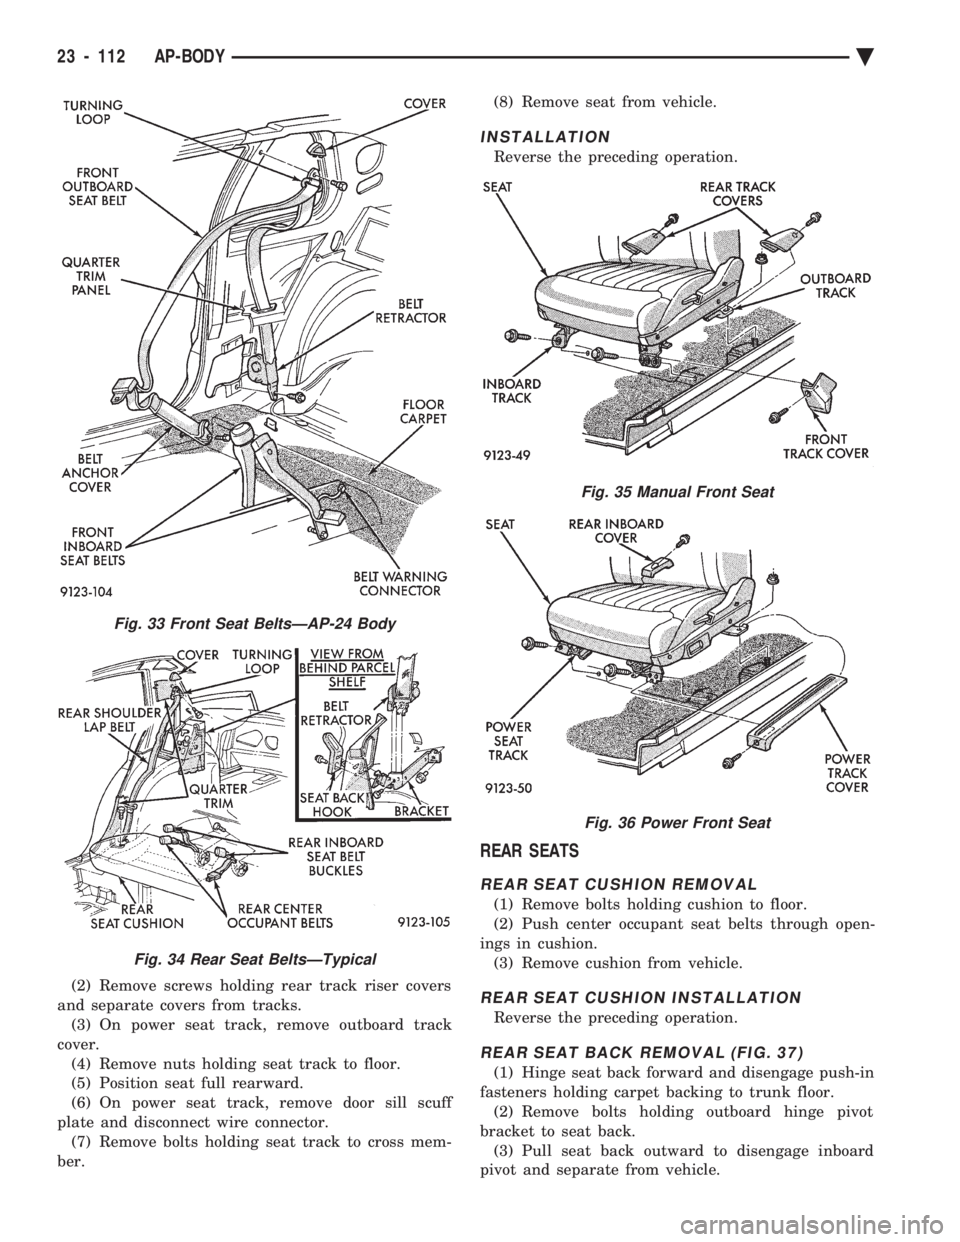
(2) Remove screws holding rear track riser covers
and separate covers from tracks. (3) On power seat track, remove outboard track
cover. (4) Remove nuts holding seat track to floor.
(5) Position seat full rearward.
(6) On power seat track, remove door sill scuff
plate and disconnect wire connector. (7) Remove bolts holding seat track to cross mem-
ber. (8) Remove seat from vehicle.
INSTALLATION
Reverse the preceding operation.
REAR SEATS
REAR SEAT CUSHION REMOVAL
(1) Remove bolts holding cushion to floor.
(2) Push center occupant seat belts through open-
ings in cushion. (3) Remove cushion from vehicle.
REAR SEAT CUSHION INSTALLATION
Reverse the preceding operation.
REAR SEAT BACK REMOVAL (FIG. 37)
(1) Hinge seat back forward and disengage push-in
fasteners holding carpet backing to trunk floor. (2) Remove bolts holding outboard hinge pivot
bracket to seat back. (3) Pull seat back outward to disengage inboard
pivot and separate from vehicle.
Fig. 33 Front Seat BeltsÐAP-24 Body
Fig. 34 Rear Seat BeltsÐTypical
Fig. 35 Manual Front Seat
Fig. 36 Power Front Seat
23 - 112 AP-BODY Ä
Page 2271 of 2438
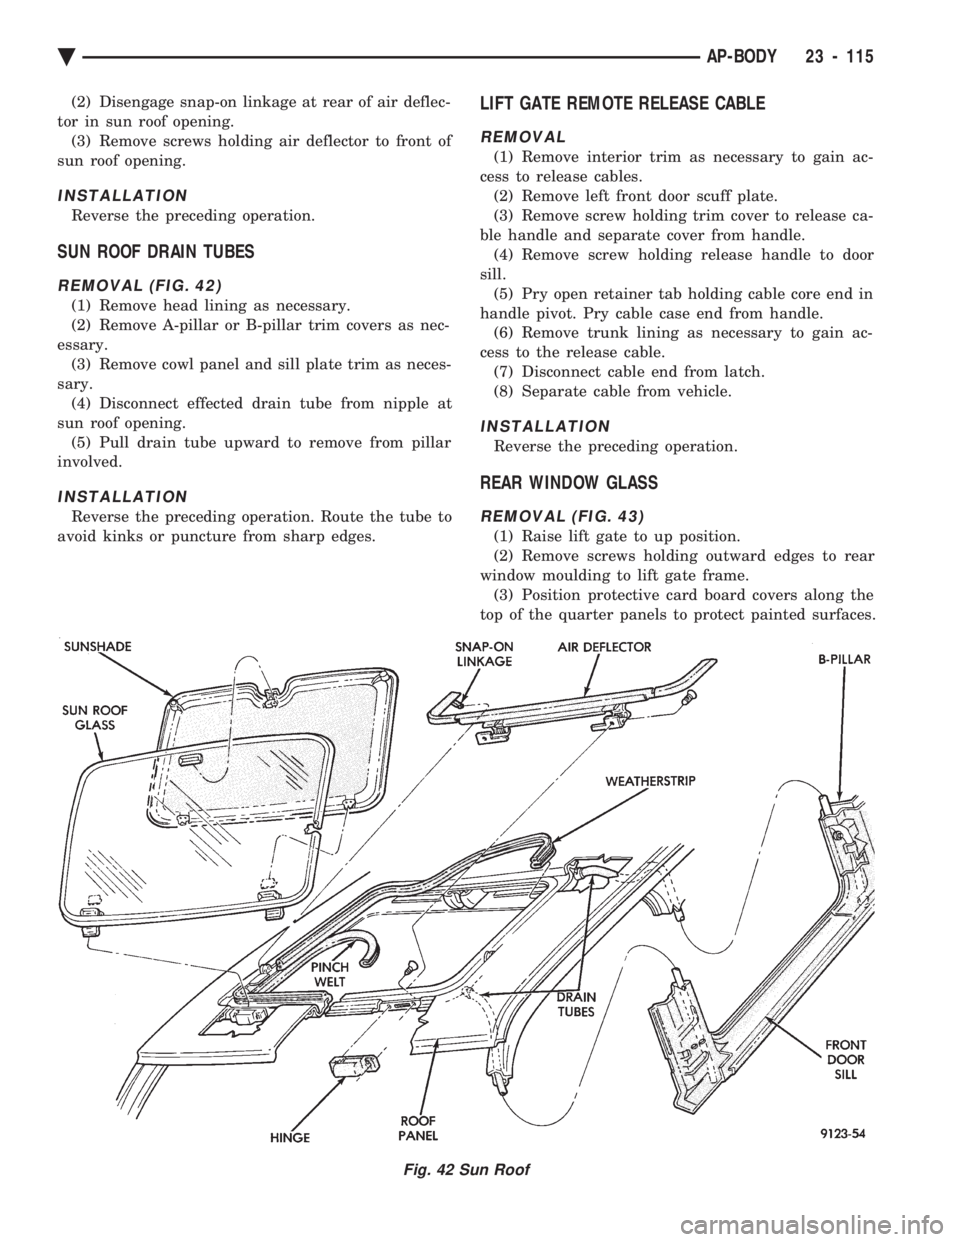
(2) Disengage snap-on linkage at rear of air deflec-
tor in sun roof opening. (3) Remove screws holding air deflector to front of
sun roof opening.
INSTALLATION
Reverse the preceding operation.
SUN ROOF DRAIN TUBES
REMOVAL (FIG. 42)
(1) Remove head lining as necessary.
(2) Remove A-pillar or B-pillar trim covers as nec-
essary. (3) Remove cowl panel and sill plate trim as neces-
sary. (4) Disconnect effected drain tube from nipple at
sun roof opening. (5) Pull drain tube upward to remove from pillar
involved.
INSTALLATION
Reverse the preceding operation. Route the tube to
avoid kinks or puncture from sharp edges.
LIFT GATE REMOTE RELEASE CABLE
REMOVAL
(1) Remove interior trim as necessary to gain ac-
cess to release cables. (2) Remove left front door scuff plate.
(3) Remove screw holding trim cover to release ca-
ble handle and separate cover from handle. (4) Remove screw holding release handle to door
sill. (5) Pry open retainer tab holding cable core end in
handle pivot. Pry cable case end from handle. (6) Remove trunk lining as necessary to gain ac-
cess to the release cable. (7) Disconnect cable end from latch.
(8) Separate cable from vehicle.
INSTALLATION
Reverse the preceding operation.
REAR WINDOW GLASS
REMOVAL (FIG. 43)
(1) Raise lift gate to up position.
(2) Remove screws holding outward edges to rear
window moulding to lift gate frame. (3) Position protective card board covers along the
top of the quarter panels to protect painted surfaces.
Fig. 42 Sun Roof
Ä AP-BODY 23 - 115
Page 2273 of 2438
AP/27-VEHICLE CONVERTIBLE BODY COMPONENT SERVICE INDEX
page page
A-Pillar and Windshield Header Weatherstrip . . . 117
Convertible Top Adjustments ............... 131
Convertible Top Header ................... 118
Convertible Top Latch Hooks ............... 131
Door Glass Alignment .................... 131
Door Glass Rear Channel ................. 127
Door Striker Guide ...................... 128
Forward Roof Rail ....................... 121
Fourth Roof Bow and Slat ................. 120
Fourth Roof Bow Slat .................... 132
Front Door Belt Moulding and Weatherstrip .... 127
Front Door Glass ........................ 125
Front Door Stationary Glass and Division Channel ............................. 126
Front Door Stationary Glass Channel Weatherstrip .......................... 126
Front Door Striker Guide Socket ............ 127
Front Seat Belt Retractor .................. 128
General Information ...................... 117
Quarter Glass and Roller Bracket ........... 132
Quarter Panel Belt Moulding ............... 129
Quarter Trim Panel ...................... 128
Rear Roof Rail ......................... 121
Rear Seat Back ......................... 128 Rear Seat Belt Retractor
.................. 129
Rear Tensioner Plate ..................... 132
Rear Window .......................... 122
Roof Linkage ........................... 121
Roof Rail Weatherstrip ................... 118
Roof Rail Weatherstrip Retainer ............. 131
Second Roof Bow and Linkage ............. 119
Sling-Well ............................. 124
Stationary Quarter Glass and Weatherstrip .... 121
Third Roof Bow ......................... 120
Top Cover ............................. 124
Top Frame ............................ 125
Top Header Trim Cover ................... 118
Top Latch ............................. 118
Top Lift Assist Cylinder ................... 122
Top Stack Down-Stop .................... 132
Top Stack Up-Stop ...................... 132
Trunk Hinge Lid ........................ 130
Trunk Lid .............................. 130
Trunk Lid Applique ...................... 130
Trunk Lid Lining ........................ 129
Trunk Opening Weatherstrip ............... 130
Windshield Header Lining ................. 117
Windshield Header Moulding ............... 117
GENERAL INFORMATION
This section will cover components that are unique
to the AP-vehicle convertible. All components that
are common to the AP-vehicle two door hardtop are
covered in the AP-Vehicle Body Components section.
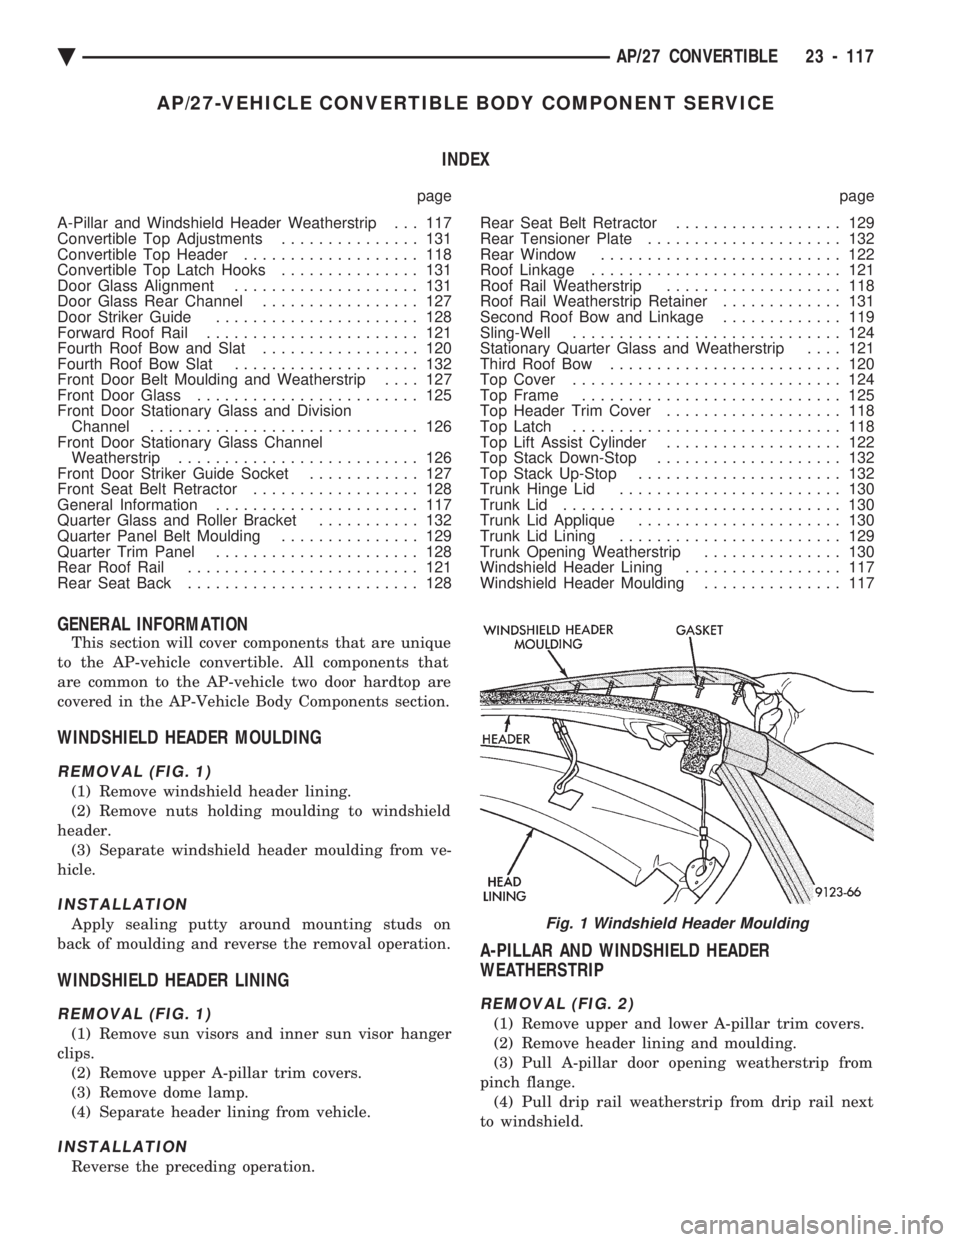
WINDSHIELD HEADER MOULDING
REMOVAL (FIG. 1)
(1) Remove windshield header lining.
(2) Remove nuts holding moulding to windshield
header. (3) Separate windshield header moulding from ve-
hicle.
INSTALLATION
Apply sealing putty around mounting studs on
back of moulding and reverse the removal operation.
WINDSHIELD HEADER LINING
REMOVAL (FIG. 1)
(1) Remove sun visors and inner sun visor hanger
clips. (2) Remove upper A-pillar trim covers.
(3) Remove dome lamp.
(4) Separate header lining from vehicle.
INSTALLATION
Reverse the preceding operation.
A-PILLAR AND WINDSHIELD HEADER
WEATHERSTRIP
REMOVAL (FIG. 2)
(1) Remove upper and lower A-pillar trim covers.
(2) Remove header lining and moulding.
(3) Pull A-pillar door opening weatherstrip from
pinch flange. (4) Pull drip rail weatherstrip from drip rail next
to windshield.
Fig. 1 Windshield Header Moulding
Ä AP/27 CONVERTIBLE 23 - 117
Page 2279 of 2438
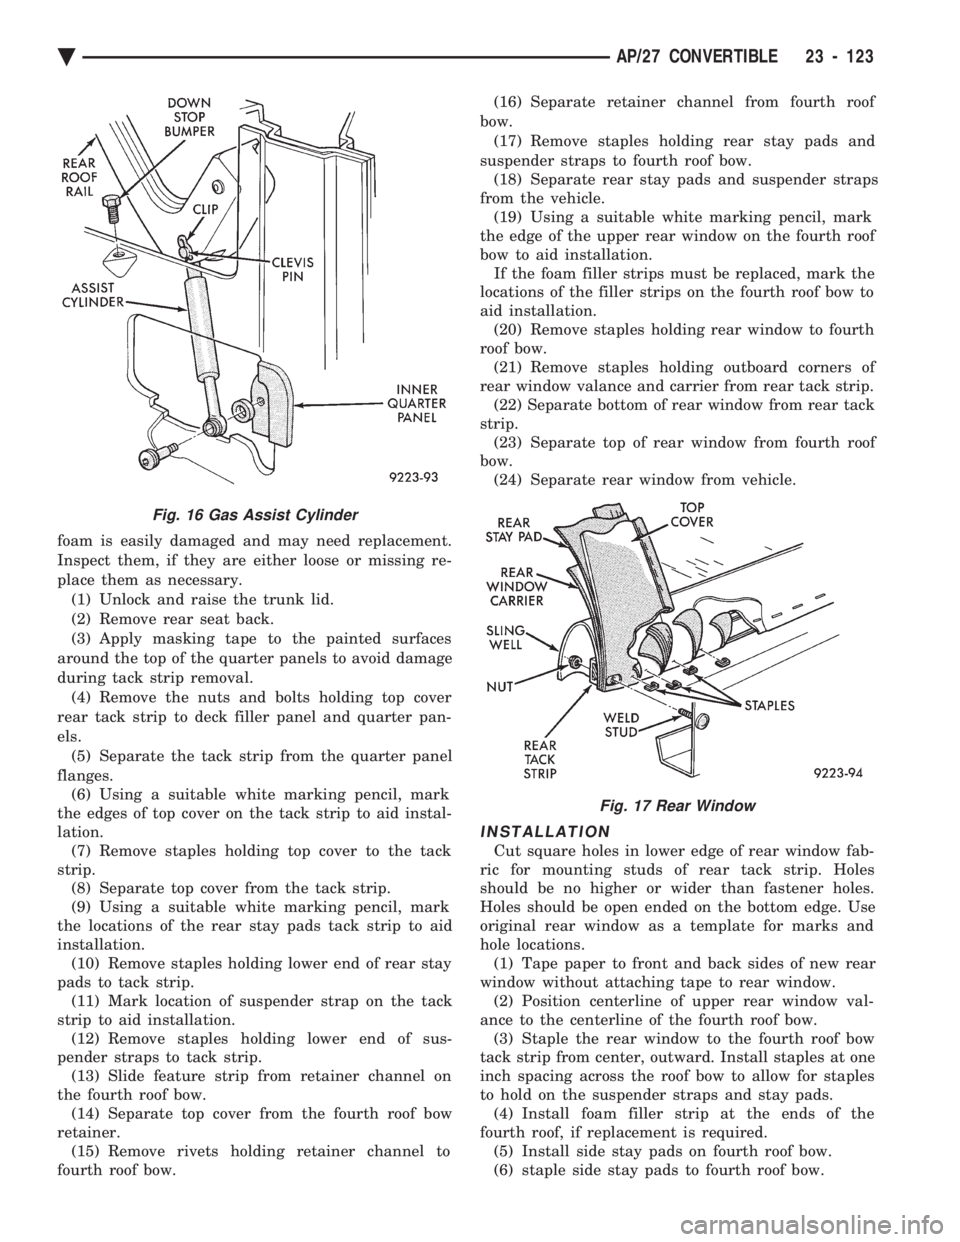
foam is easily damaged and may need replacement.
Inspect them, if they are either loose or missing re-
place them as necessary.(1) Unlock and raise the trunk lid.
(2) Remove rear seat back.
(3) Apply masking tape to the painted surfaces
around the top of the quarter panels to avoid damage
during tack strip removal. (4) Remove the nuts and bolts holding top cover
rear tack strip to deck filler panel and quarter pan-
els. (5) Separate the tack strip from the quarter panel
flanges. (6) Using a suitable white marking pencil, mark
the edges of top cover on the tack strip to aid instal-
lation. (7) Remove staples holding top cover to the tack
strip. (8) Separate top cover from the tack strip.
(9) Using a suitable white marking pencil, mark
the locations of the rear stay pads tack strip to aid
installation. (10) Remove staples holding lower end of rear stay
pads to tack strip. (11) Mark location of suspender strap on the tack
strip to aid installation. (12) Remove staples holding lower end of sus-
pender straps to tack strip. (13) Slide feature strip from retainer channel on
the fourth roof bow. (14) Separate top cover from the fourth roof bow
retainer. (15) Remove rivets holding retainer channel to
fourth roof bow. (16) Separate retainer channel from fourth roof
bow. (17) Remove staples holding rear stay pads and
suspender straps to fourth roof bow. (18) Separate rear stay pads and suspender straps
from the vehicle. (19) Using a suitable white marking pencil, mark
the edge of the upper rear window on the fourth roof
bow to aid installation. If the foam filler strips must be replaced, mark the
locations of the filler strips on the fourth roof bow to
aid installation. (20) Remove staples holding rear window to fourth
roof bow. (21) Remove staples holding outboard corners of
rear window valance and carrier from rear tack strip. (22) Separate bottom of rear window from rear tack
strip. (23) Separate top of rear window from fourth roof
bow. (24) Separate rear window from vehicle.
INSTALLATION
Cut square holes in lower edge of rear window fab-
ric for mounting studs of rear tack strip. Holes
should be no higher or wider than fastener holes.
Holes should be open ended on the bottom edge. Use
original rear window as a template for marks and
hole locations. (1) Tape paper to front and back sides of new rear
window without attaching tape to rear window. (2) Position centerline of upper rear window val-
ance to the centerline of the fourth roof bow. (3) Staple the rear window to the fourth roof bow
tack strip from center, outward. Install staples at one
inch spacing across the roof bow to allow for staples
to hold on the suspender straps and stay pads. (4) Install foam filler strip at the ends of the
fourth roof, if replacement is required. (5) Install side stay pads on fourth roof bow.
(6) staple side stay pads to fourth roof bow.
Fig. 16 Gas Assist Cylinder
Fig. 17 Rear Window
Ä AP/27 CONVERTIBLE 23 - 123
Page 2280 of 2438
(7) Install lower portion of rear window in position
on rear tack strip, align to the bottom center mark. (8) Staple the corners of the rear window valance
and carrier to the rear tack strip. Verify the edges
are even. (9) Position rear stay pads and suspender straps
over fourth roof bow and over the outboard ends of
the rear window fabric. (10) Stretch lower end of suspender straps to edge
of rear tack strip. (11) Staple lower end of suspender straps to rear
tack strip. (12) Staple lower end of rear stay pad to rear tack
strip. (13) Position top cover retainer channel on fourth
roof bow. (14) Rivet top cover retainer channel to fourth roof
bow with aluminum pop-rivets. (15) Position top cover over the fourth roof bow re-
tainer locating the centerline reference marks. (16) Slide feature strip insert into the fourth roof
bow retainer channel. (17) Position top cover on rear tack strip.
(18) Staple top cover to rear tack strip starting
from the outboard corner and stapling inward. (19) Position rear tack strip over the mounting
studs on inside of quarter panels. (20) Install nuts and bolts to hold rear tack strip to
the quarter panels an deck panel. (21) Install rear seat back.
(22) Remove protective materials that was applied
to the body during to removal operation.
TOP COVER
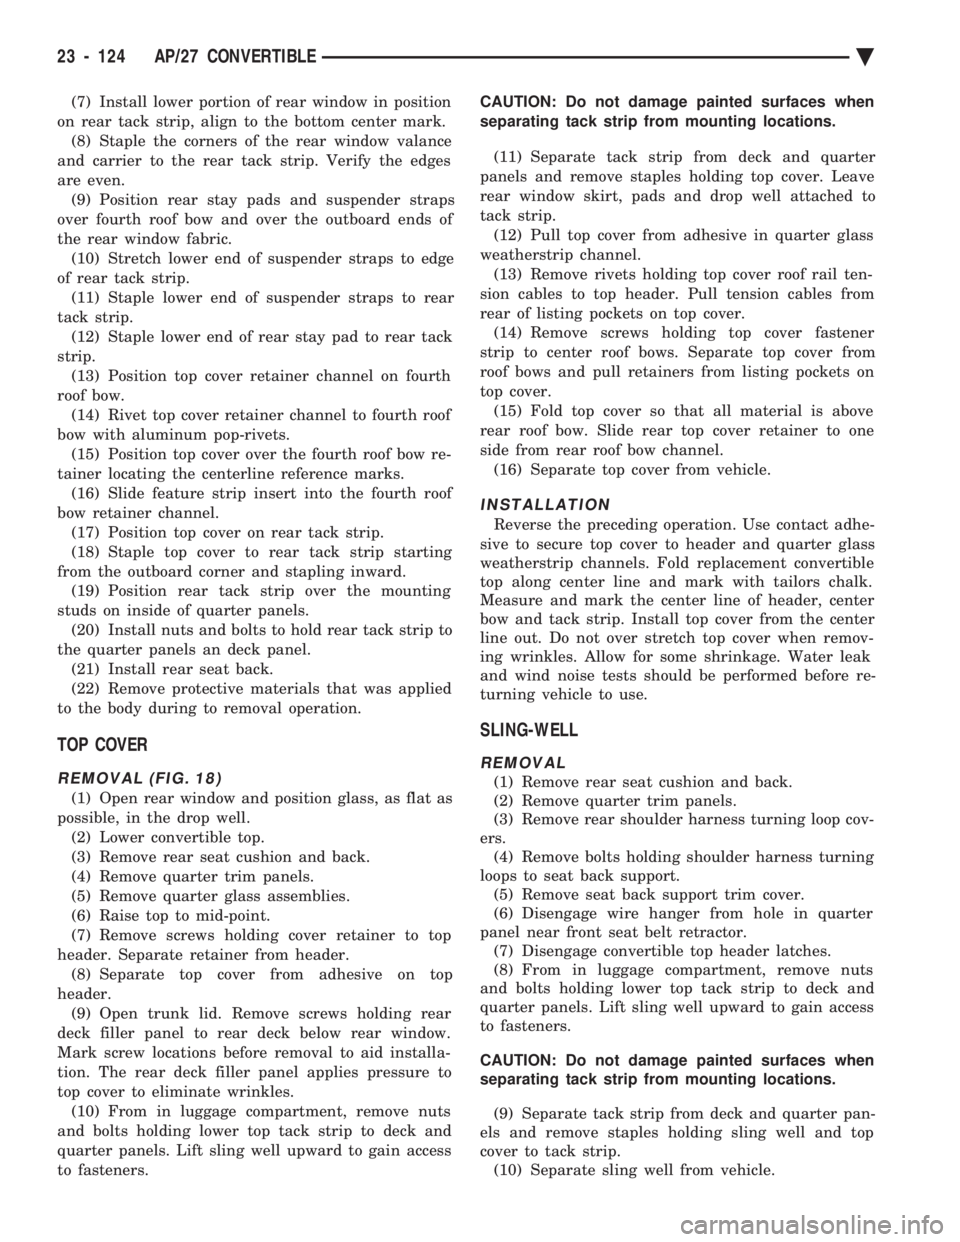
REMOVAL (FIG. 18)
(1) Open rear window and position glass, as flat as
possible, in the drop well. (2) Lower convertible top.
(3) Remove rear seat cushion and back.
(4) Remove quarter trim panels.
(5) Remove quarter glass assemblies.
(6) Raise top to mid-point.
(7) Remove screws holding cover retainer to top
header. Separate retainer from header. (8) Separate top cover from adhesive on top
header. (9) Open trunk lid. Remove screws holding rear
deck filler panel to rear deck below rear window.
Mark screw locations before removal to aid installa-
tion. The rear deck filler panel applies pressure to
top cover to eliminate wrinkles. (10) From in luggage compartment, remove nuts
and bolts holding lower top tack strip to deck and
quarter panels. Lift sling well upward to gain access
to fasteners. CAUTION: Do not damage painted surfaces when
separating tack strip from mounting locations.
(11) Separate tack strip from deck and quarter
panels and remove staples holding top cover. Leave
rear window skirt, pads and drop well attached to
tack strip. (12) Pull top cover from adhesive in quarter glass
weatherstrip channel. (13) Remove rivets holding top cover roof rail ten-
sion cables to top header. Pull tension cables from
rear of listing pockets on top cover. (14) Remove screws holding top cover fastener
strip to center roof bows. Separate top cover from
roof bows and pull retainers from listing pockets on
top cover. (15) Fold top cover so that all material is above
rear roof bow. Slide rear top cover retainer to one
side from rear roof bow channel. (16) Separate top cover from vehicle.
INSTALLATION
Reverse the preceding operation. Use contact adhe-
sive to secure top cover to header and quarter glass
weatherstrip channels. Fold replacement convertible
top along center line and mark with tailors chalk.
Measure and mark the center line of header, center
bow and tack strip. Install top cover from the center
line out. Do not over stretch top cover when remov-
ing wrinkles. Allow for some shrinkage. Water leak
and wind noise tests should be performed before re-
turning vehicle to use.
SLING-WELL
REMOVAL
(1) Remove rear seat cushion and back.
(2) Remove quarter trim panels.
(3) Remove rear shoulder harness turning loop cov-
ers. (4) Remove bolts holding shoulder harness turning
loops to seat back support. (5) Remove seat back support trim cover.
(6) Disengage wire hanger from hole in quarter
panel near front seat belt retractor. (7) Disengage convertible top header latches.
(8) From in luggage compartment, remove nuts
and bolts holding lower top tack strip to deck and
quarter panels. Lift sling well upward to gain access
to fasteners.
CAUTION: Do not damage painted surfaces when
separating tack strip from mounting locations.
(9) Separate tack strip from deck and quarter pan-
els and remove staples holding sling well and top
cover to tack strip. (10) Separate sling well from vehicle.
23 - 124 AP/27 CONVERTIBLE Ä