instrument panel CHEVROLET EXPRESS 2020 Get To Know Guide
[x] Cancel search | Manufacturer: CHEVROLET, Model Year: 2020, Model line: EXPRESS, Model: CHEVROLET EXPRESS 2020Pages: 356, PDF Size: 5.7 MB
Page 73 of 356

Chevrolet Express Owner Manual (GMNA-Localizing-U.S./Canada/Mexico-
13882570) - 2020 - CRC - 11/1/19
72 Seats and Restraints
5. To tighten the belt, push downon the child restraint, pull the
shoulder portion of the belt to
tighten the lap portion of the
belt, and feed the shoulder belt
back into the retractor. When
installing a forward-facing child
restraint, it may be helpful to
use your knee to push down on
the child restraint as you
tighten the belt.
Try to pull the belt out of the
retractor to make sure the
retractor is locked. If the
retractor is not locked, repeat
Steps 4 and 5. 6. If the child restraint has a top
tether, follow the child restraint
manufacturer's instructions
regarding the use of the top
tether. See Lower Anchors and
Tethers for Children (LATCH
System) 062.
7. Before placing a child in the child restraint, make sure it is
securely held in place. To
check, grasp the child restraint
at the seat belt path and
attempt to move it side to side
and back and forth. When the
child restraint is properly
installed, there should be no
more than 2.5 cm (1 in) of
movement.
To remove the child restraint,
unbuckle the vehicle seat belt and
let it return to the stowed position.
If the top tether is attached to a top
tether anchor, disconnect it.
Securing Child Restraints
(With the Seat Belt in the
Front Seat)
This vehicle has airbags. A rear
seat is a safer place to secure a
forward-facing child restraint. See
Where to Put the Restraint 061.
There may be a switch on the
instrument panel that you can use to
turn off the front outboard
passenger frontal airbag. See
Airbag On-Off Switch 050 for more
information, including important
safety information.
Never put a rear-facing child
restraint in the front. This is because
the risk to the rear-facing child is so
great if the airbag deploys.
{Warning
A child in a rear-facing child
restraint can be seriously injured
or killed if the front outboard
passenger airbag inflates. This is
because the back of the
(Continued)
Page 77 of 356

Chevrolet Express Owner Manual (GMNA-Localizing-U.S./Canada/Mexico-
13882570) - 2020 - CRC - 11/1/19
76 Storage
Storage
Storage Compartments
Storage Compartments . . . . . . . . 76
Front Storage . . . . . . . . . . . . . . . . . . 76
Additional Storage Features
Cargo Tie-Downs . . . . . . . . . . . . . . 77
Storage
Compartments
{Warning
Do not store heavy or sharp
objects in storage compartments.
In a crash, these objects may
cause the cover to open and
could result in injury.
Front Storage
If equipped, the front storage
compartment is at the center of the
instrument panel extension near the
floor. To open, pull up on the latch.
There may also be storage
compartments on the inside of each
front door.
Page 84 of 356

Chevrolet Express Owner Manual (GMNA-Localizing-U.S./Canada/Mexico-
13882570) - 2020 - CRC - 11/1/19
Instruments and Controls 83
calibration is complete. The
DIC display will then return to
PRESS
VTO CALIBRATE
COMPASS.
Clock
Setting the Time or Date
1. With the radio on, pressHand
the HR, MIN, MM, DD, and
YYYY (hour, minute, month,
day, and year) display.
2. Press the softkey under any one of the tabs to be changed.
Every time the softkey is
pressed again, the time or the
date if selected, increases
by one.
Another way to increase the
time or date is to press
¨SEEK
or
\FWD (forward).
3. To decrease, press
©SEEK or
sREV. Turn thefknob, on
the upper right side of the
radio, to adjust the selected
setting. Changing the Time or Date Default
Settings
1. With the radio on, press
Hand
then the softkey under the
forward arrow that is currently
displayed on the infotainment
display until the time 12H
(hour) and 24H (hour), and the
date MM/DD (month and day)
and DD/MM (day and month)
are displayed.
2. Press the softkey under the desired option.
3. Press
Hagain to apply the
selected default, or let the
screen time out.
Power Outlets
Power Outlets 12 Volt Direct
Current
The accessory power outlets can be
used to plug in electrical equipment,
such as a cell phone or an MP3
player.
The vehicle may have two
accessory power outlets on the
instrument panel. Remove the cover to access and
replace when not in use.
Certain power accessory plugs may
not be compatible to the accessory
power outlet and could overload
vehicle or adapter fuses. If a
problem is experienced, see your
dealer.
{Warning
Power is always supplied to the
outlets. Do not leave electrical
equipment plugged in when the
vehicle is not in use because the
vehicle could catch fire and cause
injury or death.
Caution
Leaving electrical equipment
plugged in for an extended period
of time while the vehicle is off will
drain the battery. Always unplug
electrical equipment when not in
(Continued)
Page 85 of 356

Chevrolet Express Owner Manual (GMNA-Localizing-U.S./Canada/Mexico-
13882570) - 2020 - CRC - 11/1/19
84 Instruments and Controls
Caution (Continued)
use and do not plug in equipment
that exceeds the maximum
20 amp rating.
When adding electrical equipment,
be sure to follow the proper
installation instructions included with
the equipment. See Add-On
Electrical Equipment 0213.
Caution
Hanging heavy equipment from
the power outlet can cause
damage not covered by the
vehicle warranty. The power
outlets are designed for
accessory power plugs only, such
as cell phone charge cords.
Power Outlet 110/120 Volt
Alternating Current
This power outlet can be used to
plug in electrical equipment that
uses a maximum limit of 150 watts. The 110/120 volt power outlet is on
the instrument panel.
An indicator light on the outlet turns
on to show it is in use. The light
comes on when the ignition is on,
equipment requiring less than 150
watts is plugged into the outlet, and
no system fault is detected.
The indicator light does not come on
when the ignition is off, or if the
equipment is not fully seated into
the outlet.
If equipment is connected using
more than 150 watts or a system
fault is detected, a protection circuit
shuts off the power supply and the
indicator light turns off. To reset the
circuit, unplug the item and plug it
back in or turn the Retained
Accessory Power (RAP) off and
then back on. See
Retained
Accessory Power (RAP) 0167.
The power outlet is not designed for
the following, and may not work
properly if they are plugged in: .
Equipment with high initial peak
wattage, such as
compressor-driven refrigerators
and electric power tools
. Other equipment requiring an
extremely stable power supply,
such as
microcomputer-controlled
electric blankets and touch
sensor lamps
. Medical equipment
Cigarette Lighter
If equipped with a cigarette lighter,
to heat, push it in all the way and let
go. When it is ready for use, it will
pop back out by itself.
Do not use the lighter to plug in
accessory devices. Use the power
outlets provided.
Caution
Holding a cigarette lighter in while
it is heating does not let the
lighter back away from the
(Continued)
Page 92 of 356

Chevrolet Express Owner Manual (GMNA-Localizing-U.S./Canada/Mexico-
13882570) - 2020 - CRC - 11/1/19
Instruments and Controls 91
module. For more information on the
airbag system, seeAirbag System
0 43.
The airbag readiness light comes on
for several seconds when the
vehicle is started. If the light does
not come on then, have it fixed
immediately.
{Warning
If the airbag readiness light stays
on after the vehicle is started or
comes on while driving, it means
the airbag system might not be
working properly. The airbags in
the vehicle might not inflate in a
crash, or they could even inflate
without a crash. To help avoid
injury, have the vehicle serviced
right away. If there is a problem with the airbag
system, a Driver Information Center
(DIC) message may also display.
Airbag On-Off Light
When the front outboard passenger
airbag is manually turned off using
the airbag on-off switch on the
instrument panel, if equipped, the
indicator light OFF or the off symbol
will come on and stay on as a
reminder that the airbag has been
turned off. This light will go off when
the airbag has been turned on. See
Airbag On-Off Switch
050 for more
information, including important
safety information.
United States
Page 95 of 356

Chevrolet Express Owner Manual (GMNA-Localizing-U.S./Canada/Mexico-
13882570) - 2020 - CRC - 11/1/19
94 Instruments and Controls
previous guidelines and see your
dealer for service as soon as
possible.
If the light is on steady :A
malfunction has been detected.
Diagnosis and service may be
required.
Check the following:
. A loose or missing fuel cap may
cause the light to come on. See
Filling the Tank 0194. A few
driving trips with the cap
properly installed may turn the
light off.
. Poor fuel quality can cause
inefficient engine operation and
poor driveability, which may go
away once the engine is warmed
up. If this occurs, change the
fuel brand. It may require at
least one full tank of the proper
fuel to turn the light off. See
Recommended Fuel 0192.
If the light remains on, see your
dealer.Emissions Inspection and
Maintenance Programs
If the vehicle requires an Emissions
Inspection/Maintenance test, the
test equipment will likely connect to
the vehicle's Data Link
Connector (DLC).
The DLC is under the instrument
panel to the left of the steering
wheel. Connecting devices that are
not used to perform an Emissions
Inspection/Maintenance test or to
service the vehicle may affect
vehicle operation. See Add-On
Electrical Equipment 0213. See
your dealer if assistance is needed.
The vehicle may not pass
inspection if:
. The light is on when the engine
is running. .
The light does not come on
when the ignition is on while the
engine is off.
. Critical emission control systems
have not been completely
diagnosed. If this happens, the
vehicle would not be ready for
inspection and might require
several days of routine driving
before the system is ready for
inspection. This can happen if
the 12-volt battery has recently
been replaced or run down, or if
the vehicle has been recently
serviced.
See your dealer if the vehicle will
not pass or cannot be made ready
for the test.
Brake System Warning
Light
The vehicle brake system consists
of two hydraulic circuits. If one
circuit is not working, the remaining
circuit can still work to stop the
vehicle. For normal braking
performance, both circuits need to
be working.
Page 100 of 356

Chevrolet Express Owner Manual (GMNA-Localizing-U.S./Canada/Mexico-
13882570) - 2020 - CRC - 11/1/19
Instruments and Controls 99
This light comes on when the
high-beam headlamps are in use.
SeeHeadlamp High/Low-Beam
Changer 0111.
Cruise Control Light
This light comes on when the cruise
control is set.
This light goes out when the cruise
control is canceled. See Cruise
Control 0180.
Information Displays
Driver Information
Center (DIC)
This vehicle has a DIC.
All messages will appear in the DIC
display at the bottom of the
instrument cluster.
The DIC comes on when the ignition
is on. After a short delay, the DIC
will display the information that was
last displayed before the engine
was turned off.
The DIC displays trip, fuel, and
vehicle system information, and
warning messages if a system
problem is detected.
If the vehicle has these features, the
DIC also displays the compass
direction and the outside air
temperature when viewing the trip
and fuel information. The compass
direction appears on the top right
corner of the DIC display. The
outside air temperature
automatically appears in the bottom
right corner of the DIC display. If there is a problem with the system
that controls the temperature
display, the numbers will be
replaced with dashes. If this occurs,
have the vehicle serviced by your
dealer.
If the vehicle has a diesel engine,
see the Duramax diesel
supplement.
DIC Operation and Displays
The DIC has different displays
which can be accessed by pressing
the DIC buttons on the instrument
panel, next to the instrument cluster.
Page 111 of 356

Chevrolet Express Owner Manual (GMNA-Localizing-U.S./Canada/Mexico-
13882570) - 2020 - CRC - 11/1/19
110 Lighting
Lighting
Exterior Lighting
Exterior Lamp Controls . . . . . . . 110
Exterior Lamps OffReminder . . . . . . . . . . . . . . . . . . . . 111
Headlamp High/Low-Beam Changer . . . . . . . . . . . . . . . . . . . . . 111
Flash-to-Pass . . . . . . . . . . . . . . . . . 111
Daytime Running Lamps (DRL) . . . . . . . . . . . . . . . . 112
Automatic Headlamp System . . . . . . . . . . . . . . . . . . . . . . 112
Hazard Warning Flashers . . . . . 113
Turn and Lane-Change Signals . . . . . . . . . . . . . . . . . . . . . . 113
Interior Lighting
Instrument Panel IlluminationControl . . . . . . . . . . . . . . . . . . . . . . 114
Dome Lamps . . . . . . . . . . . . . . . . . 114
Reading Lamps . . . . . . . . . . . . . . . 115
Lighting Features
Entry Lighting . . . . . . . . . . . . . . . . . 115
Entry/Exit Lighting . . . . . . . . . . . . 115
Exit Lighting . . . . . . . . . . . . . . . . . . 115
Battery Load Management . . . . 115
Battery Power Protection . . . . . 116 Exterior Lighting Battery
Saver . . . . . . . . . . . . . . . . . . . . . . . 116
Exterior Lighting
Exterior Lamp Controls
The exterior lamp control is on the
instrument panel to the left of the
steering wheel.
There are four positions:
O: Briefly turn the control to this
position to turn the automatic
headlamps and Daytime Running
Lamps (DRL) off or back on.
For vehicles first sold in Canada,
the off position only works for
vehicles that are shifted into the
P (Park) position.
Page 112 of 356

Chevrolet Express Owner Manual (GMNA-Localizing-U.S./Canada/Mexico-
13882570) - 2020 - CRC - 11/1/19
Lighting 111
AUTO :Automatically turns the
exterior lamps on and off,
depending on outside lighting.
;: Turns on the parking lamps
including all lamps, except the
headlamps.
2: Turns on the headlamps
together with the parking lamps and
instrument panel lights.
If the headlamps are turned on
while the vehicle is on, the
headlamps turn off automatically
10 minutes after the ignition is
turned off. If the headlamps are
turned on while the vehicle is off,
the headlamps will continue to stay
on. To prevent the battery from
being drained, turn the control to the
Oposition.
A warning chime sounds if the driver
door is opened while the ignition
switch is off and the headlamps
are on.
To change the headlamps from low
beam to high beam, pull the turn
signal lever all the way toward you.
Then release it.
Exterior Lamps Off
Reminder
If a door is open, a reminder chime
sounds when the headlamps or
parking lamps are manually turned
on and the key is out of the ignition.
To turn off the chime, turn the
headlamp switch to
Oor AUTO and
then back on, or close and re-open
the door. In the auto mode, the
headlamps turn off once the ignition
is off or may remain on until the
headlamp delay ends, if enabled in
the Driver Information Center (DIC).
See “Exit Lighting” underVehicle
Personalization 0105.
Headlamp High/
Low-Beam Changer
2 3:Pull the turn signal lever all
the way toward you to change the
headlamps from low to high beam.
Then release it.
Pull the turn signal lever all the way
toward you again and release it to
change the headlamps back to
low beam.
This instrument cluster light comes
on when the high-beam headlamps
are on.
Flash-to-Pass
This feature is used to signal to the
vehicle ahead that you want
to pass.
If the headlamps are off or in the
low‐beam position, pull the turn
signal lever toward you to
momentarily switch to high beams.
Release the lever to turn the
high-beam headlamps off.
Page 113 of 356

Chevrolet Express Owner Manual (GMNA-Localizing-U.S./Canada/Mexico-
13882570) - 2020 - CRC - 11/1/19
112 Lighting
Daytime Running
Lamps (DRL)
DRL can make it easier for others to
see the front of the vehicle during
the day. Fully functional DRL are
required on all vehicles first sold in
Canada.
The DRL system comes on in
daylight when the following
conditions are met:
.The ignition is on.
. The exterior lamp control is in
the AUTO position.
. The shift lever is not in P (Park).
. The light sensor determines it is
daytime.
When the DRL are on, the taillamps,
sidemarker, instrument panel lights,
and other lamps will not be on.
The automatic headlamp system
automatically switches from DRL to
the headlamps depending on the
darkness of the surroundings. To turn off the DRL, turn the exterior
lamp control to
Oand then release
it. For vehicles first sold in Canada,
the DRL can only be turned off
when the vehicle is parked.
Automatic Headlamp
System
When it is dark enough outside and
the headlamp switch is in AUTO,
the automatic headlamp system
turns on the headlamps, along with
the taillamps, sidemarker lamps,
parking lamps, and the instrument
panel lights. The radio lights will
also be dim.
To turn off the automatic headlamp
system, turn the exterior lamp
control to the off position and then
release. For vehicles first sold in
Canada, the transmission must be
in the P (Park) position, before the
automatic headlamp system can be
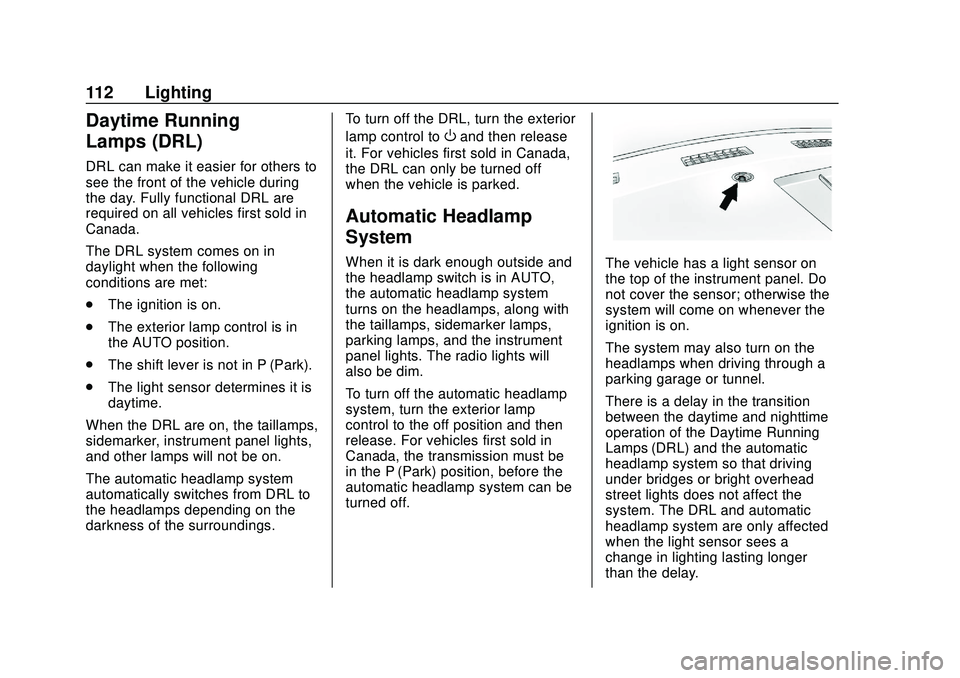
turned off.The vehicle has a light sensor on
the top of the instrument panel. Do
not cover the sensor; otherwise the
system will come on whenever the
ignition is on.
The system may also turn on the
headlamps when driving through a
parking garage or tunnel.
There is a delay in the transition
between the daytime and nighttime
operation of the Daytime Running
Lamps (DRL) and the automatic
headlamp system so that driving
under bridges or bright overhead
street lights does not affect the
system. The DRL and automatic
headlamp system are only affected
when the light sensor sees a
change in lighting lasting longer
than the delay.