power steering CHEVROLET EXPRESS 2020 Get To Know Guide
[x] Cancel search | Manufacturer: CHEVROLET, Model Year: 2020, Model line: EXPRESS, Model: CHEVROLET EXPRESS 2020Pages: 356, PDF Size: 5.7 MB
Page 155 of 356

Chevrolet Express Owner Manual (GMNA-Localizing-U.S./Canada/Mexico-
13882570) - 2020 - CRC - 11/1/19
154 Driving and Operating
Caution
If the steering wheel is turned
until it reaches the end of its
travel, and is held in that position
for more than 15 seconds,
damage may occur to the power
steering system and there may be
loss of power steering assist.
Curve Tips
.Take curves at a reasonable
speed.
. Reduce speed before entering a
curve.
. Maintain a reasonable steady
speed through the curve.
. Wait until the vehicle is out of
the curve before accelerating
gently into the straightaway.
Steering in Emergencies
.There are some situations when
steering around a problem may
be more effective than braking. .
Holding both sides of the
steering wheel allows you to turn
180 degrees without removing
a hand.
. Antilock Brake System (ABS)
allows steering while braking.
Off-Road Recovery
The vehicle's right wheels can drop
off the edge of a road onto the
shoulder while driving. Follow
these tips: 1. Ease off the accelerator and
then, if there is nothing in the
way, steer the vehicle so that it
straddles the edge of the
pavement.
2. Turn the steering wheel about one-eighth of a turn, until the
right front tire contacts the
pavement edge.
3. Turn the steering wheel to go straight down the roadway.
Loss of Control
Skidding
There are three types of skids that
correspond to the vehicle's three
control systems:
.Braking Skid —wheels are not
rolling.
. Steering or Cornering Skid —
too much speed or steering in a
curve causes tires to slip and
lose cornering force.
. Acceleration Skid —too much
throttle causes the driving
wheels to spin.
Page 164 of 356

Chevrolet Express Owner Manual (GMNA-Localizing-U.S./Canada/Mexico-
13882570) - 2020 - CRC - 11/1/19
Driving and Operating 163
Ignition Positions
0. Stopping the Engine/LOCK/OFF
1. ACC/ACCESSORY
2. ON/RUN
3. START
The ignition switch has four
positions.
To shift out of P (Park), the ignition
must be in ON/RUN and the brake
pedal must be applied.0 (Stopping the Engine/LOCK/
OFF) :
This position turns off the
vehicle. It also locks the ignition, the
transmission, and the steering
column, if equipped with a locking
steering column.
To turn off the vehicle:
1. Make sure that the vehicle is stopped.
2. Shift to P (Park).
3. Continue to hold the brake pedal, then set the parking
brake. See Parking Brake
0 177. 4. Push the key all the way in
toward the steering column (1),
then turn the key to
LOCK/OFF (2).
5. Remove the key.
6. Release the brake pedal.
See your dealer if the key can be
removed in any other position.
Retained Accessory Power (RAP)
will remain active. See Retained
Accessory Power (RAP) 0167.
A warning chime will sound when
the driver door is opened and the
key is in the ignition.
If equipped with a locking steering
column, the steering can bind with
the front wheels turned off center,
which may prevent key rotation out
of LOCK/OFF. If this happens, move
the steering wheel from right to left
while turning the key to ACC/
ACCESSORY. If this does not work,
then the vehicle needs service.
Page 165 of 356
Chevrolet Express Owner Manual (GMNA-Localizing-U.S./Canada/Mexico-
13882570) - 2020 - CRC - 11/1/19
164 Driving and Operating
{Warning
Turning off the vehicle while
moving may cause loss of power
assist in the brake and steering
systems and disable the airbags.
While driving, turn off the vehicle
only in an emergency.
In an emergency, if the vehicle
cannot be pulled over and must be
turned off while driving: 1. Push the key all the way in toward the steering column,
then turn the key to ACC/
ACCESSORY.
2. Brake using firm and steady pressure. Do not pump the
brakes repeatedly. This may
deplete power assist, requiring
increased brake pedal force.
3. Shift the vehicle to N (Neutral). This can be done while the
vehicle is moving. Continue
braking and steer the vehicle to
a safe location.
4. Come to a complete stop. 5. Shift to P (Park).
6. Continue to hold the brake
pedal, then set the parking
brake. See Parking Brake
0 177.
7. Push the key all the way in toward the steering column,
then turn the ignition to
LOCK/OFF.
8. Remove the key.
9. Release the brake pedal.
Caution
Use the correct key, make sure it
is all the way in —or pushed all
the way in toward the steering
column when turning off the
vehicle —and turn it only with
your hand.
1 (ACC/ACCESSORY) : This
position allows features such as the
infotainment system to operate
while the vehicle is off. It also
unlocks the steering column,
if equipped with a locking steering
column. Use this position if the vehicle must be pushed or towed.
See
Retained Accessory Power
(RAP) 0167.
From ON/RUN, push the key all the
way in toward the steering column,
then turn the key to ACC/
ACCESSORY.
If the key is left in ACC/
ACCESSORY with the engine off,
the battery could drain and the
vehicle may not start.
A warning chime will sound when
the driver door is opened and the
key is in the ignition.
2 (ON/RUN) : This position can be
used to operate the electrical
accessories and to display some
instrument cluster warning and
indicator lights. This position can
also be used for service and
diagnostics, and to verify the proper
operation of the malfunction
indicator lamp as may be required
for emission inspection purposes.
The switch stays in this position
when the engine is running. The
transmission is also unlocked in this
position.
Page 166 of 356

Chevrolet Express Owner Manual (GMNA-Localizing-U.S./Canada/Mexico-
13882570) - 2020 - CRC - 11/1/19
Driving and Operating 165
If the key is left in ON/RUN with the
engine off, the battery could drain
and the vehicle may not start.
3 (START) :This is the position that
starts the engine. When the engine
starts, release the key. The ignition
returns to ON/RUN for driving.
Starting the Engine
If the vehicle has a diesel engine,
see the Duramax diesel
supplement.
To place the transmission in the
proper gear:
Move the shift lever to P (Park) or
N (Neutral). The engine will not start
in any other position. To restart the
engine when the vehicle is already
moving, use N (Neutral) only.
Caution
If you add electrical parts or
accessories, you could change
the way the engine operates. Any
resulting damage would not be
(Continued)
Caution (Continued)
covered by the vehicle warranty.
SeeAdd-On Electrical Equipment
0 213.
Caution
Do not try to shift to P (Park) if the
vehicle is moving. If you do, you
could damage the transmission.
Shift to P (Park) only when the
vehicle is stopped.
Caution
If the steering wheel is turned
until it reaches the end of its
travel, and is held in that position
while starting the vehicle, damage
may occur to the hydraulic power
steering system and there may be
loss of power steering assist. Starting Procedure
1. With your foot off the accelerator pedal, turn the
ignition key to START. When
the engine starts, let go of the
key. The idle speed will go
down as your engine gets
warm. Do not race the engine
immediately after starting it.
Operate the engine and
transmission gently to allow the
oil to warm up and lubricate all
moving parts.
When the low fuel warning light
is on and the FUEL LEVEL
LOW message is displayed in
the Driver Information Center
(DIC), the Computer-Controlled
Cranking System is disabled to
prevent possible vehicle
component damage. When this
happens, hold the ignition
switch in the START position to
continue engine cranking.
Page 215 of 356
Chevrolet Express Owner Manual (GMNA-Localizing-U.S./Canada/Mexico-
13882570) - 2020 - CRC - 11/1/19
214 Vehicle Care
Vehicle Care
General Information
General Information . . . . . . . . . . 215
California Proposition65 Warning . . . . . . . . . . . . . . . . . 215
California Perchlorate Materials Requirements . . . . . 216
Accessories and Modifications . . . . . . . . . . . . . . . . 216
Vehicle Checks
Doing Your OwnService Work . . . . . . . . . . . . . . . 216
Hood . . . . . . . . . . . . . . . . . . . . . . . . . 217
Engine Compartment Overview . . . . . . . . . . . . . . . . . . . . 218
Engine Oil . . . . . . . . . . . . . . . . . . . . 222
Engine Oil Life System . . . . . . . 224
Automatic Transmission Fluid (6-Speed Transmission) . . . . . 225
Automatic Transmission Fluid (8-Speed Transmission) . . . . . 228
Engine Air Cleaner/Filter . . . . . . 229
Cooling System . . . . . . . . . . . . . . 230
Engine Overheating . . . . . . . . . . 235
Engine Fan . . . . . . . . . . . . . . . . . . . 236
Power Steering Fluid . . . . . . . . . 237
Washer Fluid . . . . . . . . . . . . . . . . . 237 Brakes . . . . . . . . . . . . . . . . . . . . . . . 238
Brake Fluid . . . . . . . . . . . . . . . . . . . 239
Battery - North America . . . . . . 240
Rear Axle . . . . . . . . . . . . . . . . . . . . 241
Noise Control System . . . . . . . . 241
Starter Switch Check . . . . . . . . . 242
Automatic Transmission Shift
Lock Control Function
Check . . . . . . . . . . . . . . . . . . . . . . . 243
Ignition Transmission Lock Check . . . . . . . . . . . . . . . . . . . . . . . 243
Park Brake and P (Park) Mechanism Check . . . . . . . . . . 243
Wiper Blade Replacement . . . . 244
Windshield Replacement . . . . . 244
Headlamp Aiming
Front Headlamp Aiming . . . . . . 245
Bulb Replacement
Bulb Replacement . . . . . . . . . . . . 245
Halogen Bulbs . . . . . . . . . . . . . . . . 245
Front Turn Signal, Sidemarker, and Parking Lamps . . . . . . . . . 245
Taillamps . . . . . . . . . . . . . . . . . . . . . 246
Center High-Mounted Stoplamp (CHMSL) . . . . . . . . . 247
License Plate Lamp . . . . . . . . . . 247
Electrical System
Electrical System Overload . . . 248 Fuses and Circuit Breakers . . . 249
Engine Compartment Fuse
Block . . . . . . . . . . . . . . . . . . . . . . . . 249
Floor Console Fuse Block . . . . 253
Wheels and Tires
Tires . . . . . . . . . . . . . . . . . . . . . . . . . . 255
All-Season Tires . . . . . . . . . . . . . . 256
Winter Tires . . . . . . . . . . . . . . . . . . 256
Tire Sidewall Labeling . . . . . . . . 257
Tire Designations . . . . . . . . . . . . . 259
Tire Terminology and Definitions . . . . . . . . . . . . . . . . . . 260
Tire Pressure . . . . . . . . . . . . . . . . . 263
Tire Pressure Monitor System . . . . . . . . . . . . . . . . . . . . . . 264
Tire Pressure Monitor
Operation . . . . . . . . . . . . . . . . . . . 265
Tire Inspection . . . . . . . . . . . . . . . . 268
Tire Rotation . . . . . . . . . . . . . . . . . 268
Dual Tire Rotation . . . . . . . . . . . . 270
When It Is Time for New Tires . . . . . . . . . . . . . . . . . . . . . . . . 270
Buying New Tires . . . . . . . . . . . . . 271
Different Size Tires and Wheels . . . . . . . . . . . . . . . . . . . . . . 272
Uniform Tire Quality Grading . . . . . . . . . . . . . . . . . . . . . 273
Wheel Alignment and Tire Balance . . . . . . . . . . . . . . . . . . . . . 274
Wheel Replacement . . . . . . . . . . 275
Page 221 of 356
Chevrolet Express Owner Manual (GMNA-Localizing-U.S./Canada/Mexico-
13882570) - 2020 - CRC - 11/1/19
220 Vehicle Care
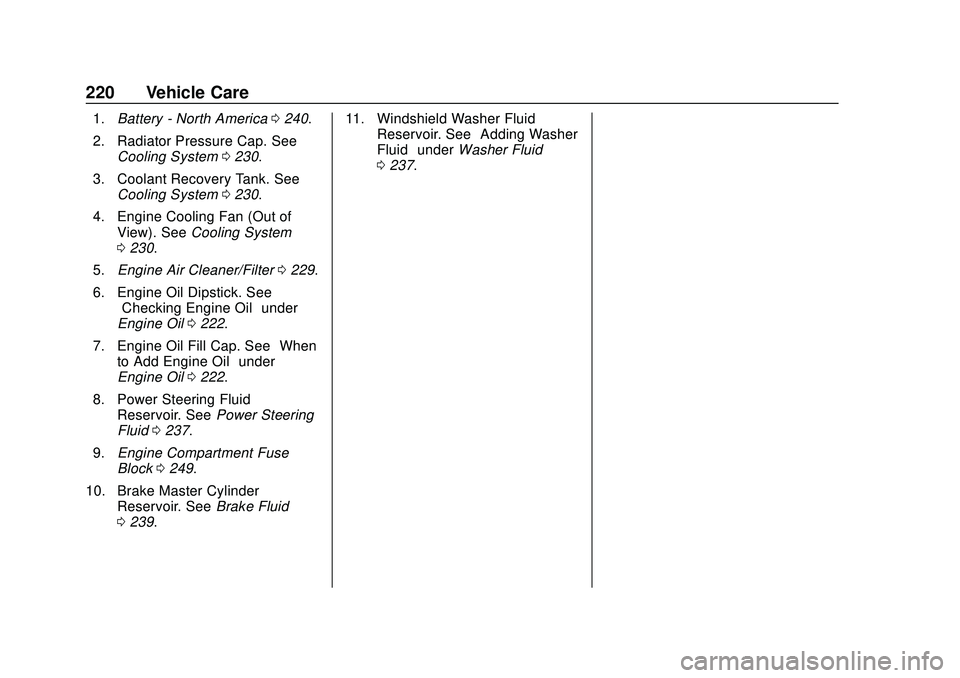
1.Battery - North America 0240.
2. Radiator Pressure Cap. See Cooling System 0230.
3. Coolant Recovery Tank. See Cooling System 0230.
4. Engine Cooling Fan (Out of View). See Cooling System
0 230.
5. Engine Air Cleaner/Filter 0229.
6. Engine Oil Dipstick. See “Checking Engine Oil” under
Engine Oil 0222.
7. Engine Oil Fill Cap. See “When
to Add Engine Oil” under
Engine Oil 0222.
8. Power Steering Fluid Reservoir. See Power Steering
Fluid 0237.
9. Engine Compartment Fuse
Block 0249.
10. Brake Master Cylinder Reservoir. See Brake Fluid
0 239. 11. Windshield Washer Fluid
Reservoir. See “Adding Washer
Fluid” under Washer Fluid
0 237.
Page 223 of 356
Chevrolet Express Owner Manual (GMNA-Localizing-U.S./Canada/Mexico-
13882570) - 2020 - CRC - 11/1/19
222 Vehicle Care
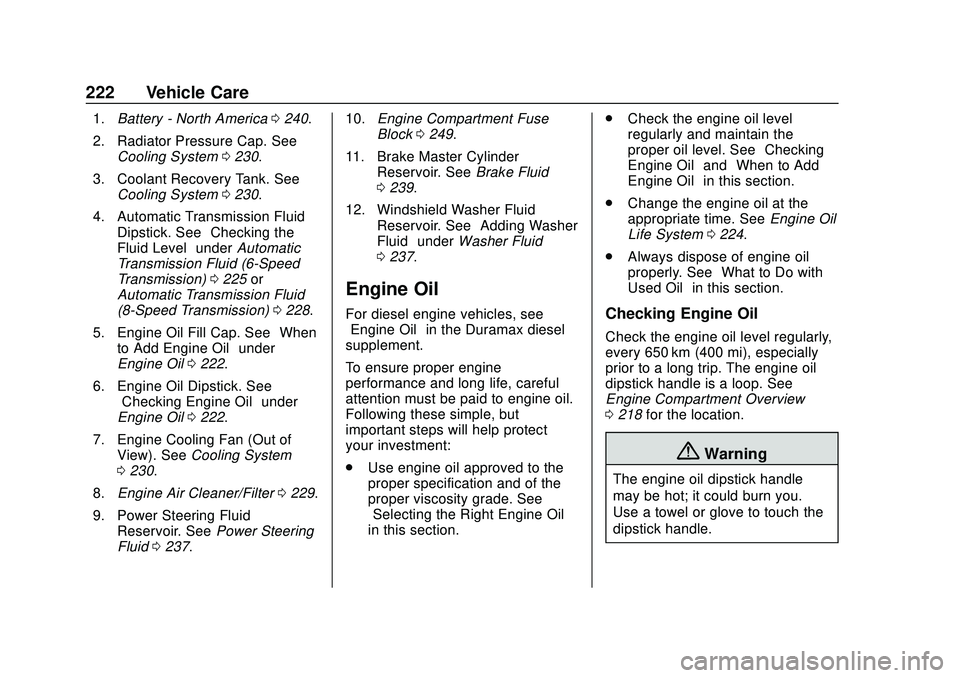
1.Battery - North America 0240.
2. Radiator Pressure Cap. See Cooling System 0230.
3. Coolant Recovery Tank. See Cooling System 0230.
4. Automatic Transmission Fluid Dipstick. See “Checking the
Fluid Level” underAutomatic
Transmission Fluid (6-Speed
Transmission) 0225 or
Automatic Transmission Fluid
(8-Speed Transmission) 0228.
5. Engine Oil Fill Cap. See “When
to Add Engine Oil” under
Engine Oil 0222.
6. Engine Oil Dipstick. See “Checking Engine Oil” under
Engine Oil 0222.
7. Engine Cooling Fan (Out of View). See Cooling System
0 230.
8. Engine Air Cleaner/Filter 0229.
9. Power Steering Fluid Reservoir. See Power Steering
Fluid 0237. 10.
Engine Compartment Fuse
Block 0249.
11. Brake Master Cylinder Reservoir. See Brake Fluid
0 239.
12. Windshield Washer Fluid Reservoir. See “Adding Washer
Fluid” under Washer Fluid
0 237.
Engine Oil
For diesel engine vehicles, see
“Engine Oil” in the Duramax diesel
supplement.
To ensure proper engine
performance and long life, careful
attention must be paid to engine oil.
Following these simple, but
important steps will help protect
your investment:
. Use engine oil approved to the
proper specification and of the
proper viscosity grade. See
“Selecting the Right Engine Oil”
in this section. .
Check the engine oil level
regularly and maintain the
proper oil level. See “Checking
Engine Oil” and“When to Add
Engine Oil” in this section.
. Change the engine oil at the
appropriate time. See Engine Oil
Life System 0224.
. Always dispose of engine oil
properly. See “What to Do with
Used Oil” in this section.Checking Engine Oil
Check the engine oil level regularly,
every 650 km (400 mi), especially
prior to a long trip. The engine oil
dipstick handle is a loop. See
Engine Compartment Overview
0218 for the location.
{Warning
The engine oil dipstick handle
may be hot; it could burn you.
Use a towel or glove to touch the
dipstick handle.
Page 238 of 356
Chevrolet Express Owner Manual (GMNA-Localizing-U.S./Canada/Mexico-
13882570) - 2020 - CRC - 11/1/19
Vehicle Care 237
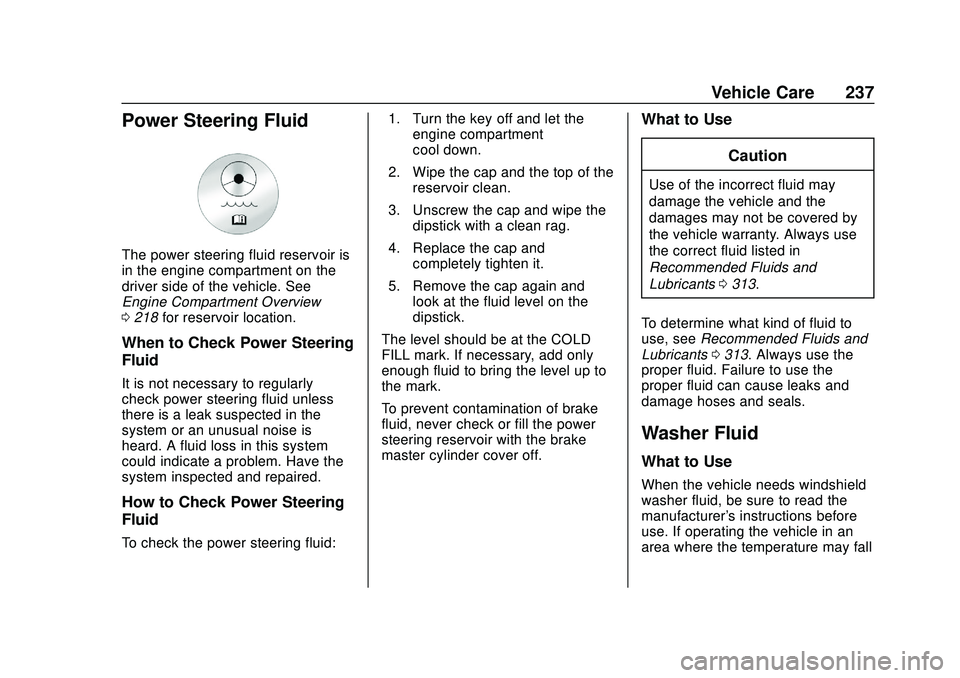
Power Steering Fluid
The power steering fluid reservoir is
in the engine compartment on the
driver side of the vehicle. See
Engine Compartment Overview
0218 for reservoir location.
When to Check Power Steering
Fluid
It is not necessary to regularly
check power steering fluid unless
there is a leak suspected in the
system or an unusual noise is
heard. A fluid loss in this system
could indicate a problem. Have the
system inspected and repaired.
How to Check Power Steering
Fluid
To check the power steering fluid: 1. Turn the key off and let the
engine compartment
cool down.
2. Wipe the cap and the top of the reservoir clean.
3. Unscrew the cap and wipe the dipstick with a clean rag.
4. Replace the cap and completely tighten it.
5. Remove the cap again and look at the fluid level on the
dipstick.
The level should be at the COLD
FILL mark. If necessary, add only
enough fluid to bring the level up to
the mark.
To prevent contamination of brake
fluid, never check or fill the power
steering reservoir with the brake
master cylinder cover off.
What to Use
Caution
Use of the incorrect fluid may
damage the vehicle and the
damages may not be covered by
the vehicle warranty. Always use
the correct fluid listed in
Recommended Fluids and
Lubricants0313.
To determine what kind of fluid to
use, see Recommended Fluids and
Lubricants 0313. Always use the
proper fluid. Failure to use the
proper fluid can cause leaks and
damage hoses and seals.
Washer Fluid
What to Use
When the vehicle needs windshield
washer fluid, be sure to read the
manufacturer's instructions before
use. If operating the vehicle in an
area where the temperature may fall
Page 252 of 356
Chevrolet Express Owner Manual (GMNA-Localizing-U.S./Canada/Mexico-
13882570) - 2020 - CRC - 11/1/19
Vehicle Care 251
FusesUsage
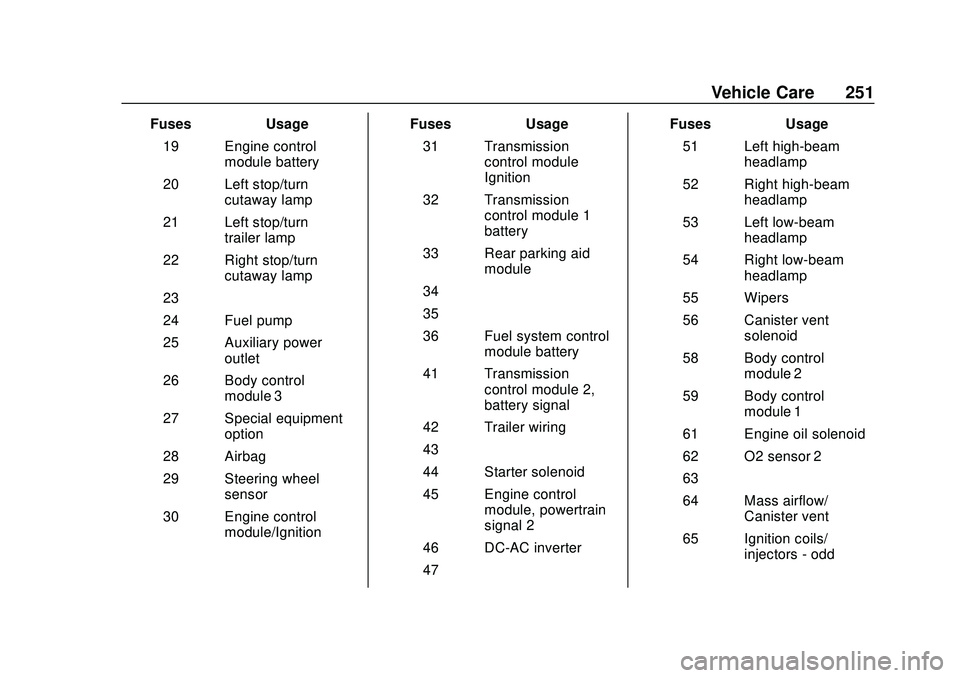
19 Engine control module battery
20 Left stop/turn cutaway lamp
21 Left stop/turn trailer lamp
22 Right stop/turn cutaway lamp
23 –
24 Fuel pump
25 Auxiliary power outlet
26 Body control module 3
27 Special equipment option
28 Airbag
29 Steering wheel sensor
30 Engine control module/Ignition Fuses
Usage
31 Transmission control module
Ignition
32 Transmission control module 1
battery
33 Rear parking aid module
34 –
35 –
36 Fuel system control module battery
41 Transmission control module 2,
battery signal
42 Trailer wiring
43 –
44 Starter solenoid
45 Engine control module, powertrain
signal 2
46 DC-AC inverter
47 – Fuses
Usage
51 Left high-beam headlamp
52 Right high-beam headlamp
53 Left low-beam headlamp
54 Right low-beam headlamp
55 Wipers
56 Canister vent solenoid
58 Body control module 2
59 Body control module 1
61 Engine oil solenoid
62 O2 sensor 2
63 –
64 Mass airflow/ Canister vent
65 Ignition coils/ injectors - odd
Page 299 of 356
Chevrolet Express Owner Manual (GMNA-Localizing-U.S./Canada/Mexico-
13882570) - 2020 - CRC - 11/1/19
298 Vehicle Care
Caution (Continued)
Damage could occur and the
repairs would not be covered by
the vehicle warranty.
Brake System
Visually inspect brake lines and
hoses for proper hook-up, binding,
leaks, cracks, chafing, etc. Inspect
disc brake pads for wear and rotors
for surface condition. Inspect drum
brake linings/shoes for wear or
cracks. Inspect all other brake parts.
Steering, Suspension, and
Chassis Components
Visually inspect steering,
suspension, and chassis
components for damaged, loose,
or missing parts or signs of wear at
least once a year.
Inspect power steering for proper
attachment, connections, binding,
leaks, cracks, chafing, etc.
Visually check constant velocity joint
boots and axle seals for leaks.Lubricate the upper and lower
control arm ball joints, at least every
other engine oil change.
Lubricate the tie rod ball joints, idler
arm pivot shaft bearings, idler arm
socket, and pitman arm socket, at
least every other engine oil change.
Caution
Lubrication of applicable steering/
suspension points should not be
done unless the temperature is
−12 °C (10 °F) or higher,
or damage could result.
Body Component Lubrication
Lubricate all key lock cylinders,
hood hinges, liftgate hinges, and the
fuel door hinge unless the
components are plastic. Applying
silicone grease on weatherstrips
with a clean cloth will make them
last longer, seal better, and not stick
or squeak.
Underbody Maintenance
At least twice a year, spring and fall,
use plain water to flush dirt and
debris from the vehicle's underbody.
Your dealer or an underbody car
washing system can do this. If not
removed, rust and corrosion can
develop.
Do not directly power wash the
transfer case and/or front/rear axle
output seals. High pressure water
can overcome the seals and
contaminate the fluid. Contaminated
fluid will decrease the life of the
transfer case and/or axles and
should be replaced.
Sheet Metal Damage
If the vehicle is damaged and
requires sheet metal repair or
replacement, make sure the body
repair shop applies anti-corrosion
material to parts repaired or
replaced to restore corrosion
protection.
Original manufacturer replacement
parts will provide the corrosion
protection while maintaining the
vehicle warranty.