stop start CHEVROLET HHR 2011 1.G Owners Manual
[x] Cancel search | Manufacturer: CHEVROLET, Model Year: 2011, Model line: HHR, Model: CHEVROLET HHR 2011 1.GPages: 430, PDF Size: 4.57 MB
Page 27 of 430
Black plate (21,1)Chevrolet HHR Owner Manual - 2011
Tire Pressure Monitor
This vehicle may have a Tire Pressure Monitor
System (TPMS).
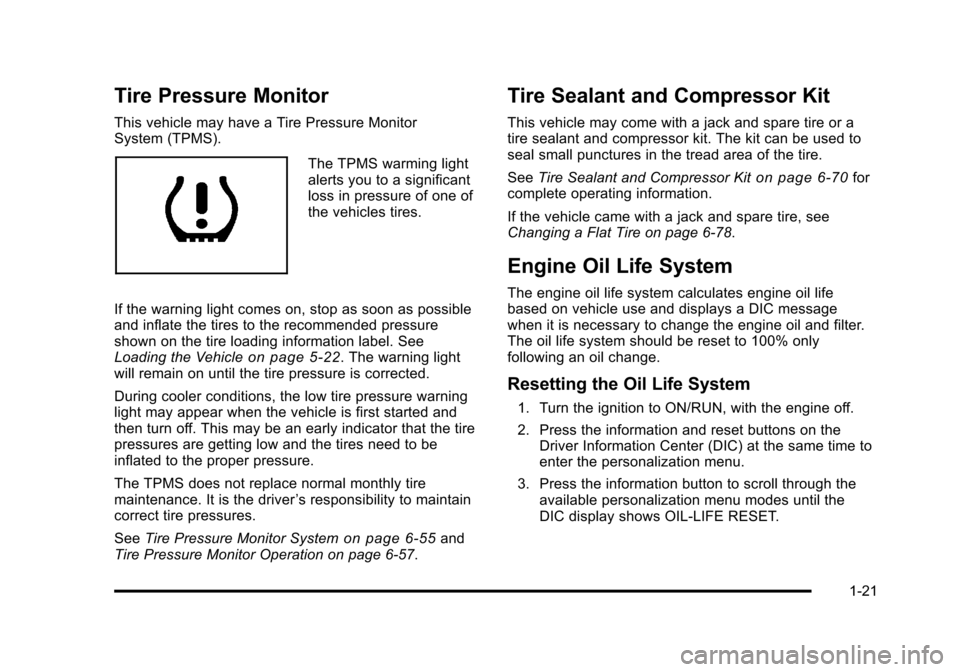
The TPMS warming light
alerts you to a significant
loss in pressure of one of
the vehicles tires.
If the warning light comes on, stop as soon as possible
and inflate the tires to the recommended pressure
shown on the tire loading information label. See
Loading the Vehicle
on page 5‑22. The warning light
will remain on until the tire pressure is corrected.
During cooler conditions, the low tire pressure warning
light may appear when the vehicle is first started and
then turn off. This may be an early indicator that the tire
pressures are getting low and the tires need to be
inflated to the proper pressure.
The TPMS does not replace normal monthly tire
maintenance. It is the driver ’s responsibility to maintain
correct tire pressures.
See Tire Pressure Monitor System
on page 6‑55and
Tire Pressure Monitor Operation on page 6‑57.
Tire Sealant and Compressor Kit
This vehicle may come with a jack and spare tire or a
tire sealant and compressor kit. The kit can be used to
seal small punctures in the tread area of the tire.
See Tire Sealant and Compressor Kit
on page 6‑70for
complete operating information.
If the vehicle came with a jack and spare tire, see
Changing a Flat Tire on page 6‑78.
Engine Oil Life System
The engine oil life system calculates engine oil life
based on vehicle use and displays a DIC message
when it is necessary to change the engine oil and filter.
The oil life system should be reset to 100% only
following an oil change.
Resetting the Oil Life System
1. Turn the ignition to ON/RUN, with the engine off.
2. Press the information and reset buttons on the Driver Information Center (DIC) at the same time to
enter the personalization menu.
3. Press the information button to scroll through the available personalization menu modes until the
DIC display shows OIL-LIFE RESET.
1-21
Page 28 of 430
Black plate (22,1)Chevrolet HHR Owner Manual - 2011
4. Press and hold the reset button until the DICdisplay shows ACKNOWLEDGED. This will tell you
the system has been reset.
5. Turn the key to LOCK/OFF.
For vehicles with the 2.2L (VIN Code V) or 2.4L
(VIN Code B) engines, you can also reset the
system as follows: 1. Turn the ignition key to ON/RUN with the engine off.
2. Fully press and release the accelerator pedal slowly three times within five seconds.
3. Turn the key to LOCK/OFF, then start the engine.
See Engine Oil Life System on page 6‑19.
Fuel E85 (85% Ethanol)
Vehicles that have a FlexFuel badge and a yellow fuel
cap can use either unleaded gasoline or ethanol fuel
containing up to 85% ethanol (E85). See Fuel E85
(85% Ethanol)
on page 6‑8. For all other vehicles,
use only the unleaded gasoline described under
Gasoline Octane on page 6‑6.
Driving for Better Fuel Economy
Driving habits can affect fuel mileage. Here are some
driving tips to get the best fuel economy possible.
.Avoid fast starts and accelerate smoothly.
.Brake gradually and avoid abrupt stops.
.Avoid idling the engine for long periods of time.
.When road and weather conditions are
appropriate, use cruise control, if equipped.
.Always follow posted speed limits or drive more
slowly when conditions require.
.Keep vehicle tires properly inflated.
.Combine several trips into a single trip.
.Replace the vehicle's tires with the same TPC
Spec number molded into the tire's sidewall near
the size.
.Follow recommended scheduled maintenance.
1-22
Page 40 of 430
Black plate (8,1)Chevrolet HHR Owner Manual - 2011
Reclining Seatbacks
{WARNING:
You can lose control of the vehicle if you try to
adjust the seat while the vehicle is moving. The
sudden movement could startle and confuse you,
or make you push a pedal when you do not want
to. Adjust the driver seat only when the vehicle is
not moving.
{WARNING:
If either seatback is not locked, it could move
forward in a sudden stop or crash. That could
cause injury to the person sitting there. Always
push and pull on the seatbacks to be sure they
are locked.
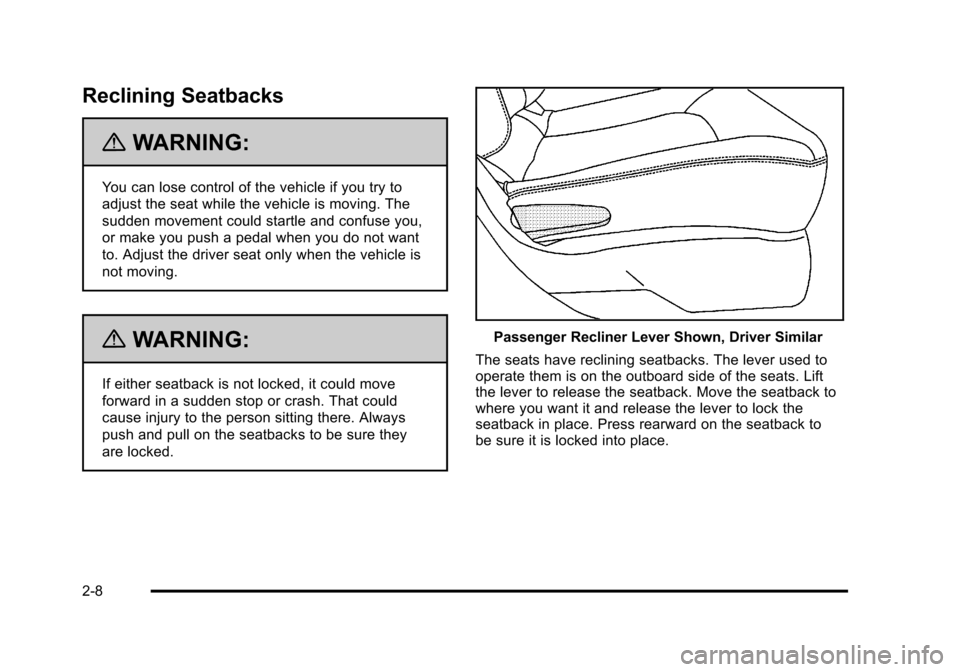
Passenger Recliner Lever Shown, Driver Similar
The seats have reclining seatbacks. The lever used to
operate them is on the outboard side of the seats. Lift
the lever to release the seatback. Move the seatback to
where you want it and release the lever to lock the
seatback in place. Press rearward on the seatback to
be sure it is locked into place.
2-8
Page 126 of 430
Black plate (20,1)Chevrolet HHR Owner Manual - 2011
To program the new key:1. Verify that the new key has a
1stamped on it.
2. Insert the already programmed key in the ignition and start the engine. If the engine will not start, see
your dealer for service.
3. After the engine has started, turn the key to LOCK/ OFF, and remove the key.
4. Insert the key to be programmed and turn it to the ON/RUN position within five seconds of the original
key being turned to the LOCK/OFF position.
The security light will turn off once the key has
been programmed.
5. Repeat Steps 1 through 4 if additional keys are to be programmed.
If you lose or damage your PASS-Key
®III+ key, see
your dealer or a locksmith who can service
PASS-Key
®III+ to have a new key made.
Do not leave the key or device that disarms or
deactivates the theft deterrent system in the vehicle.
Starting and Operating Your
Vehicle
New Vehicle Break-In
Notice: The vehicle does not need an elaborate
break-in. But it will perform better in the long run if
you follow these guidelines:
.Do not drive at any one constant speed, fast
or slow, for the first 500 miles (805 km). Do
not make full-throttle starts. Avoid
downshifting to brake or slow the vehicle.
.Avoid making hard stops for the first
200 miles (322 km) or so. During this time the
new brake linings are not yet broken in. Hard
stops with new linings can mean premature
wear and earlier replacement. Follow this
breaking-in guideline every time you get new
brake linings.
.Do not tow a trailer during break-in. See
Towing a Trailer (Automatic Transmission)
on page 5‑31or Towing a Trailer (Manual
Transmission)
on page 5‑37for the trailer
towing capabilities of your vehicle and more
information.
Following break‐in, engine speed and load can be
gradually increased.
3-20
Page 128 of 430
Black plate (22,1)Chevrolet HHR Owner Manual - 2011
3. Come to a complete stop, shift to P (Park), andturn the ignition to LOCK/OFF. On vehicles with an
automatic transmission, the shift lever must be in
P (Park) to turn the ignition switch to the LOCK/
OFF position.
4. Set the parking brake. See Parking Brake
on
page 3‑30.
The steering can bind with the wheel turned off center.
If this happens, move it from right to left while turning
the key to ACC/ACCESSORY. If this does not work,
then the vehicle needs service.
{WARNING:
If you have a manual transmission removing the
key from the ignition switch will lock the steering
column and result in a loss of ability to steer the
vehicle. This could cause a collision. If you need
to turn the engine off while the vehicle is moving,
turn the key to ACC/ACCESSORY. ACC (ACC/ACCESSORY):
This position operates
some of the electrical accessories. It unlocks the
steering wheel and ignition.
R (ON/RUN): This is the position in which you can
operate the electrical accessories and to display some
instrument panel cluster warning and indicator lights.
The switch stays in this position when the engine is
running.
If you leave the key in the ACC/ACCESSORY or ON/
RUN position with the engine off, the battery could be
drained. You may not be able to start the vehicle if the
battery is allowed to drain for an extended period
of time.
/ (START): This position starts the engine. When the
engine starts, release the key. The ignition switch will
return to ON/RUN for driving.
A warning tone will sound when the driver door is
opened, the ignition is in LOCK/OFF or ACC/
ACCESSORY and the key is in the ignition.
3-22
Page 130 of 430
Black plate (24,1)Chevrolet HHR Owner Manual - 2011
Retained Accessory Power (RAP)
These vehicle accessories may be used for up to
10 minutes after the engine is turned off.
.Audio System
.Power Windows, if equipped
.Sunroof, if equipped
The power windows and sunroof will continue to work
for up to 10 minutes or until any door is opened. The
radio will work when the key is in ON/RUN or ACC/
ACCESSORY. Once the key is turned from ON/RUN to
OFF/LOCK, the radio will continue to work for
10 minutes or until the driver's door is opened.
Starting the Engine
Place the transmission in the proper gear.
Automatic Transmission
Move the shift lever to P (Park) or N (Neutral). The
engine will not start in any other position. To restart the
vehicle when it is already moving, use N (Neutral) only.
Notice: Do not try to shift to P (Park) if the vehicle is
moving. If you do, you could damage the
transmission. Shift to P (Park) only when the vehicle
is stopped.
Manual Transmission
The shift lever should be in N (Neutral) and the parking
brake engaged. Hold the clutch pedal down to the floor
and start the engine. The vehicle will not start if the
clutch pedal is not all the way down.
Starting Procedure
1. With your foot off the accelerator pedal, turn the ignition key to START. When the engine starts, let
go of the key. The idle speed will go down as the
engine warms. Do not race the engine immediately
after starting it. Operate the engine and
transmission gently to allow the oil to warm up and
lubricate all moving parts.
The vehicle has a Computer-Controlled Cranking
System. This feature assists in starting the engine
and protects components. If the ignition key is
turned to the START position, and then released
when the engine begins cranking, the engine will
continue cranking for a few seconds or until the
vehicle starts. If the engine does not start and the
key is held in START for many seconds, cranking
will be stopped after 15 seconds to prevent
cranking motor damage. To prevent gear damage,
this system also prevents cranking if the engine is
already running. Engine cranking can be stopped
by turning the ignition switch to ACC/ACCESSORY
or LOCK/OFF.
3-24
Page 131 of 430
Black plate (25,1)Chevrolet HHR Owner Manual - 2011
Notice:Cranking the engine for long periods of
time, by returning the key to the START position
immediately after cranking has ended, can overheat
and damage the cranking motor, and drain the
battery. Wait at least 15 seconds between each try,
to let the cranking motor cool down.
2. If the engine does not start after 5‐10 seconds, especially in very cold weather (below 0°F or
−18°C), it could be flooded with too much gasoline.
Push the accelerator pedal all the way to the floor
and holding it there as you hold the key in START
for a maximum of 15 seconds. Wait at least
15 seconds between each try, to allow the cranking
motor to cool. When the engine starts, let go of the
key and accelerator. If the vehicle starts briefly but
then stops again, repeat the procedure. This clears
the extra gasoline from the engine. Do not race the
engine immediately after starting it. Operate the
engine and transmission gently until the oil warms
up and lubricates all moving parts. Notice:
The engine is designed to work with the
electronics in the vehicle. If you add electrical parts
or accessories, you could change the way the
engine operates. Before adding electrical
equipment, check with your dealer. If you do not,
the engine might not perform properly. Any
resulting damage would not be covered by the
vehicle warranty.
Engine Coolant Heater
The engine coolant heater can provide easier starting
and better fuel economy during engine warm‐up in cold
weather condition at or below −18°C (0°F). Vehicles
with an engine coolant heater should be plugged in at
least four hours before starting. An internal thermostat
in the plug-end of the cord may exist which will prevent
engine coolant heater operation at temperatures
above −18°C (0°F).
3-25
Page 133 of 430
Black plate (27,1)Chevrolet HHR Owner Manual - 2011
WARNING: (Continued)
Do not leave the vehicle when the engine is
running unless you have to. If you have left the
engine running, the vehicle can move suddenly.
You or others could be injured. To be sure the
vehicle will not move, even when you are on fairly
level ground, always set the parking brake and
move the shift lever to P (Park). SeeShifting Into
Park (Automatic Transmission)
on page 3‑31.
If you are pulling a trailer, see Towing a Trailer
(Automatic Transmission)
on page 5‑31or
Towing a Trailer (Manual Transmission)
on
page 5‑37
.
Make sure the shift lever is fully in P (Park) before
starting the engine. The vehicle has an automatic
transmission shift lock control system. You have to fully
apply the regular brakes first and then press the shift
lever button before the vehicle can shift from P (Park)
when the ignition key is in ON/RUN. If the vehicle
cannot shift out of P (Park), ease pressure on the shift
lever and push the shift lever all the way into P (Park)
as you maintain brake application. Then press the shift
lever button and then move the shift lever into another
gear. See Shifting Out of Park (Automatic Transmission)
on page 3‑33. R (Reverse):
Use this gear to back up.
Notice: Shifting to R (Reverse) while the vehicle is
moving forward could damage the transmission.
The repairs would not be covered by the vehicle
warranty. Shift to R (Reverse) only after the vehicle
is stopped.
To rock your vehicle back and forth to get out of snow,
ice, or sand without damaging the transmission, see If
Your Vehicle is Stuck in Sand, Mud, Ice, or Snow
on
page 5‑21.
N (Neutral): In this position, the engine does not
connect with the wheels. To restart the engine when the
vehicle is already moving, use N (Neutral) only. Also,
use N (Neutral) when the vehicle is being towed.
{WARNING:
Shifting into a drive gear while the engine is
running at high speed is dangerous. Unless your
foot is firmly on the brake pedal, the vehicle could
move very rapidly. You could lose control and hit
people or objects. Do not shift into a drive gear
while the engine is running at high speed.
3-27
Page 135 of 430
Black plate (29,1)Chevrolet HHR Owner Manual - 2011
Manual Transmission Operation
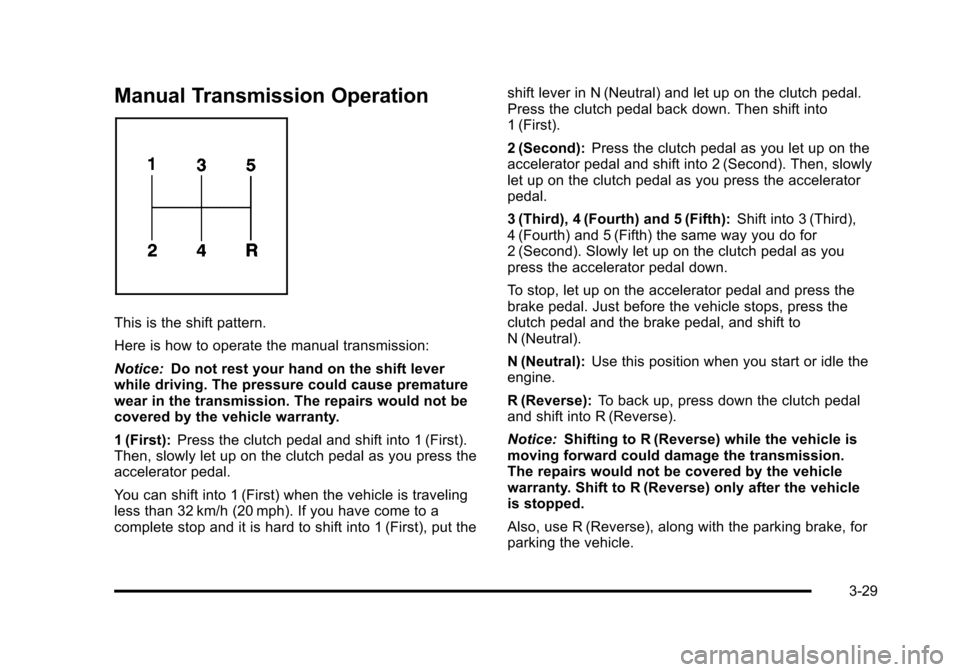
This is the shift pattern.
Here is how to operate the manual transmission:
Notice:Do not rest your hand on the shift lever
while driving. The pressure could cause premature
wear in the transmission. The repairs would not be
covered by the vehicle warranty.
1 (First): Press the clutch pedal and shift into 1 (First).
Then, slowly let up on the clutch pedal as you press the
accelerator pedal.
You can shift into 1 (First) when the vehicle is traveling
less than 32 km/h (20 mph). If you have come to a
complete stop and it is hard to shift into 1 (First), put the shift lever in N (Neutral) and let up on the clutch pedal.
Press the clutch pedal back down. Then shift into
1 (First).
2 (Second):
Press the clutch pedal as you let up on the
accelerator pedal and shift into 2 (Second). Then, slowly
let up on the clutch pedal as you press the accelerator
pedal.
3 (Third), 4 (Fourth) and 5 (Fifth): Shift into 3 (Third),
4 (Fourth) and 5 (Fifth) the same way you do for
2 (Second). Slowly let up on the clutch pedal as you
press the accelerator pedal down.
To stop, let up on the accelerator pedal and press the
brake pedal. Just before the vehicle stops, press the
clutch pedal and the brake pedal, and shift to
N (Neutral).
N (Neutral): Use this position when you start or idle the
engine.
R (Reverse): To back up, press down the clutch pedal
and shift into R (Reverse).
Notice: Shifting to R (Reverse) while the vehicle is
moving forward could damage the transmission.
The repairs would not be covered by the vehicle
warranty. Shift to R (Reverse) only after the vehicle
is stopped.
Also, use R (Reverse), along with the parking brake, for
parking the vehicle.
3-29
Page 152 of 430
Black plate (46,1)Chevrolet HHR Owner Manual - 2011
Roof Rack System
The vehicle may have a roof rack system.
{WARNING:
If something is carried on top of the vehicle that is
longer or wider than the roof rack—like paneling,
plywood, or a mattress— the wind can catch it
while the vehicle is being driven. The item being
carried could be violently torn off, and this could
cause a collision, and damage the vehicle. Never
carry something longer or wider than the roof rack
on top of the vehicle unless using a GM Certified
accessory carrier.
For vehicles with a roof rack, the rack can be used to
load items. For roof racks that do not have crossrails
included, GM Certified crossrails can be purchased as
an accessory. See your dealer for additional
information.
Notice: Loading cargo on the roof rack that weighs
more than 75 kg (165 lbs) or hangs over the rear or
sides of the vehicle may damage the vehicle. Load
cargo so that it rests evenly between the crossrails,
making sure to fasten cargo securely. Notice:
Loading cargo directly on the roof of the
vehicle may cause damage to the vehicle and would
not be covered under warranty. Do not place cargo
on the roof the vehicle.
To prevent damage or loss of cargo when driving, check
to make sure crossrails and cargo are securely
fastened. Loading cargo on the roof rack will make the
vehicle’s center of gravity higher. Avoid high speeds,
sudden starts, sharp turns, sudden braking or abrupt
maneuvers, otherwise it may result in loss of control.
If driving for a long distance, on rough roads, or at high
speeds, occasionally stop the vehicle to make sure the
cargo remains in its place.
Do not exceed the maximum vehicle capacity when
loading the vehicle. For more information on vehicle
capacity and loading, see Loading the Vehicle
on
page 5‑22.
Convenience Net
The vehicle may have a convenience net. The metal
rings in the cargo area can be used to attach the
convenience net for several uses. The net can be used
to attach items secured to the floor, to the rear liftgate or
liftgate glass. The net is not for larger, heavier loads.
3-46