lock CHEVROLET KODIAK 2005 Owner's Manual
[x] Cancel search | Manufacturer: CHEVROLET, Model Year: 2005, Model line: KODIAK, Model: CHEVROLET KODIAK 2005Pages: 374, PDF Size: 5.46 MB
Page 76 of 374
Express-Down Feature
The driver’s window also has an express-down feature
that allows the window to be lowered without holding
down the switch. Press and hold the rear of the window
switch labeled AUTO for one second to activate the
express-down mode.
The express-down mode can be cancelled at any time
by pressing the front of the switch. To open the
window part way, lightly tap the switch until the window
is at the desired position.
Lockout Feature
o
(Lockout):If you have a crew cab model with
power windows, the driver’s door will have a window
lockout feature. When engaged, this feature will prevent
all window switches, except the driver’s window
switches, from operating. This switch is located above
the four window switches on the driver’s door. When the
switch is not engaged, all windows will return to
normal operation.
Sliding Rear Window
To open the sliding rear window, pull the latch toward
the driver’s side of the vehicle.
To close the window, slide the window toward the
passenger’s side of the vehicle. The latch will
automatically lock into place. Try to open the window
without releasing the latch to be sure the window is in the
locked position.
Sun Visors
To block out glare, you can swing down the visors.
You can also swing them out to block glare from the side.
2-10
Page 78 of 374
Ignition Positions
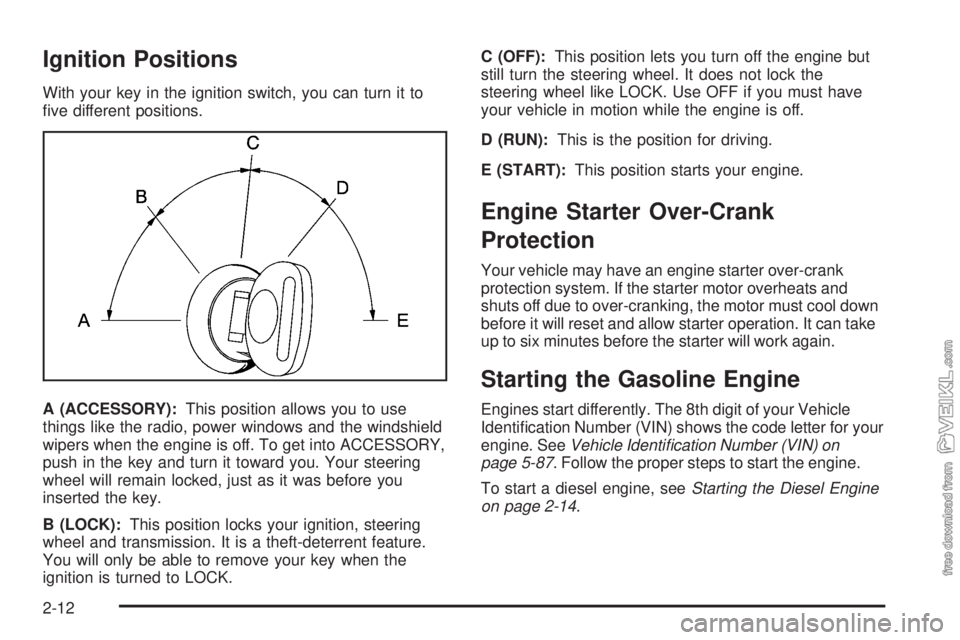
With your key in the ignition switch, you can turn it to
five different positions.
A (ACCESSORY):This position allows you to use
things like the radio, power windows and the windshield
wipers when the engine is off. To get into ACCESSORY,
push in the key and turn it toward you. Your steering
wheel will remain locked, just as it was before you
inserted the key.
B (LOCK):This position locks your ignition, steering
wheel and transmission. It is a theft-deterrent feature.
You will only be able to remove your key when the
ignition is turned to LOCK.C (OFF):This position lets you turn off the engine but
still turn the steering wheel. It does not lock the
steering wheel like LOCK. Use OFF if you must have
your vehicle in motion while the engine is off.
D (RUN):This is the position for driving.
E (START):This position starts your engine.
Engine Starter Over-Crank
Protection
Your vehicle may have an engine starter over-crank
protection system. If the starter motor overheats and
shuts off due to over-cranking, the motor must cool down
before it will reset and allow starter operation. It can take
up to six minutes before the starter will work again.
Starting the Gasoline Engine
Engines start differently. The 8th digit of your Vehicle
Identification Number (VIN) shows the code letter for your
engine. SeeVehicle Identi�cation Number (VIN) on
page 5-87. Follow the proper steps to start the engine.
To start a diesel engine, seeStarting the Diesel Engine
on page 2-14.
2-12
Page 82 of 374
If you are trying to start your engine after you have run
out of fuel, seeRunning Out of Fuel on page 5-15.
When your engine is cold, let it run for a few minutes
before you move your vehicle. This lets oil pressure
build up. Your engine will sound louder when it is cold.
Notice:If you are not in an idling vehicle and
the engine overheats, you would not be there to
see the overheated engine indication. This could
damage your vehicle. Do not let your engine
run when you are not in your vehicle.
Cold Weather Starting
If your vehicle has the DURAMAX®Diesel Engine,
the following notice applies:
Notice:Your diesel engine has an electric air intake
heater system which reduces white smoke and helps
start the engine in cold weather. Do not spray
starting �uid into the air intake where it can contact
the heater elements.If you do not have the GM Automatic Ether Injection
System, do not use starting �uid or you could
damage your engine. If you have the GM system,
use only GM approved starting �uid that has been
tested to establish compatibility with the air inlet
heater system.
The following tips will help you get good starting in
cold weather.
•Use the recommended engine oil when the outside
temperature drops below freezing. SeeEngine Oil
(Caterpillar
®Diesel Engine) on page 5-22or
Engine Oil (DURAMAX®Diesel) on page 5-22or
Engine Oil (Gasoline Engine) on page 5-26.
When the outside temperature drops below
0°F (−18°C), use of the optional engine coolant
block heater is recommended.
•If you experience longer cranking times, notice an
unusual amount of exhaust smoke or are at
higher altitudes (over 7,000 ft. or 2 135 m), you may
use your optional engine coolant block heater.
SeeEngine Coolant Heater on page 2-24.
•SeeWhat Fuel to Use on page 5-8for information
on what fuel to use in cold weather.
2-16
Page 91 of 374
Diesel Engine Exhaust Brake
If your vehicle is equipped with a diesel engine,
it may have an exhaust brake, which is located in the
exhaust system.
The exhaust brake is used to help slow the vehicle and
may assist the vehicle’s foundation brakes. The use of
the exhaust brake will assist the braking of the vehicle
and prolong the life of the foundation brake lining
material.
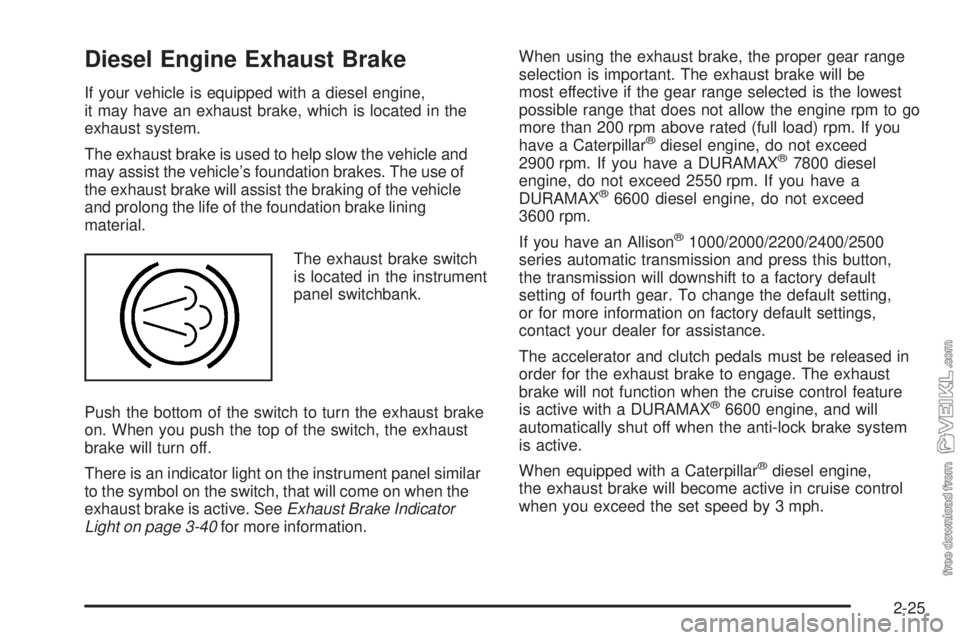
The exhaust brake switch
is located in the instrument
panel switchbank.
Push the bottom of the switch to turn the exhaust brake
on. When you push the top of the switch, the exhaust
brake will turn off.
There is an indicator light on the instrument panel similar
to the symbol on the switch, that will come on when the
exhaust brake is active. SeeExhaust Brake Indicator
Light on page 3-40for more information.When using the exhaust brake, the proper gear range
selection is important. The exhaust brake will be
most effective if the gear range selected is the lowest
possible range that does not allow the engine rpm to go
more than 200 rpm above rated (full load) rpm. If you
have a Caterpillar
®diesel engine, do not exceed
2900 rpm. If you have a DURAMAX®7800 diesel
engine, do not exceed 2550 rpm. If you have a
DURAMAX
®6600 diesel engine, do not exceed
3600 rpm.
If you have an Allison
®1000/2000/2200/2400/2500
series automatic transmission and press this button,
the transmission will downshift to a factory default
setting of fourth gear. To change the default setting,
or for more information on factory default settings,
contact your dealer for assistance.
The accelerator and clutch pedals must be released in
order for the exhaust brake to engage. The exhaust
brake will not function when the cruise control feature
is active with a DURAMAX
®6600 engine, and will
automatically shut off when the anti-lock brake system
is active.
When equipped with a Caterpillar
®diesel engine,
the exhaust brake will become active in cruise control
when you exceed the set speed by 3 mph.
2-25
Page 99 of 374
Four-Wheel Drive
If your vehicle has four-wheel drive, you can send your
engine’s driving power to all four wheels for extra
traction. To get the most satisfaction out of four-wheel
drive, you must be familiar with its operation. Read the
part that follows before using four-wheel drive.
You should use two-wheel drive high for most normal
driving conditions.
Notice:Driving on clean, dry pavement in
four-wheel drive for an extended period of time may
cause premature wear on your vehicle’s powertrain.
Do not drive on clean, dry pavement in four-wheel
drive for extended periods of time.
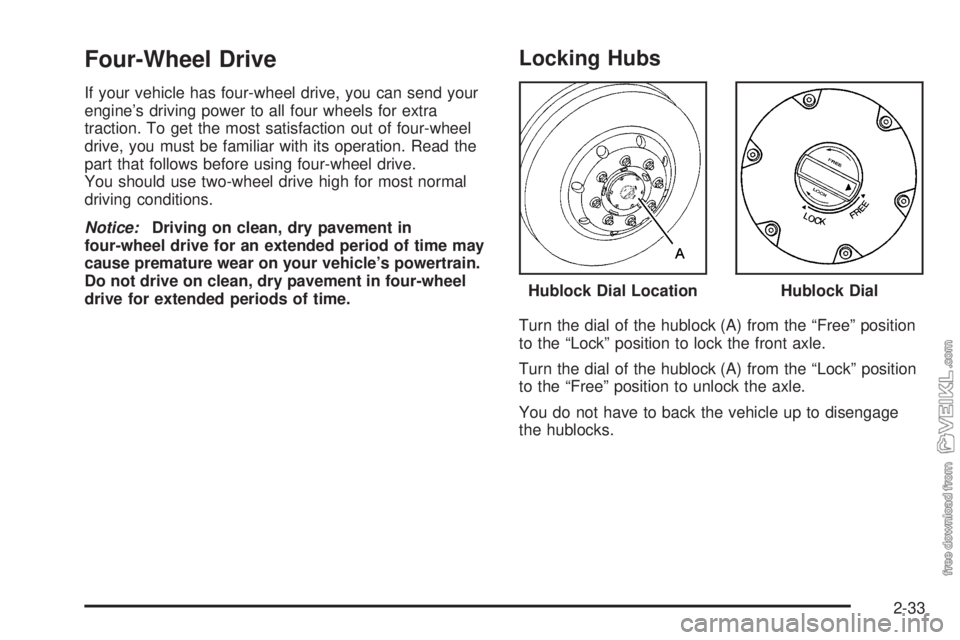
Locking Hubs
Turn the dial of the hublock (A) from the “Free” position
to the “Lock” position to lock the front axle.
Turn the dial of the hublock (A) from the “Lock” position
to the “Free” position to unlock the axle.
You do not have to back the vehicle up to disengage
the hublocks.Hublock Dial Location
Hublock Dial
2-33
Page 100 of 374
Electronic Transfer Case
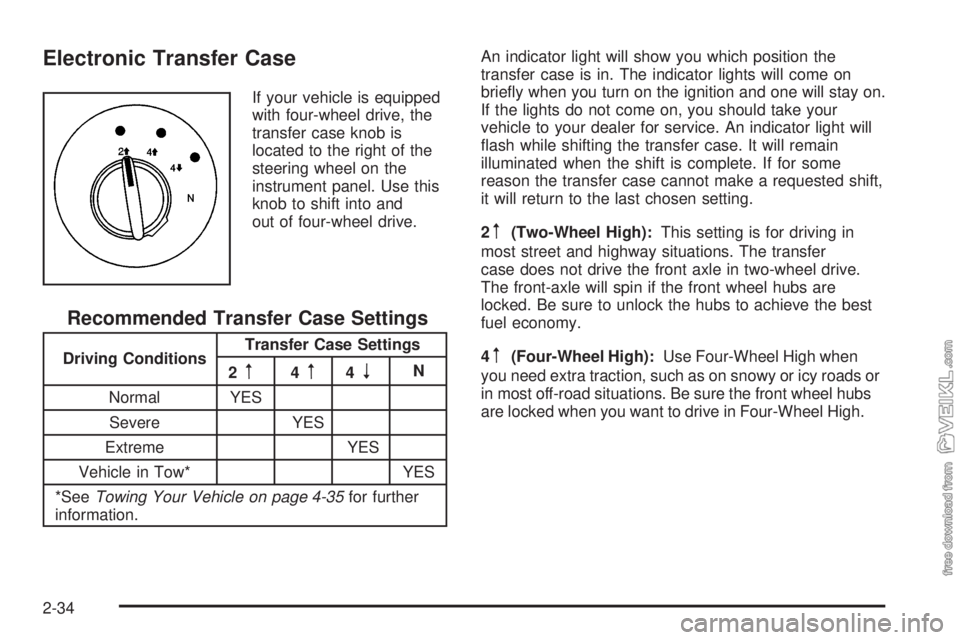
If your vehicle is equipped
with four-wheel drive, the
transfer case knob is
located to the right of the
steering wheel on the
instrument panel. Use this
knob to shift into and
out of four-wheel drive.
Recommended Transfer Case Settings
Driving ConditionsTransfer Case Settings
2m4m4nN
Normal YES
Severe YES
Extreme YES
Vehicle in Tow* YES
*SeeTowing Your Vehicle on page 4-35for further
information.An indicator light will show you which position the
transfer case is in. The indicator lights will come on
briefly when you turn on the ignition and one will stay on.
If the lights do not come on, you should take your
vehicle to your dealer for service. An indicator light will
flash while shifting the transfer case. It will remain
illuminated when the shift is complete. If for some
reason the transfer case cannot make a requested shift,
it will return to the last chosen setting.
2
m(Two-Wheel High):This setting is for driving in
most street and highway situations. The transfer
case does not drive the front axle in two-wheel drive.
The front-axle will spin if the front wheel hubs are
locked. Be sure to unlock the hubs to achieve the best
fuel economy.
4
m(Four-Wheel High):Use Four-Wheel High when
you need extra traction, such as on snowy or icy roads or
in most off-road situations. Be sure the front wheel hubs
are locked when you want to drive in Four-Wheel High.
2-34
Page 101 of 374
4n(Four-Wheel Low):This setting sends maximum
power to all four wheels. You might choose Four-Wheel
Low if you are driving off-road in deep sand, deep mud,
and climbing or descending steep hills. Be sure the
front wheel hubs are locked when you want to drive in
Four-Wheel Low.
{CAUTION:
Shifting the transfer case to NEUTRAL can
cause your vehicle to roll even if the
transmission is in PARK (P). You or someone
else could be injured. If you are going to leave
your vehicle, set the parking brake and shift
the transmission to PARK (P) and make sure
the transfer case is in a drive gear.Notice:If your vehicle has an Allison
®transmission
and you try to put the transmission in PARK (P)
while the transfer case is in Four-Wheel Low,
the transmission may not go into PARK (P) and
could damage your vehicle. When parking your
vehicle, make sure the transfer case is in Two-Wheel
High or Four-Wheel High.
NEUTRAL:Shift the vehicle’s transfer case to
NEUTRAL only when towing your vehicle.
Shifting Into Four-Wheel High
Turn the knob to four-wheel high. This can be done
at 3 mph or less and when you are shifting out of
Four-Wheel Low. The indicator light will flash while
shifting. It will remain illuminated when the shift is
complete.
Shifting Into Two-Wheel High
Turn the knob to Two-Wheel High. This can be done
at 3 mph or less and when you are shifting out of
Four-Wheel Low.
2-35
Page 103 of 374
Shifting Into NEUTRAL
Before shifting the transfer case to NEUTRAL, first
make sure the vehicle is parked so that it will not roll.
1. Set the parking brake.
2. Start the vehicle.
3. Put the transmission in NEUTRAL (N).
4. Shift the transfer case to Two-Wheel High.
5. Turn the transfer case knob all of the way past
Four-Wheel Low and hold it there for a minimum
of 10 seconds. The neutral indicator light will
come on.
6. Shift the transmission to REVERSE (R) for
one second, then shift the transmission to
DRIVE (D) for one second.
7. Turn the ignition to OFF.
8. Place the transmission shift lever in PARK. (P).
9. Turn the ignition to LOCK.
Shifting Out of NEUTRAL
To shift the transfer case out of NEUTRAL, do the
following:
1. Set the parking brake and apply the regular
brake pedal.
2. Turn the ignition to RUN with the engine off.
3. Put the transmission in NEUTRAL (N).
4. Turn the transfer case knob to the desired shift
position (Two-Wheel High, Four-Wheel High,
Four-Wheel Low).
5. After the transfer case has shifted out of NEUTRAL,
the indicator light will go out.
6. Release the parking brake.
7. Start the engine and shift the transmission lever to
the desired position.
Excessively shifting the transfer case into or out of the
different modes may cause the transfer case to enter the
shift protection mode. This will protect the transfer case
from possible damage and will only allow the transfer
case to respond to one shift per 10 seconds. The transfer
case may stay in this mode for up to three minutes.
2-37
Page 111 of 374
Mirrors
Manual Rearview Mirror
If your vehicle has this feature, pull the tab under the
mirror toward you to reduce glare from headlamps
behind you after dark. Push the tab away from you to
restore the mirror to the daytime position.
Outside Manual Mirrors
Adjust the outside rearview mirrors so you can see a
little of the side of your vehicle, and the area beside your
vehicle from a comfortable driving position. All mirrors
can be folded in to enter narrow passageways.
Outside Power Mirrors
If you have outside power mirrors, they can be adjusted
from the inside of the vehicle.
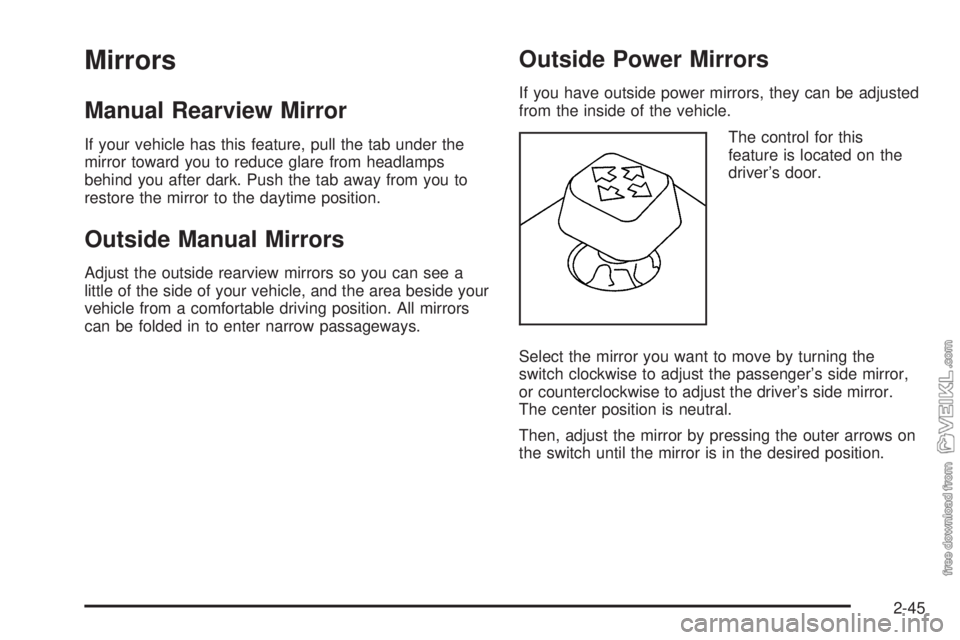
The control for this
feature is located on the
driver’s door.
Select the mirror you want to move by turning the
switch clockwise to adjust the passenger’s side mirror,
or counterclockwise to adjust the driver’s side mirror.
The center position is neutral.
Then, adjust the mirror by pressing the outer arrows on
the switch until the mirror is in the desired position.
2-45
Page 113 of 374
Storage Areas
Your vehicle includes a number of storage
compartments.
Some vehicles have storage areas in the instrument
panel. Another small storage area may be located
overhead. Other models may have more storage area
underneath the front passenger’s bench seat. Lift the
seat cushion to use the storage area.
Your vehicle may have a storage tray located behind
the driver and passenger seats.
All models have storage pockets and cupholders on
each of the doors. Some models may have additional
cupholders in the center floor console.
All models also have storage compartments located
beneath the floorboard on both sides of the vehicle.
Center Console Storage Area
Your vehicle may have a center console compartment if
you have the bucket or suspension seats.
The back of your center bench seat may also fold
forward to reveal a console compartment.
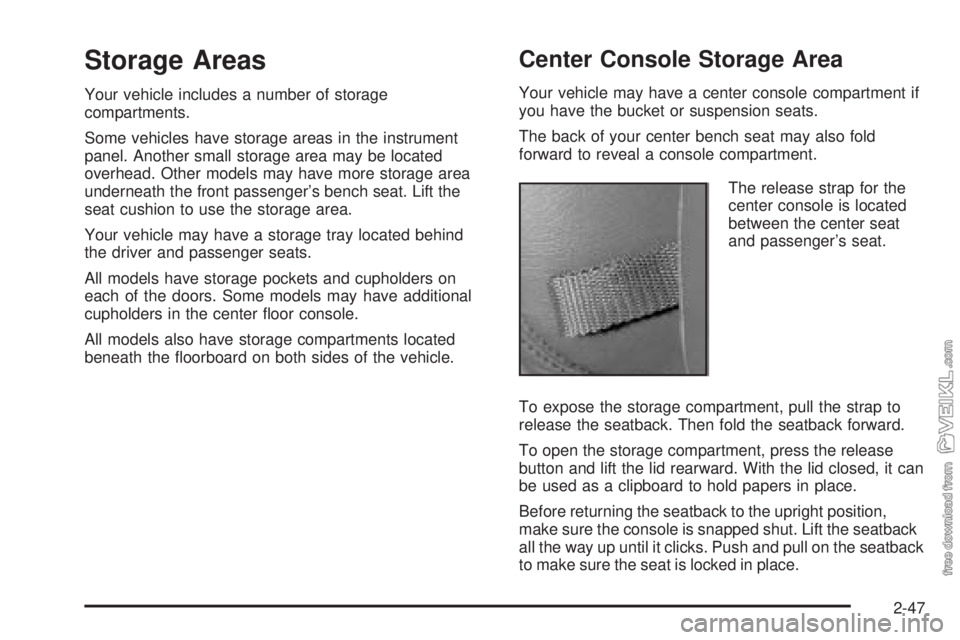
The release strap for the
center console is located
between the center seat
and passenger’s seat.
To expose the storage compartment, pull the strap to
release the seatback. Then fold the seatback forward.
To open the storage compartment, press the release
button and lift the lid rearward. With the lid closed, it can
be used as a clipboard to hold papers in place.
Before returning the seatback to the upright position,
make sure the console is snapped shut. Lift the seatback
all the way up until it clicks. Push and pull on the seatback
to make sure the seat is locked in place.
2-47