lock CHEVROLET S10 1994 2.G Manual PDF
[x] Cancel search | Manufacturer: CHEVROLET, Model Year: 1994, Model line: S10, Model: CHEVROLET S10 1994 2.GPages: 340, PDF Size: 18.45 MB
Page 262 of 340
Downloaded from www.Manualslib.com manuals search engine Lock Cylinders
To be sure your locks operate properly, they must be lubricated.
Refer to the Maintenance Schedule to determine
how often to lubricate them
and what type
of lubricant to use.
You should not use penetrating oils because they could wash out the factory
installed lubricant and cause
the lock to bind. De-icers which contain
alcohol could
also wash away the lubricant, so be sure to lubricate the lock
after using a de-icer of this type.
Tailgate Handle
The tailgate handle pivot points on your vehicle should be lubricated to keep
the handle working smoothly.
Refer to the Maintenance Schedule to determine
how often to lubricate them
and what type
of lubricant to use.
Exhaust System
To help prevent damage to your exhaust system, do not continue to drive
your vehicle if you notice:
Engine misfiring
Loss of performance
Other unusual operating conditions
Have your engine and exhaust system serviced regularly.
Three- Way Catalytic Converter
Your vehicle's three-way catalytic converter is designed to reduce the
pollutants in your vehicle's exhaust. Use only unleaded fuel in your vehicle.
If you use leaded fuel, you could damage your three-way catalytic converter
and other engine components.
Malfunction Indicator Lamp (SERVICE ENGINE SOON )
This light on your instrument panel lets you know when your emission
system needs service. The light will come on briefly when you start your
engine to let you know that the system
is working. If it does not come on
when you start your engine, or if it comes on and stays on while you're
driving, your system may
need service. Your vehicle should still be
driveable, but you should have your system serviced right away.
6-44
Page 263 of 340
Downloaded from www.Manualslib.com manuals search engine Engine Control Module System
This system has an oxygen (02) sensor that helps keep your engine’s
air-fuel mixture at a proper level. Use only unleaded fuel in your vehicle.
If
you use leaded fuel, you could damage your oxygen (02) sensor and affect
your vehicle’s emissions.
Loading Your Vehicle
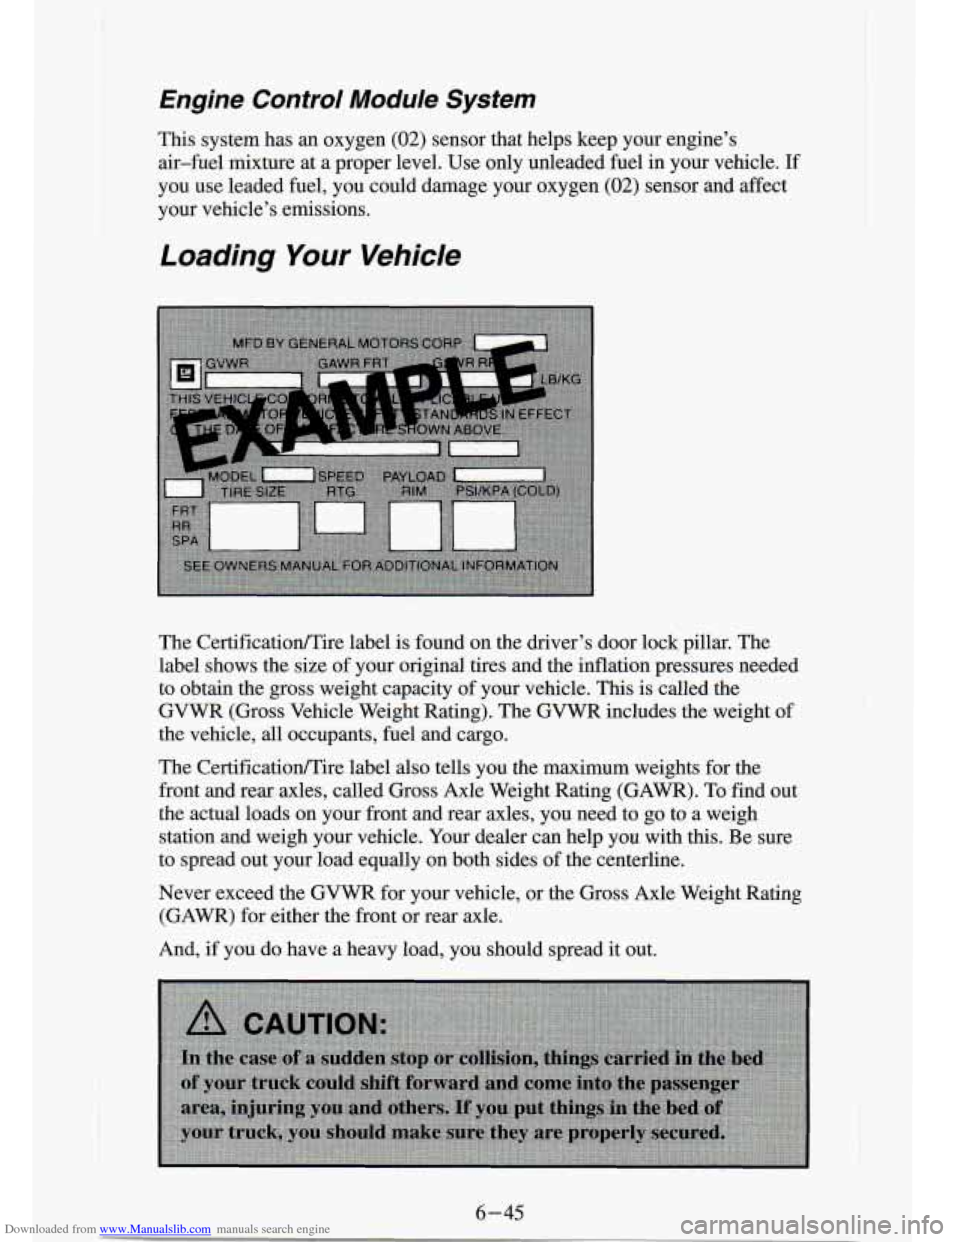
The CertificatiodTire label is found on the driver’s door lock pillar. The
label shows the size of your original tires and the inflation pressures needed
to obtain the
gross weight capacity of your vehicle. This is called the
GVWR (Gross Vehicle Weight Rating). The GVWR includes the weight of
the vehicle,
all occupants, fuel and cargo.
The CertificatiodTire label
also tells you the maximum weights for the
front and rear axles, called Gross Axle Weight Rating
(GAWR). To find out
the actual
loads on your front and rear axles, you need to go to a weigh
station and weigh
your vehicle. Your dealer can help you with this. Be sure
to spread out your load equally
on both sides of the centerline.
Never exceed the GVWR for your vehicle, or the Gross Axle Weight Rating
(GAWR) for either the front or rear axle.
And, if you do have a heavy load, you should spread it out.
6-45
Page 268 of 340
Downloaded from www.Manualslib.com manuals search engine You must weigh any accessories, trailer hitches or other equipment you a\
dd
to your vehicle. Then, subtract this extra weight from the CWR\
. This extra weight may shorten the center of gravity zone for your vehicle. Your dealer
can help you with this.
If your slide-in camper and its load weigh less than the CWR, the center of
gravity zone
for your vehicle may be larger.
Your dealer can help you make a good vehicle-camper match. He’ll also
help you determine your CWR.
After you’ve loaded your vehicle and camper, drive to a wei\
gh station and weigh on the front and rear wheels separately. This will tell you the loads on
your axles. The loads on the front and rear axles shouldn’t be more than
either
of the GAWRs. The total of the axle loads should not be more than
the GVWR.
Open your driver’s door and look at the door lock pillar for the
CertificationD‘ire label to find out your GAWR and GVWR.
11 you ve gone over ; Jr weight ratings, move or take out some things until
all the weights fall below the ratings. Of course, you should always tie down
any loose items when you load your vehicle or camper.
When you install and load your slide-in camper, check the manu\
facturer’s instructions.
If you want more information on curb weights, cargo weights, cargo weight
rating and the correct center of gravity zone for your vehicle, your dealer
can help you. Just ask for a copy of “Consumer Information, Truck
-
Camper Loading.”
Trailer Recommendations
You must subtract your hitch loads from the CWR for your vehicle. Weigh
your vehicle with your trailer attached,
so that you won’t go over the
GVWR or the GAWR.
You’ll get the best performance if you spread out the weight of your load
the right way, and if you choose the correct hitch and trailer brakes.
For more information, see “Trailer Towing’’ in the Index.
Pickup Conversion To Chassis Cab
General Motors is aware that some vehicle owners may consider having the
pickup
box removed and a commercial or recreational body installed.
However, we recommend that conversions of this type not be done to this
pickup. Owners should be aware that, as manufactured, there are differences
between a chassis cab and a pickup with the box removed which\
may affect vehicle safety.
For further information, contact the GM Zone Office for your
area. (See the “Warranty and Owner Assistance” booklet fo\
r Zone Office.)
6 --50
Page 270 of 340
Downloaded from www.Manualslib.com manuals search engine Inflation - Tire Pressure
The CertificatiodTire label which is on the driver’s door lock pillar, shows
the correct inflation pressures for your tires, when they’re cold. ‘‘C01d’~
means your vehicle has been sitting for at least three hours or driven no
more than a mile.
NOTICE:
Don’t let anyone tell you that underinflation or overinflation is
all right. It’s not. If your tires don’t have enough air
(underinflation) you can get:
0 Too much flexing
0 Too much heat
0 Tire overloading
Bad wear
Bad handling
Bad fuel economy.
If your tires have too much air (overinflation), you can get:
Unusual wear
0 Bad handling
Rough ride
0 Needless damage from road hazards.
Page 289 of 340
Downloaded from www.Manualslib.com manuals search engine Headlights
The headlight wiring is protected by a circuit breaker in the light switch. An
electrical overload will cause the lights to go on and off, or in some cases to
remain
off. If this happens, have your headlight wiring checked right away.
Windshield Wipers
The windshield wiper motor is protected by a circuit breaker and a fuse. If
the motor overheats due to heavy snow, etc., the wiper will stop until .the
motor cools. If the overload is caused by some electrical problem and not
snow, etc., be sure to get it fixed.
Power Windows and Other Power Options
Circuit breakers in the fuse panel protect the power windows and other
power accessories. When the current load is too heavy, the circuit breaker
opens and closes, protecting the circuit until the problem is fixed.
Trailer Wiring Harness
The optional seven-wire trailer wiring harness is protected by an in-line
fuse in the battery feed wire. This fuse
is near the junction block. See
“Trailer Wiring Harness”
in the Features & Controls section.
Page 290 of 340
Downloaded from www.Manualslib.com manuals search engine Fuse Block
..
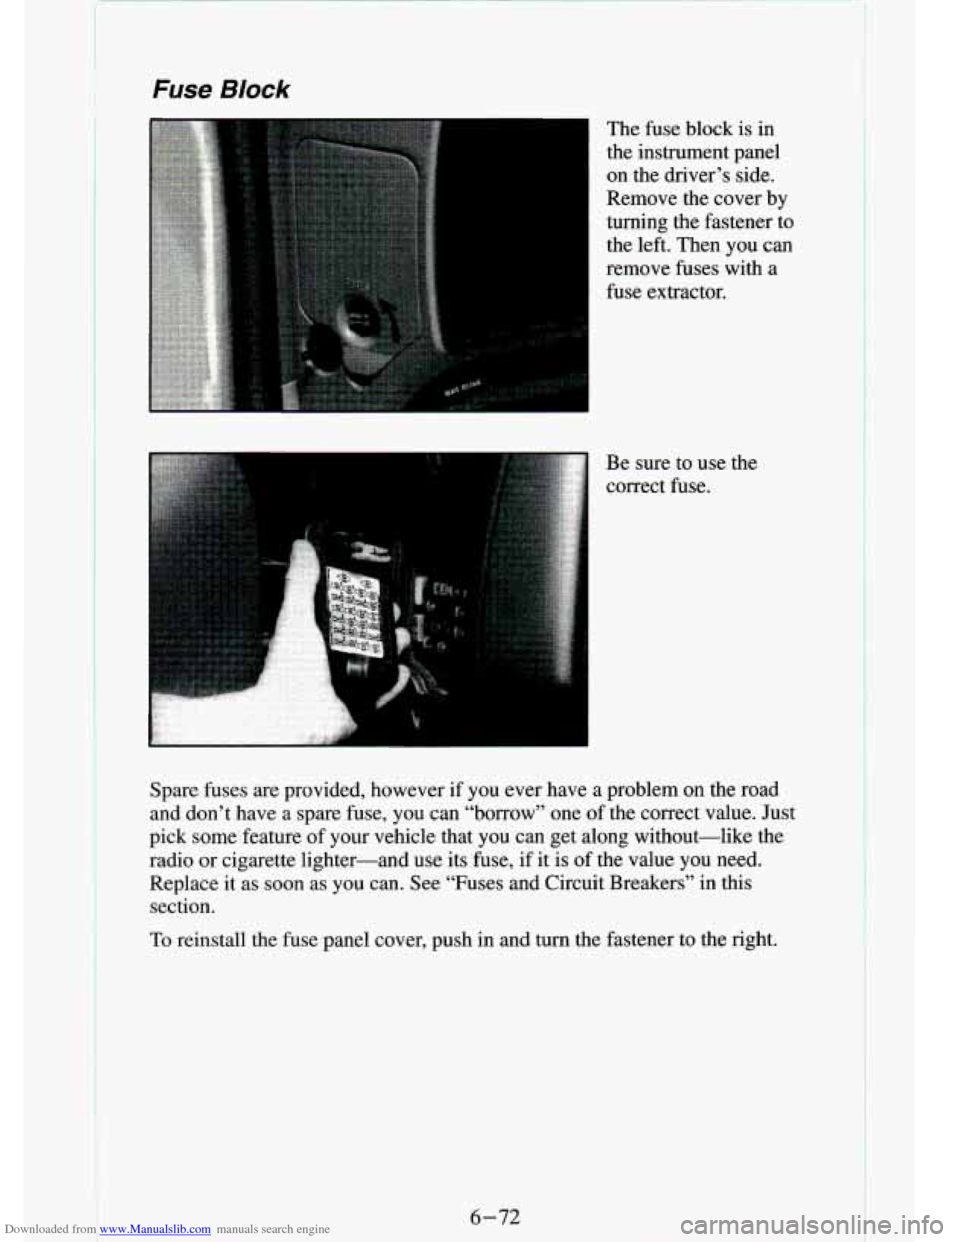
The fuse block is in
the instrument panel
on the driver’s side.
Remove the cover by
turning the fastener to
the left. Then you can
remove fuses with a
fuse extractor.
Spare fuses are provided, however if you ever have a problem on the road
and don’t have a spare fuse, you can “borrow” one of the correct value. Just
pick some feature of your vehicle that you can get along without-like the
radio or cigarette lighter-and use its fuse, if it is of the value you need.
Replace
it as soon as you can. See “Fuses and Circuit Breakers” in this
section.
i
c
TO reinstall the fuse panel cover, push in and turn the fastener to the right.
6-72
Page 293 of 340
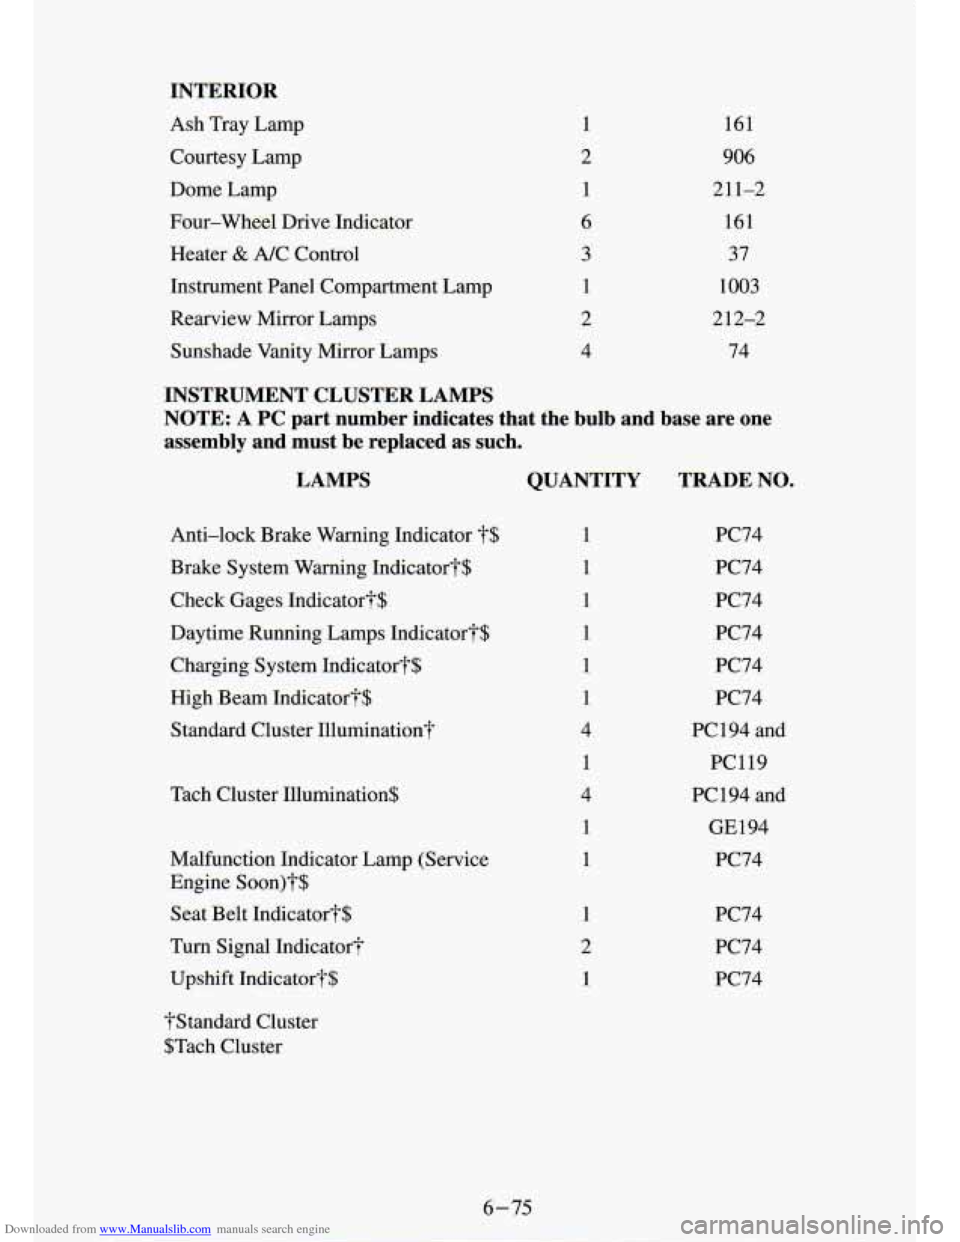
Downloaded from www.Manualslib.com manuals search engine INTERIOR
Ash Tray Lamp
Courtesy Lamp
Dome Lamp
Fol -Wheel Drive - lit, lr
Hearer & A/C Controi
Instrument Panel Compartment Lamp
Rearview Mirror Lamps Sunshade Vanity Mirror Lamps 1
2 1
4 161
906
211-2 161
37
1003
2 12-2
74
INSTRUMENT CLUSTER LAMPS NOTE:
A PC part number indicates that the bulb and base are one
assembly
and must be replaced as such.
LAMPS QUANTITY
TRADE NO.
Anti-lock Brake Warning Indicator ?$
Brake System Warning Indicator?$
Check Gages Indicator?$
Daytime Running Lamps Indicator?$
Charging System Indicator?$ High Beam Indicator?$
Standard Cluster Illumination?
Tach Cluster Illumination$
Malfunction Indicator Lamp (Service
Engine
Soon)?$
Seat Belt Indicator?$
Turn Signal Indicator?
Upshift Indicator?$
?Standard Cluster
$Tach Cluster 1
1
1
1
1
1
4
1
4
1
1
PC74
PC74
PC74
PC74
PC74
PC74
PC 194 and
PC119
PC194 and
GE 194
PC74
PC74
PC74
PC74
Page 294 of 340
![CHEVROLET S10 1994 2.G Manual PDF Downloaded from www.Manualslib.com manuals search engine VI 0
rxlCPWR 7 30 A
WDO PWR]
20
A
ACCY A
r4WD 1 20A
N
rFOG 1 20 A A
N
N w
N P
Fuses and Circuit Breakers
FUSE/CIRCUIT
BREAKER CHEVROLET S10 1994 2.G Manual PDF Downloaded from www.Manualslib.com manuals search engine VI 0
rxlCPWR 7 30 A
WDO PWR]
20
A
ACCY A
r4WD 1 20A
N
rFOG 1 20 A A
N
N w
N P
Fuses and Circuit Breakers
FUSE/CIRCUIT
BREAKER](/img/24/8266/w960_8266-293.png)
Downloaded from www.Manualslib.com manuals search engine VI 0
rxlCPWR 7 30 A
WDO PWR']
20
A
ACCY A
r4WD 1 20A
N
rFOG 1 20 A A
N
N w
N P
Fuses and Circuit Breakers
FUSE/CIRCUIT
BREAKER
A
B
1
2
3
4
5
NAME CIRCUITS PROTECTED
PWR ACCY
Power Door Locks
PWR WDO Power Windows
STOP/HAZ Stop Lamps, Hazard Lamps, Chime
HORNDM Dome Lamp, Lighted Visor Mirror, Module
Glove Box Lamp,
Horn, I/€' Courtesy
Lamps, Power Mirrors
T/L CTSY Electric Shift Transfer Case Module,
Park Lamps, License Plate Lamps
GAUGES Auto Transmission, Alternator Field, Variable Throttle Control, A/C
Compressor, Cluster, Chime Module,
Four-wheel Drive Indicator Lamp,
Heated Oxygen Sensor, Daytime
Running Lamps Module
(NOT USED)
6-76
Page 295 of 340
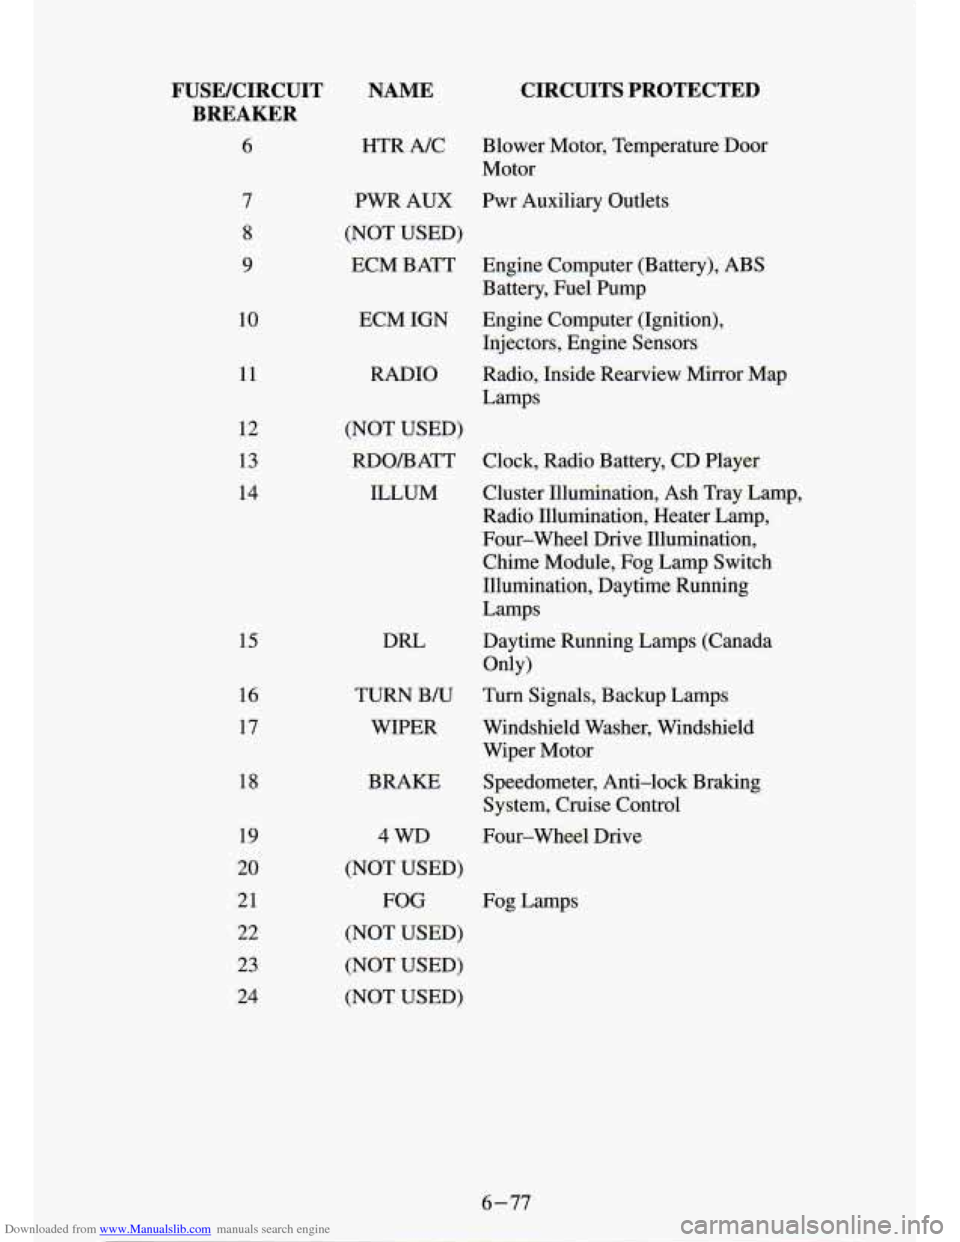
Downloaded from www.Manualslib.com manuals search engine FUSEKIRCUIT BREAKER
6
10
11
12
13
14
15
16
17
18
19
20
21
22
23
24
NAME
HTR NC
CIRCUITS PROTECTED
Blower Motor, Temperature Door
Motor
PWR AUX Pwr Auxiliary Outlets
(NOT USED) ECM BATT Engine Computer (Battery), ABS
Battery, Fuel Pump
ECM IGN Engine Computer (Ignition), Injectors, Engine Sensors
RADIO
(NOT USED) RDO/BATT ILLUM
DRL
TURN B/U
WIPER
BRAKE
4 WD
(NOT USED) FOG
(NOT USED)
(NOT USED)
(NOT USED) Radio,
Inside Rearview
Mirror Map
Lamps
Clock, Radio Battery, CD Player
Cluster Illumination, Ash Tray Lamp,
Radio Illumination, Heater Lamp,
Four-wheel Drive Illumination, Chime Module, Fog Lamp Switch
Illumination, Daytime Running
Lamps
Daytime Running Lamps (Canada
Turn Signals, Backup Lamps
Windshield Washer, Windshield
Wiper Motor Only)
Speedometer, Anti-lock Braking
System, Cruise Control
Four-wheel Drive
Fog Lamps
Page 306 of 340
Downloaded from www.Manualslib.com manuals search engine Owner Checks and Services
Listed below are owner checks and services which would be made\
at the
time period specified to help ensure proper safety, emission pe\
rformance,
and dependability
of your vehicle.
Be sure any necessary repairs
are completed at once. Whenever any fluids
or lubricants are added to your vehicle, make sure they are t\
he proper ones,
as shown in this section.
At Least Once a Month
Tire Inflation Pressure Check - Check the tires for proper inflation. If
they
are low, inflate them to the level specified on the Certification \
label.
See “Inflation-Tire Pressure” in the Index.
At feast Four Times a Year
Tailgate Lubrication - Lubricate tailgate latch bolt, handle assembly pivot
points, and hinges with lubricant recommended in
this section. Lubricate
every
3,000 miles (5 000 kilometers) if following Maintenance Schedule I, or
every
7,500 &les (12 500 kilometers) if following Maintenance Schedule II.
At Least Once a Year
Key Lock Cylinder Lubrication - Lubricate key lock cylinders with one
of the lubricants recammended in
this section.
Transmission Neutral or Clutch Start Switch Operation -
1.
2.
3.
4.
Before you start, be sure you have enough room around the veh\
icle.
Firmly apply both the manual parking brake, and the regular br\
ake. See
“Brakes” and “Parking Brake” in the Index.
Do not use the accelerator
pedal.
Be ready to
turn off the engine immediately if it starts.
On automatic transmission vehicles,
try to start the engine in each gear.
The starter should work only in
T“ (Park) or “N’ (Neutral).
On manual transmission vehicles, put the shift lever in “N’ (Neutral),
push the clutch down halfway, and
try to start the engine. The starter
should work only when the clutch is pushed down
all the way to the floor.
7-10