CHEVROLET SILVERADO 2017 3.G Owners Manual
Manufacturer: CHEVROLET, Model Year: 2017, Model line: SILVERADO, Model: CHEVROLET SILVERADO 2017 3.GPages: 509, PDF Size: 8.87 MB
Page 381 of 509
Chevrolet Silverado Owner Manual (GMNA-Localizing-U.S./Canada/Mexico-9956065) - 2017 - CRC - 4/29/16
380 Vehicle Care
Front Axle
When to Check and ChangeLubricant
It is not necessary to regularlycheck front axle fluid unless a leakis suspected, or an unusual noise isheard. A fluid loss could indicate aproblem. Have it inspected andrepaired.
How to Check Lubricant
To g e t a n a c c u r a t e r e a d i n g , t h evehicle should be on a levelsurface.
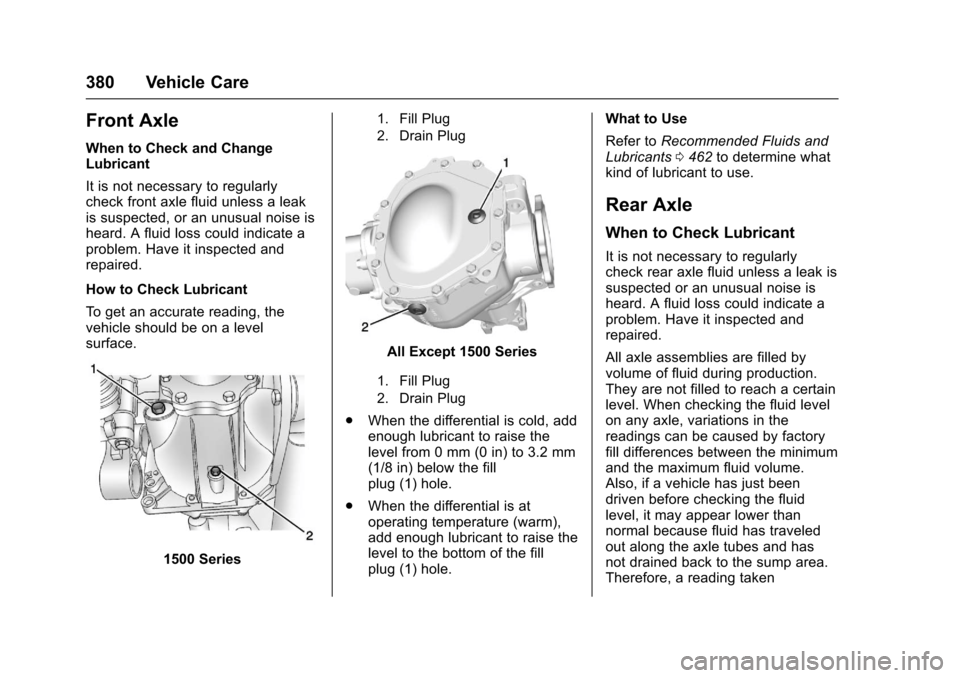
1500 Series
1. Fill Plug
2. Drain Plug
All Except 1500 Series
1. Fill Plug
2. Drain Plug
.When the differential is cold, addenough lubricant to raise thelevel from 0 mm (0 in) to 3.2 mm(1/8 in) below the fillplug (1) hole.
.When the differential is atoperating temperature (warm),add enough lubricant to raise thelevel to the bottom of the fillplug (1) hole.
What to Use
Refer toRecommended Fluids andLubricants0462to determine whatkind of lubricant to use.
Rear Axle
When to Check Lubricant
It is not necessary to regularlycheck rear axle fluid unless a leak issuspected or an unusual noise isheard. A fluid loss could indicate aproblem. Have it inspected andrepaired.
All axle assemblies are filled byvolume of fluid during production.They are not filled to reach a certainlevel. When checking the fluid levelon any axle, variations in thereadings can be caused by factoryfill differences between the minimumand the maximum fluid volume.Also, if a vehicle has just beendriven before checking the fluidlevel, it may appear lower thannormal because fluid has traveledout along the axle tubes and hasnot drained back to the sump area.Therefore, a reading taken
Page 382 of 509
Chevrolet Silverado Owner Manual (GMNA-Localizing-U.S./Canada/Mexico-9956065) - 2017 - CRC - 4/29/16
Vehicle Care 381
five minutes after the vehicle hasbeen driven will appear to have alower fluid level than a vehicle thathas been stationary for an hour ortwo. The rear axle assembly mustbe supported on a flat, level surfaceto get a true reading.
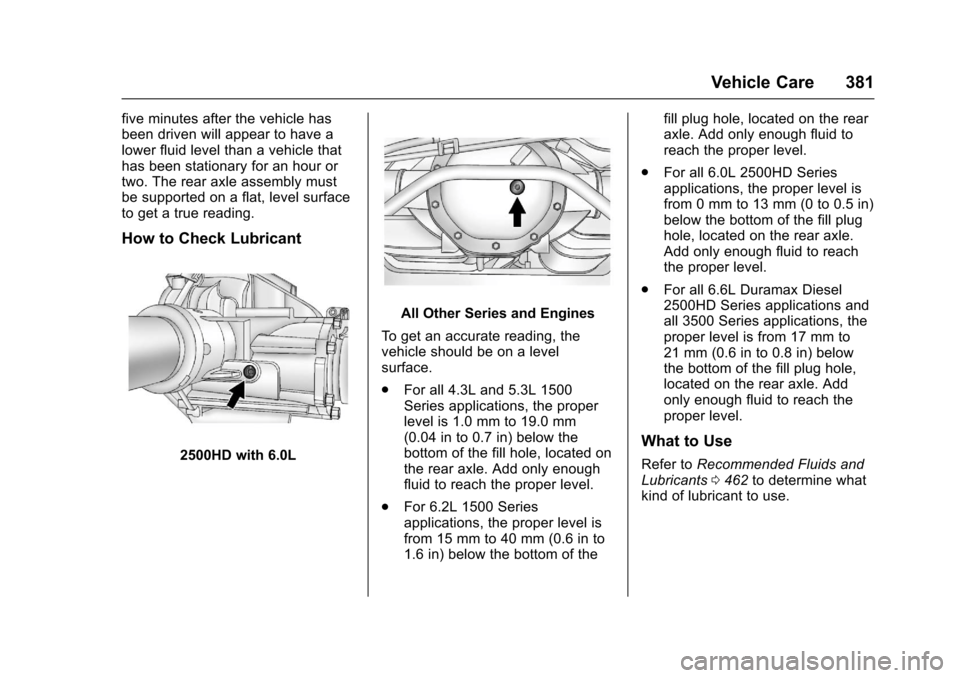
How to Check Lubricant
2500HD with 6.0L
All Other Series and Engines
To g e t a n a c c u r a t e r e a d i n g , t h evehicle should be on a levelsurface.
.For all 4.3L and 5.3L 1500Series applications, the properlevel is 1.0 mm to 19.0 mm(0.04 in to 0.7 in) below thebottom of the fill hole, located onthe rear axle. Add only enoughfluid to reach the proper level.
.For 6.2L 1500 Seriesapplications, the proper level isfrom 15 mm to 40 mm (0.6 in to1.6 in) below the bottom of the
fill plug hole, located on the rearaxle. Add only enough fluid toreach the proper level.
.For all 6.0L 2500HD Seriesapplications, the proper level isfrom 0 mm to 13 mm (0 to 0.5 in)below the bottom of the fill plughole, located on the rear axle.Add only enough fluid to reachthe proper level.
.For all 6.6L Duramax Diesel2500HD Series applications andall 3500 Series applications, theproper level is from 17 mm to21 mm (0.6 in to 0.8 in) belowthe bottom of the fill plug hole,located on the rear axle. Addonly enough fluid to reach theproper level.
What to Use
Refer toRecommended Fluids andLubricants0462to determine whatkind of lubricant to use.
Page 383 of 509
Chevrolet Silverado Owner Manual (GMNA-Localizing-U.S./Canada/Mexico-9956065) - 2017 - CRC - 4/29/16
382 Vehicle Care
Noise Control System
Noise Emission Warranty
General Motors warrants to the firstperson who purchases this vehiclefor purposes other than resale andto each subsequent purchaser thatthis vehicle as manufactured byGeneral Motors was designed, builtand equipped to conform at the timeit left General Motors control with allapplicable U.S. EPA Noise ControlRegulations. This warranty coversthis vehicle as designed, built andequipped by General Motors and isnot limited to any particular part,component or system of the vehiclemanufactured by General Motors.Defects in design, assembly or anypart, component or system of thevehicle manufactured by GeneralMotors, which at the time it leftGeneral Motors control causednoise emissions to exceed Federalstandards, are covered by thewarranty for the life of the vehicle.
The following information relates tocompliance with federal noiseemission standards for vehicles withaGrossVehicleWeightRating
(GVWR) of more than 4 536 kg(10,000 lb). The noise controlsystem warranty is given in yourwarranty manual.
These standards apply only tovehicles sold in the United States.
Federal law prohibits the followingacts or the causing thereof:
1. The removal or renderinginoperative by any person,other than for purposes ofmaintenance, repair orreplacement, of any device orelement of design incorporatedinto any new vehicle for thepurpose of noise control, priorto its sale or delivery to theultimate purchaser or while it isin use; or
2. The use of the vehicle aftersuch device or element ofdesign has been removed orrendered inoperative by anyperson.
Among those acts presumed toconstitute tampering are the actslisted below.
Insulation:
Removal of the noise shields or anyunderhood insulation.
Engine:
Removal or rendering engine speedgovernor, if the vehicle has one,inoperative so as to allow enginespeed to exceed manufacturerspecifications.
Fan and Drive:
.Removal of fan clutch, if thevehicle has one, or renderingclutch inoperative.
.Removal of the fan shroud, if thevehicle has one.
Air Intake:
.Removal of the air cleanersilencer.
.Modification of the air cleaner.
Exhaust:
.Removal of the muffler and/orresonator.
.Removal of the exhaust pipesand exhaust pipe clamps.
Page 384 of 509
Chevrolet Silverado Owner Manual (GMNA-Localizing-U.S./Canada/Mexico-9956065) - 2017 - CRC - 4/29/16
Vehicle Care 383
Starter Switch Check
{Warning
When you are doing this
inspection, the vehicle could
move suddenly. If the vehicle
moves, you or others could be
injured.
1. Before starting this check, besure there is enough roomaround the vehicle.
2. Apply both the parking brakeand the regular brake.
Do not use the acceleratorpedal, and be ready to turn offthe engine immediately if itstarts.
3. For automatic transmissionvehicles, try to start the enginein each gear. The vehicleshould start only in P (Park) orN(Neutral). If the vehicle startsin any other position, contactyour dealer for service.
For manual transmissionvehicles, put the shift lever inNeutral, push the clutch pedaldown halfway, and try to startthe engine. The vehicle shouldstart only when the clutchpedal is pushed down all theway to the floor. If the vehiclestarts when the clutch pedal isnot pushed all the way down,contact your dealer for service.
Automatic Transmission
Shift Lock Control
Function Check
{Warning
When you are doing this
inspection, the vehicle could
move suddenly. If the vehicle
moves, you or others could be
injured.
1. Before starting this check, besure there is enough roomaround the vehicle. It should beparked on a level surface.
2. Apply the parking brake. Beready to apply the regularbrake immediately if the vehiclebegins to move.
3. With the engine off, turn theignition on, but do not start theengine. Without applying theregular brake, try to move theshift lever out of P (Park) withnormal effort. If the shift levermoves out of P (Park), contactyour dealer for service.
Ignition Transmission
Lock Check
While parked, and with the parkingbrake set, try to turn the ignition toLOCK/OFF in each shift leverposition.
.For automatic transmissionvehicles, the ignition should turnto LOCK/OFF only when theshift lever is in P (Park).
.For manual transmissionvehicles, the ignition should turnto LOCK/OFF only when youpress the key release button.
Page 385 of 509
Chevrolet Silverado Owner Manual (GMNA-Localizing-U.S./Canada/Mexico-9956065) - 2017 - CRC - 4/29/16
384 Vehicle Care
On all vehicles, the ignition keyshould come out only in LOCK/OFF.
Contact your dealer if service isrequired.
Park Brake and P (Park)
Mechanism Check
{Warning
When you are doing this check,
the vehicle could begin to move.
Yo u o r o t h e r s c o u l d b e i n j u r e d
and property could be damaged.
Make sure there is room in front
of the vehicle in case it begins to
roll. Be ready to apply the regular
brake at once should the vehicle
begin to move.
Park on a fairly steep hill, with thevehicle facing downhill. Keepingyour foot on the regular brake, setthe parking brake.
.To c h e c k t h e p a r k i n g b r a k e ' sholding ability: With the enginerunning and the transmission inN(Neutral), slowly remove foot
pressure from the regular brakepedal. Do this until the vehicle isheld by the parking brake only.
.To c h e c k t h e P ( P a r k )mechanism's holding ability:With the engine running, shift toP(Park). Then release theparking brake followed by theregular brake.
Contact your dealer if service isrequired.
Wiper Blade Replacement
Windshield wiper blades should beinspected for wear or cracking.
Replacement blades come indifferent types and are removed indifferent ways. For properwindshield wiper blade length andtype, seeMaintenanceReplacement Parts0464.
Caution
Allowing the wiper arm to touch
the windshield when no wiper
blade is installed could damage
(Continued)
Caution (Continued)
the windshield. Any damage that
occurs would not be covered by
the vehicle warranty. Do not allow
the wiper arm to touch the
windshield.
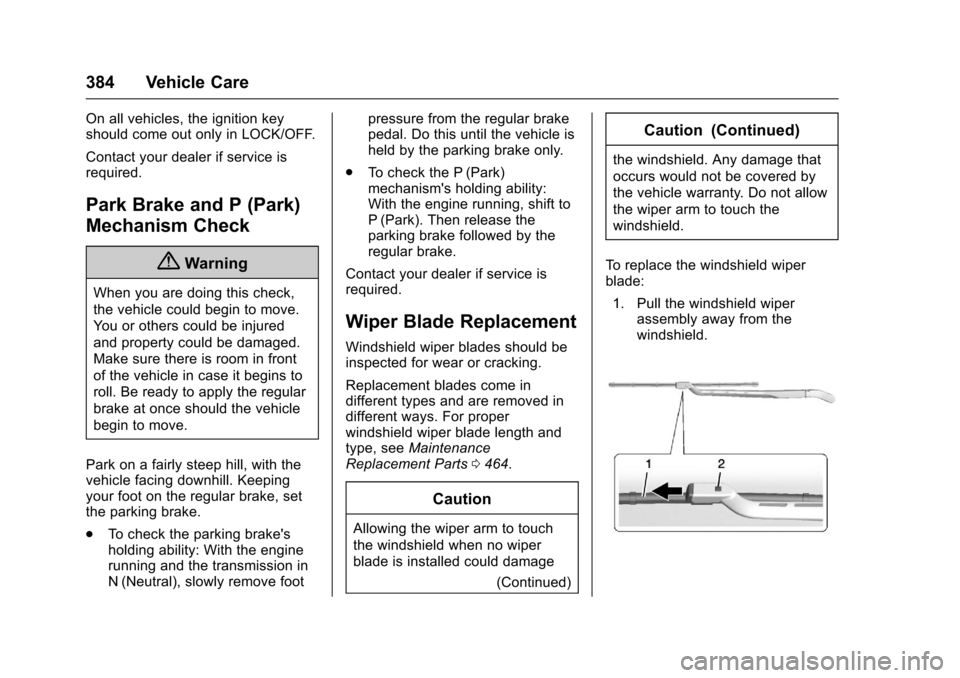
To r e p l a c e t h e w i n d s h i e l d w i p e rblade:
1. Pull the windshield wiperassembly away from thewindshield.
Page 386 of 509
Chevrolet Silverado Owner Manual (GMNA-Localizing-U.S./Canada/Mexico-9956065) - 2017 - CRC - 4/29/16
Vehicle Care 385
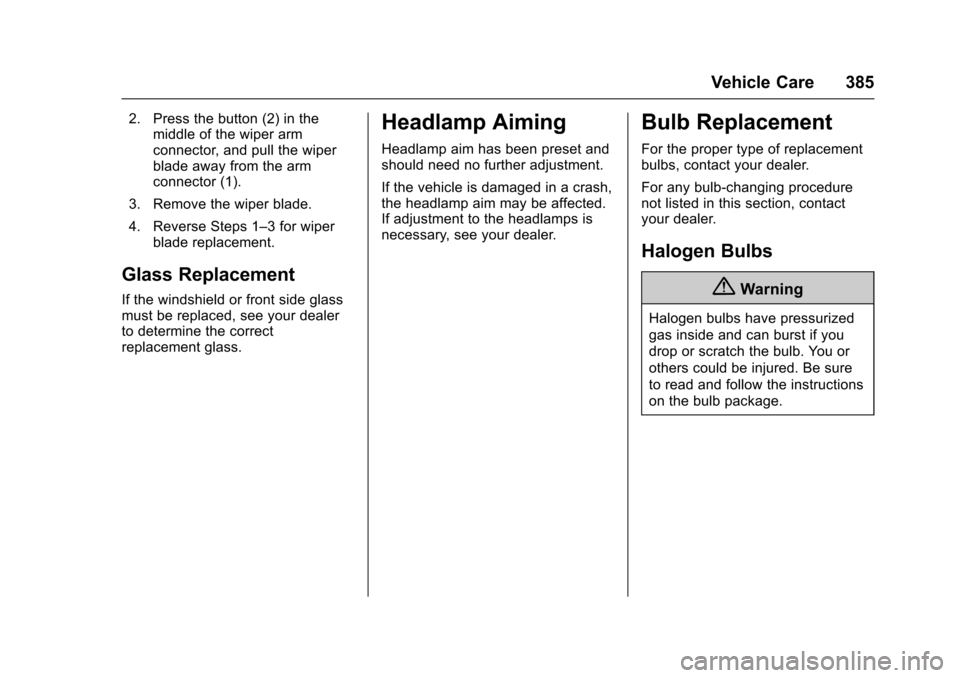
2. Press the button (2) in themiddle of the wiper armconnector, and pull the wiperblade away from the armconnector (1).
3. Remove the wiper blade.
4. Reverse Steps 1–3forwiperblade replacement.
Glass Replacement
If the windshield or front side glassmust be replaced, see your dealerto determine the correctreplacement glass.
Headlamp Aiming
Headlamp aim has been preset andshould need no further adjustment.
If the vehicle is damaged in a crash,the headlamp aim may be affected.If adjustment to the headlamps isnecessary, see your dealer.
Bulb Replacement
For the proper type of replacementbulbs, contact your dealer.
For any bulb-changing procedurenot listed in this section, contactyour dealer.
Halogen Bulbs
{Warning
Halogen bulbs have pressurized
gas inside and can burst if you
drop or scratch the bulb. You or
others could be injured. Be sure
to read and follow the instructions
on the bulb package.
Page 387 of 509
Chevrolet Silverado Owner Manual (GMNA-Localizing-U.S./Canada/Mexico-9956065) - 2017 - CRC - 4/29/16
386 Vehicle Care
High Intensity Discharge
(HID) Lighting
{Warning
The High Intensity Discharge
(HID) lighting system operates at
averyhighvoltage.Ifyoutryto
service any of the system
components, you could be
seriously injured. Have your
dealer or a qualified technician
service them.
After an HID headlamp bulb hasbeen replaced, the beam might be aslightly different shade than it wasoriginally. This is normal.
LED Lighting
This vehicle has several LED lamps.For replacement of any LED lightingassembly, contact your dealer.
Headlamps, Front Turn
Signal, Sidemarker, and
Parking Lamps
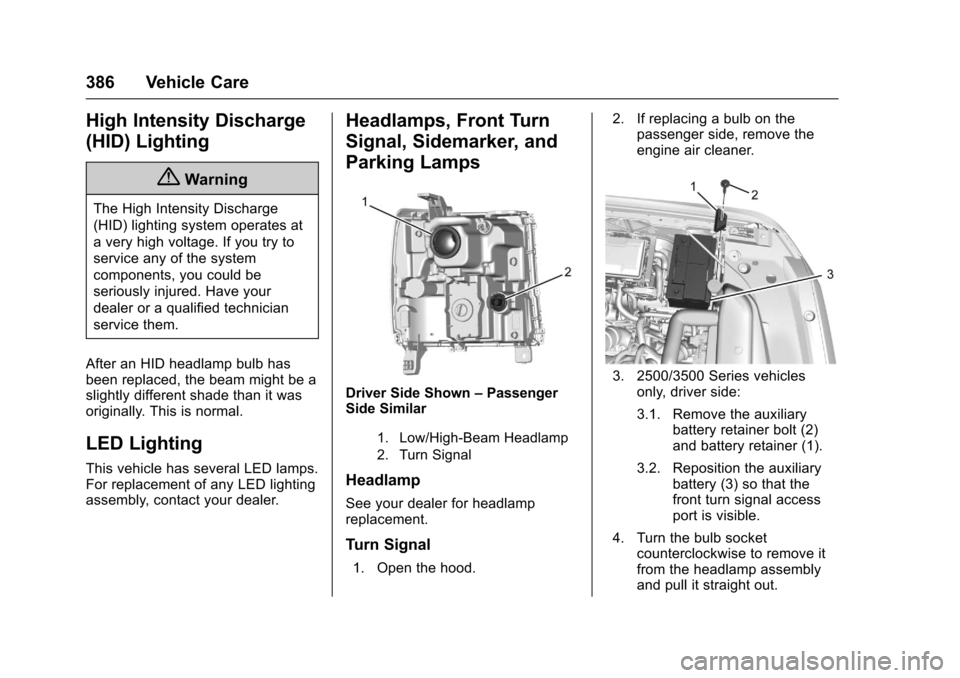
Driver Side Shown–PassengerSide Similar
1. Low/High-Beam Headlamp
2. Turn Signal
Headlamp
See your dealer for headlampreplacement.
Turn Signal
1. Open the hood.
2. If replacing a bulb on thepassenger side, remove theengine air cleaner.
3. 2500/3500 Series vehiclesonly, driver side:
3.1. Remove the auxiliarybattery retainer bolt (2)and battery retainer (1).
3.2. Reposition the auxiliarybattery (3) so that thefront turn signal accessport is visible.
4. Turn the bulb socketcounterclockwise to remove itfrom the headlamp assemblyand pull it straight out.
Page 388 of 509
Chevrolet Silverado Owner Manual (GMNA-Localizing-U.S./Canada/Mexico-9956065) - 2017 - CRC - 4/29/16
Vehicle Care 387
5. Remove the bulb by pulling itstraight out of the bulb socket.
6. Install new bulb into bulbsocket.
7. Turn the bulb socket clockwiseto install it in the headlampassembly.
8. 2500/3500 Series vehiclesonly, driver side:
8.1. Reposition the auxiliarybattery (3).
8.2. Install the auxiliarybattery retainer (1) andbattery retainer bolt (3).
9. If replacing a bulb on thepassenger side, reinstall theengine air cleaner.
10. Close the hood.
Fog Lamps
To r e p l a c e t h e f r o n t f o g l a m p b u l b :
1. Locate the fog lamp under thefront bumper.
2. Disconnect the electricalconnector from the fog lampbulb assembly by pressing theconnector release.
3. Remove the bulb from thehousing by squeezing the tworelease tabs and pulling itstraight out of the assembly.
Taillamps (Chassis Cab
Models)
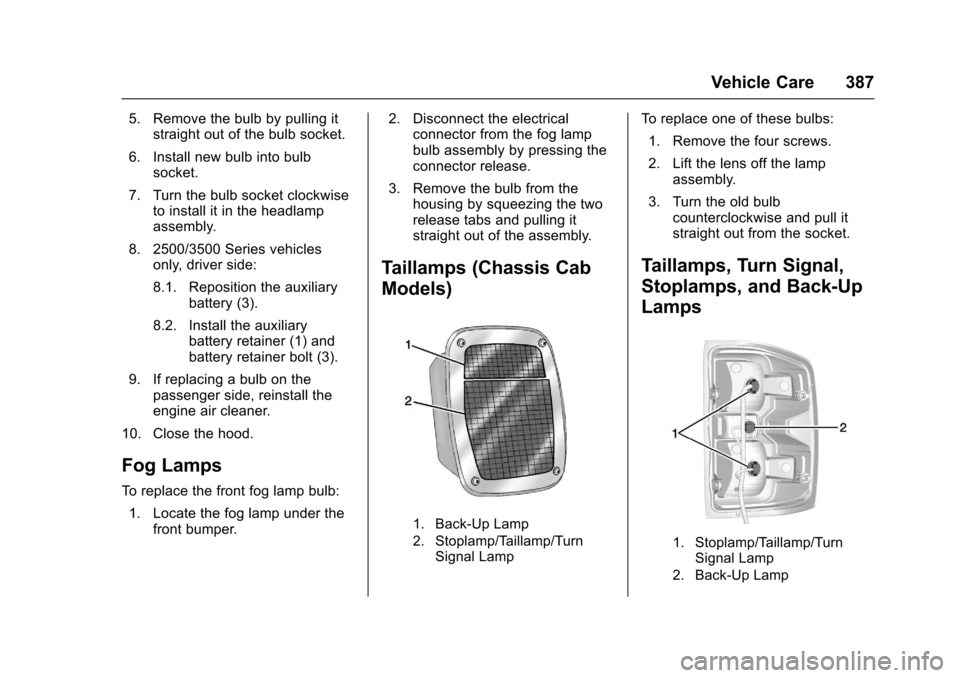
1. Back-Up Lamp
2. Stoplamp/Taillamp/TurnSignal Lamp
To r e p l a c e o n e o f t h e s e b u l b s :
1. Remove the four screws.
2. Lift the lens off the lampassembly.
3. Turn the old bulbcounterclockwise and pull itstraight out from the socket.
Taillamps, Turn Signal,
Stoplamps, and Back-Up
Lamps
1. Stoplamp/Taillamp/TurnSignal Lamp
2. Back-Up Lamp
Page 389 of 509
Chevrolet Silverado Owner Manual (GMNA-Localizing-U.S./Canada/Mexico-9956065) - 2017 - CRC - 4/29/16
388 Vehicle Care
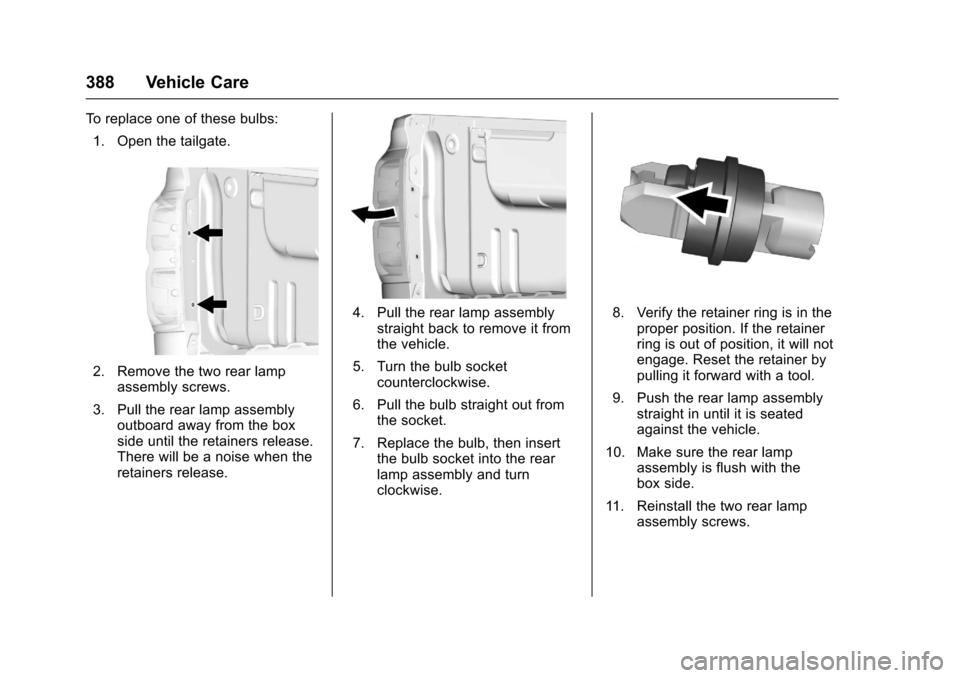
To r e p l a c e o n e o f t h e s e b u l b s :
1. Open the tailgate.
2. Remove the two rear lampassembly screws.
3. Pull the rear lamp assemblyoutboard away from the boxside until the retainers release.There will be a noise when theretainers release.
4. Pull the rear lamp assemblystraight back to remove it fromthe vehicle.
5. Turn the bulb socketcounterclockwise.
6. Pull the bulb straight out fromthe socket.
7. Replace the bulb, then insertthe bulb socket into the rearlamp assembly and turnclockwise.
8. Verify the retainer ring is in theproper position. If the retainerring is out of position, it will notengage. Reset the retainer bypulling it forward with a tool.
9. Push the rear lamp assemblystraight in until it is seatedagainst the vehicle.
10. Make sure the rear lampassembly is flush with thebox side.
11 . R e i n s t a l l t h e t w o r e a r l a m passembly screws.
Page 390 of 509
Chevrolet Silverado Owner Manual (GMNA-Localizing-U.S./Canada/Mexico-9956065) - 2017 - CRC - 4/29/16
Vehicle Care 389
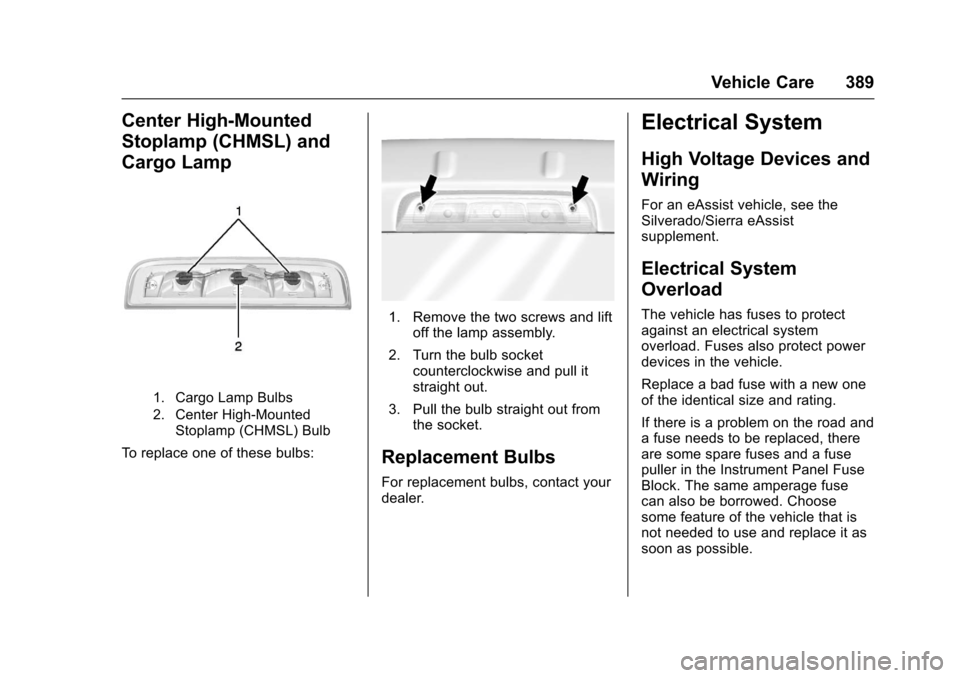
Center High-Mounted
Stoplamp (CHMSL) and
Cargo Lamp
1. Cargo Lamp Bulbs
2. Center High-MountedStoplamp (CHMSL) Bulb
To r e p l a c e o n e o f t h e s e b u l b s :
1. Remove the two screws and liftoff the lamp assembly.
2. Turn the bulb socketcounterclockwise and pull itstraight out.
3. Pull the bulb straight out fromthe socket.
Replacement Bulbs
For replacement bulbs, contact yourdealer.
Electrical System
High Voltage Devices and
Wiring
For an eAssist vehicle, see theSilverado/Sierra eAssistsupplement.
Electrical System
Overload
The vehicle has fuses to protectagainst an electrical systemoverload. Fuses also protect powerdevices in the vehicle.
Replace a bad fuse with a new oneof the identical size and rating.
If there is a problem on the road andafuseneedstobereplaced,thereare some spare fuses and a fusepuller in the Instrument Panel FuseBlock. The same amperage fusecan also be borrowed. Choosesome feature of the vehicle that isnot needed to use and replace it assoon as possible.