remove CHEVROLET SILVERADO 2500 2023 Owner's Manual
[x] Cancel search | Manufacturer: CHEVROLET, Model Year: 2023, Model line: SILVERADO 2500, Model: CHEVROLET SILVERADO 2500 2023Pages: 441, PDF Size: 14.4 MB
Page 88 of 441
Chevrolet Silverado 2500 HD/3500 HD Owner Manual (GMNA-Localizing-U.
S./Canada/Mexico-15546003) - 2022 - CRC - 5/5/21
Seats and Restraints 87
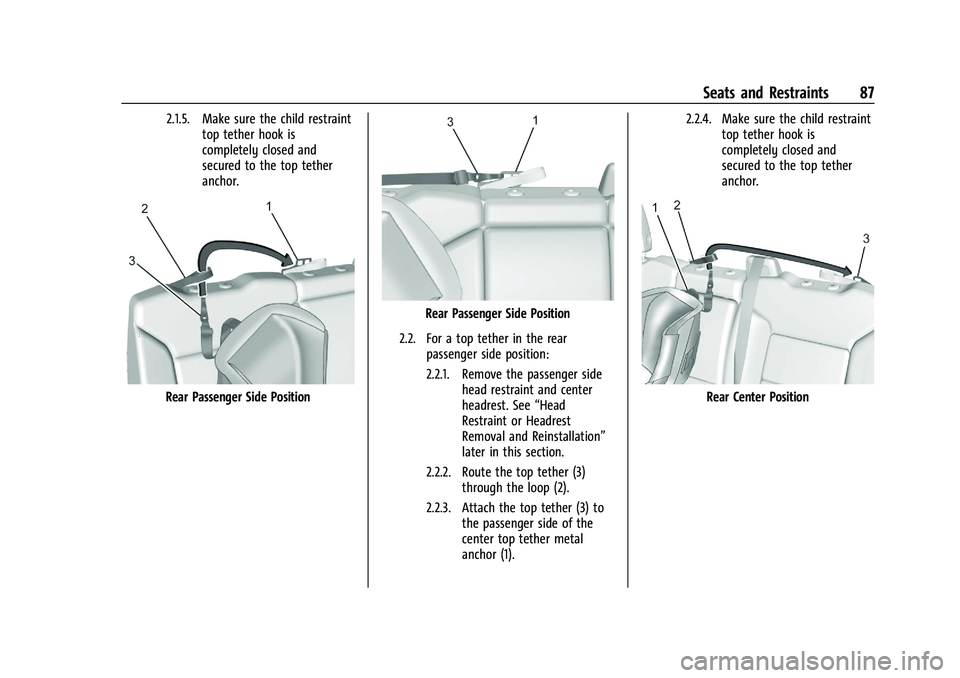
2.1.5. Make sure the child restrainttop tether hook is
completely closed and
secured to the top tether
anchor.
Rear Passenger Side Position
Rear Passenger Side Position
2.2. For a top tether in the rear passenger side position:
2.2.1. Remove the passenger side head restraint and center
headrest. See “Head
Restraint or Headrest
Removal and Reinstallation”
later in this section.
2.2.2. Route the top tether (3) through the loop (2).
2.2.3. Attach the top tether (3) to the passenger side of the
center top tether metal
anchor (1). 2.2.4. Make sure the child restraint
top tether hook is
completely closed and
secured to the top tether
anchor.
Rear Center Position
Page 89 of 441
Chevrolet Silverado 2500 HD/3500 HD Owner Manual (GMNA-Localizing-U.
S./Canada/Mexico-15546003) - 2022 - CRC - 5/5/21
88 Seats and Restraints
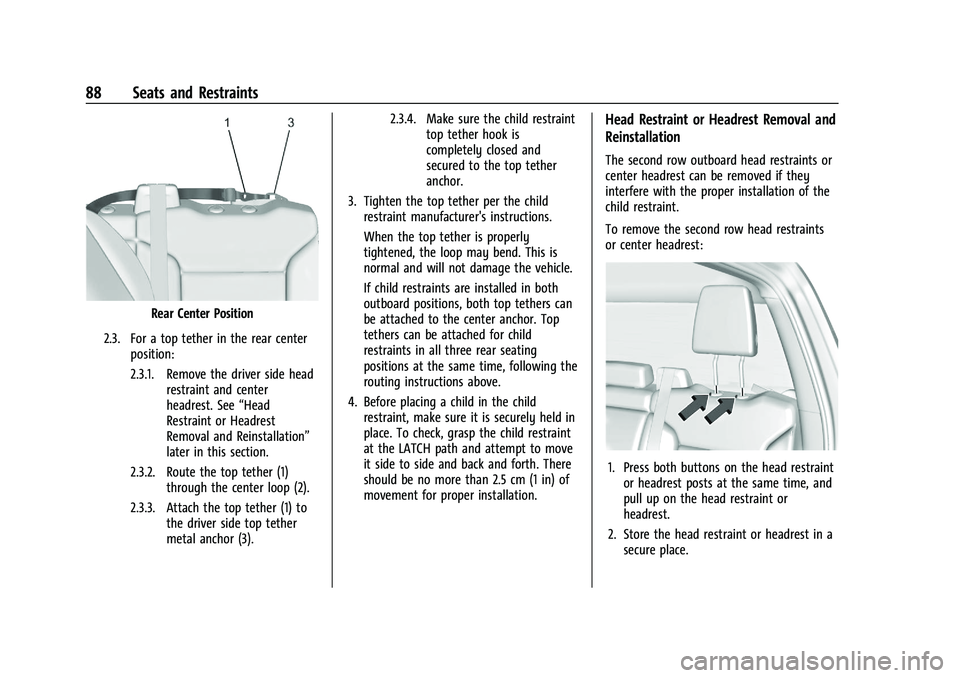
Rear Center Position
2.3. For a top tether in the rear center position:
2.3.1. Remove the driver side head restraint and center
headrest. See “Head
Restraint or Headrest
Removal and Reinstallation”
later in this section.
2.3.2. Route the top tether (1) through the center loop (2).
2.3.3. Attach the top tether (1) to the driver side top tether
metal anchor (3). 2.3.4. Make sure the child restraint
top tether hook is
completely closed and
secured to the top tether
anchor.
3. Tighten the top tether per the child restraint manufacturer's instructions.
When the top tether is properly
tightened, the loop may bend. This is
normal and will not damage the vehicle.
If child restraints are installed in both
outboard positions, both top tethers can
be attached to the center anchor. Top
tethers can be attached for child
restraints in all three rear seating
positions at the same time, following the
routing instructions above.
4. Before placing a child in the child restraint, make sure it is securely held in
place. To check, grasp the child restraint
at the LATCH path and attempt to move
it side to side and back and forth. There
should be no more than 2.5 cm (1 in) of
movement for proper installation.
Head Restraint or Headrest Removal and
Reinstallation
The second row outboard head restraints or
center headrest can be removed if they
interfere with the proper installation of the
child restraint.
To remove the second row head restraints
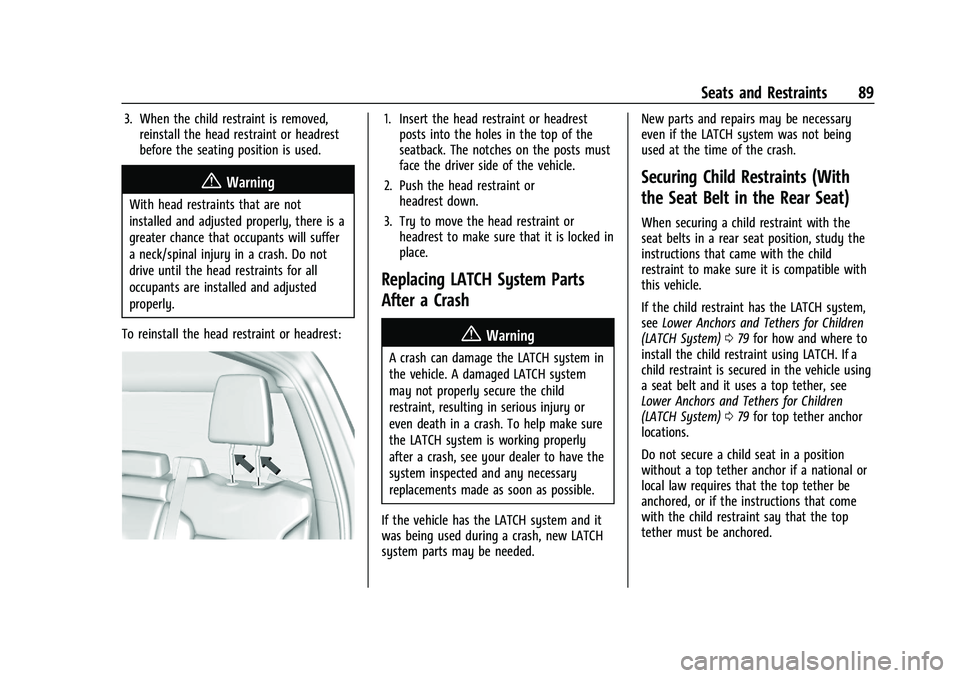
or center headrest:
1. Press both buttons on the head restraintor headrest posts at the same time, and
pull up on the head restraint or
headrest.
2. Store the head restraint or headrest in a secure place.
Page 90 of 441
Chevrolet Silverado 2500 HD/3500 HD Owner Manual (GMNA-Localizing-U.
S./Canada/Mexico-15546003) - 2022 - CRC - 5/5/21
Seats and Restraints 89
3. When the child restraint is removed,reinstall the head restraint or headrest
before the seating position is used.
{Warning
With head restraints that are not
installed and adjusted properly, there is a
greater chance that occupants will suffer
a neck/spinal injury in a crash. Do not
drive until the head restraints for all
occupants are installed and adjusted
properly.
To reinstall the head restraint or headrest:
1. Insert the head restraint or headrest posts into the holes in the top of the
seatback. The notches on the posts must
face the driver side of the vehicle.
2. Push the head restraint or headrest down.
3. Try to move the head restraint or headrest to make sure that it is locked in
place.
Replacing LATCH System Parts
After a Crash
{Warning
A crash can damage the LATCH system in
the vehicle. A damaged LATCH system
may not properly secure the child
restraint, resulting in serious injury or
even death in a crash. To help make sure
the LATCH system is working properly
after a crash, see your dealer to have the
system inspected and any necessary
replacements made as soon as possible.
If the vehicle has the LATCH system and it
was being used during a crash, new LATCH
system parts may be needed. New parts and repairs may be necessary
even if the LATCH system was not being
used at the time of the crash.
Securing Child Restraints (With
the Seat Belt in the Rear Seat)
When securing a child restraint with the
seat belts in a rear seat position, study the
instructions that came with the child
restraint to make sure it is compatible with
this vehicle.
If the child restraint has the LATCH system,
see
Lower Anchors and Tethers for Children
(LATCH System) 079 for how and where to
install the child restraint using LATCH. If a
child restraint is secured in the vehicle using
a seat belt and it uses a top tether, see
Lower Anchors and Tethers for Children
(LATCH System) 079 for top tether anchor
locations.
Do not secure a child seat in a position
without a top tether anchor if a national or
local law requires that the top tether be
anchored, or if the instructions that come
with the child restraint say that the top
tether must be anchored.
Page 91 of 441
Chevrolet Silverado 2500 HD/3500 HD Owner Manual (GMNA-Localizing-U.
S./Canada/Mexico-15546003) - 2022 - CRC - 5/5/21
90 Seats and Restraints
In Canada, the law requires that
forward-facing child restraints have a top
tether, and that the tether be attached.
If the child restraint or vehicle seat position
does not have the LATCH system, you will
be using the seat belt to secure the child
restraint. Be sure to follow the instructions
that came with the child restraint.
If more than one child restraint needs to be
installed in the rear seat, be sure to read
Where to Put the Restraint078.
Double Cab
1. Remove the head restraint or headrest
prior to installing a forward-facing child
restraint in an outboard rear seating
position. See “Head Restraint or Headrest
Removal and Reinstallation” underLower
Anchors and Tethers for Children (LATCH
System) 079.
2. Put the child restraint on the seat.
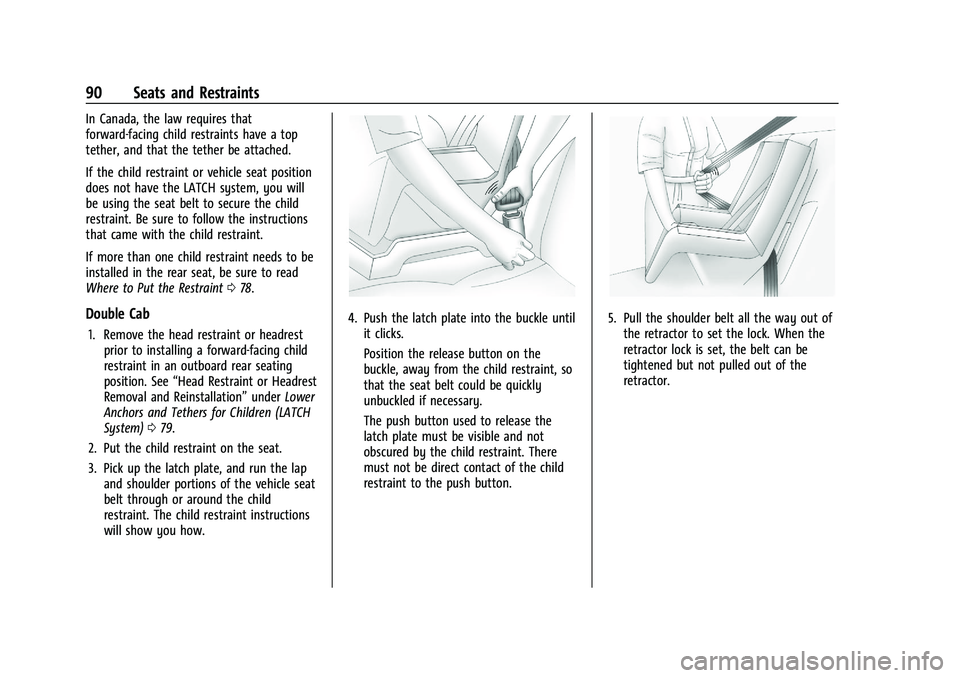
3. Pick up the latch plate, and run the lap and shoulder portions of the vehicle seat
belt through or around the child
restraint. The child restraint instructions
will show you how.
4. Push the latch plate into the buckle untilit clicks.
Position the release button on the
buckle, away from the child restraint, so
that the seat belt could be quickly
unbuckled if necessary.
The push button used to release the
latch plate must be visible and not
obscured by the child restraint. There
must not be direct contact of the child
restraint to the push button.5. Pull the shoulder belt all the way out ofthe retractor to set the lock. When the
retractor lock is set, the belt can be
tightened but not pulled out of the
retractor.
Page 92 of 441
Chevrolet Silverado 2500 HD/3500 HD Owner Manual (GMNA-Localizing-U.
S./Canada/Mexico-15546003) - 2022 - CRC - 5/5/21
Seats and Restraints 91
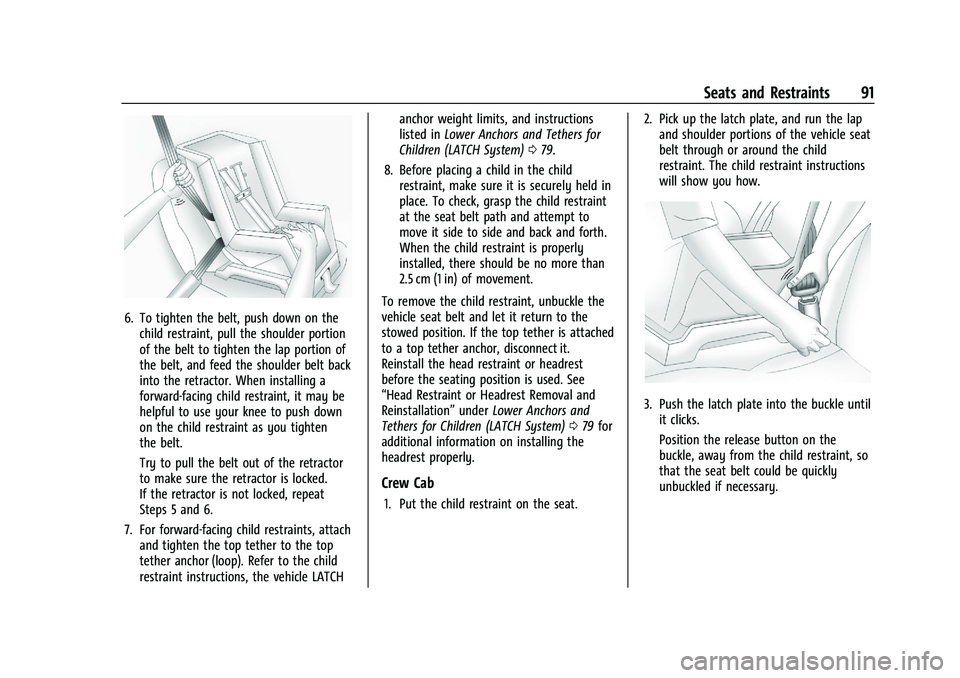
6. To tighten the belt, push down on thechild restraint, pull the shoulder portion
of the belt to tighten the lap portion of
the belt, and feed the shoulder belt back
into the retractor. When installing a
forward-facing child restraint, it may be
helpful to use your knee to push down
on the child restraint as you tighten
the belt.
Try to pull the belt out of the retractor
to make sure the retractor is locked.
If the retractor is not locked, repeat
Steps 5 and 6.
7. For forward-facing child restraints, attach and tighten the top tether to the top
tether anchor (loop). Refer to the child
restraint instructions, the vehicle LATCH anchor weight limits, and instructions
listed in
Lower Anchors and Tethers for
Children (LATCH System) 079.
8. Before placing a child in the child restraint, make sure it is securely held in
place. To check, grasp the child restraint
at the seat belt path and attempt to
move it side to side and back and forth.
When the child restraint is properly
installed, there should be no more than
2.5 cm (1 in) of movement.
To remove the child restraint, unbuckle the
vehicle seat belt and let it return to the
stowed position. If the top tether is attached
to a top tether anchor, disconnect it.
Reinstall the head restraint or headrest
before the seating position is used. See
“Head Restraint or Headrest Removal and
Reinstallation” underLower Anchors and
Tethers for Children (LATCH System) 079 for
additional information on installing the
headrest properly.
Crew Cab
1. Put the child restraint on the seat. 2. Pick up the latch plate, and run the lap
and shoulder portions of the vehicle seat
belt through or around the child
restraint. The child restraint instructions
will show you how.
3. Push the latch plate into the buckle untilit clicks.
Position the release button on the
buckle, away from the child restraint, so
that the seat belt could be quickly
unbuckled if necessary.
Page 93 of 441
Chevrolet Silverado 2500 HD/3500 HD Owner Manual (GMNA-Localizing-U.
S./Canada/Mexico-15546003) - 2022 - CRC - 5/5/21
92 Seats and Restraints
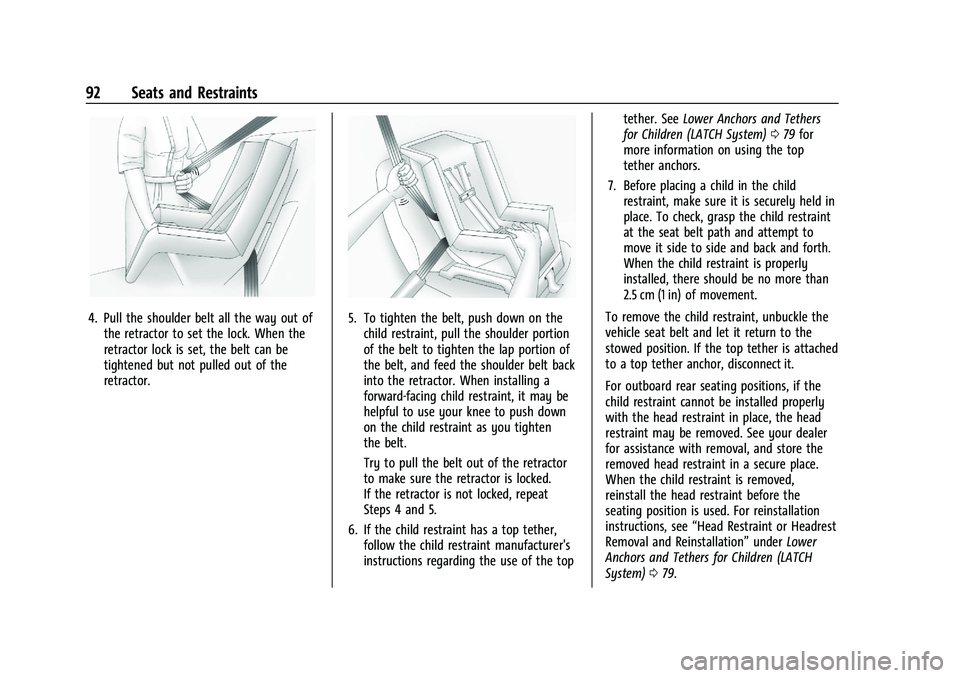
4. Pull the shoulder belt all the way out ofthe retractor to set the lock. When the
retractor lock is set, the belt can be
tightened but not pulled out of the
retractor.5. To tighten the belt, push down on thechild restraint, pull the shoulder portion
of the belt to tighten the lap portion of
the belt, and feed the shoulder belt back
into the retractor. When installing a
forward-facing child restraint, it may be
helpful to use your knee to push down
on the child restraint as you tighten
the belt.
Try to pull the belt out of the retractor
to make sure the retractor is locked.
If the retractor is not locked, repeat
Steps 4 and 5.
6. If the child restraint has a top tether, follow the child restraint manufacturer's
instructions regarding the use of the top tether. See
Lower Anchors and Tethers
for Children (LATCH System) 079 for
more information on using the top
tether anchors.
7. Before placing a child in the child restraint, make sure it is securely held in
place. To check, grasp the child restraint
at the seat belt path and attempt to
move it side to side and back and forth.
When the child restraint is properly
installed, there should be no more than
2.5 cm (1 in) of movement.
To remove the child restraint, unbuckle the
vehicle seat belt and let it return to the
stowed position. If the top tether is attached
to a top tether anchor, disconnect it.
For outboard rear seating positions, if the
child restraint cannot be installed properly
with the head restraint in place, the head
restraint may be removed. See your dealer
for assistance with removal, and store the
removed head restraint in a secure place.
When the child restraint is removed,
reinstall the head restraint before the
seating position is used. For reinstallation
instructions, see “Head Restraint or Headrest
Removal and Reinstallation” underLower
Anchors and Tethers for Children (LATCH
System) 079.
Page 96 of 441
Chevrolet Silverado 2500 HD/3500 HD Owner Manual (GMNA-Localizing-U.
S./Canada/Mexico-15546003) - 2022 - CRC - 5/5/21
Seats and Restraints 95
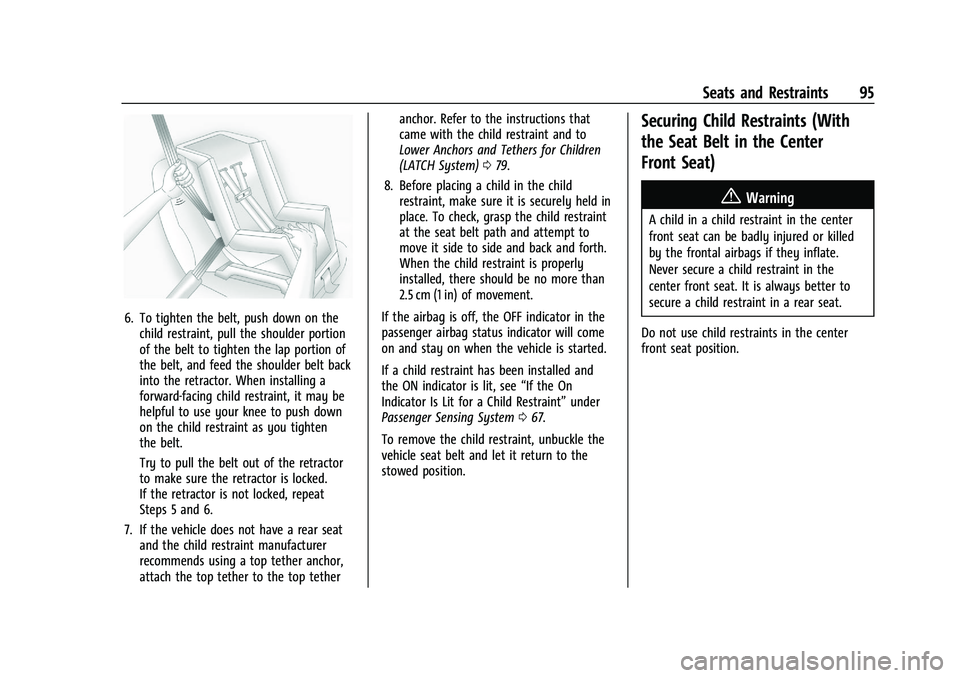
6. To tighten the belt, push down on thechild restraint, pull the shoulder portion
of the belt to tighten the lap portion of
the belt, and feed the shoulder belt back
into the retractor. When installing a
forward-facing child restraint, it may be
helpful to use your knee to push down
on the child restraint as you tighten
the belt.
Try to pull the belt out of the retractor
to make sure the retractor is locked.
If the retractor is not locked, repeat
Steps 5 and 6.
7. If the vehicle does not have a rear seat and the child restraint manufacturer
recommends using a top tether anchor,
attach the top tether to the top tether anchor. Refer to the instructions that
came with the child restraint and to
Lower Anchors and Tethers for Children
(LATCH System)
079.
8. Before placing a child in the child restraint, make sure it is securely held in
place. To check, grasp the child restraint
at the seat belt path and attempt to
move it side to side and back and forth.
When the child restraint is properly
installed, there should be no more than
2.5 cm (1 in) of movement.
If the airbag is off, the OFF indicator in the
passenger airbag status indicator will come
on and stay on when the vehicle is started.
If a child restraint has been installed and
the ON indicator is lit, see “If the On
Indicator Is Lit for a Child Restraint” under
Passenger Sensing System 067.
To remove the child restraint, unbuckle the
vehicle seat belt and let it return to the
stowed position.
Securing Child Restraints (With
the Seat Belt in the Center
Front Seat)
{Warning
A child in a child restraint in the center
front seat can be badly injured or killed
by the frontal airbags if they inflate.
Never secure a child restraint in the
center front seat. It is always better to
secure a child restraint in a rear seat.
Do not use child restraints in the center
front seat position.
Page 100 of 441
Chevrolet Silverado 2500 HD/3500 HD Owner Manual (GMNA-Localizing-U.
S./Canada/Mexico-15546003) - 2022 - CRC - 5/5/21
Storage 99
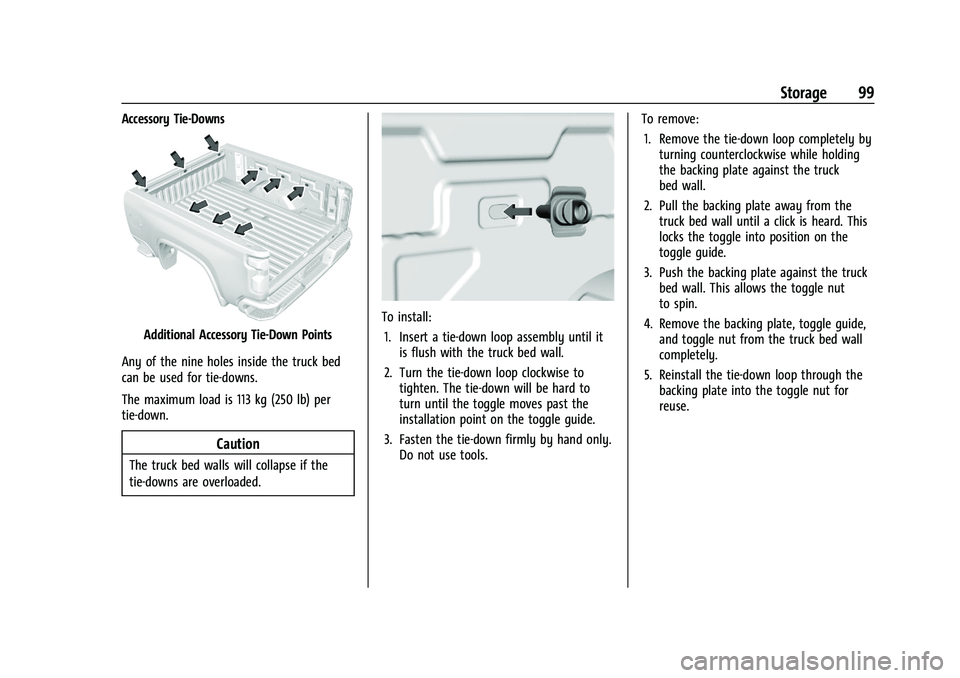
Accessory Tie-Downs
Additional Accessory Tie-Down Points
Any of the nine holes inside the truck bed
can be used for tie-downs.
The maximum load is 113 kg (250 lb) per
tie-down.
Caution
The truck bed walls will collapse if the
tie-downs are overloaded.
To install: 1. Insert a tie-down loop assembly until it is flush with the truck bed wall.
2. Turn the tie-down loop clockwise to tighten. The tie-down will be hard to
turn until the toggle moves past the
installation point on the toggle guide.
3. Fasten the tie-down firmly by hand only. Do not use tools. To remove:
1. Remove the tie-down loop completely by turning counterclockwise while holding
the backing plate against the truck
bed wall.
2. Pull the backing plate away from the truck bed wall until a click is heard. This
locks the toggle into position on the
toggle guide.
3. Push the backing plate against the truck bed wall. This allows the toggle nut
to spin.
4. Remove the backing plate, toggle guide, and toggle nut from the truck bed wall
completely.
5. Reinstall the tie-down loop through the backing plate into the toggle nut for
reuse.
Page 106 of 441
Chevrolet Silverado 2500 HD/3500 HD Owner Manual (GMNA-Localizing-U.
S./Canada/Mexico-15546003) - 2022 - CRC - 5/12/21
Instruments and Controls 105
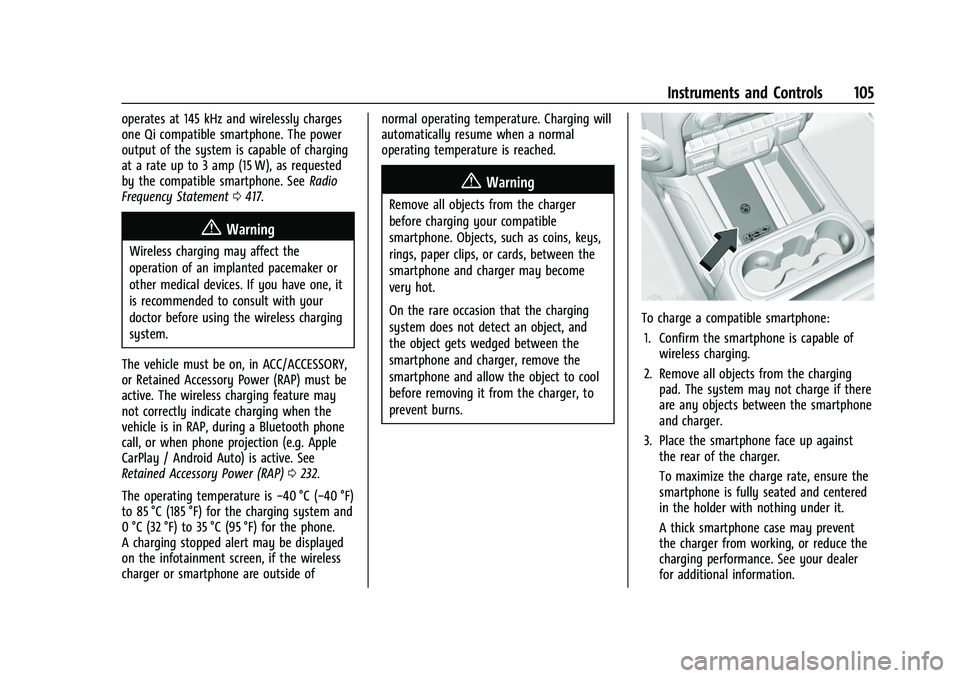
operates at 145 kHz and wirelessly charges
one Qi compatible smartphone. The power
output of the system is capable of charging
at a rate up to 3 amp (15 W), as requested
by the compatible smartphone. SeeRadio
Frequency Statement 0417.
{Warning
Wireless charging may affect the
operation of an implanted pacemaker or
other medical devices. If you have one, it
is recommended to consult with your
doctor before using the wireless charging
system.
The vehicle must be on, in ACC/ACCESSORY,
or Retained Accessory Power (RAP) must be
active. The wireless charging feature may
not correctly indicate charging when the
vehicle is in RAP, during a Bluetooth phone
call, or when phone projection (e.g. Apple
CarPlay / Android Auto) is active. See
Retained Accessory Power (RAP) 0232.
The operating temperature is −40 °C (−40 °F)
to 85 °C (185 °F) for the charging system and
0 °C (32 °F) to 35 °C (95 °F) for the phone.
A charging stopped alert may be displayed
on the infotainment screen, if the wireless
charger or smartphone are outside of normal operating temperature. Charging will
automatically resume when a normal
operating temperature is reached.
{Warning
Remove all objects from the charger
before charging your compatible
smartphone. Objects, such as coins, keys,
rings, paper clips, or cards, between the
smartphone and charger may become
very hot.
On the rare occasion that the charging
system does not detect an object, and
the object gets wedged between the
smartphone and charger, remove the
smartphone and allow the object to cool
before removing it from the charger, to
prevent burns.
To charge a compatible smartphone:
1. Confirm the smartphone is capable of wireless charging.
2. Remove all objects from the charging pad. The system may not charge if there
are any objects between the smartphone
and charger.
3. Place the smartphone face up against the rear of the charger.
To maximize the charge rate, ensure the
smartphone is fully seated and centered
in the holder with nothing under it.
A thick smartphone case may prevent
the charger from working, or reduce the
charging performance. See your dealer
for additional information.
Page 107 of 441
![CHEVROLET SILVERADO 2500 2023 Owners Manual Chevrolet Silverado 2500 HD/3500 HD Owner Manual (GMNA-Localizing-U.
S./Canada/Mexico-15546003) - 2022 - CRC - 5/12/21
106 Instruments and Controls
4. A green]will appear on the
infotainment display,](/img/24/55842/w960_55842-106.png "CHEVROLET SILVERADO 2500 2023 Owners Manual Chevrolet Silverado 2500 HD/3500 HD Owner Manual (GMNA-Localizing-U.
S./Canada/Mexico-15546003) - 2022 - CRC - 5/12/21
106 Instruments and Controls
4. A green]will appear on the
infotainment display,")
Chevrolet Silverado 2500 HD/3500 HD Owner Manual (GMNA-Localizing-U.
S./Canada/Mexico-15546003) - 2022 - CRC - 5/12/21
106 Instruments and Controls
4. A green]will appear on the
infotainment display, next to the phone
icon. This indicates that the smartphone
is detected.
5. If a smartphone is placed on the charger and
]turns off or turns yellow, remove
the smartphone and any objects from
the pad. Turn the smartphone
180 degrees and wait a few seconds
before placing/aligning it on the pad
again.
6. If a smartphone is placed on the charger and
]turns red, the charger and/or the
smartphone is overheated. Remove the
smartphone and any objects from the
charger in order to cool the system.
The smartphone may become warm during
charging. This is normal. In warmer
temperatures, the speed of charging may be
reduced.
Software Acknowledgements
Certain Wireless Charging Module product
from LG Electronics, Inc. ("LGE") contains the
open source software detailed below. Refer
to the indicated open source licenses (as are
included following this notice) for the terms
and conditions of their use. OSS Notice Information
To obtain the source code that is contained
in this product, please visit
http://opensource.lge.com. In addition to
the source code, all referred license terms,
warranty disclaimers and copyright notices
are available for download. LG Electronics
will also provide open source code to you
on CD-ROM for a charge covering the cost of
performing such distribution (such as the
cost of media, shipping, and handling) upon
email request to [email protected]. This
offer is valid for three (3) years from the
date on which you purchased the product.
Freescale-WCT library
Copyright (c) 2012-2014 Freescale
Semiconductor, Inc.. All rights reserved.
Redistribution and use in source and binary
forms, with or without modification, are
permitted provided that the following
conditions are met:
1. Redistributions of source code must retain the above copyright notice, this
list of conditions and the following
disclaimer.
2. Redistributions in binary form must reproduce the above copyright notice,
this list of conditions and the following disclaimer in the documentation and/or
other materials provided with the
distribution.
3. Neither the name of the copyright holder nor the names of its contributors may be
used to endorse or promote products
derived from this software without
specific prior written permission.
THIS SOFTWARE IS PROVIDED BY THE
COPYRIGHT HOLDERS AND CONTRIBUTORS
"AS IS" AND ANY EXPRESS OR IMPLIED
WARRANTIES, INCLUDING, BUT NOT LIMITED
TO, THE IMPLIED WARRANTIES OF
MERCHANTABILITY AND FITNESS FOR A
PARTICULAR PURPOSE ARE DISCLAIMED. IN
NO EVENT SHALL THE COPYRIGHT HOLDER
OR CONTRIBUTORS BE LIABLE FOR ANY
DIRECT, INDIRECT, INCIDENTAL, SPECIAL,
EXEMPLARY, OR CONSEQUENTIAL DAMAGES
(INCLUDING, BUT NOT LIMITED TO,
PROCUREMENT OF SUBSTITUTE GOODS OR
SERVICES; LOSS OF USE, DATA, OR PROFITS;
OR BUSINESS INTERRUPTION) HOWEVER
CAUSED AND ON ANY THEORY OF LIABILITY,
WHETHER IN CONTRACT, STRICT LIABILITY, OR
TORT (INCLUDING NEGLIGENCE OR
OTHERWISE) ARISING IN ANY WAY OUT OF
THE USE OF THIS SOFTWARE, EVEN IF
ADVISED OF THE POSSIBILITY OF SUCH
DAMAGE.