remove CHEVROLET SILVERADO 2500 2023 Service Manual
[x] Cancel search | Manufacturer: CHEVROLET, Model Year: 2023, Model line: SILVERADO 2500, Model: CHEVROLET SILVERADO 2500 2023Pages: 441, PDF Size: 14.4 MB
Page 168 of 441
Chevrolet Silverado 2500 HD/3500 HD Owner Manual (GMNA-Localizing-U.
S./Canada/Mexico-15546003) - 2022 - CRC - 5/5/21
Infotainment System 167
2. Search for the destination using One-Box,Voice search, or the Quick Category
icons.
3. Choose search results Along Route, Nearby, or Near Destination.
4. Choose the desired waypoint and touch Add to Trip or replace the current
destination by touching New Destination.
Route options are not available for
waypoints.
Arriving at a Waypoint
When approaching a waypoint, the system
will display a Destination Arrival view. To
continue on to the next destination touch
the Drive to message on the infotainment
display.
If the vehicle passes the waypoint or gets
out of the current route, the system will
automatically reroute back to this waypoint.
At the same time, it will show a Drive to
icon along with the next waypoint address
so the current waypoint can be skipped and
guidance can resume to the next waypoint
or destination. Editing a Waypoint
When waypoints are added during active
guidance, the system allows a stop to be
deleted or the order to be changed. To edit
a waypoint:
1. Touch
A.
2. Touch Edit Destinations.
.Modify destination order by touching
and holding the arrow until it is
highlighted. Drag to move the
waypoint up or down the list.
.Delete a waypoint by touchingY.
A pop-up will appear to confirm
waypoint removal. Once the request
is confirmed, the system will remove
the address from the destinations list.
Touch
zon the top right corner so
the system can recalculate the route.
If there is only one address in the
destinations list, the system will
disable the move and delete
functions. The system will not allow
the final destination to be deleted.
Map Information
Road network attributes are contained in the
map database for map information.
Attributes include information such as street names, street addresses, and turn
restrictions. A detailed area includes all
major highways, service roads, and
residential roads. The detailed areas include
Places of Interest (POIs) such as restaurants,
airports, banks, hospitals, police stations, gas
stations, tourist attractions, and historical
monuments.
If the vehicle does not have an applicable
service plan, the map database may not
include data for newly constructed areas or
map database corrections that are
completed after production. The navigation
system provides full route guidance in the
detailed map areas.
Zoom Control
The zoom control display is shown on the
map view. A few ways to zoom in or
out are:
.Touch + or
–to zoom in or out on
the map.
.Double tap with one finger to zoom in or
single tap with two fingers to zoom out
on the map.
.Use the index finger and thumb to zoom
out by pinching and then zoom in by
spreading those two fingers on the map.
Page 170 of 441
Chevrolet Silverado 2500 HD/3500 HD Owner Manual (GMNA-Localizing-U.
S./Canada/Mexico-15546003) - 2022 - CRC - 5/5/21
Infotainment System 169
When the vehicle is approaching a turn with
the next turn following in quick succession,
a quick-turn list appears below the primary
turn indicator. An audio prompt will
announce the quick turn.
Auto-Zoom
When approaching a maneuver, the map
will automatically zoom in to show both the
vehicle icon and the upcoming maneuver to
give a better view of the maneuver. Once
the maneuver is complete, the system will
zoom back to the previous zoom level.
Touch
Aon the map to access Settings,
then touch Map Preferences to access
Auto-Zoom. This feature can be enabled or
disabled.
Directions
Touch the menu option next to the next
turn street name to display Directions.
Directions displays the turns and directions
from the current location to the final
destination.
Editing Directions
Directions can be edited by choosing
y,
which expands the list to fill the display and
enters the Edit Mode. While in Edit Mode,
an unwanted route segment can be removed from the route by touching
Ynext
to the segment. A pop-up appears to
confirm segment removal.
When the route segment has been removed,
all segments are replaced by an activity
indicator while the new route is
recalculated. When the recalculation is
complete, the activity indicator is replaced
with the new route segments.
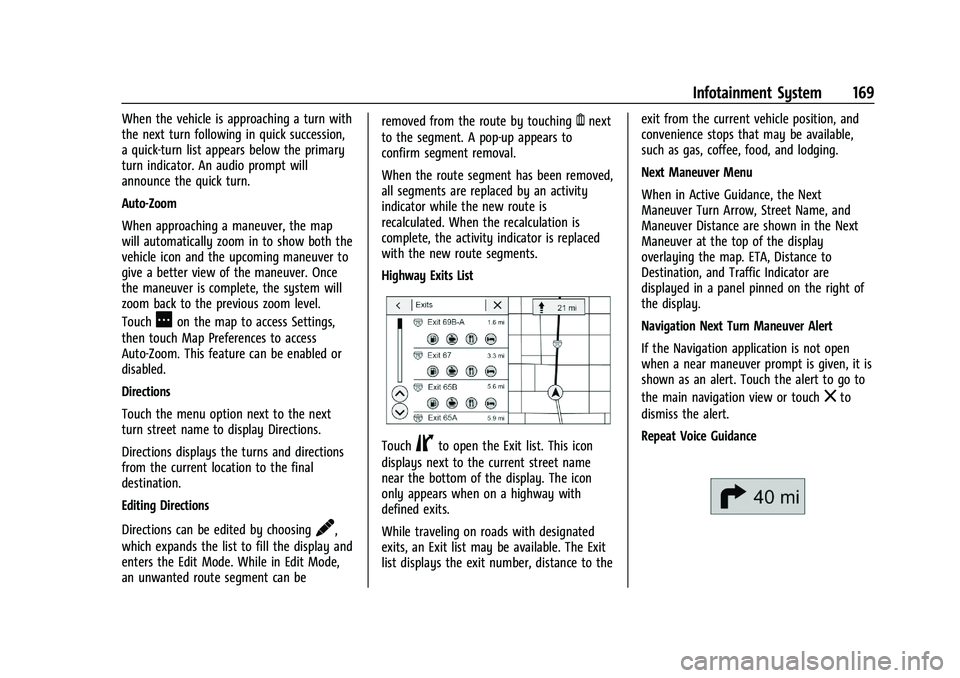
Highway Exits List
TouchCto open the Exit list. This icon
displays next to the current street name
near the bottom of the display. The icon
only appears when on a highway with
defined exits.
While traveling on roads with designated
exits, an Exit list may be available. The Exit
list displays the exit number, distance to the exit from the current vehicle position, and
convenience stops that may be available,
such as gas, coffee, food, and lodging.
Next Maneuver Menu
When in Active Guidance, the Next
Maneuver Turn Arrow, Street Name, and
Maneuver Distance are shown in the Next
Maneuver at the top of the display
overlaying the map. ETA, Distance to
Destination, and Traffic Indicator are
displayed in a panel pinned on the right of
the display.
Navigation Next Turn Maneuver Alert
If the Navigation application is not open
when a near maneuver prompt is given, it is
shown as an alert. Touch the alert to go to
the main navigation view or touch
zto
dismiss the alert.
Repeat Voice Guidance
Page 179 of 441
Chevrolet Silverado 2500 HD/3500 HD Owner Manual (GMNA-Localizing-U.
S./Canada/Mexico-15546003) - 2022 - CRC - 5/5/21
178 Infotainment System
Voice Recognition for Navigation (If
Equipped)
“Navigation”:Begin a dialog to enter
specific destination information.
“Navigation Commands” :Begin a dialog to
enter specific destination information.
“Address” :Begin a dialog to enter a
specific destination address, which includes
the entire address consisting of the house
number, street name, city, state/province,
and country. Do not include the ZIP code.
“Place of Interest” :Begin a dialog to enter
a destination Place of Interest category or
major brand name.
The name must be precisely spoken.
Nicknames or short names for the
businesses will not likely be found. Lesser
known businesses might have to be located
by category, such as fast food, hotels,
or banks.
“Navigate to Contact” :Begin a dialog to
enter a specific destination contact name.
“Cancel Route” :End route guidance.
“Take Me Home” :Create a route to a
stored home location.
Voice Recognition for the Phone
“Call
stored contact. The command may include
location if the contact has location numbers
stored.
“Call
Mobile,” or“On Other” :Initiate a call to a
stored contact and location at home, at
work, on mobile device, or on another
phone.
“Call
to a cell phone number of seven digits, 10
digits, or three digit emergency numbers.
“Pair Phone” :Begin the Bluetooth pairing
process. Follow the instructions on the
infotainment display.
“Redial” :Initiate a call to the last dialed
number.
“Switch Phone” :Select a different
connected cell phone for outgoing calls.
“Voice Keypad” :Begin a dialog to enter
special numbers like international numbers.
The numbers can be entered in groups of
digits with each group of digits being
repeated back by the system. If the group
of digits is not correct, the command
“Delete” will remove the last group of digits and allow them to be re-entered. Once the
entire number has been entered, the
command
“Call”will start dialing the
number.
Phone Assistant Voice Recognition
Press and holdgon the steering wheel
controls to pass through and launch Google
phone assistant or Siri.
For the low radio, whether connected by
Bluetooth or phone projection, the only
available voice recognition is either Siri
(iPhone) or the Google Assistant (Android).
Phone
Bluetooth (Overview)
The Bluetooth-capable system can interact
with many mobile devices, allowing:
.Placement and receipt of calls in a
hands-free mode.
.Sharing of the device’s address book or
contact list with the vehicle.
To minimize driver distraction, before
driving, and with the vehicle parked:
.Become familiar with the features of the
mobile device. Organize the phone book
and contact lists clearly and delete
Page 181 of 441
Chevrolet Silverado 2500 HD/3500 HD Owner Manual (GMNA-Localizing-U.
S./Canada/Mexico-15546003) - 2022 - CRC - 5/5/21
180 Infotainment System
.Pairing only needs to be completed once,
unless the pairing information on the cell
phone changes or the cell phone is
deleted from the system.
.If multiple paired cell phones are within
range of the system, the system connects
to the paired cell phone that is set to
First to Connect. If there is no cell phone
set to First to Connect, it will link to the
cell phone which was used last. To link to
a different paired cell phone, see“Linking
to a Different Phone” later in this section.
Pairing a Phone 1. Make sure Bluetooth has been enabled on the cell phone before the pairing
process is started.
2. Touch the Phone icon on the Home Page or the phone icon on the shortcut tray
near the bottom of the display.
3. Touch Phones at the top of the infotainment display. There is also a
Connect Phones option in the middle of
the Phone display which will shortcut to
the Phone List menu.
4. Touch Add Phone.
5. Select the vehicle name shown on the infotainment display from your cell
phone’s Bluetooth Settings list. 6. Follow the instructions on the cell phone
to confirm the six-digit code showing on
the infotainment display and touch Pair.
The code on the cell phone and
infotainment display will need to be
acknowledged for a successful pair.
7. Start the pairing process on the cell phone to be paired to the vehicle. See
the cell phone manufacturer's user guide
for information on this process. Once the
cell phone is paired, it will show under
Connected.
8. If the vehicle name does not appear on your cell phone, there are a few ways to
start the pairing process over:
.Turn the cell phone off and then
back on.
.Go back to the beginning of the
Phone menus on the infotainment
display and restart the pairing
process.
.Reset the cell phone, but this step
should be done as a last effort.
9. If the cell phone prompts to accept connection or allow phone book
download, touch Always Accept and
Allow. The phone book may not be
available if not accepted. 10. Repeat Steps 1−8 to pair additional cell
phones.
First to Connect Paired Phones
If multiple paired cell phones are within
range of the system, the system connects to
the paired cell phone that is set as First to
Connect. To enable a paired cell phone as
the First to Connect phone: 1. Make sure the cell phone is turned on.
2. Touch Settings, then touch System.
3. Touch Phones to access all paired and all connected cell phones and mobile
devices.
4. Touch the information icon to the right of the cell phone to open the cell
phone’s settings menu.
5. Touch the First to Connect option, to enable the setting for that device.
Cell phones and mobile devices can be
added, removed, connected, and
disconnected. A sub-menu will display
whenever a request is made to add or
manage cell phones and mobile devices.
Secondary Phone
A cell phone can be enabled as a Secondary
Phone by touching the information icon to
the right of the paired cell phone name to
Page 191 of 441
Chevrolet Silverado 2500 HD/3500 HD Owner Manual (GMNA-Localizing-U.
S./Canada/Mexico-15546003) - 2022 - CRC - 5/5/21
190 Infotainment System
.Active Call View: Shows active call display
when answering a call.
Touch the controls on the infotainment
display to disable or enable.
.Privacy: Only show call alerts in the
instrument cluster.
Touch Off or On.
.Sort Contacts: Touch to sort by first or
last name.
.Re-sync Device Contacts:
This allows the device contacts to re-sync
if you are having difficulty accessing all of
the contacts on your cell phone.
.Delete All Vehicle Contacts: Touch to
delete all vehicle stored contacts.
.OnStar Phone TTY Mode: This enables
OnStar cell phone TTY mode.
Touch Disable or Enable.
Vehicle
This menu allows adjustment of different
vehicle features. SeeVehicle Personalization
0 131.
Personal
If equipped, this menu allows adjustment of
different user profile settings. See “Users”in
Using the System 0152 for information on
setting up user profiles.
The menu may contain the following:
Name
Touch to edit your user name that will be
displayed in the vehicle.
Vehicle Account Information
Touch to view the vehicle account
information and to change the account
password.
An “unverified user account” pop-up will
display until the account information
verification process has been completed on
the Internet. Check your registered e-mail
account for an activation e-mail to complete
the verification process.
Profile Picture
Touch to choose or change your profile
picture.
Profile Identifiers
Touch to have the vehicle recognize the
identifier you choose. Touch Vehicle Key 1 and/or Vehicle Key 2.
If the Remote Keyless Entry (RKE)
transmitter is lost or stolen, see your dealer.
Security
Touch to have your profile secured with
a PIN.
Touch No or Yes.
Vehicle Name
Touch to edit your vehicle name.
Vehicle Account
Touch to view the vehicle account
information and to change the account
password.
Delete Profile
Touch to remove the profile from the
vehicle.
Touch Remove or Cancel.
Teen Driver
If equipped, this allows multiple keys to be
registered for beginner drivers to encourage
safe driving habits. When the vehicle is
started with a Teen Driver key, it will
automatically activate certain safety
systems, allow setting of some features, and
Page 192 of 441
Chevrolet Silverado 2500 HD/3500 HD Owner Manual (GMNA-Localizing-U.
S./Canada/Mexico-15546003) - 2022 - CRC - 5/5/21
Infotainment System 191
limit the use of others. The Report Card will
record vehicle data about driving behavior
that can be viewed later. When the vehicle
is started with a registered key, the Driver
Information Center (DIC) displays a message
that Teen Driver is active.
To access:1. Touch Settings on the Home Page, then touch Vehicle, and then Teen Driver.
2. Create a Personal Identification Number (PIN) by choosing a four-digit PIN.
Re-enter the PIN to confirm. To change
the PIN, touch Change PIN.
The PIN is required to:
.Register or unregister keys.
.Change Teen Driver settings.
.Change or clear the Teen Driver PIN.
.Access or delete Report Card data.
Register keys to activate Teen Driver and
assign restrictions to the key:
Any vehicle key can be registered, up to a
maximum of eight keys. Label the key to
tell it apart from the other keys.
For a pushbutton start system: 1. Start the engine. 2. For automatic transmissions, the vehicle
must be in P (Park). For manual
transmissions, the vehicle must be
stopped with the parking brake set.
3. From the Settings menu, touch Vehicle and then Teen Driver.
4. Enter the PIN.
5. Place the Remote Keyless Entry (RKE) transmitter key you wish to register in
the transmitter pocket. The key does not
need to be the one that started the
vehicle. See Remote Keyless Entry (RKE)
System Operation (Key Access) 010 or
Remote Keyless Entry (RKE) System
Operation (Keyless Access) 013 for
transmitter pocket location.
6. From the Teen Driver menu, touch Setup Keys..If the transmitter key has not
previously been registered, the option
to add the key displays. Touch Add
and a confirmation message displays.
Teen Driver restrictions will be
applied whenever this key is used to
operate the vehicle.
.If the transmitter key has already
been registered, the option to
remove the key displays. If Remove is
touched, the transmitter key is no longer registered. A confirmation
message displays, and Teen Driver
restrictions will not be applied if this
transmitter key is used to operate
the vehicle.
In vehicles with a pushbutton start system,
if a Teen Driver and a non-Teen Driver key
are both present at start up, the vehicle will
recognize the non-Teen Driver key to start
the vehicle. The Teen Driver settings will not
be active.
For a keyed ignition system: 1. Start the engine.
2. For automatic transmissions, the vehicle must be in P (Park). For manual
transmissions, the vehicle must be
stopped with the parking brake set.
3. From the Settings menu, touch Vehicle and then Teen Driver.
4. Enter the PIN.
5. Touch Setup Keys. The system displays instructions for registering or
unregistering a key. A confirmation
message displays.
Page 193 of 441
Chevrolet Silverado 2500 HD/3500 HD Owner Manual (GMNA-Localizing-U.
S./Canada/Mexico-15546003) - 2022 - CRC - 5/5/21
192 Infotainment System
Manage Settings
Audio Volume Limit :Allows the audio
volume limit to be turned on or off. Touch
Set Audio Volume Limit to choose the
maximum allowable audio volume level.
Set Audio Volume Limit : Allows a
maximum radio volume to be set. Use the
arrows to choose the maximum allowable
level for the audio volume.
Teen Driver Speed Limiter : Limits the
maximum speed of the vehicle. When the
speed limiter is turned on and the vehicle is
started with a Teen Driver key, the DIC
displays a message that the top speed is
limited.
On certain vehicles, when the Speed Limiter
is turned ON, the vehicle’s maximum
acceleration will be limited. The DIC will
display a message that the acceleration is
limited.
Teen Driver Speed Warning : Allows the
speed warning to be turned on or off. Touch
Set Teen Driver Speed Warning to set the
warning speed. Set Teen Driver Speed Warning :
Displays a
warning in the DIC when exceeding a
selectable speed. Choose the desired speed
warning level. The speed warning does not
limit the speed of the vehicle.
SiriusXM Explicit Content Filter (if
equipped) : Allows the SiriusXM Explicit
Content Filter to be turned ON or OFF.
When ON, the teen driver will not be able
to listen to SiriusXM stations that contain
explicit content, and the Explicit Content
Filter selection in the Audio Settings will be
unavailable for change.
When Teen Driver is Active:
.If equipped with Buckle to Drive, shifting
out of P (Park) will be prevented if the
driver seat belt, and in some vehicles the
front passenger seat belt, is not buckled.
.The radio will mute when the driver seat
belt, and in some vehicles the front
passenger seat belt, is not buckled. The
audio from any device paired to the
vehicle will also be muted.
.An object placed on the front passenger
seat, such as a briefcase, handbag,
grocery bag, laptop, or other electronic
device, could cause the passenger sensing
system to falsely sense an unbuckled
front passenger and mute the radio. If this happens, remove the object from
the seat. See
Passenger Sensing System
0 67.
.Some safety systems, such as Forward
Collision Alert, if equipped, cannot be
turned off.
.The gap setting for the Forward Collision
Alert and Adaptive Cruise Control,
if equipped, cannot be changed.
.When trying to change a safety feature
that is not configurable in Teen Driver,
the DIC displays a message indicating
that Teen Driver is active and the action
is not available.
.Super Cruise, if equipped, is not available.
.Enhanced Low Fuel Warning (if equipped)
–When the vehicle is low on fuel, the
low fuel light on the instrument cluster
flashes and the DIC low fuel warning
cannot be dismissed.
.Do not tow a trailer.
Report Card
The vehicle owner must secure the driver’s
consent to record certain vehicle data when
the vehicle is driven with a registered Teen
Driver key. There is one Report Card per
Page 201 of 441
Chevrolet Silverado 2500 HD/3500 HD Owner Manual (GMNA-Localizing-U.
S./Canada/Mexico-15546003) - 2022 - CRC - 5/5/21
200 Infotainment System
The product you have purchased ("Product")
contains Software (Runtime Configuration
No. 505962; "Software") which is distributed
by or on behalf of the Product manufacturer
"Manufacturer") under license from Software
Systems Co. ("QSSC"). You may only use the
Software in the Product and in compliance
with the license terms below.
Subject to the terms and conditions of this
License, QSSC hereby grants you a limited,
non-exclusive, non-transferable license to use
the Software in the Product for the purpose
intended by the Manufacturer. If permitted
by the Manufacturer, or by applicable law,
you may make one backup copy of the
Software as part of the Product software.
QSSC and its licensors reserve all license+C31
rights not expressly granted herein, and
retain all right, title and interest in and to
all copies of the Software, including all
intellectual property rights therein. Unless
required by applicable law you may not
reproduce, distribute or transfer,
or de-compile, disassemble or otherwise
attempt to unbundle, reverse engineer,
modify or create derivative works of, the
Software. You agree: (1) not to remove,
cover or alter any proprietary notices, labels
or marks in or on the Software, and to
ensure that all copies bear any noticecontained on the original; and (2) not to
export the Product or the Software in
contravention of applicable export
control laws.
EXCEPT TO THE EXTENT OTHERWISE
REQUIRED BY APPLICABLE LAW, QSSC AND
ITS LICENSORS PROVIDE THE SOFTWARE ON
AN "AS IS" BASIS, WITHOUT WARRANTIES OR
CONDITIONS OF ANY KIND, EITHER EXPRESS
OR IMPLIED INCLUDING, WITHOUT
LIMITATION, ANY WARRANTIES OR
CONDITIONS OF TITLE, NON-INFRINGEMENT,
MERCHANTABILITY OR FITNESS FOR A
PARTICULAR PURPOSE. ANY WARRANTIES OR
OTHER PROVISIONS OFFERED BY THE
MANUFACTURER OR ITS DISTRIBUTOR(S)
THAT DIFFER FROM THIS LICENSE ARE
OFFERED BY THE MANUFACTURER OR ITS
DISTRIBUTOR(S) ALONE AND NOT BY QSSC,
ITS AFFILIATES OR THEIR LICENSORS. YOU
ASSUME ANY RISKS ASSOCIATED WITH YOUR
USE OF THE SOFTWARE UNDER THIS LICENSE.
EXCEPT TO THE EXTENT OTHERWISE
REQUIRED BY APPLICABLE LAW (SUCH AS IN
THE CASE OF DELIBERATE OR GROSSLY
NEGLIGENT ACTS), IN NO EVENT SHALL QSSC,
ITS AFFILIATES OR THEIR LICENSORS BE
LIABLE TO YOU UNDER ANY LEGAL THEORY,
WHETHER IN TORT (INCLUDING NEGLIGENCE),
CONTRACT OR OTHERWISE, FOR DAMAGES,
INCLUDING ANY DIRECT, INDIRECT, SPECIAL,
INCIDENTAL, OR CONSEQUENTIAL DAMAGES
OF ANY CHARACTER ARISING AS A RESULT OF
THIS LICENSE OR OUT OF THE USE OR
INABILITY TO USE THE PRODUCT (INCLUDING
BUT NOT LIMITED TO DAMAGES FOR LOSS
OF GOODWILL, WORK STOPPAGE, PRODUCT
FAILURE OR MALFUNCTION, OR ANY AND ALL
OTHER COMMERCIAL DAMAGES OR LOSSES),
EVEN IF QSSC, ITS AFFILIATES OR THEIR
LICENSORS HAVE BEEN ADVISED OF THE
POSSIBILITY OF SUCH DAMAGES.
WMA
This product is protected by certain
intellectual property rights of Microsoft. Use
or distribution of such technology outside of
this product is prohibited without a license
from Microsoft.
For more information on the Software,
including any open source software license
terms (and available source code) as well as
copyright attributions applicable to the
Runtime Configuration indicated above,
please contact the Manufacturer or contact
QSSC at 175 Terence Matthews Crescent,
Kanata, Ontario, Canada K2M 1W8
([email protected]).
Page 209 of 441
Chevrolet Silverado 2500 HD/3500 HD Owner Manual (GMNA-Localizing-U.
S./Canada/Mexico-15546003) - 2022 - CRC - 5/5/21
208 Climate Controls
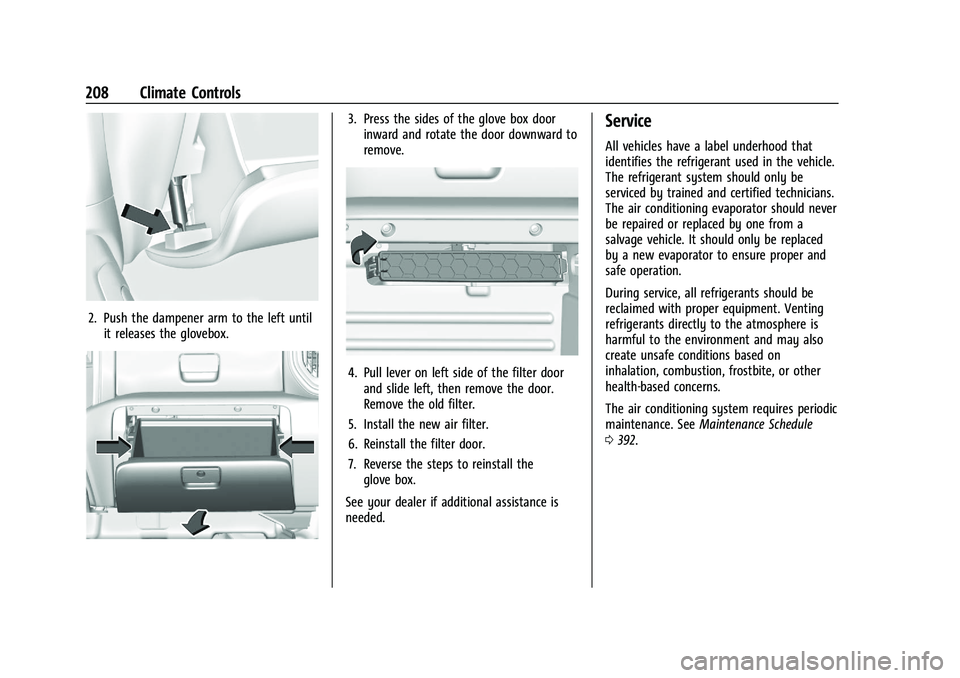
2. Push the dampener arm to the left untilit releases the glovebox.
3. Press the sides of the glove box doorinward and rotate the door downward to
remove.
4. Pull lever on left side of the filter doorand slide left, then remove the door.
Remove the old filter.
5. Install the new air filter.
6. Reinstall the filter door.
7. Reverse the steps to reinstall the glove box.
See your dealer if additional assistance is
needed.
Service
All vehicles have a label underhood that
identifies the refrigerant used in the vehicle.
The refrigerant system should only be
serviced by trained and certified technicians.
The air conditioning evaporator should never
be repaired or replaced by one from a
salvage vehicle. It should only be replaced
by a new evaporator to ensure proper and
safe operation.
During service, all refrigerants should be
reclaimed with proper equipment. Venting
refrigerants directly to the atmosphere is
harmful to the environment and may also
create unsafe conditions based on
inhalation, combustion, frostbite, or other
health-based concerns.
The air conditioning system requires periodic
maintenance. See Maintenance Schedule
0 392.
Page 215 of 441
Chevrolet Silverado 2500 HD/3500 HD Owner Manual (GMNA-Localizing-U.
S./Canada/Mexico-15546003) - 2022 - CRC - 5/5/21
214 Driving and Operating
Off-Road Driving
Four-wheel-drive vehicles can be used for
off-road driving. Vehicles without four-wheel
drive and vehicles not equipped with All
Terrain (AT) or On-Off Road (OOR) tires must
not be driven off-road except on a level,
solid surface. For contact information about
the original equipment tires, see the
warranty manual.
One of the best ways for successful off-road
driving is to control the speed.
{Warning
When driving off-road, bouncing and
quick changes in direction can easily
throw you out of position. This could
cause you to lose control and crash. You
and your passengers should always wear
seat belts.
Before Driving Off-Road
.Have all necessary maintenance and
service work completed.
.Fuel the vehicle, fill fluid levels, and check
inflation pressure in all tires, including the
spare, if equipped.
.Read all the information about
four-wheel-drive vehicles in this manual.
.Remove any underbody air deflector,
if equipped. Re-attach the air deflector
after off-road driving.
.Know the local laws that apply to off-road
driving.
To gain more ground clearance if needed, it
may be necessary to remove the front fascia
lower air dam, if equipped. However, driving
without the air dam reduces fuel economy.
Caution
Operating the vehicle for extended
periods without the front fascia lower air
dam installed can cause improper airflow
to the engine. Reattach the front fascia
air dam after off-road driving.
Loading the Vehicle for Off-Road Driving
{Warning
.Unsecured cargo on the load floor can
be tossed about when driving over
rough terrain. You or your passengers
can be struck by flying objects. Secure
the cargo properly. (Continued)
Warning (Continued)
.Keep cargo in the cargo area as far
forward and as low as possible. The
heaviest things should be on the floor,
forward of the rear axle.
.Heavy loads on the roof raise the
vehicle's center of gravity, making it
more likely to roll over. You can be
seriously or fatally injured if the
vehicle rolls over. Put heavy loads
inside the cargo area, not on the roof.
For more information about loading the
vehicle, see Vehicle Load Limits 0220 and
Tires 0344.
Environmental Concerns
.Always use established trails, roads, and
areas that have been set aside for public
off-road recreational driving and obey all
posted regulations.
.Do not damage shrubs, flowers, trees,
or grasses or disturb wildlife.
.Do not park over things that burn. See
Parking over Things That Burn 0234.